Build and Deploy a Full-Stack E-Commerce Application on AWS
1. Introduction
In this project, we build and deploy a full-stack e-commerce application on Amazon Web Services (AWS). The main objective is to understand how different AWS services work together to host a real-world application.
Instead of running the entire application on a single server, we use multiple AWS services for networking, frontend hosting, authentication, backend deployment, databases, APIs, and notifications.
This project provides practical experience in deploying applications, configuring AWS infrastructure, troubleshooting issues, and managing cloud resources.
2. What Are We Building?
We are building an e-commerce application where users can register, log in, browse products, manage their shopping cart, and place orders.
The application consists of three main components:
- Frontend: Provides the user interface.
- Backend: Processes requests and handles application logic.
- Database: Stores application data.
AWS services connect these components and provide the infrastructure required to run the application securely and reliably.
3. Technologies and AWS Services Used
The project uses the following technologies and AWS services.
| Technology / Service | Purpose |
|---|---|
| React.js | Builds the frontend user interface. |
| Git | Manages source code and version control. |
| Docker | Packages backend services into container images. |
| Amazon VPC | Provides an isolated network for AWS resources. |
| Subnets and Route Tables | Organize network resources and control traffic routing. |
| Internet Gateway and NAT Gateway | Provide the required internet connectivity for network resources. |
| Amazon S3 | Stores frontend build files and product images. |
| Amazon CloudFront | Delivers frontend content to users. |
| Amazon Cognito | Handles user registration and authentication. |
| Amazon DynamoDB | Stores application data such as product and cart information. |
| Amazon RDS | Provides a managed relational database. |
| AWS Systems Manager Parameter Store | Stores application configuration values and parameters. |
| Amazon ECR | Stores Docker container images. |
| Amazon ECS with AWS Fargate | Runs containerized backend services. |
| Application Load Balancer (ALB) | Routes requests to the appropriate backend services. |
| Amazon API Gateway | Provides API endpoints and connects requests to backend services. |
| Amazon SNS | Publishes notification messages. |
| Amazon SQS | Stores messages for asynchronous processing. |
| AWS Certificate Manager (ACM) | Provides SSL/TLS certificates for HTTPS. |
| Amazon Route 53 | Manages DNS records for the custom domain. |
| Amazon CloudWatch | Supports application logging and monitoring. |
| AWS Identity and Access Management (IAM) | Controls access to AWS resources. |
Each service has a specific responsibility in the application architecture.
4. Project Architecture and Request Flow
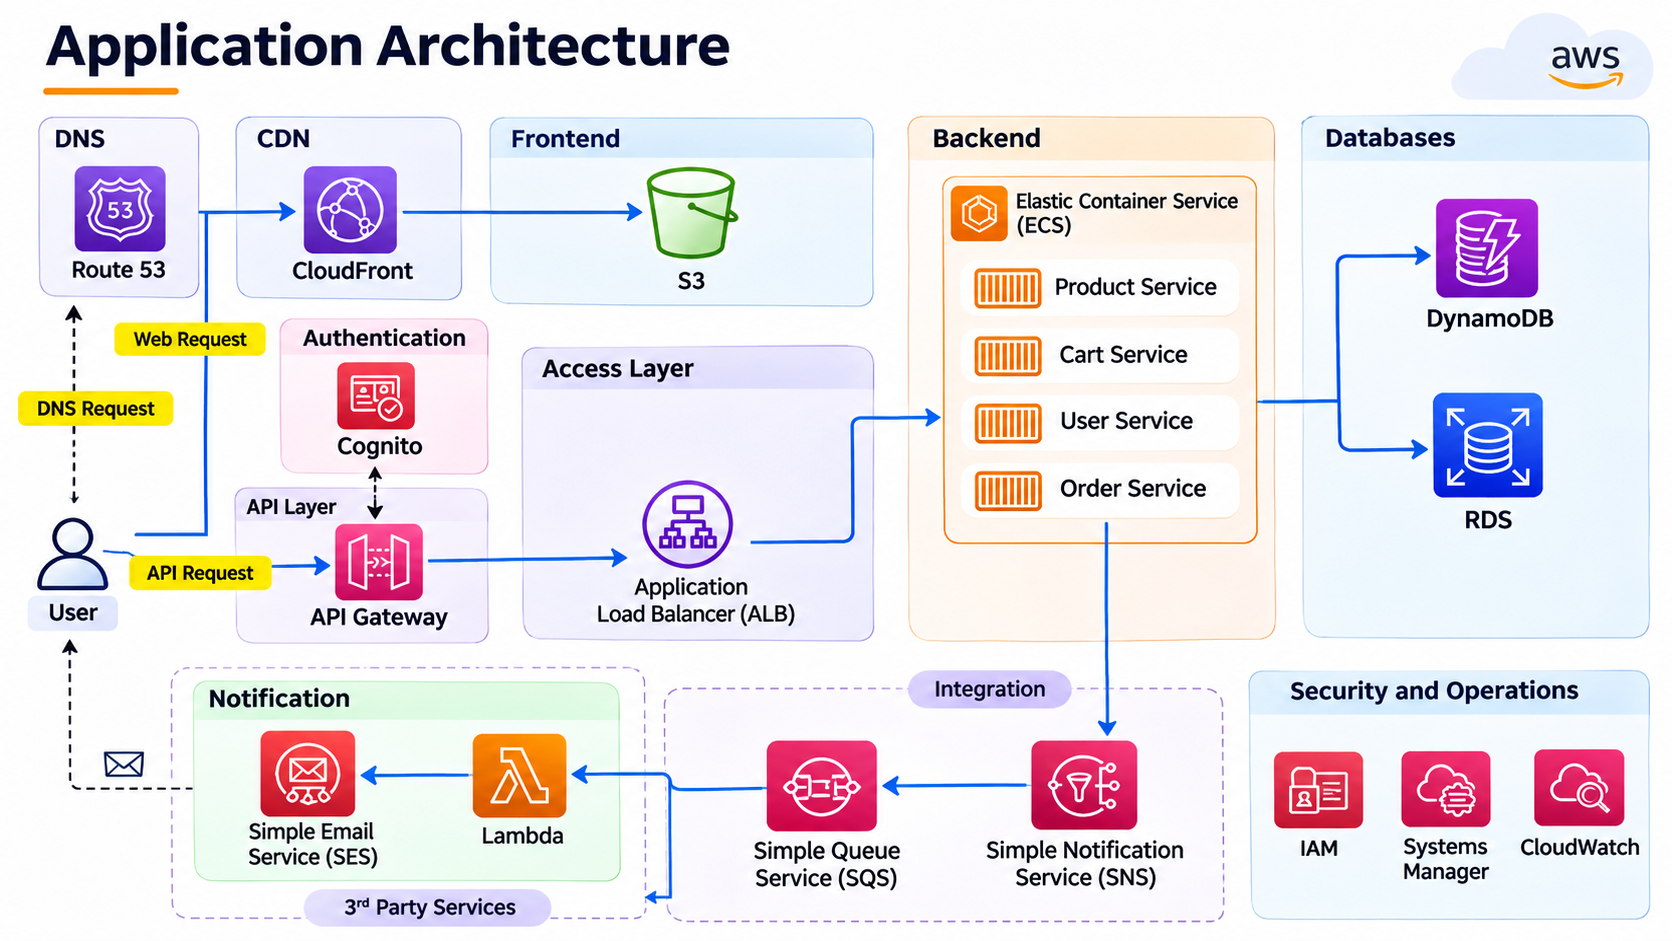
The application follows a multi-layer architecture, where each component performs a specific task.
Architecture Layers
- Frontend layer: React.js, Amazon S3, and Amazon CloudFront.
- Authentication layer: Amazon Cognito.
- API layer: Amazon API Gateway.
- Backend layer: Containerized services running on Amazon ECS with AWS Fargate.
- Database layer: Amazon DynamoDB and Amazon RDS.
- Notification layer: Amazon SNS and Amazon SQS.
- Networking and security layer: Amazon VPC, subnets, route tables, security groups, and IAM.
Application Request Flow
The application works through the following flow:
- Users access the website through Amazon CloudFront or the configured custom domain.
- CloudFront delivers the frontend files stored in Amazon S3.
- Users register or log in through Amazon Cognito.
- The frontend sends requests to Amazon API Gateway.
- API Gateway forwards requests through the configured integration to the appropriate backend services.
- Backend services process requests and communicate with Amazon DynamoDB, Amazon RDS, and other required resources.
- Order-related workflows can use Amazon SNS and Amazon SQS to support notifications and asynchronous processing.
- The application returns the response to the frontend for the user to view.
Networking and security: Amazon VPC, subnets, route tables, security groups, IAM permissions, authentication, and HTTPS help control access and communication between application components.
This overview explains how the main components work together. The individual implementation modules will cover the configuration details.
5. Project Implementation Roadmap
We will implement the project step by step, creating and configuring the required AWS resources in the following order.
- Module 0: Prerequisites and Environment Setup — Prepare the workstation, install the required tools, and configure AWS CLI access.
- Module 1: Networking Foundation — Configure the VPC, subnets, gateways, and route tables.
- Module 2: User Authentication — Configure Amazon Cognito for user registration and login.
- Module 3: Frontend Deployment — Build the React application and deploy it using Amazon S3 and CloudFront.
- Module 4: Database Configuration — Configure the required databases and application parameters.
- Module 5: Backend Deployment — Build Docker images, push them to Amazon ECR, and deploy backend services using Amazon ECS and AWS Fargate.
- Module 6: API Gateway Configuration — Configure API routes and backend integration.
- Module 7: Frontend and Backend Integration — Connect the frontend to backend APIs and verify communication.
- Module 8: Notifications — Configure Amazon SNS, Amazon SQS, and the required subscriptions.
- Module 9: Custom Domain and HTTPS — Configure DNS, the custom domain, and the SSL/TLS certificate.
- Module 10: Testing and Cleanup — Test the application, troubleshoot issues, and remove AWS resources that are no longer required.
Each module will document the relevant implementation steps, AWS console settings, commands, verification procedures, and troubleshooting observations.
Module 0: Prerequisites and Environment Setup
Overview
Before deploying the e-commerce application on AWS, we need to prepare the development environment and configure the required tools.
In this module, we will use an Amazon EC2 instance as our working environment. We will connect to the instance, clone the project repository, install the required tools, and configure AWS CLI access.
By the end of this module, the environment will be ready for the next stage of the project: Module 1 — Networking Foundation.
Prerequisites
Before starting, ensure you have the following:
1. AWS Account
- An active AWS account with the required permissions to create and manage AWS resources.
- Access to the Amazon EC2 service to launch and connect to an instance.
- AWS credentials with the necessary permissions for AWS CLI operations.
2. Amazon EC2 Instance
We will use an EC2 virtual machine as the development environment for this project.
The initial setup includes:
- Launching an EC2 instance.
- Selecting an appropriate operating system and instance type.
- Configuring the required network access.
- Connecting to the instance using the appropriate connection method.
3. Required Tools
The following tools are required for the project:
| Tool | Purpose |
|---|---|
| Git | Cloning the repository and managing source code. |
| Docker | Building and managing container images. |
| Node.js 20+ | Running and building the React frontend. |
| npm | Managing JavaScript dependencies. |
| AWS CLI v2 | Interacting with AWS services through the terminal. |
| Bash | Running the prerequisite installation script. |
Step 1: Launch and Connect to the EC2 Instance
- Launch an Amazon EC2 instance with the required configuration.
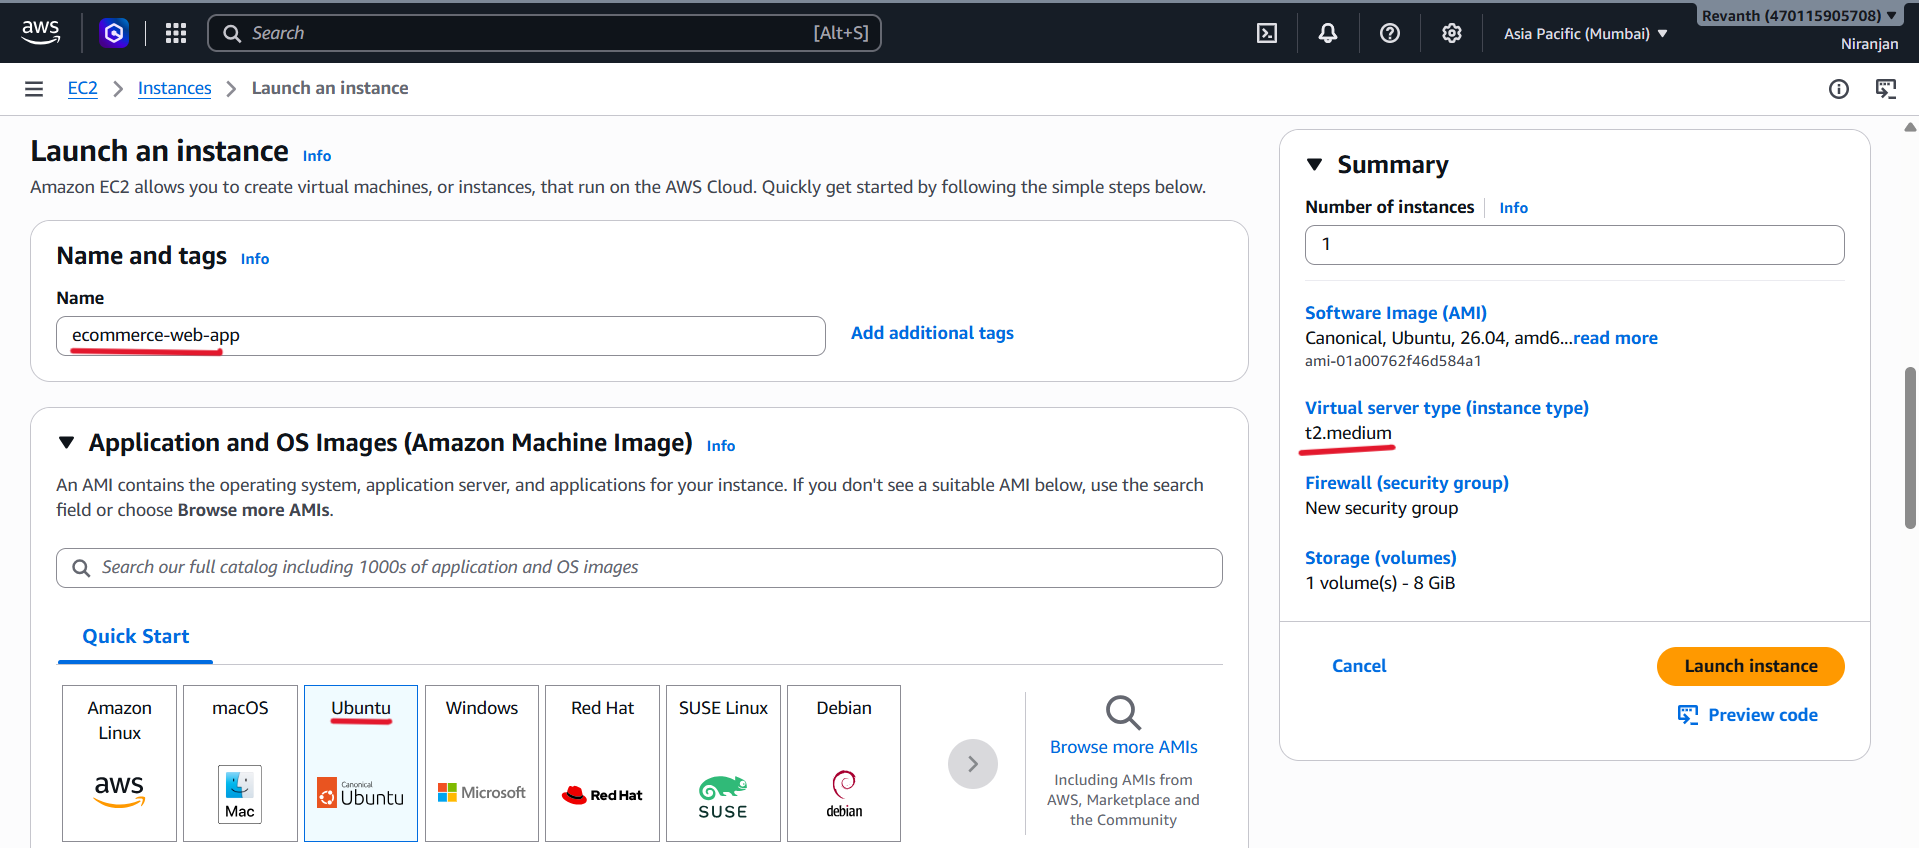
- Once the instance is running, connect to it and open the terminal to start the setup process.
Step 2: Clone the Project Repository
- Clone the e-commerce application repository to the EC2 instance.

- Run the following commands:
git clone https://github.com/KandlaguntaVenkataSivaNiranjanReddy/ecommerce-web-app.git
- The
git clonecommand downloads the project source code, whilecd ecommerce-web-appmoves into the project directory.
cd ecommerce-web-app

Step 3: Install the Required Tools
- The project repository includes an installation script for the required prerequisites.
- Run the script from the project directory:
bash install-prerequisites.sh
- The script is intended to install the required tools based on the supported operating system.
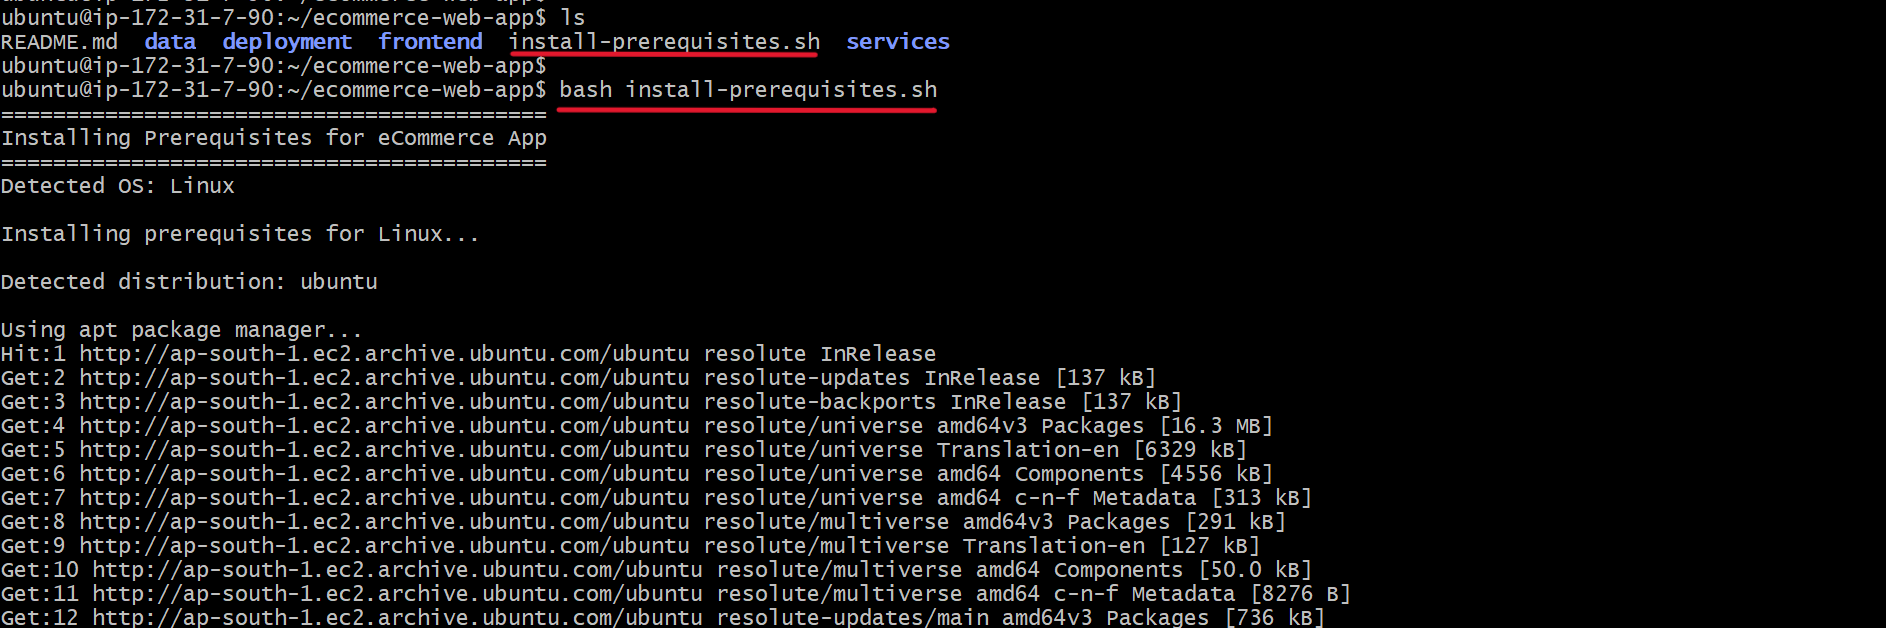
Step 4: Verify Tool Installation
- After installation, verify that the required tools are available.
Run the following commands:
aws --version
docker --version
node --version
npm --version
git --version

- These commands display the installed versions of AWS CLI, Docker, Node.js, npm, and Git.
- Confirm that each command runs successfully before proceeding.


Step 5: Configure AWS CLI Access
- AWS CLI allows us to interact with AWS services directly from the terminal.
- If AWS CLI is not already configured, run:
aws configure

- Enter the required configuration values when prompted:
AWS Access Key ID [None]: <your-access-key-id>
AWS Secret Access Key [None]: <your-secret-access-key>
Default region name [None]: ap-south-1
Default output format [None]: json
- Use the AWS region selected for your project. In this example,
ap-south-1represents the Mumbai region. - Security note: Never share your AWS access keys or commit them to the project repository. Use credentials with only the permissions required for your tasks. For EC2 workloads, an appropriately permissioned IAM role attached to the instance is generally preferable to storing long-term access keys.
Conclusion
In this module, we prepared the development environment using an Amazon EC2 instance. We connected to the instance, cloned the e-commerce project repository, installed and verified the required tools, and configured AWS CLI access.
With the prerequisites in place, we can proceed to the next stage of the project.
Module 1: Networking Foundation — Build AWS VPC Infrastructure
1. Overview
In this module, we will create the AWS network required for our e-commerce application.
We will create a VPC, six subnets across two Availability Zones, an Internet Gateway, a NAT Gateway, and route tables.
We will use the AWS Mumbai region (ap-south-1).
2. Understanding the Network Architecture
Before creating the resources, let's understand the main components.
- VPC: Our application's private network in AWS.
- Public Subnets: Used to place resources that require public network connectivity, such as the NAT Gateway.
- Private ECS Subnets: Used to run our backend services.
- Private Database Subnets: Used for our Amazon RDS database.
- Internet Gateway: Provides internet connectivity to resources in public subnets when properly configured.
- NAT Gateway: Allows resources in private subnets to make outbound internet connections.
- Route Tables: Control how network traffic moves between different networks.
We will keep our backend services and database in private subnets to limit direct exposure to the internet.
Our application will also use an internal Application Load Balancer (ALB), Amazon ECS with AWS Fargate, Amazon RDS, and Amazon DynamoDB. DynamoDB is an AWS-managed service that operates outside our VPC.
3. Network Architecture
We will create the following network infrastructure in the Asia Pacific (Mumbai) region ap-south-1.
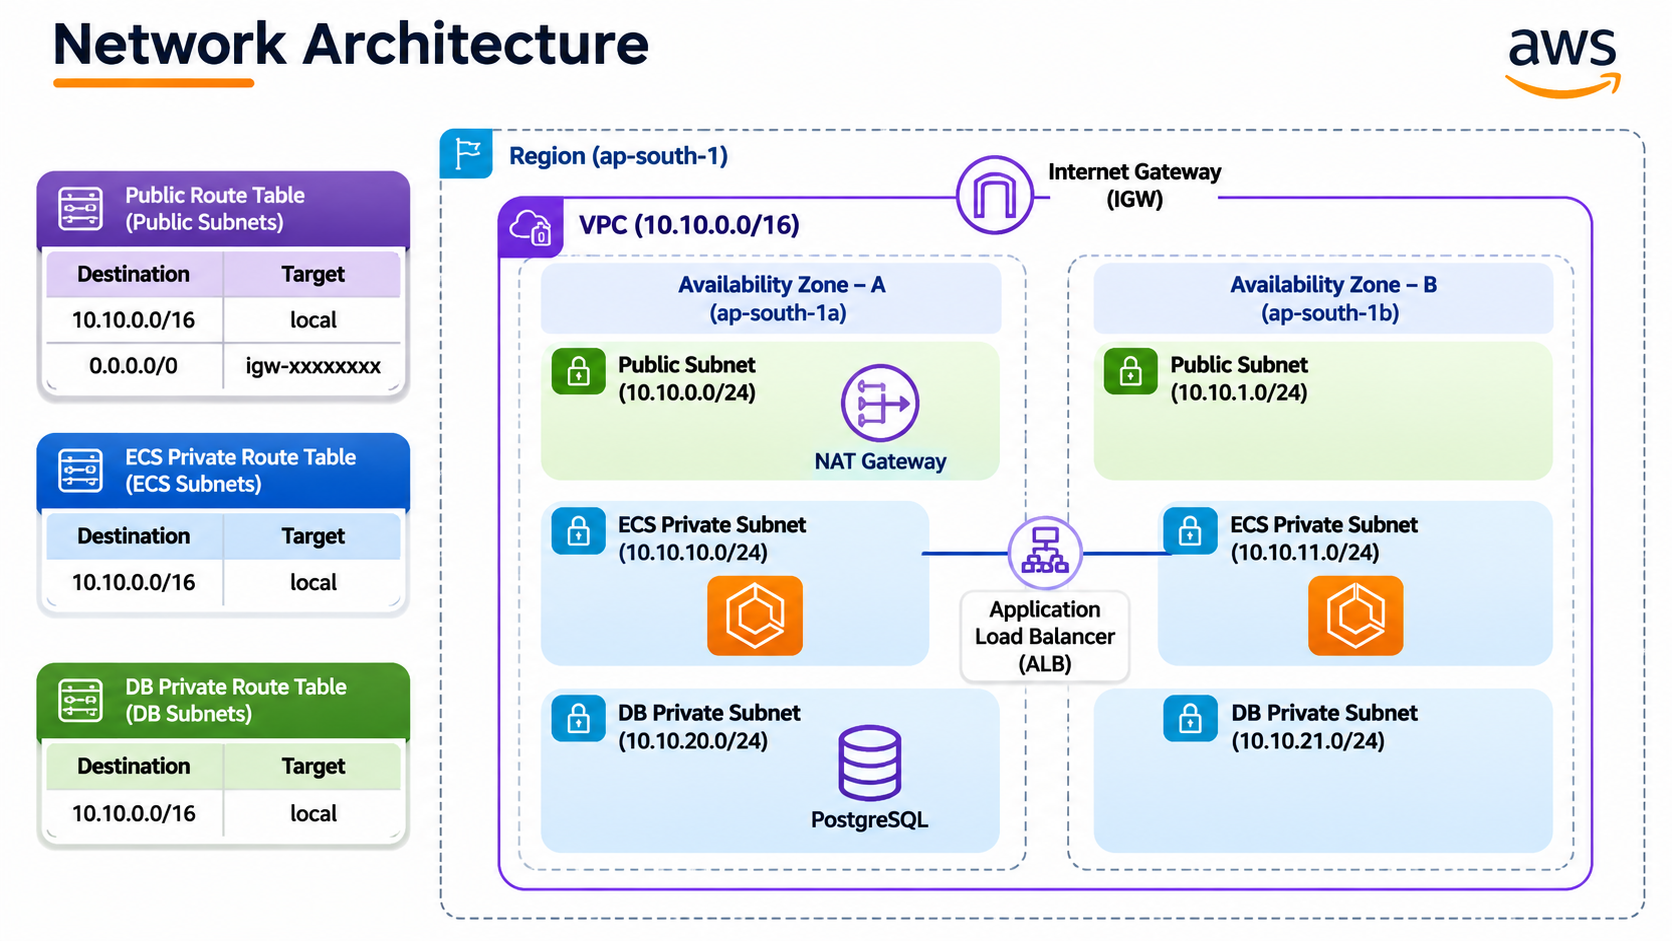
VPC Configuration
| Property | Value |
|---|---|
| VPC Name | ecommerce-vpc |
| IPv4 CIDR Block | 10.10.0.0/16 |
| AWS Region | ap-south-1 |
| Availability Zones | ap-south-1a, ap-south-1b |
| Total Subnets | 6 |
| Route Tables | 3 custom route tables |
Subnet Configuration
| Subnet Type | Subnet Name | CIDR Block | Availability Zone |
|---|---|---|---|
| Public | ecommerce-public-subnet-1 |
10.10.0.0/24 |
ap-south-1a |
| Public | ecommerce-public-subnet-2 |
10.10.1.0/24 |
ap-south-1b |
| Private ECS | ecommerce-private-ecs-1 |
10.10.10.0/24 |
ap-south-1a |
| Private ECS | ecommerce-private-ecs-2 |
10.10.11.0/24 |
ap-south-1b |
| Private Database | ecommerce-private-database-1 |
10.10.20.0/24 |
ap-south-1a |
| Private Database | ecommerce-private-database-2 |
10.10.21.0/24 |
ap-south-1b |
We use separate CIDR blocks for each subnet so that network resources can be organized without overlapping IP address ranges.
Route Table Design
We will create three custom route tables.
| Route Table | Route | Associated Subnets |
|---|---|---|
ecommerce-public-rt |
0.0.0.0/0 → Internet Gateway |
Both public subnets |
ecommerce-private-ecs-rt |
0.0.0.0/0 → NAT Gateway |
Both private ECS subnets |
ecommerce-private-db-rt |
No additional default internet route | Both private database subnets |
- Each subnet must be associated with the appropriate route table to follow the intended network design.
4. Hands-on Lab: Create the AWS Networking Infrastructure
- We will now configure the network resources through the AWS Management Console.
Step 1: Select the AWS Region
- Sign in to the AWS Management Console.
- Open the region selector.
- Select Asia Pacific (Mumbai)
ap-south-1.
Use the same AWS region for this project unless a specific service requires otherwise.
Step 2: Create the VPC
- Navigate to:AWS Console → VPC → Your VPCs → Create VPC
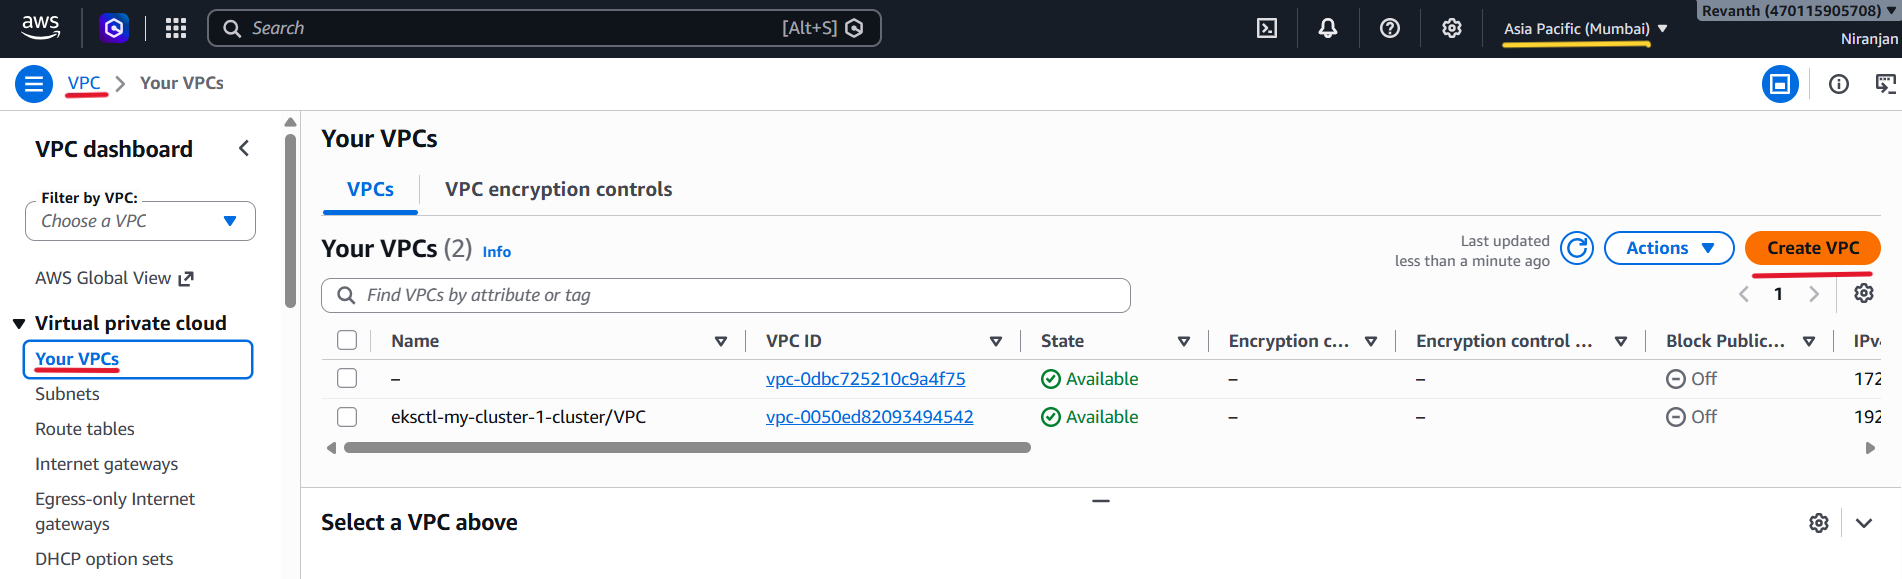
- Select VPC only and provide the following configuration:
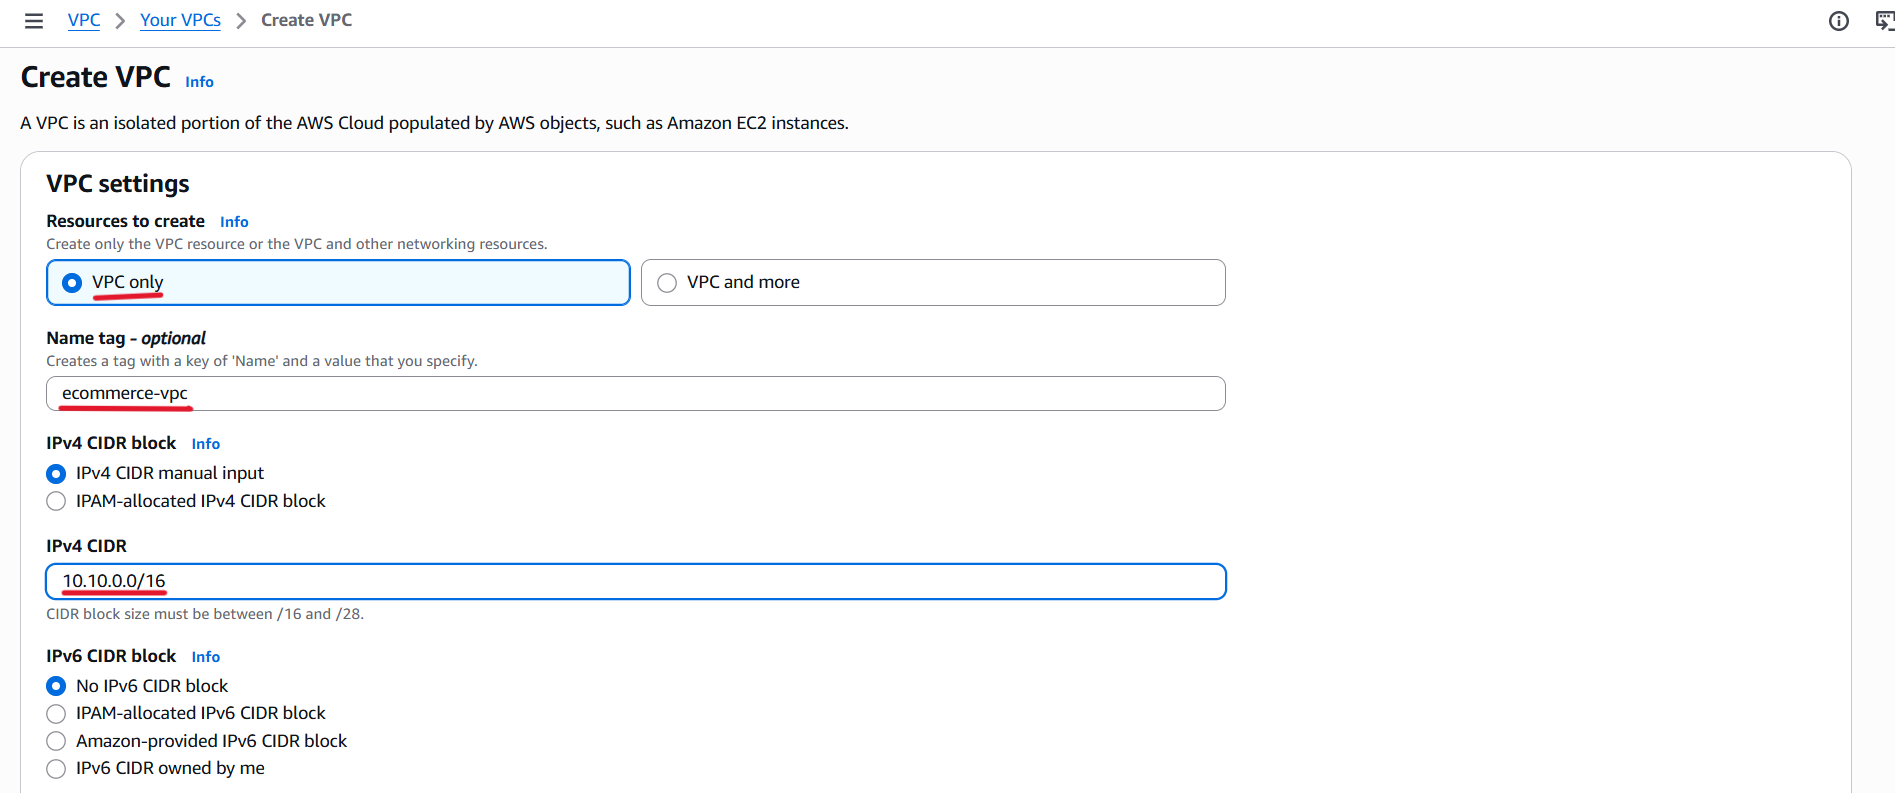
| Setting | Value |
|---|---|
| Name tag | ecommerce-vpc |
| IPv4 CIDR block | 10.10.0.0/16 |
| IPv6 CIDR block | No IPv6 CIDR block |
| Tenancy | Default |
- Click Create VPC.
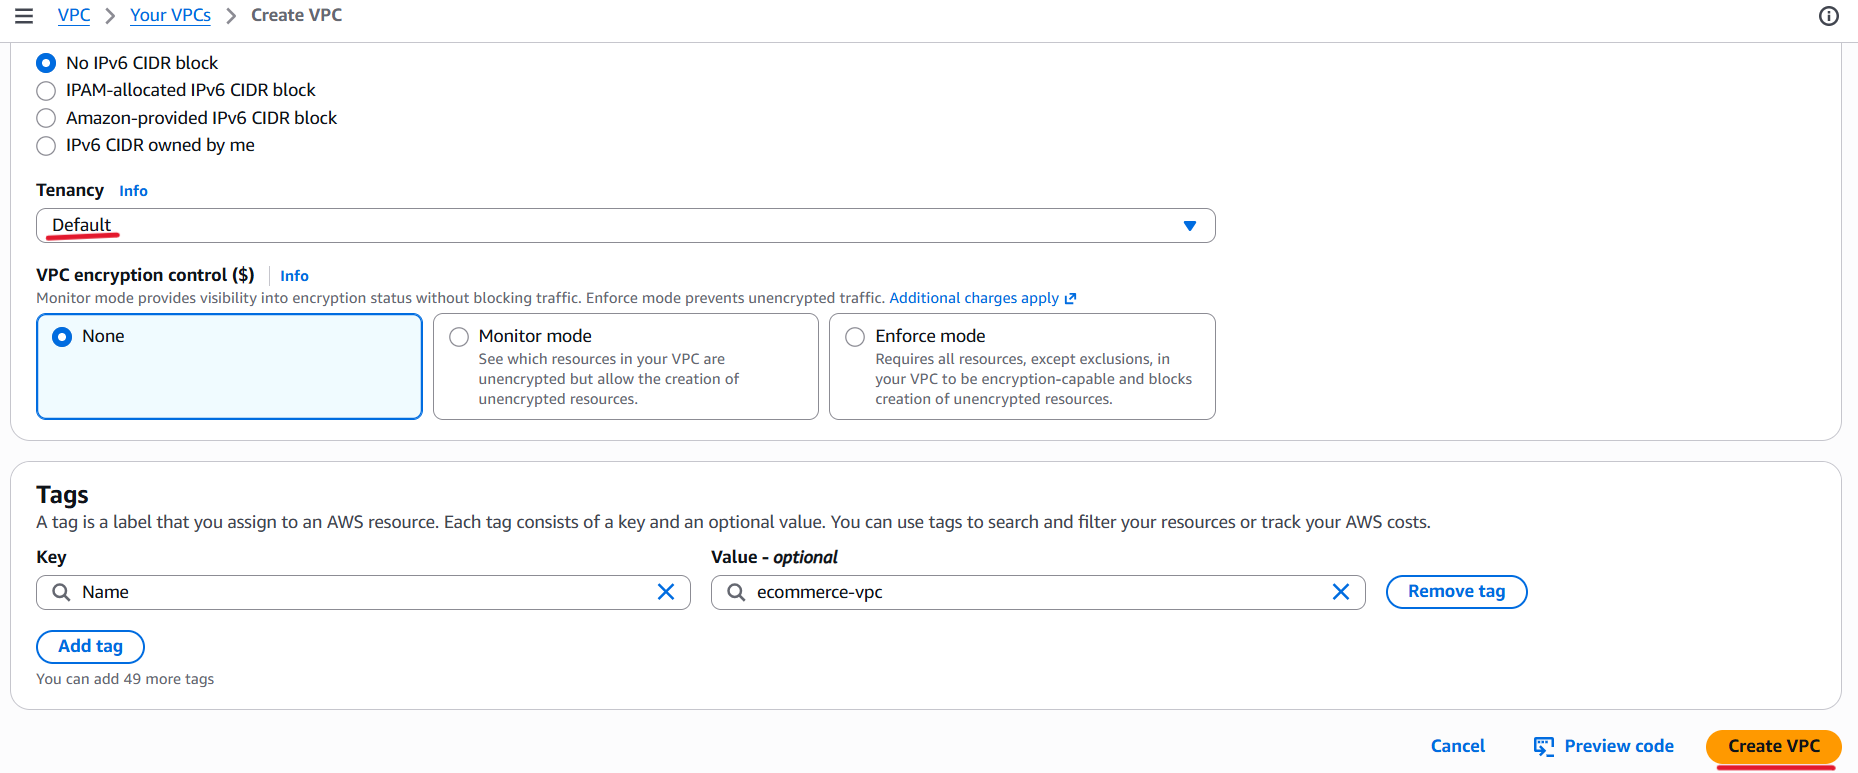
- The VPC provides the isolated network in which we will create our subnets and configure routing.
Step 3: Create and Attach the Internet Gateway
- Navigate to: VPC → Internet Gateways → Create internet gateway
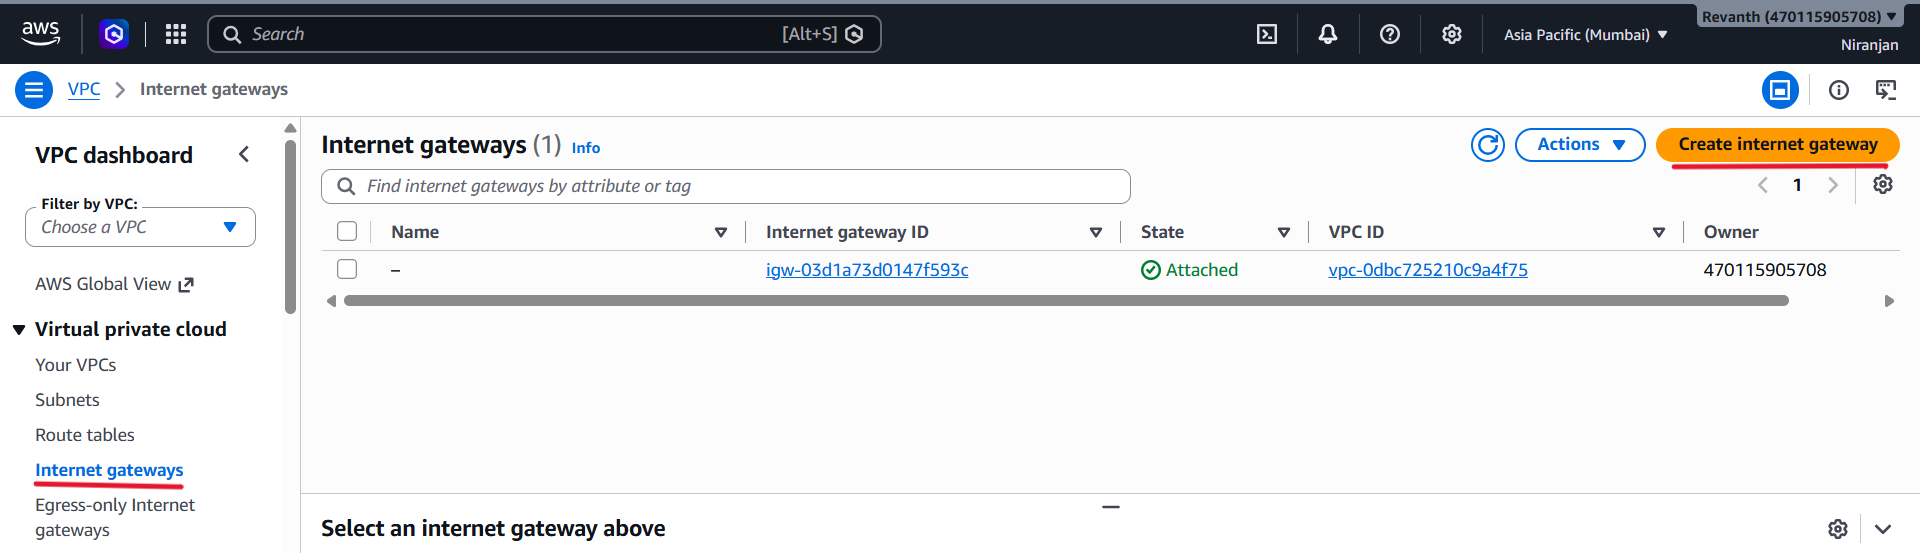
- Enter the following name:
ecommerce-igw
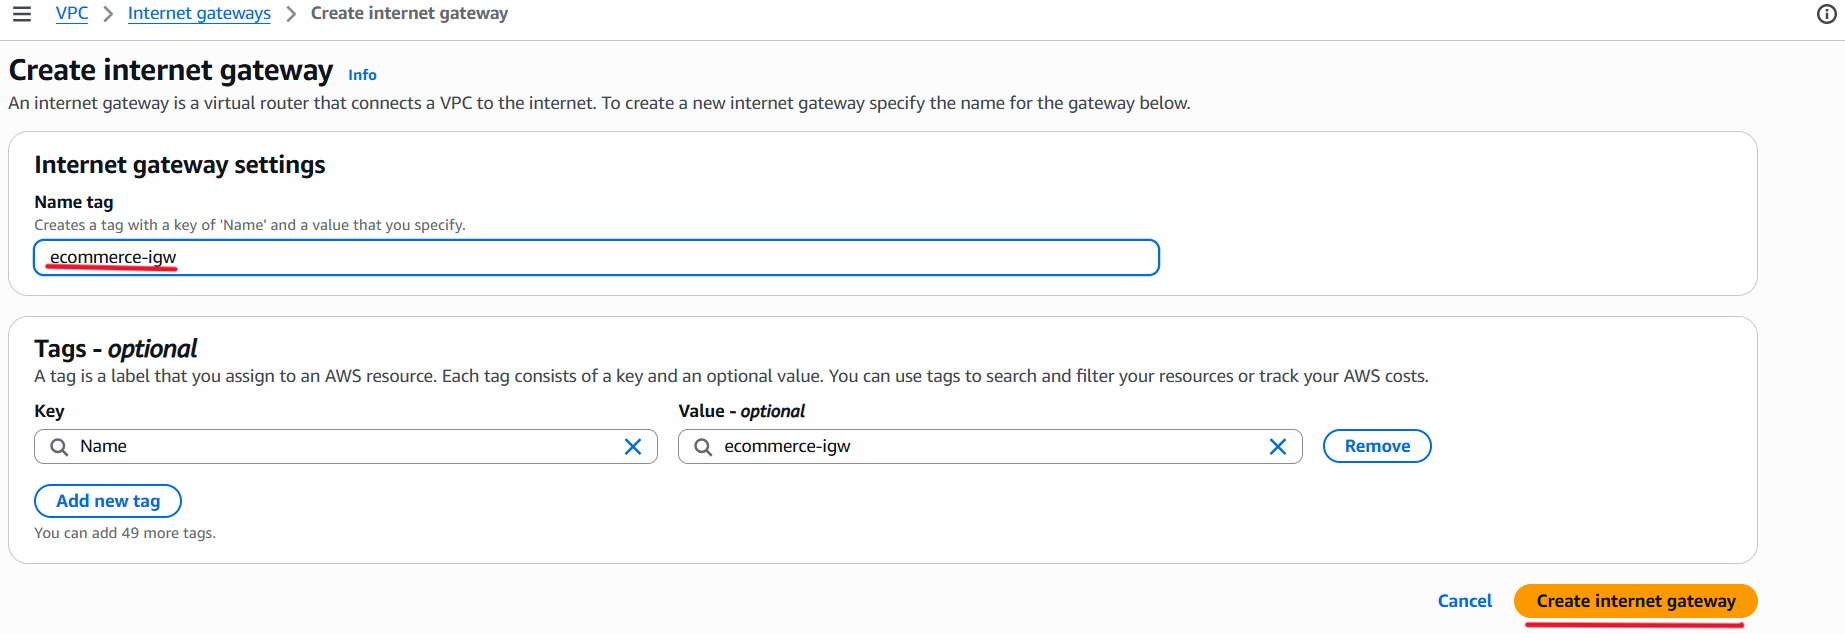
- Click Create internet gateway.
After creating it:
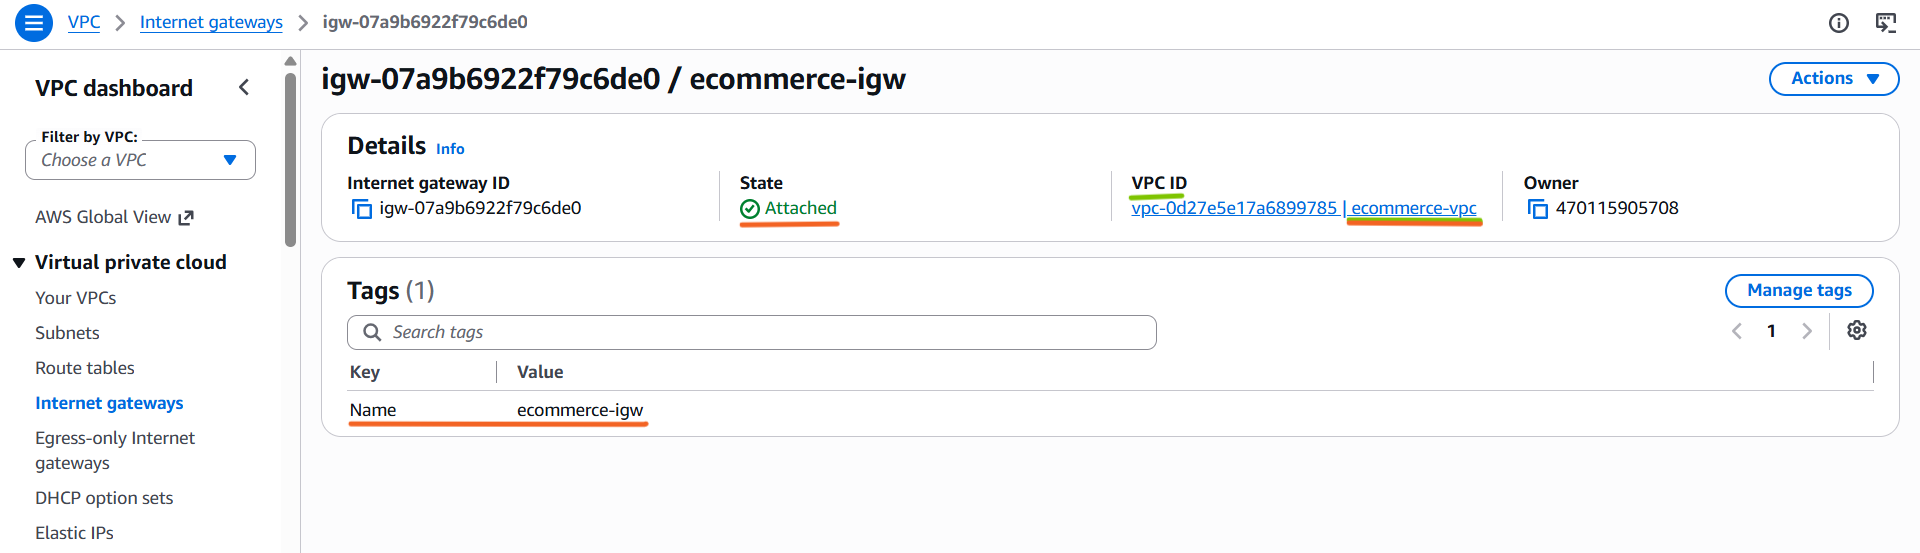
- Select the Internet Gateway.
- Choose Actions → Attach to a VPC.
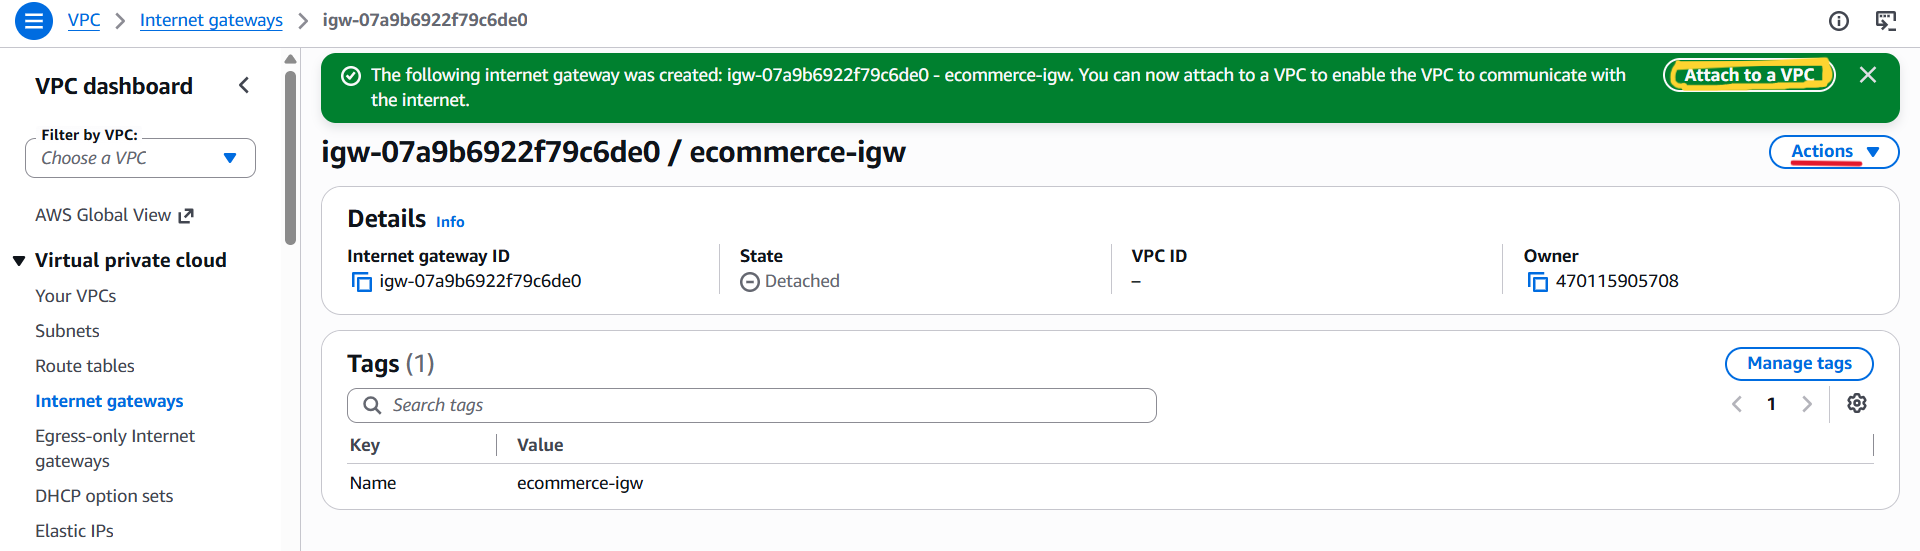
- Select
ecommerce-vpc. - Click Attach internet gateway.
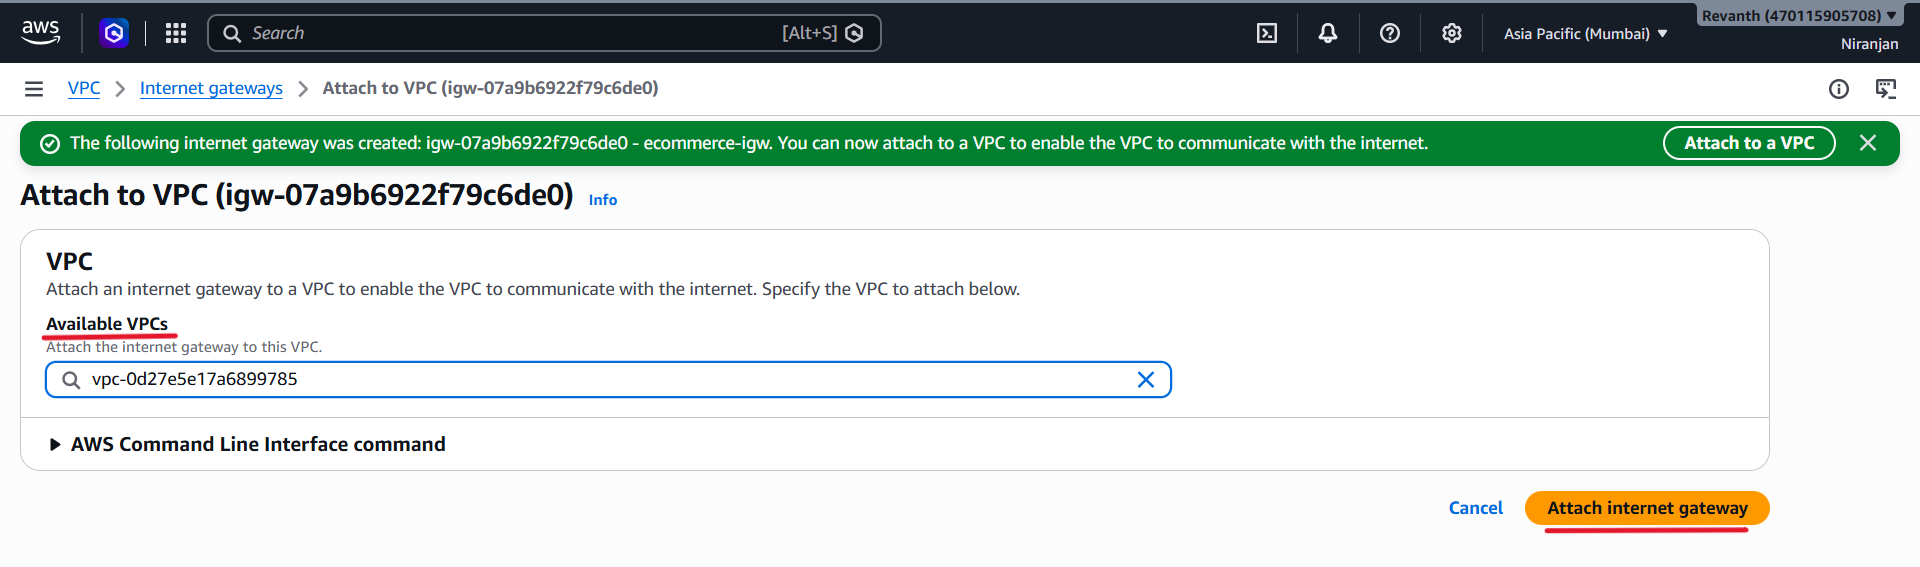
- The Internet Gateway is now attached to our VPC.
We will configure the public route to use it in a later step. - Make sure you select the correct VPC.
Step 4: Create the Six Subnets
The subnets are organized into three groups:
- Two public subnets for public network placement.
- Two private ECS subnets for backend application services.
- Two private database subnets for database resources.
Subnet Configuration
| Subnet Type | Subnet Name | CIDR Block | Availability Zone |
|---|---|---|---|
| Public | ecommerce-public-subnet-1 |
10.10.0.0/24 |
ap-south-1a |
| Public | ecommerce-public-subnet-2 |
10.10.1.0/24 |
ap-south-1b |
| Private ECS | ecommerce-private-ecs-1 |
10.10.10.0/24 |
ap-south-1a |
| Private ECS | ecommerce-private-ecs-2 |
10.10.11.0/24 |
ap-south-1b |
| Private Database | ecommerce-private-database-1 |
10.10.20.0/24 |
ap-south-1a |
| Private Database | ecommerce-private-database-2 |
10.10.21.0/24 |
ap-south-1b |
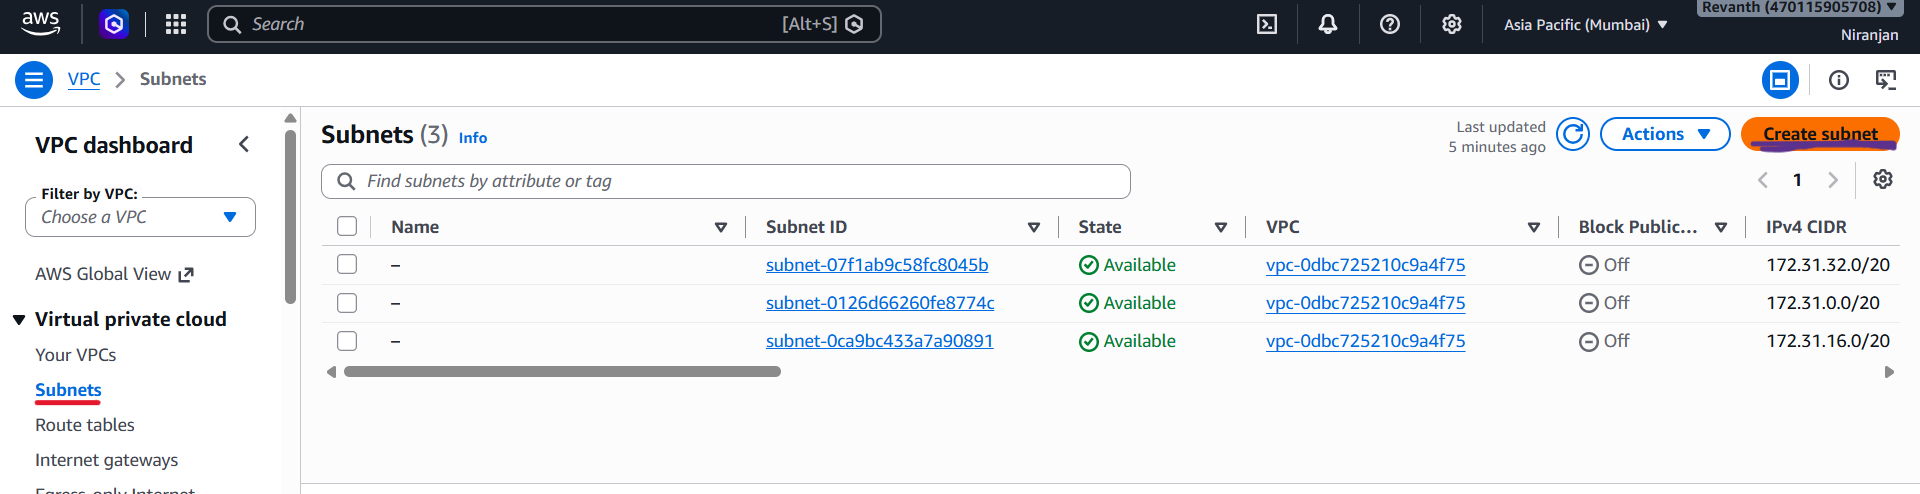
- Navigate to:VPC → Subnets → Create subnet
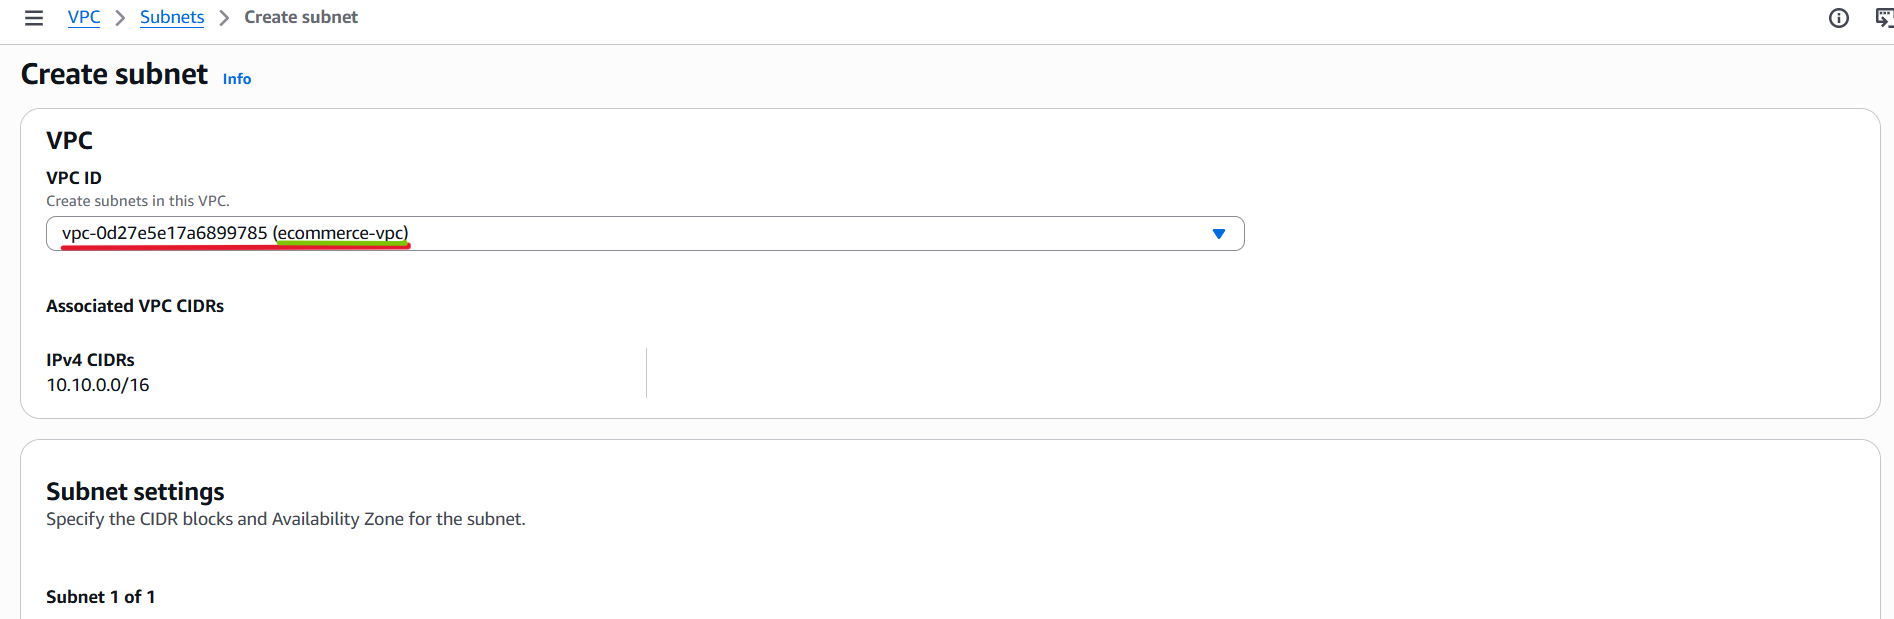
- Select
ecommerce-vpcas the VPC.
1. Create ecommerce-public-subnet-1
- Subnet Name:
ecommerce-public-subnet-1 - Availability Zone:
ap-south-1a - IPv4 CIDR Block:
10.10.0.0/24
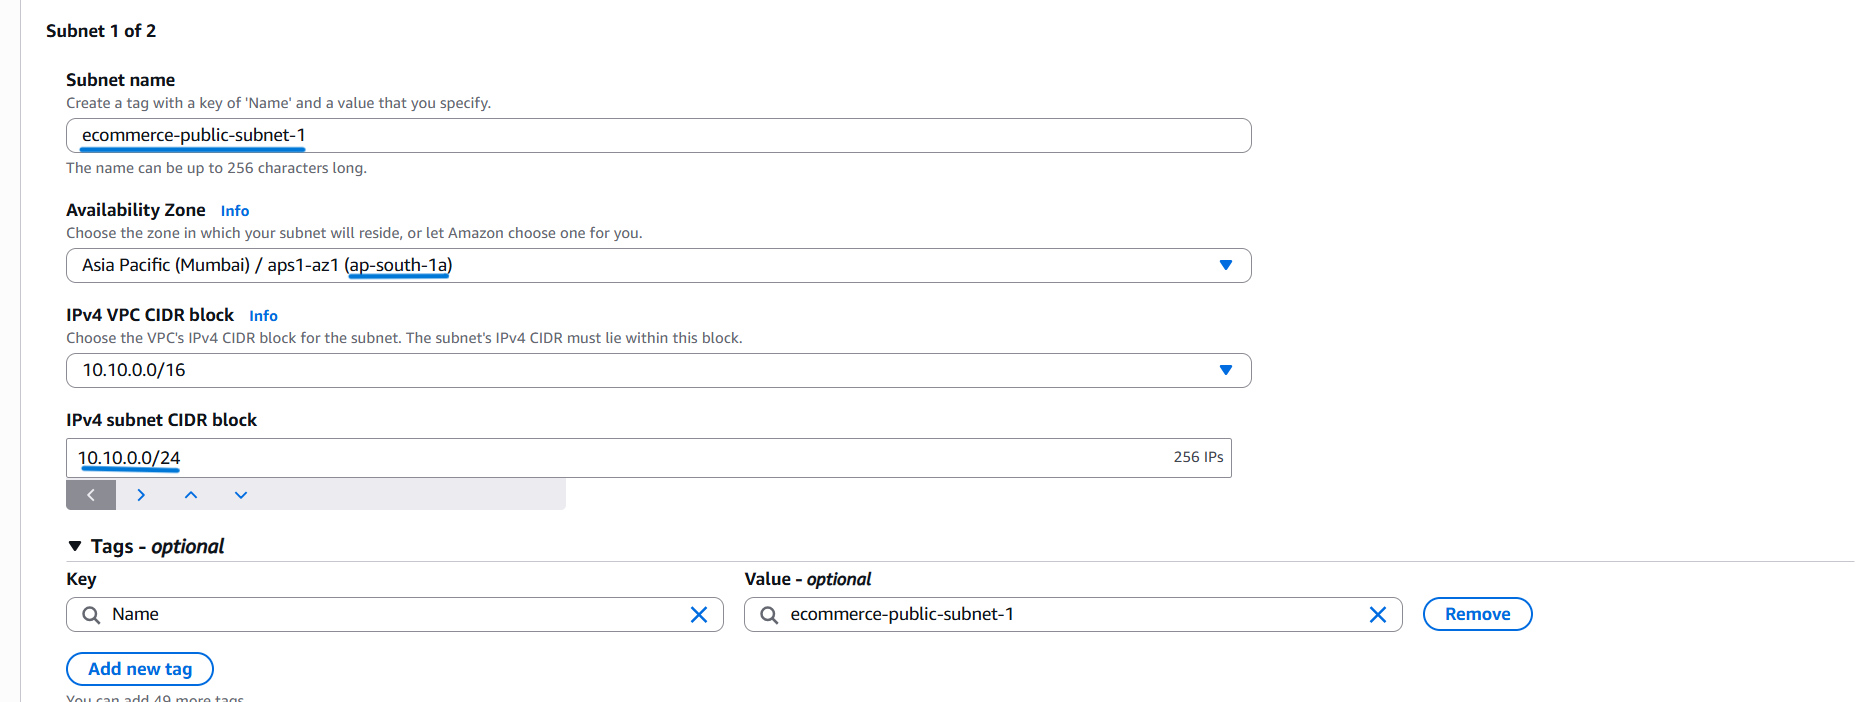
- Enter the corresponding IPv4 CIDR block
10.10.0.0/24 - Repeat the process until all subnets have been created.
2. Create ecommerce-public-subnet-2
- Subnet Name:
ecommerce-public-subnet-2 - Availability Zone:
ap-south-1b - IPv4 CIDR Block:
10.10.1.0/24
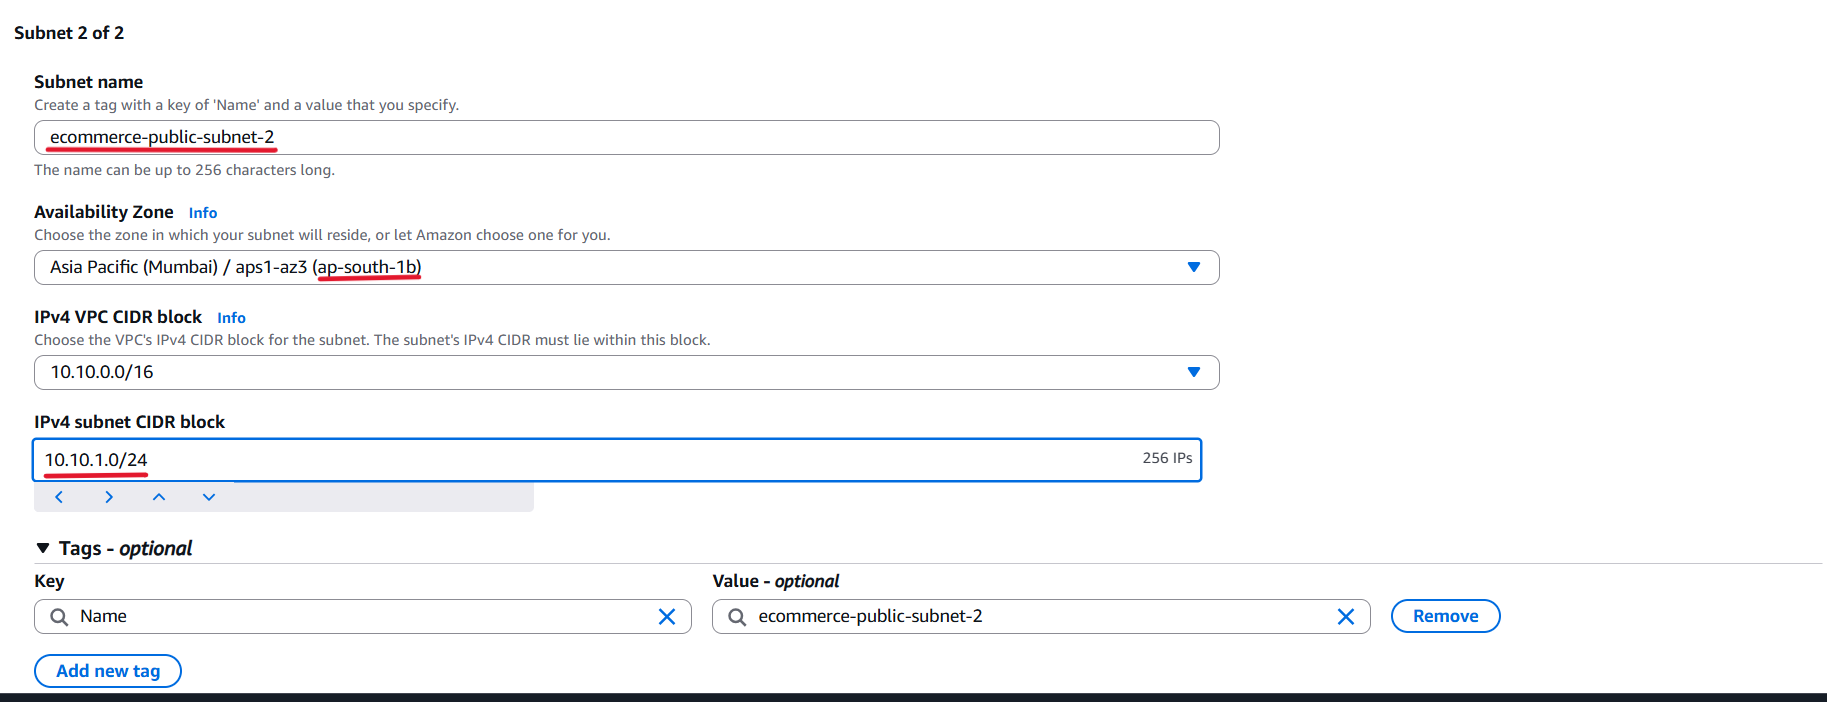
Both public subnet configurations are now covered. Next, we configure the private ECS subnets.
3. Create ecommerce-private-ecs-1
- Subnet Name:
ecommerce-private-ecs-1 - Availability Zone:
ap-south-1a - IPv4 CIDR Block:
10.10.10.0/24
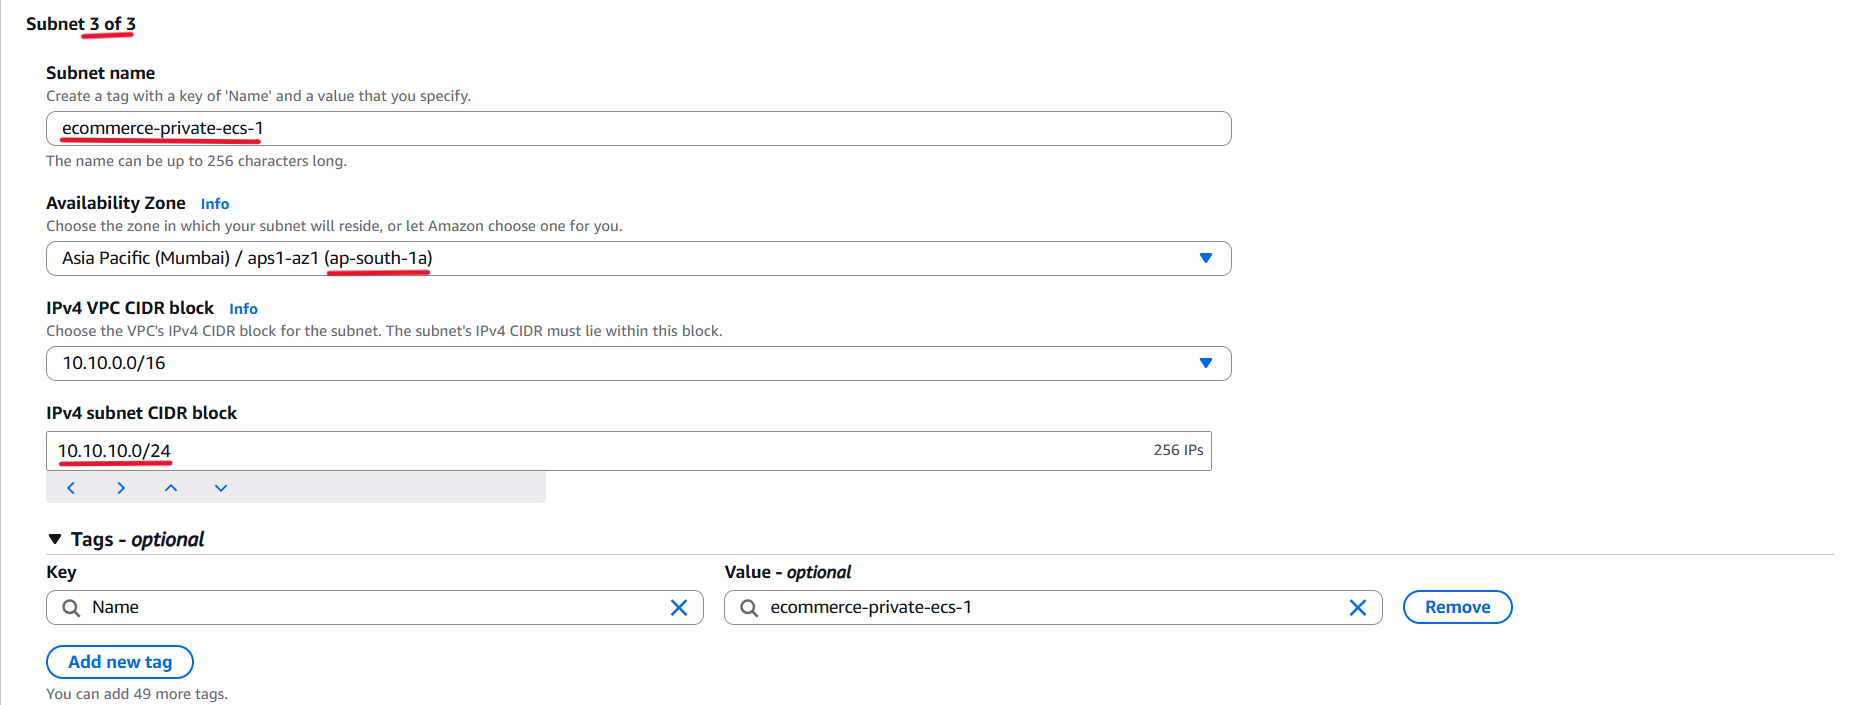
4. Create ecommerce-private-ecs-2
- Subnet Name:
ecommerce-private-ecs-2 - Availability Zone:
ap-south-1b - IPv4 CIDR Block:
10.10.11.0/24
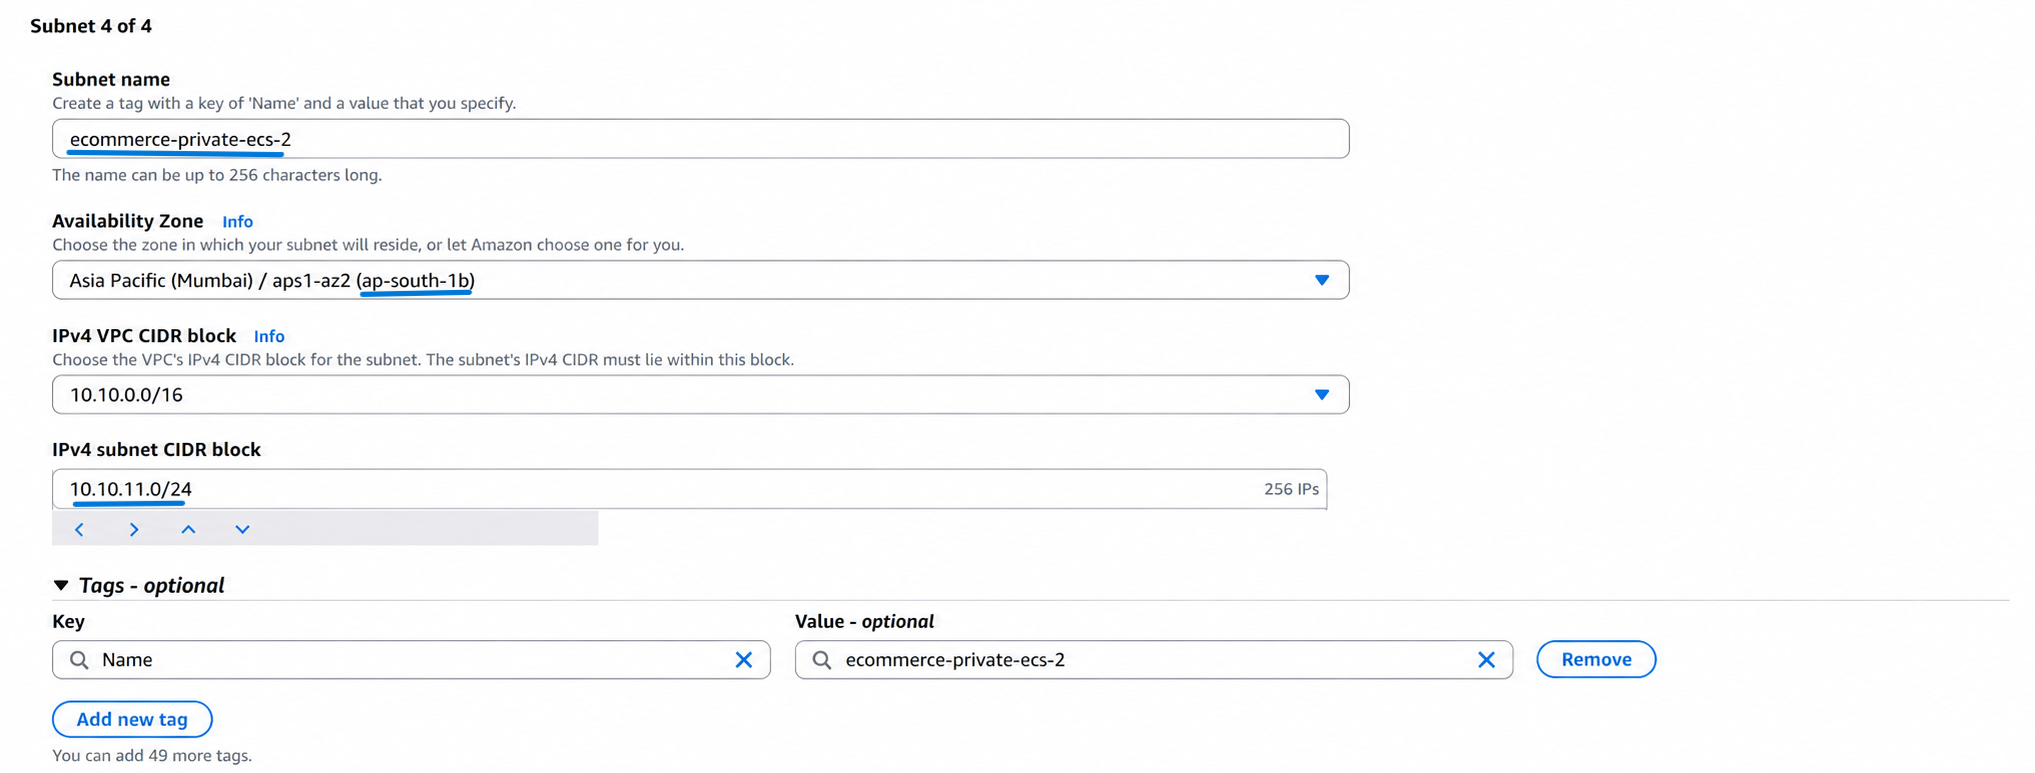
Both private ECS subnet configurations are covered. Next, we configure the private database subnets.
5. Create ecommerce-private-database-1
- Subnet Name:
ecommerce-private-database-1 - Availability Zone:
ap-south-1a - IPv4 CIDR Block:
10.10.20.0/24
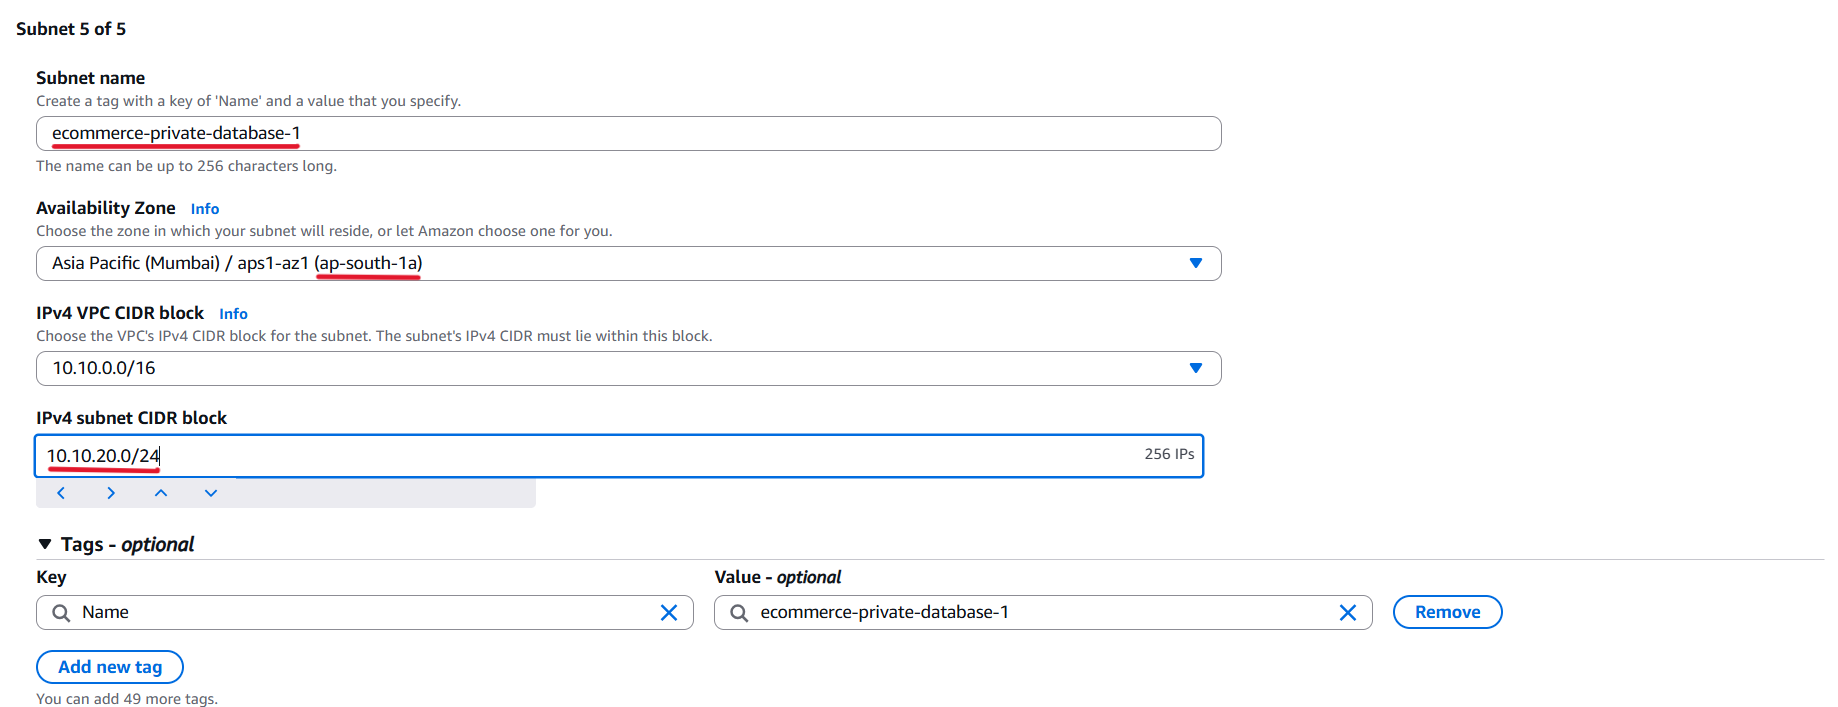
6. Create ecommerce-private-database-2
- Subnet Name:
ecommerce-private-database-2 - Availability Zone:
ap-south-1b - IPv4 CIDR Block:
10.10.21.0/24
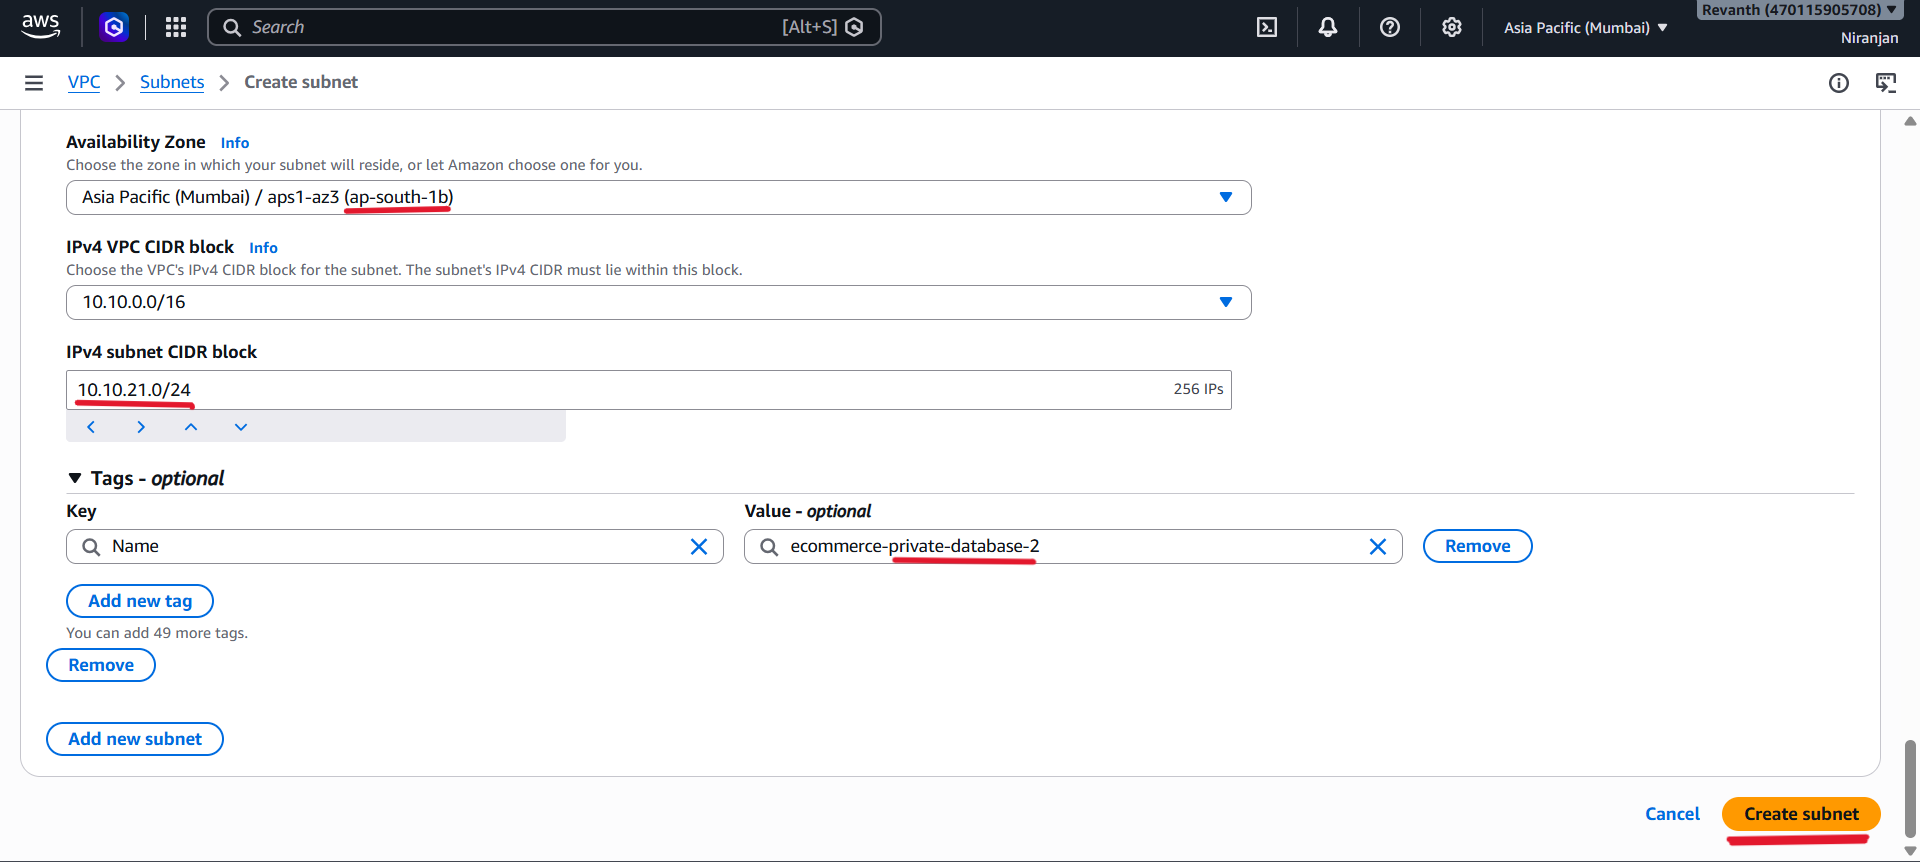
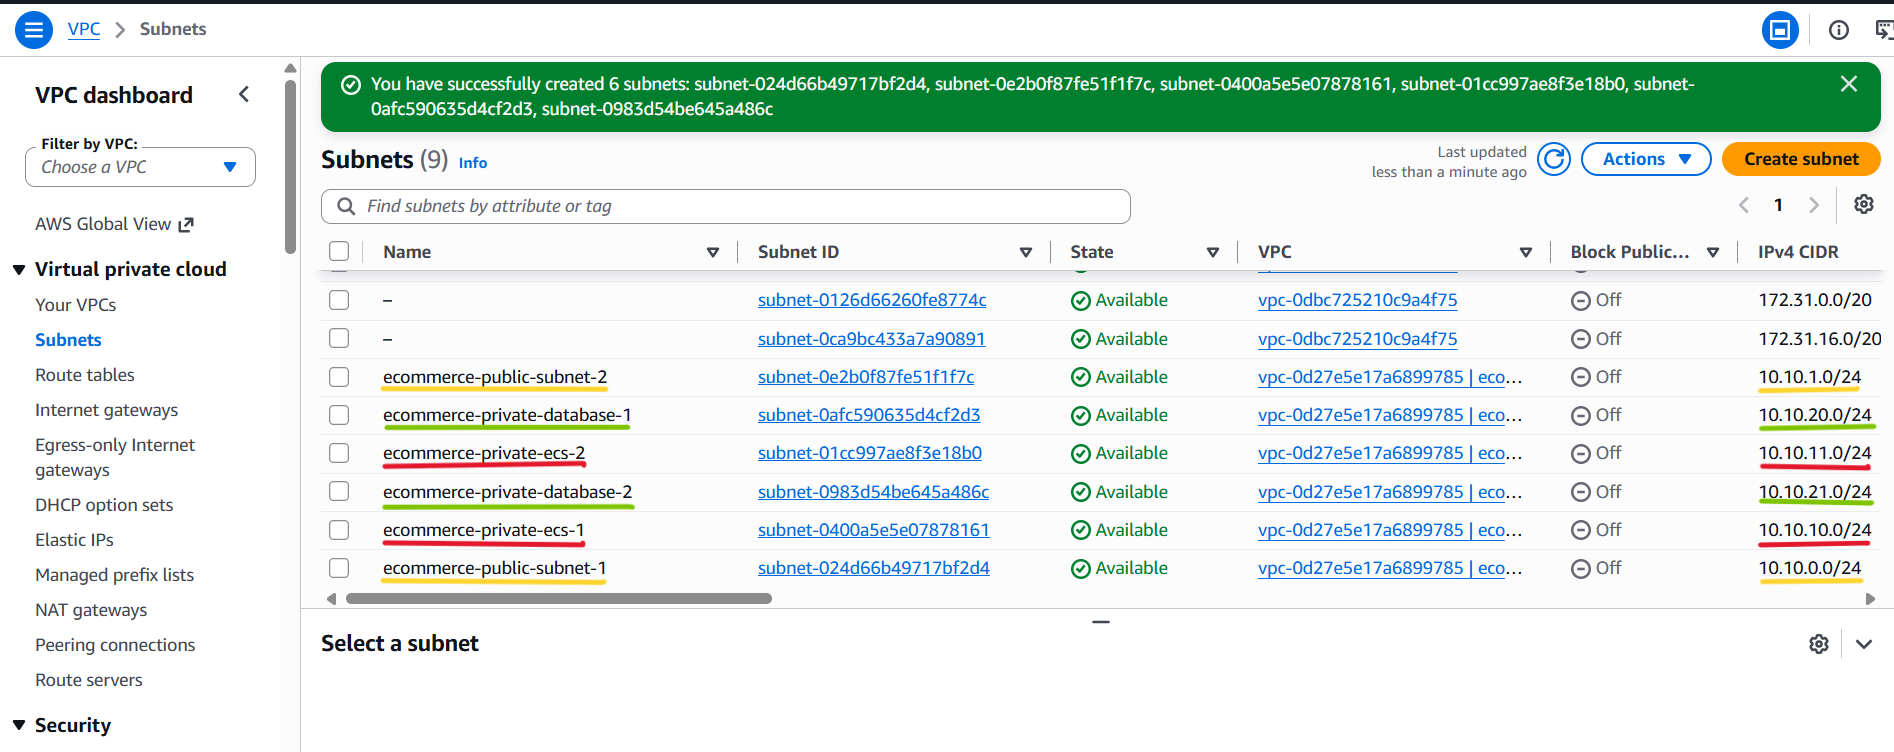
Verify the Subnets
- After creation, navigate to VPC → Subnets and verify that all six subnets have the correct names, CIDR blocks, and Availability Zones.
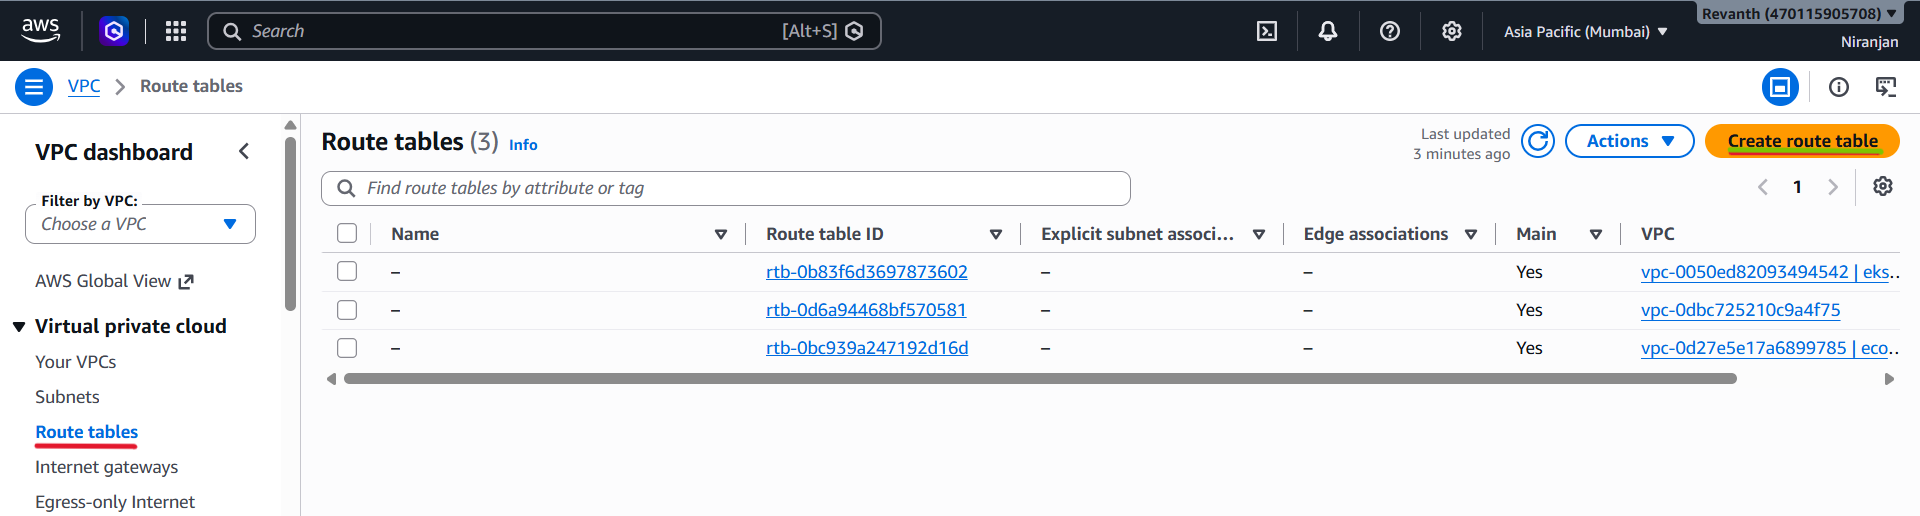
Step 5: Create the Public Route Table
- Navigate to: VPC → Route Tables → Create route table
- Enter the following details:
| Setting | Value |
|---|---|
| Name | ecommerce-public-rt |
| VPC | ecommerce-vpc |
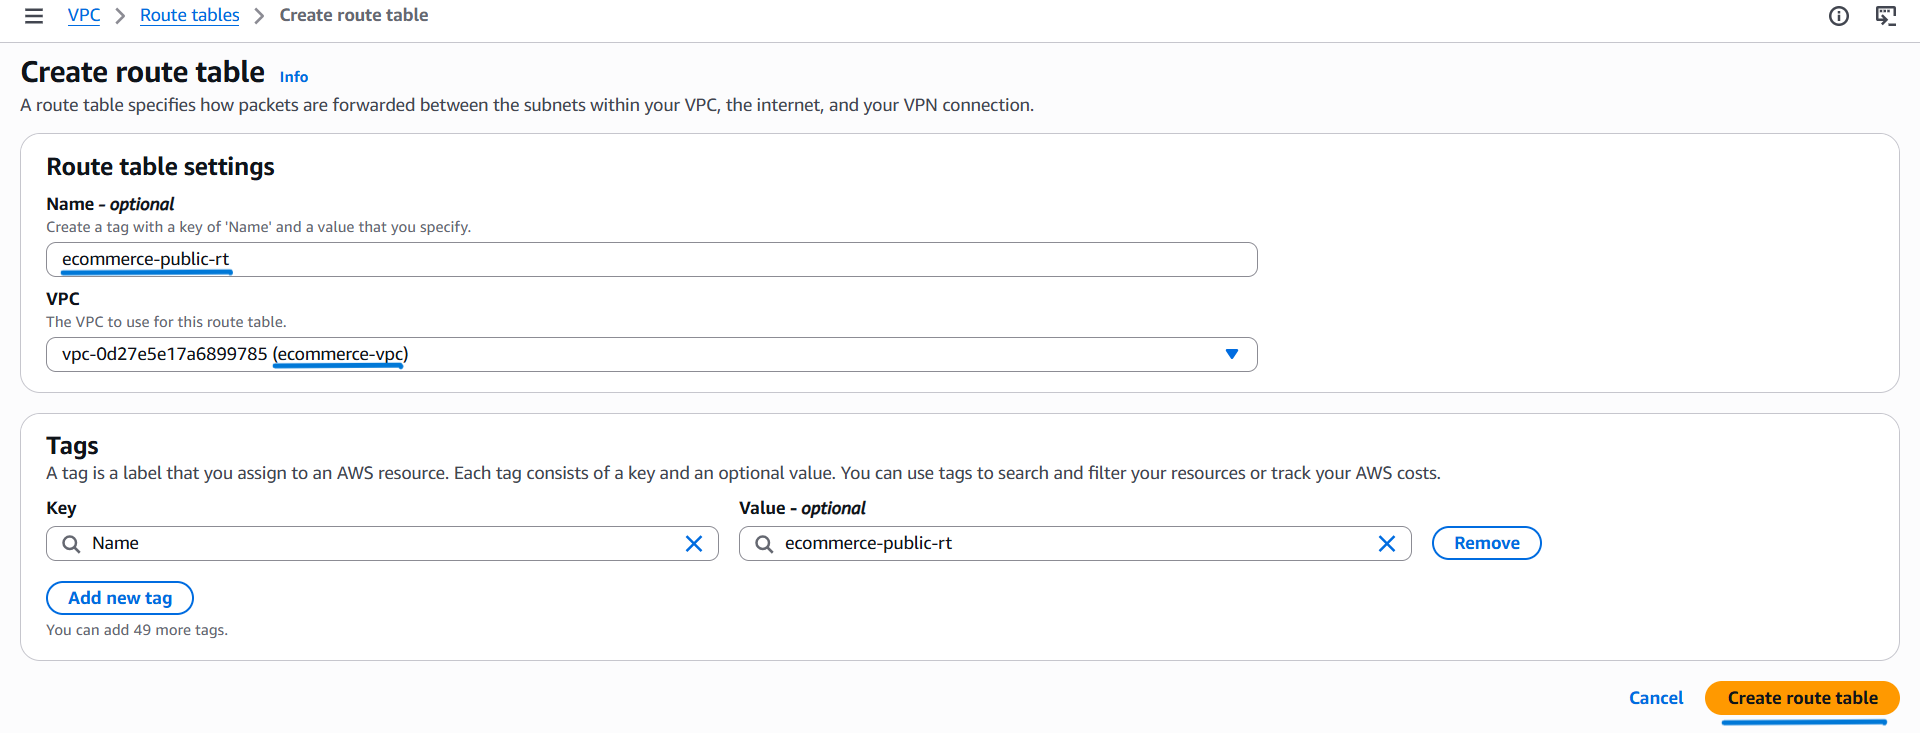
- Click Create route table.
Add the Internet Gateway Route
- Select
ecommerce-public-rt. - Open the Routes tab.
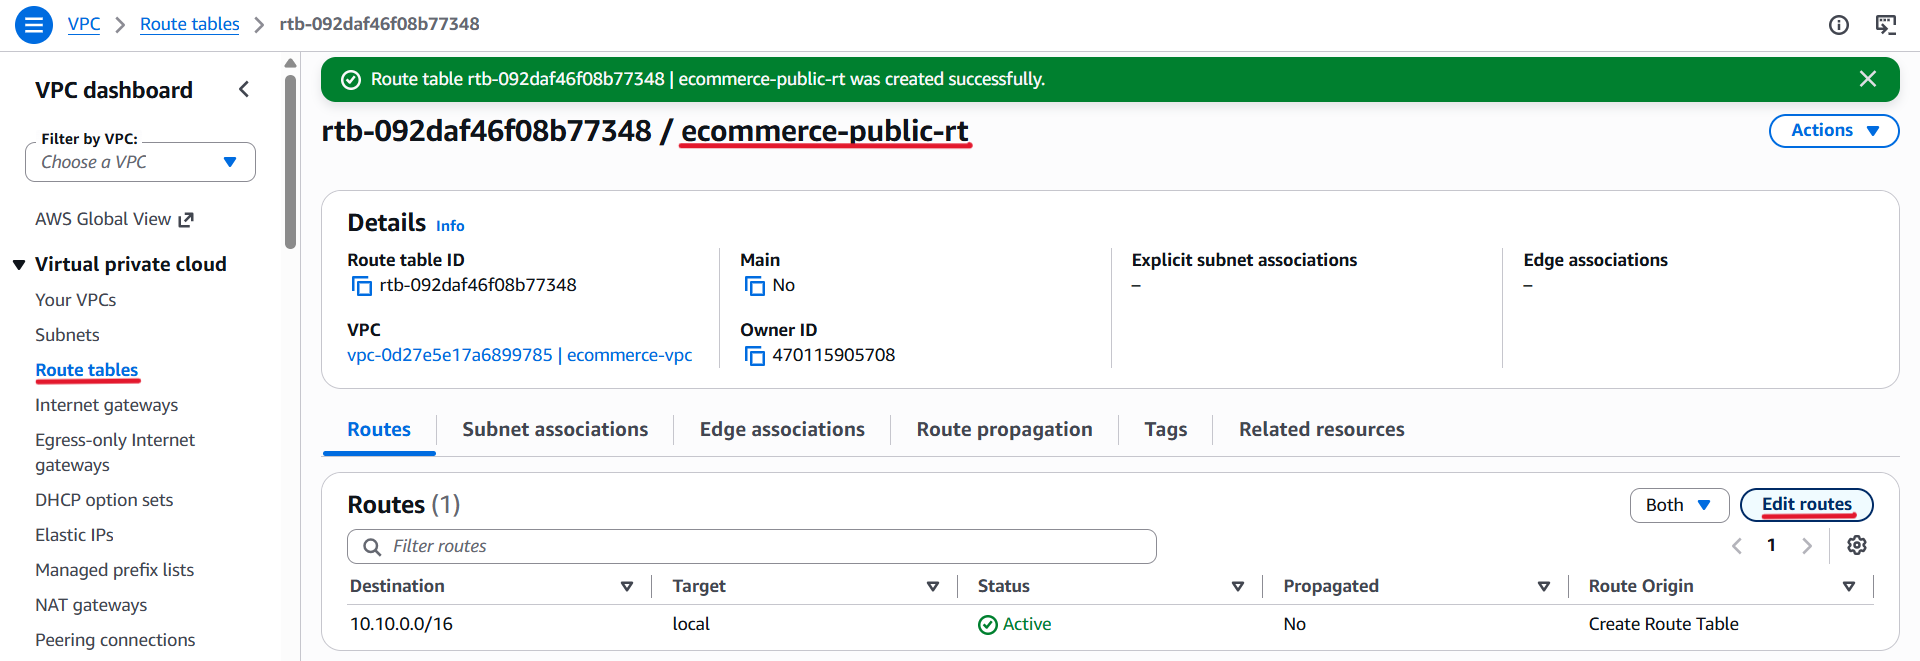
- Click Edit routes → Add route.
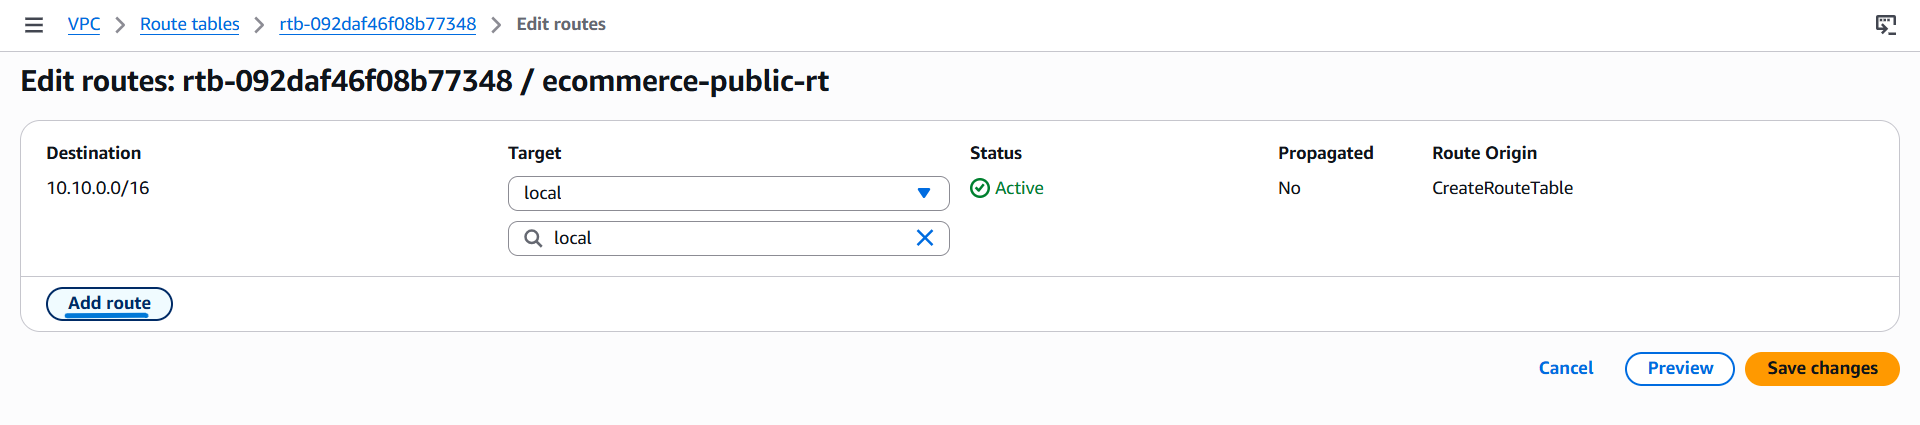
- Enter the destination
0.0.0.0/0.
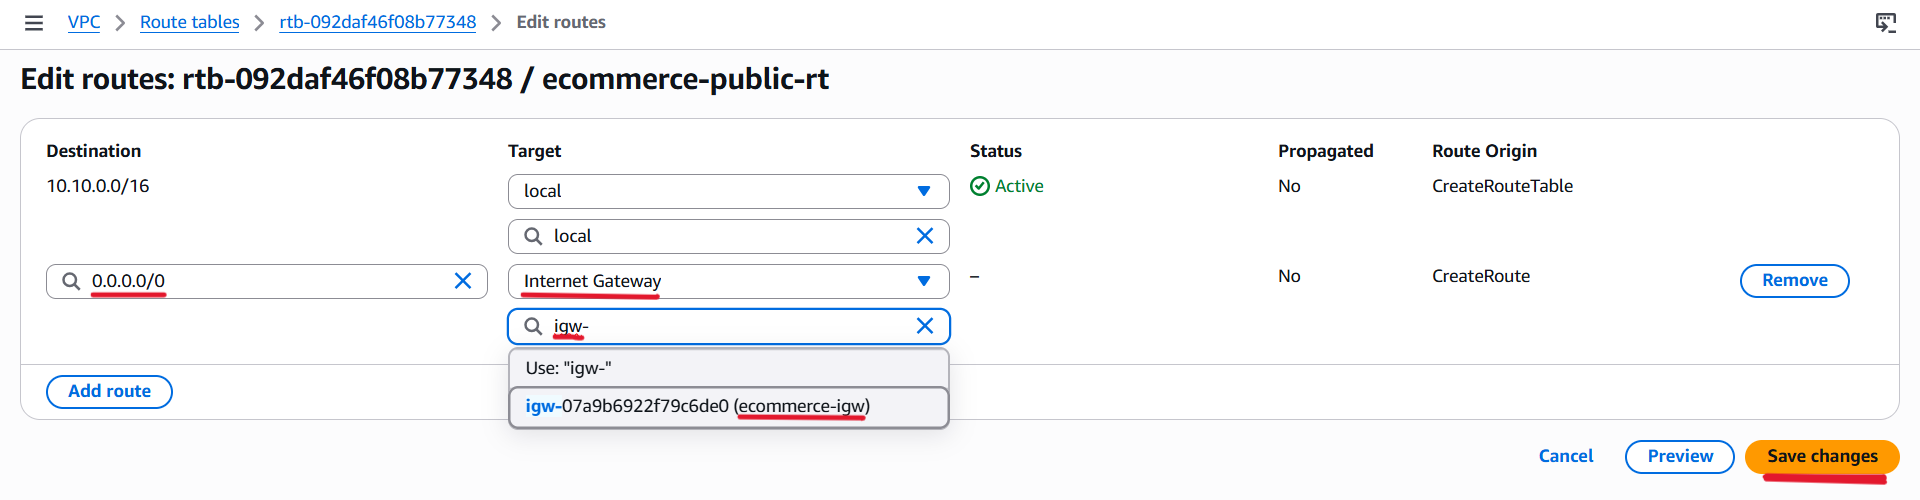
- Select
ecommerce-igwas the target. - Save the changes.
This route sends traffic destined for other IPv4 networks through the Internet Gateway.
Associate the Public Subnets
- Open the Subnet associations tab.
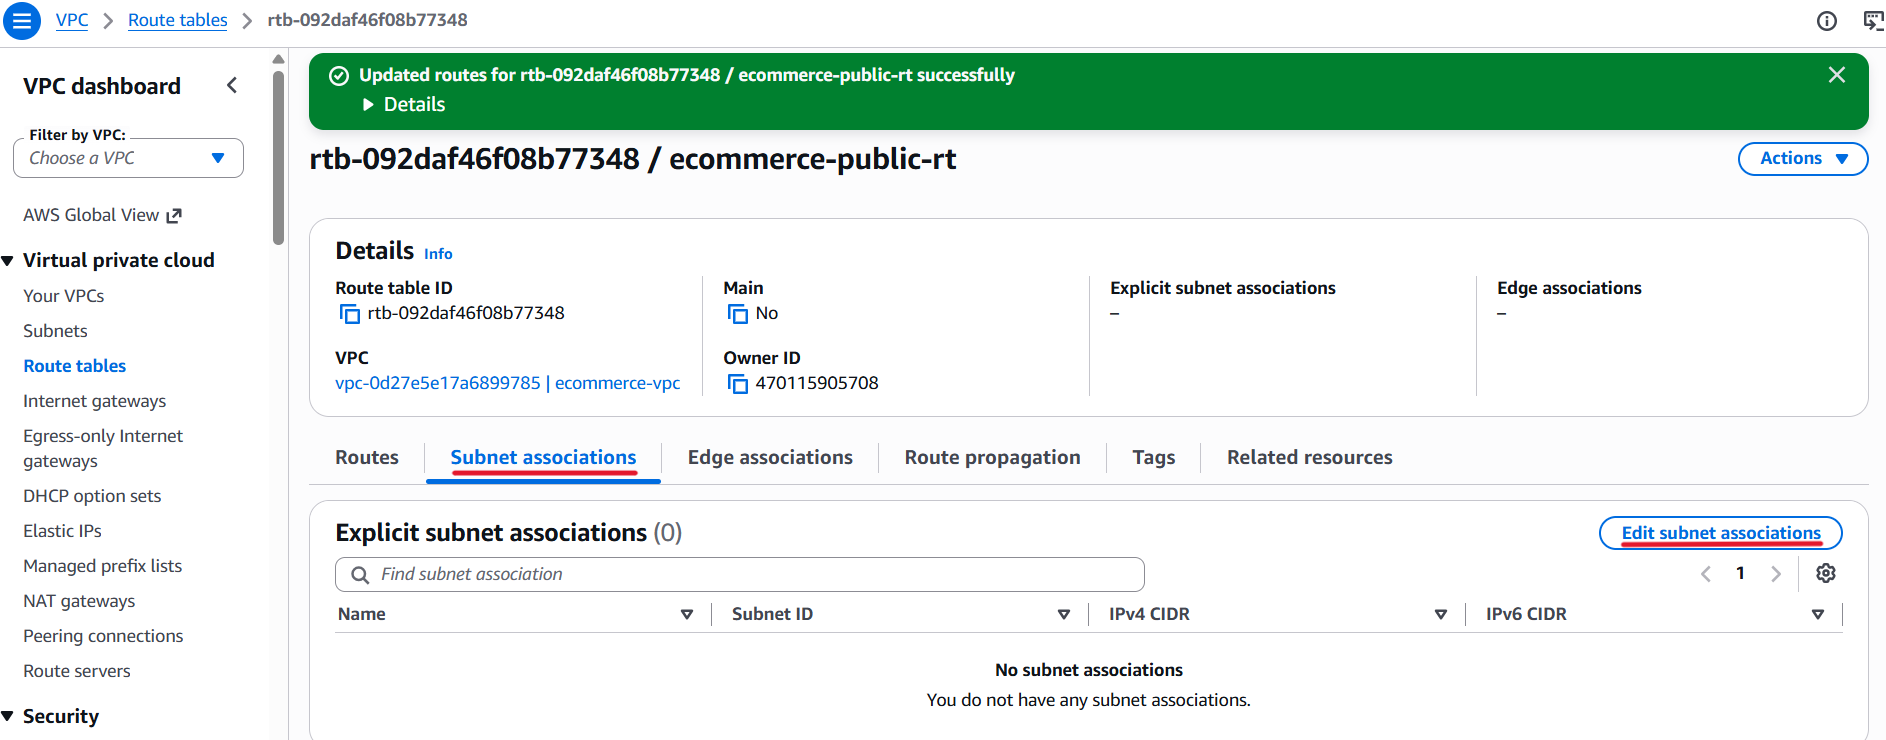
- Click Edit subnet associations.
- Select:
ecommerce-public-subnet-1ecommerce-public-subnet-2
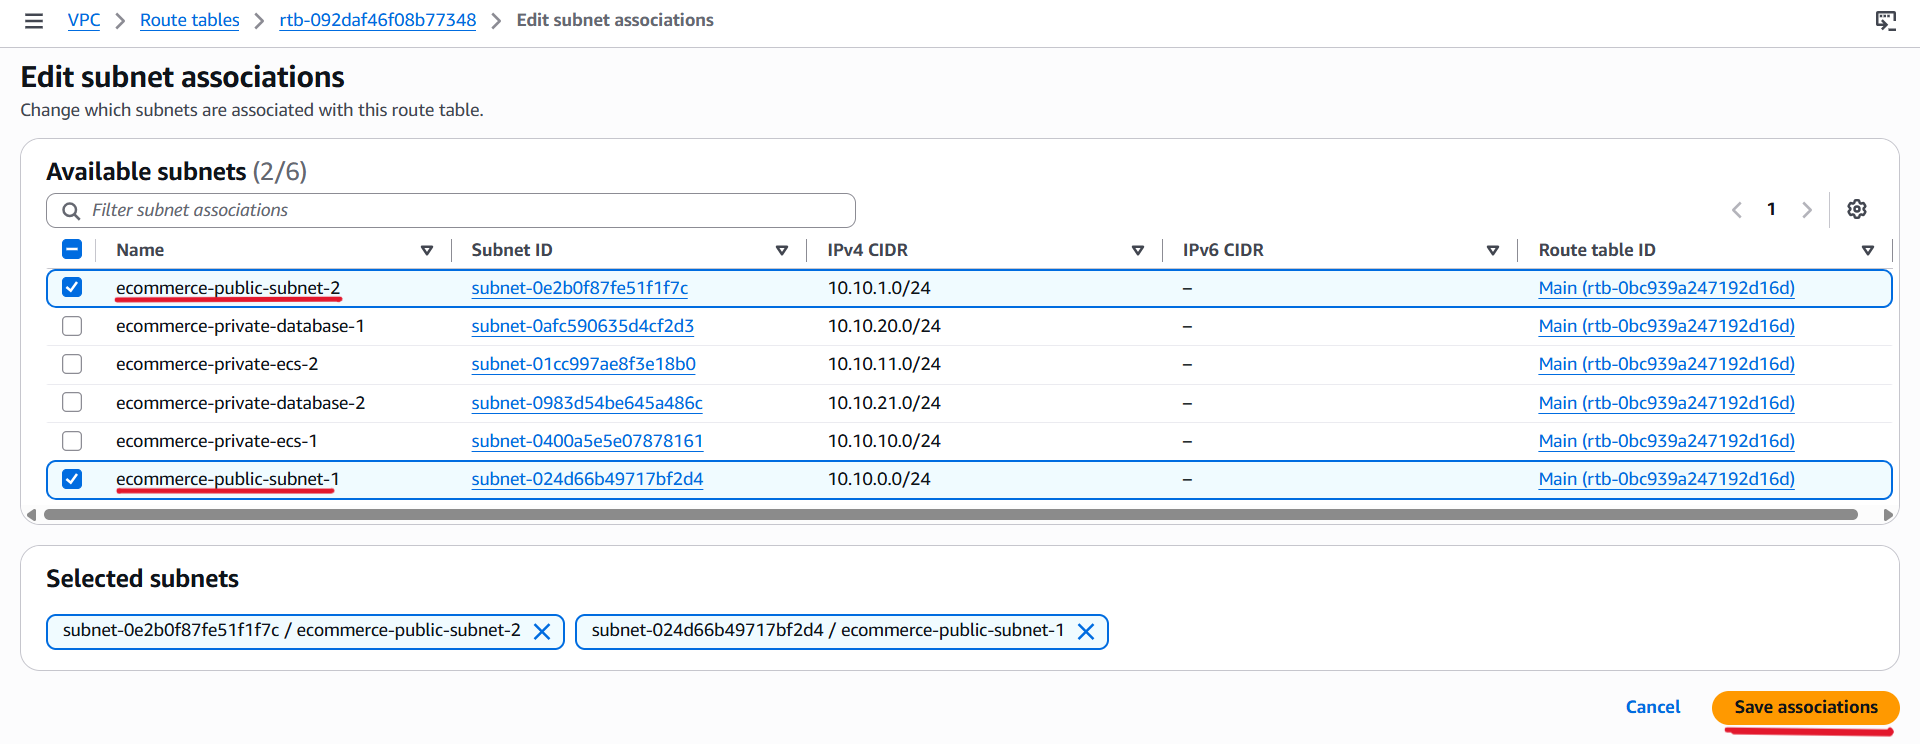
- Save the associations.
- The two public subnets now use the public route table.
Step 6: Create the Private ECS Route Table
- Navigate to: VPC → Route Tables → Create route table
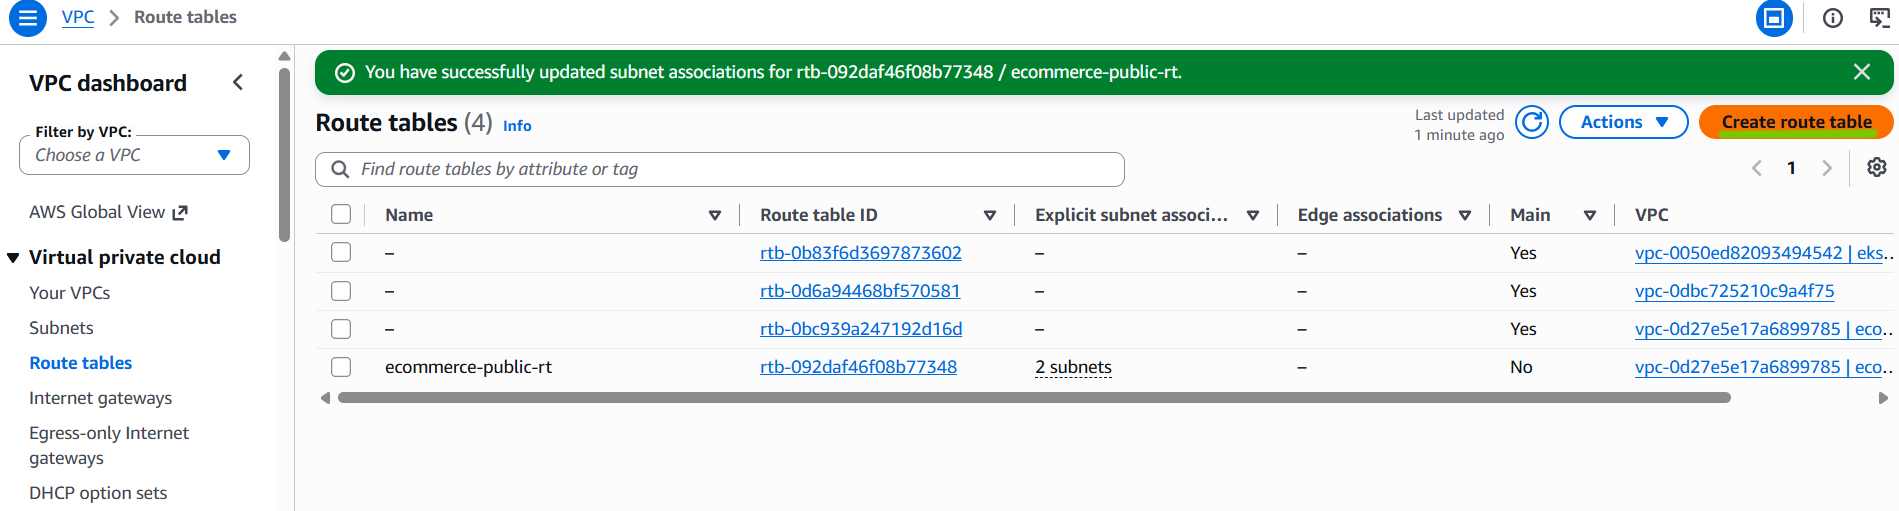
Enter:
| Setting | Value |
|---|---|
| Name | ecommerce-private-ecs-rt |
| VPC | ecommerce-vpc |
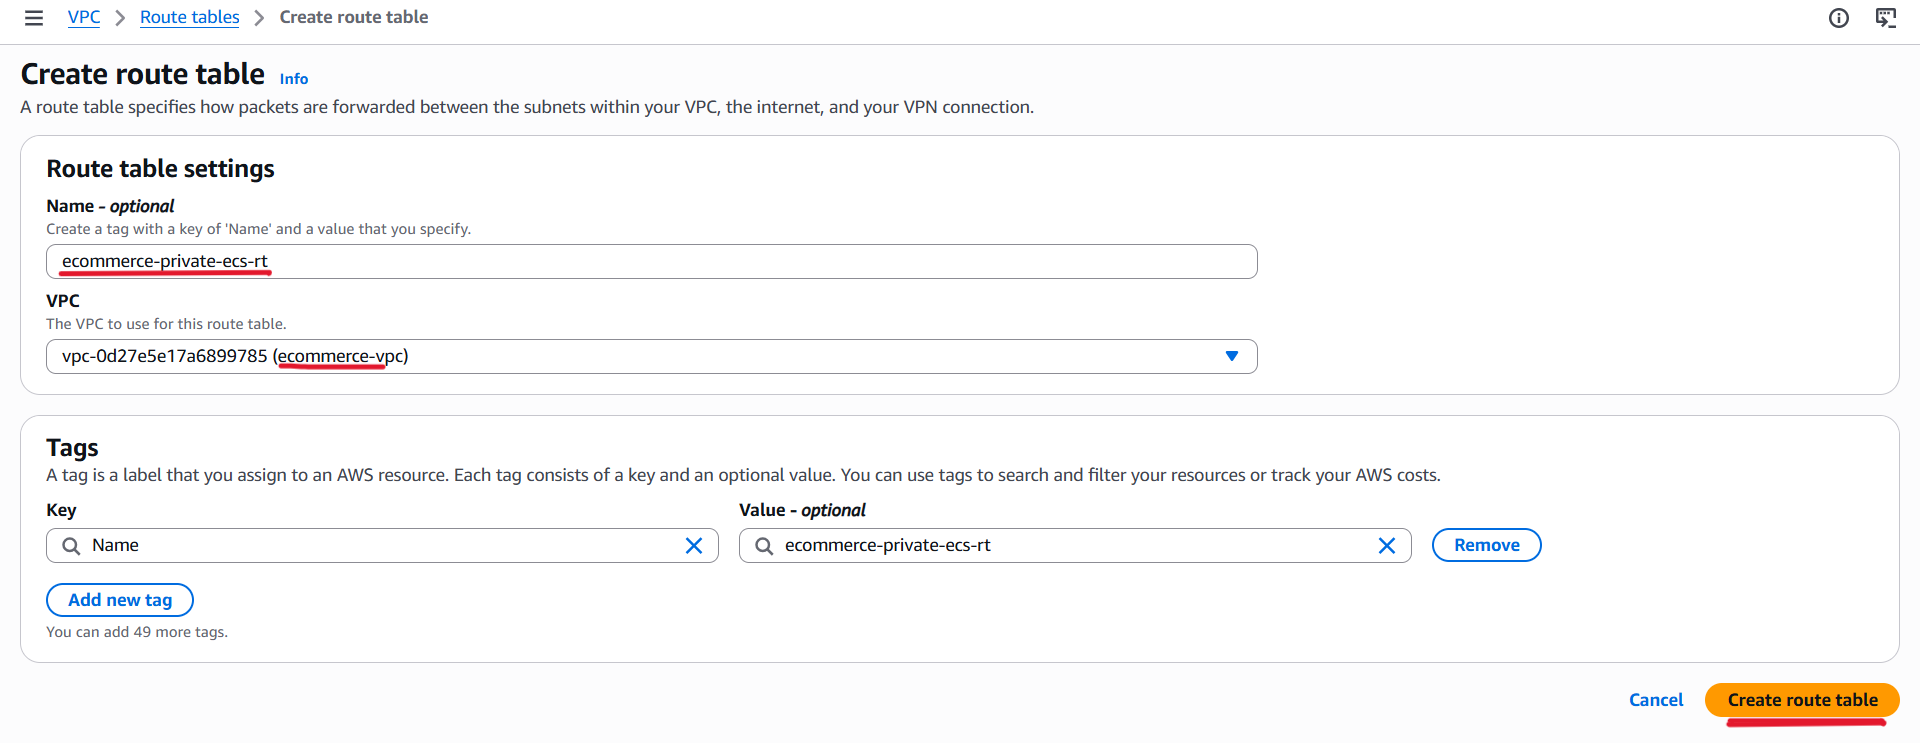
- Click Create route table.
Associate the ECS Subnets
- Select
ecommerce-private-ecs-rt. - Open Subnet associations.
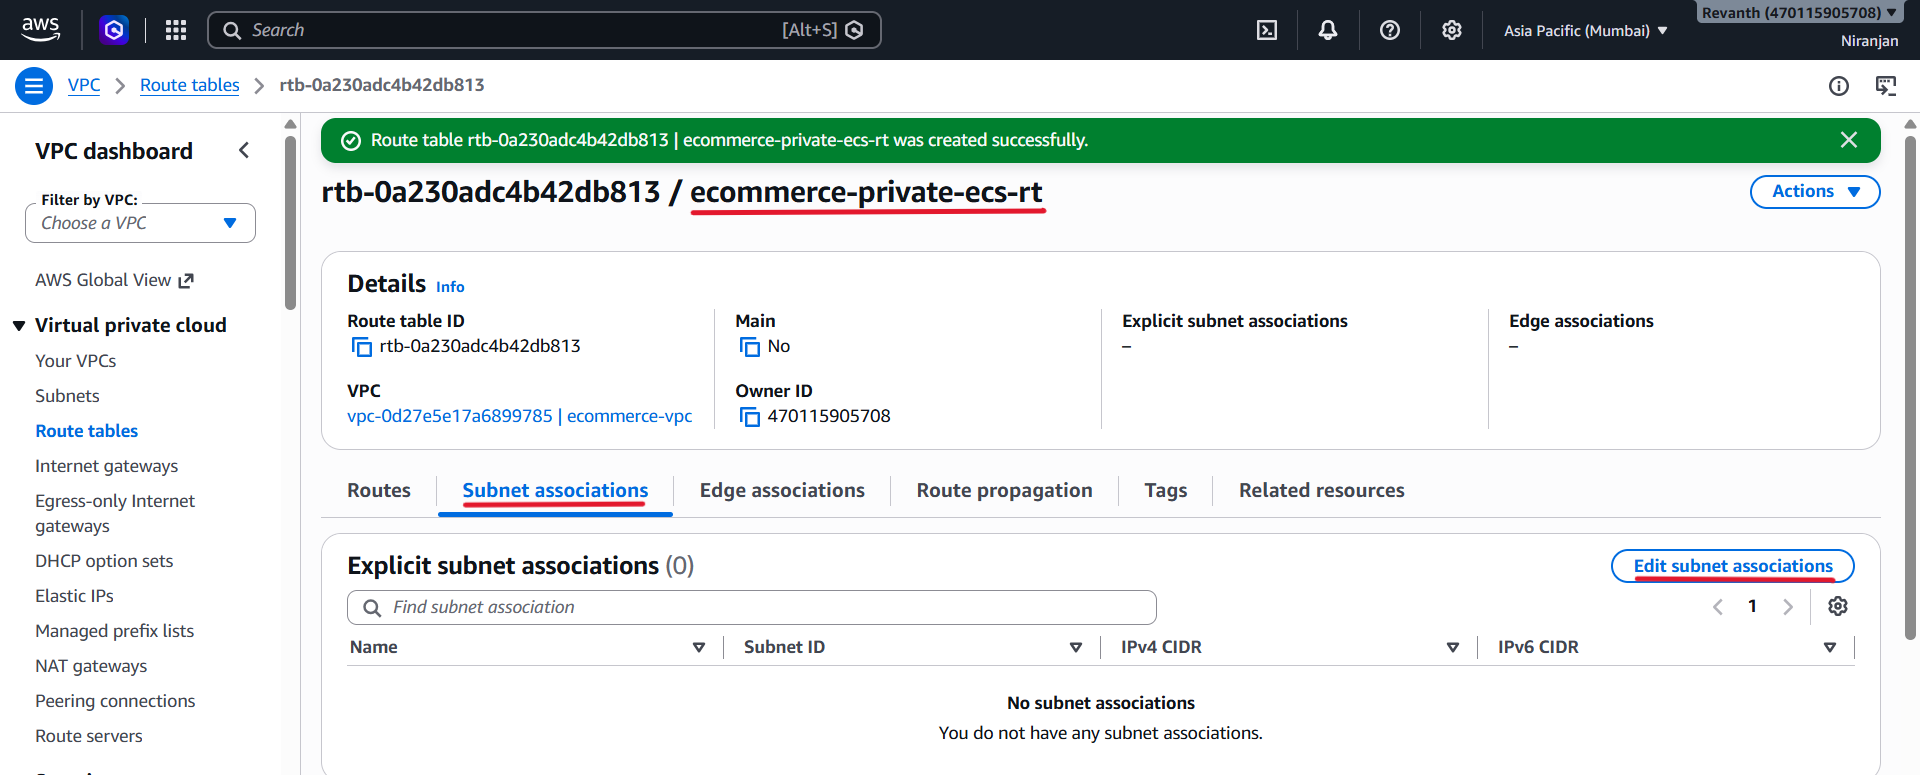
- Click Edit subnet associations.
- Select:
ecommerce-private-ecs-1ecommerce-private-ecs-2
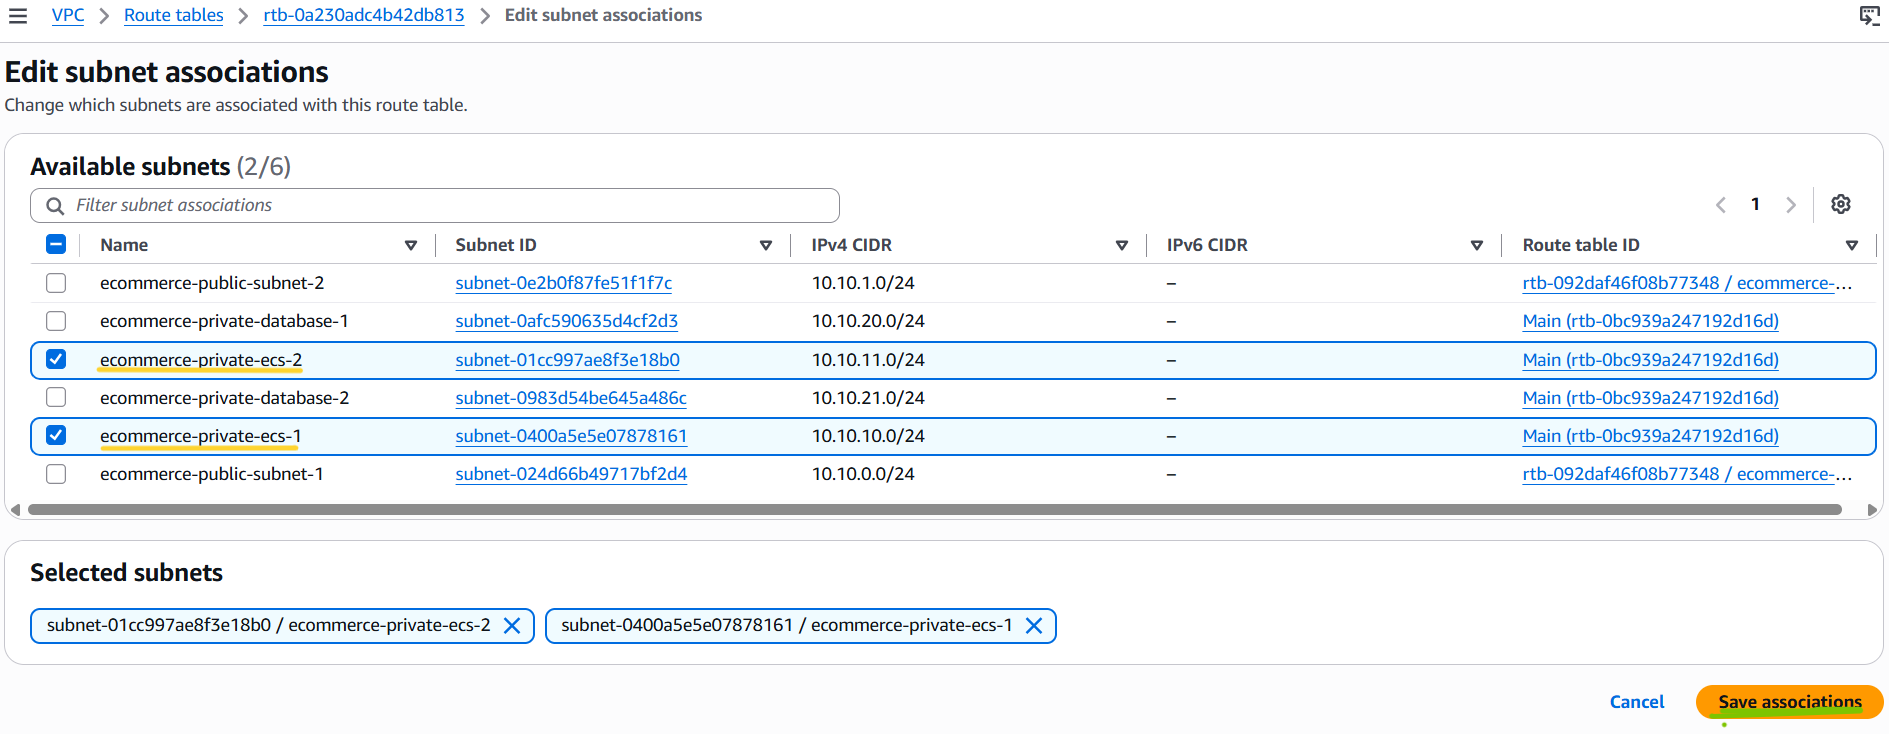
- Save the associations.
We will add the NAT Gateway route after creating the NAT Gateway.
Step 7: Create the Private Database Route Table
- Navigate to: VPC → Route Tables → Create route table
Enter:
| Setting | Value |
|---|---|
| Name | ecommerce-private-db-rt |
| VPC | ecommerce-vpc |
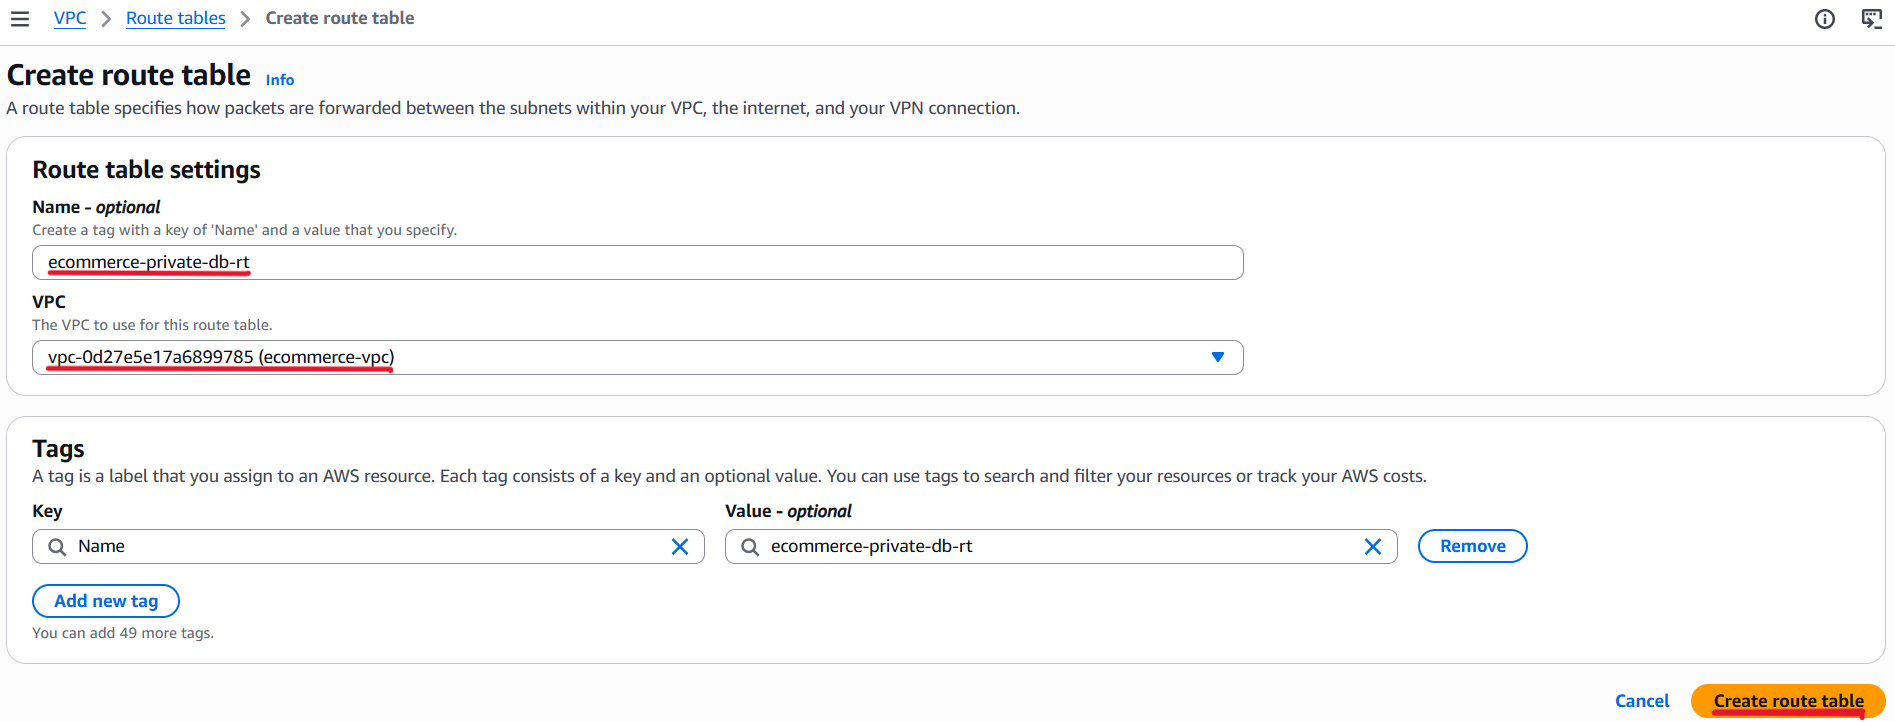
- Click Create route table.
Associate the Database Subnets
- Select
ecommerce-private-db-rt. - Open Subnet associations.
- Click Edit subnet associations.
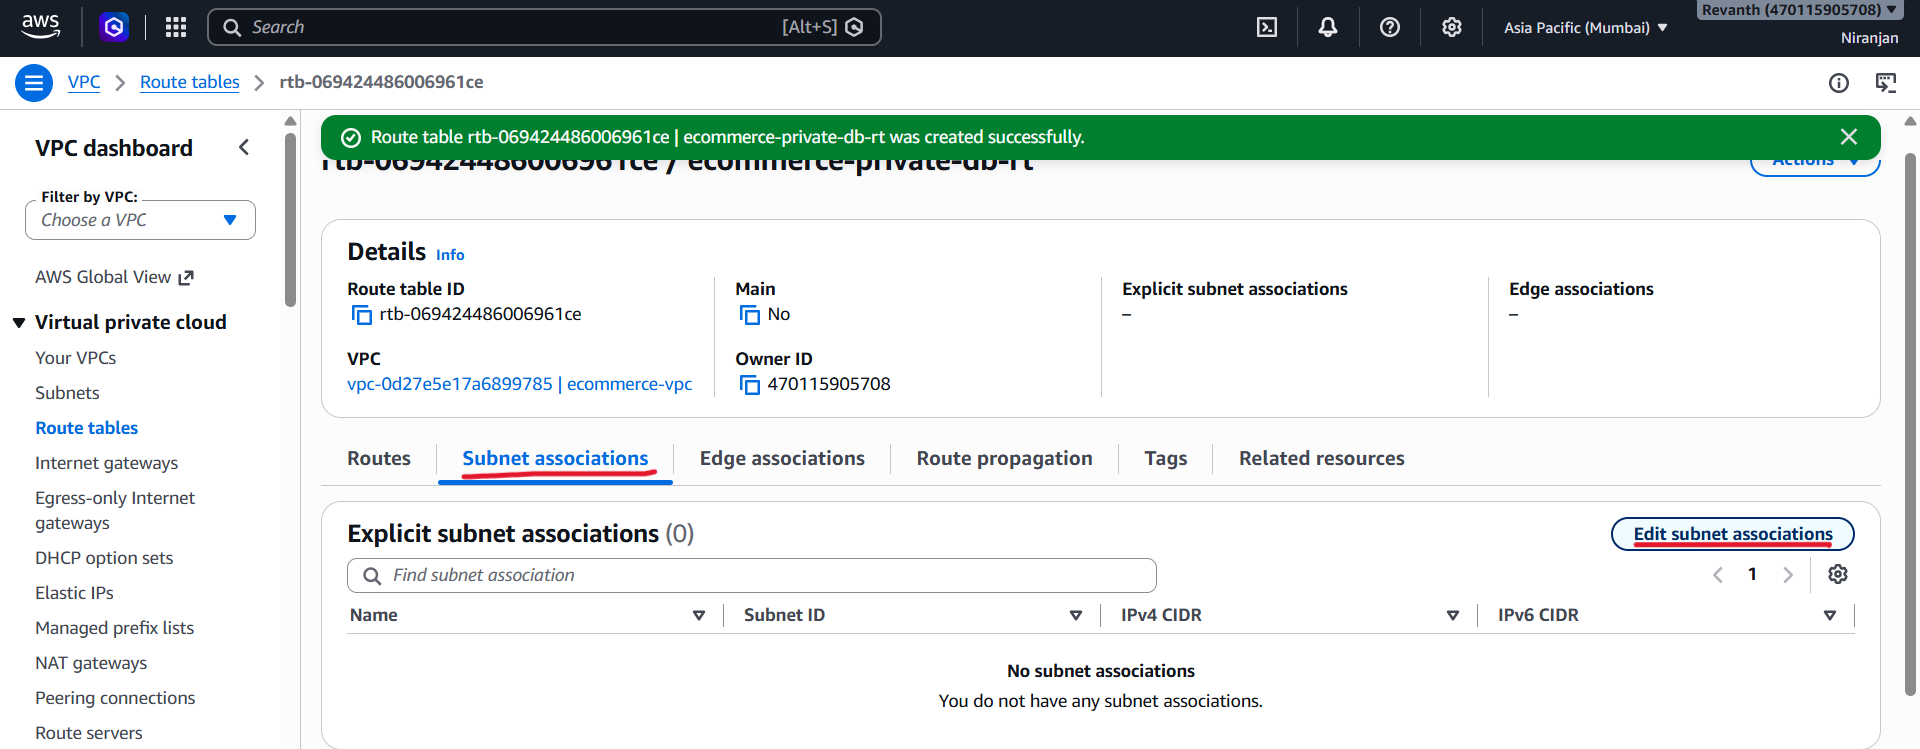
- Select:
ecommerce-private-database-1ecommerce-private-database-2
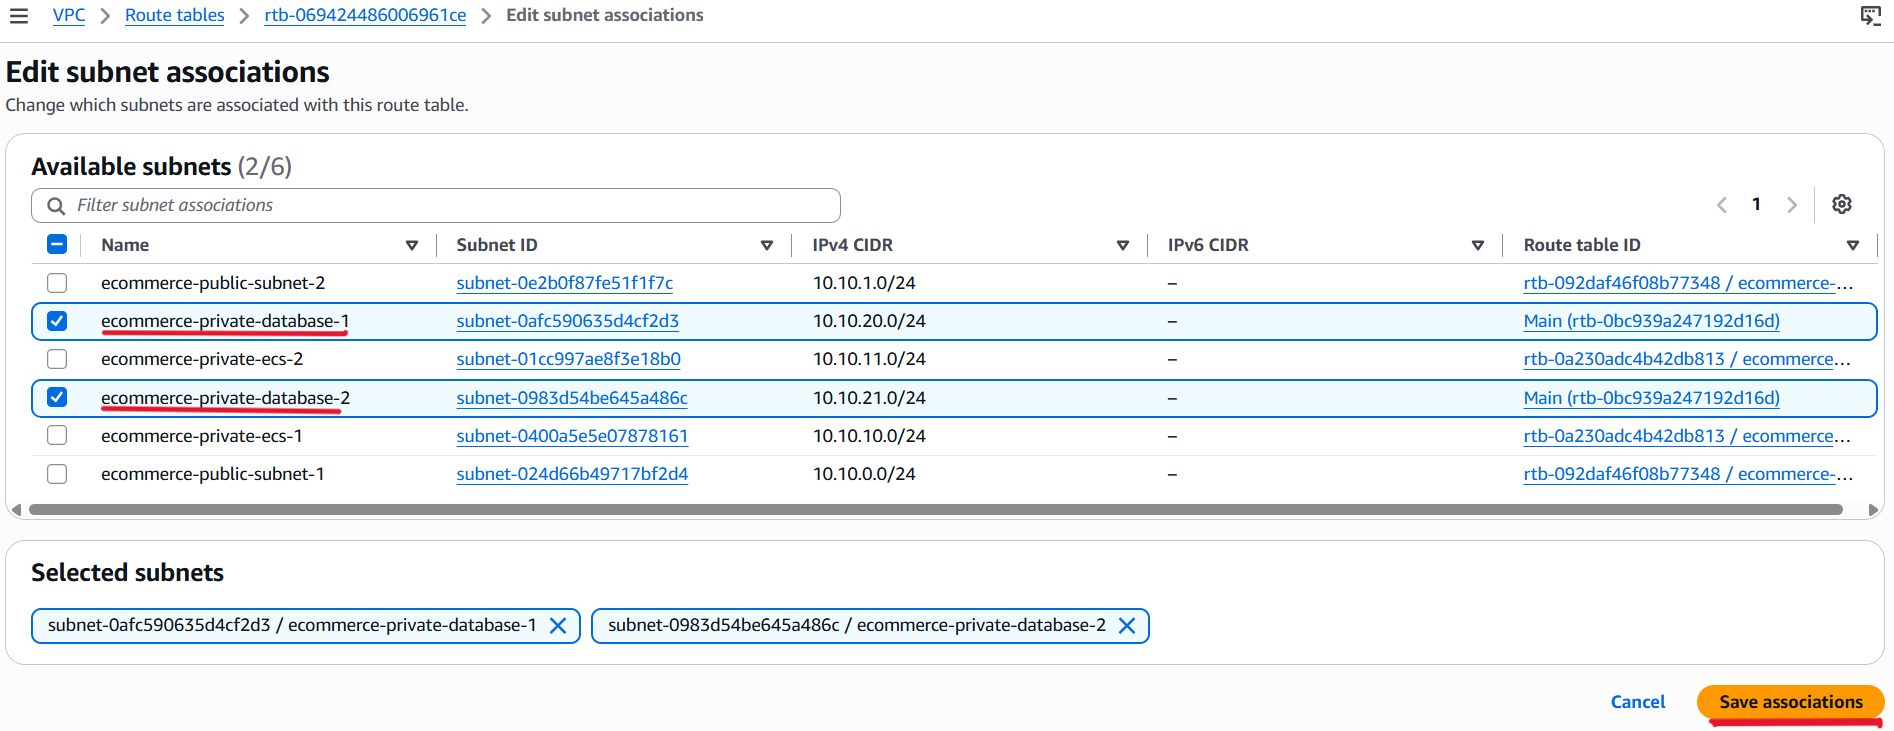
- Save the associations.
- We will not add a default internet route to this route table. The database subnets can still communicate within the VPC according to the applicable routes and security rules.
Step 8: Create the NAT Gateway
- The NAT Gateway allows resources in our private ECS subnets to initiate outbound connections to the internet without requiring direct public IP addresses.
- Navigate to: VPC → NAT Gateways → Create NAT gateway
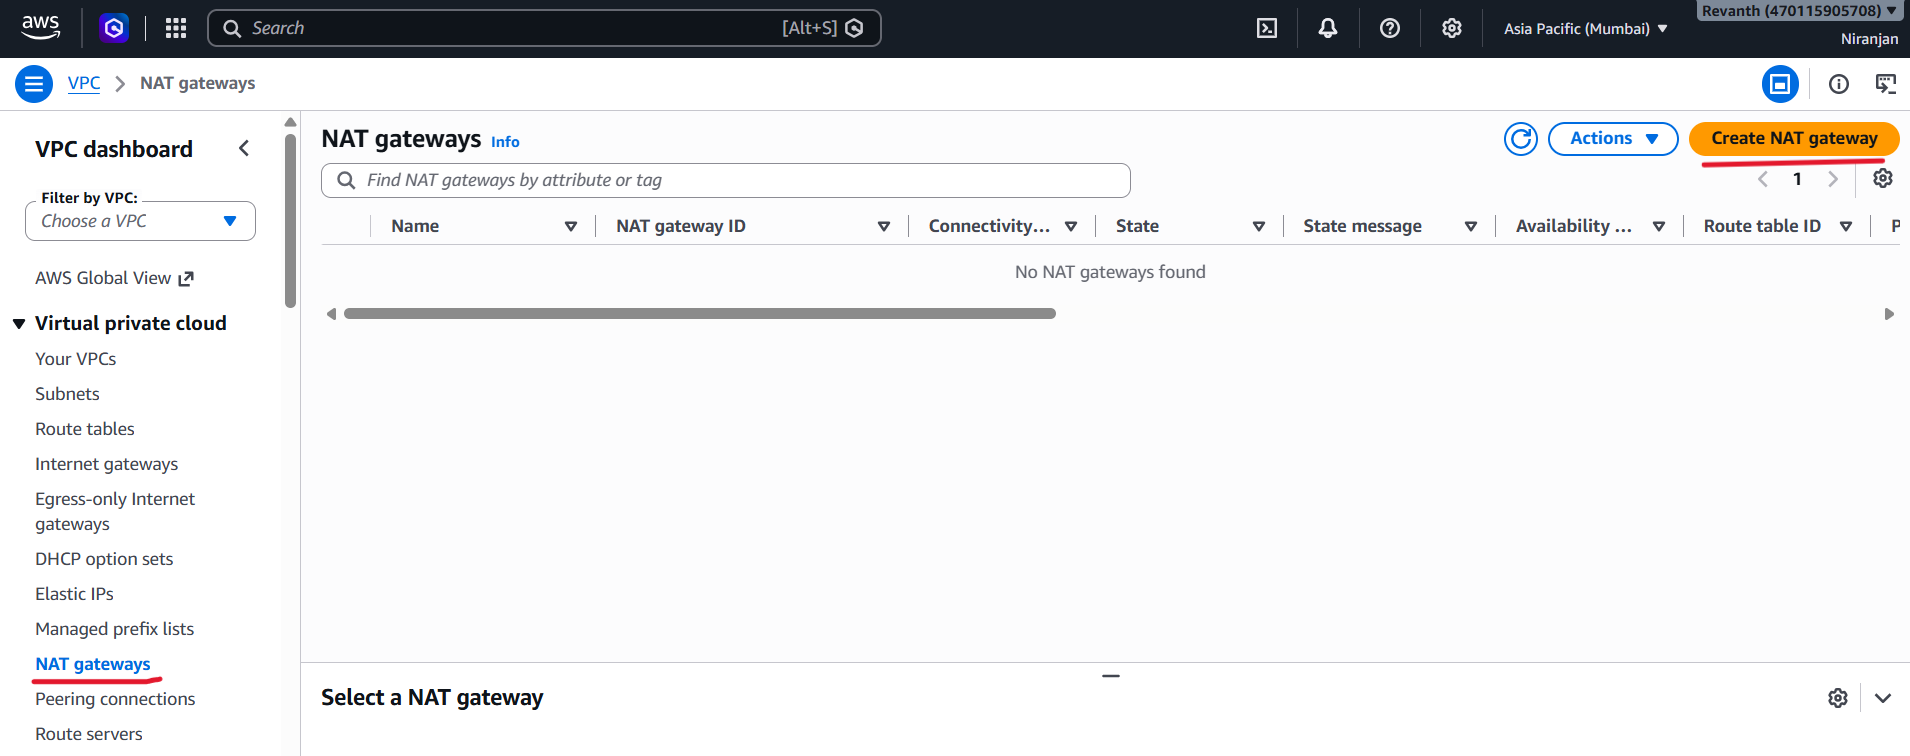
- Enter the following configuration:
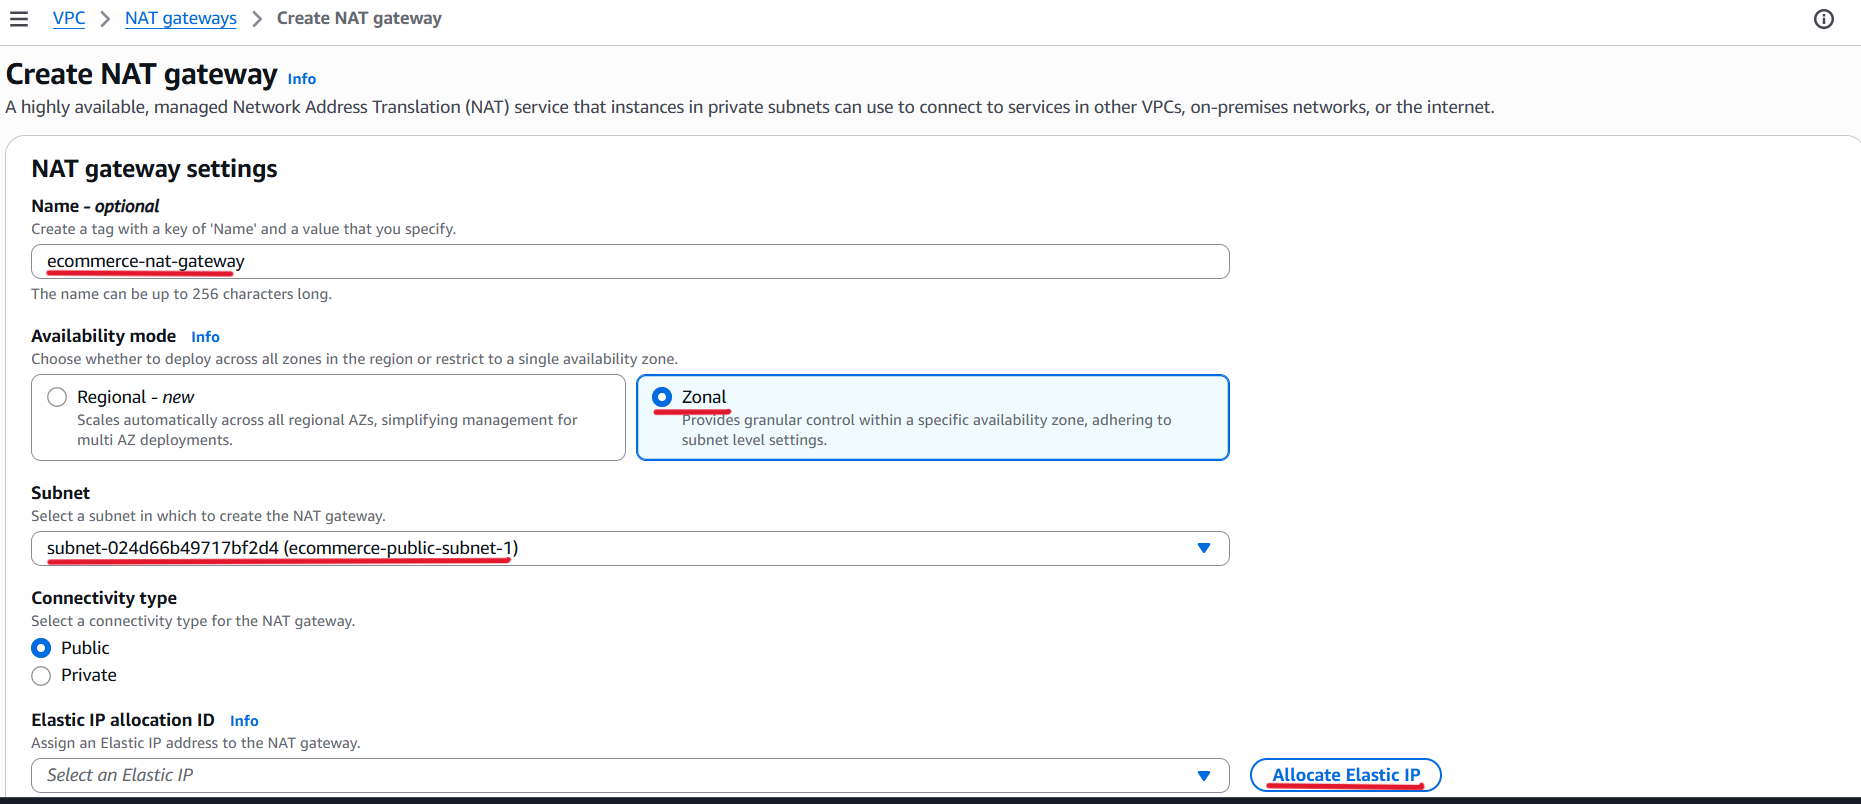
| Setting | Value |
|---|---|
| Name | ecommerce-nat-gateway |
| Availability mode | Zonal |
| Subnet | ecommerce-public-subnet-1 |
| Connectivity type | Public |
| Elastic IP | Allocate Elastic IP |
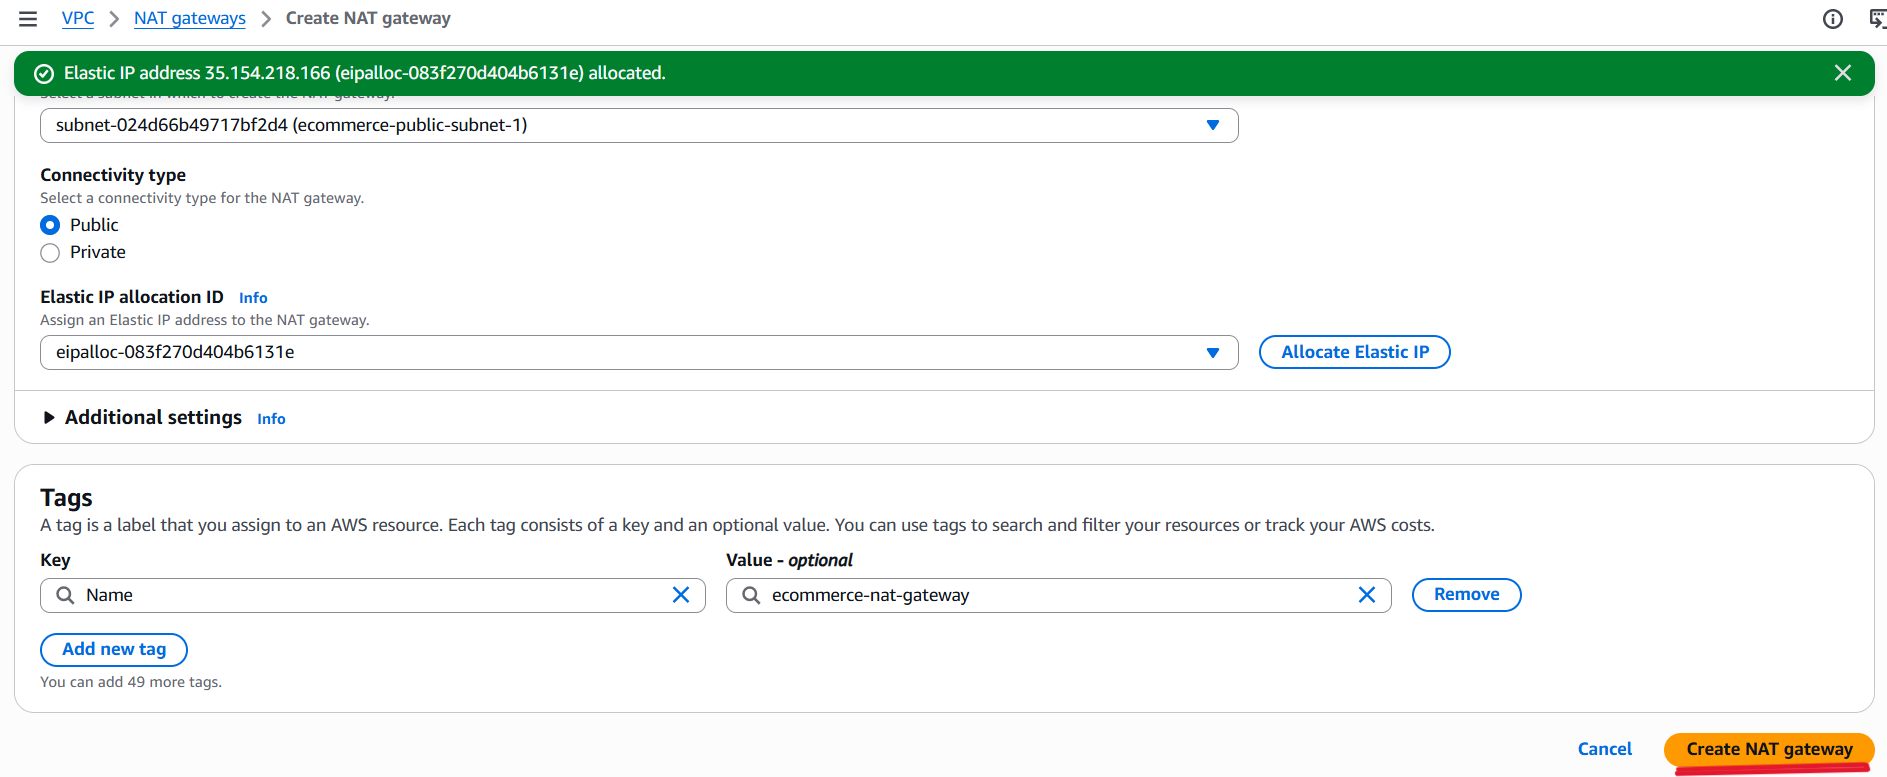
- Click Create NAT gateway.
- Wait until the NAT Gateway status changes to Available before adding it to the route table.
Note: AWS charges you for using a NAT Gateway. We are using only one NAT Gateway in one Availability Zone, so if that zone has a problem, network connectivity may be affected. Using NAT Gateways in multiple Availability Zones can improve availability.
Step 9: Add the NAT Gateway Route to the ECS Route Table
- After the NAT Gateway becomes available, navigate to:
VPC → Route Tables → ecommerce-private-ecs-rt
Then:
- Open the Routes tab.
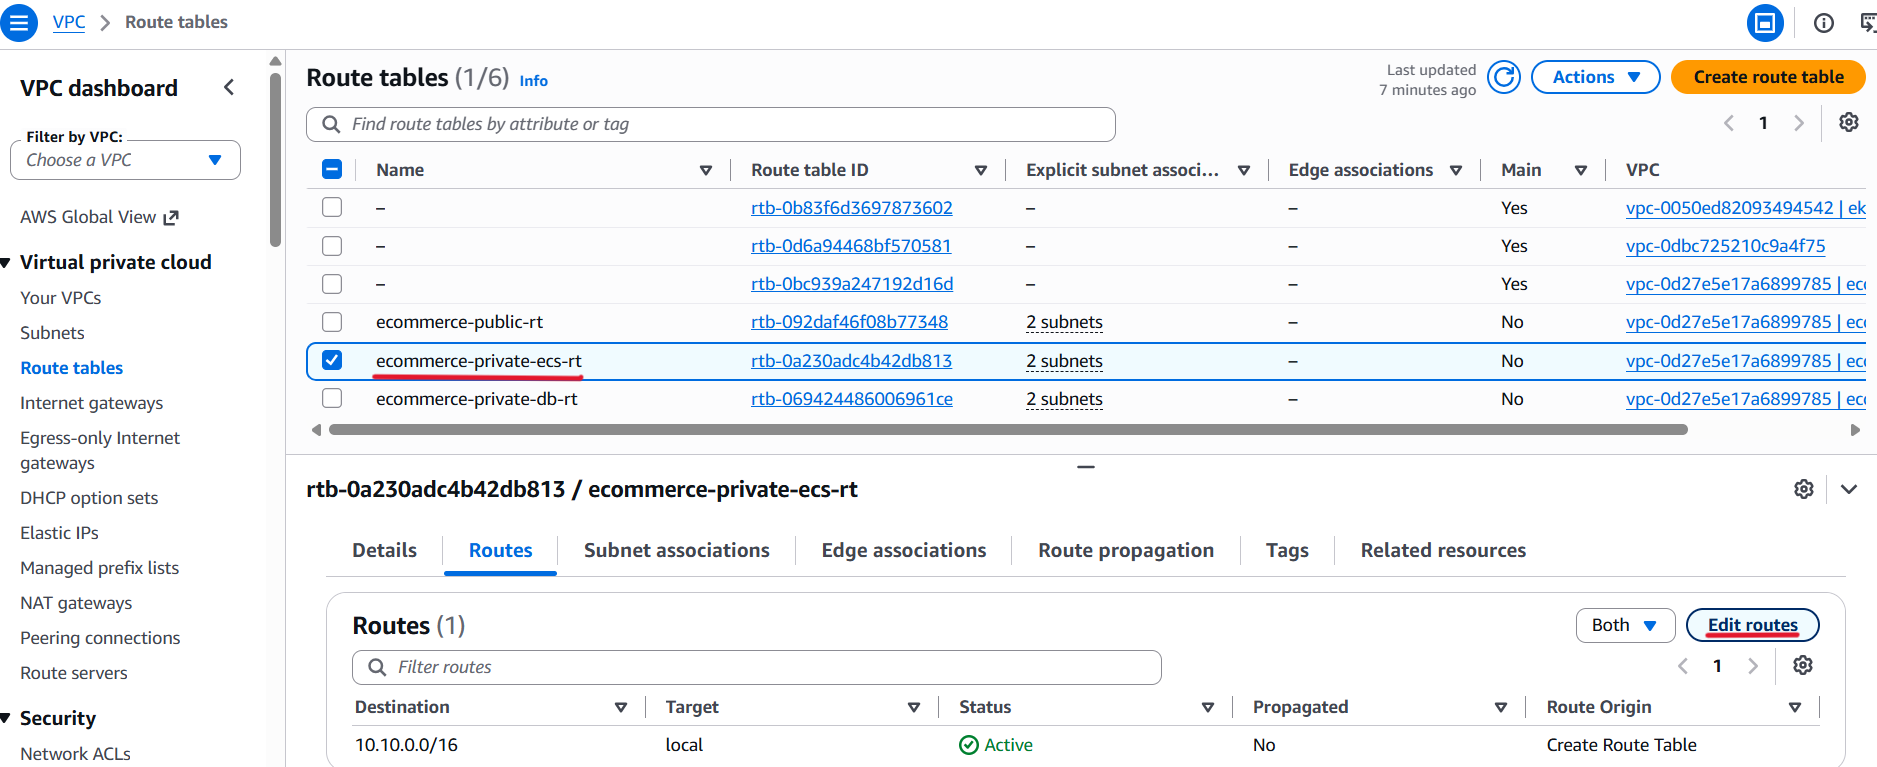
- Click Edit routes.
- Click Add route.
- Enter the destination
0.0.0.0/0.
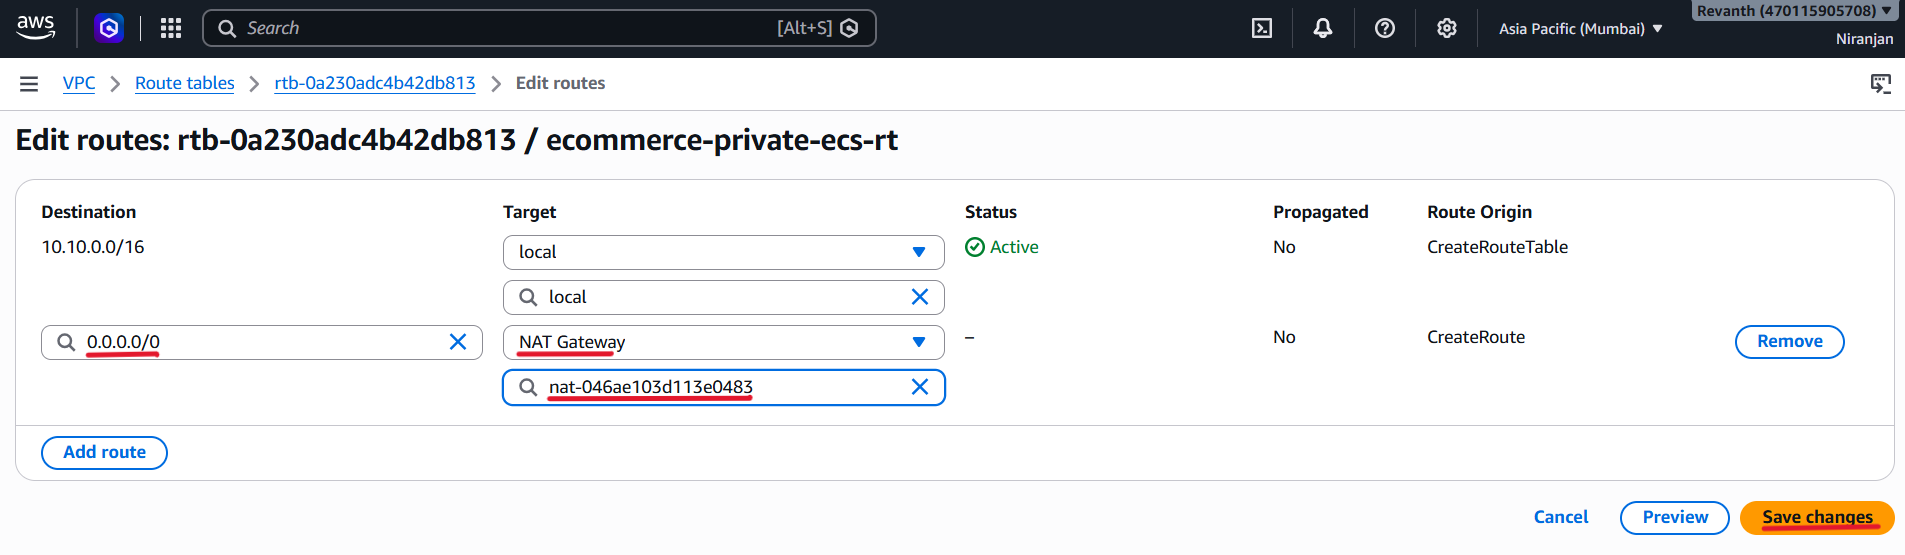
- Select the NAT Gateway
ecommerce-nat-gatewayas the target. - Save the changes.
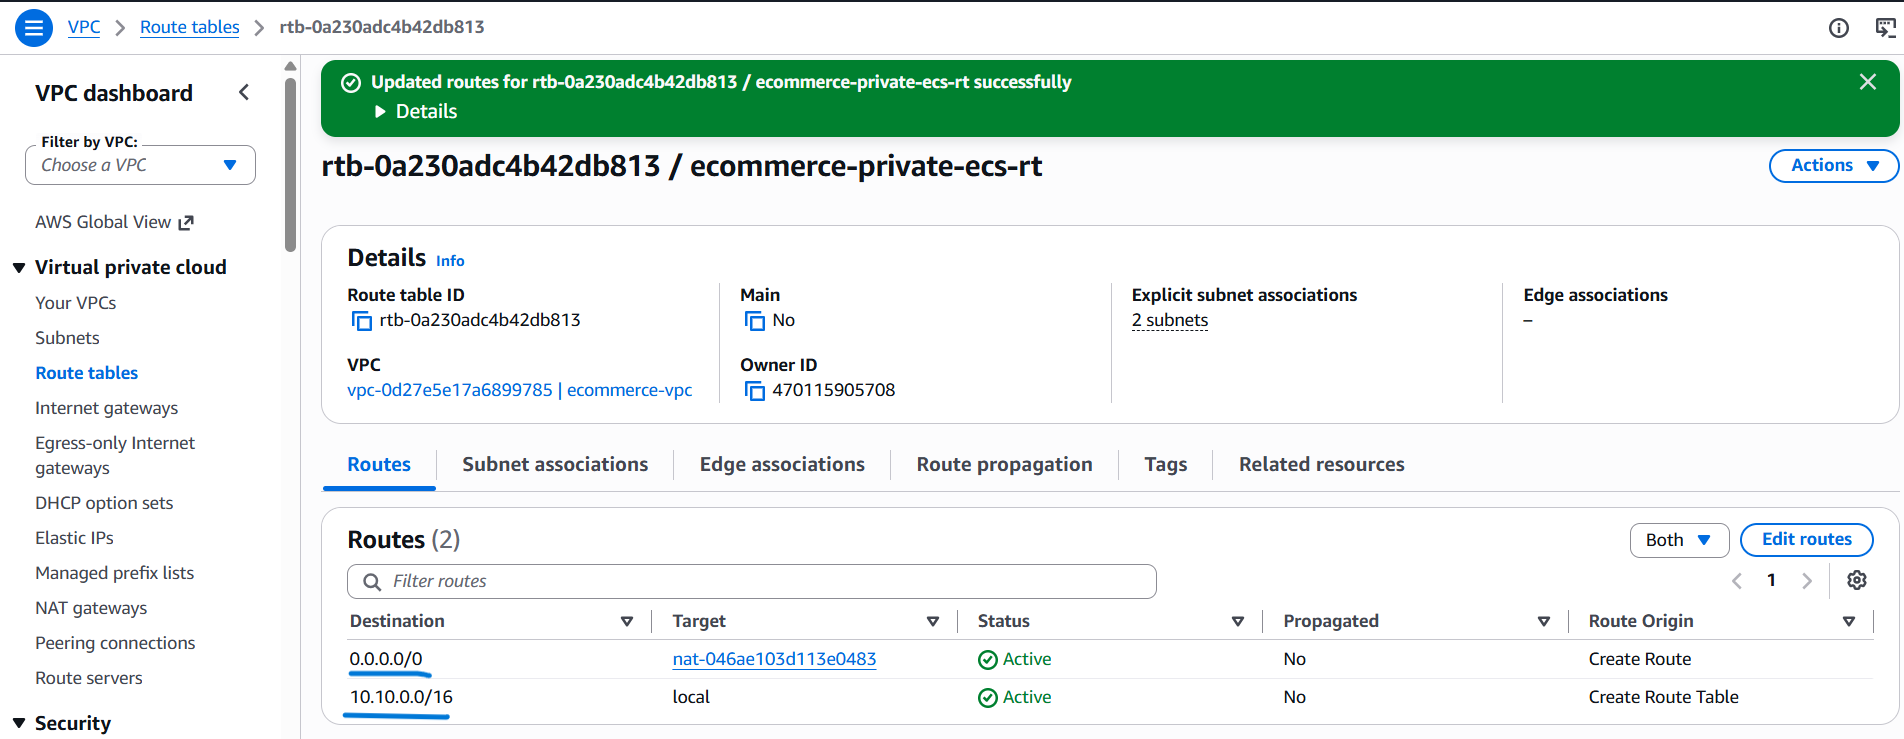
- The private ECS subnets can now use the NAT Gateway for outbound IPv4 internet traffic, subject to the applicable network and security configuration.
5. Verify the Networking Configuration
After completing the configuration, verify the resources in the VPC console.
VPC Verification
- Confirm that
ecommerce-vpcexists with CIDR10.10.0.0/16. - Confirm that
ecommerce-igwis attached to the VPC. - Confirm that all six subnets exist in their intended Availability Zones.
- Confirm that the NAT Gateway status is Available.
Route Table Verification
Check that the route tables have the expected routes and subnet associations.
| Route Table | Expected Configuration |
|---|---|
ecommerce-public-rt |
0.0.0.0/0 → Internet Gateway; both public subnets associated |
ecommerce-private-ecs-rt |
0.0.0.0/0 → NAT Gateway; both ECS subnets associated |
ecommerce-private-db-rt |
No additional default internet route; both database subnets associated |
- If a subnet is associated with the wrong route table, edit the subnet associations and correct the configuration.
- Remember that a subnet's route table alone does not determine whether a resource is publicly reachable. Public IP assignment, security groups, network ACLs, and the resource's own configuration also affect connectivity.
6. Conclusion
In this module, we created the networking foundation for our e-commerce application using Amazon VPC.
We configured:
- One VPC with CIDR
10.10.0.0/16. - Six public and private subnets across two Availability Zones.
- An Internet Gateway attached to the VPC.
- A public NAT Gateway for outbound connectivity.
- Three custom route tables with the appropriate subnet associations and routes.
This network design separates the application and database subnets and provides the routing foundation required for the next deployment stages.
Proceed to User Authentication, where we will configure Amazon Cognito for user registration and login.
Module 2: Authentication with Amazon Cognito
1. Overview
In this module, we will configure Amazon Cognito to manage user registration and login for our e-commerce application.
We will create a Cognito User Pool, configure the App Client, and enable the required authentication methods.
This allows users to sign up and log in before accessing features such as their cart, orders, and profile.
2. Understanding Amazon Cognito
Amazon Cognito is an AWS service that manages user identities and authentication.
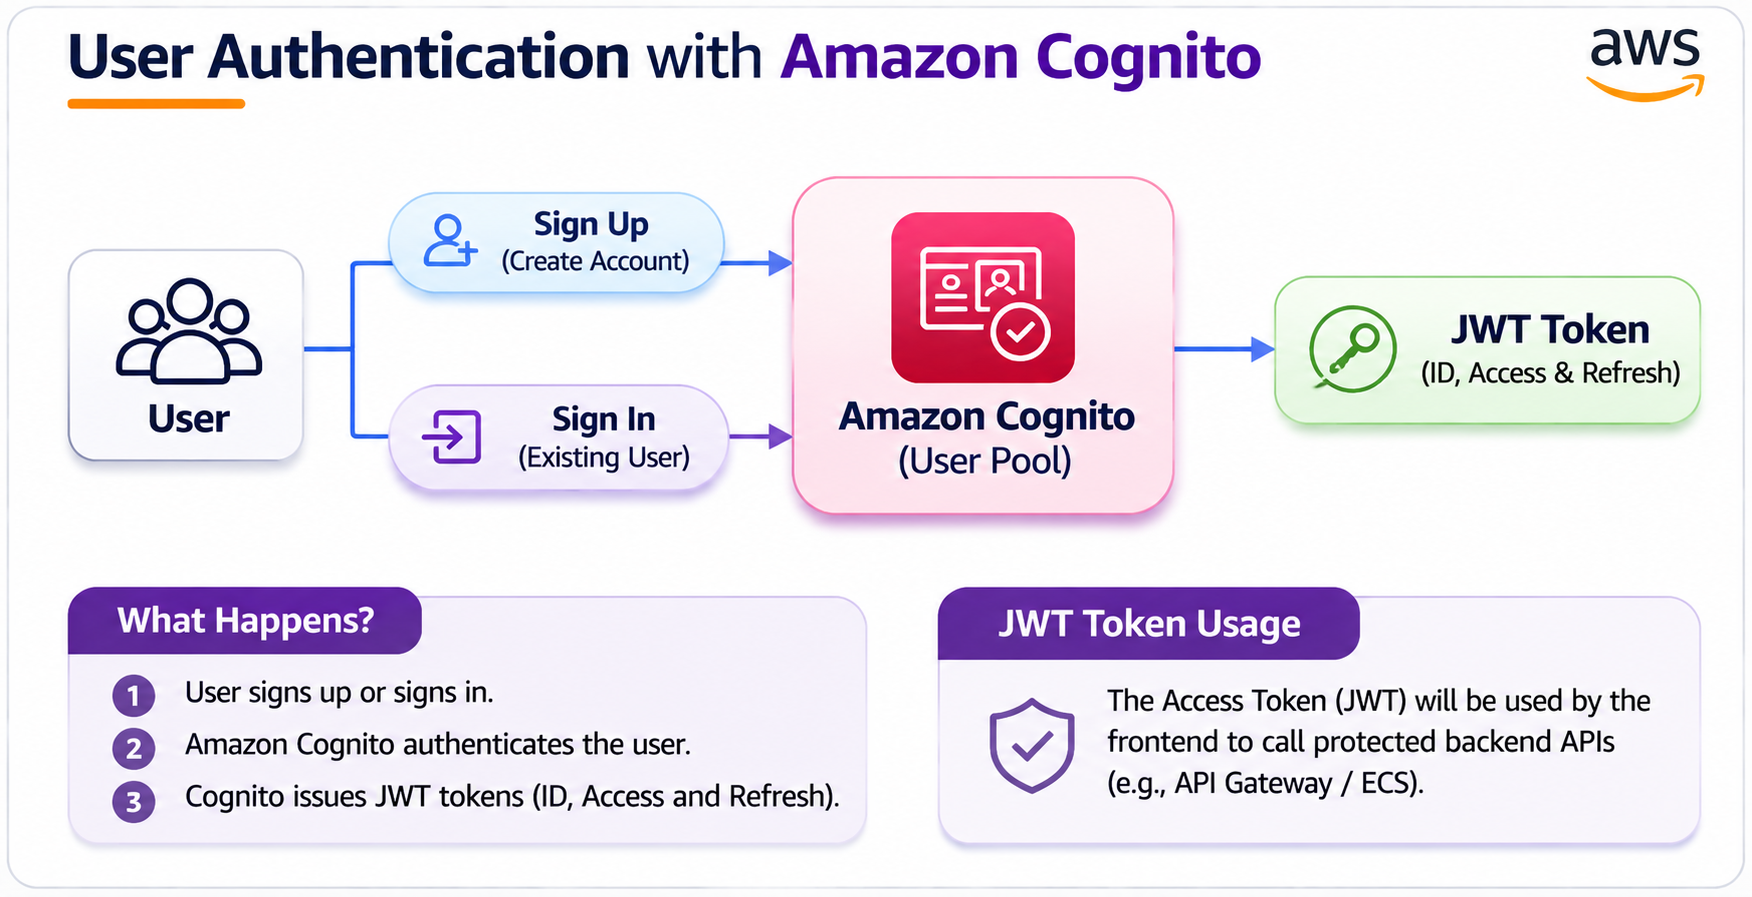
For our e-commerce application:
- User Pool: Stores user information and manages registration and login.
- App Client: Allows our frontend application to communicate with the User Pool.
- Authentication Flows: Define how users authenticate with their credentials.
- Cognito Domain: Provides a domain for Cognito's authentication endpoints.
Our product listing can be publicly accessible, while features such as managing the cart, placing orders, and viewing user profiles can require authentication.
We will use Amazon Cognito with API Gateway to help protect the application's APIs in later modules.
3. Create a Cognito User Pool
Step 1: Open Amazon Cognito
- Sign in to the AWS Management Console.
- Search for Amazon Cognito.
- Open Amazon Cognito → User pools.
- Make sure you are in the Mumbai region (
ap-south-1). - Click Create user pool.
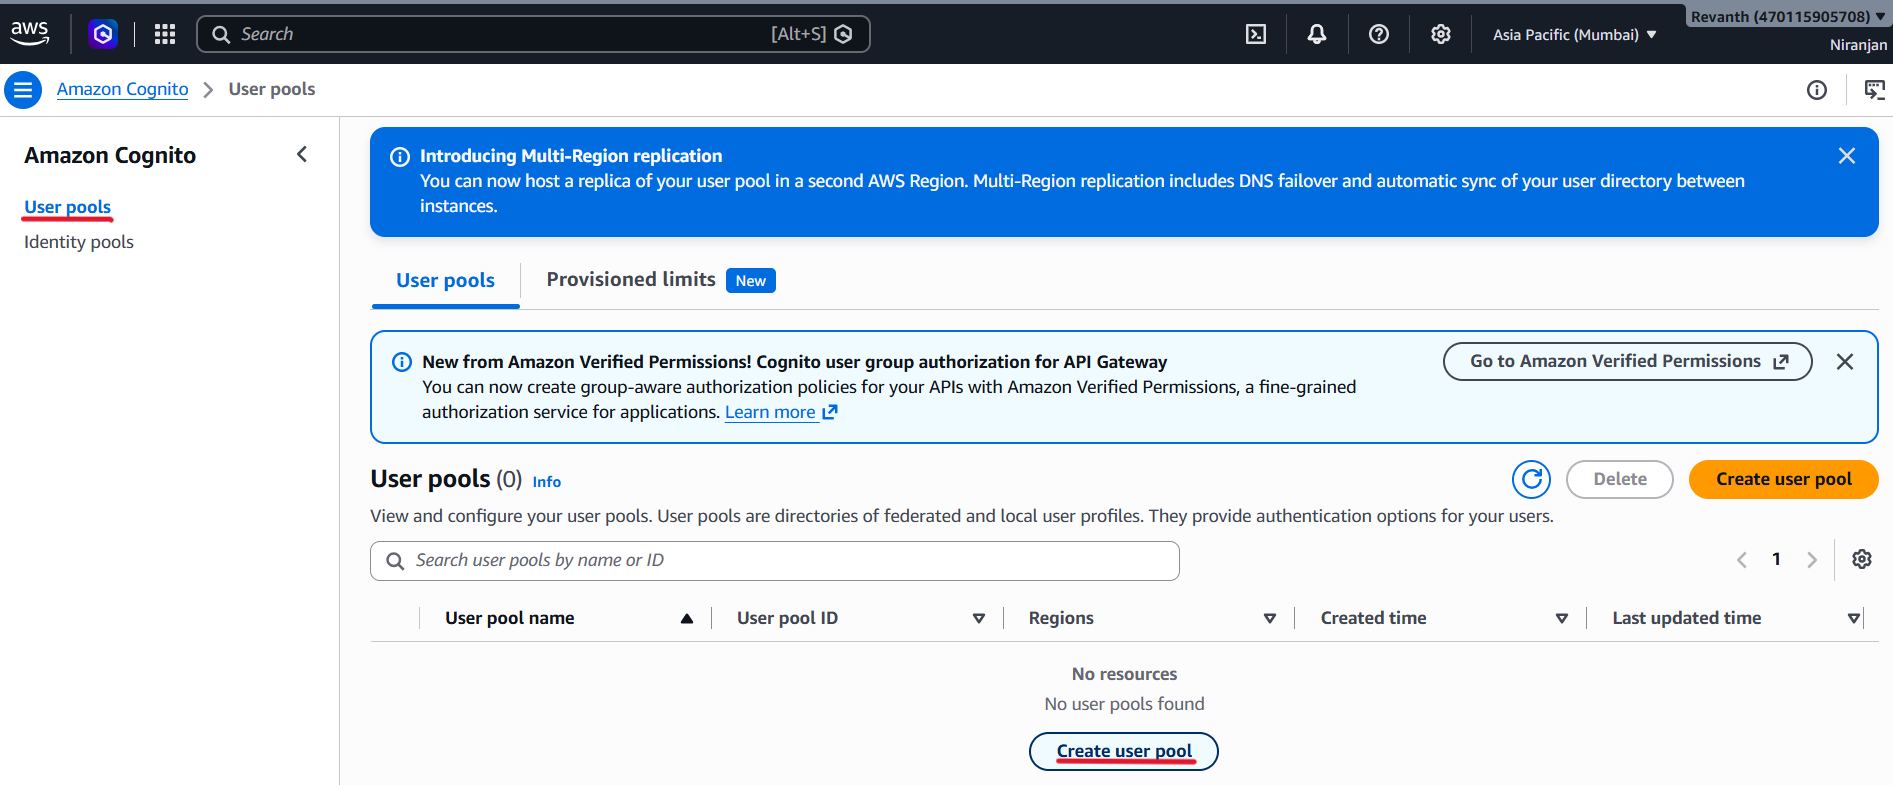
Step 2: Define the Application
Under Define your application, select:
- Application type: Single-page application (SPA)
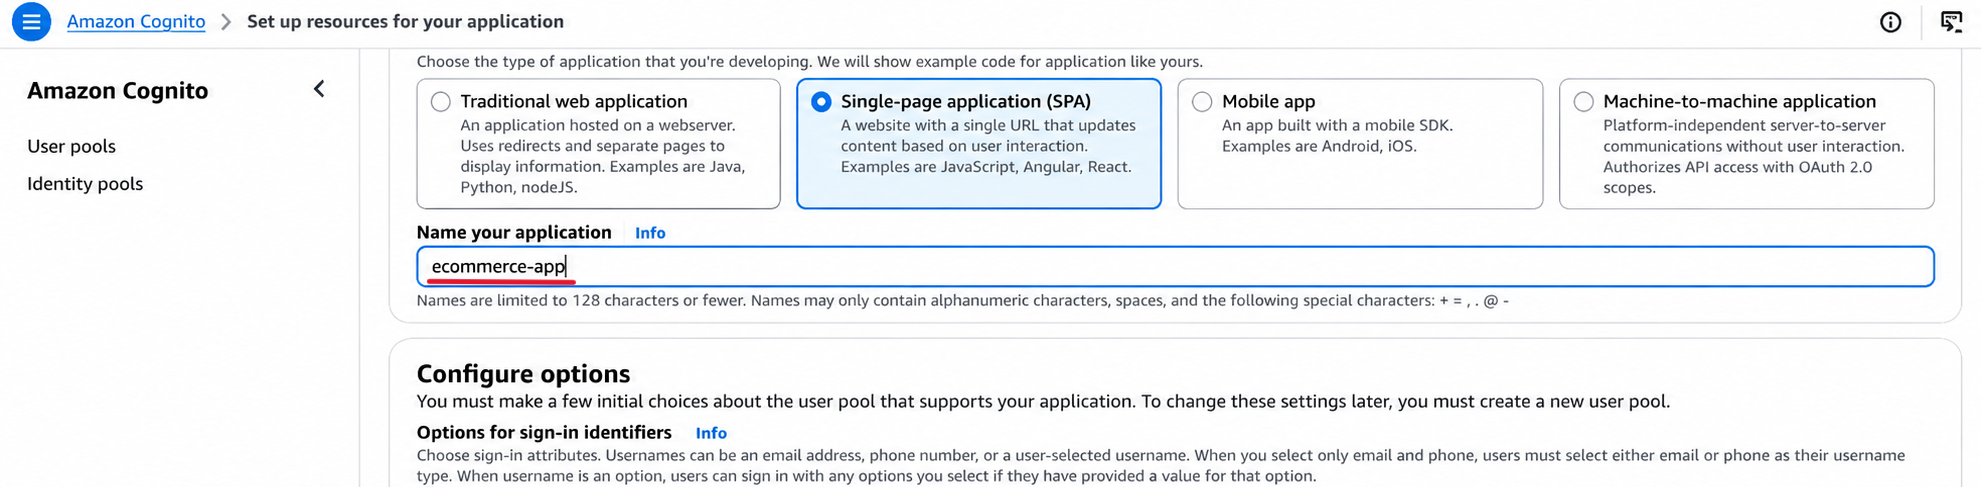
- Enter the application name:
ecommerce-app
Step 3: Configure Sign-in Options
Configure the following settings:
- Sign-in identifier: Email
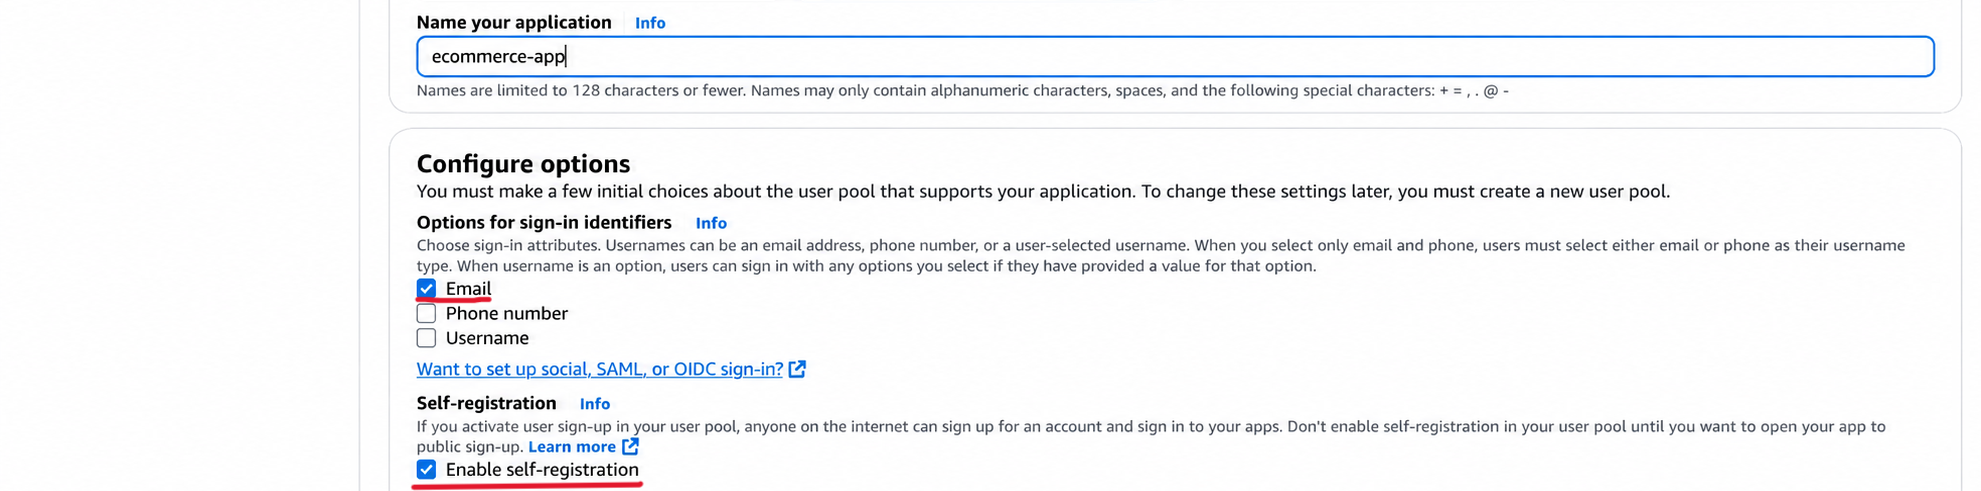
- Self-registration: Enable
- Required sign-up attributes:
emailandname
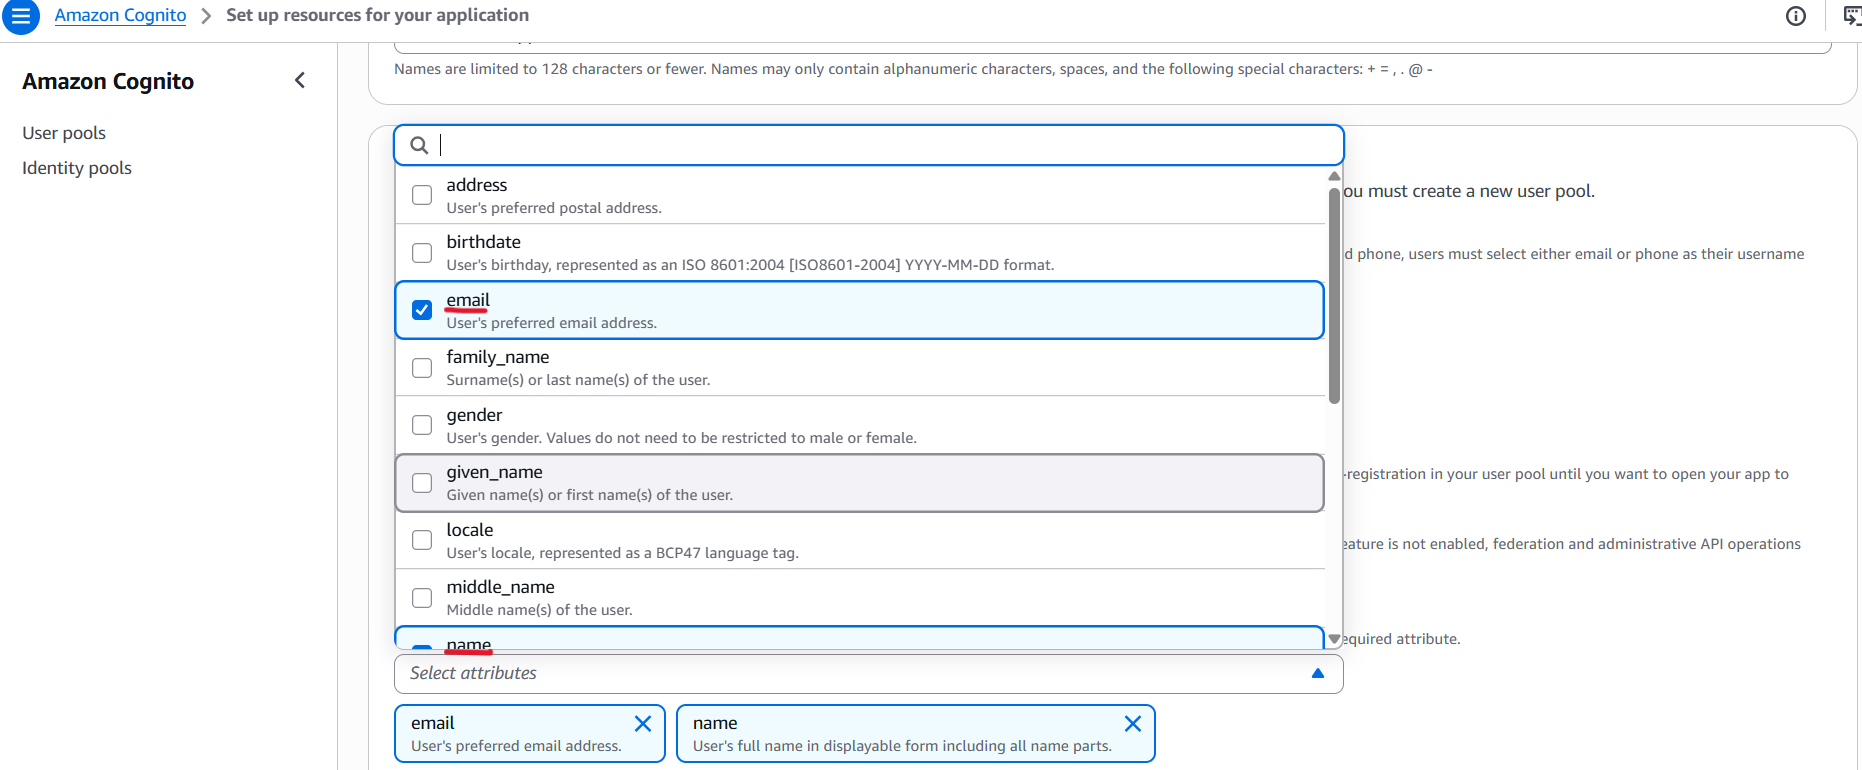
These settings allow users to register using their email addresses and provide their names during sign-up.
Step 4: Add a Return URL
- Enter your application's URL as the Return URL.
- For example:
https://yourdomain.com - Leave the Return URL field blank for now.
Step 5: Create the User Pool
- Review the configuration and click Create user directory.
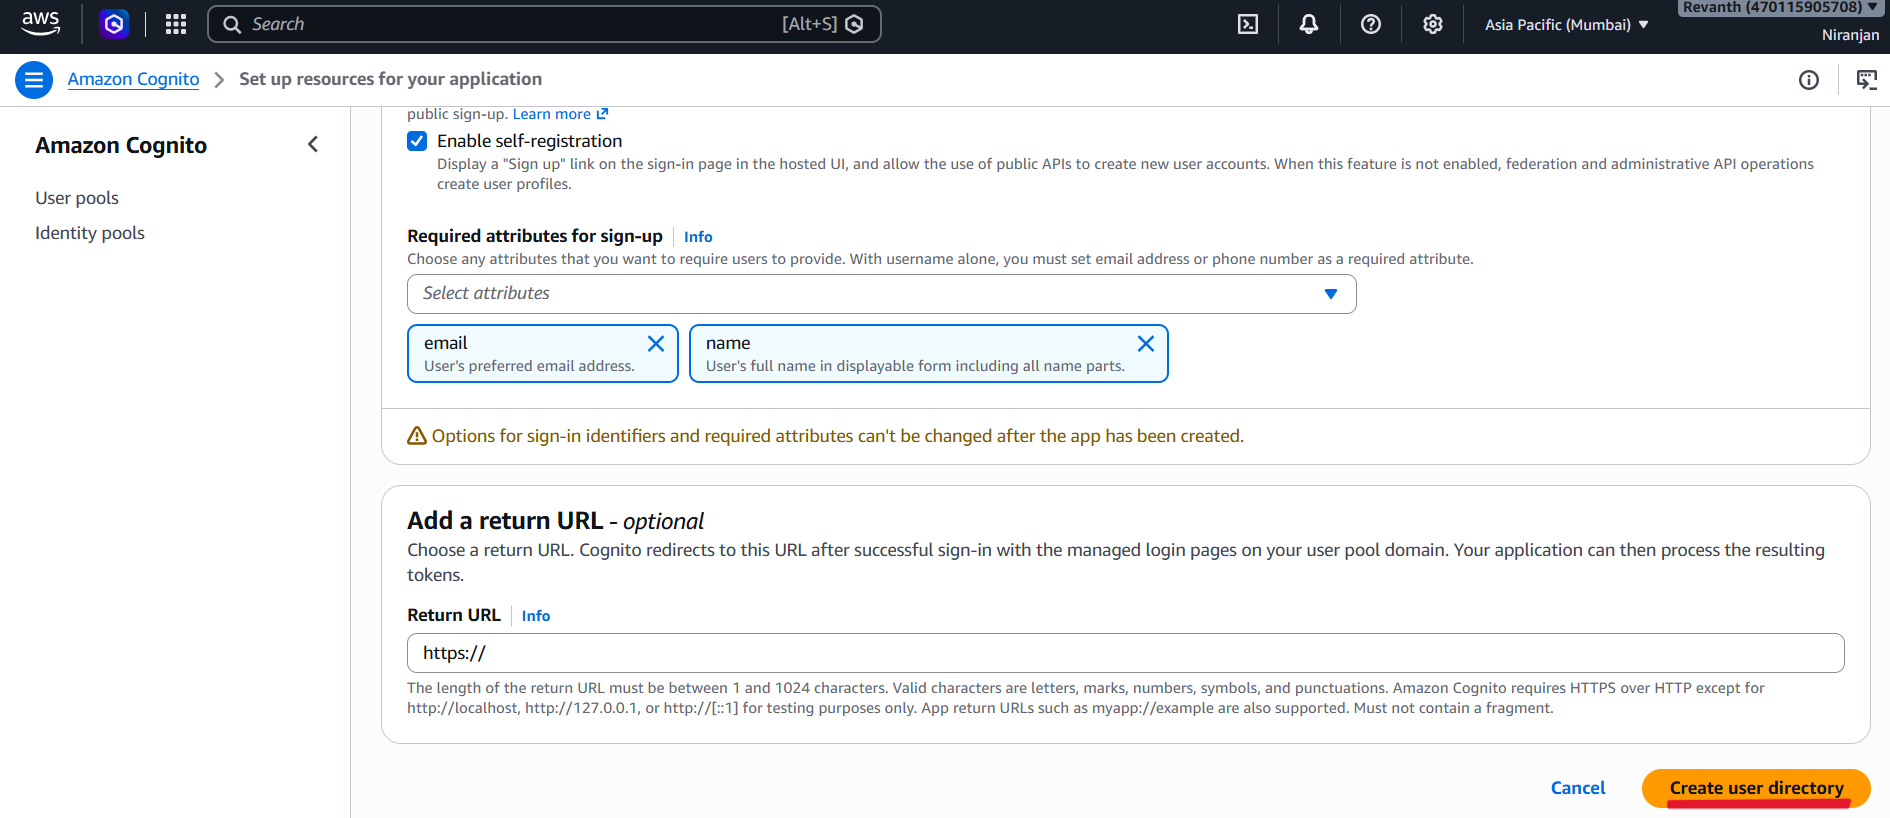
- Amazon Cognito will create the User Pool and, through the application setup wizard, configure an App Client for the application.
Step 6: Save the User Pool ID
After creating the User Pool, open its Overview page.
- Find the User Pool ID under User pool information.
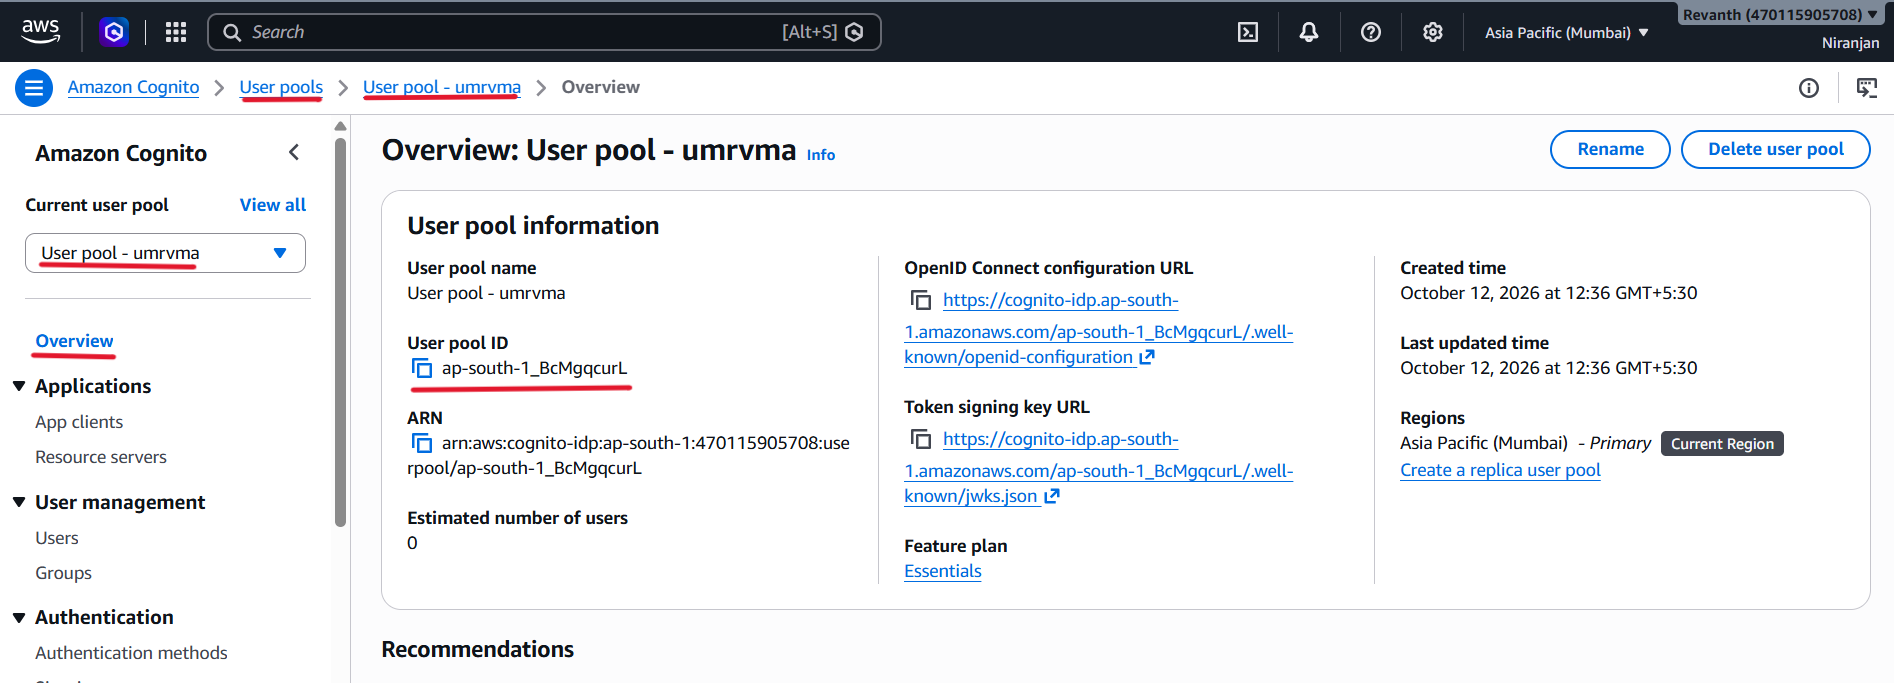
- Click the copy icon next to the ID.
- Save it in a notepad for later use.
- We will need this User Pool ID when configuring Amazon Cognito in our frontend application.
4. Configure the App Client
- After creating the User Pool, open it and navigate to App integration → App clients.
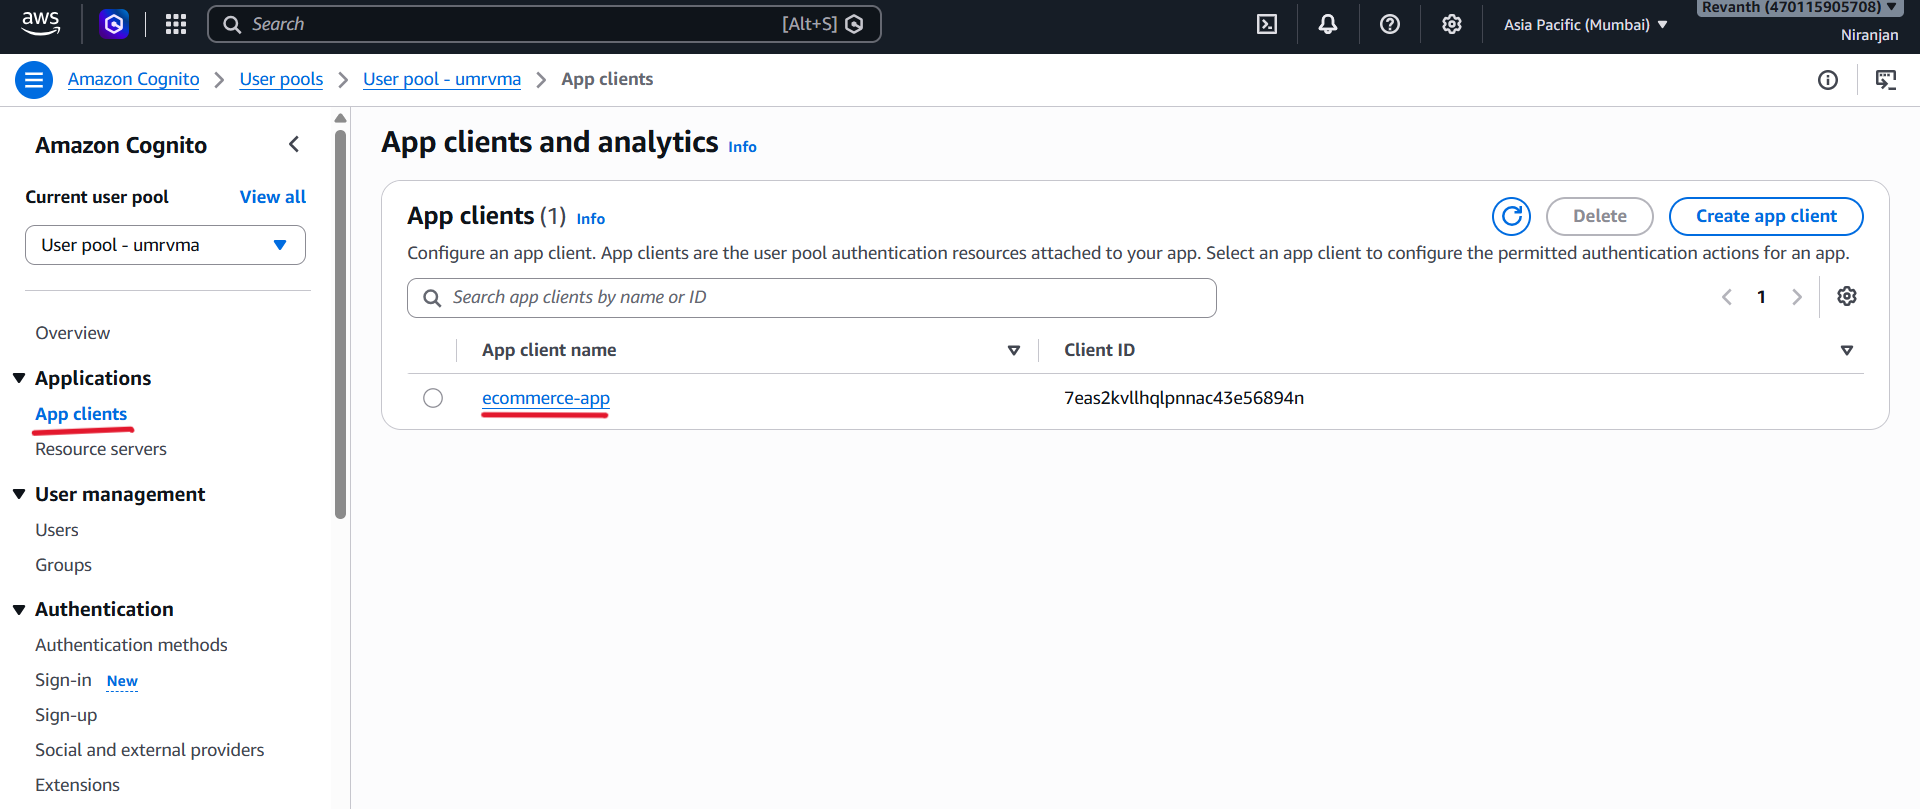
- Select the App Client created for
ecommerce-app.
Step 1: Edit Authentication Flows
- Open the App Client settings and click Edit.
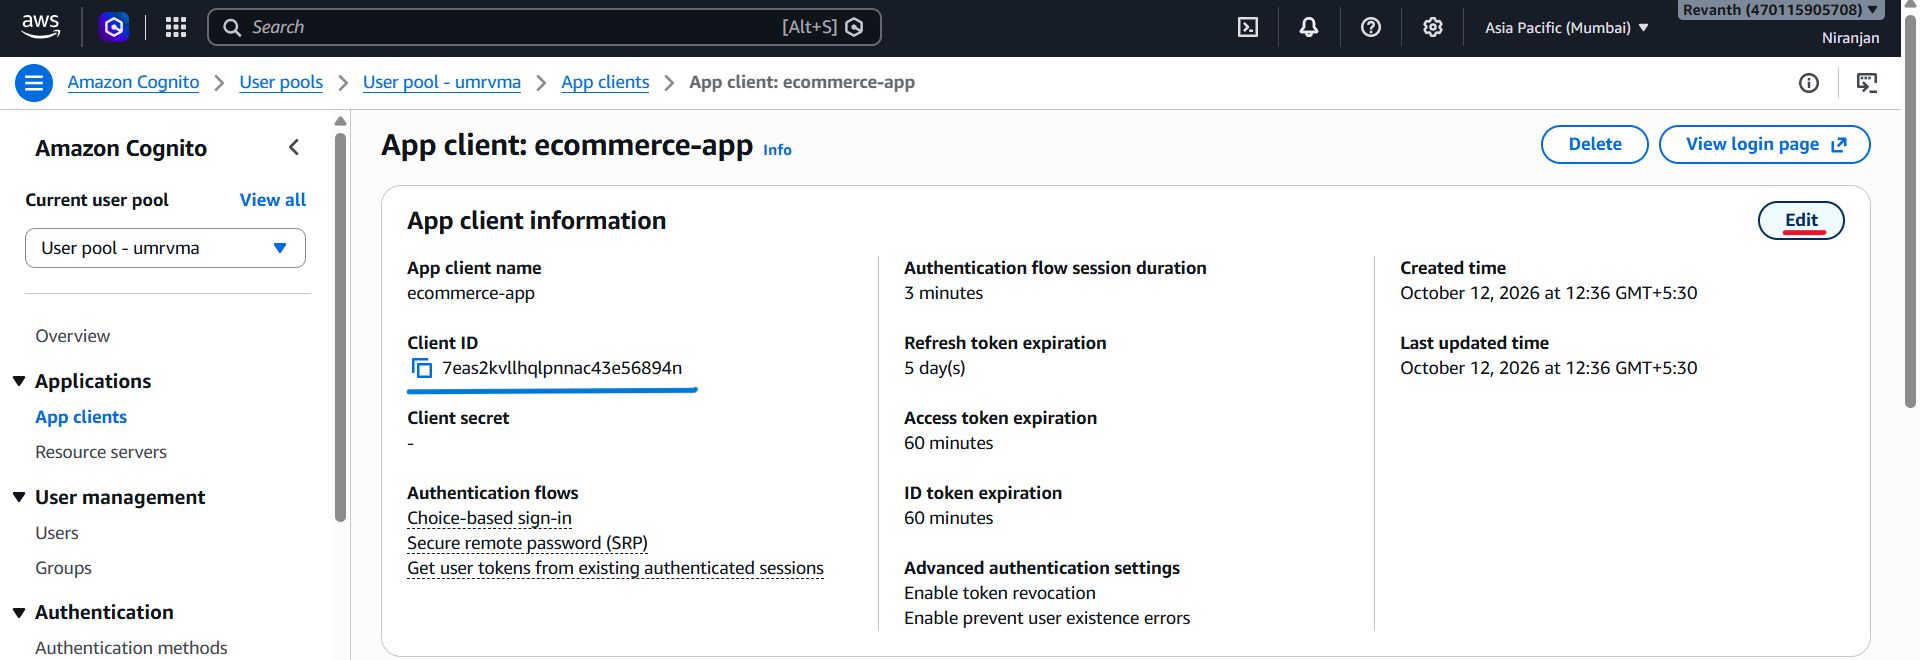
Under Authentication flows, enable Only these three options:
ALLOW_USER_PASSWORD_AUTHALLOW_USER_SRP_AUTHALLOW_REFRESH_TOKEN_AUTH- Disable any other authentication flows that are enabled.
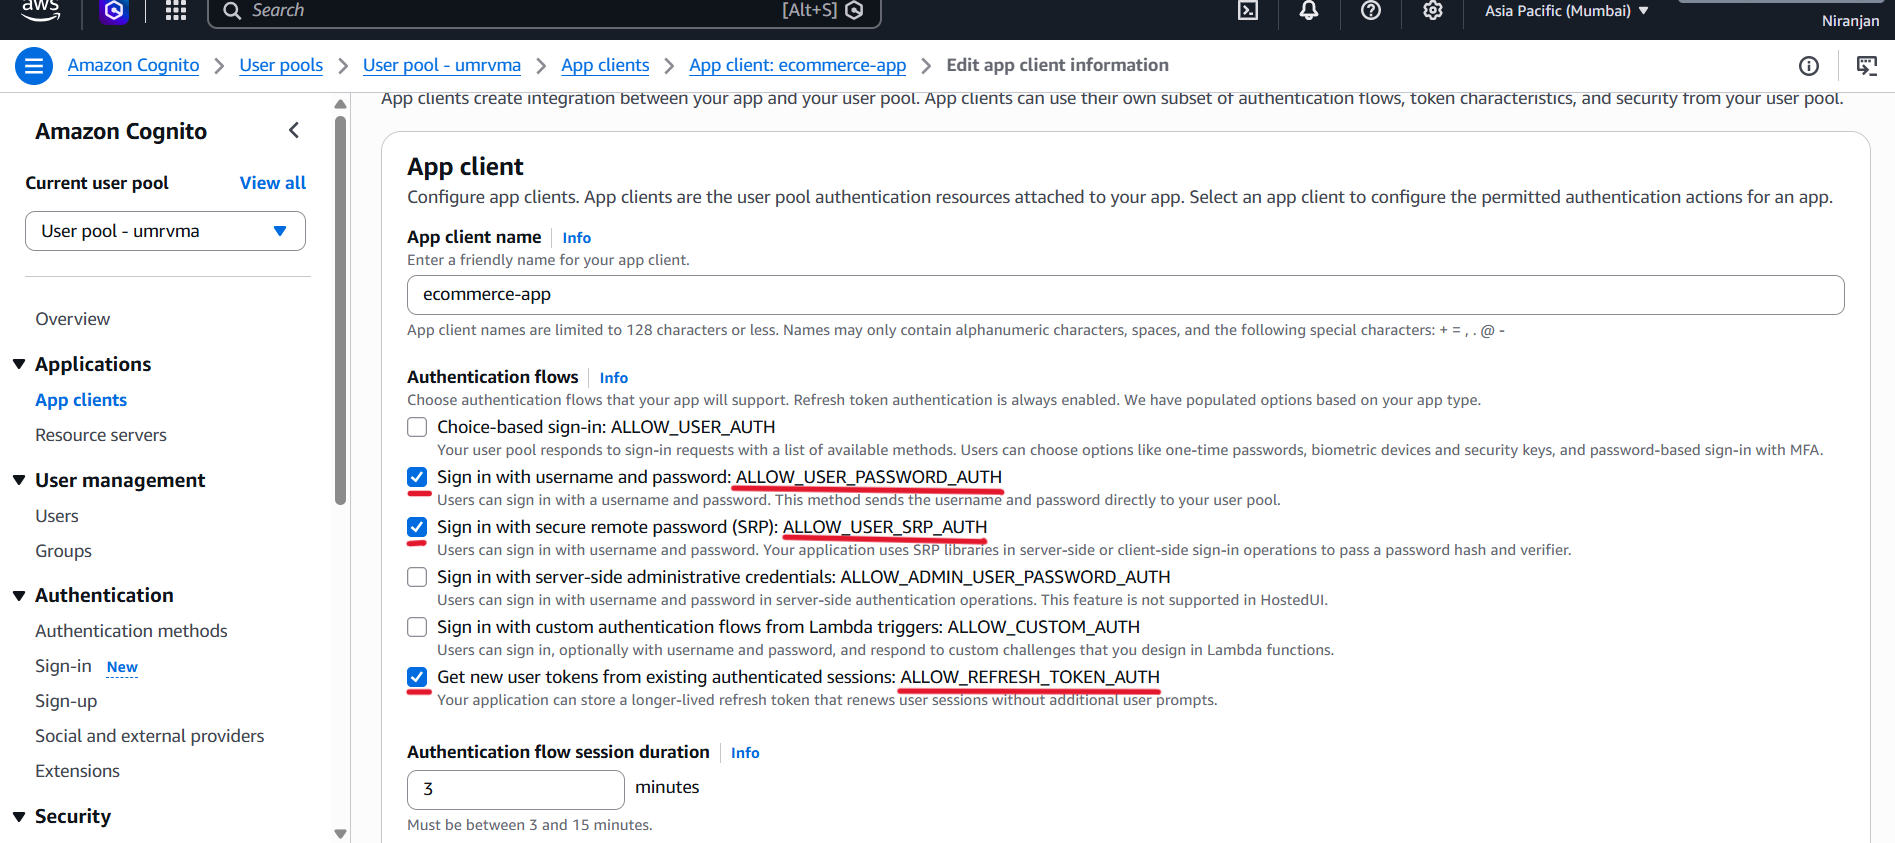
- These options support password-based authentication, SRP authentication, and refresh-token authentication.
- Click Save changes.
5. Save the Cognito Details
We need three values for the frontend configuration in the next module.
Copy and save the following values in a safe place.
1. User Pool ID
- Navigate to your User Pool and copy the User Pool ID.
- Example:
ap-south-1_xxxxxxxxx
2. App Client ID
- Open App integration → App clients and copy the Client ID.
- Example:
1a2b3c4d5e6f7g8h9i0j1k2l3m
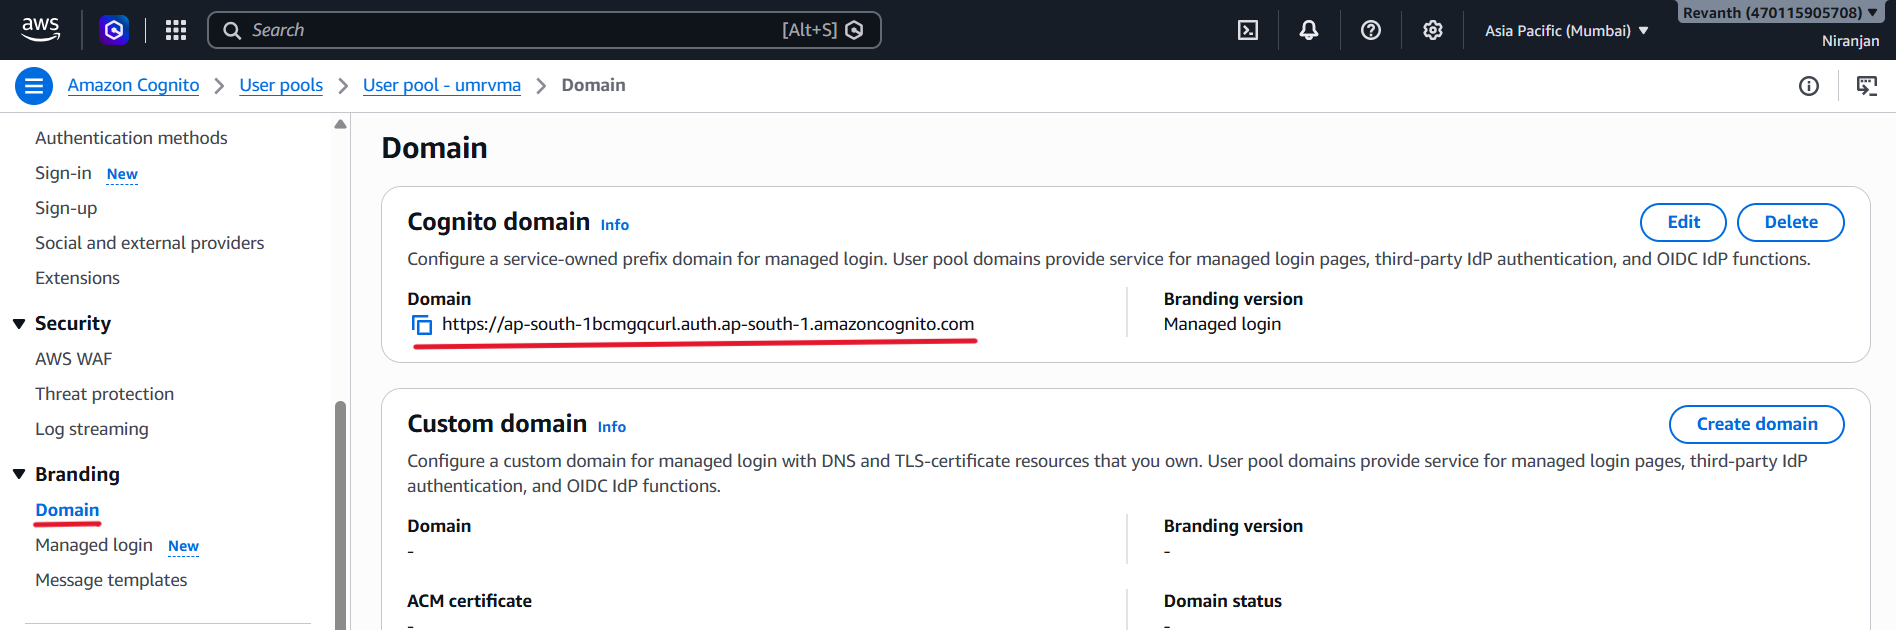
3. Cognito Domain
- Navigate to the User Pool's Branding → Domain section and copy the configured Cognito domain.
- Keep these three values available for the next module.
6. Verify the Configuration
Before moving to the next module, verify the following:
- The
ecommerce-appUser Pool has been created. - Email is enabled as the sign-in identifier.
- Self-registration is enabled.
- The required attributes are
emailandname. - The required authentication flows are enabled for the App Client.
- The User Pool ID, App Client ID, and Cognito domain have been saved.
7. Conclusion
- In this module, we configured Amazon Cognito for our e-commerce application.
- We created the User Pool, configured the App Client authentication flows, and saved the details required for frontend integration.
- Now proceed to Frontend Deployment, where we will deploy the frontend application and configure it to use Amazon Cognito for user authentication.
Module 3: Frontend Deployment
1. Overview
- In this module, we will deploy the React frontend application using Amazon S3 and Amazon CloudFront.
- We will configure the frontend with the Amazon Cognito User Pool ID and App Client ID from Module 2.
- By the end of this module, we will be able to access our application through a CloudFront URL and test user registration, login, and logout.
Note: Product listing, cart, and order features will work after completing Module 7: Frontend-Backend Integration, when the backend services and APIs are connected.
2. Understanding the Architecture
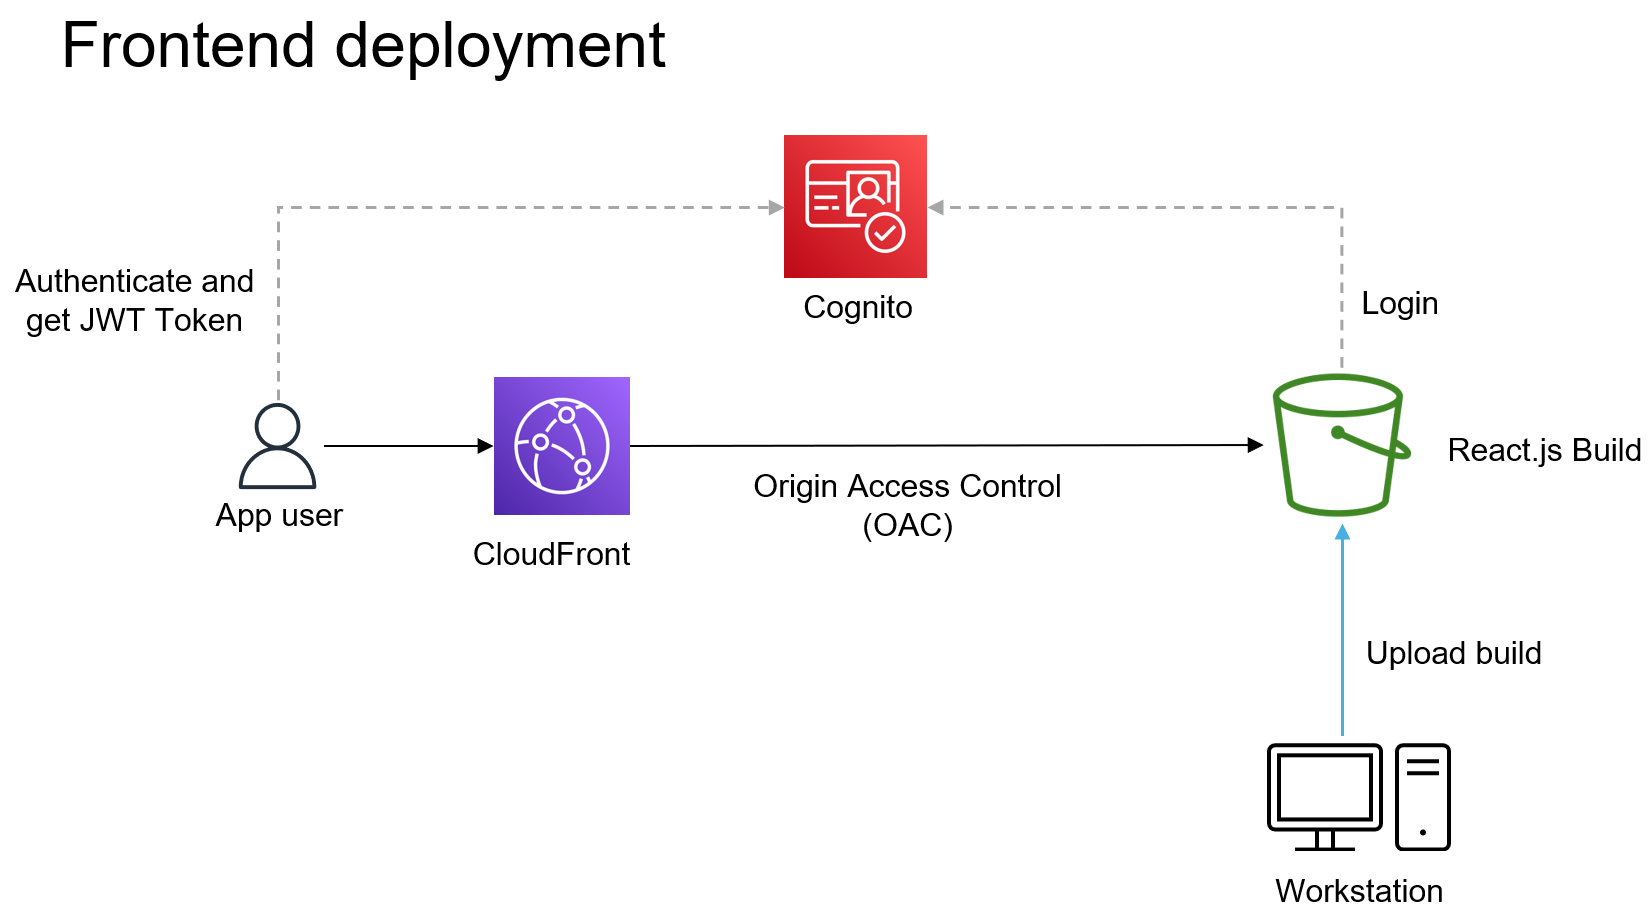
Our frontend deployment uses two main AWS services:
- Amazon S3: Stores the React application's static files, including HTML, CSS, JavaScript, and other assets.
- Amazon CloudFront: Delivers the frontend content to users through its global network and caches content to improve performance.
- We will keep the S3 bucket private and allow CloudFront to access its contents using Origin Access Control (OAC).
- This setup prevents users from accessing the S3 content directly and allows them to access the application through CloudFront.
- We will also configure Amazon Cognito in the frontend so users can sign up and log in.
3. Create an S3 Bucket for the Frontend
Step 1: Open Amazon S3
- Sign in to the AWS Management Console.
- Search for Amazon S3.
- Navigate to S3 → Buckets → Create bucket.
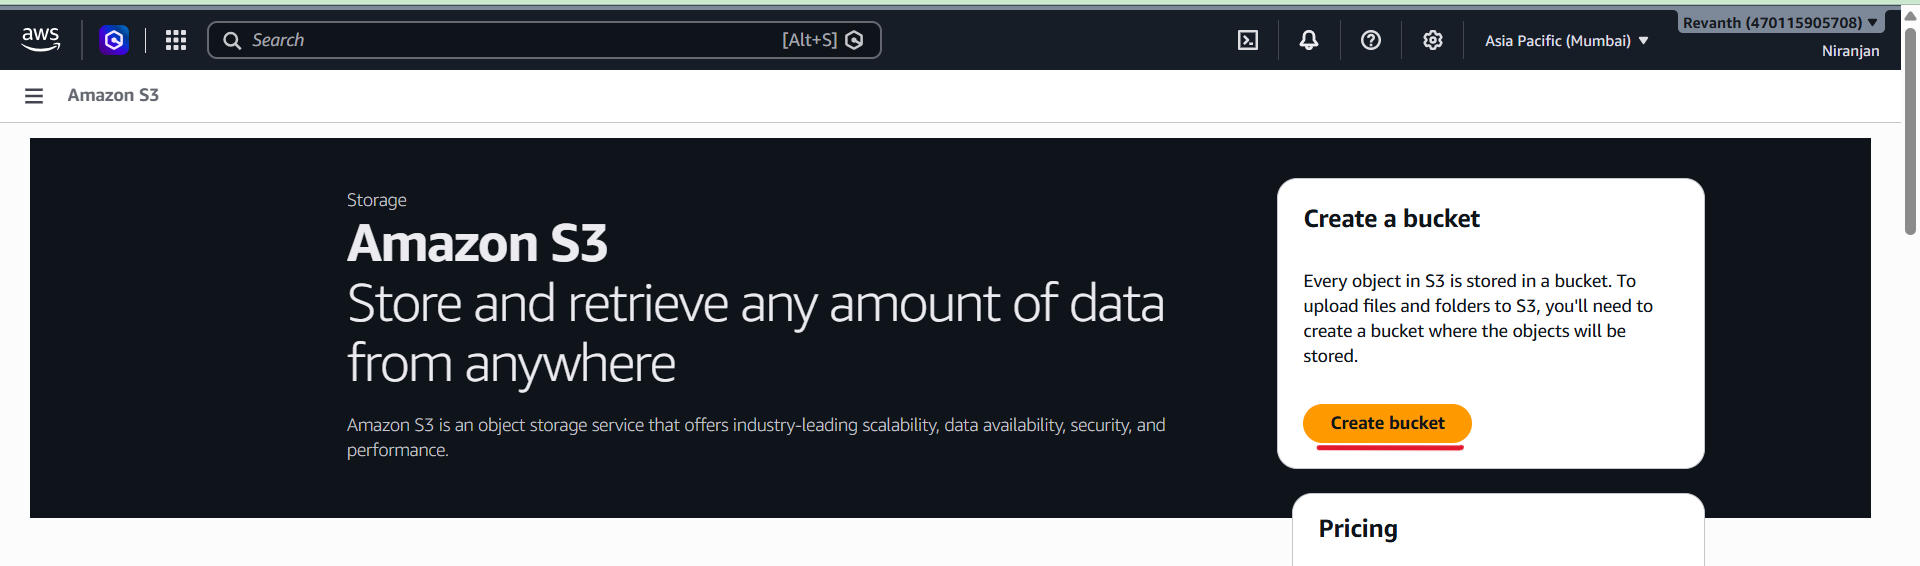
- Select General purpose bucket.
Step 2: Configure the S3 Bucket
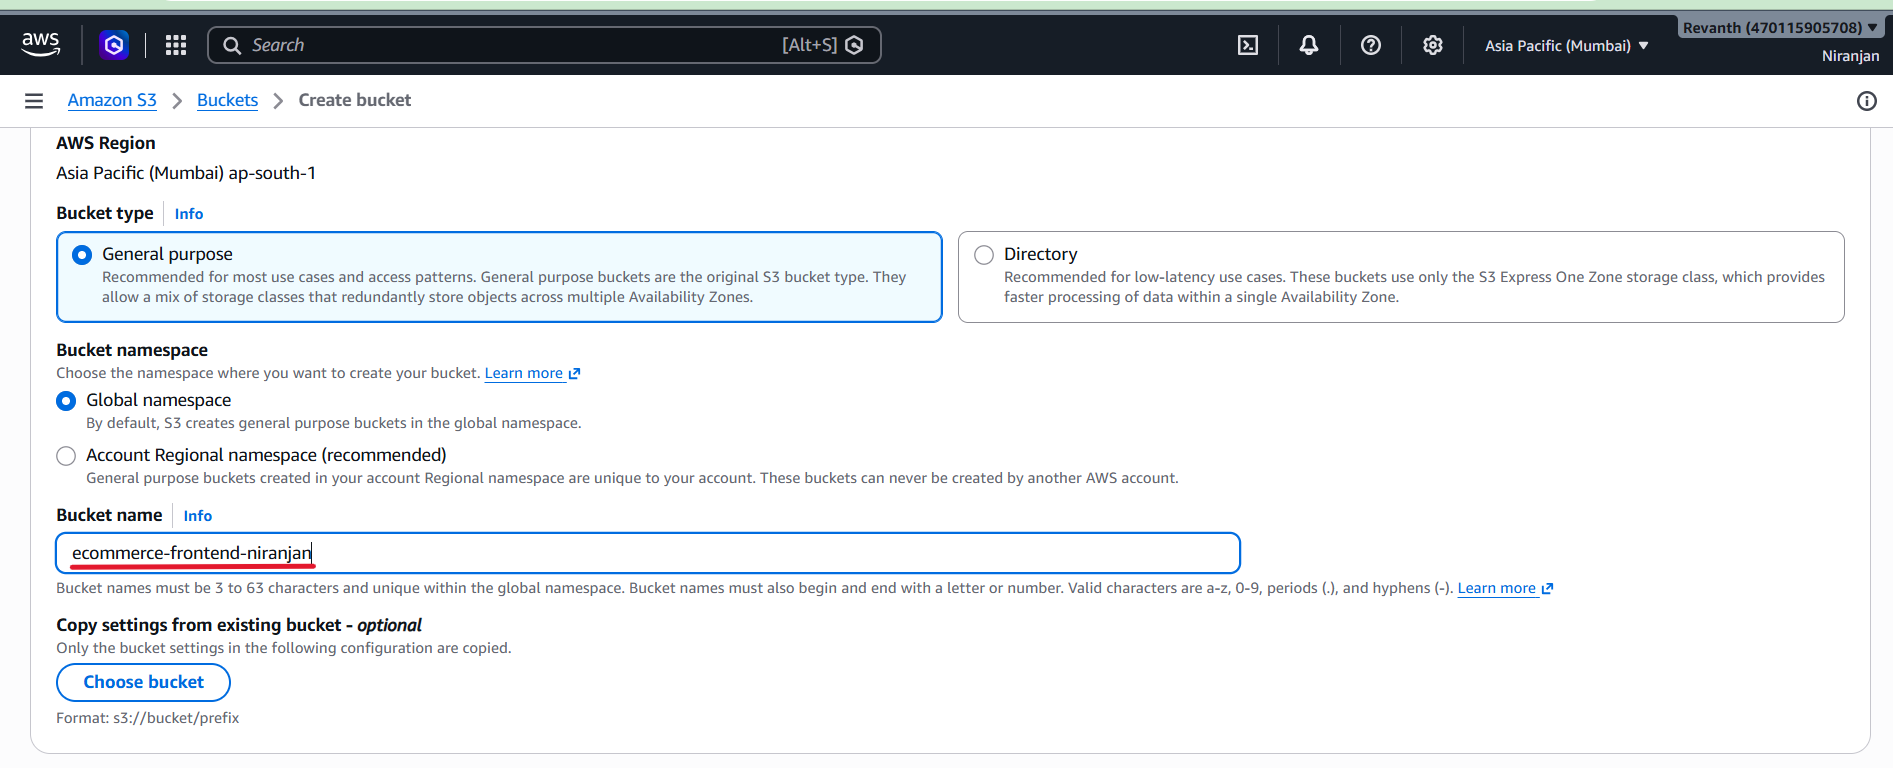
Enter the following configuration:
- Bucket name:
ecommerce-frontend-<your-name> - AWS Region: Asia Pacific (Mumbai) —
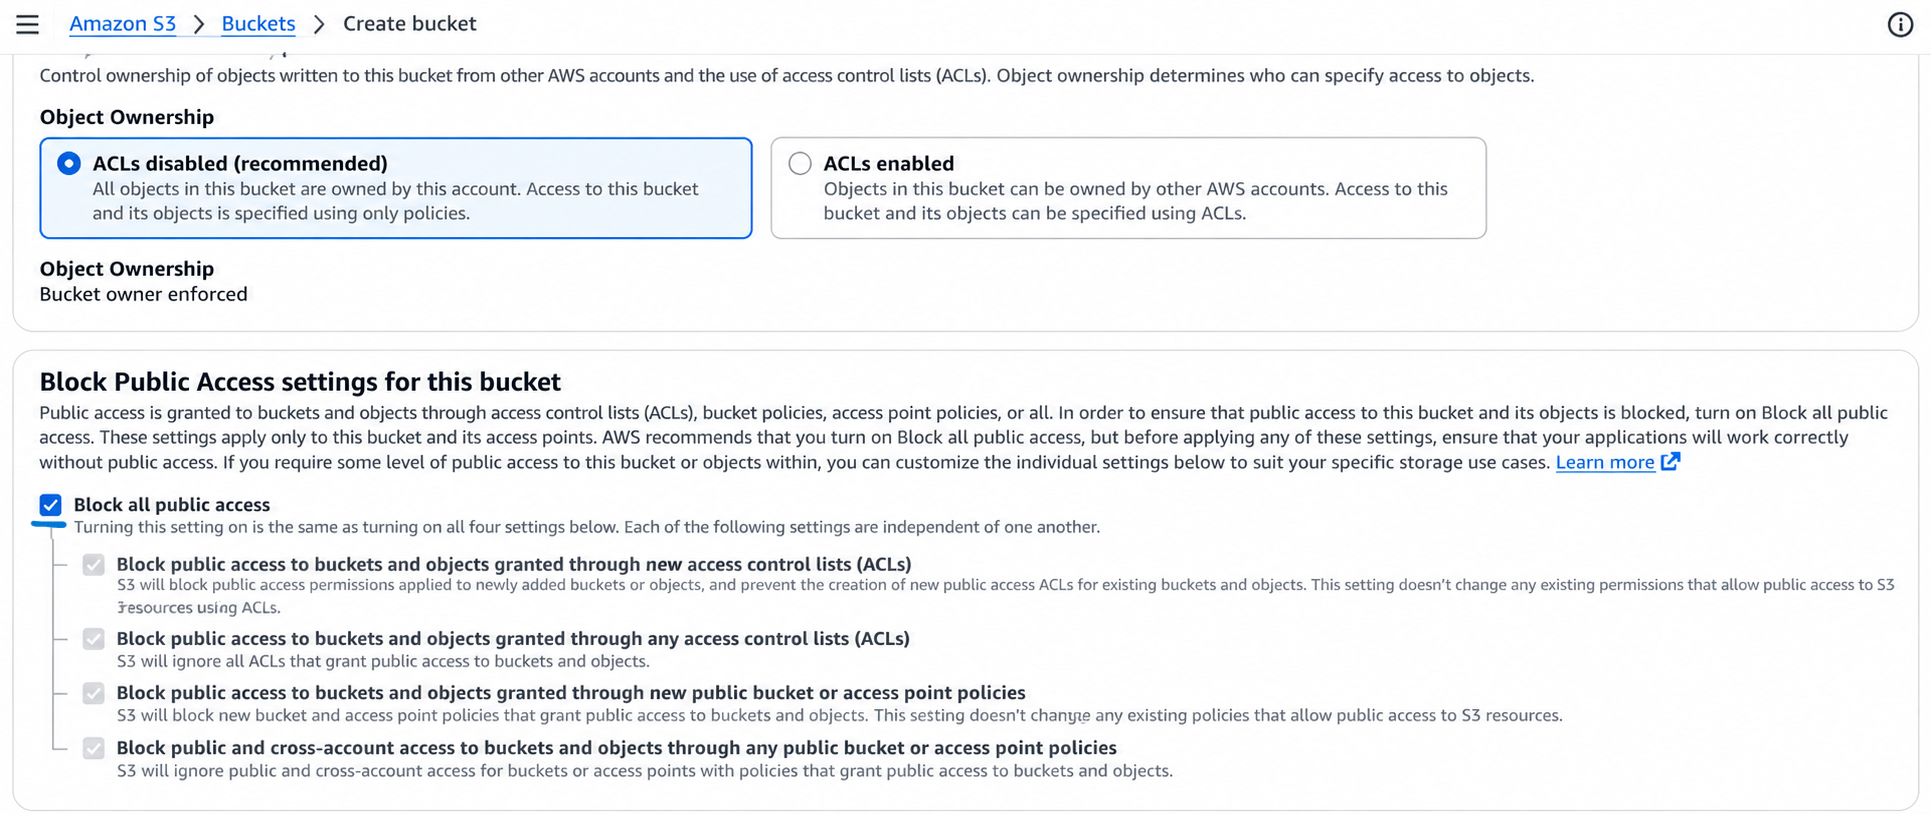
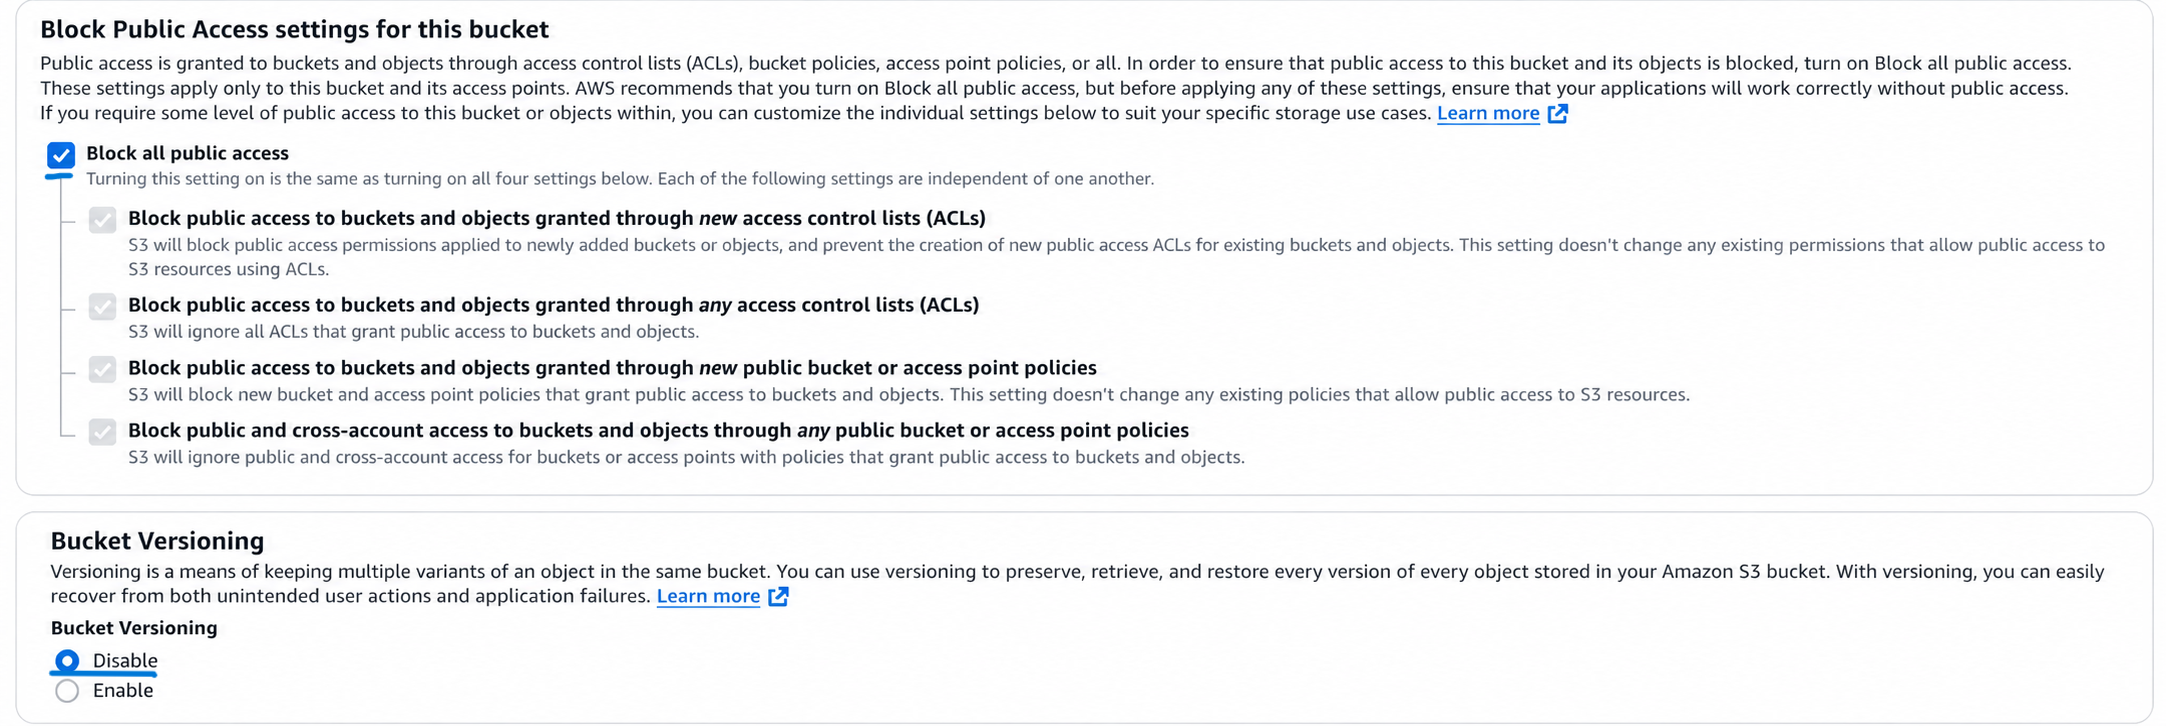
ap-south-1 - Block all public access: Keep enabled.
- Bucket Versioning: Disable.
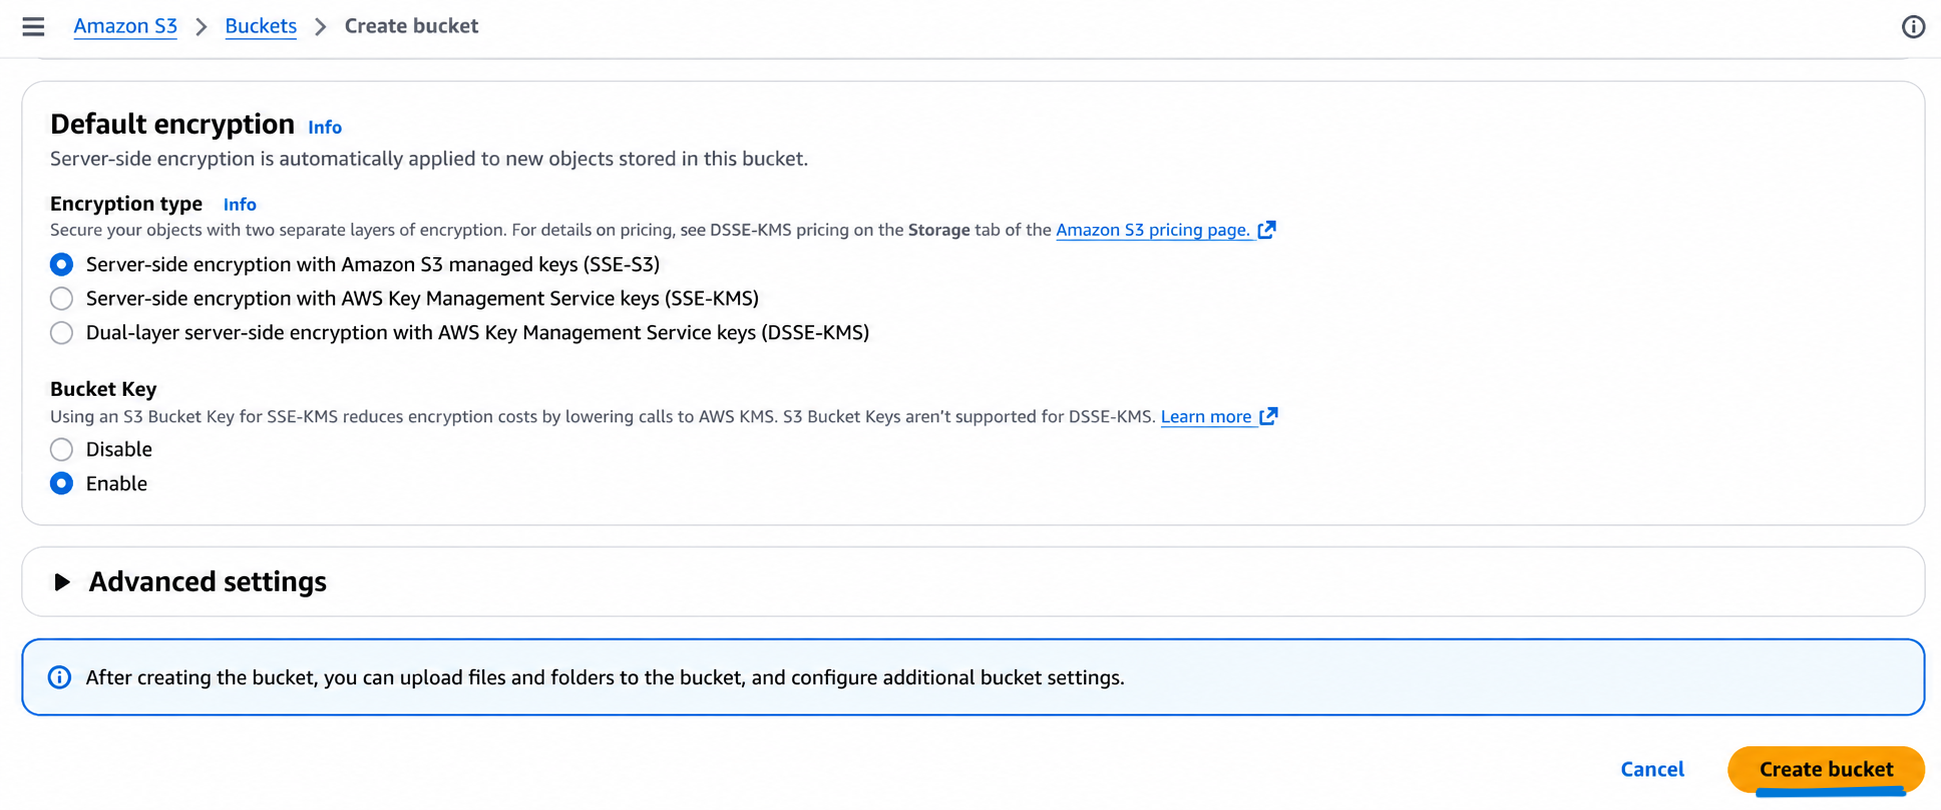
- Default Encryption: Keep enabled with the default SSE-S3 encryption.
- Replace
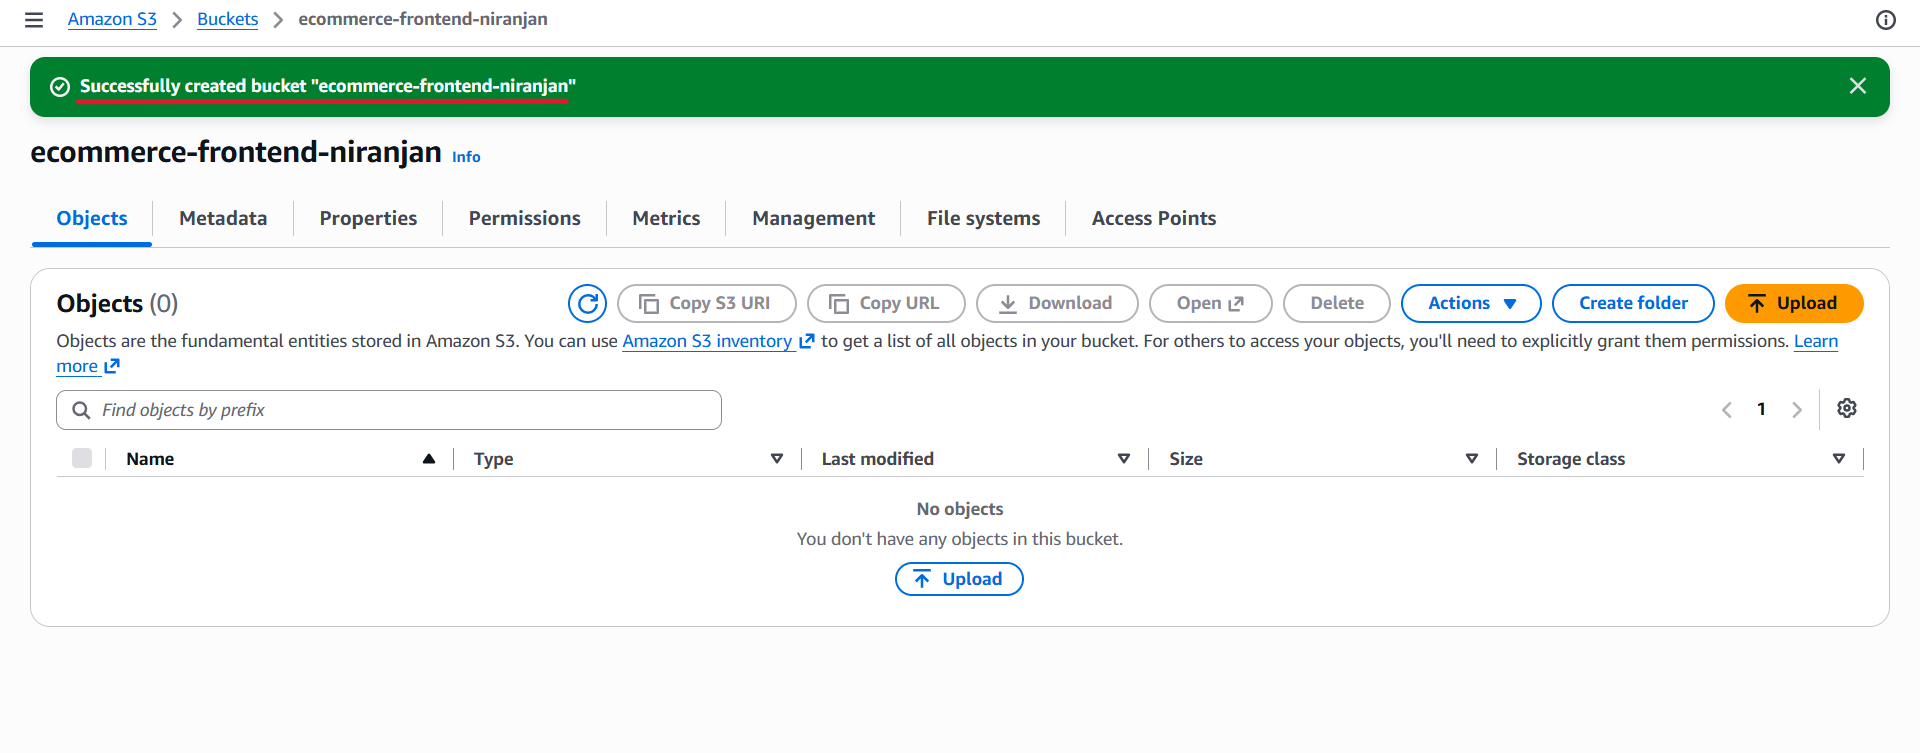
<your-name>with your preferred name or text to create a unique bucket name. - Click Create bucket.
Note: Keep the bucket private. CloudFront will access the bucket using the configured permissions.
4. Create a CloudFront Distribution
Step 1: Open CloudFront
- Search for Amazon CloudFront in the AWS Management Console.
- Navigate to CloudFront → Distributions → Create distribution.
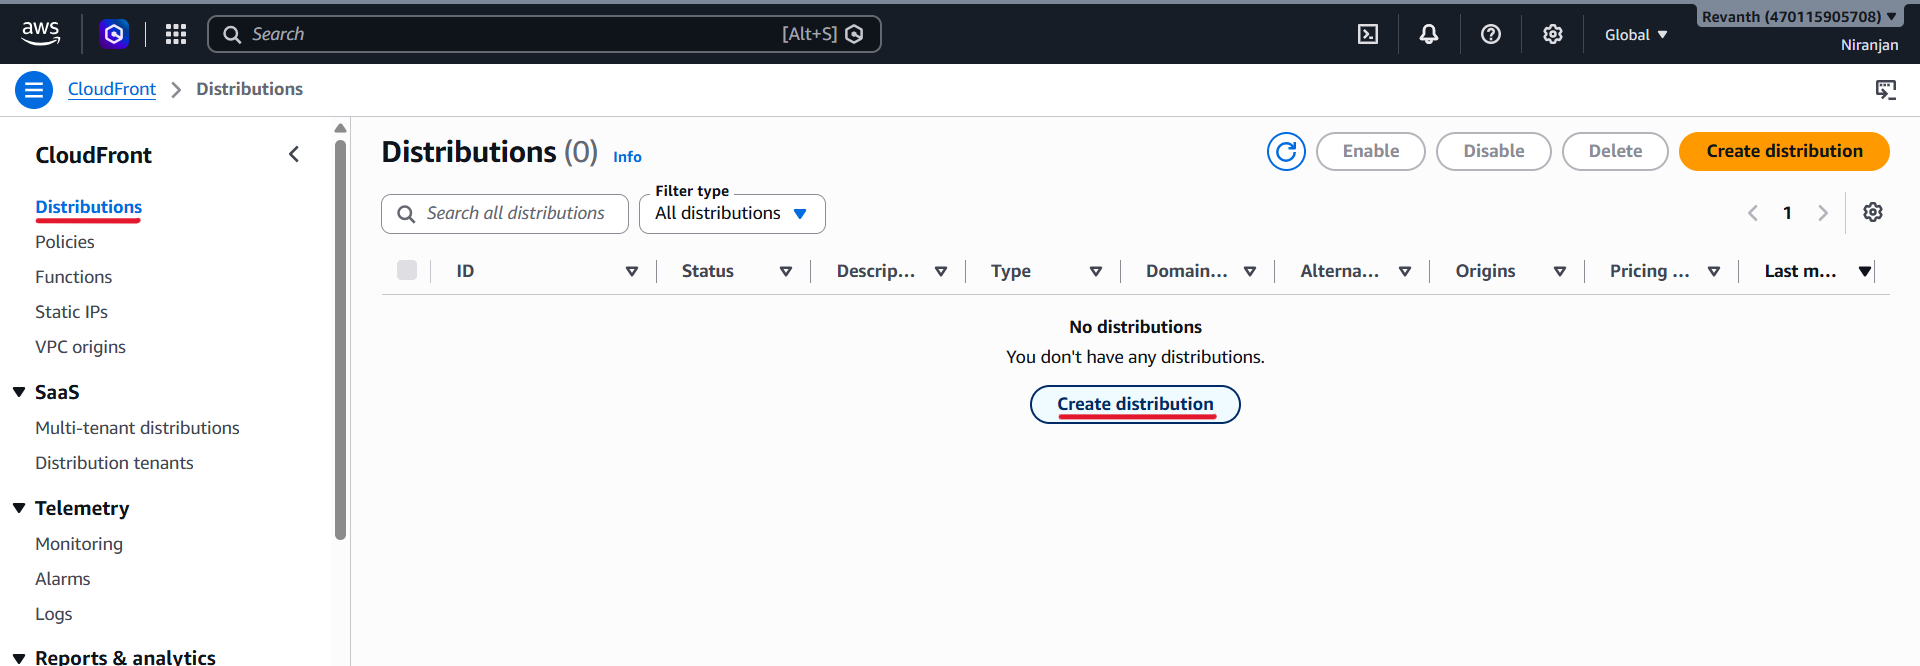
- Amazon CloudFront is a global service, so you do not need to select an AWS Region.
Step 2: Configure the Distribution
Enter the following details:
- Distribution name:
ecommerce-distribution
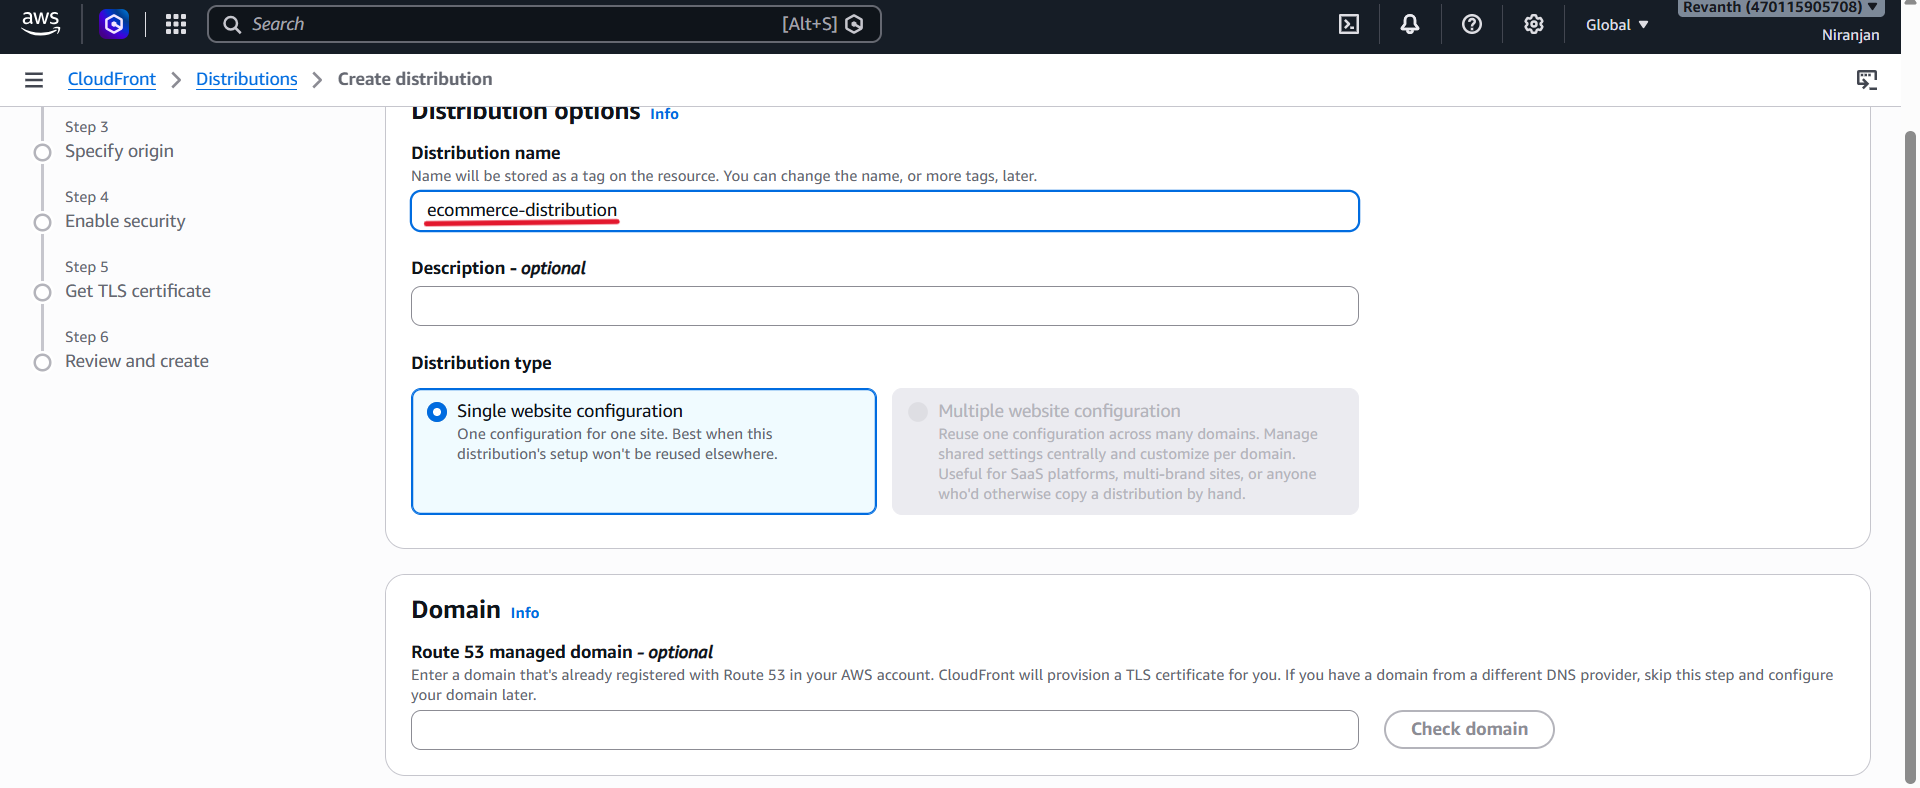
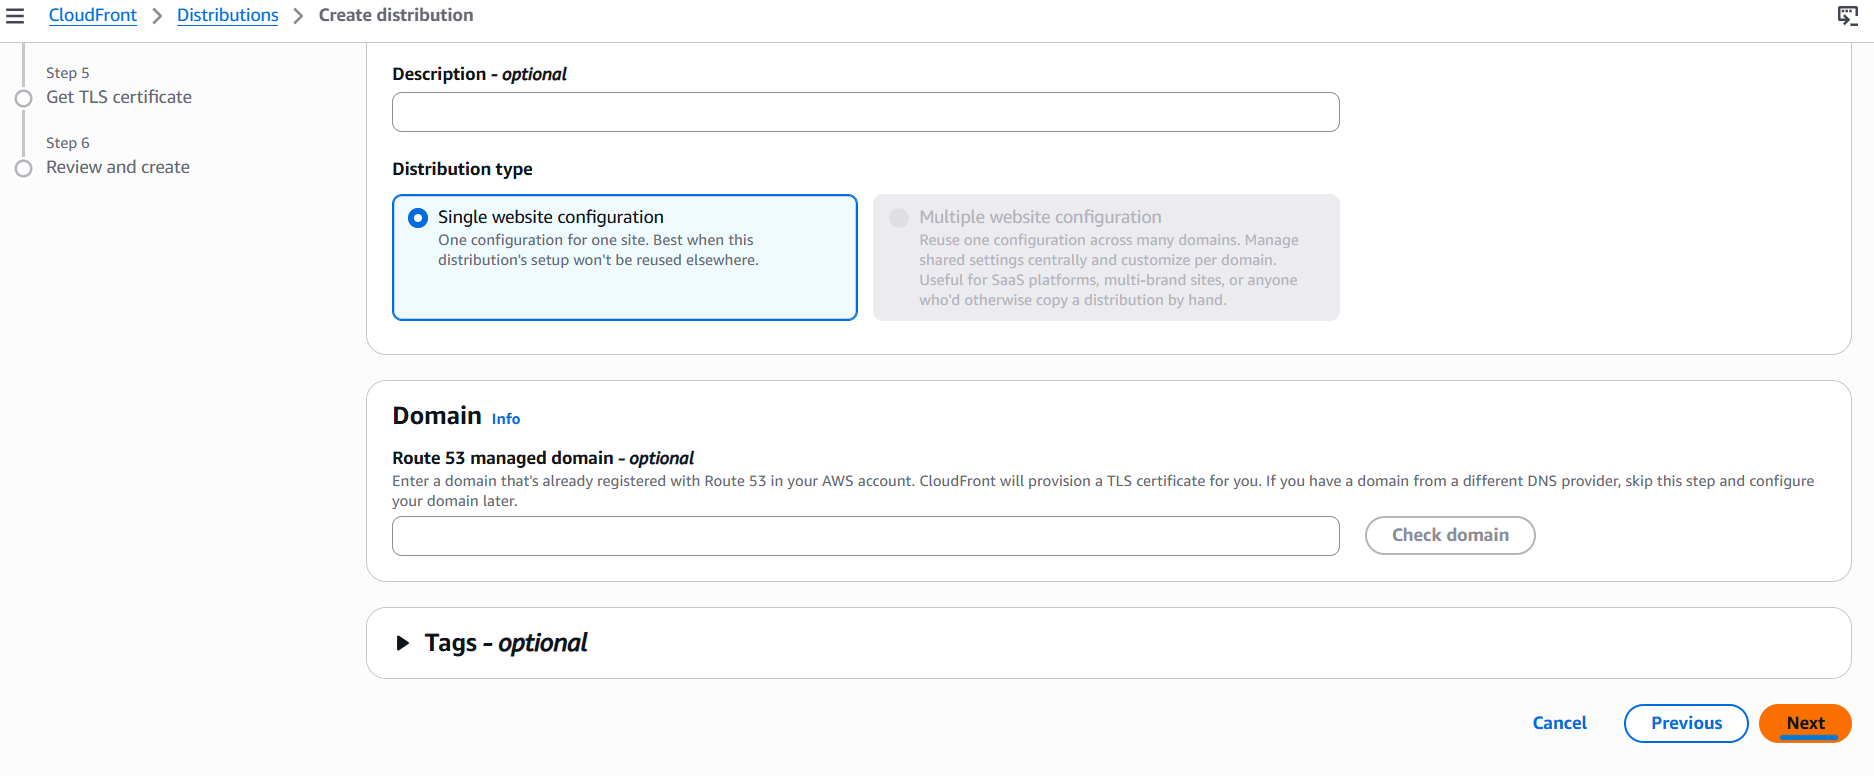
- Distribution type: Single website or app
- Origin type: Amazon S3
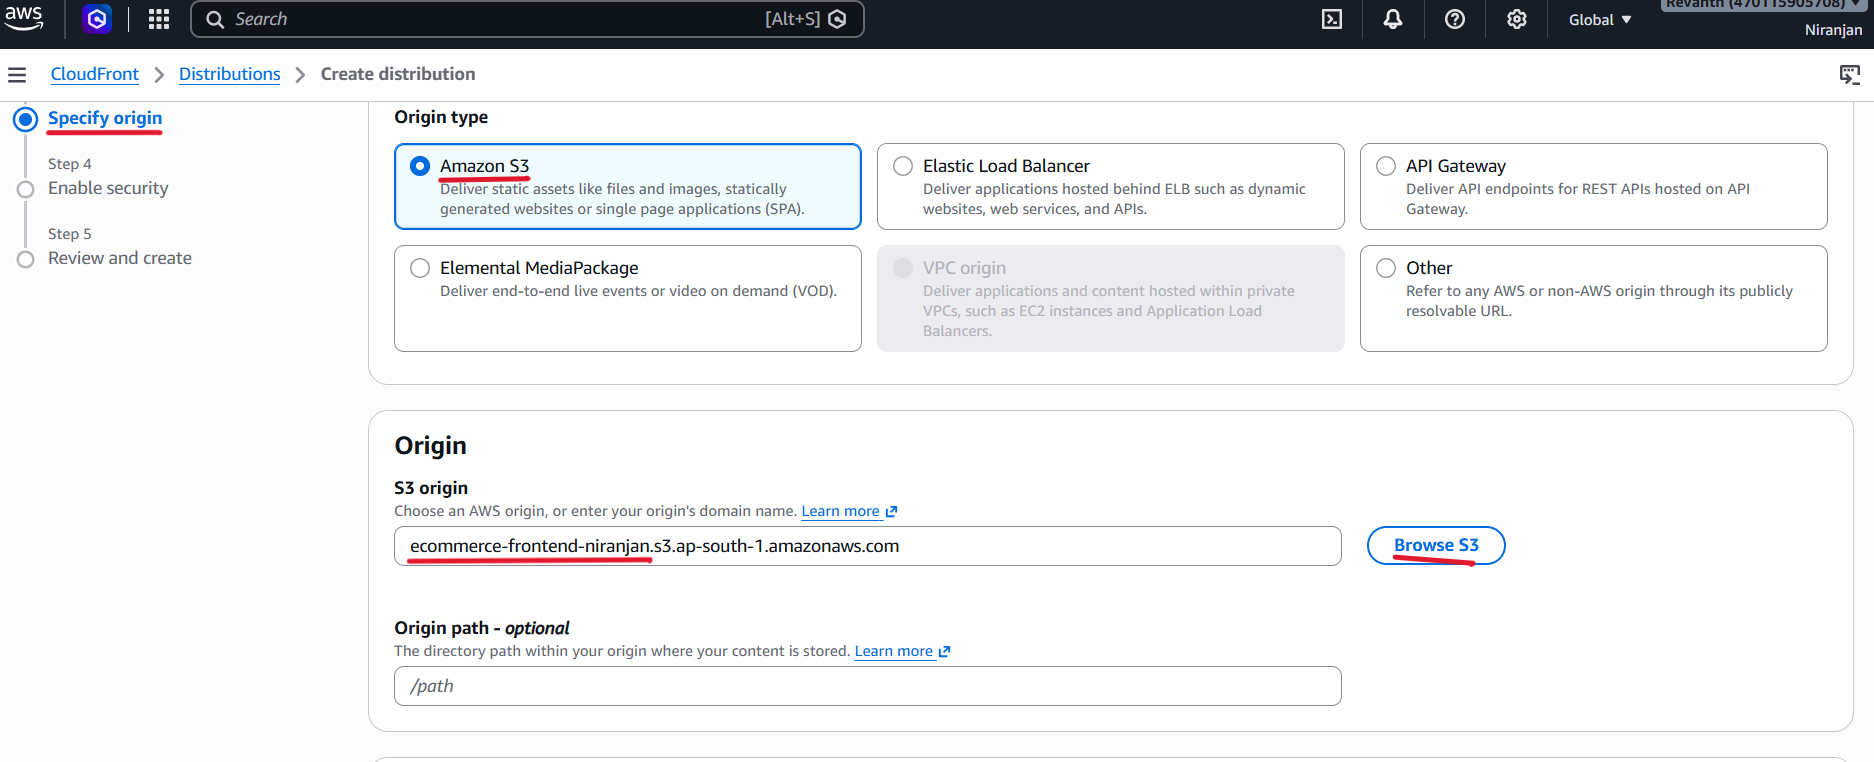
- Origin: Select your frontend S3 bucket.
- Under the origin settings, select Allow private S3 bucket access to CloudFront — Recommended.
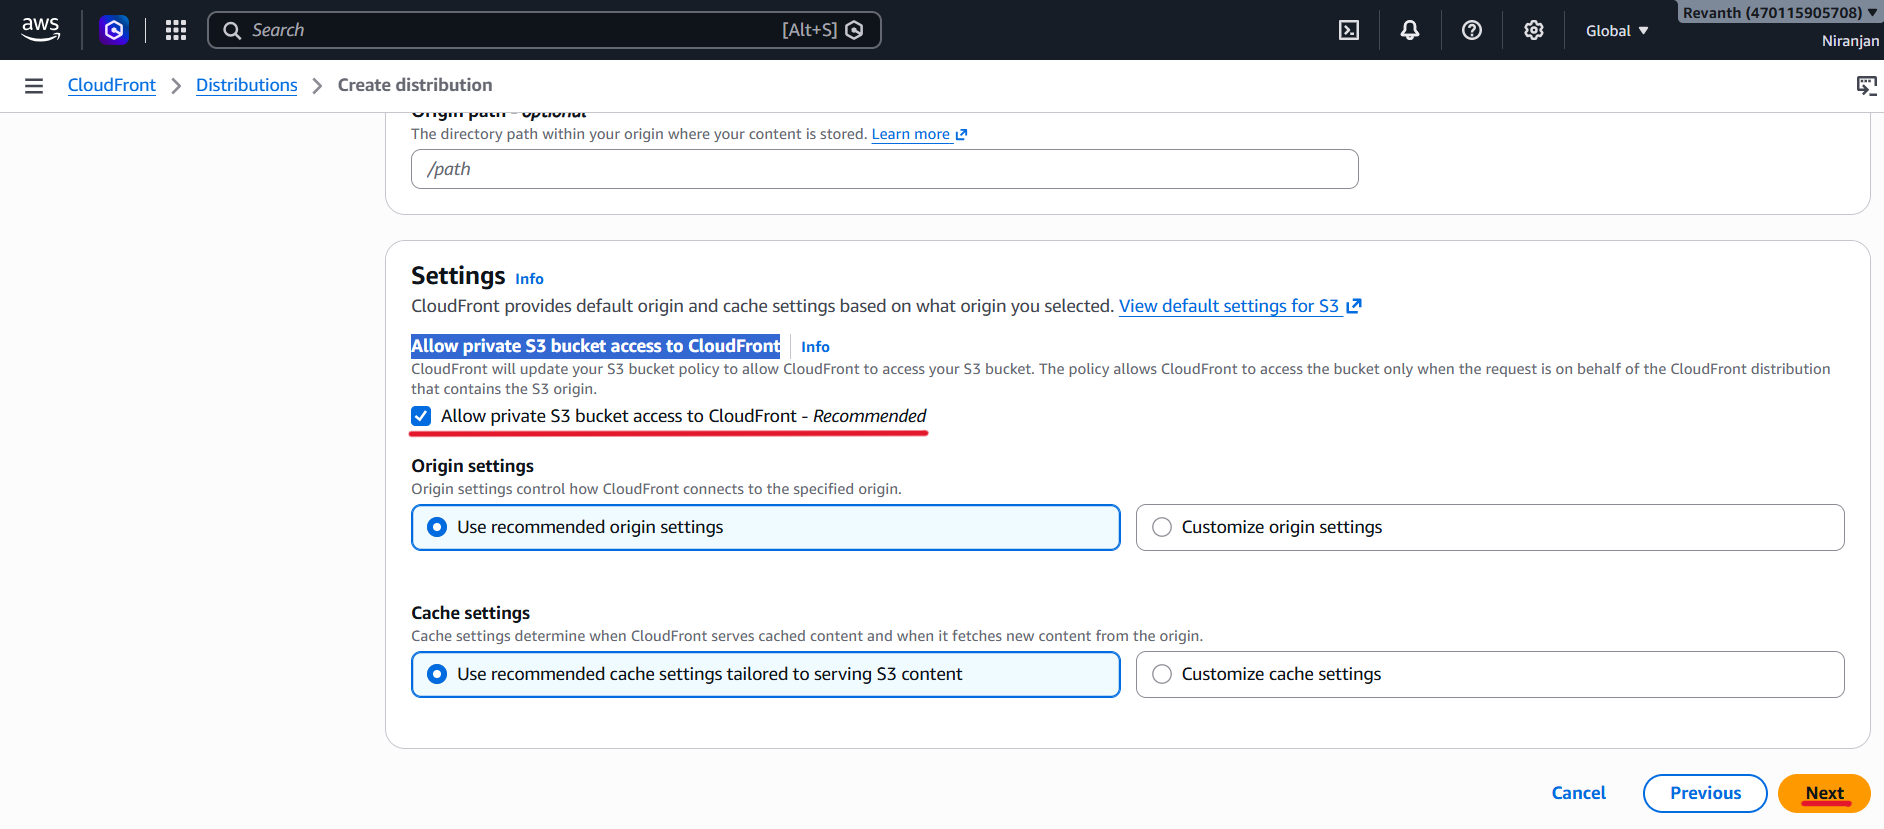
- This setting configures Origin Access Control (OAC) and allows CloudFront to access the private S3 bucket.
- Keep the recommended cache settings.
Step 3: Configure Security Settings
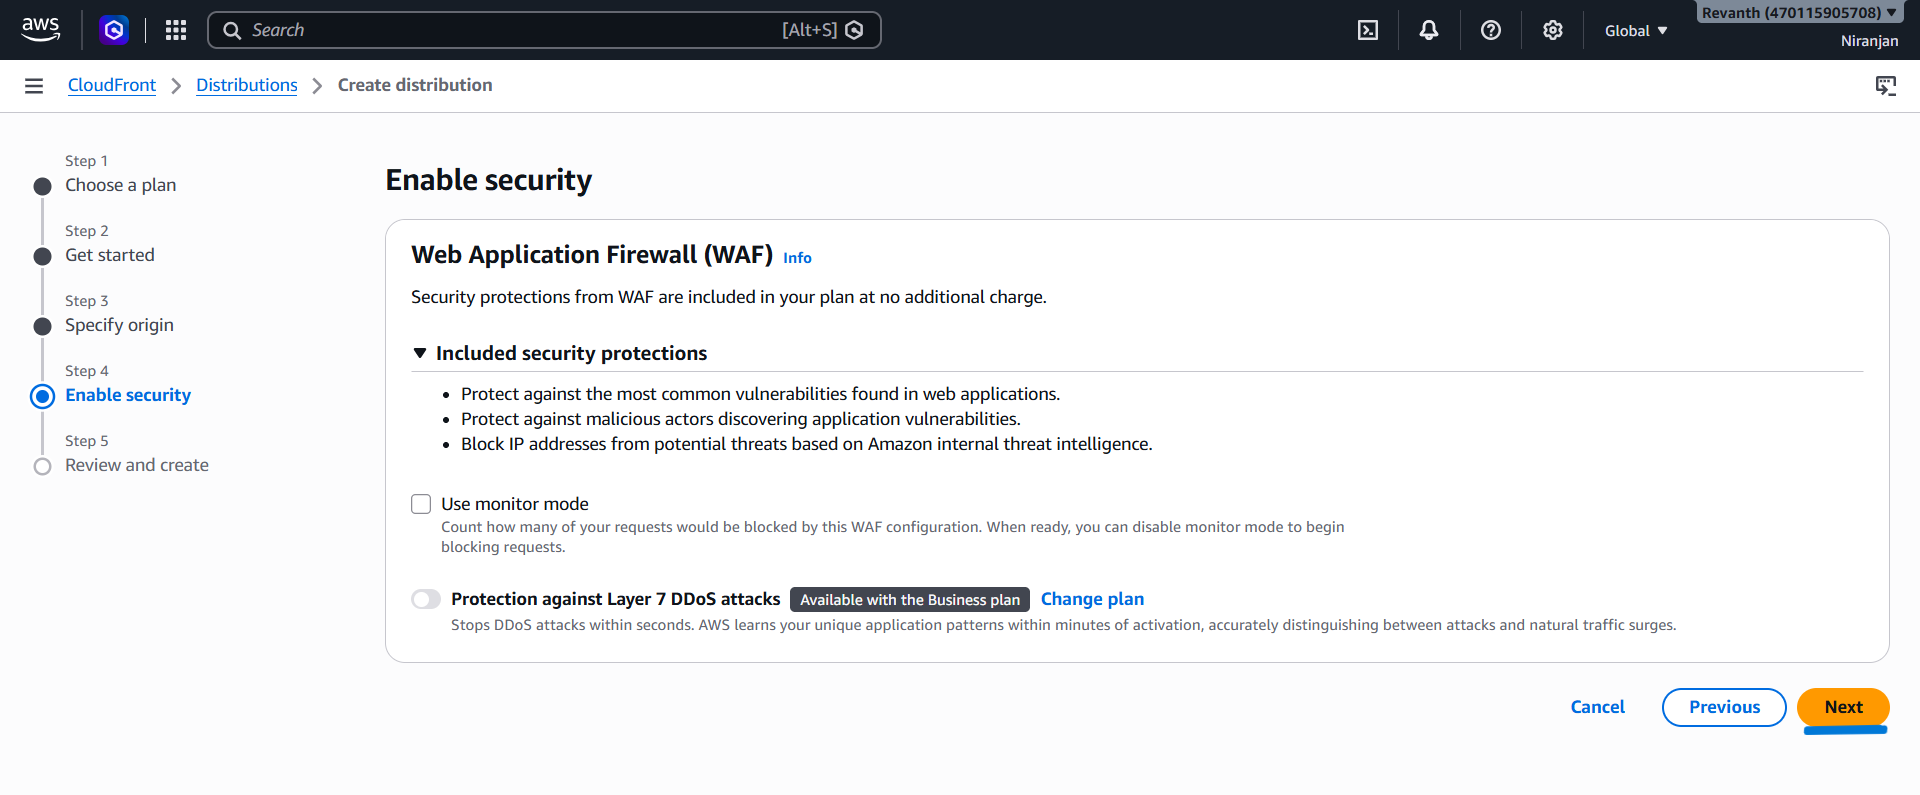
- Under the security settings:
- Select Do not enable security protections for this development and testing setup.
Step 4: Review and Create the Distribution
- Review all the CloudFront distribution settings.
- Verify that the S3 bucket is selected as the origin.
- Ensure that Allow private S3 bucket access to CloudFront is enabled.
- Confirm the recommended cache settings.
- Click Create distribution.
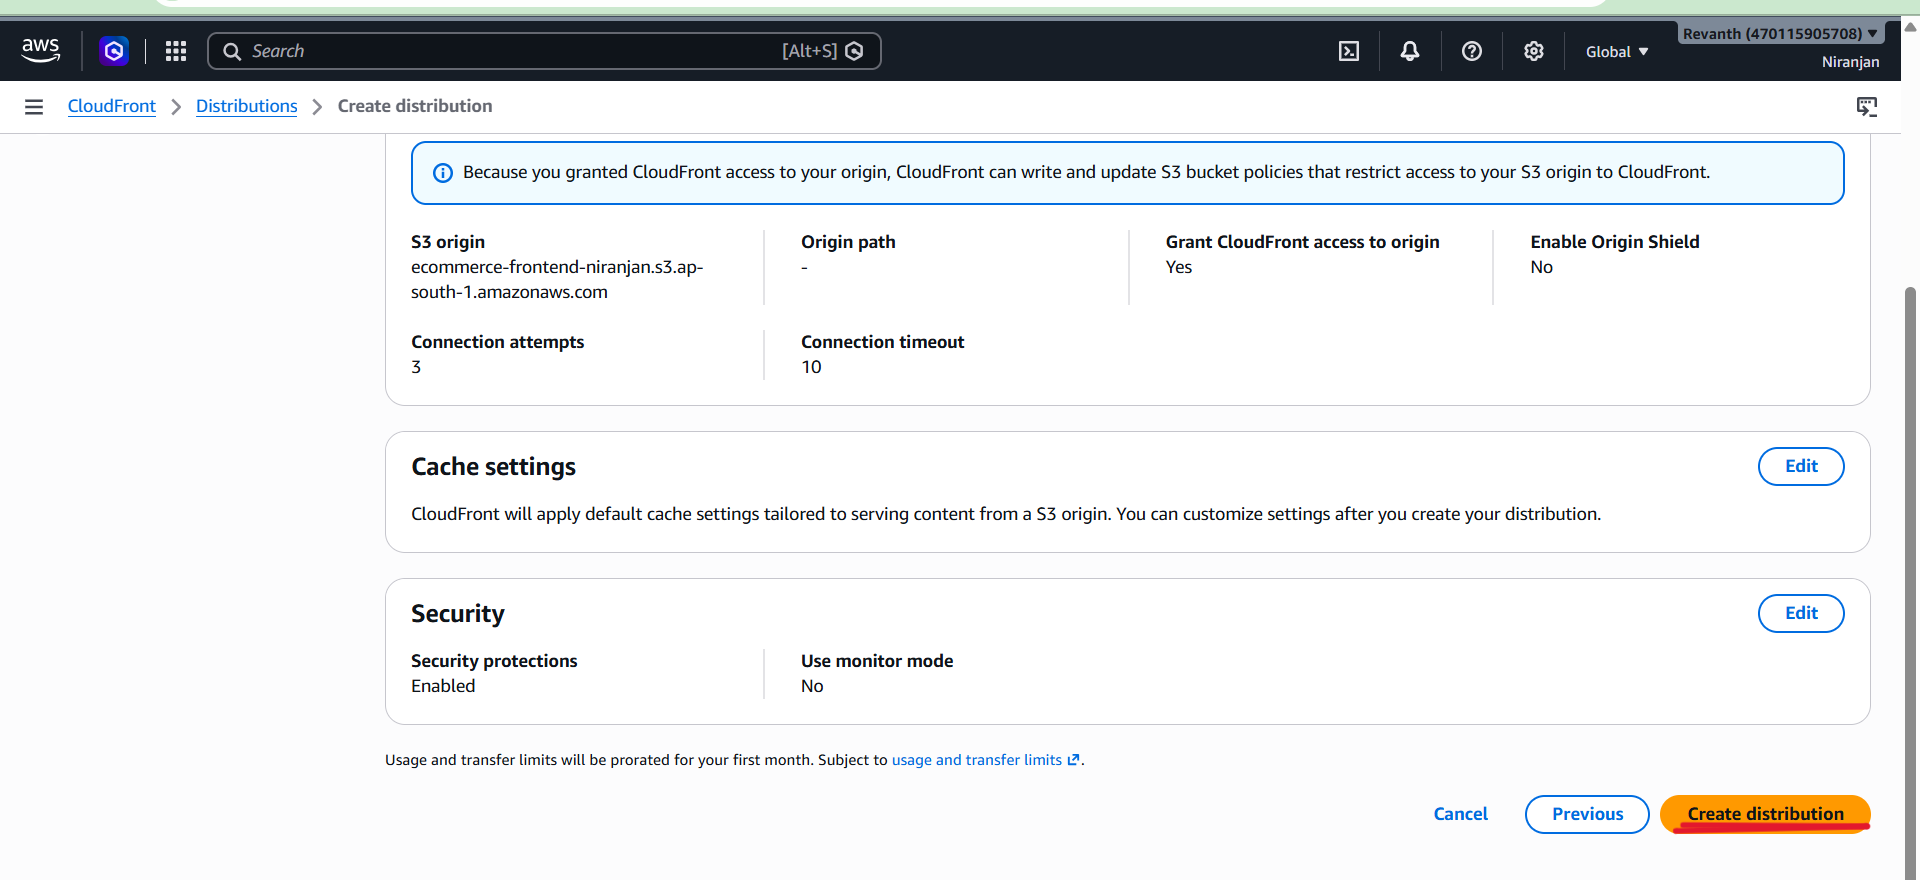
- Click Create distribution.
Step 5: Wait for Deployment
- Wait until the CloudFront distribution status changes to Deployed.
- Open the distribution details.
- Copy and save the Distribution ID and Distribution domain name for future use.
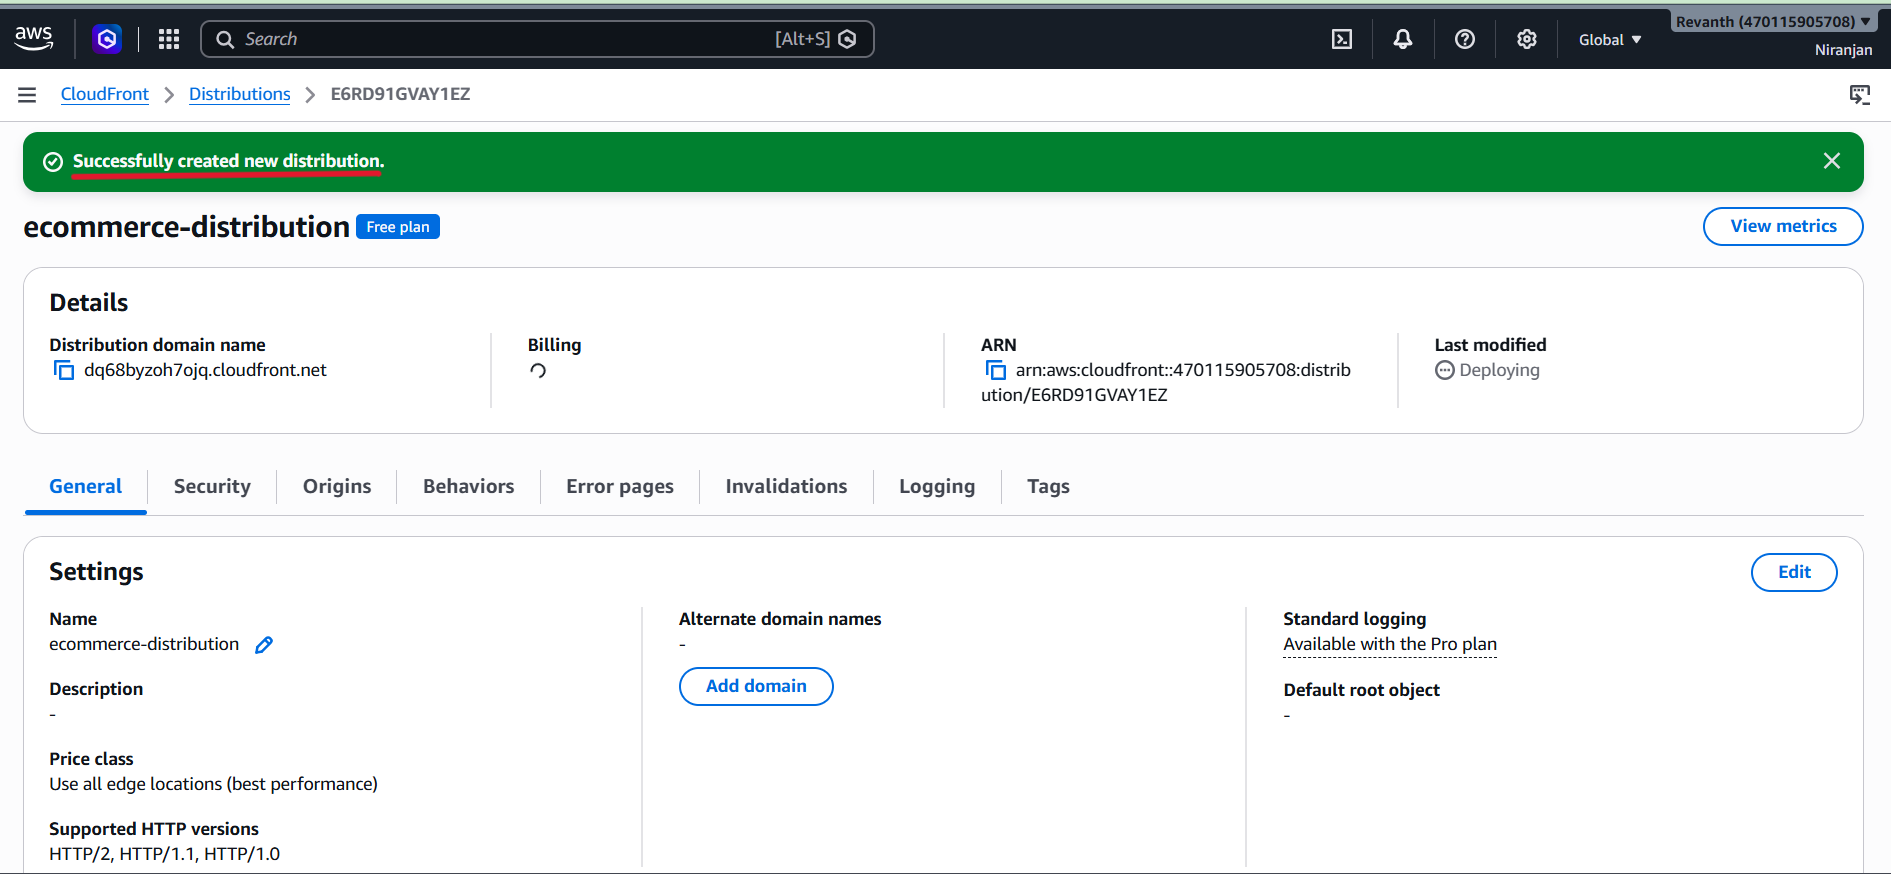
Note: CloudFront deployment may take several minutes. Wait until the distribution status changes to Deployed before proceeding to the next step.
5. Configure the CloudFront Root Document and Custom Error Pages
Step 1: Set the Default Root Object
- Navigate to: CloudFront → Distributions → Your distribution → General → Edit
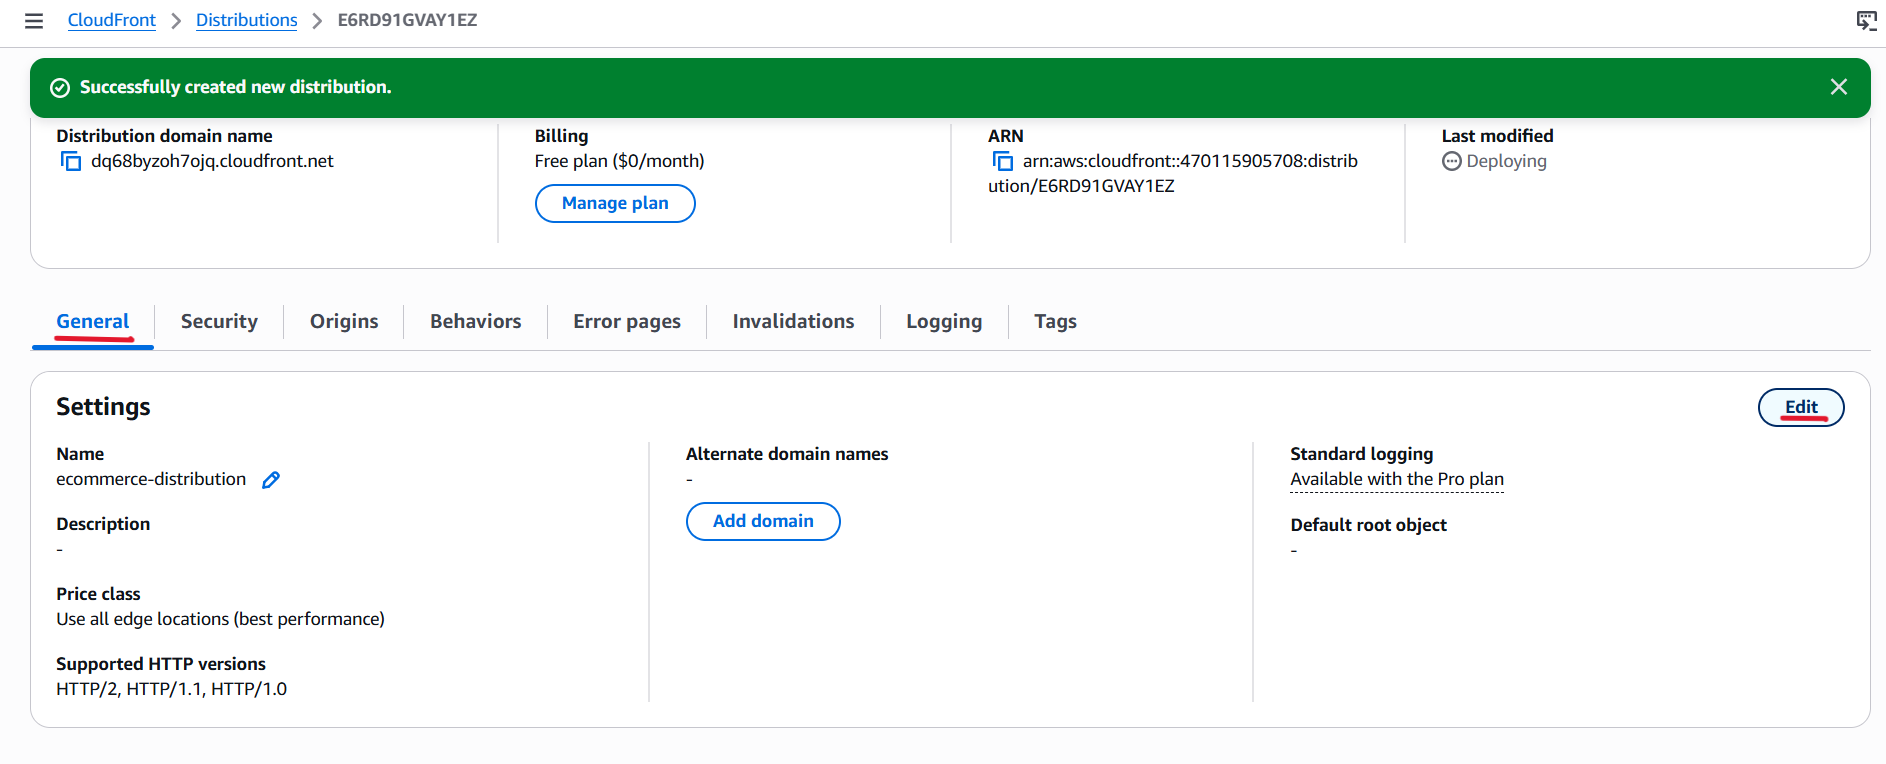
- Set the Default root object to:
index.html
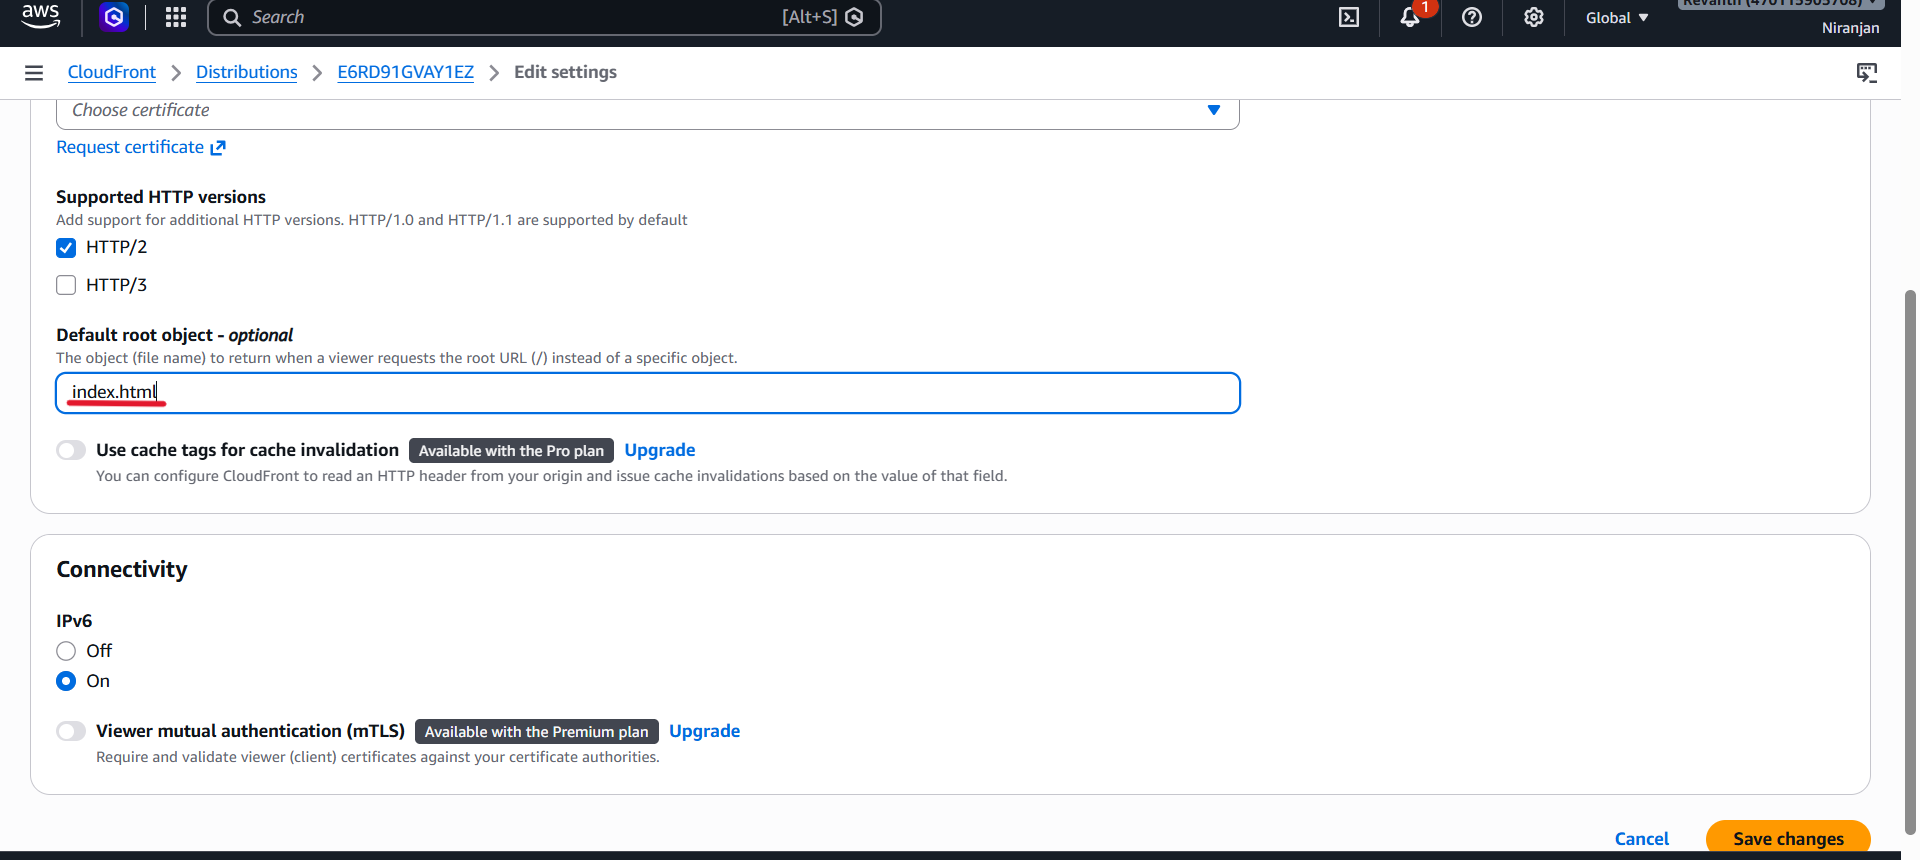
- Click Save changes.
- This tells CloudFront to load
index.htmlwhen users open the main application URL.
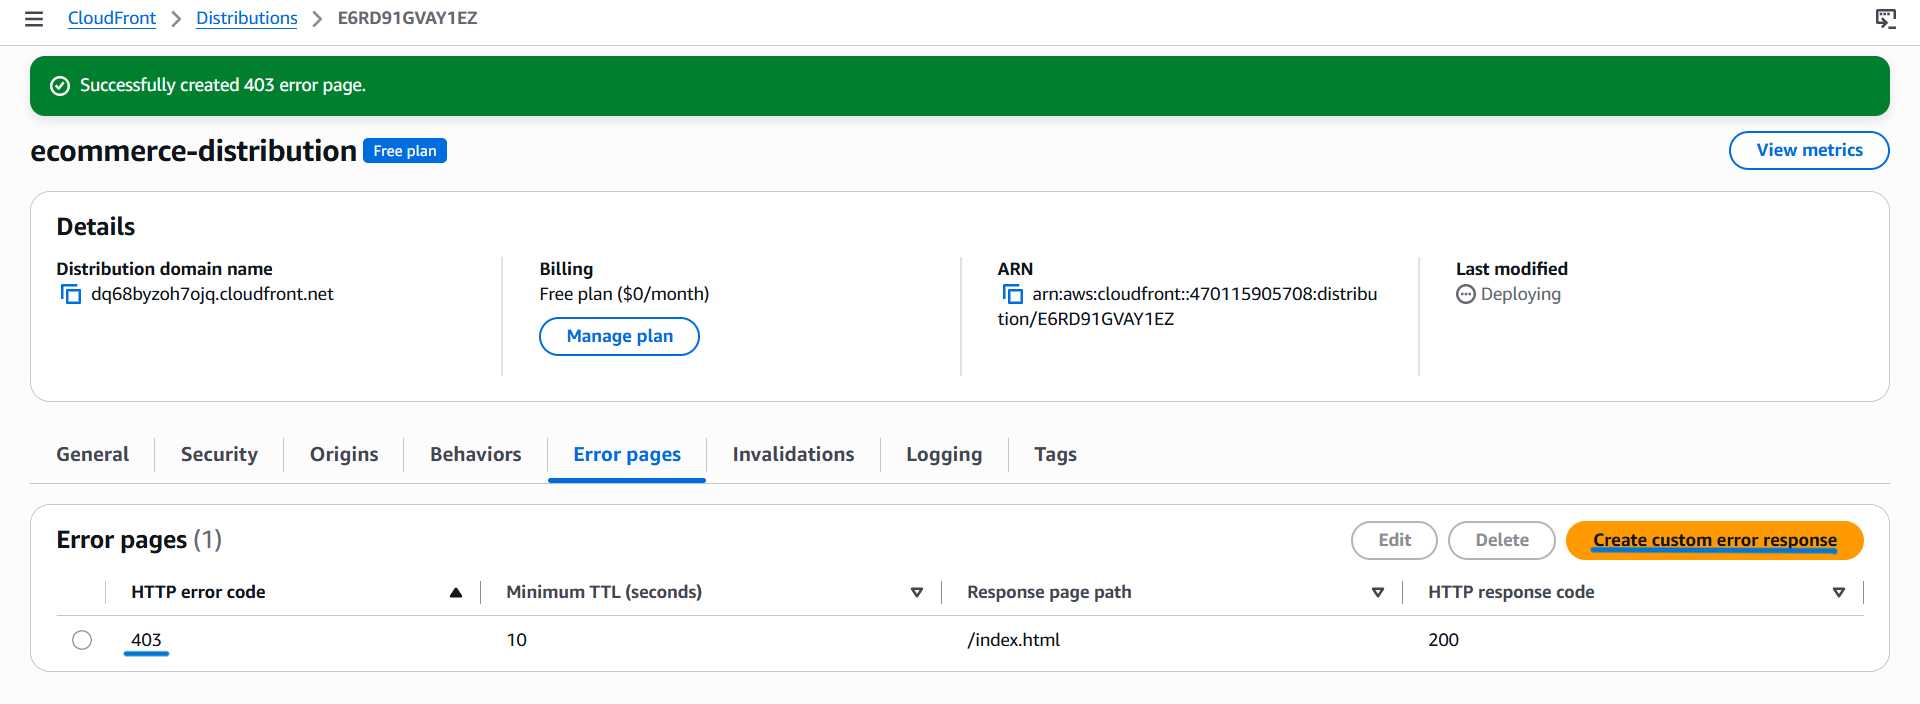
Step 2: Configure the 403 Error Response
- Navigate to: CloudFront → Your distribution → Error pages → Create custom error response
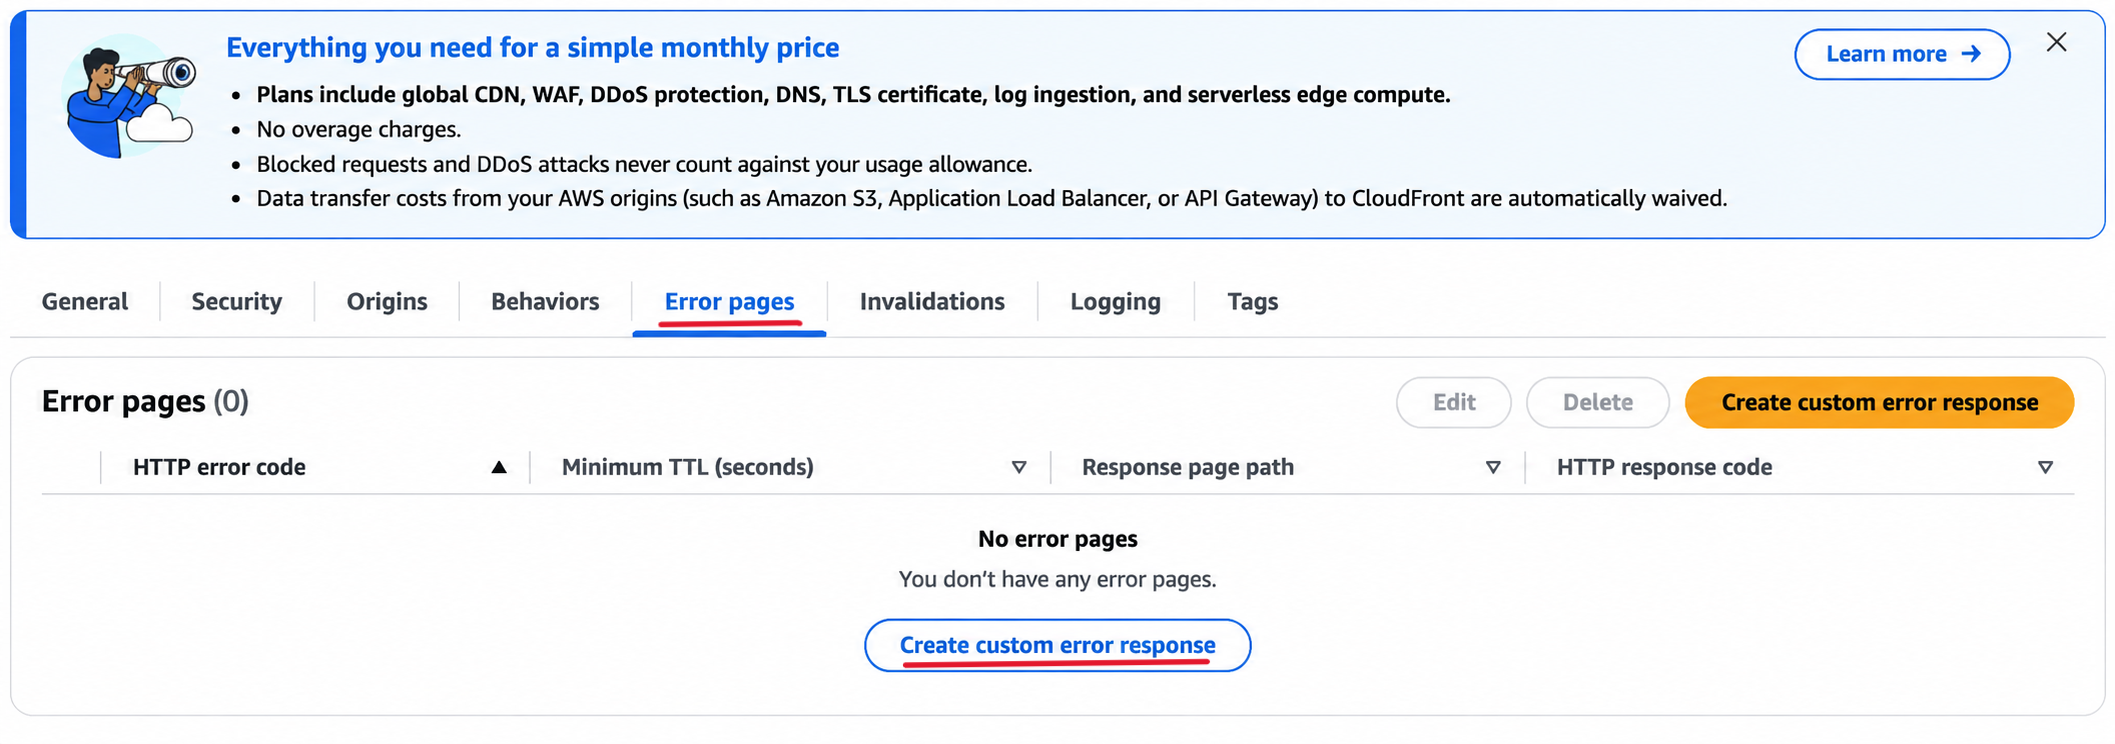
Configure the following:
- HTTP error code:
403 - Customize error response: Yes
- Response page path:
/index.html - HTTP response code:
200
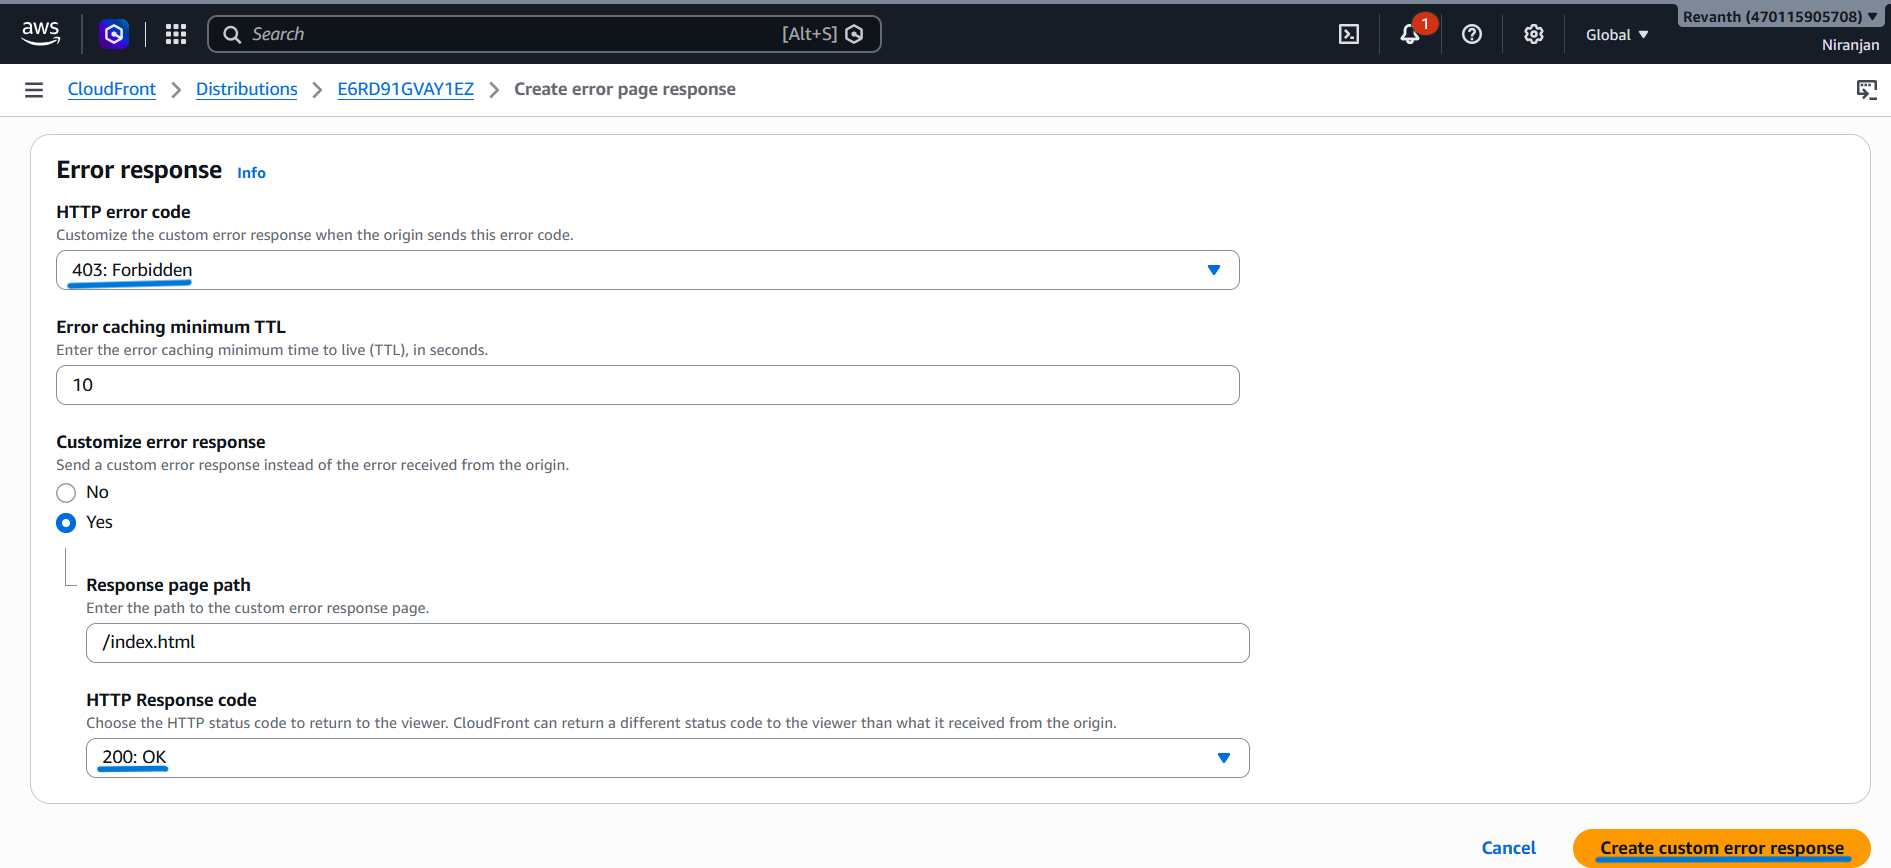
- Click Create.
Step 3: Configure the 404 Error Response
Repeat the process with the following settings:
- HTTP error code:
404 - Customize error response: Yes
- Response page path:
/index.html - HTTP response code:
200
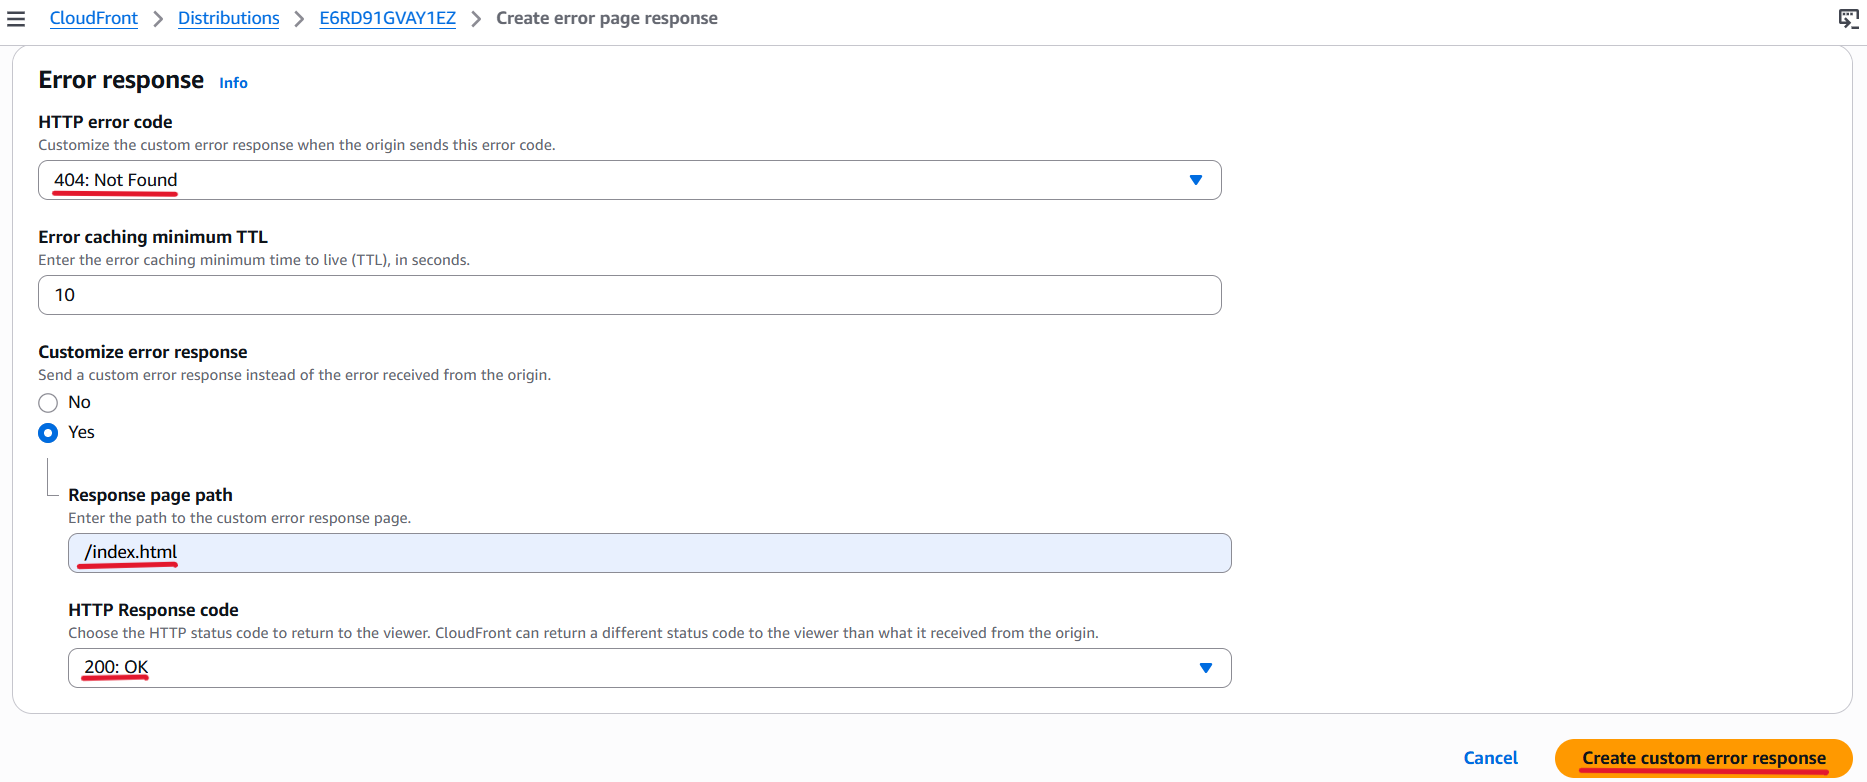
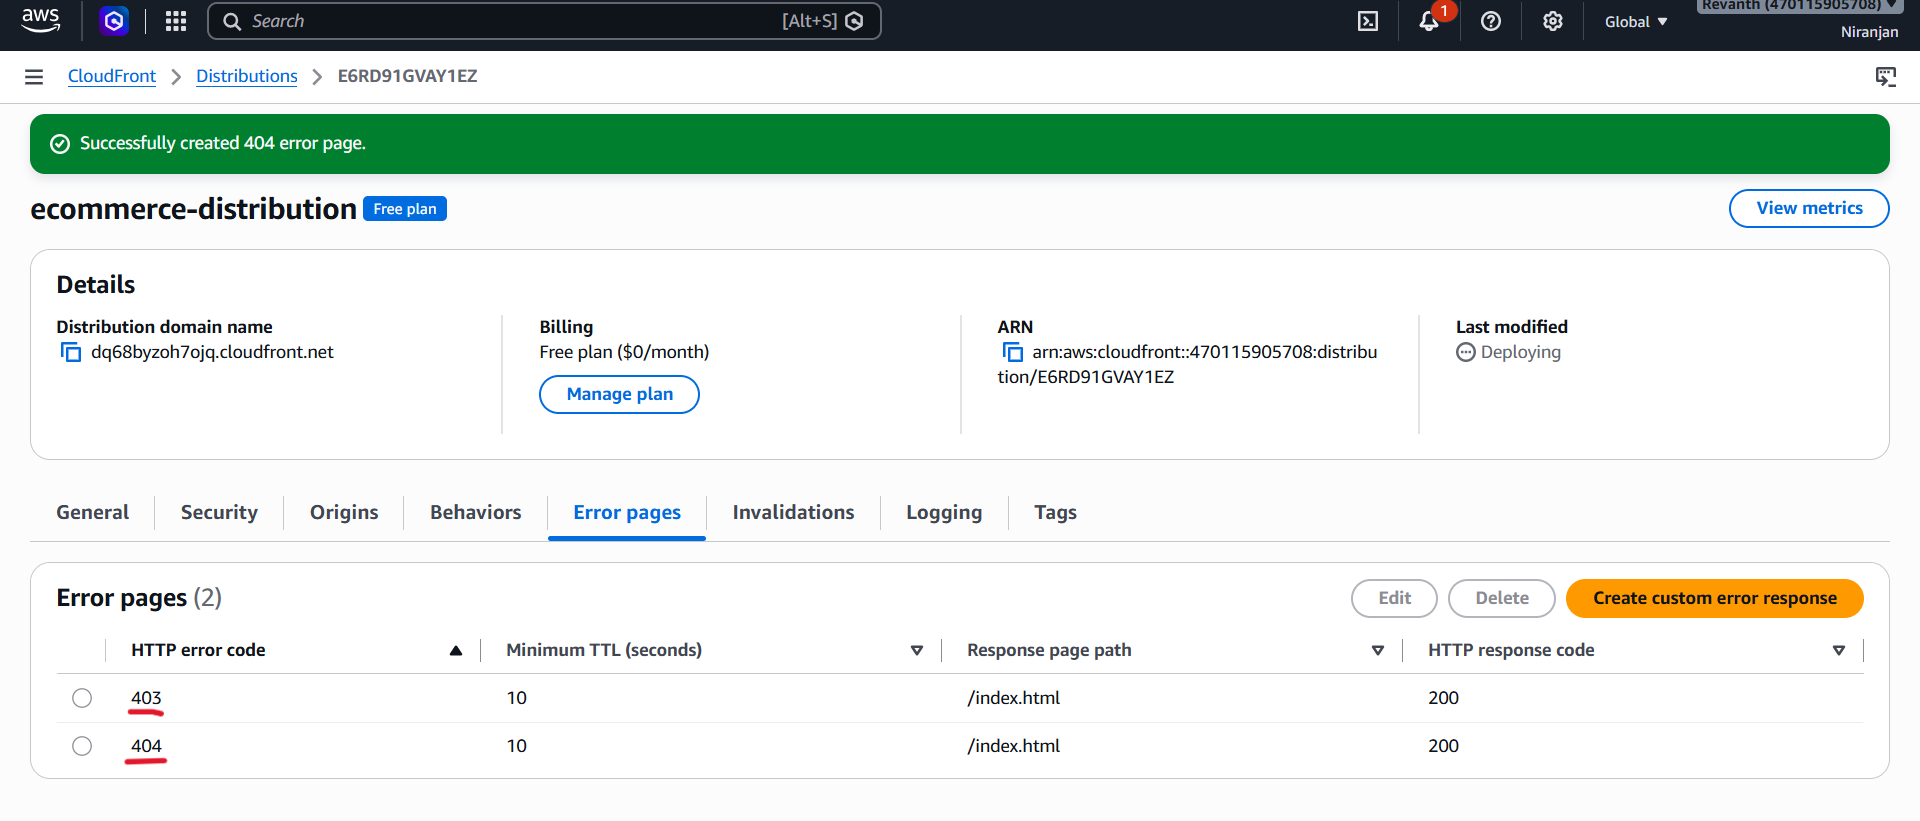
- Save the configuration.
- These settings allow React to handle application routes on the client side.
Step 4: Save the CloudFront Details
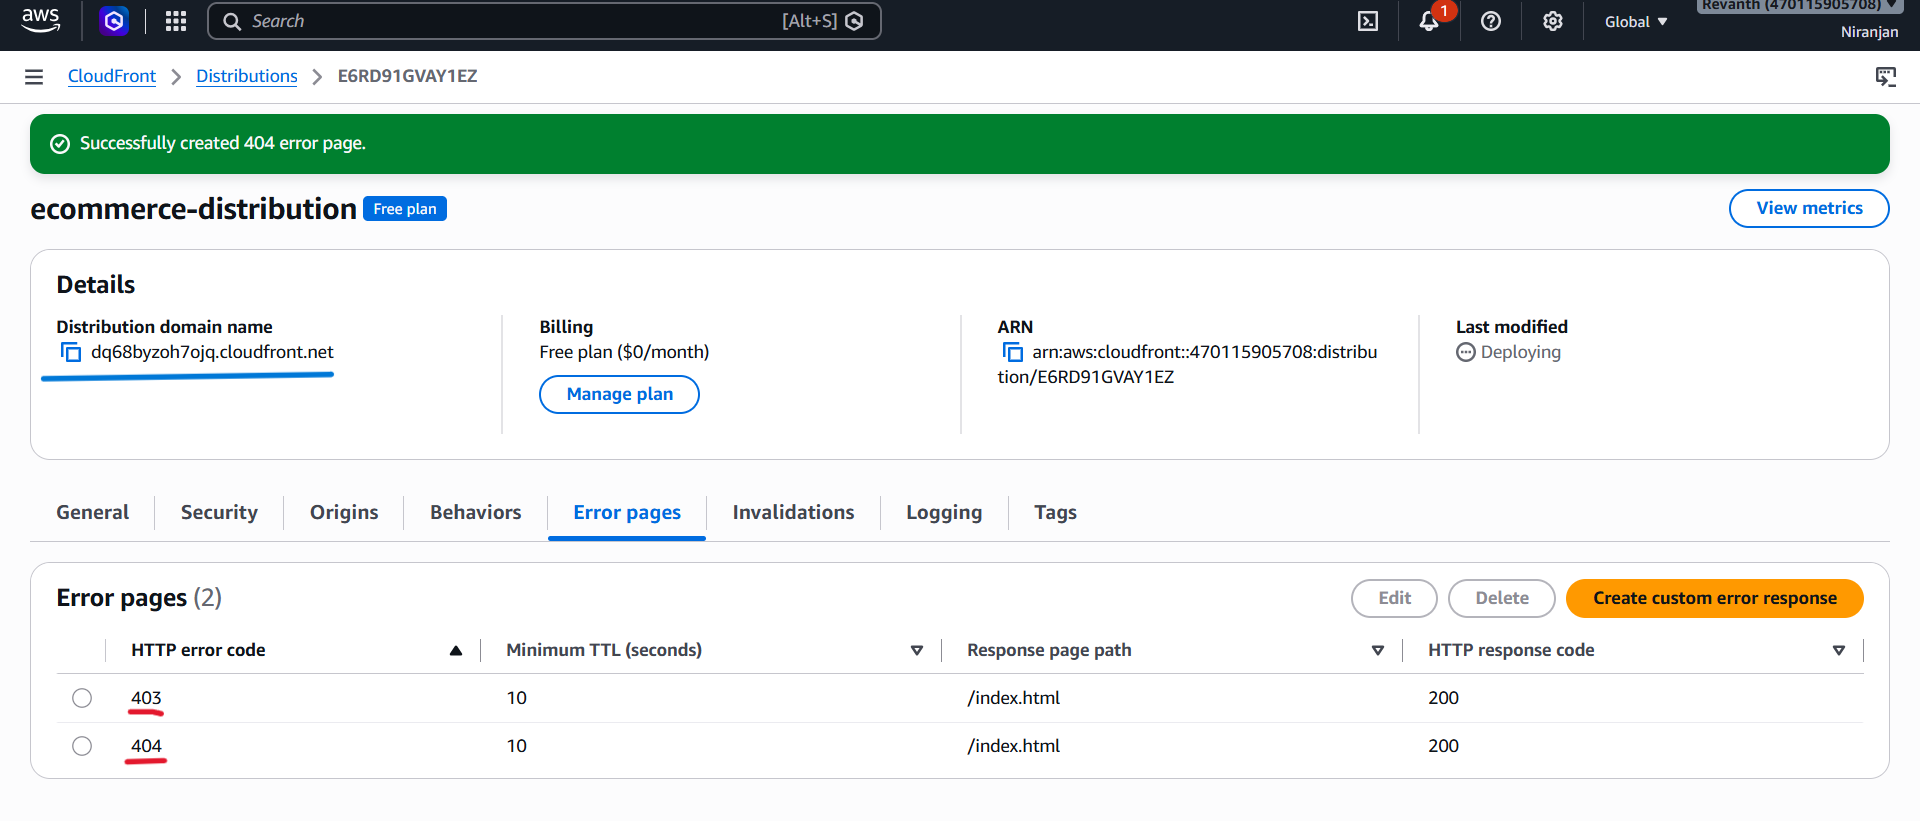
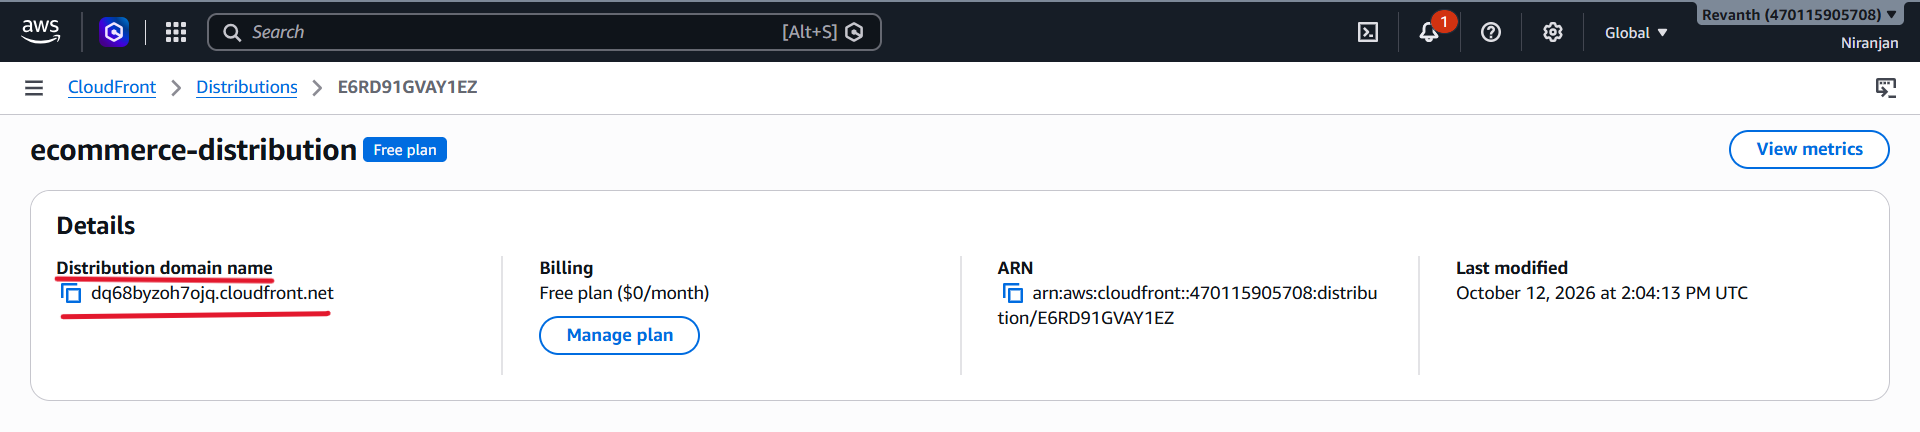
Open your CloudFront distribution and copy the following values:
- Distribution ID: For example,
E1234567890ABC - Distribution Domain Name: For example,
dq68byzoh2345u.cloudfront.net
Save both values in a notepad. We will use the CloudFront domain to access our application.
6. Verify the S3 Bucket Policy
- After creating the CloudFront distribution, check whether the S3 bucket policy allows CloudFront to access the bucket.
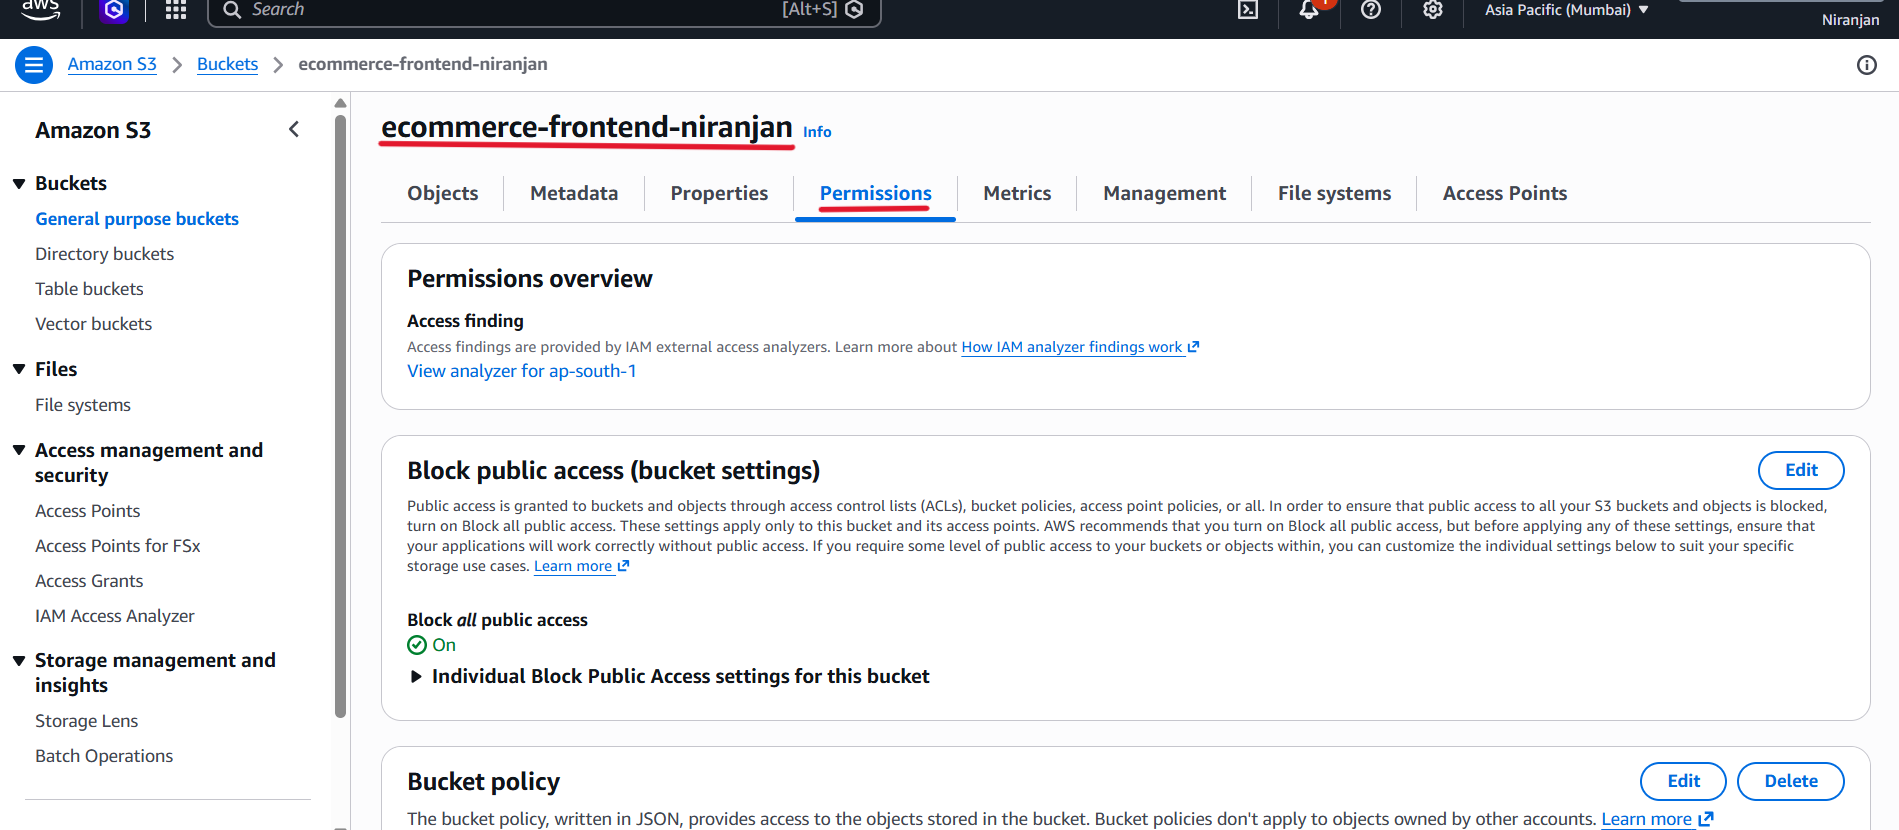
- Navigate to: Amazon S3 → Your frontend bucket → Permissions → Bucket policy
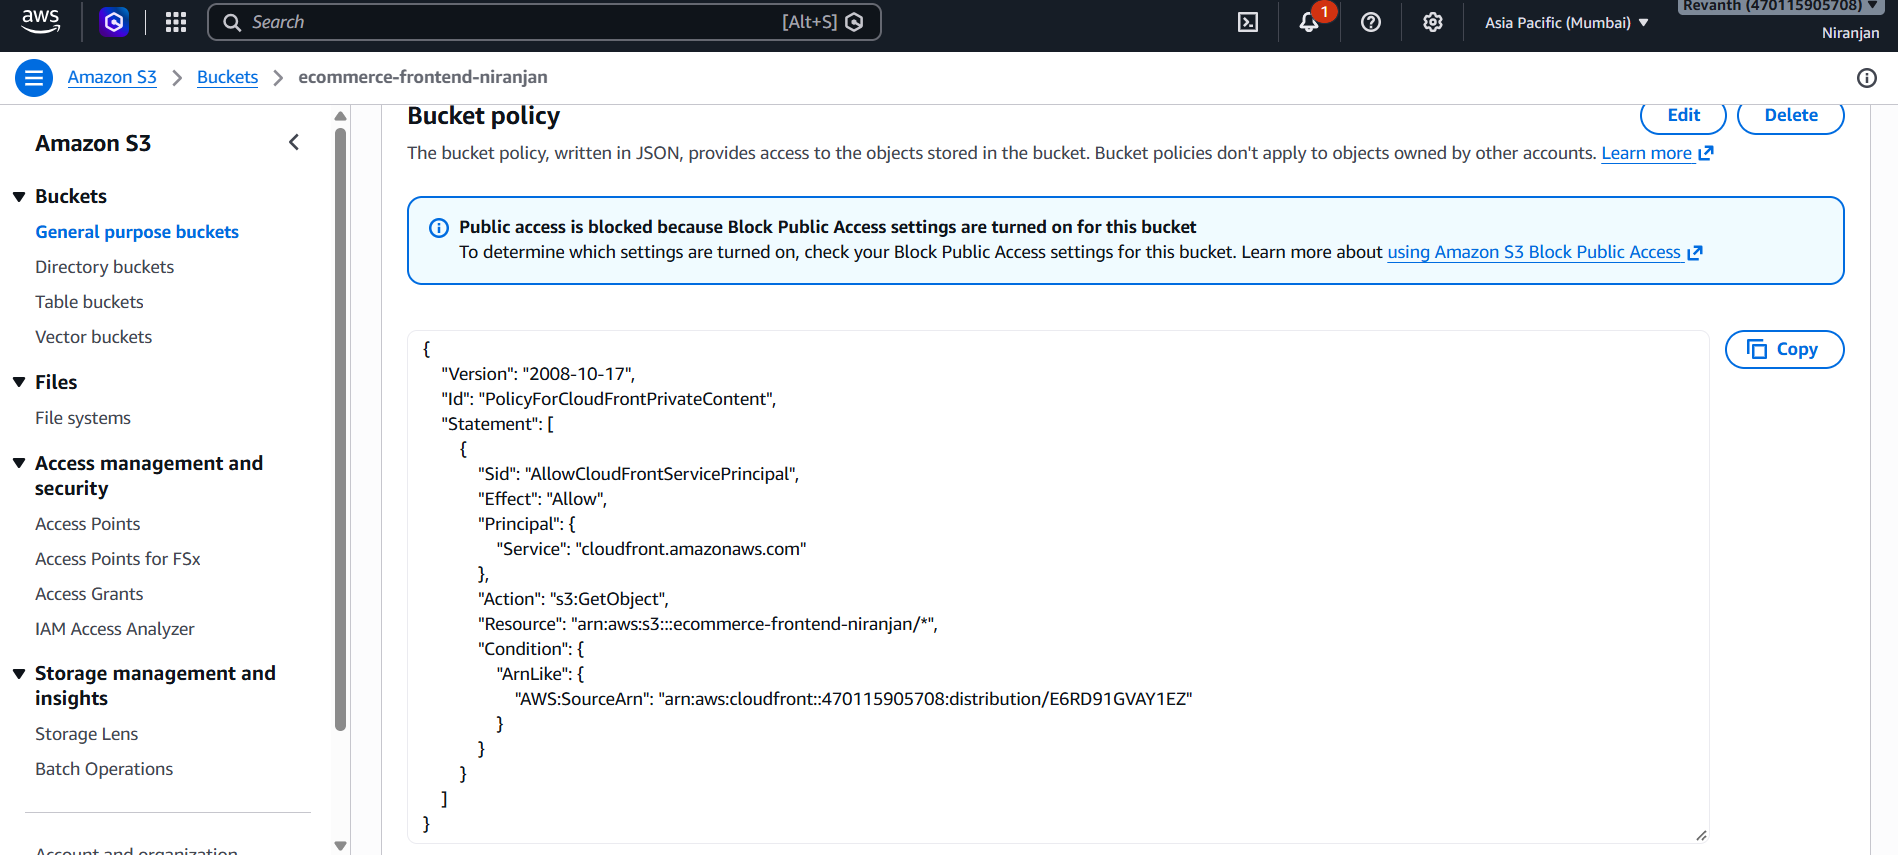
- Verify that the policy allows the CloudFront service to read objects from your bucket and restricts access to your specific CloudFront distribution.
The policy should include:
- Principal:
cloudfront.amazonaws.com - Action:
s3:GetObject - Resource: Your frontend bucket's objects.
- Condition: The ARN of your CloudFront distribution.
- CloudFront may configure this policy automatically when you enable private S3 access during distribution creation.
- If the policy has not been updated, check the configuration and add the appropriate policy using your AWS account ID, S3 bucket name, and CloudFront distribution ID.
7. Configure the React Application
We will now configure the frontend to use the Cognito details created in Module 2.
Step 1: Open the Frontend Directory
Open your terminal in the project working environment and navigate to the React application directory:
cd frontend/react-app

Step 2: Update the AWS Configuration

- Open the following file:
src/aws-config.js
nano aws-config.js

- Update the configuration with your actual Cognito User Pool ID and App Client ID.
const awsConfig = {
  Auth: {
    Cognito: {
      userPoolId: '<COGNITO_USER_POOL_ID>',
      userPoolClientId: '<COGNITO_CLIENT_ID>',
      loginWith: {
        email: true,
      },
    }
  },
  API: {
    baseUrl: ''
  }
};

export default awsConfig;
- Replace the placeholder values with the details saved in Module 2.
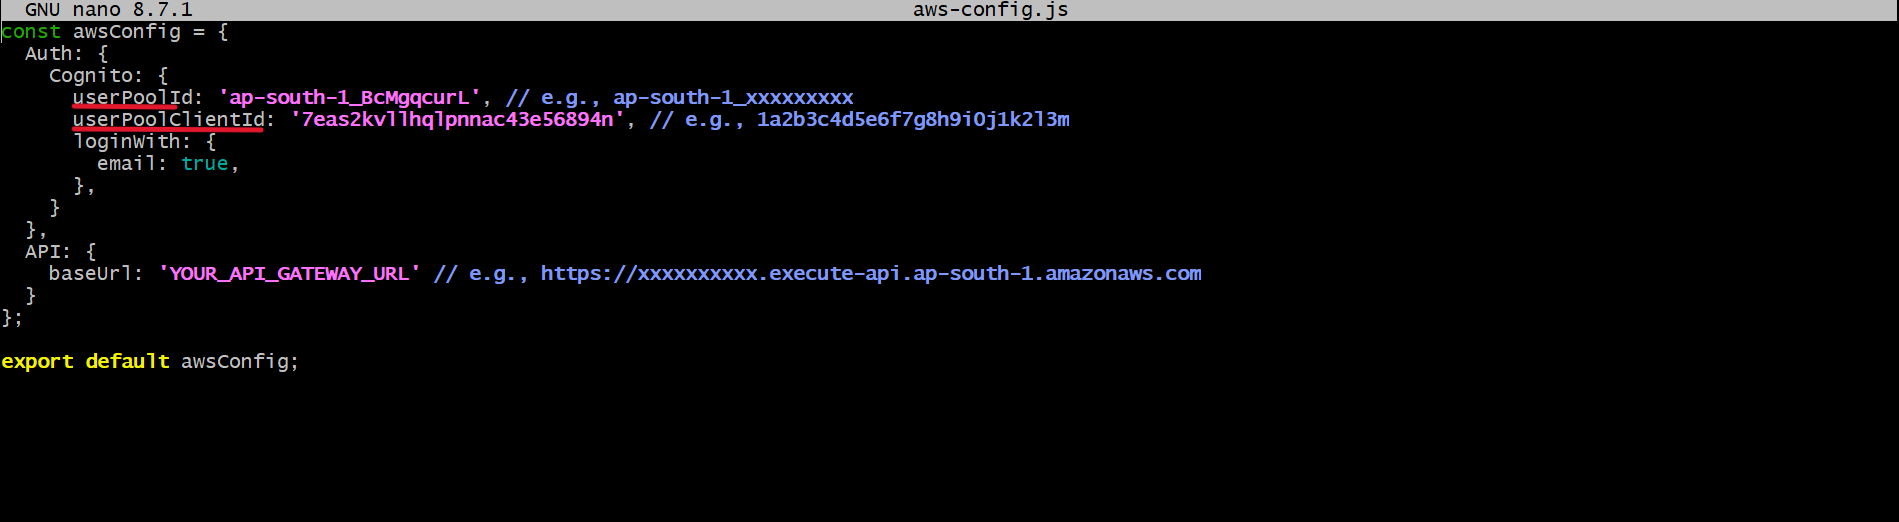
- Keep
baseUrlempty for now. We will configure it when connecting the frontend to the backend APIs in Module 7. - Save the file.
8. Build and Deploy the React Frontend
Step 1: Install Dependencies
- Run the following command inside the React application directory:
npm install
- This command installs the packages required by the frontend application.
- Wait for the installation to finish.
Step 2: Build the Application
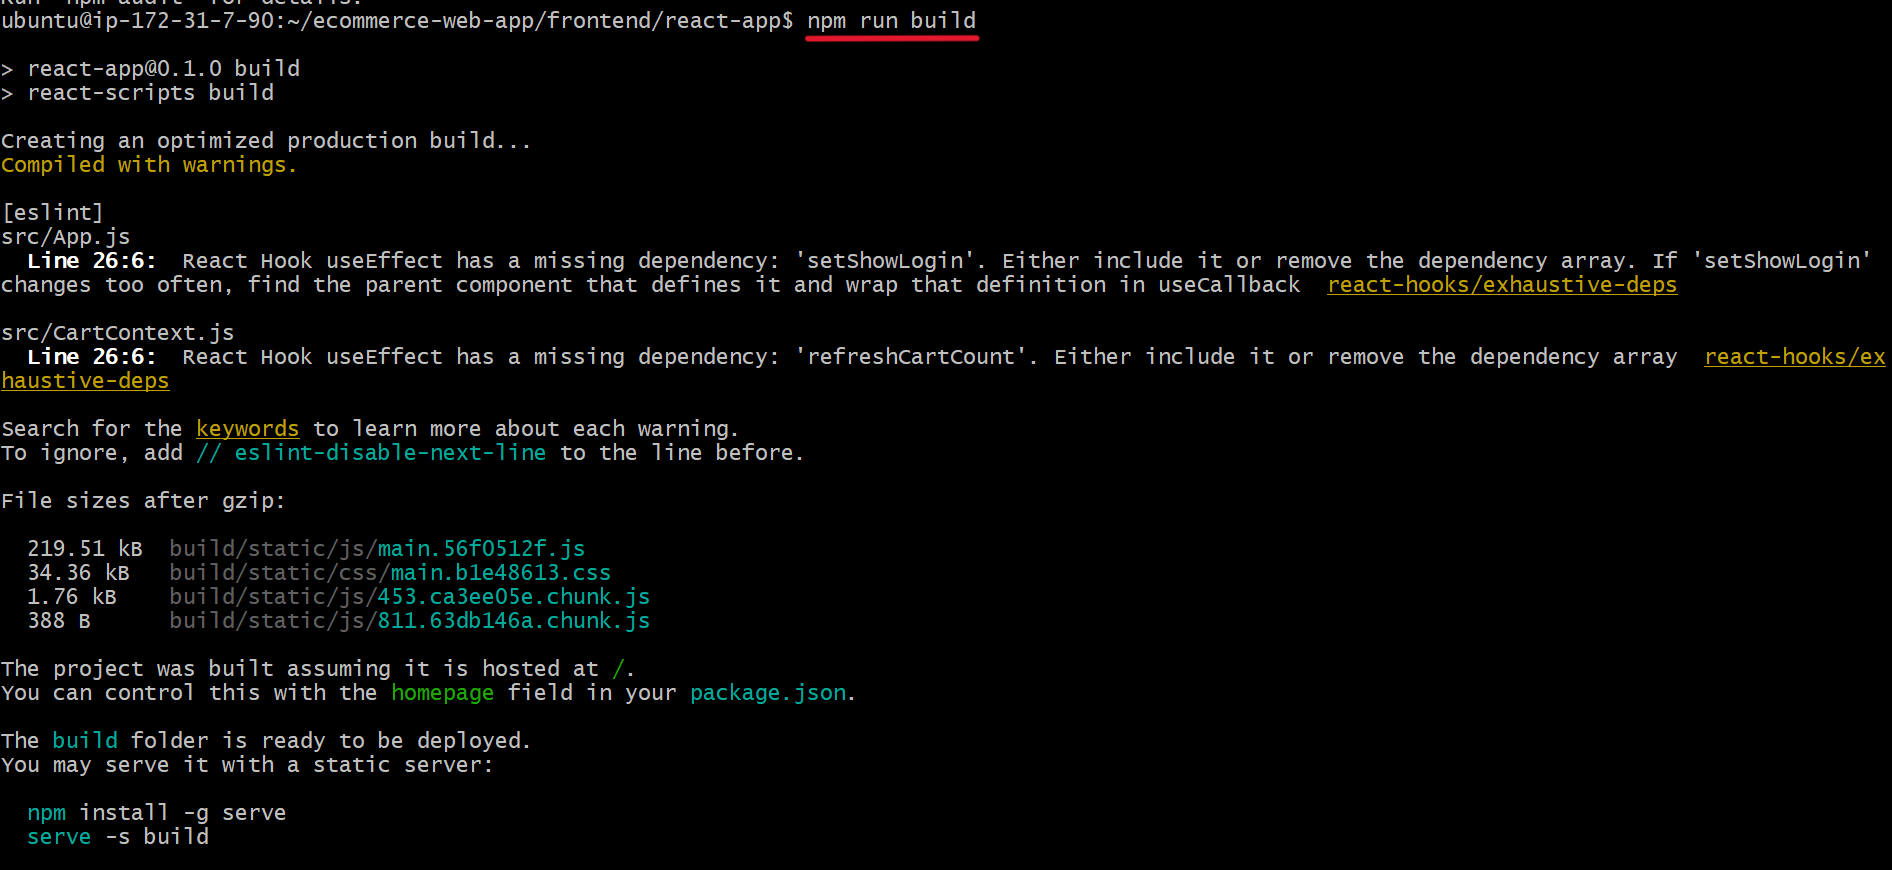
Run:
npm run build
- This command creates the production build files in the
builddirectory.
Step 3: Upload the Build to S3
- Run the following command, replacing
<your-frontend-bucket-name>with your actual S3 bucket name:
aws s3 sync build/ s3://<your-frontend-bucket-name> --delete --exclude "images/*"
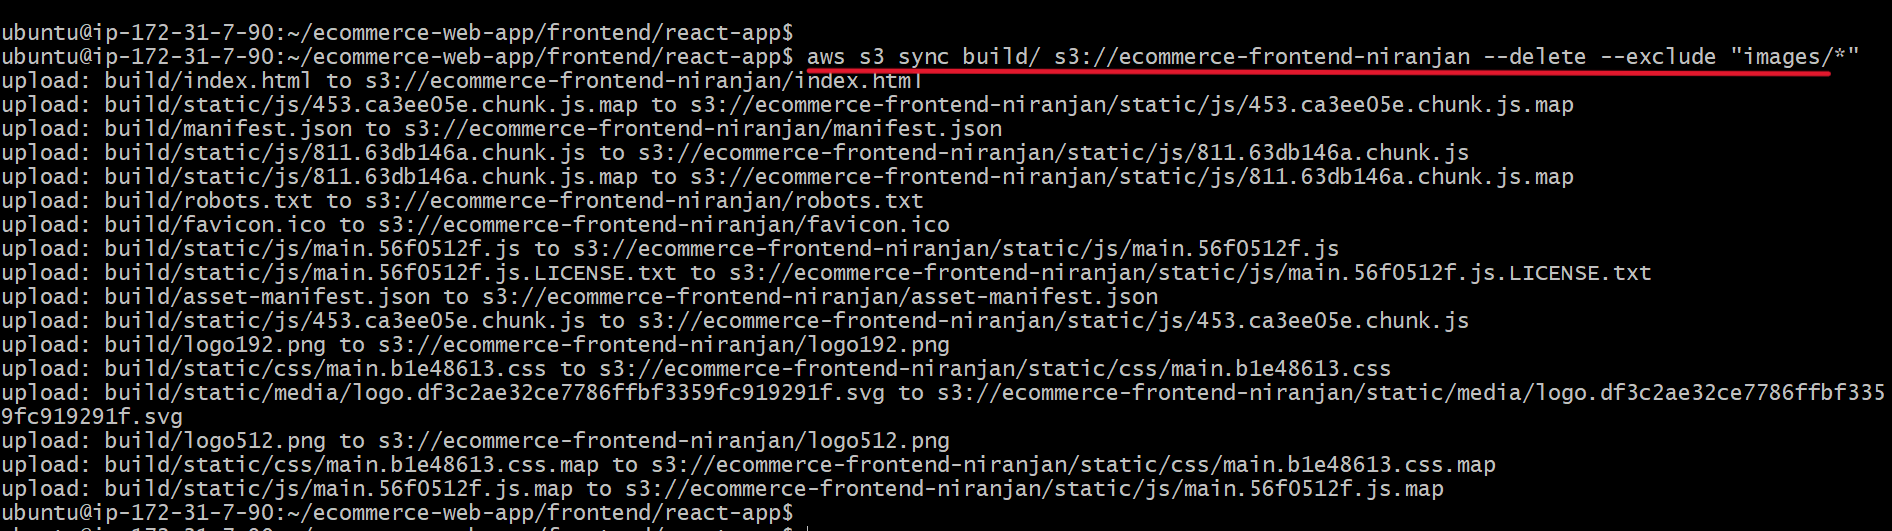
- This command uploads the frontend build files to S3.
- The
--deleteoption removes destination files that are no longer present in the local source, while--exclude "images/*"excludes the images path from the sync operation.
9. Open CloudFront and Test the Frontend Application
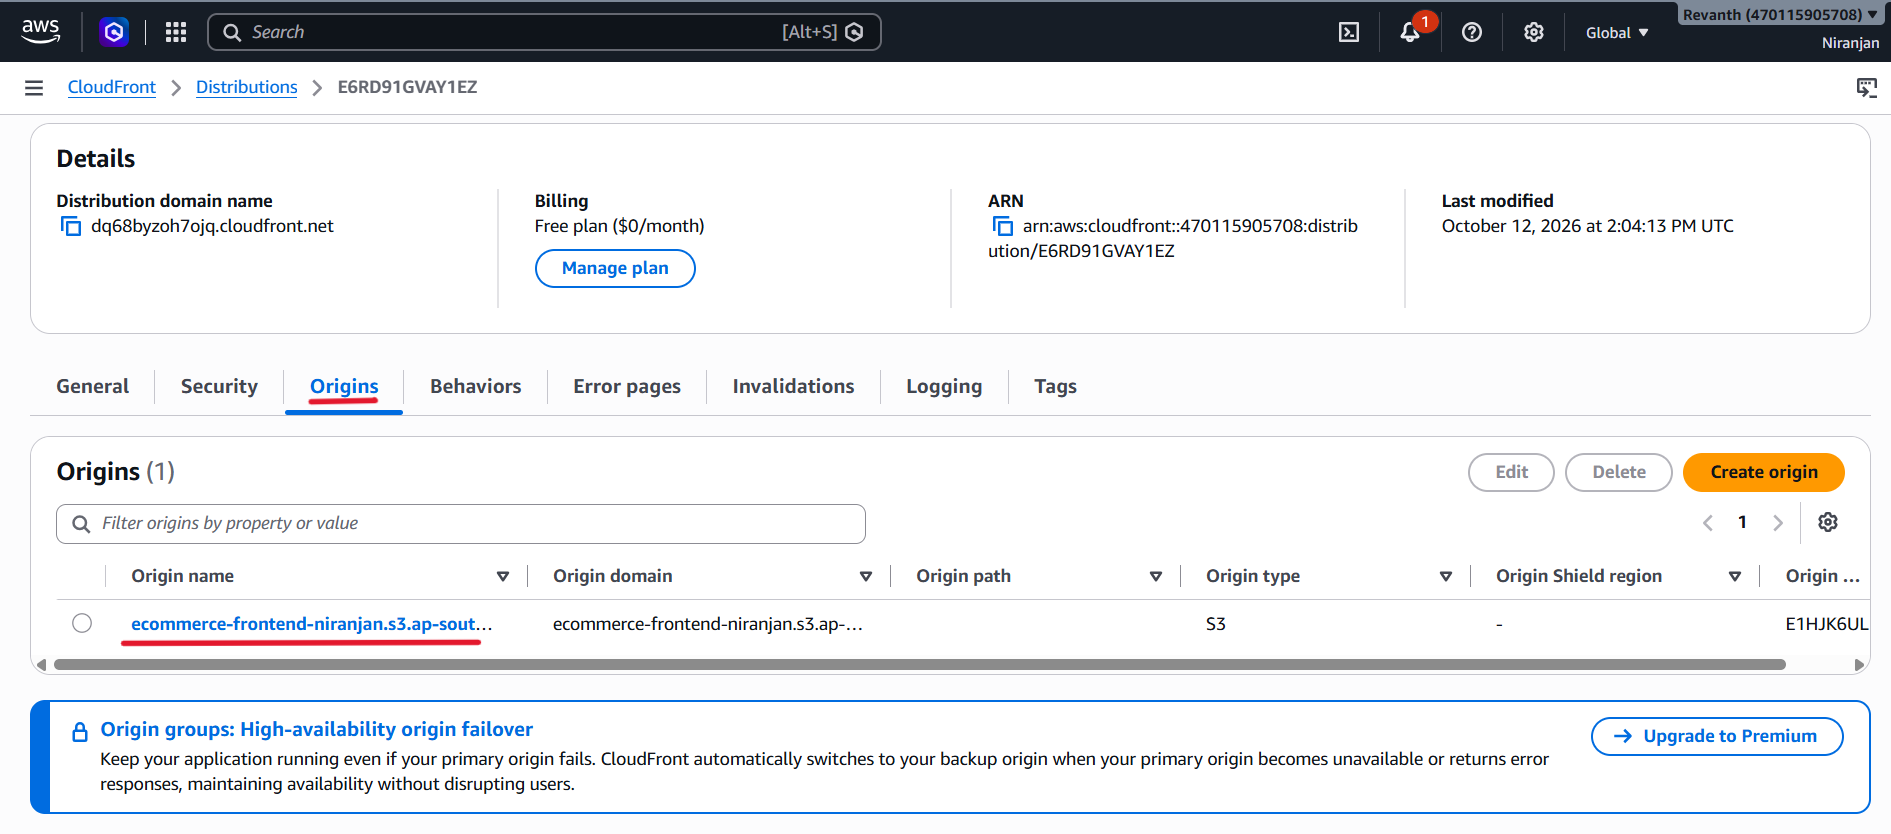
Step 1: Verify CloudFront Origins
- The Origins tab shows the S3 bucket configured as the source for serving the frontend application files.
Step 2: Verify CloudFront Behaviors
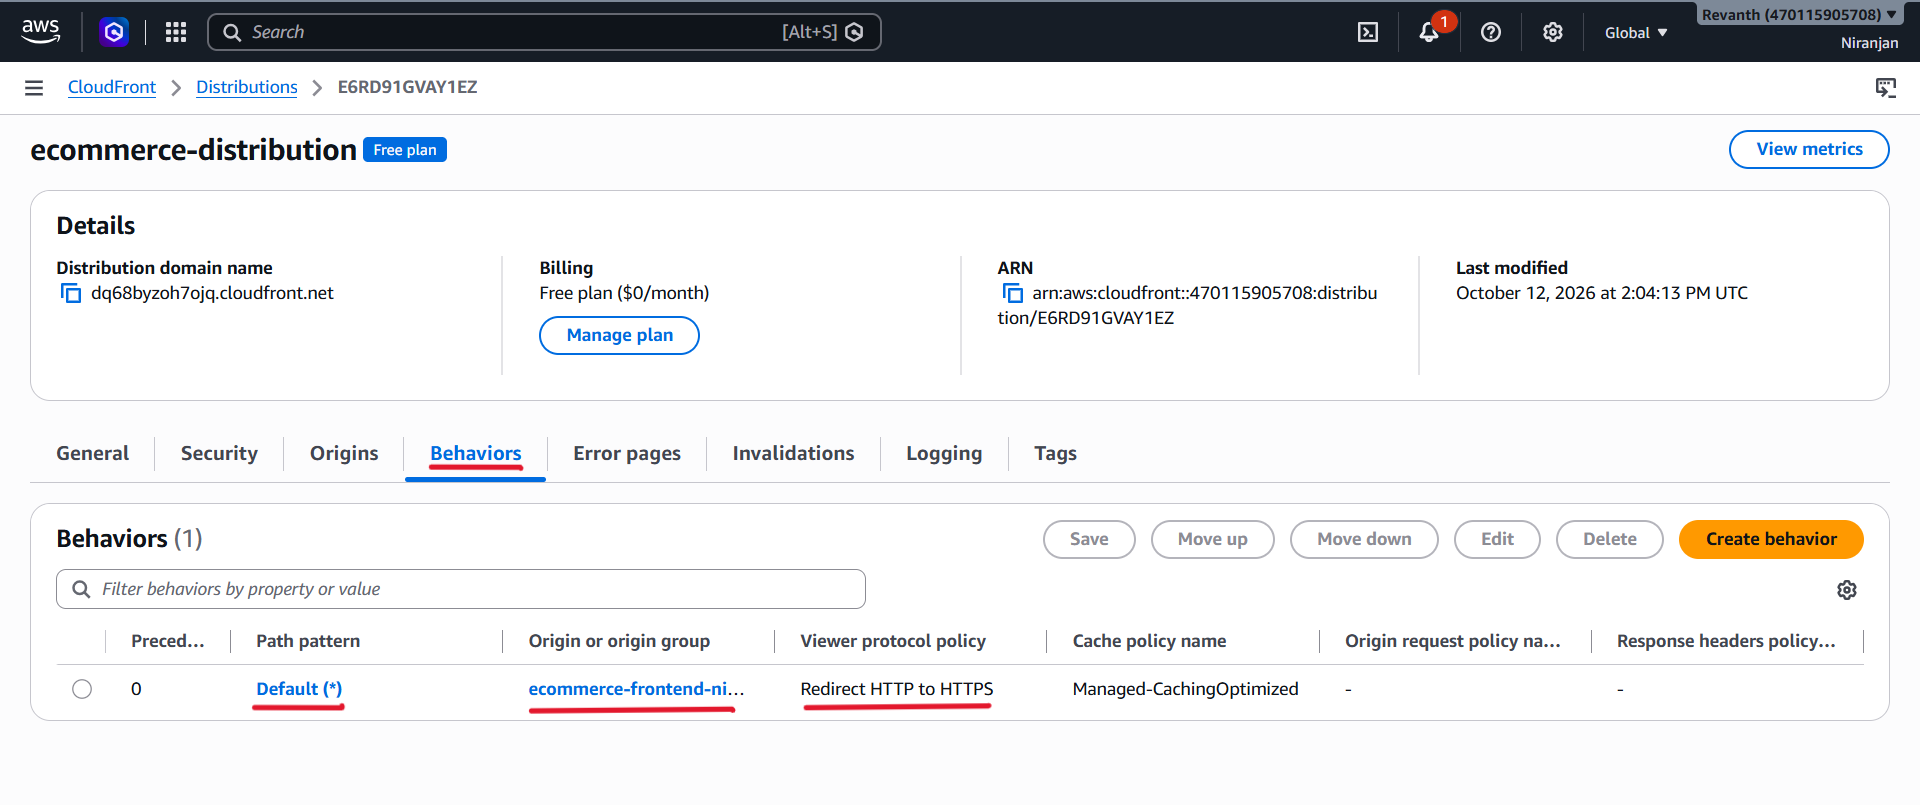
- The Behaviors tab shows the default path pattern (
*), which forwards incoming requests to the configured S3 origin. It also shows the viewer protocol policy set to Redirect HTTP to HTTPS.
Step 3: Open the Application
- Open your CloudFront domain in a browser:
https://<your-cloudfront-domain>
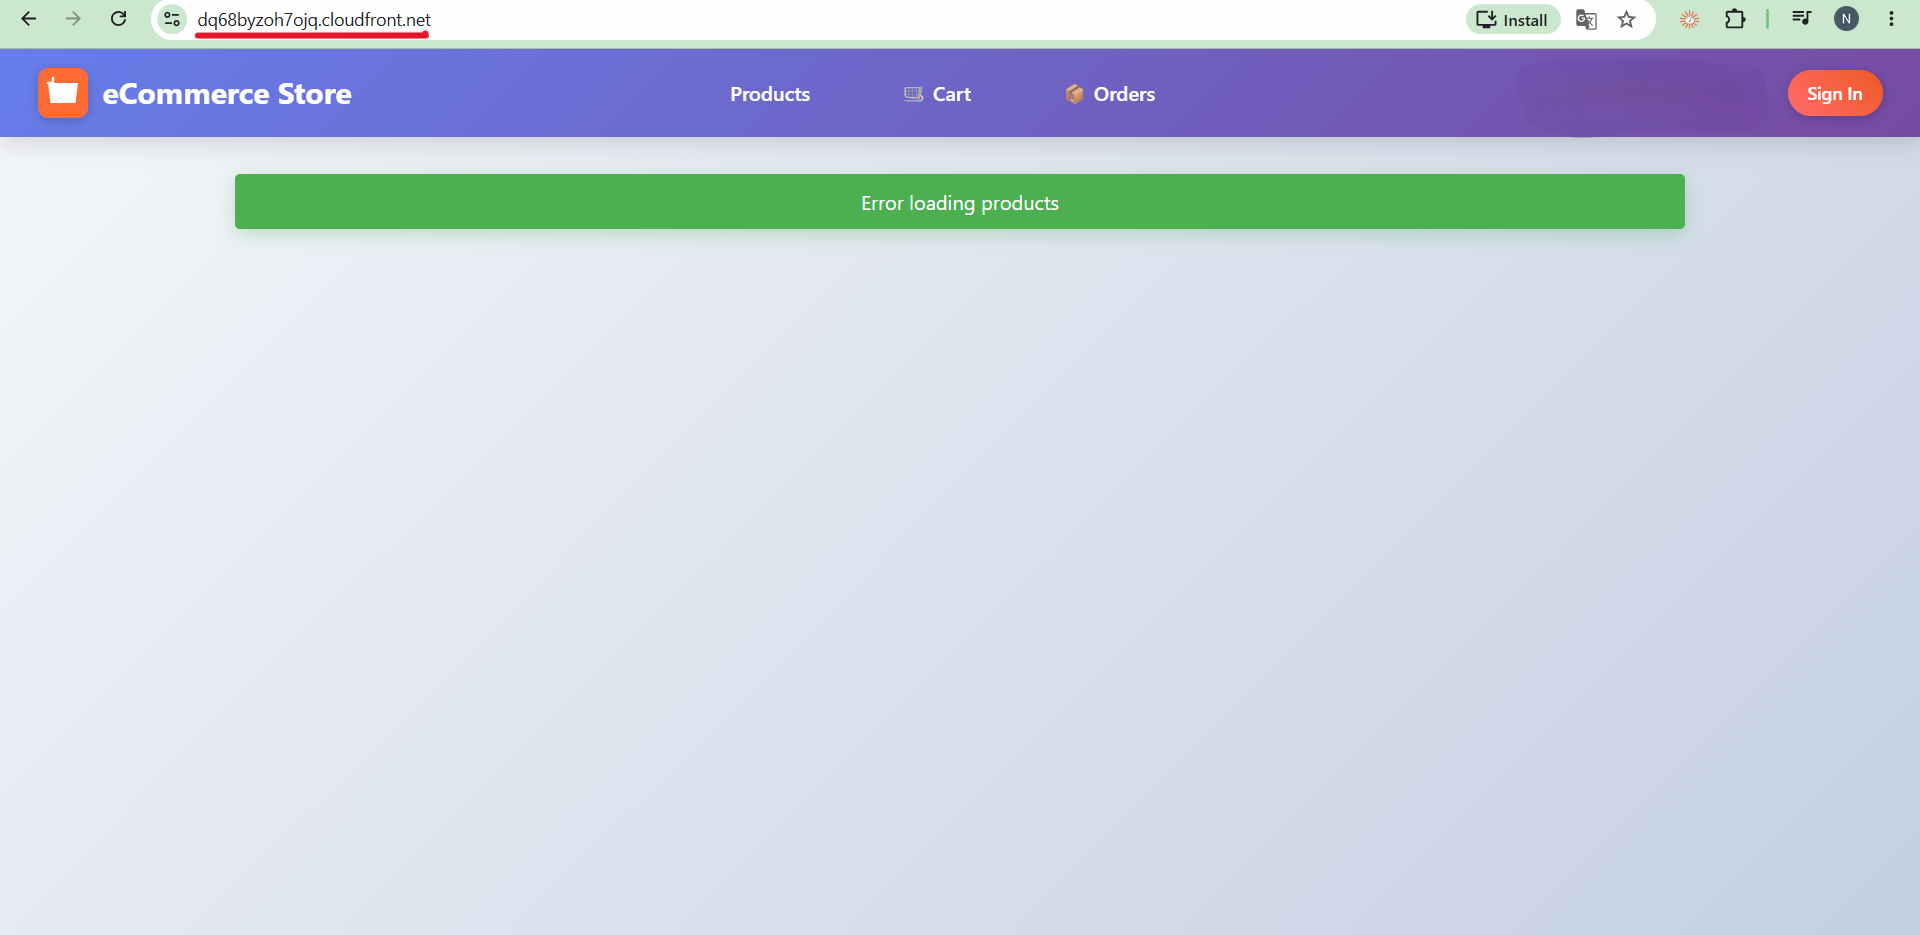
- Verify that the frontend application loads successfully.
Step 2: Test User Registration
- Open the sign-up page.
- Enter your email address, name, and password.
- Submit the registration form.
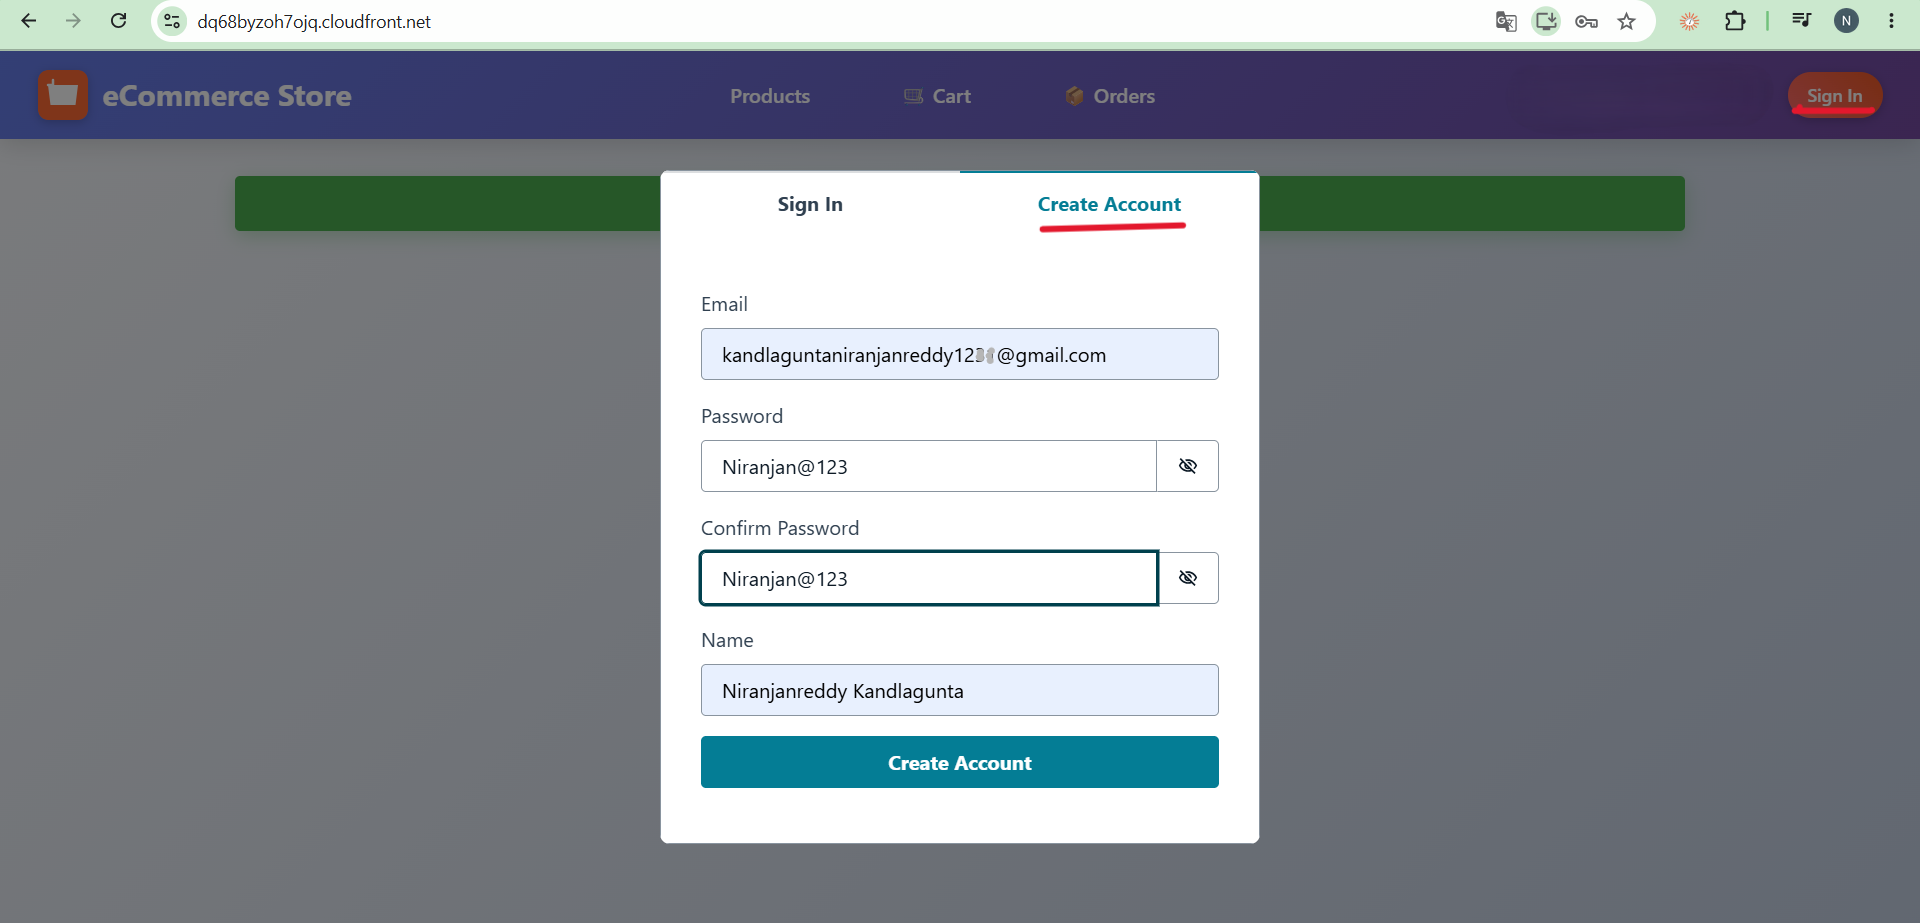
- Check your email for the verification code.
- Enter the code to verify your account.
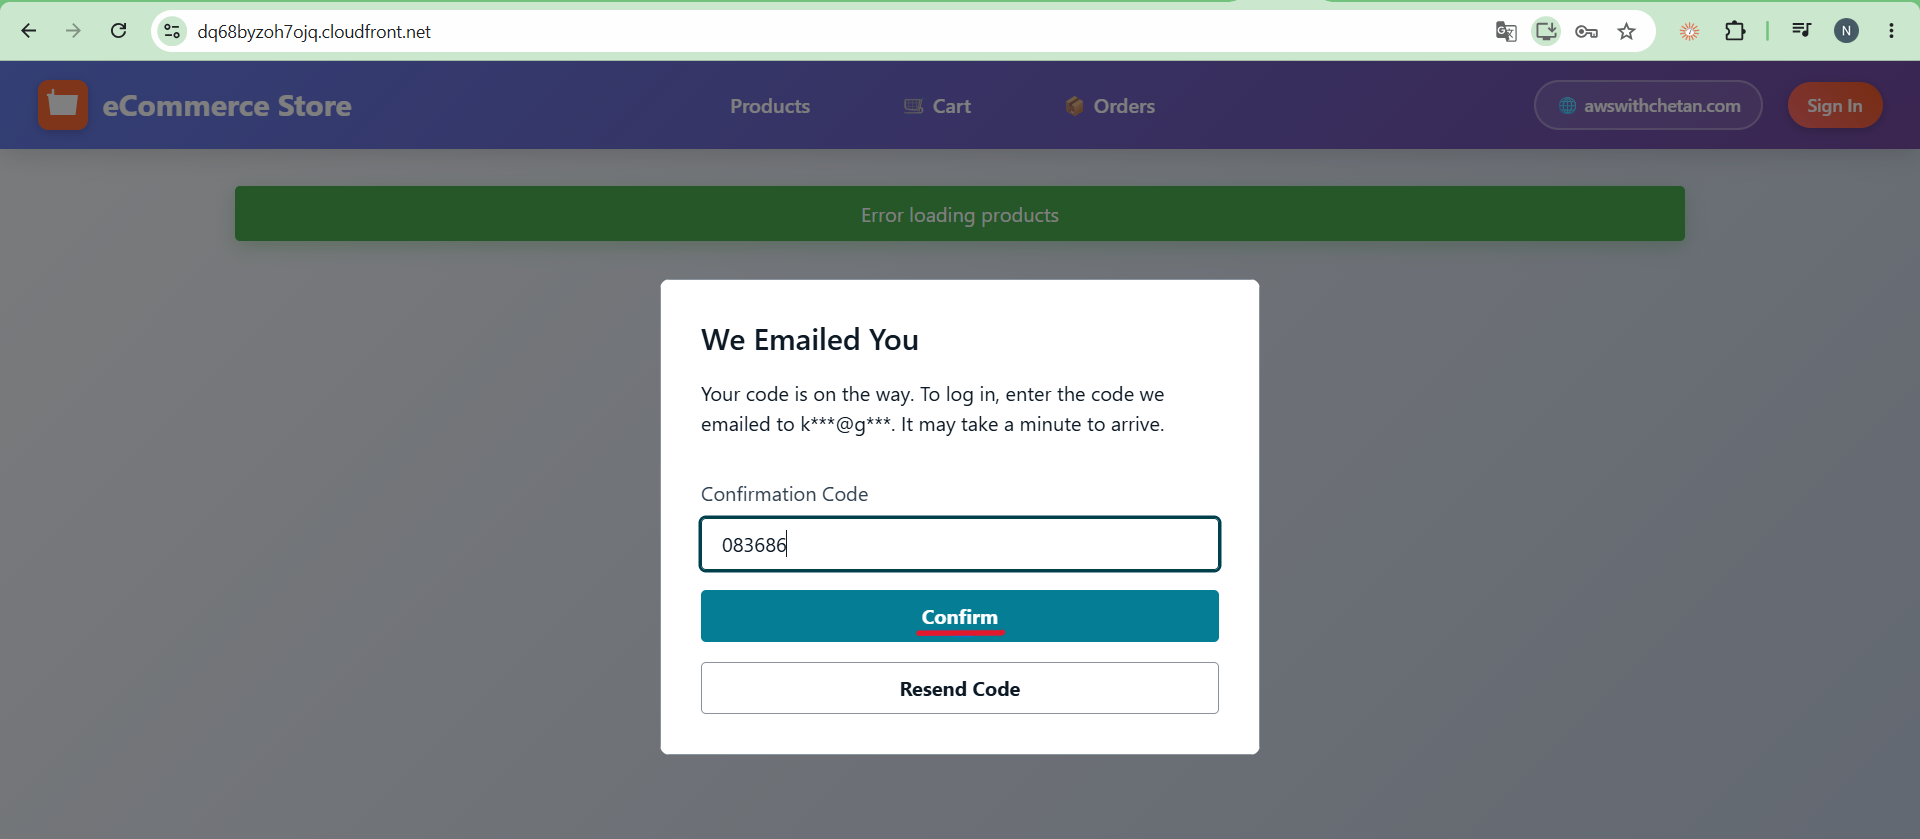
Step 3: Test Login and Logout
- Open the sign-in page.
- Enter your registered email address and password.
- Verify that you can log in successfully.
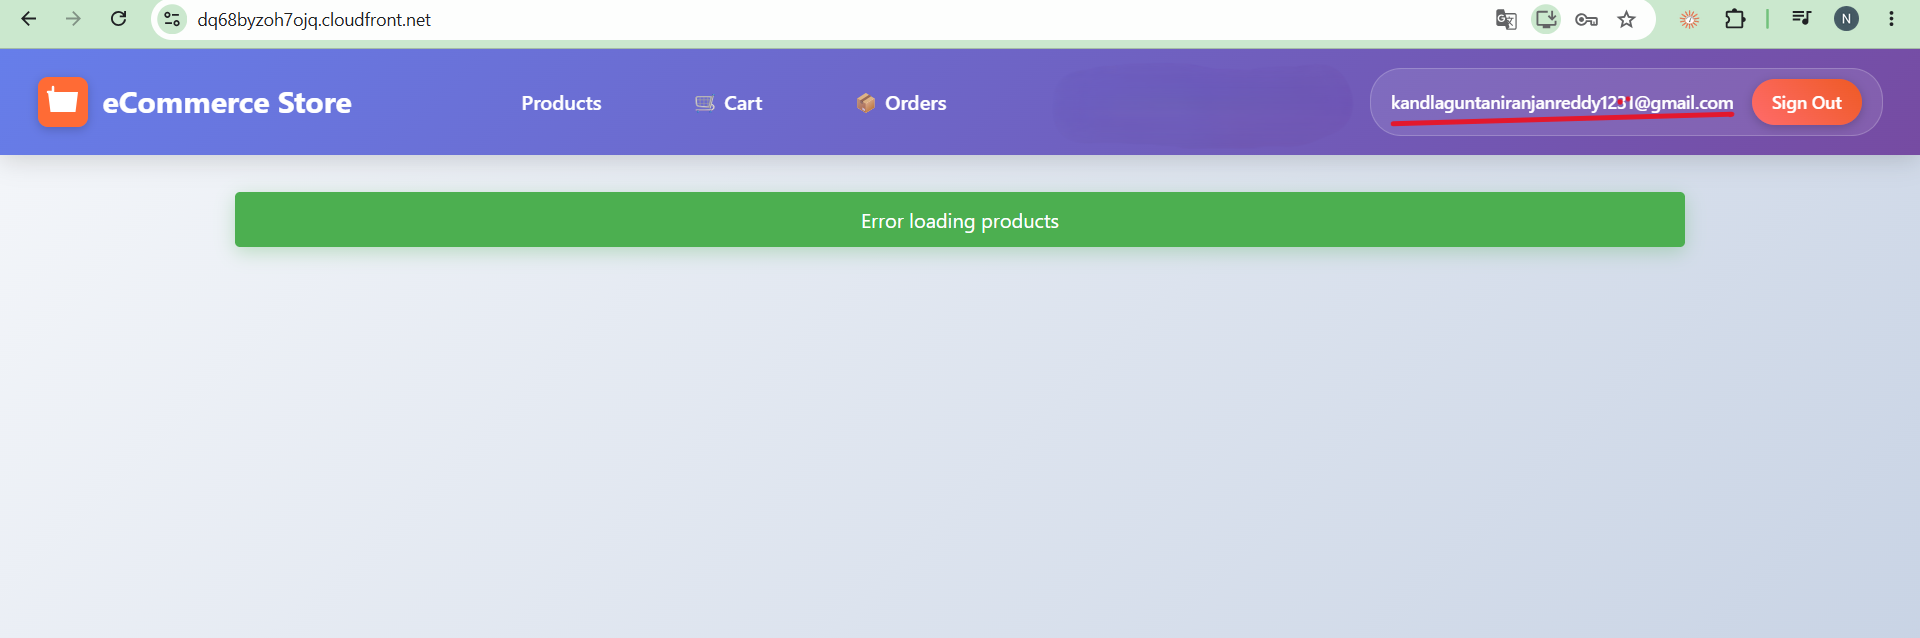
- Log out and confirm that you can sign in again.
Expected Results
Working in this module:
- Frontend application loads through CloudFront.
- Users can sign up.
- Email verification works.
- Users can log in and log out.
Not yet working:
- Product listing may display an error because the backend API is not connected.
- Cart and order features require the backend services and APIs.
These features will be connected in Module 7: Frontend-Backend Integration.
11. Conclusion
- In this module, we deployed our React frontend using Amazon S3 and Amazon CloudFront.
- We configured private S3 access through Origin Access Control (OAC), set up the default root document and custom error pages, and connected the frontend to Amazon Cognito.
- Finally, we built and uploaded the React application and tested the registration, login, and logout functionality.
- Now Proceed to Database Configuration, where we will configure the database required for our e-commerce application.
Module 4: Data Layer
Overview
- In this module, we will configure the data storage and databases required for our e-commerce application.
- In the previous module, we deployed the frontend using Amazon S3 and CloudFront and configured Amazon Cognito for user authentication. Now, we will prepare the data layer required by our backend services.
- Our application uses Amazon S3 to store product images, Amazon DynamoDB to store product and cart data, and Amazon RDS PostgreSQL to store user and order data. We will also use AWS Systems Manager Parameter Store to store configuration values required by our microservices.
In This Module
- Upload product images to Amazon S3 and access them through CloudFront.
- Create DynamoDB tables for products and shopping carts.
- Load sample product data into DynamoDB.
- Create an Amazon RDS PostgreSQL database for user and order services.
- Store database configuration parameters in AWS Systems Manager Parameter Store.
4.1 Upload Product Images to Amazon S3
- We will use the same S3 bucket created in Module 3 to store our product images. CloudFront will deliver these images to users and cache them at edge locations for improved performance.
- The repository contains 20 sample product images under the
data/product-images/directory.
Step 1: Upload the Product Images
- Open your terminal and navigate to the repository's
datadirectory.
cd data
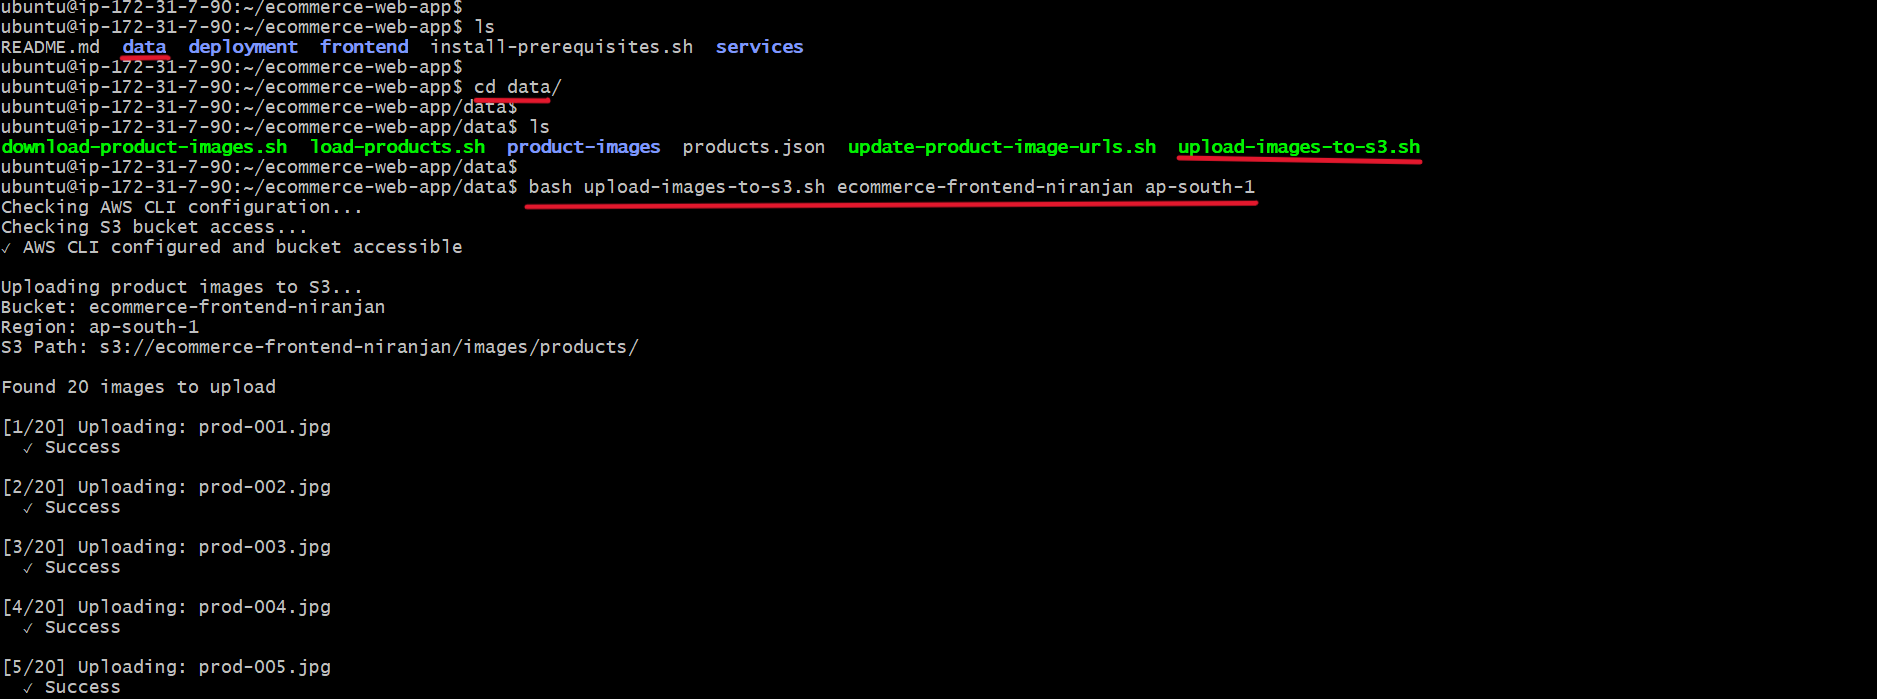
- Run the upload script using your S3 bucket name and AWS Region, as required by the script in your repository.
bash upload-images-to-s3.sh <your-bucket-name> <your-region>
Example values:
- S3 bucket:
<your-frontend-bucket-name> - AWS Region:
ap-south-1
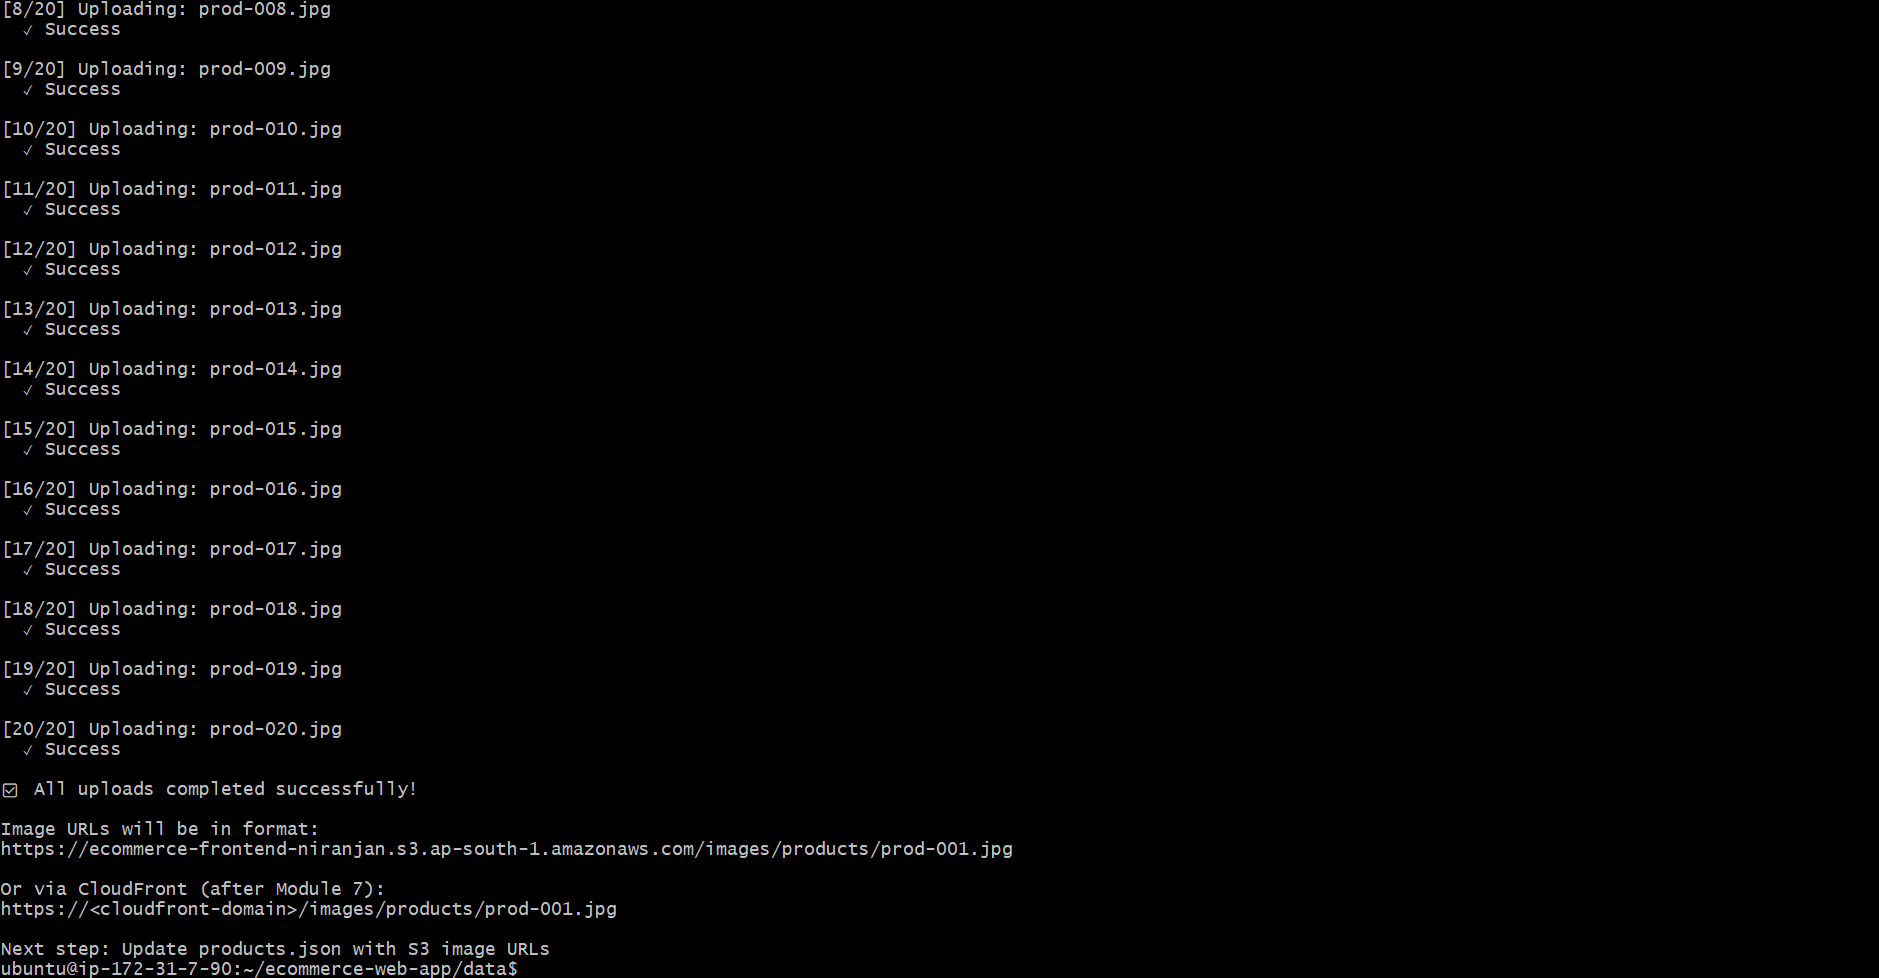
- The script uses the AWS CLI to upload the sample product images to your S3 bucket.
Step 2: Verify the Uploaded Images
- Open the AWS Management Console.
- Navigate to Amazon S3 → Buckets.
- Open your frontend bucket.
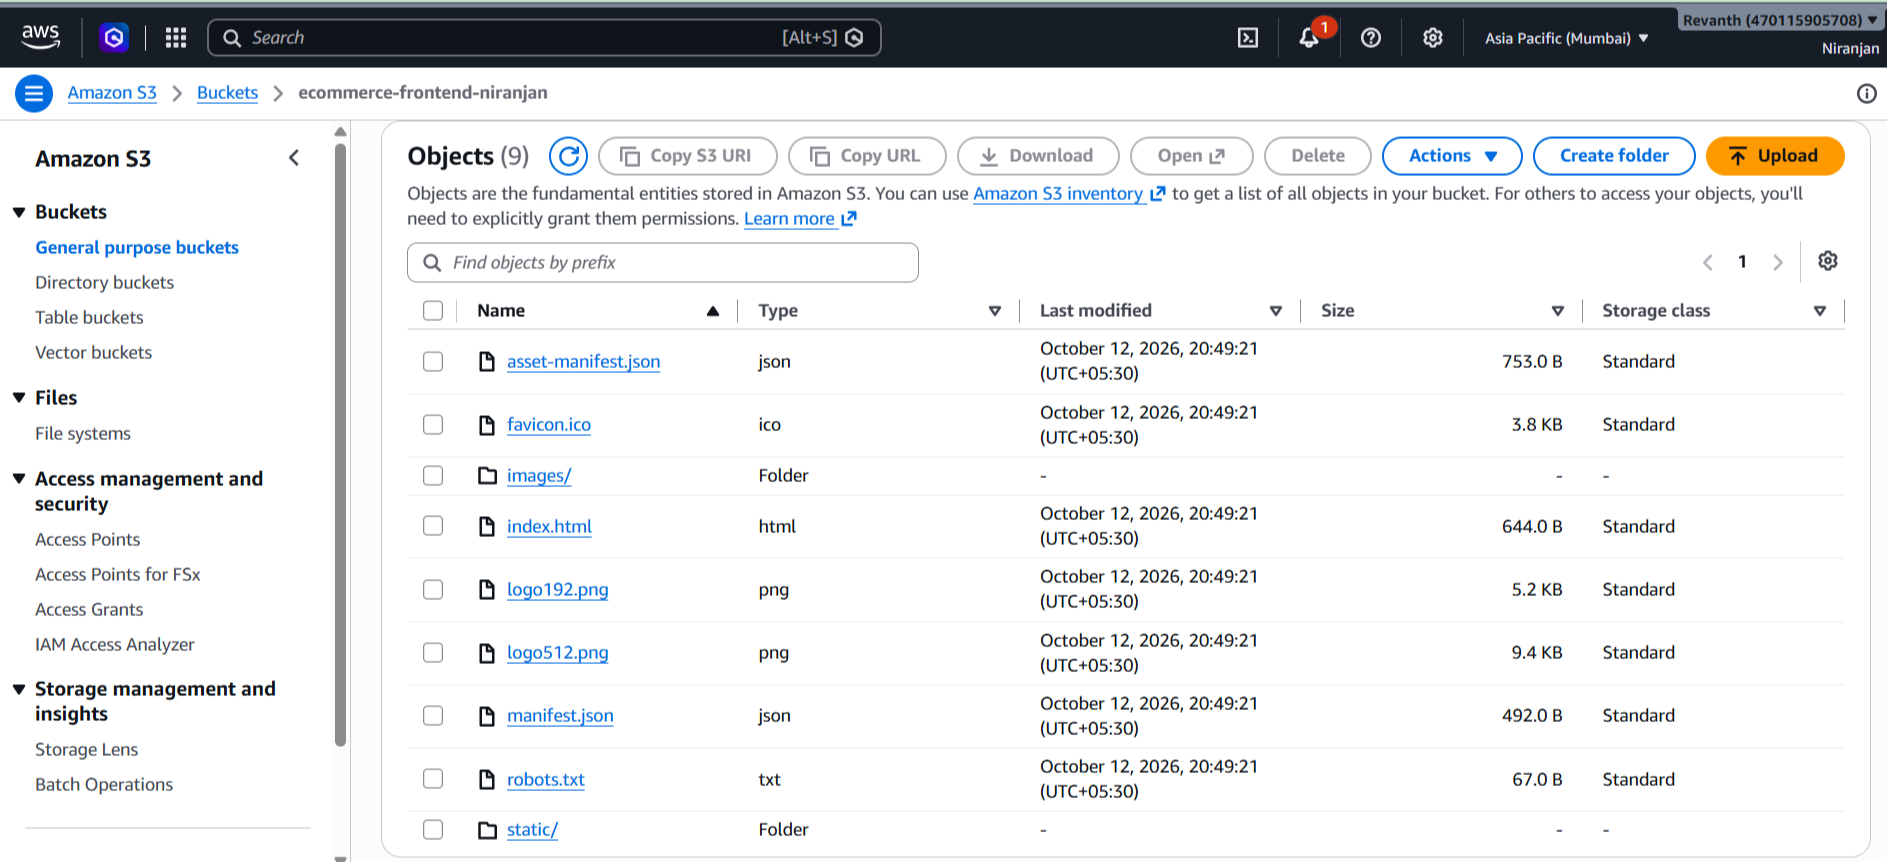
- Navigate to the
images/products/directory. - Verify that the 20 product images have been uploaded.
4.2 Amazon DynamoDB — NoSQL Database
Amazon DynamoDB is a fully managed NoSQL database service. In this project, we will create two tables:
ecommerce-products— stores product information.ecommerce-cart— stores shopping cart information for each user.
The product table will contain sample data that we load manually using a script. The cart table will be populated automatically when users add items to their carts.
Step 1: Create the Tables
- Open the AWS Management Console.
- Navigate to Amazon DynamoDB → Tables.
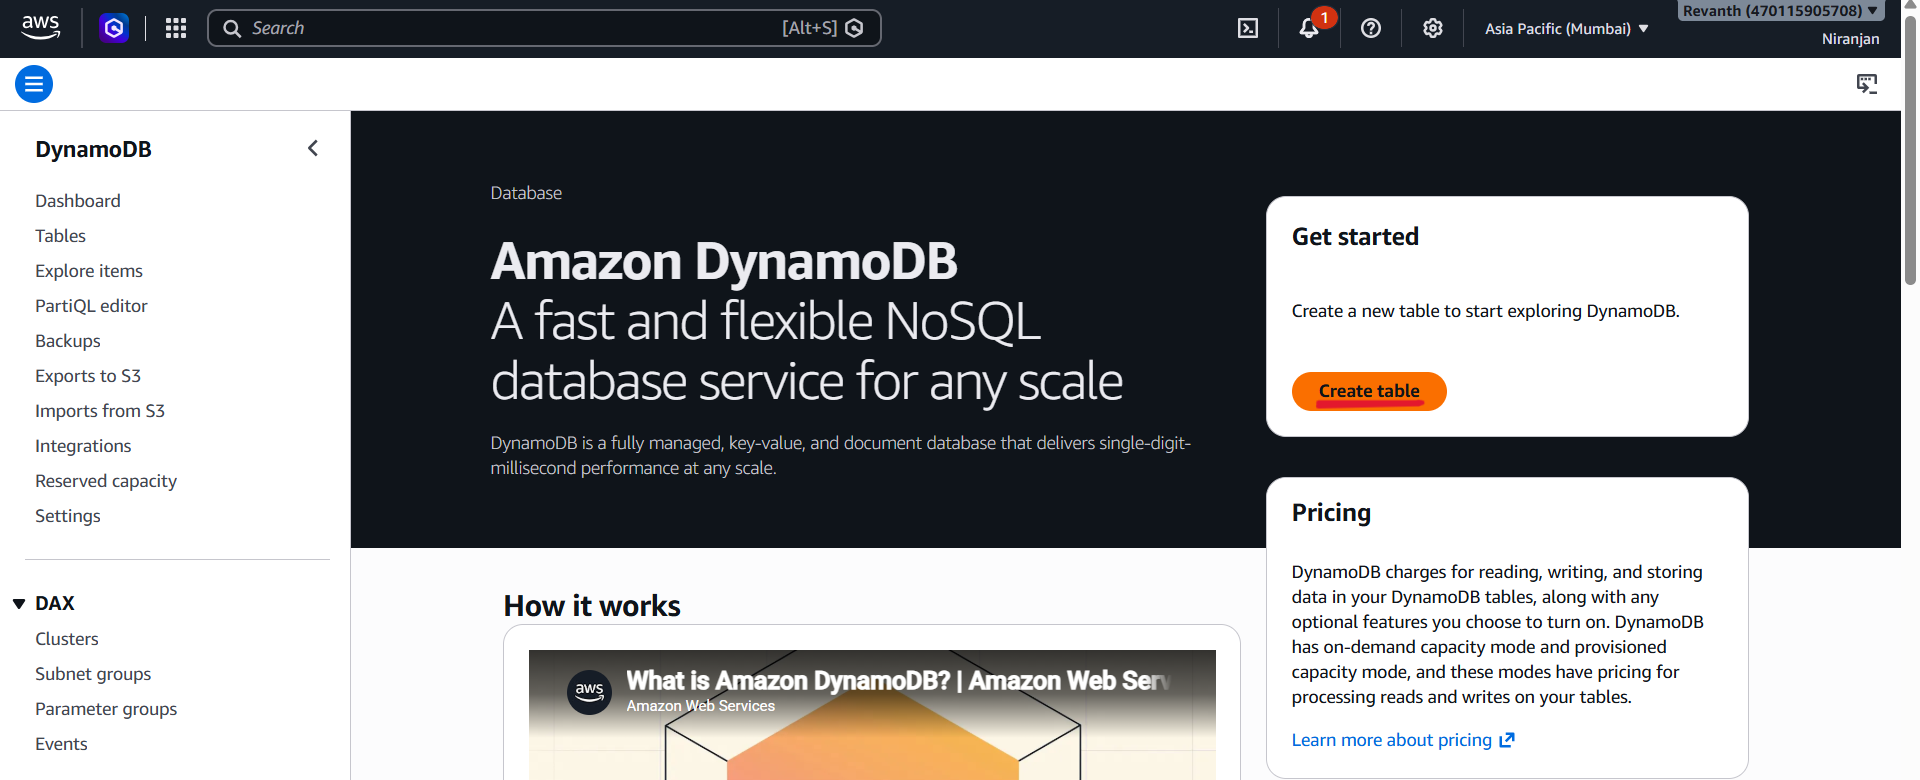
- Click Create table.
- Configure the following settings.
- DynamoDB Console → Tables → Create table
Step 3: Create Products Table
- Table name:
ecommerce-products - Partition key:
product_id(String)
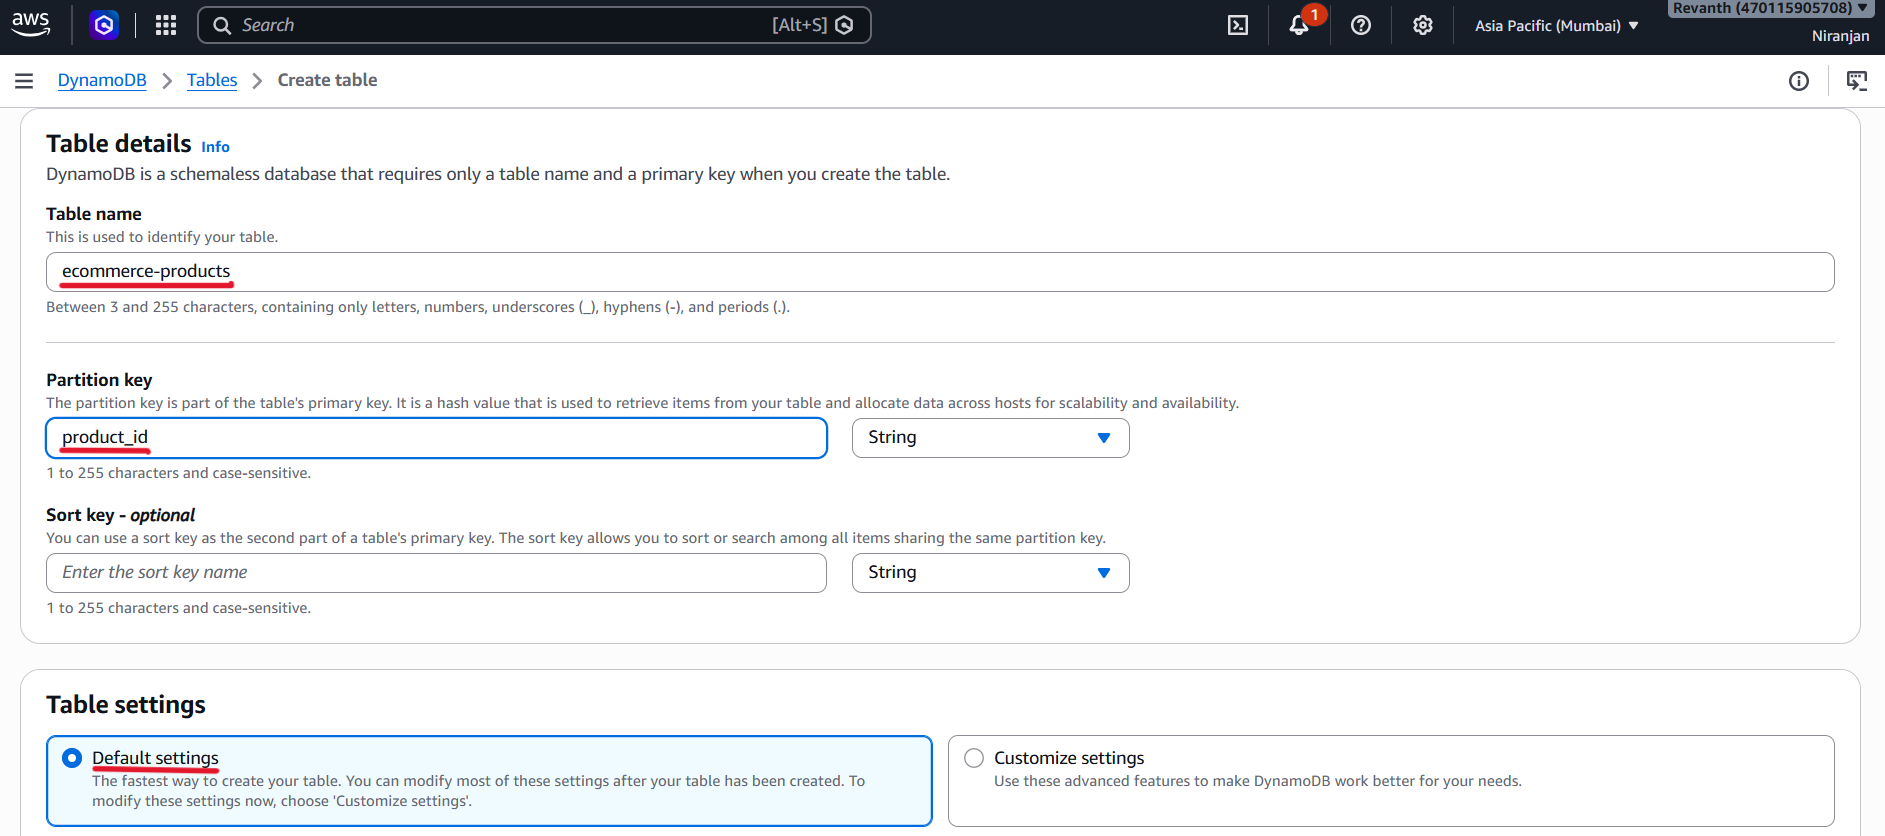
- Sort key: Leave empty (no sort key needed)
- Table class: DynamoDB Standard
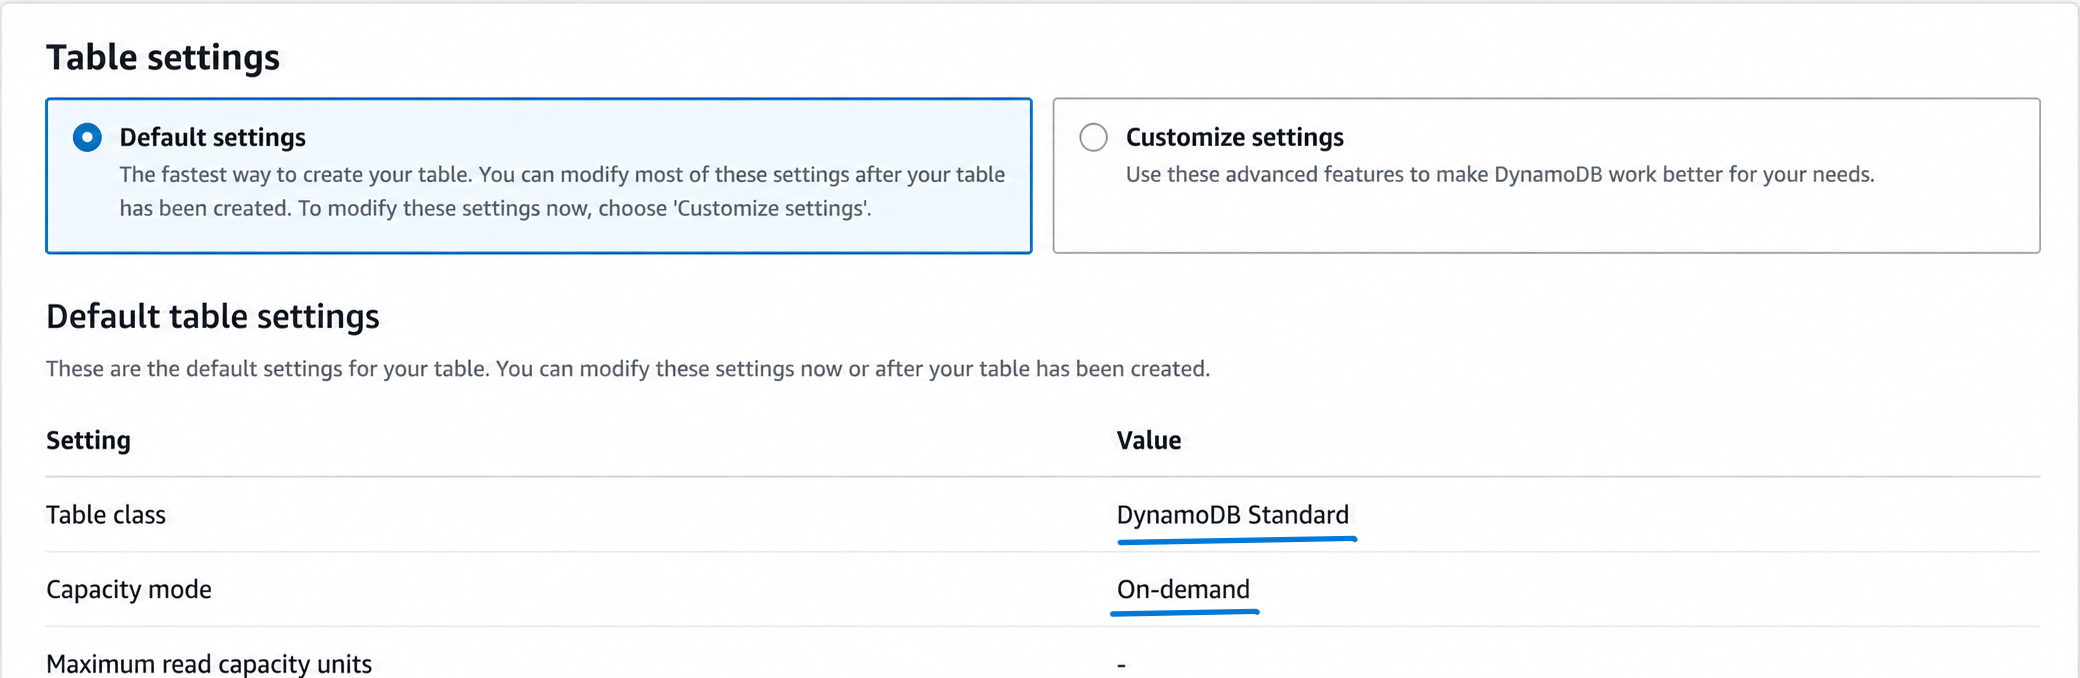
- Capacity mode: On-demand
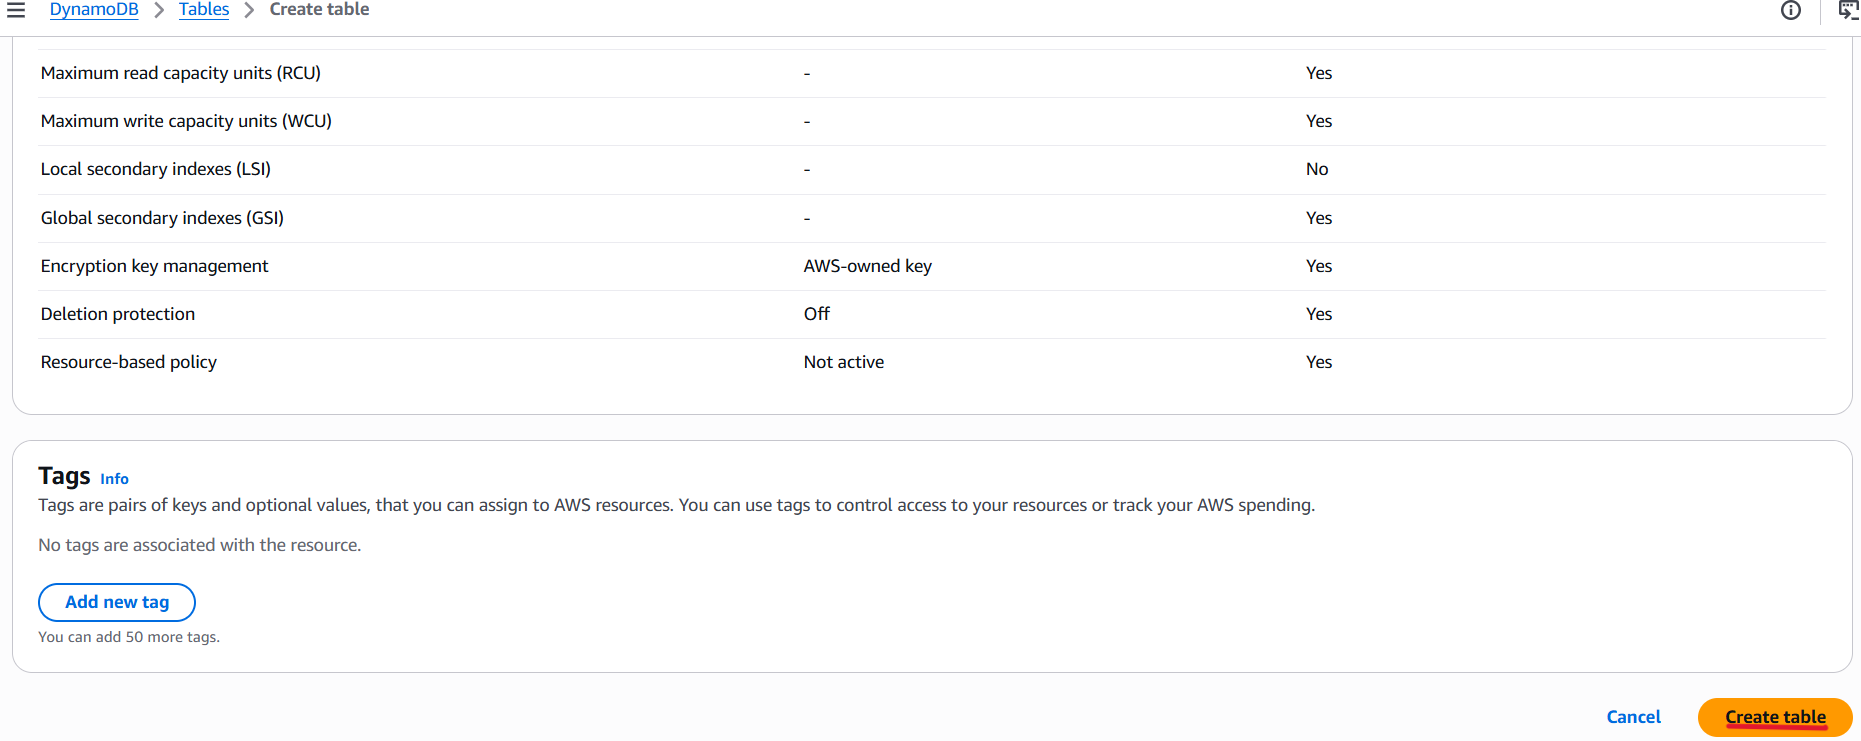
- Create table
- Wait until the table becomes active.
Step 3: Create the Cart Table
- DynamoDB Console → Tables → Create table
- Table name:
ecommerce-cart - Partition key:
user_id(String)
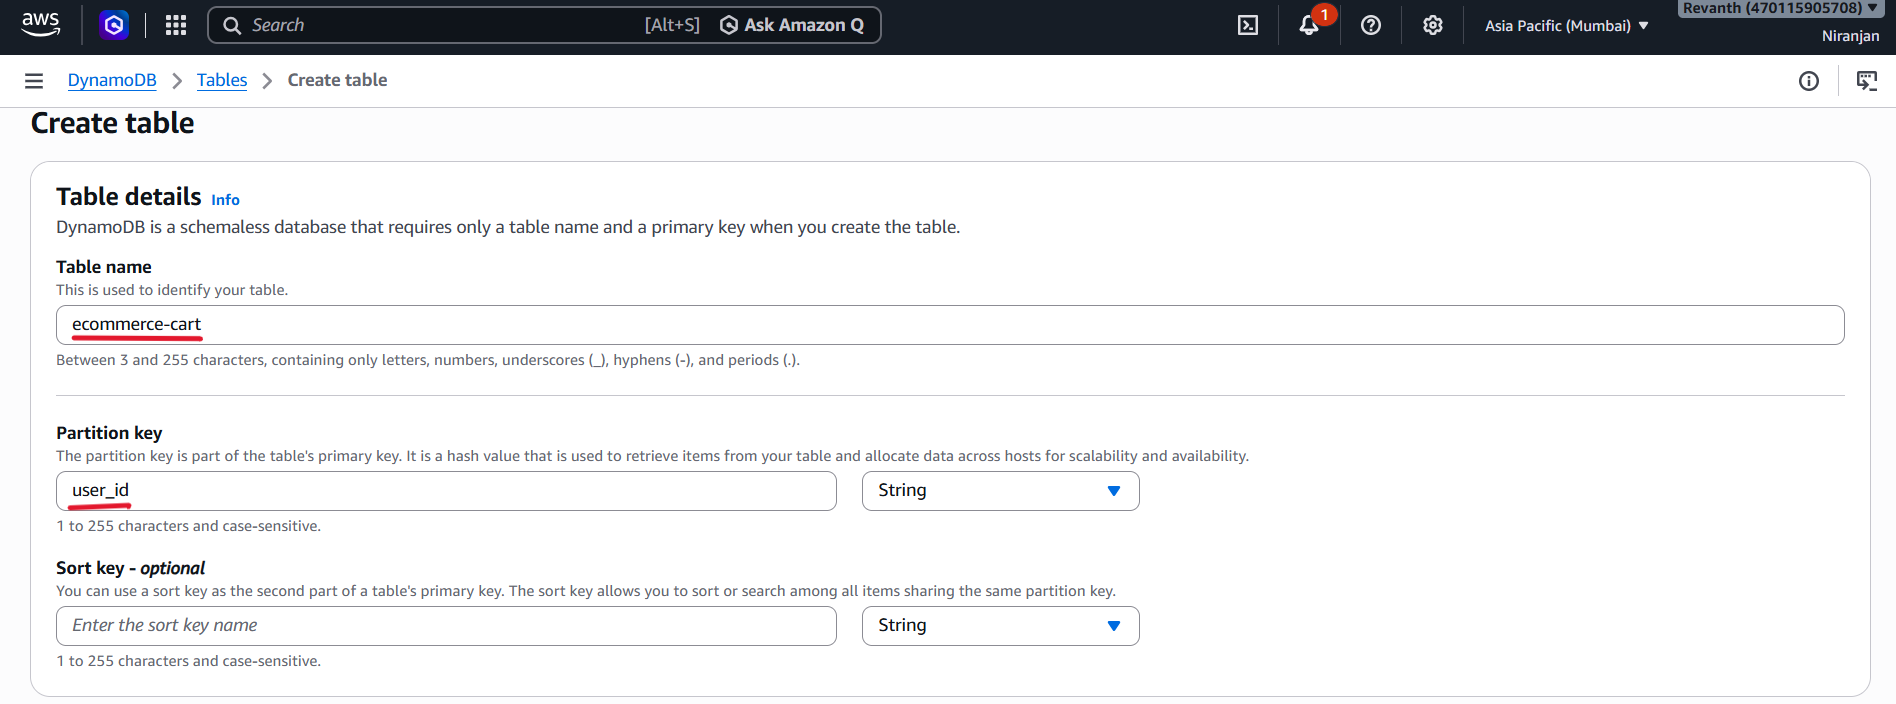
- Sort key: Leave empty (no sort key needed)
- Table class: DynamoDB Standard
- Capacity mode: On-demand
- Create table
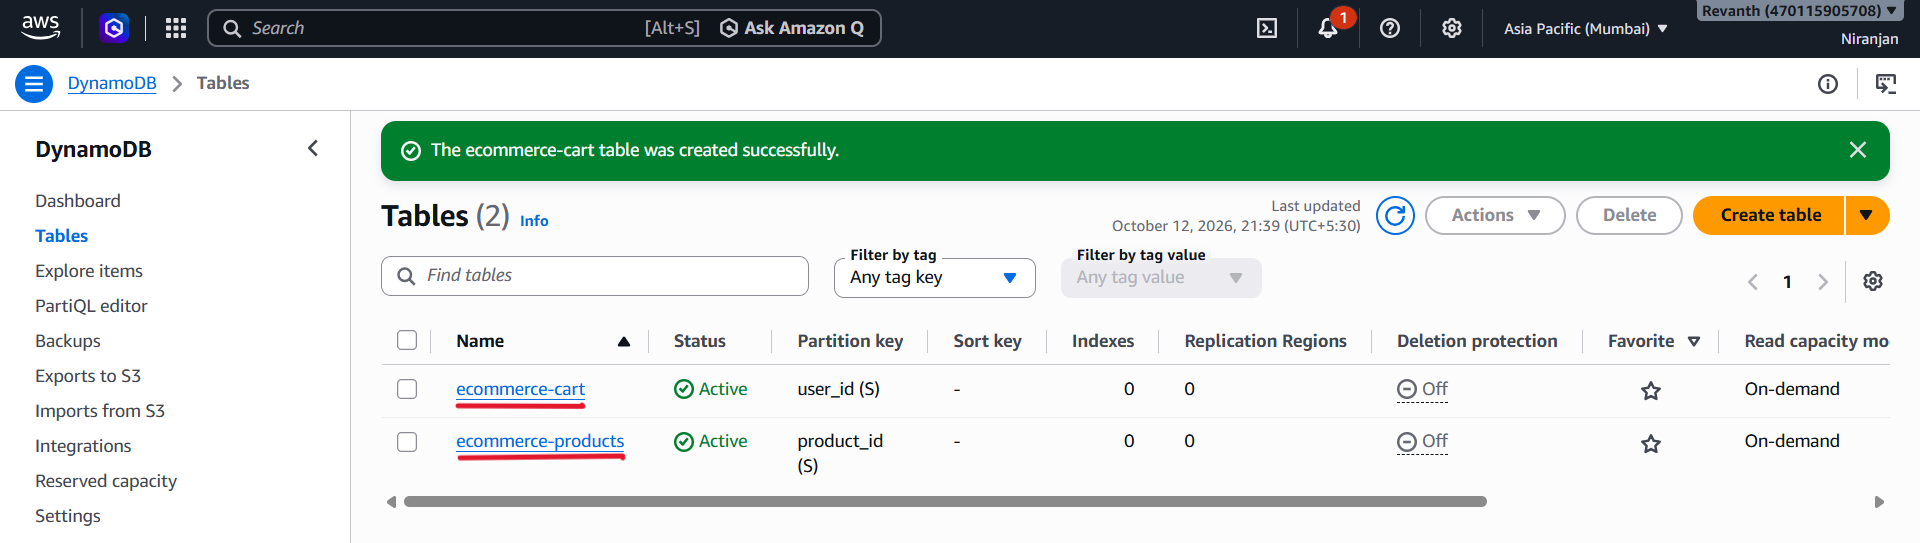
- Wait until the table becomes active. The
user_idpartition key identifies the user whose cart contains the items.
Step 4: Understand the Sample Product Data
The repository contains a products.json file with sample data for 20 products.
Each product contains fields such as:
product_idnamedescriptionpricestockimage_urlcategory
Example product:
{
  "product_id": "prod-001",
  "name": "Wireless Bluetooth Headphones",
  "description": "Premium noise-cancelling over-ear headphones",
  "price": 89.99,
  "stock": 150,
  "image_url": "https://example.com/images/products/prod-001.jpg",
  "category": "Electronics"
}
- The example
image_urlis a placeholder. We must replace it with the actual CloudFront URL before loading the product data into DynamoDB.
Step 5: Update the Product Image URLs
- Navigate to the repository's
datadirectory.
cd data
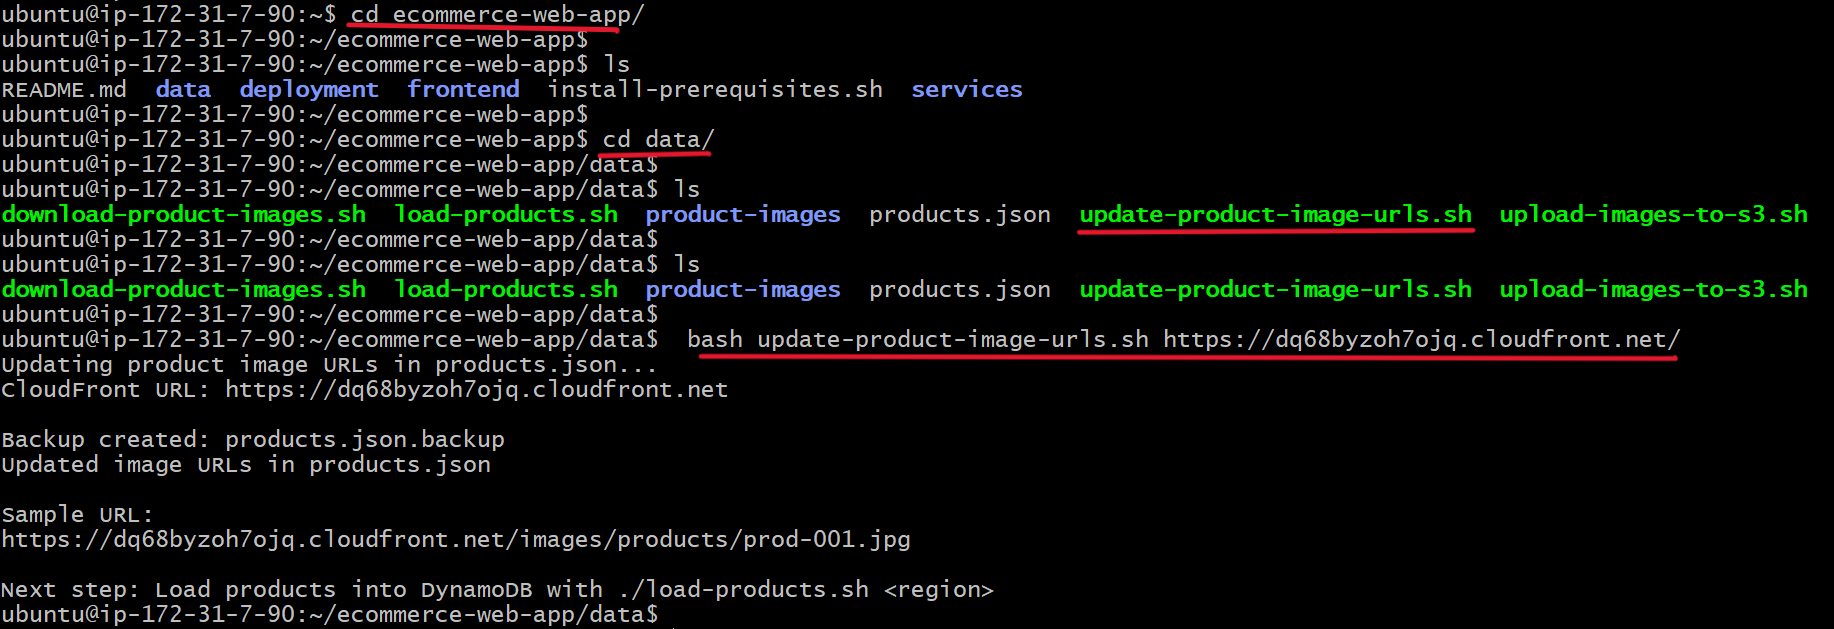
- Run the following script, replacing the placeholder with your CloudFront domain:
bash update-product-image-urls.sh https://<your-cloudfront-domain>
Example:
bash update-product-image-urls.sh https://dq68byzoh70jq.cloudfront.net
- This script updates the product image URLs in
products.jsonto use CloudFront. - Verify that the image URLs point to the correct CloudFront domain and the
images/products/path.
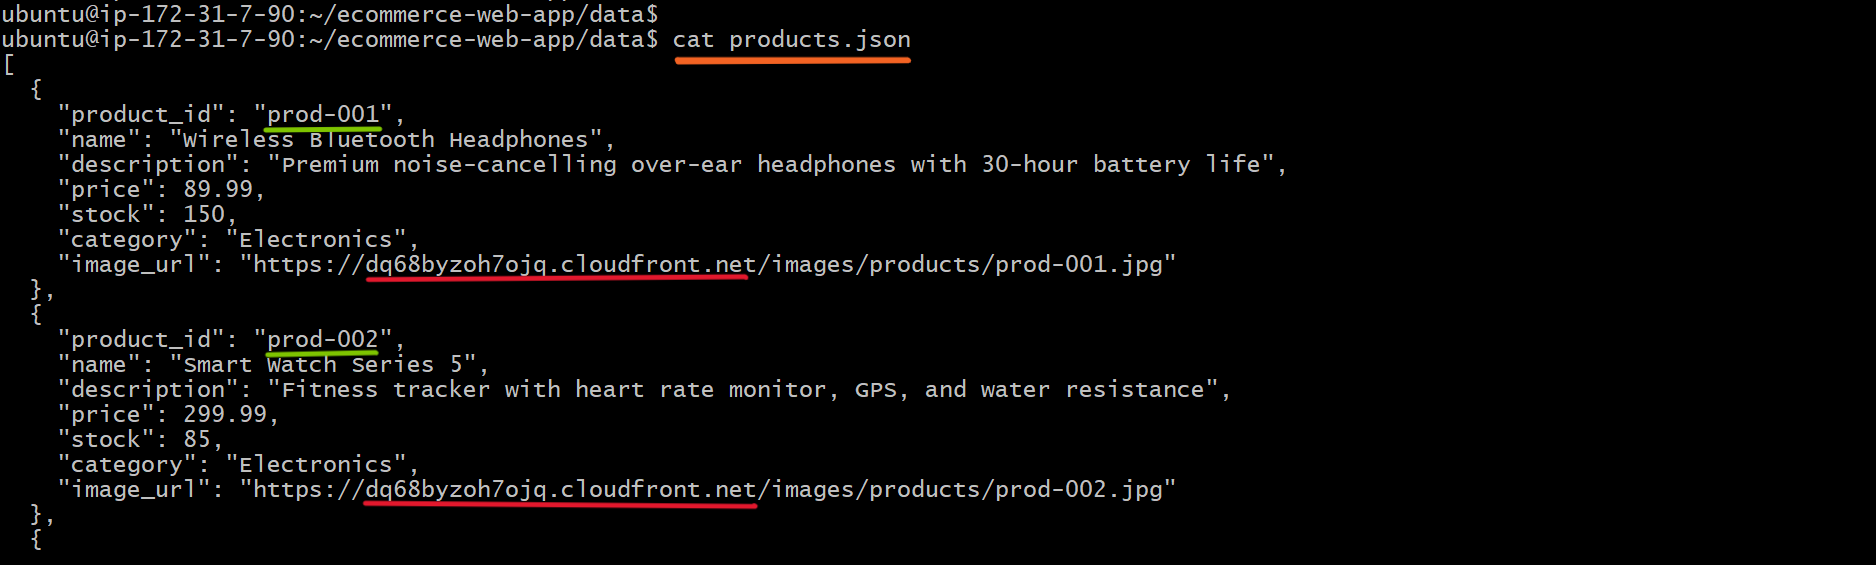
- The
update-product-image-urls.shscript replaces the placeholder image URLs inproducts.jsonwith the CloudFront URL. - This updates the image URLs for all 20 products, so each product points to its corresponding image in the S3 bucket through CloudFront.
Step 6: Load Products into DynamoDB
- Run the product loading script from the
datadirectory:
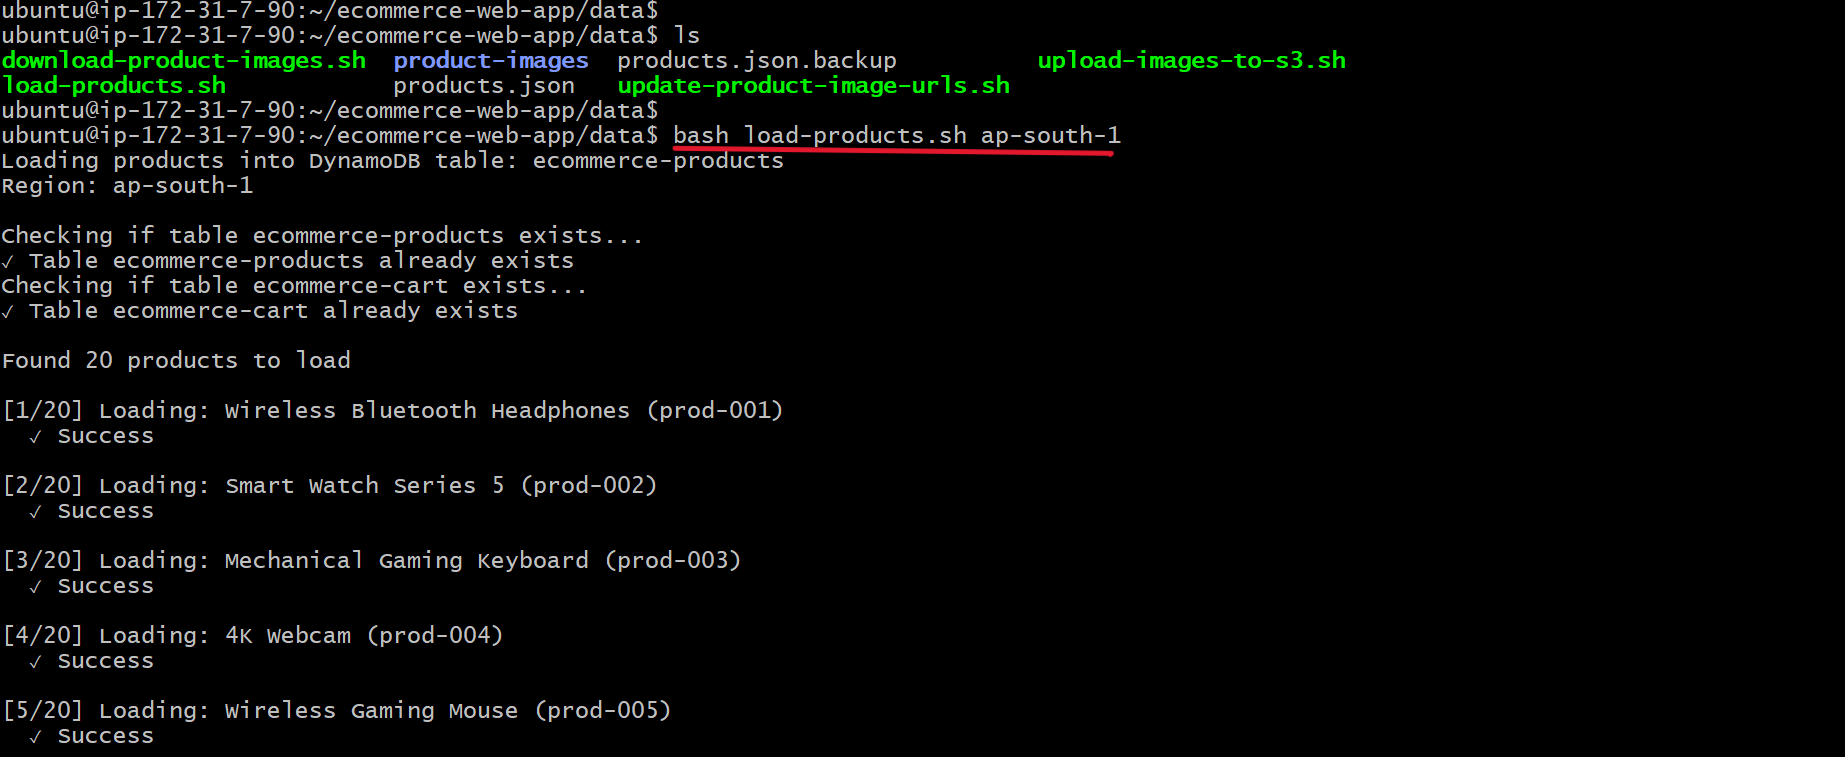
bash load-products.sh <your-region>
Example:
bash load-products.sh ap-south-1
- The script loads the 20 sample products into the
ecommerce-productsDynamoDB table.
Important: Ensure that the table name expected by the script matches the table you created.
- Terminal showing the product loading process.
Step 7: Verify the Product Data
- Open Amazon DynamoDB → Tables.
- Select
ecommerce-products.
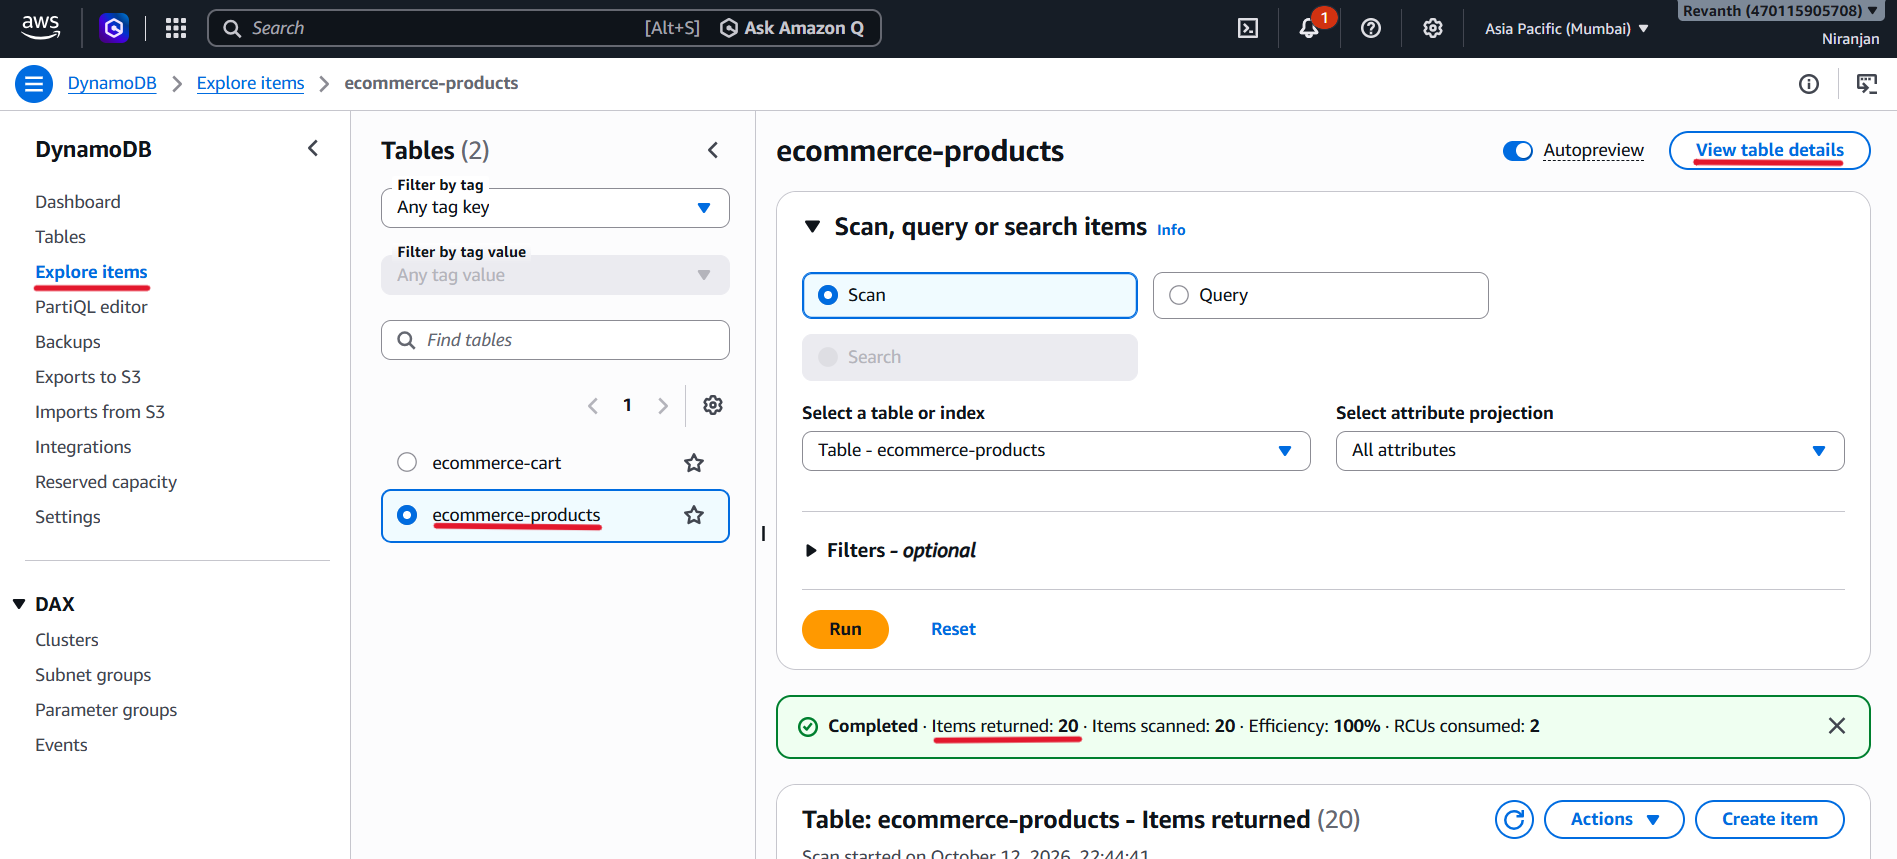
- Open Explore table items.
- Verify that the table contains 20 product items.
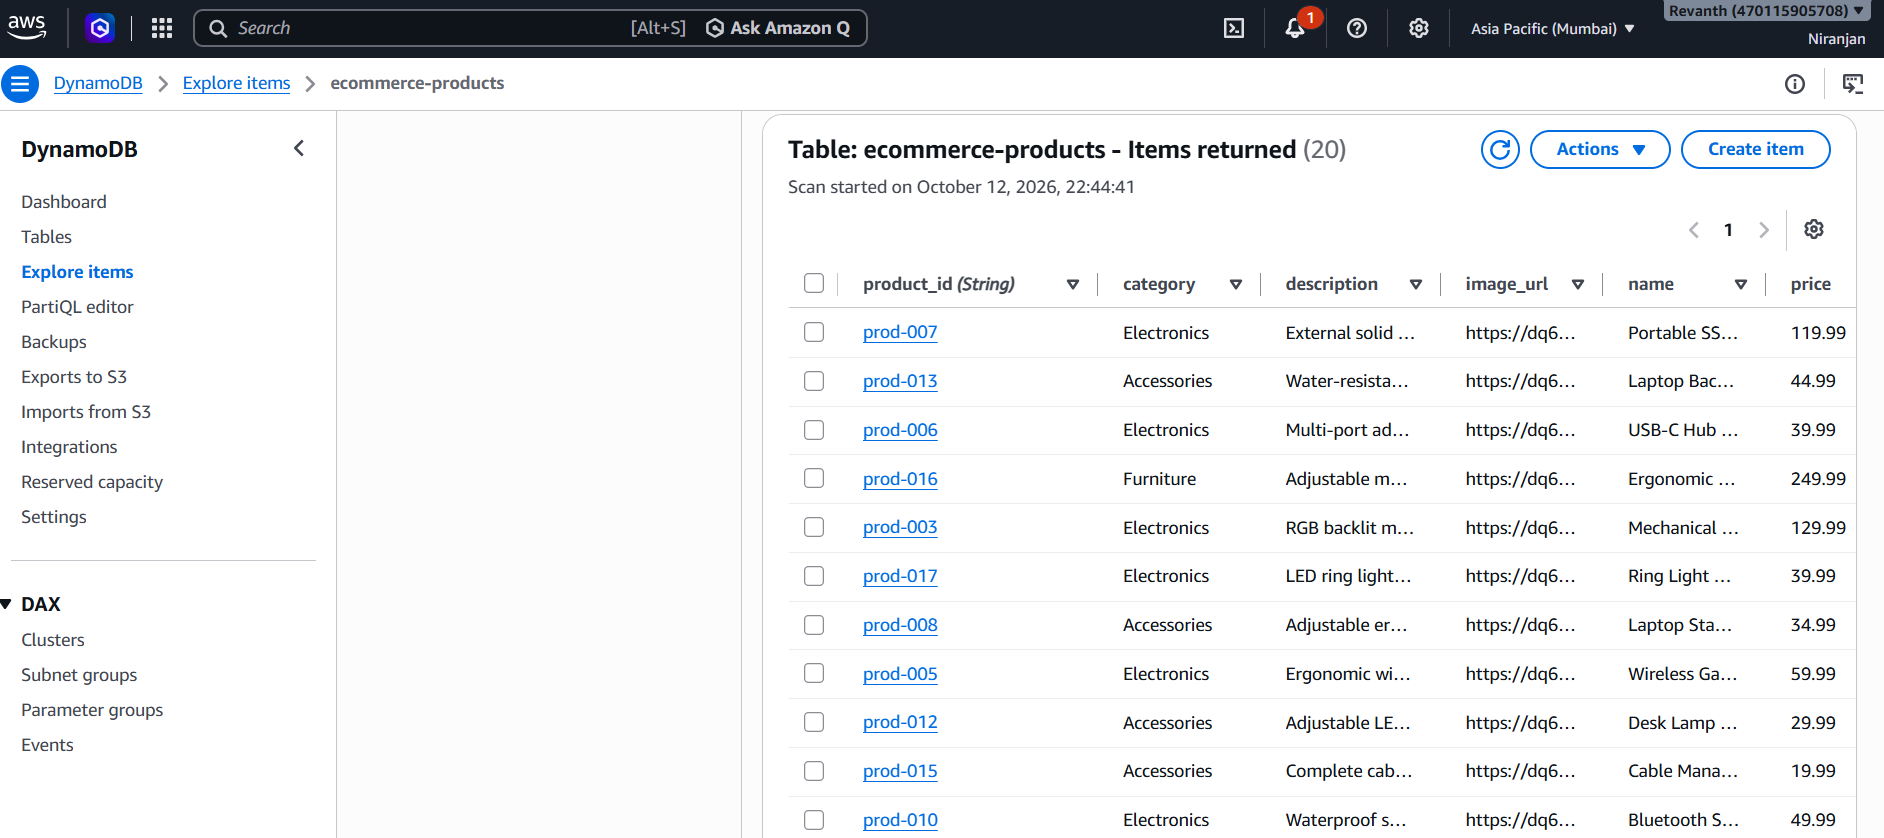
- Open an item and check its product details and CloudFront image URL.
- At this point, we have uploaded the product images to S3 and created the DynamoDB tables with sample product data.
4.3 Amazon RDS — PostgreSQL Database
- Amazon RDS is a managed relational database service. In this project, we will use PostgreSQL to store the data required by the user and order services.
- The database will be deployed inside our existing VPC, using private database subnets. It will not be publicly accessible.
- We will use a single Availability Zone configuration for this development and testing environment to keep costs lower.
Step 1: Create a DB Subnet Group
A DB subnet group identifies the subnets that Amazon RDS can use within our VPC.
- Open Amazon RDS → Subnet groups.
- Click Create DB subnet group.
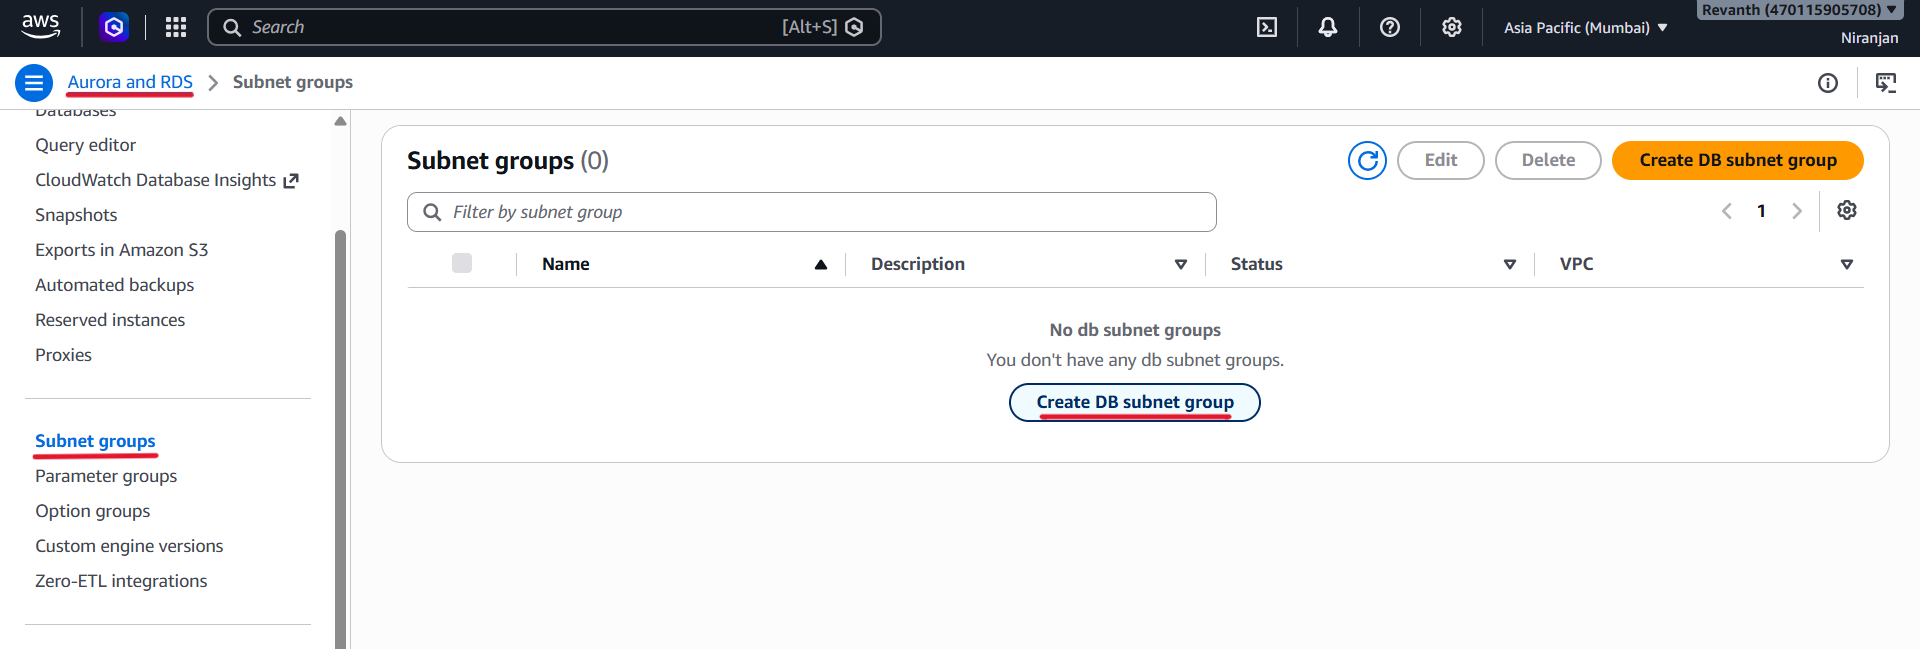
- Enter the following details.
| Setting | Value |
|---|---|
| Name | ecommerce-db-subnet-group |
| Description | Subnet group for ecommerce RDS |
| VPC | ecommerce-vpc |
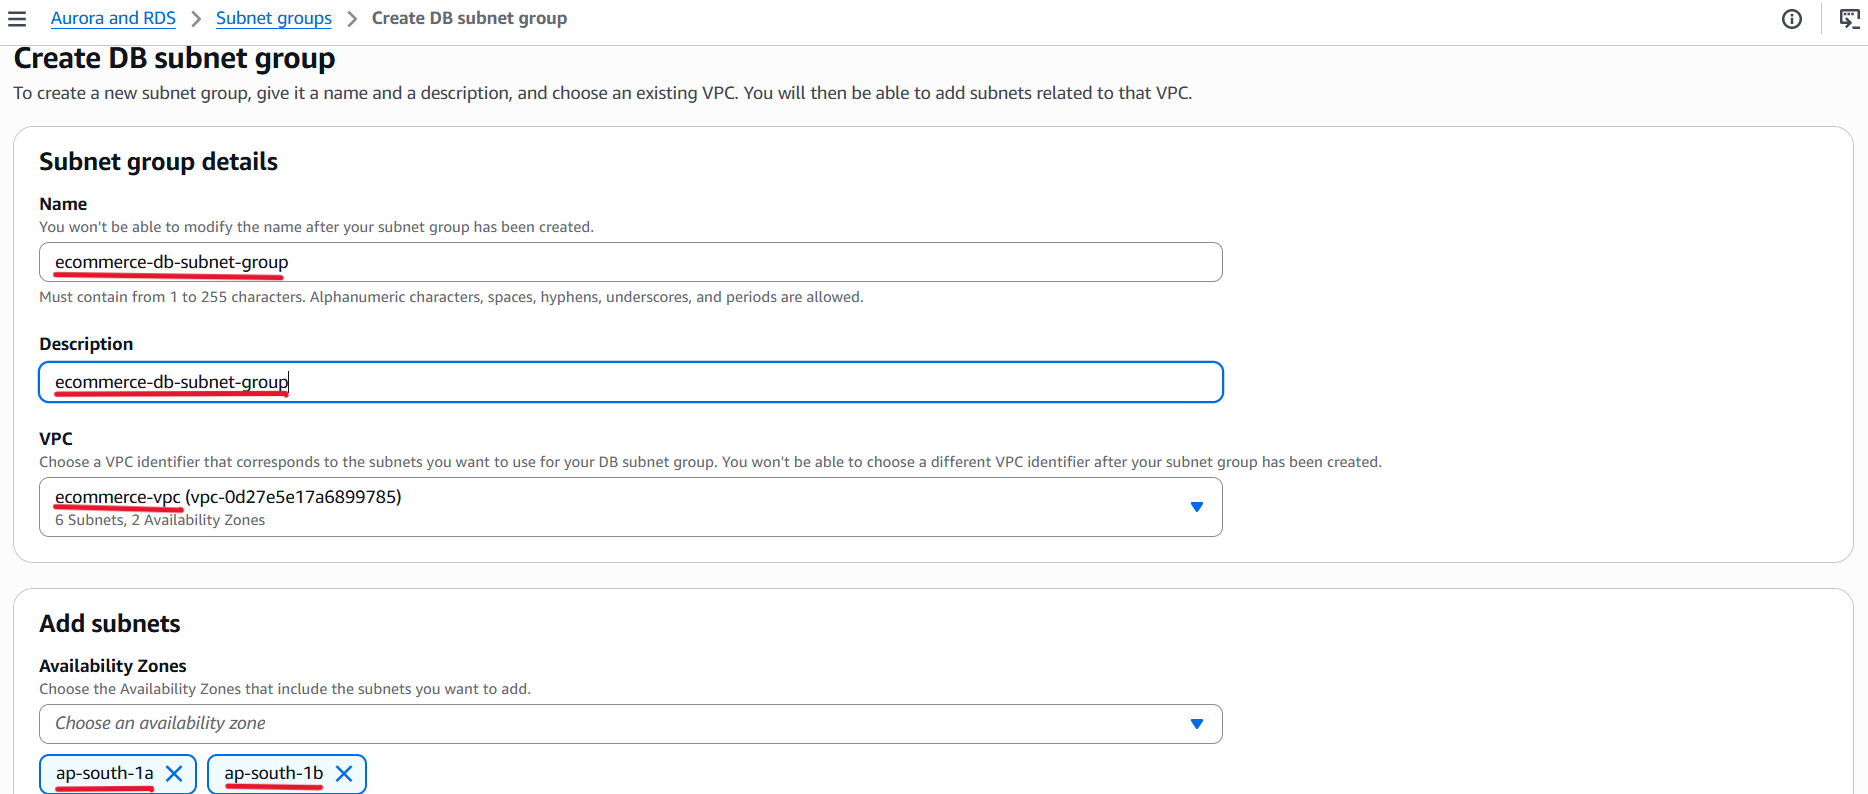
Availability Zones |
|
Subnets | Both private database subnets |
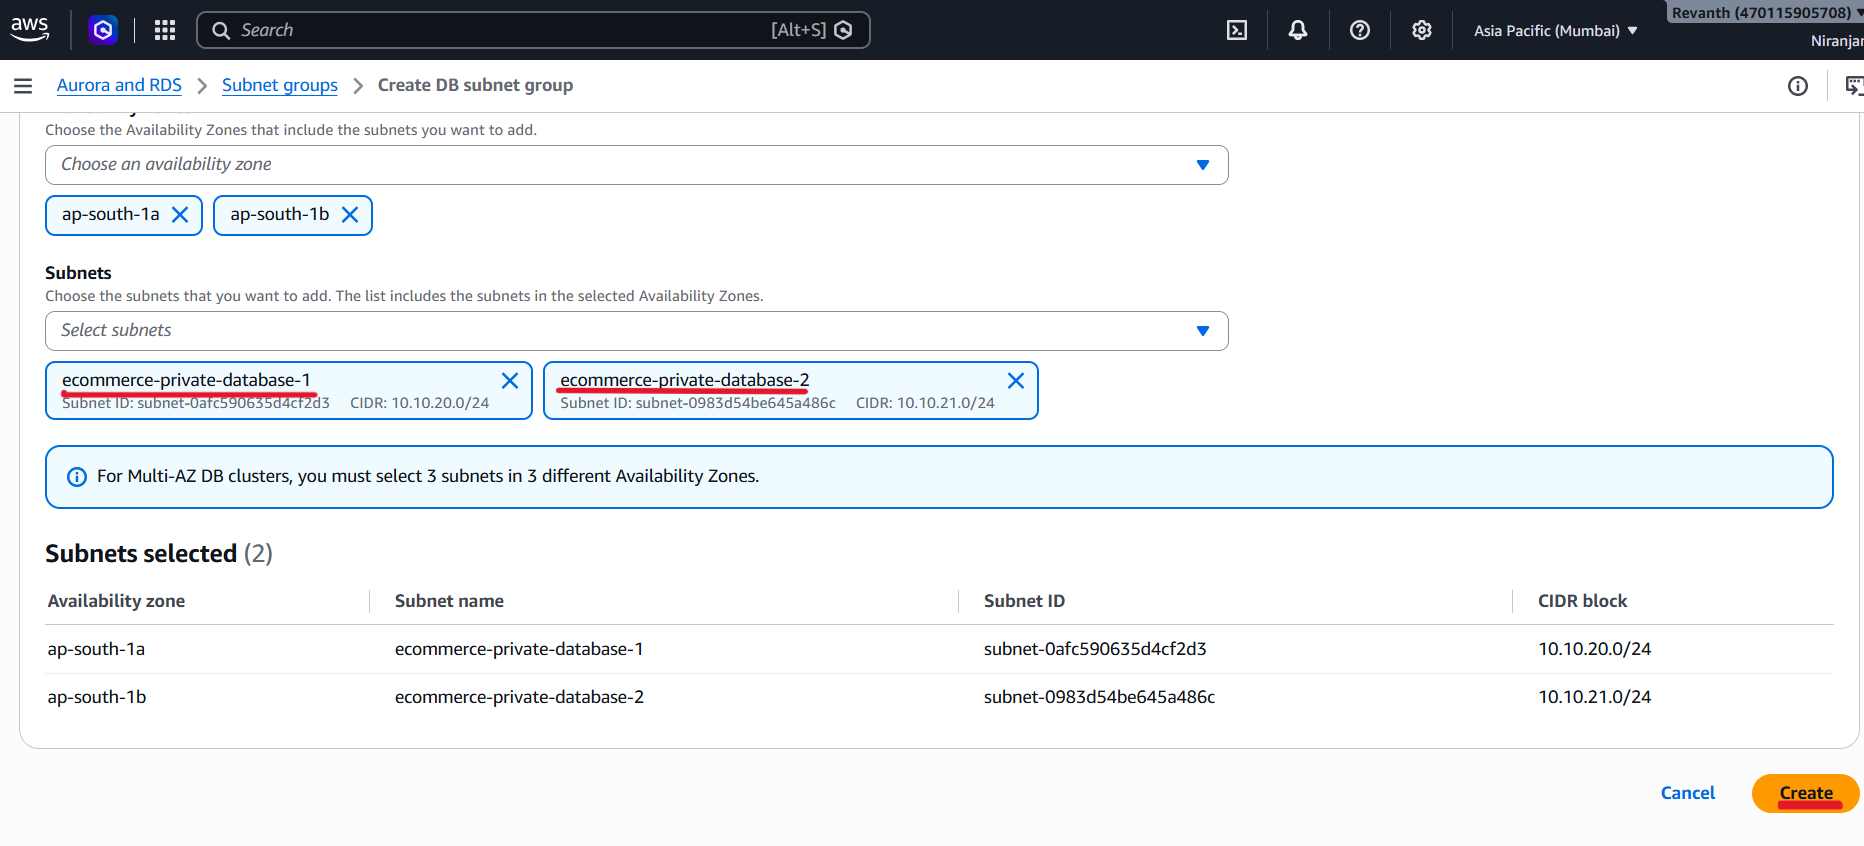
- Select the two private database subnets created in Module 1.
- Click Create.
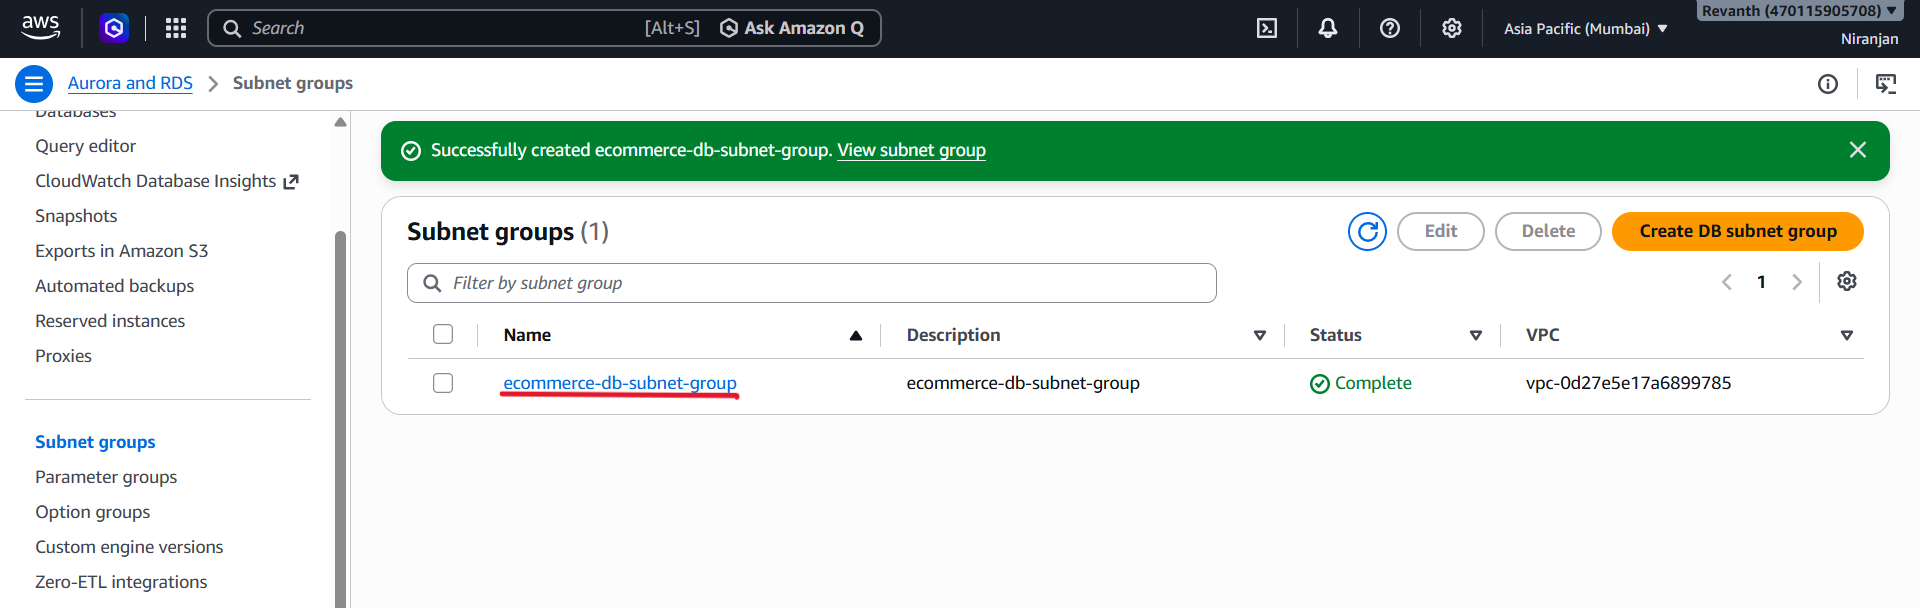
- The DB subnet group should include the private database subnets in both Availability Zones.
Step 2: Create a Security Group for RDS
The RDS security group controls which network traffic can reach the database.
- Open VPC → Security Groups.
- Click Create security group.
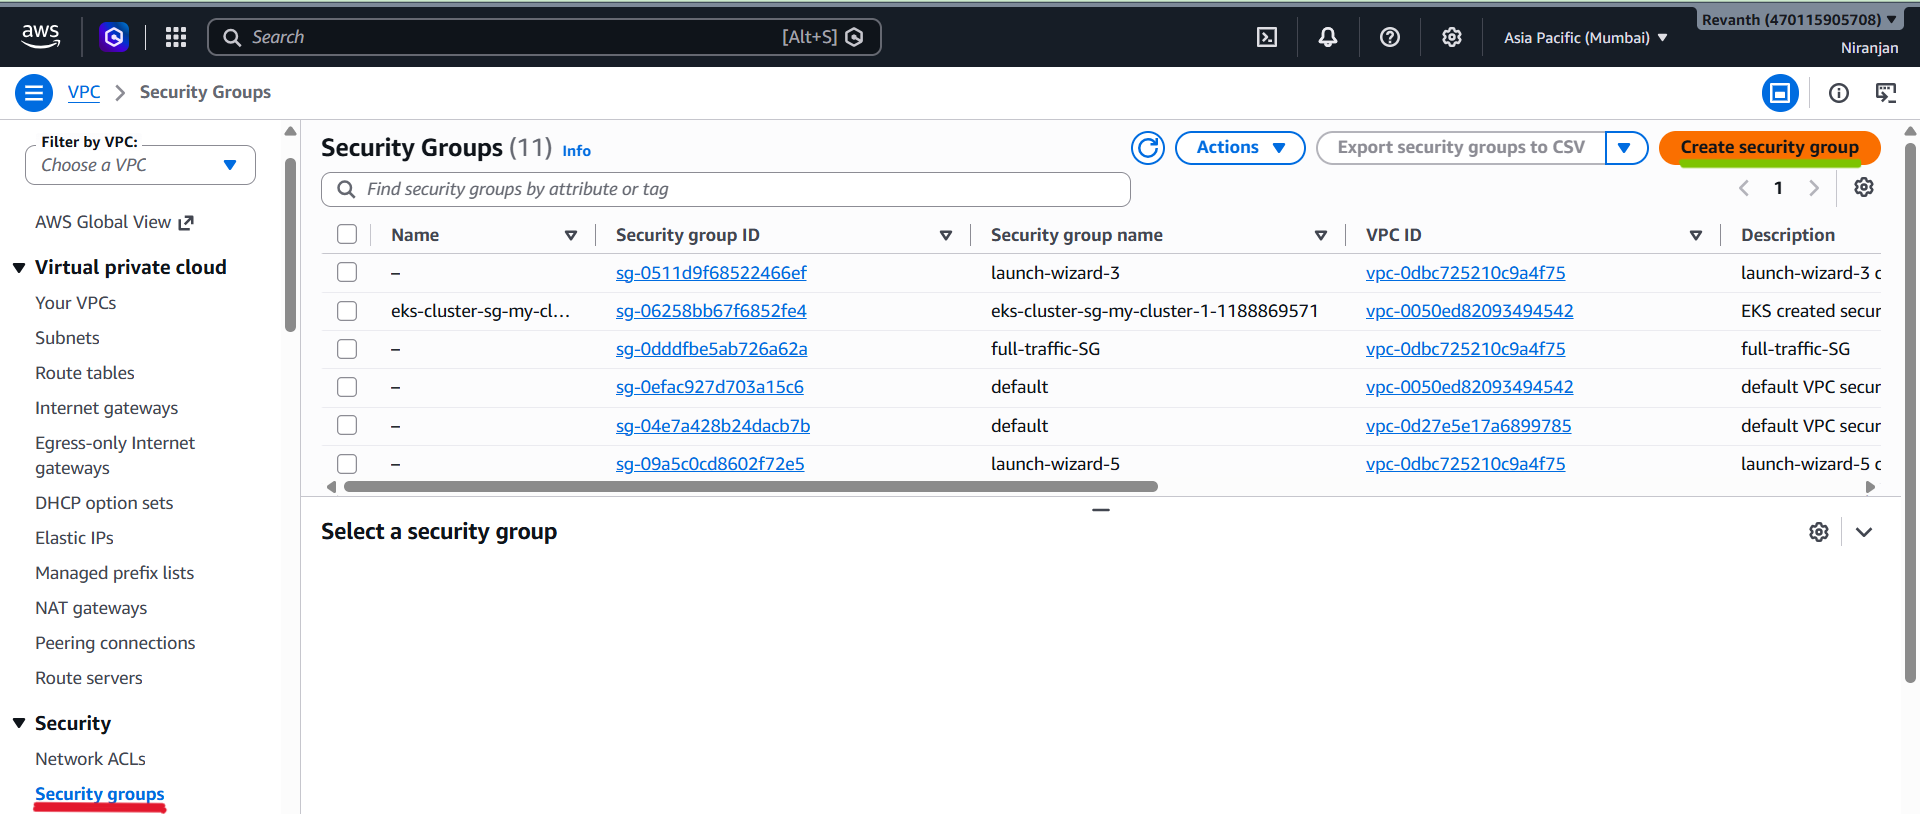
- Configure the following settings.
| Setting | Value |
|---|---|
| Security group name | ecommerce-rds-sg |
| Description | Security group for RDS PostgreSQL |
| VPC | ecommerce-vpc |
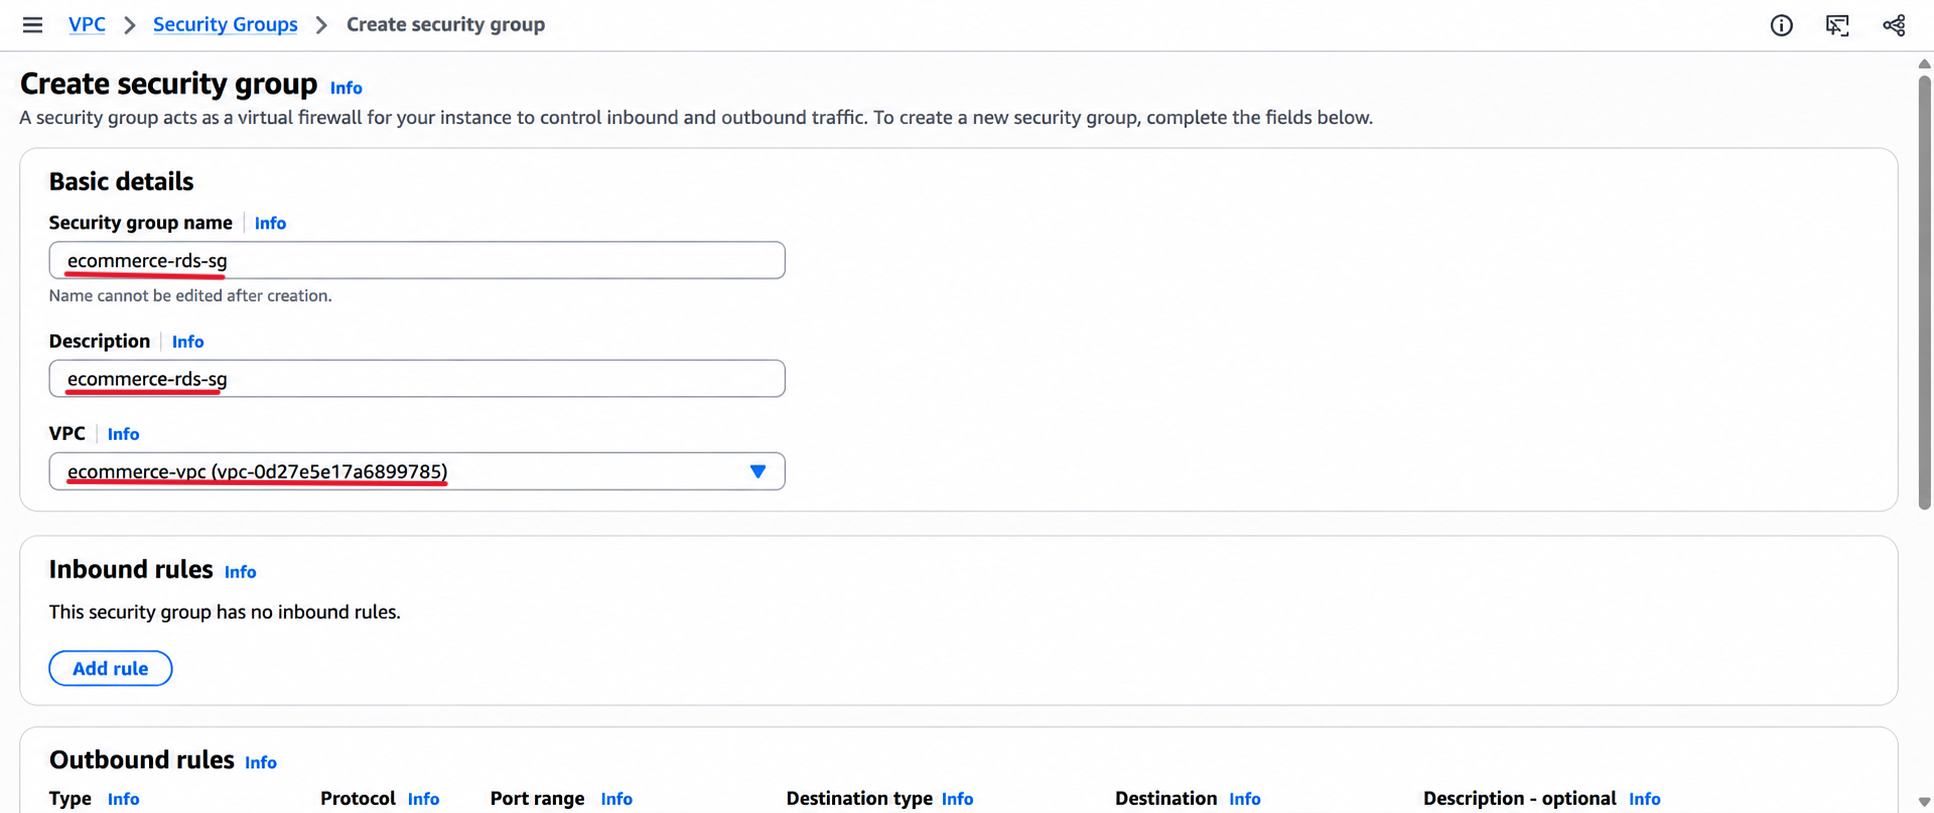
- Under Inbound rules, add the following rule.
| Setting | Value |
|---|---|
| Type | PostgreSQL |
| Protocol | TCP |
| Port | 5432 |
| Source | 10.10.0.0/16 |
| Description | Allow PostgreSQL from VPC |
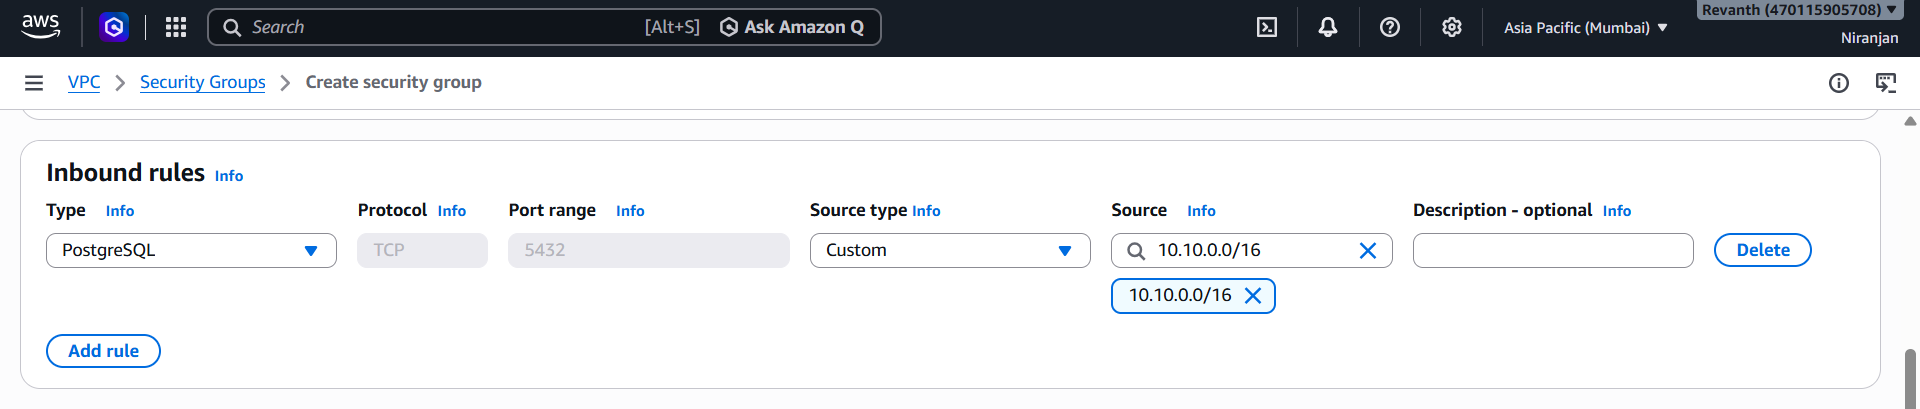
- Keep the default outbound rules.
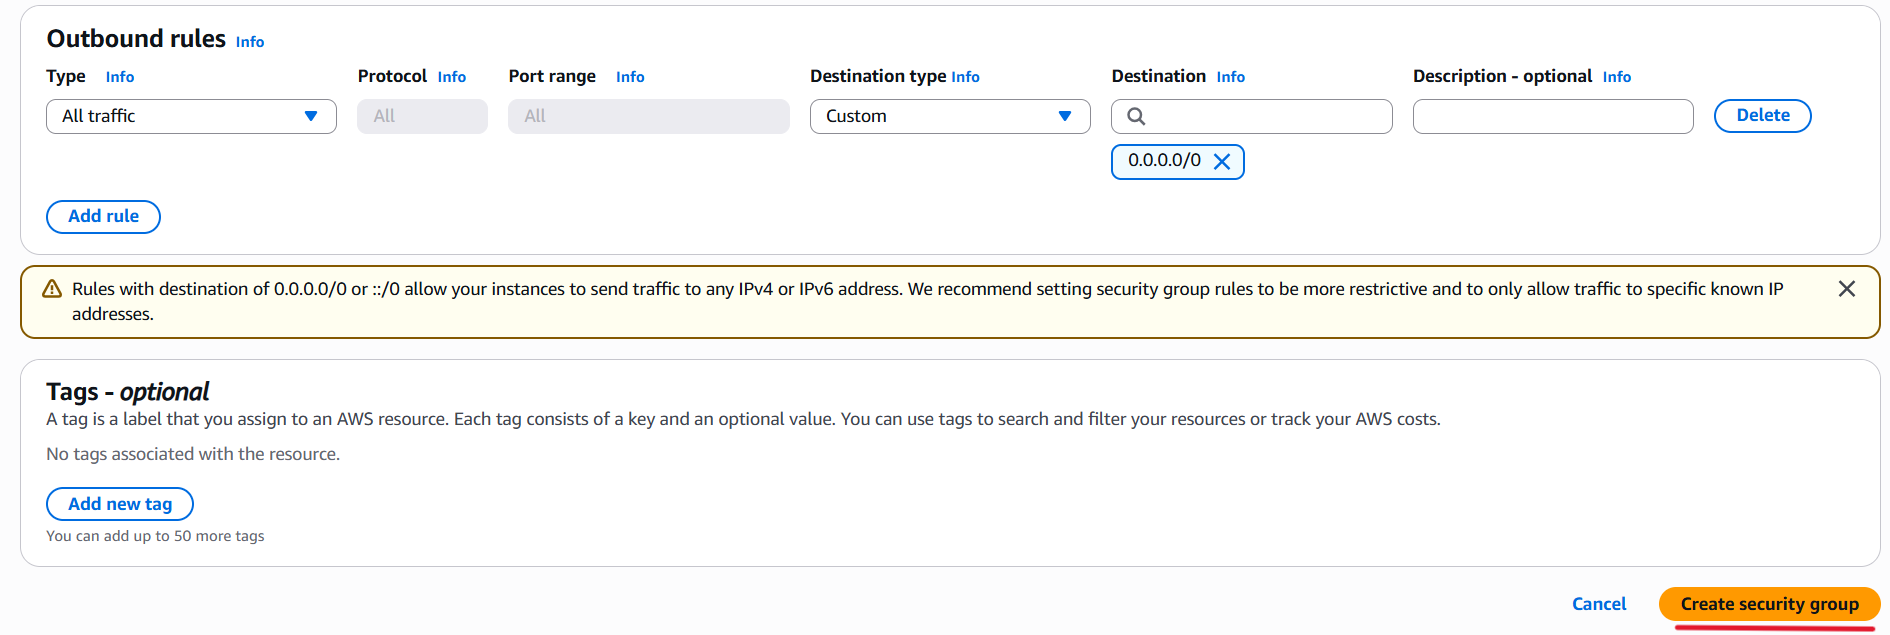
- Click Create security group.
Security note: The VPC CIDR rule is the initial configuration demonstrated in the lecture. For a more restrictive setup, allow inbound PostgreSQL traffic only from the ECS services' security group once it has been created.
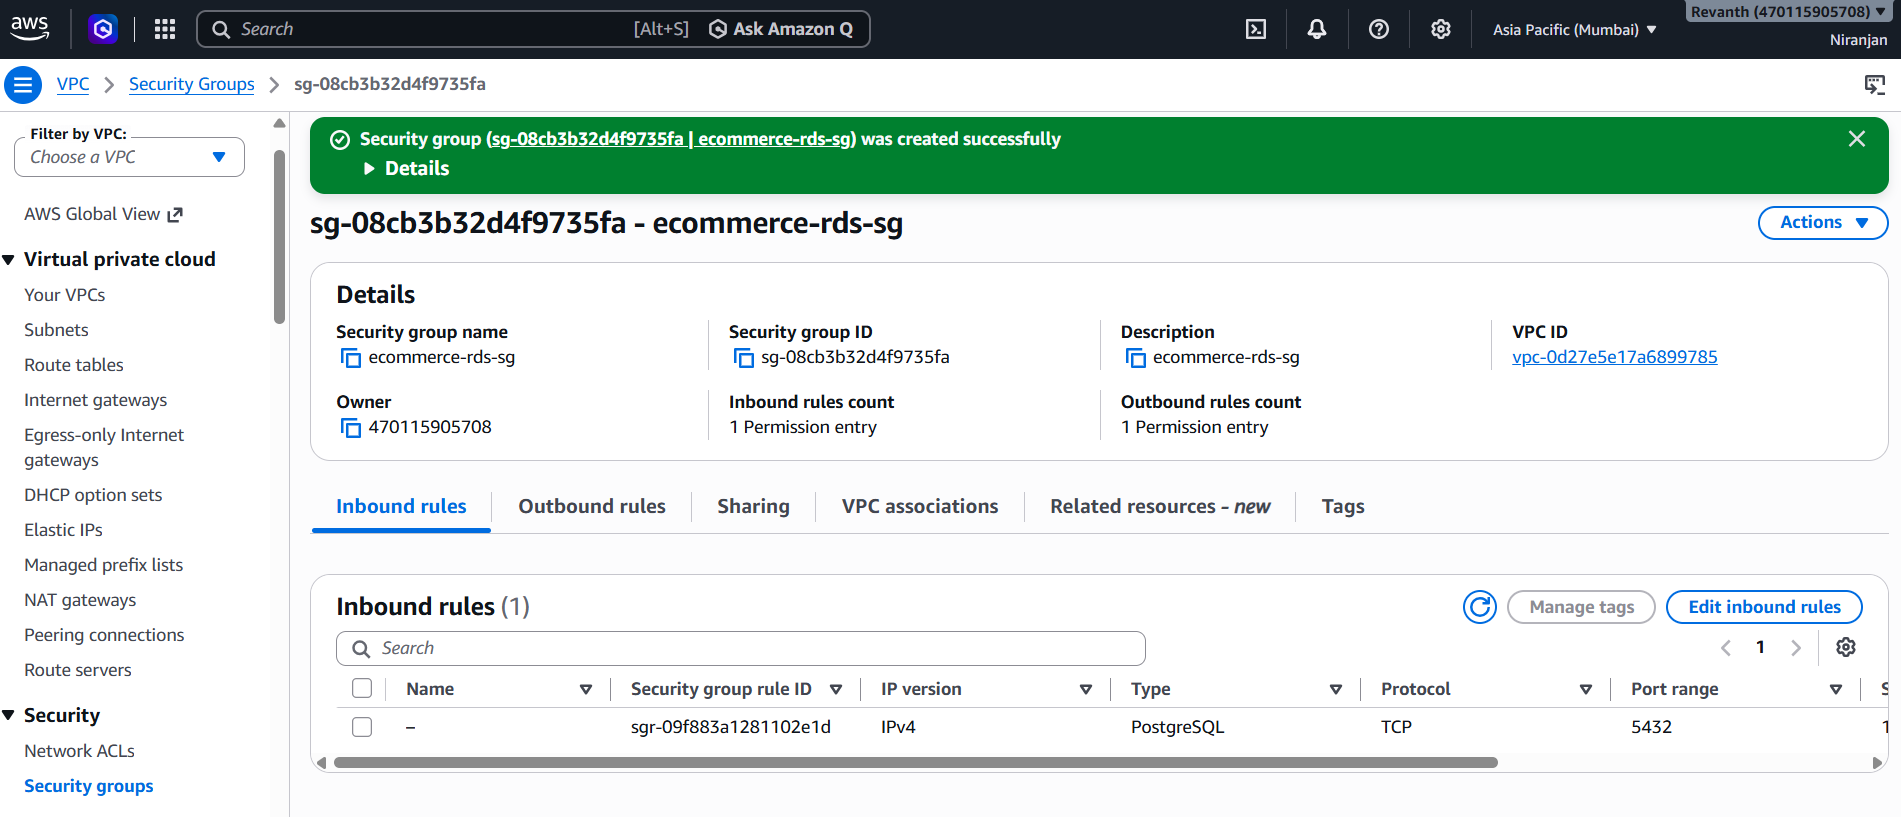
Step 3: Create the RDS PostgreSQL Database
- Open Amazon RDS → Databases.
- Click Create database.
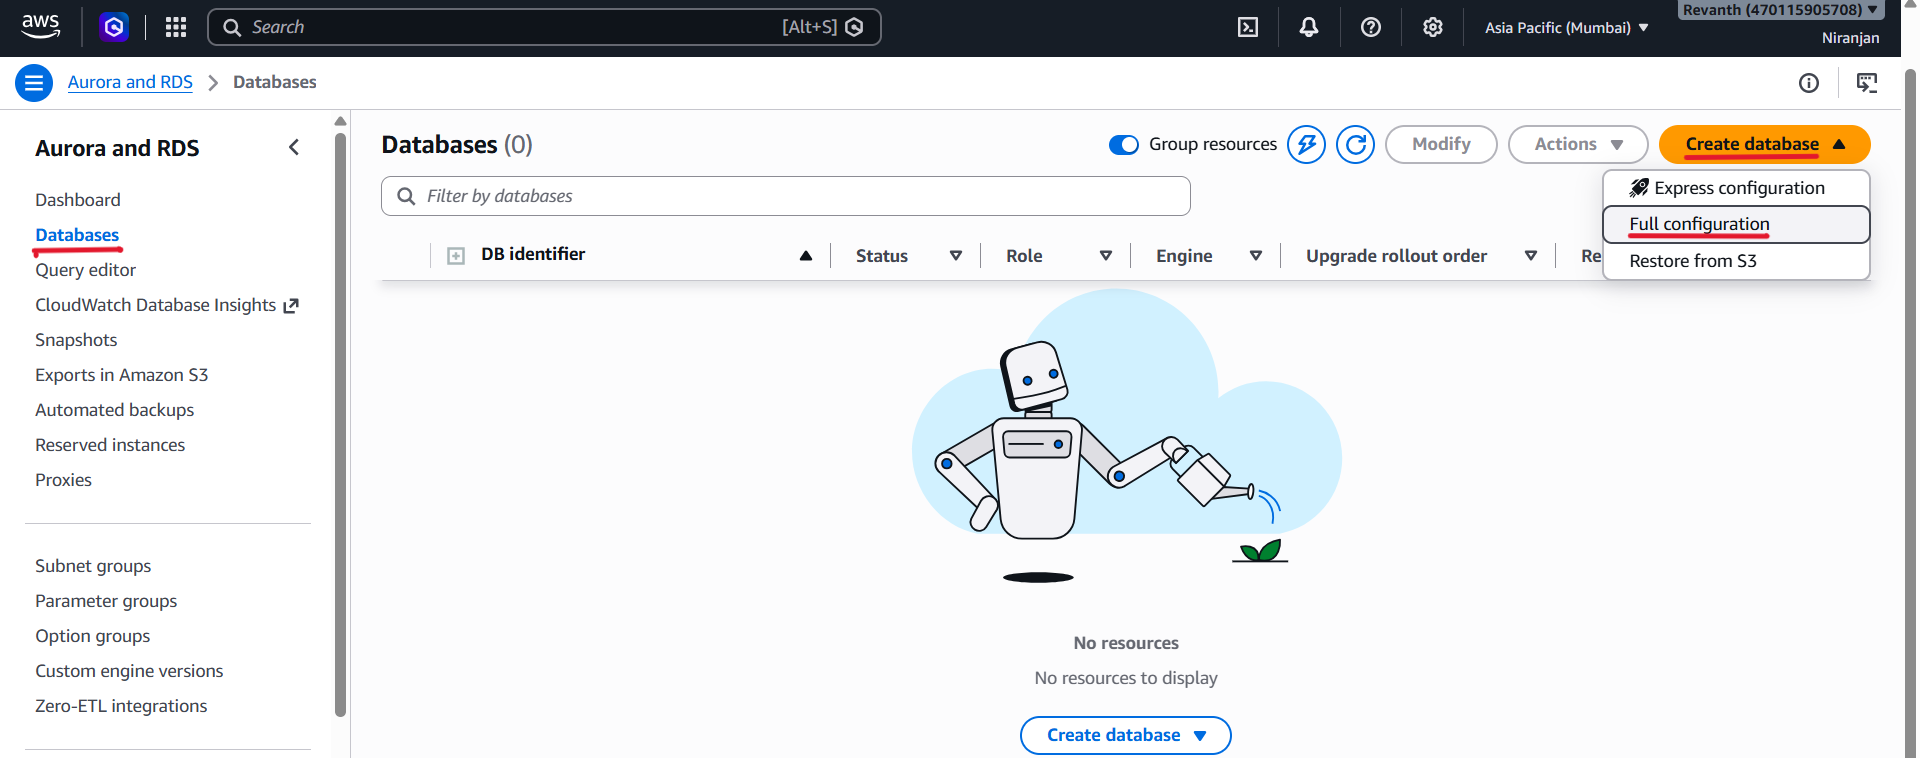
3. Configure the database as follows.
Engine and Template
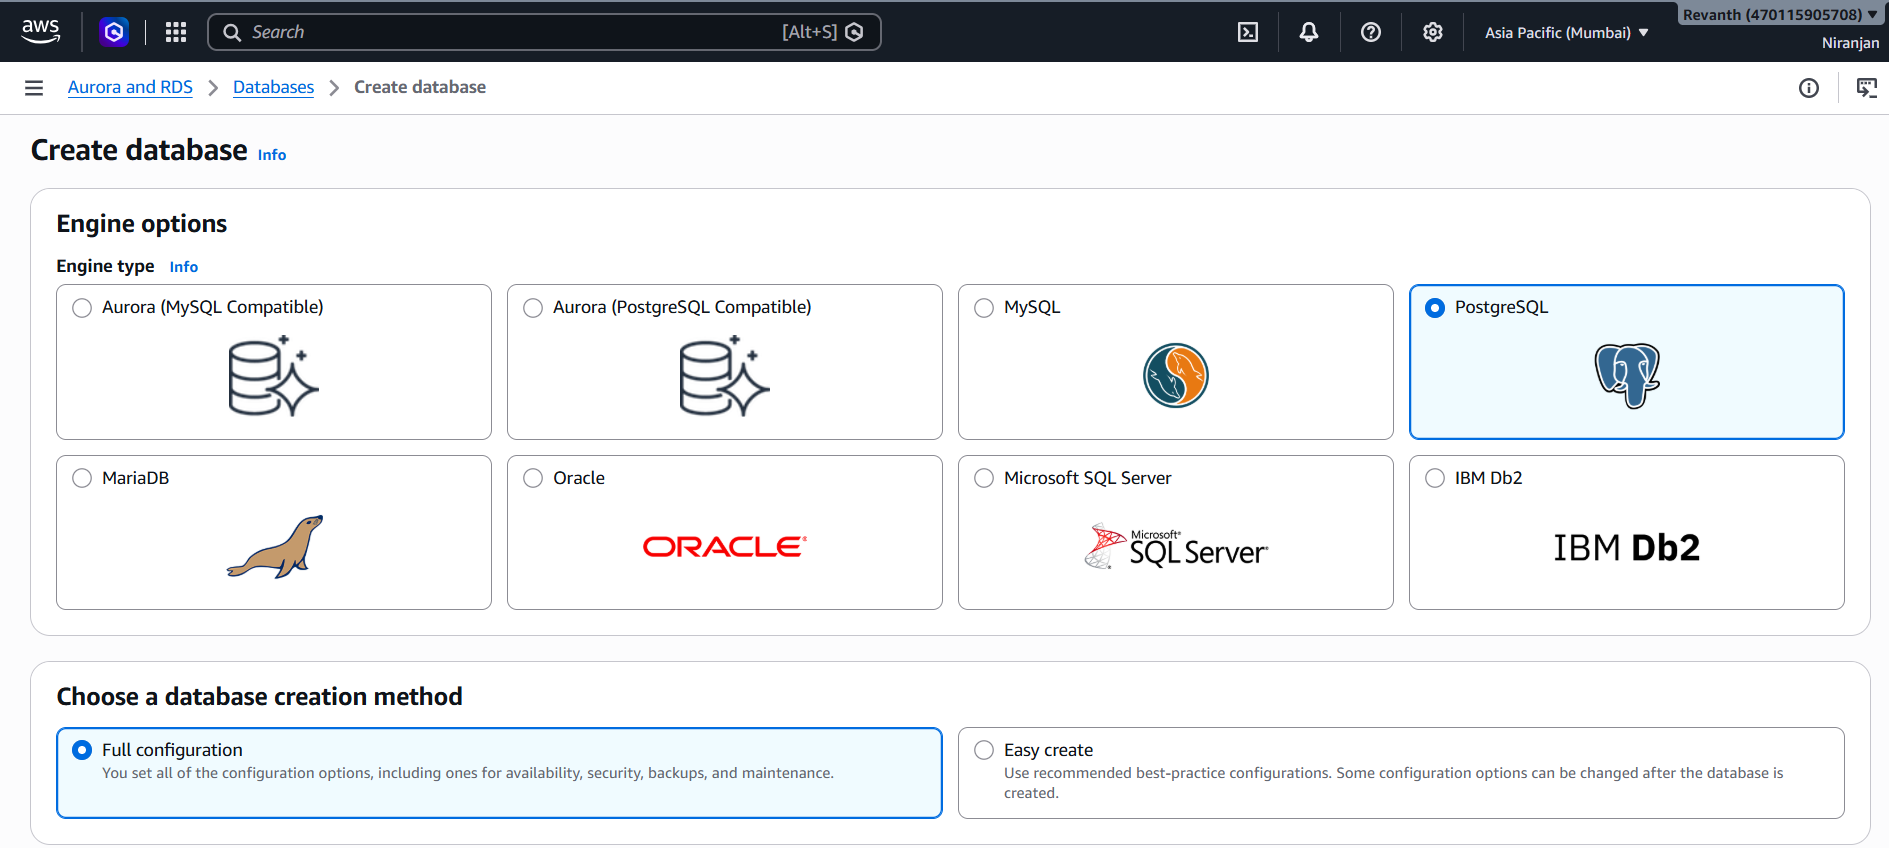
| Setting | Value |
|---|---|
| Engine type | PostgreSQL |
| Database creation method | Full configuration |
| Template | Free tier or Dev/Test, depending on availability |
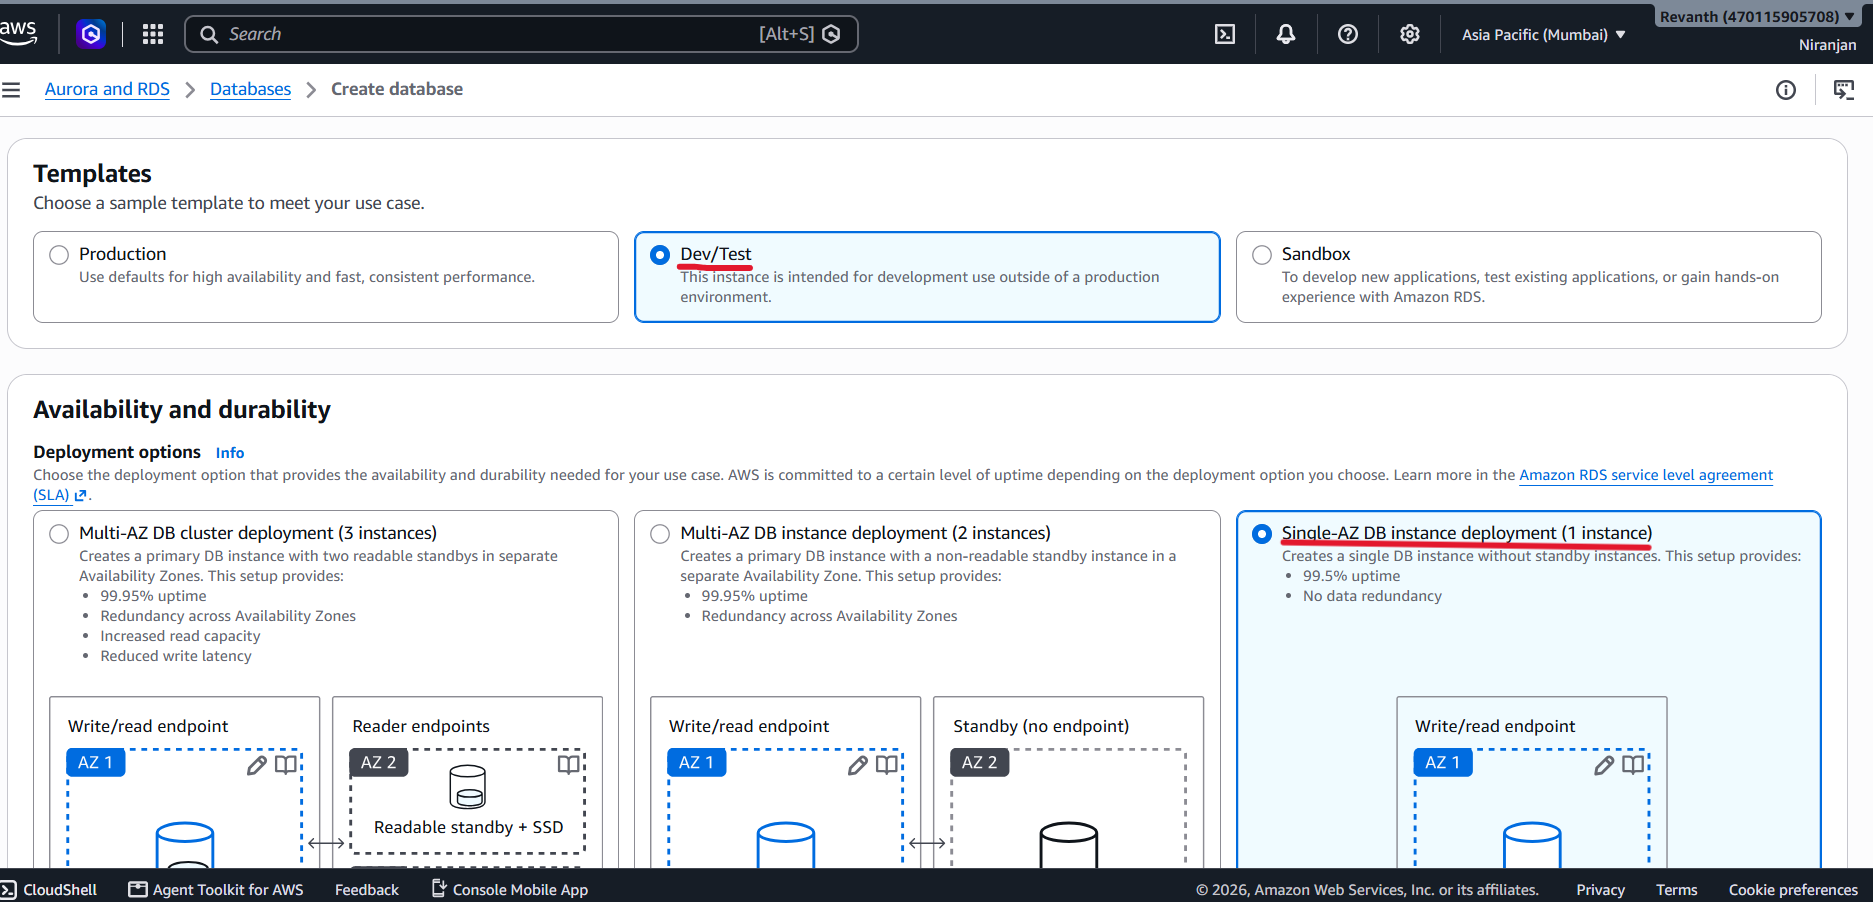
- Choose the available development configuration that supports a single-AZ database.
Settings
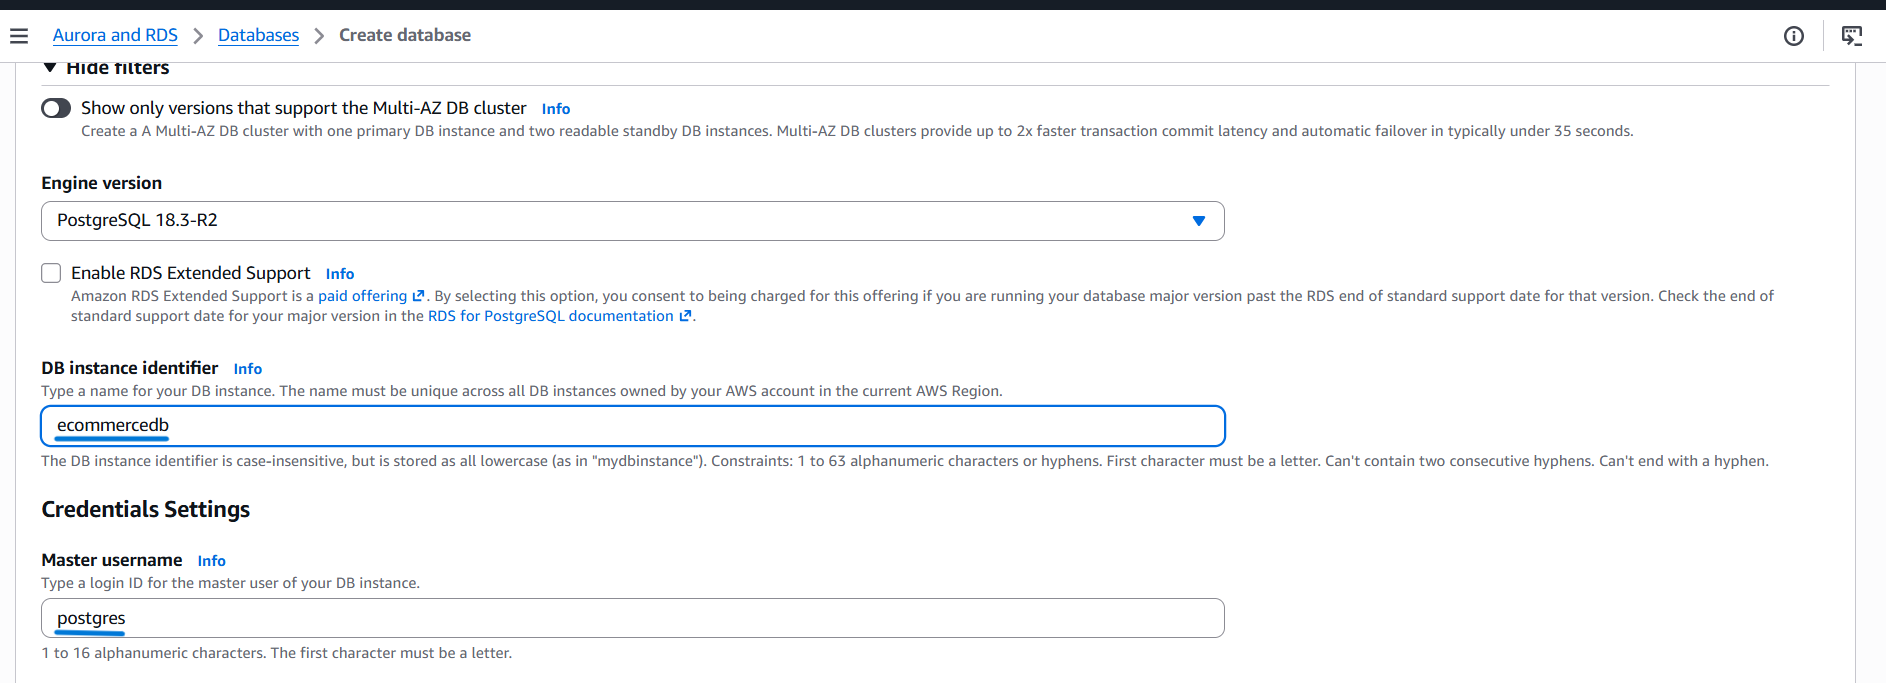
| Setting | Value |
|---|---|
| DB instance identifier | ecommercedb |
| Master username | postgres |
| Master password | Create your own strong password |
| Database authentication | Password authentication |
Save the password securely.You will need it when configuring Parameter Store.
Instance Configuration
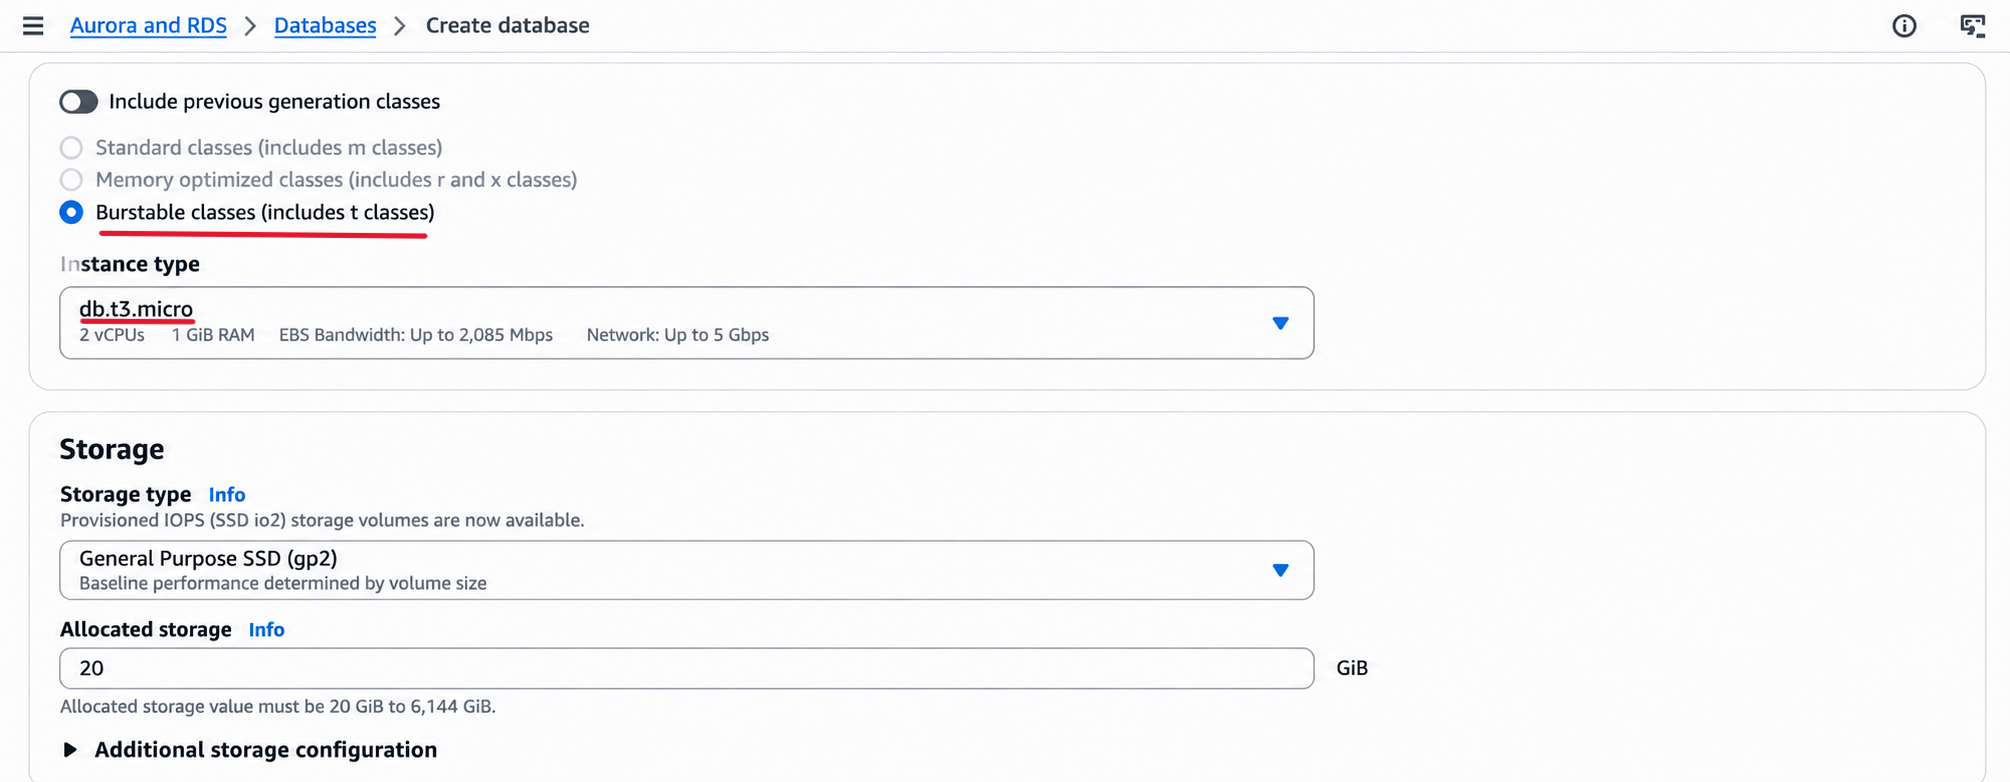
- Select the
db.t3.microinstance class if it is available and suitable for your account and chosen template.
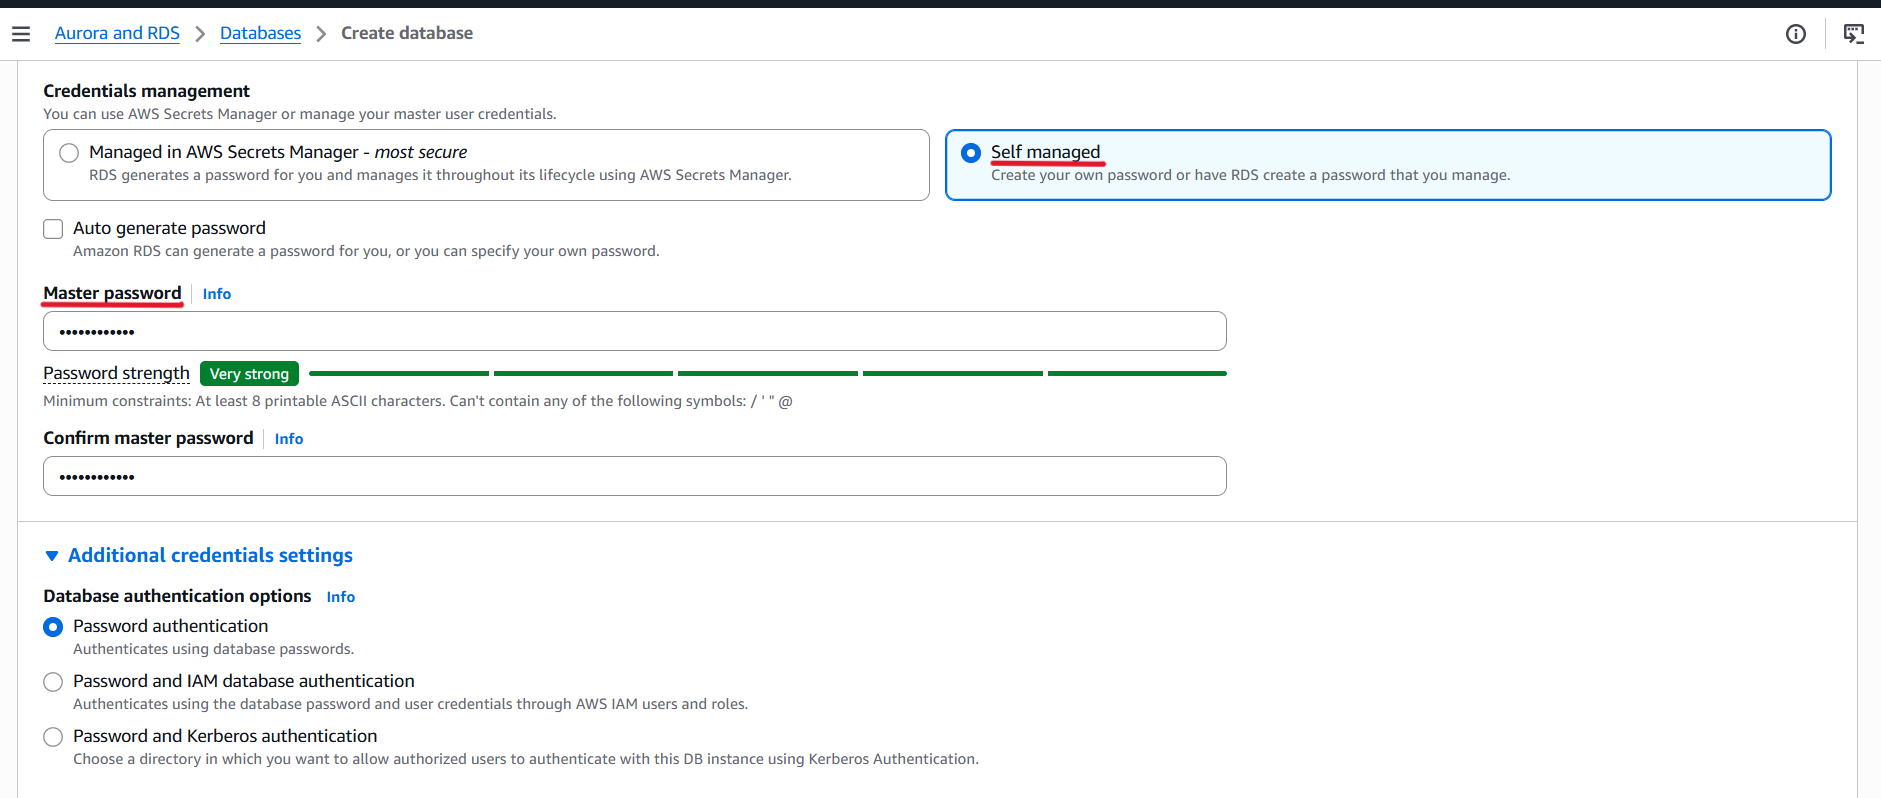
Save the password securely.You will need it when configuring Parameter Store.
Connectivity
| Setting | Value |
|---|---|
| VPC | ecommerce-vpc |
| DB subnet group | ecommerce-db-subnet-group |
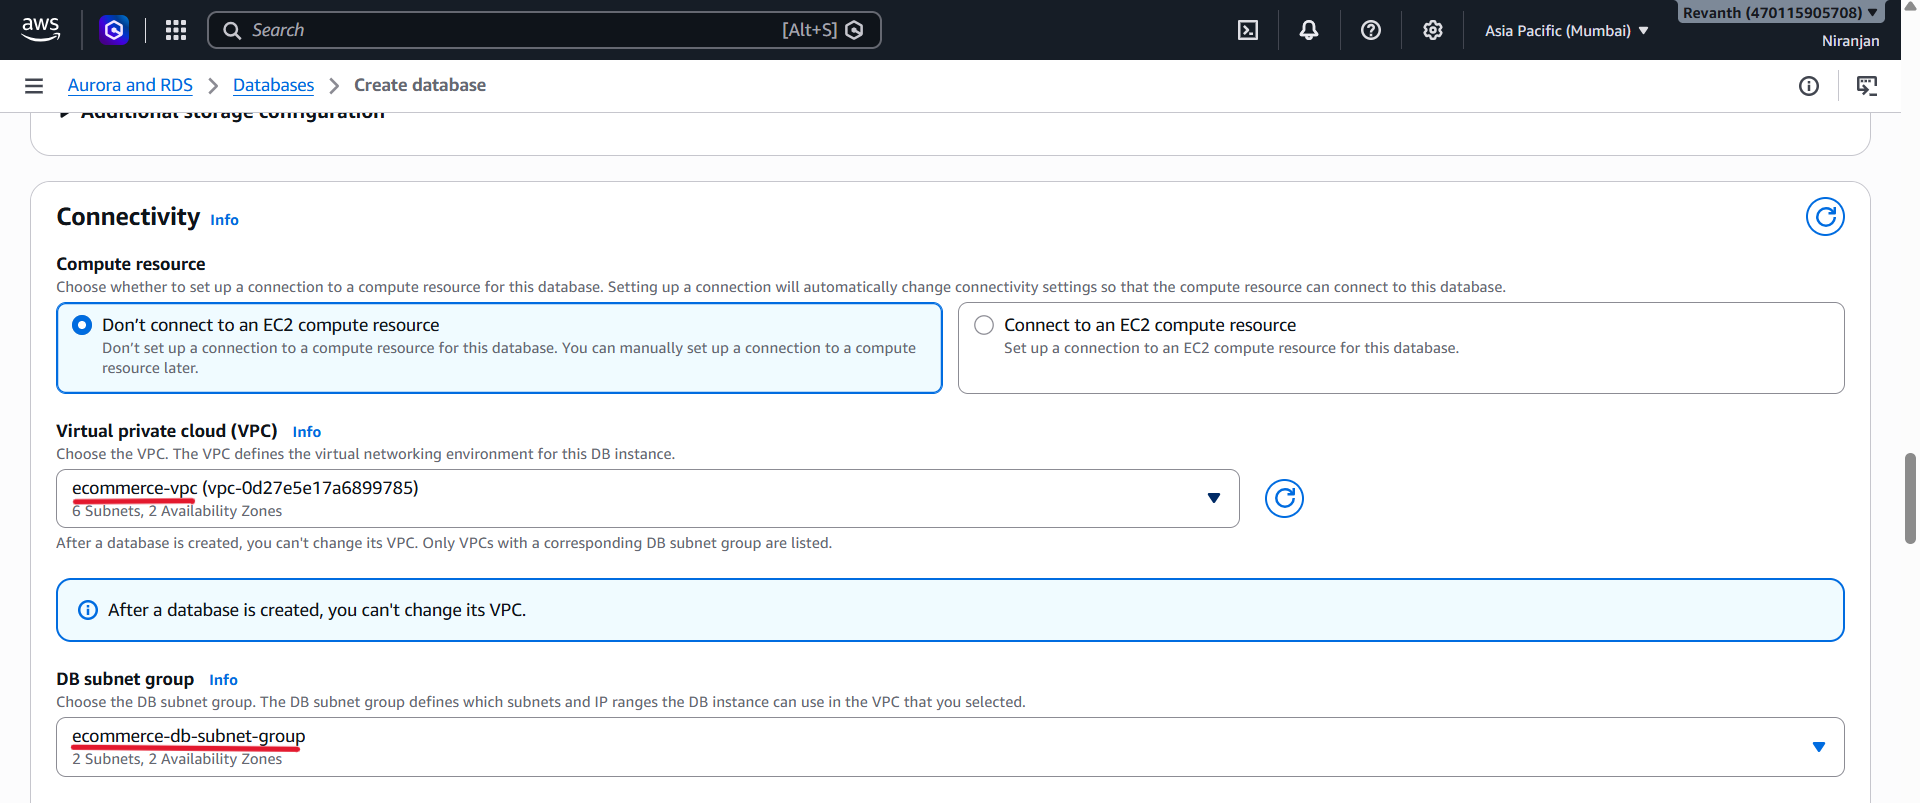
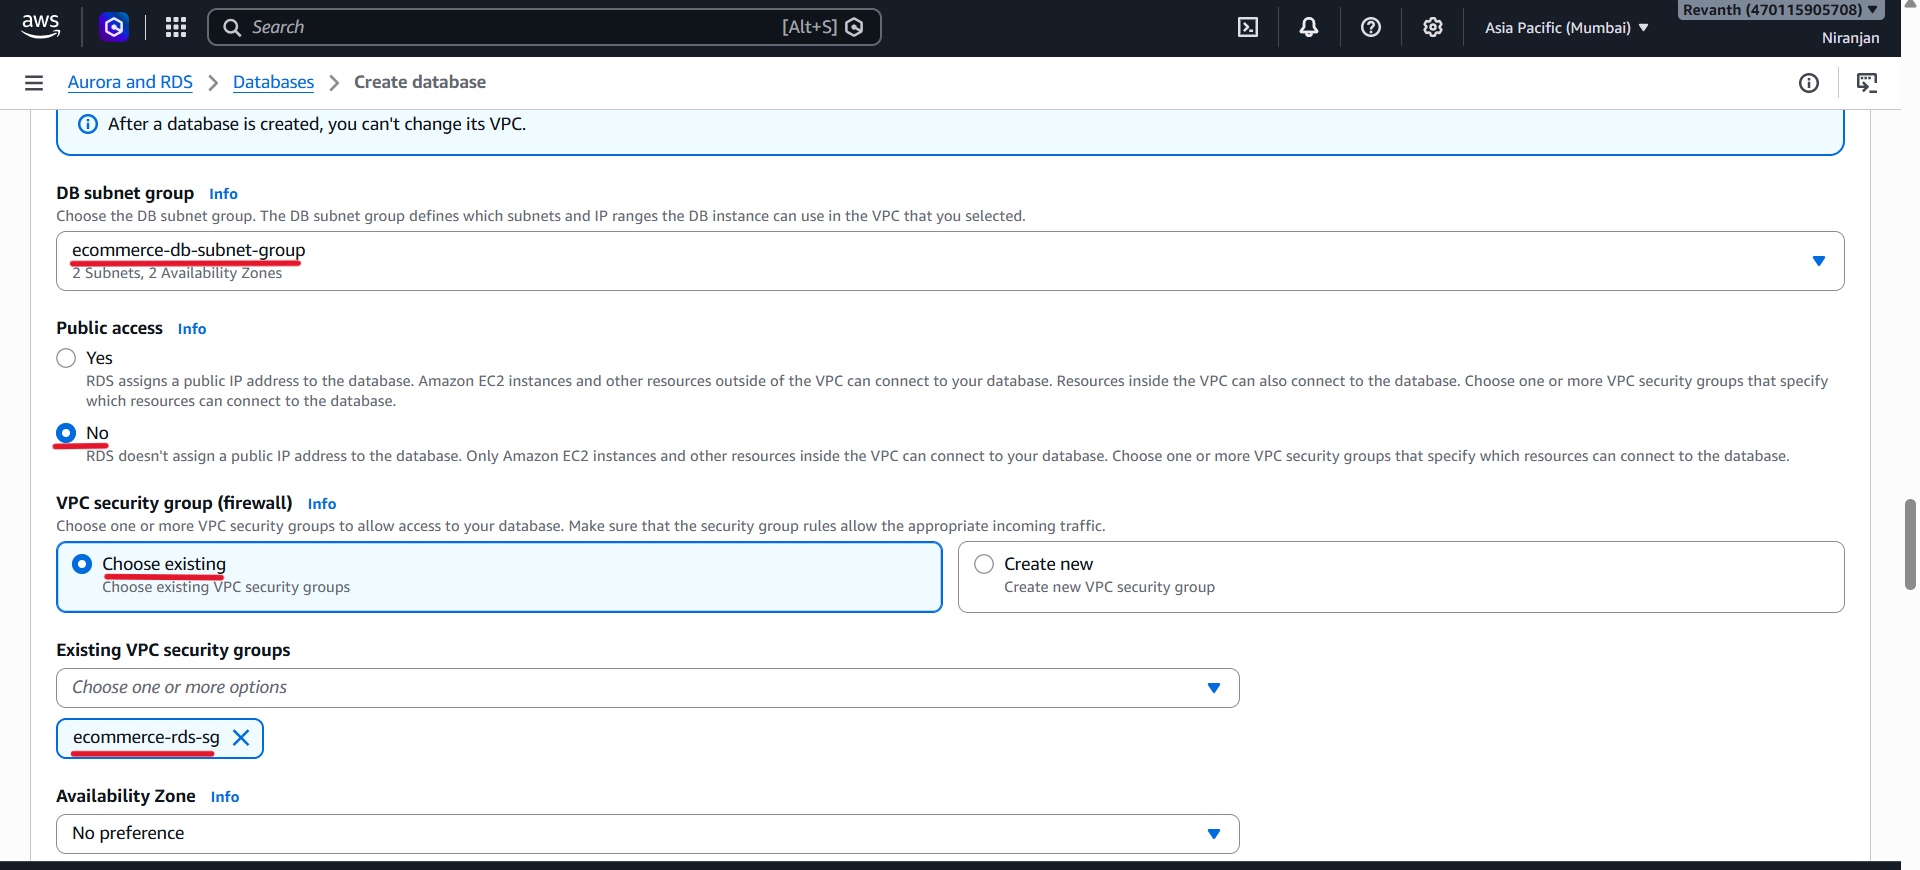
Public access | No |
VPC security group |
|
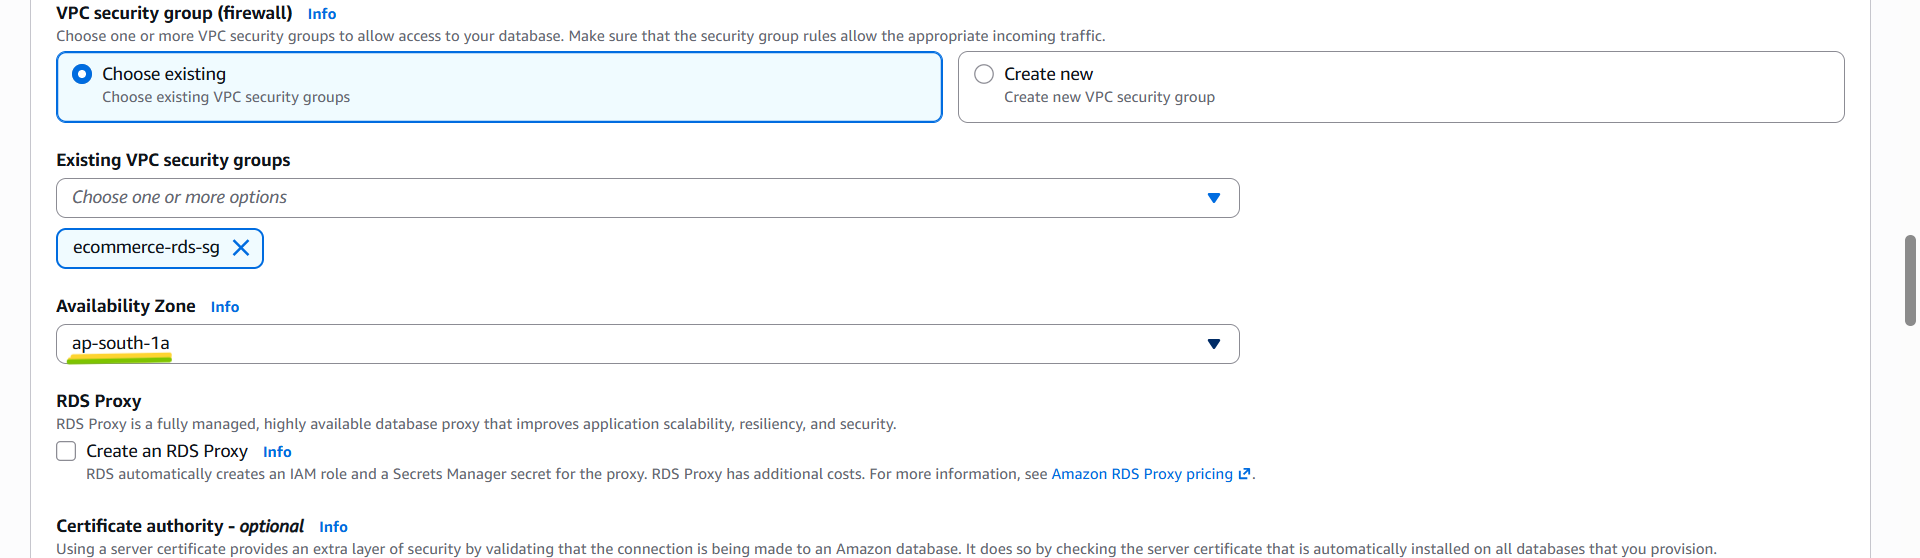
Availability Zone | Select the first Availability Zone (ap-south-1a) |
- Keep the database private. Do not enable public access.
- Select the first Availability Zone (ap-south-1a)
Additional Configuration
Expand Additional configuration and set the initial database name.
| Setting | Value |
|---|---|
| Initial database name | ecommercedb |
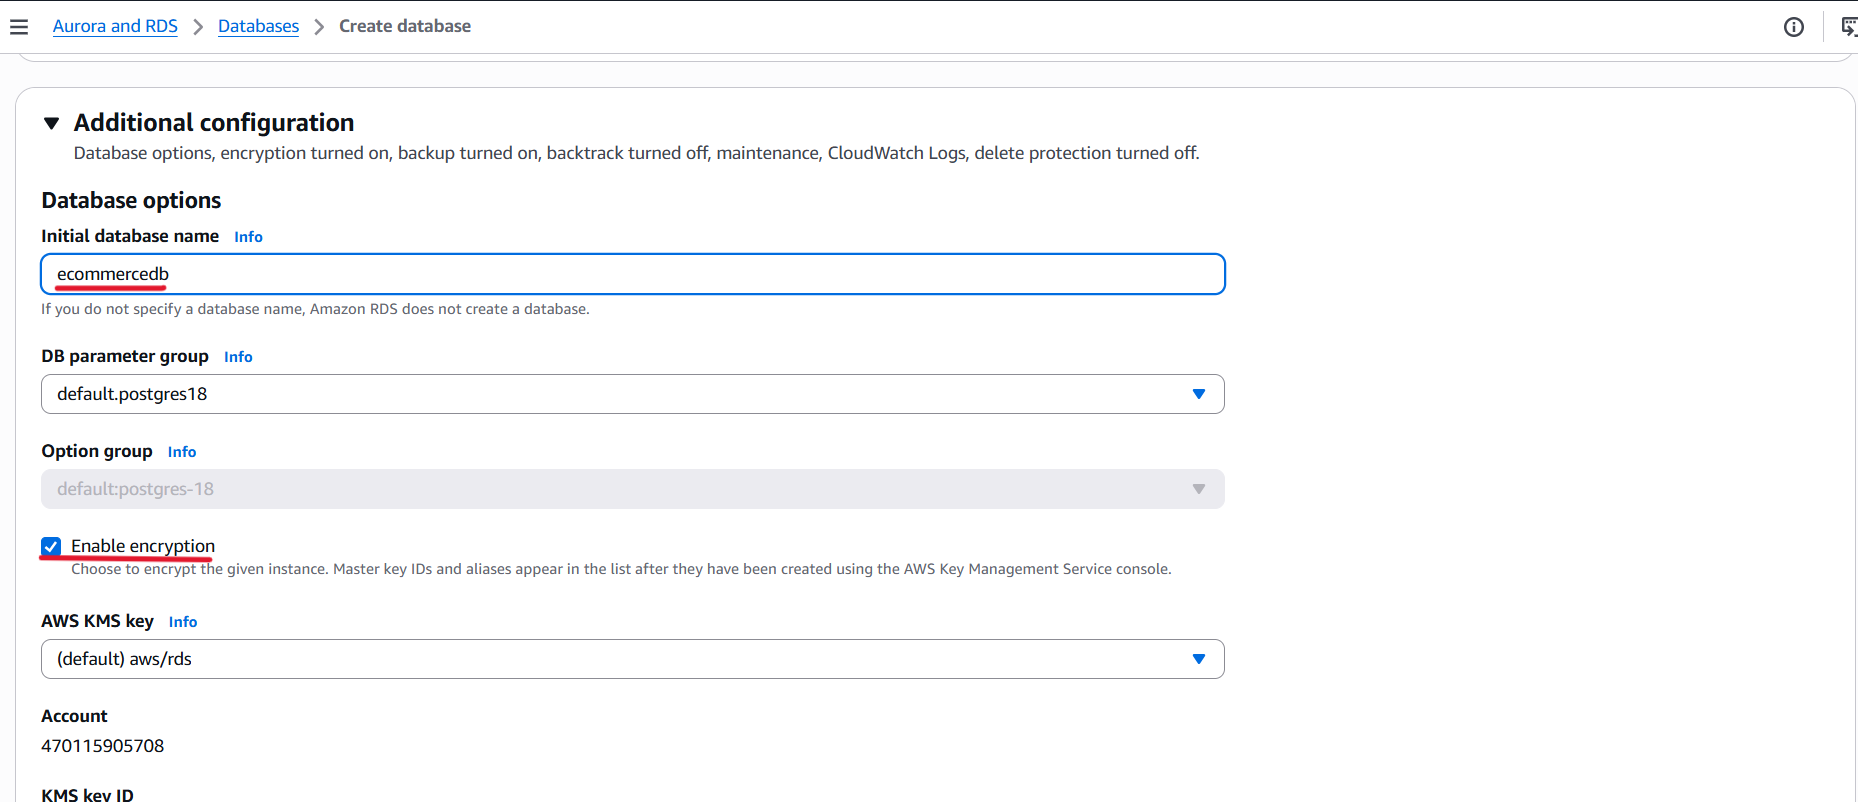
- Important: The initial database name is required by the backend services. Make sure it matches the expected name exactly
ecommercedb.
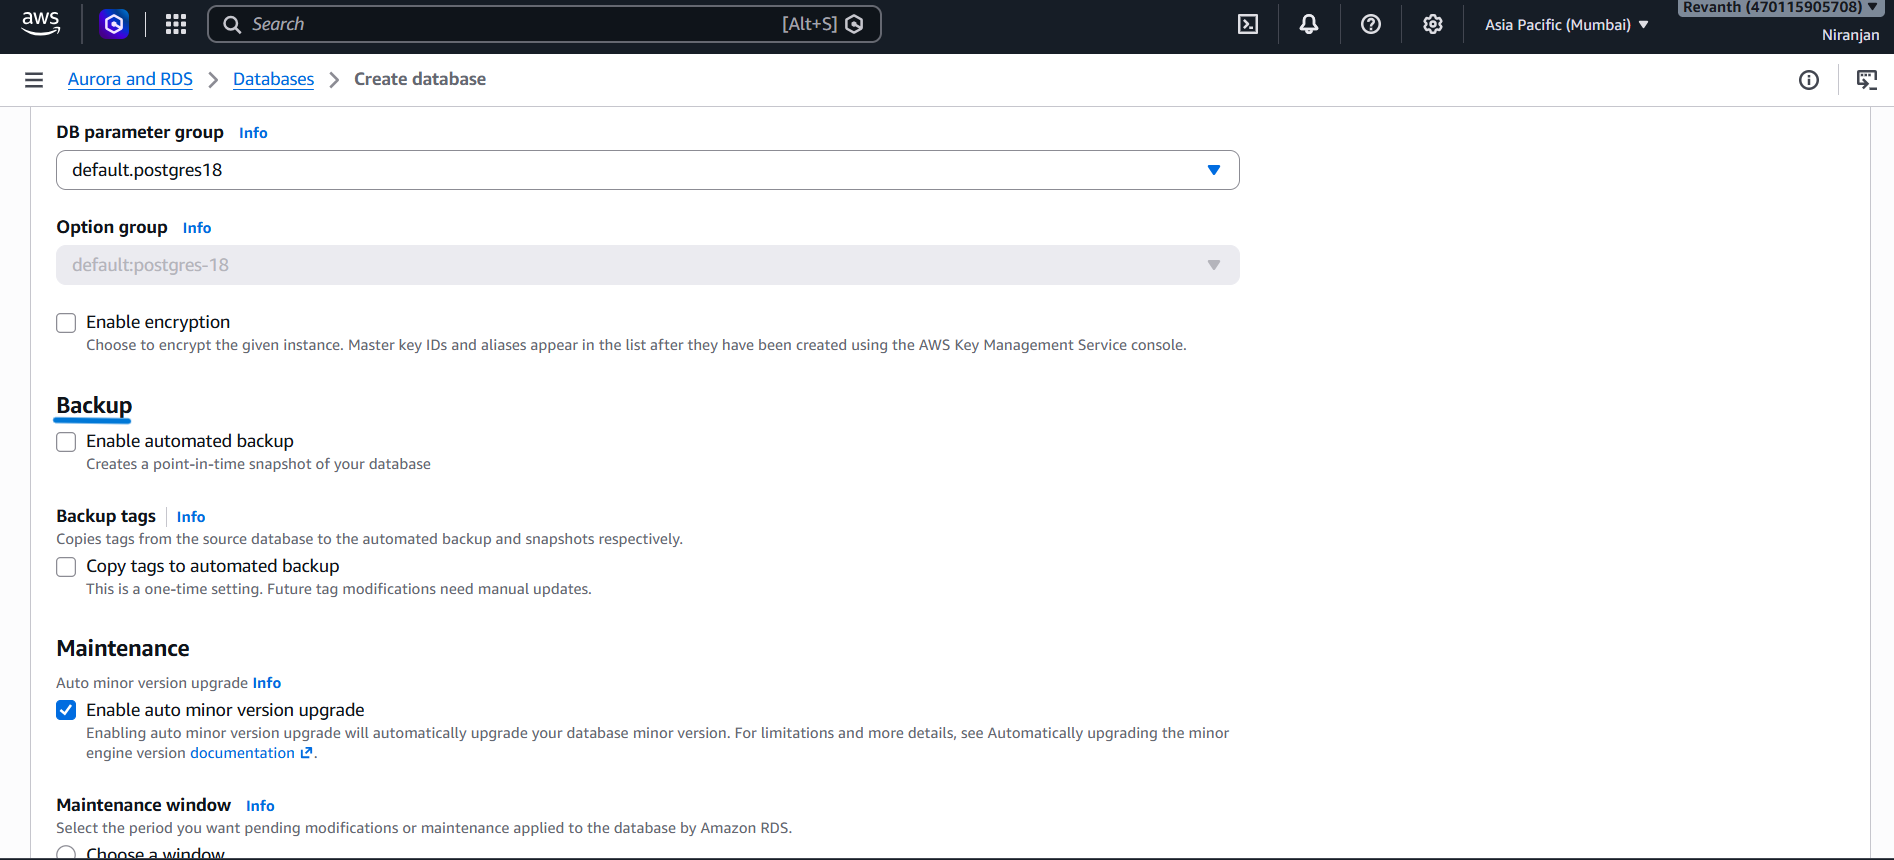
- By default, automated backups are enabled. For this development and testing project, uncheck this option to disable backups.
- For a production environment, keep automated backups enabled to protect your database.
- Review all the settings.
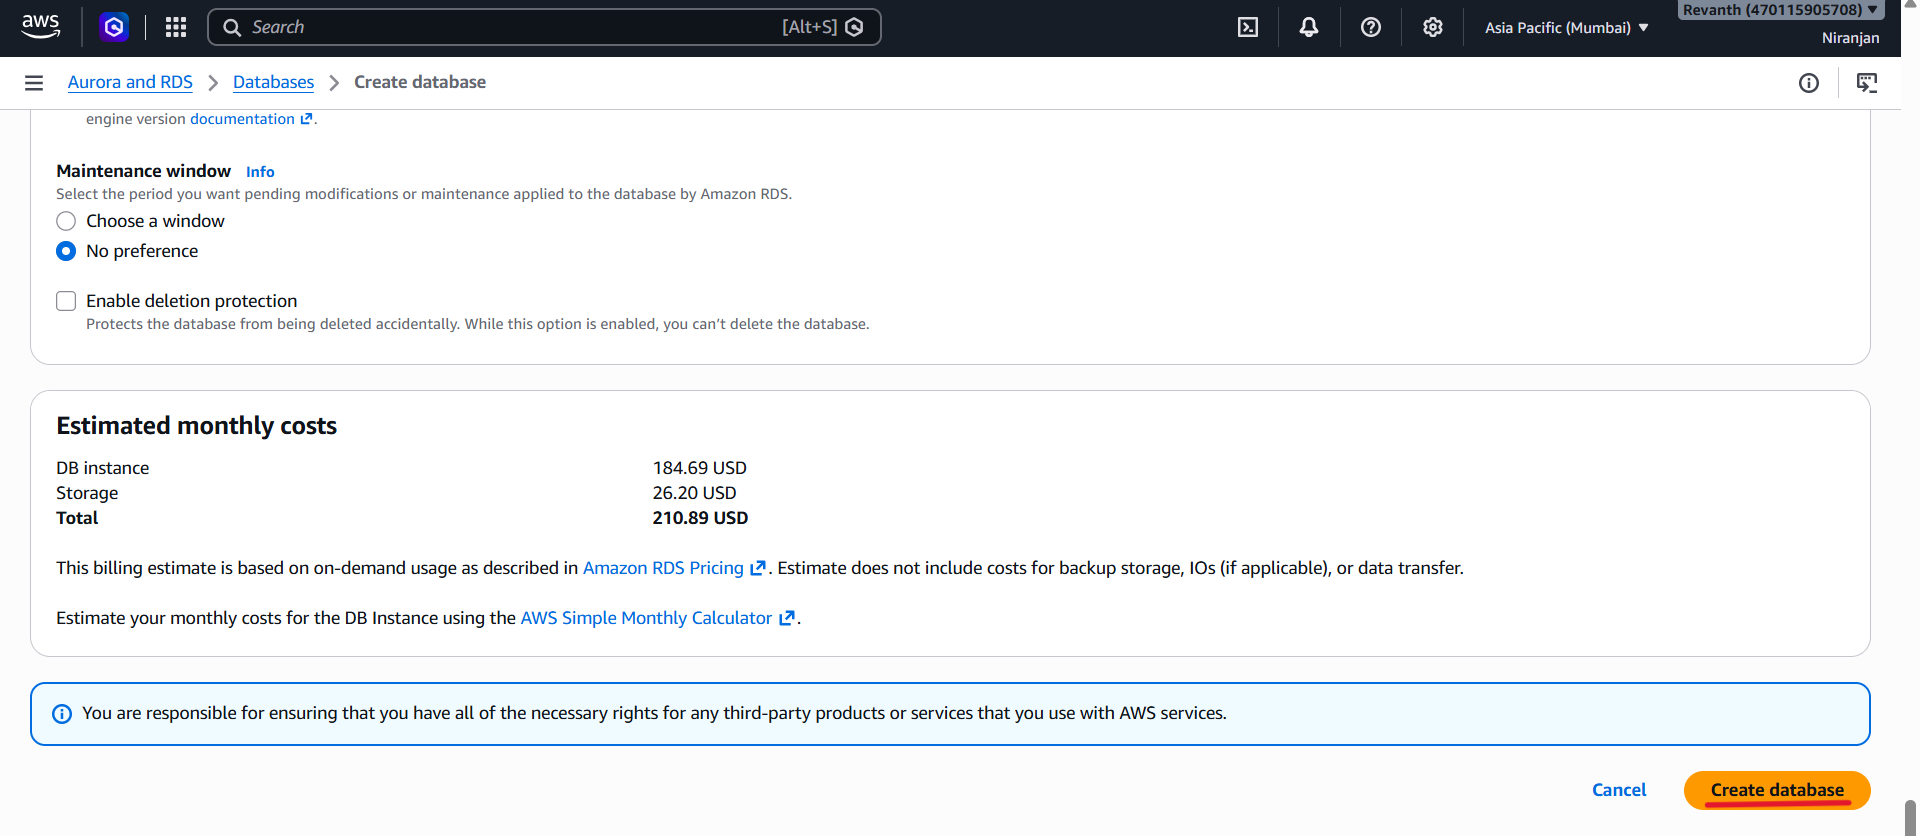
- Click Create database.
Step 4: Wait for the Database to Become Available
RDS database creation may take approximately 5–10 minutes.
- Open Amazon RDS → Databases.
- Select your database.
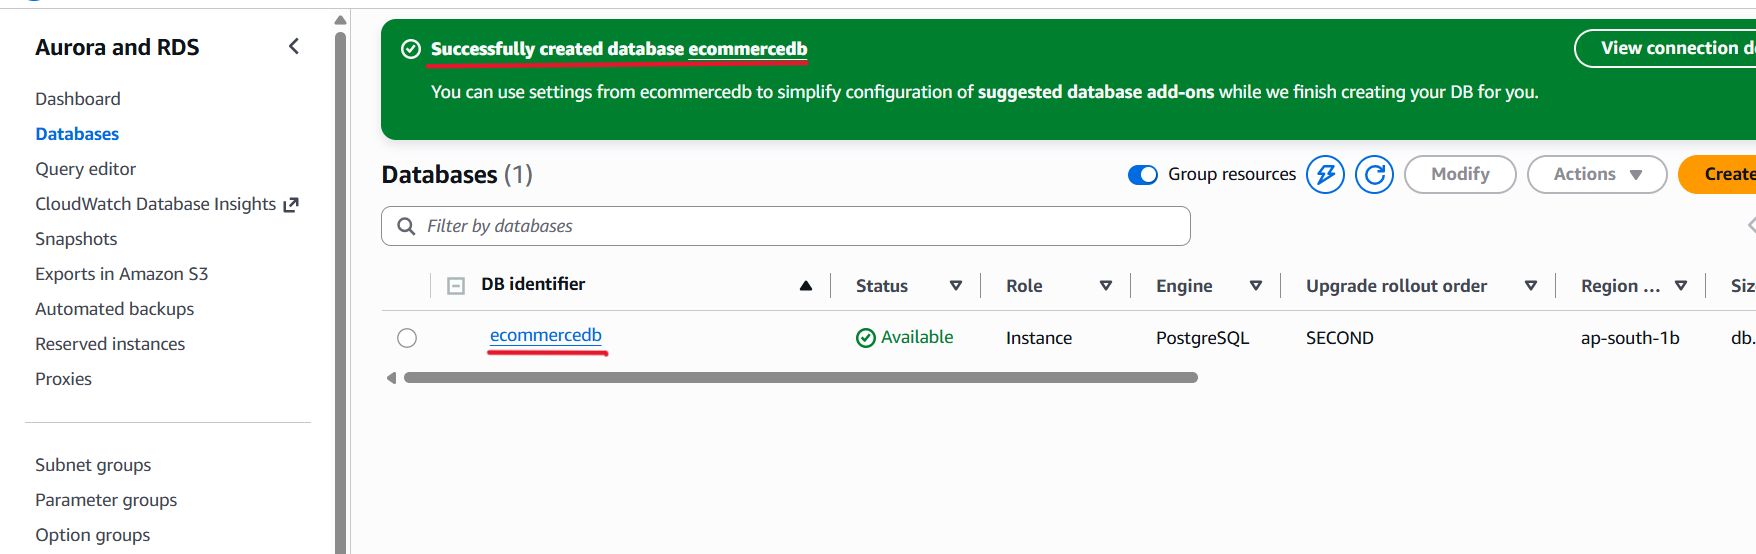
- Wait until its status becomes Available.
- Find the database endpoint in the database details.
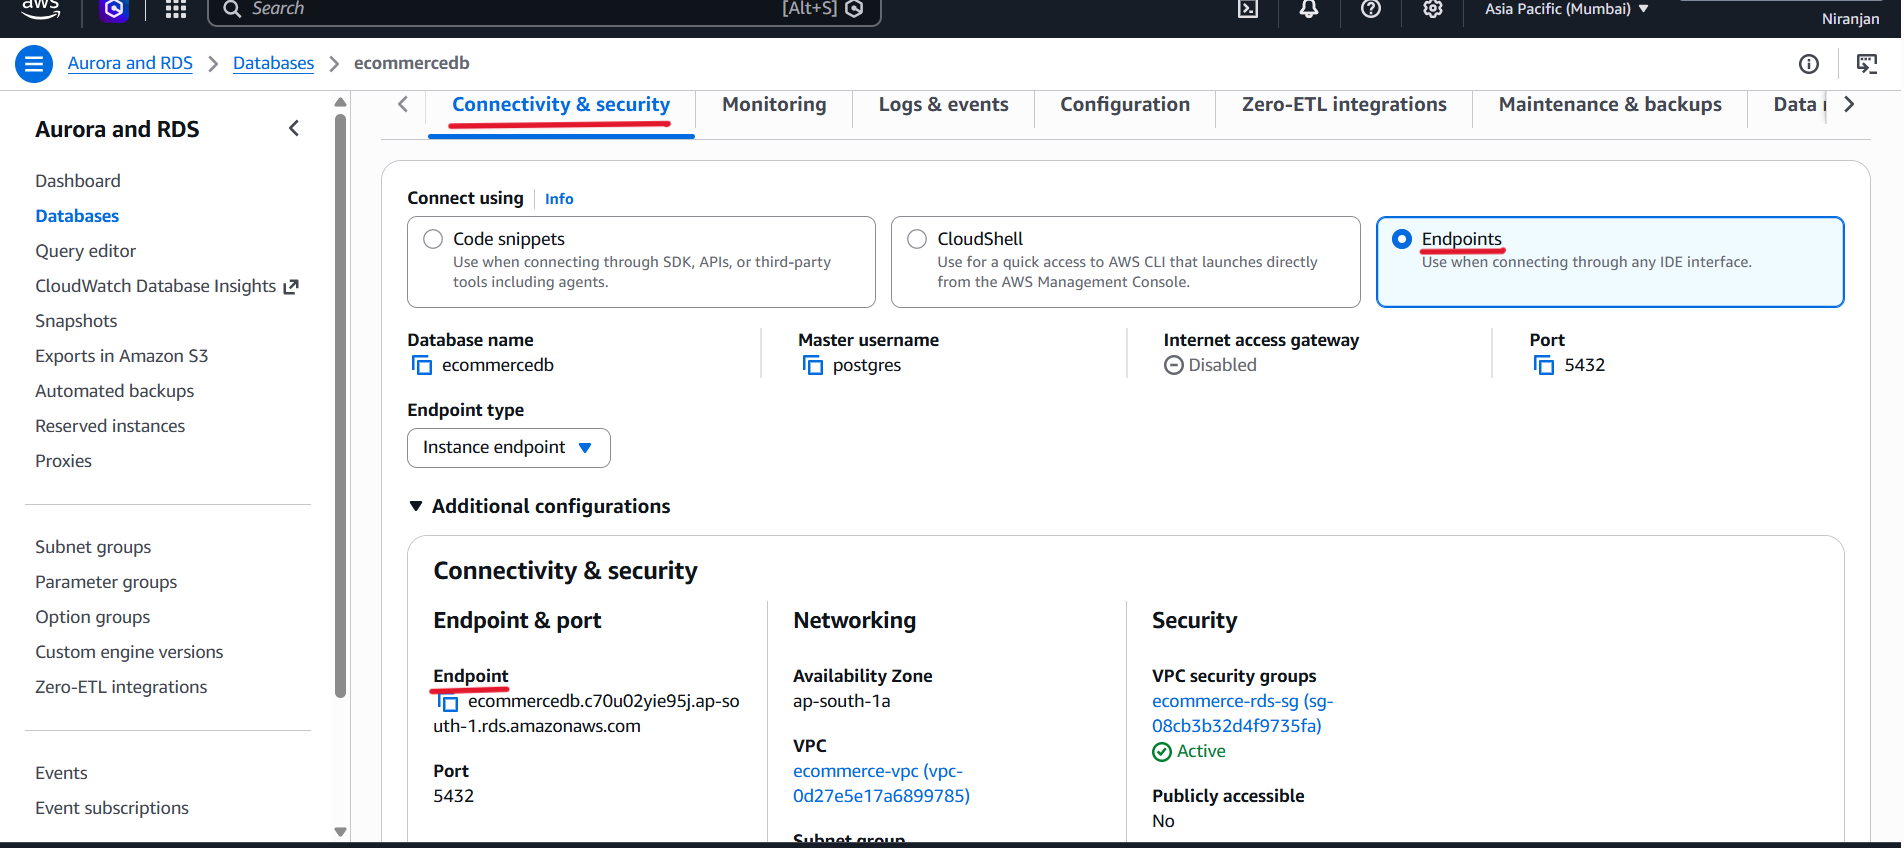
- Copy and save the endpoint for the next section.
- The endpoint will be used by the backend services to connect to PostgreSQL.
Cost note: RDS can incur charges while running. Stop the database when you are not using it, if stopping is supported for your instance and setup. Remember to start it again before continuing with the backend deployment module. Storage and other resources may still incur charges while the database is stopped.
4.4 AWS Systems Manager Parameter Store
AWS Systems Manager Parameter Store provides a central place to store configuration values that applications can retrieve at runtime.
In this project, the backend services will use Parameter Store to retrieve the AWS Region and database connection details.
We will create three parameters:
- AWS Region
- Database host
- Database password
The database username is postgres, as configured when creating the RDS database.
Step 1: Open Parameter Store
- Open the AWS Management Console.
- Navigate to AWS Systems Manager.
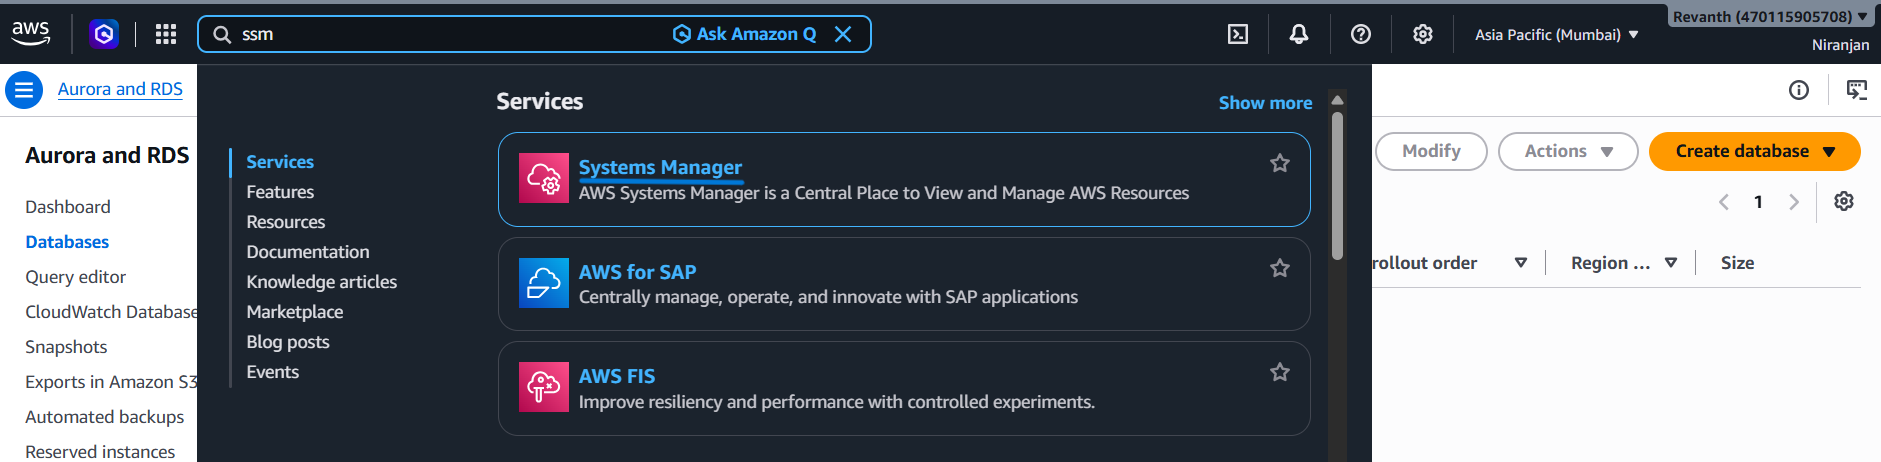
- Select Parameter Store from the navigation menu.
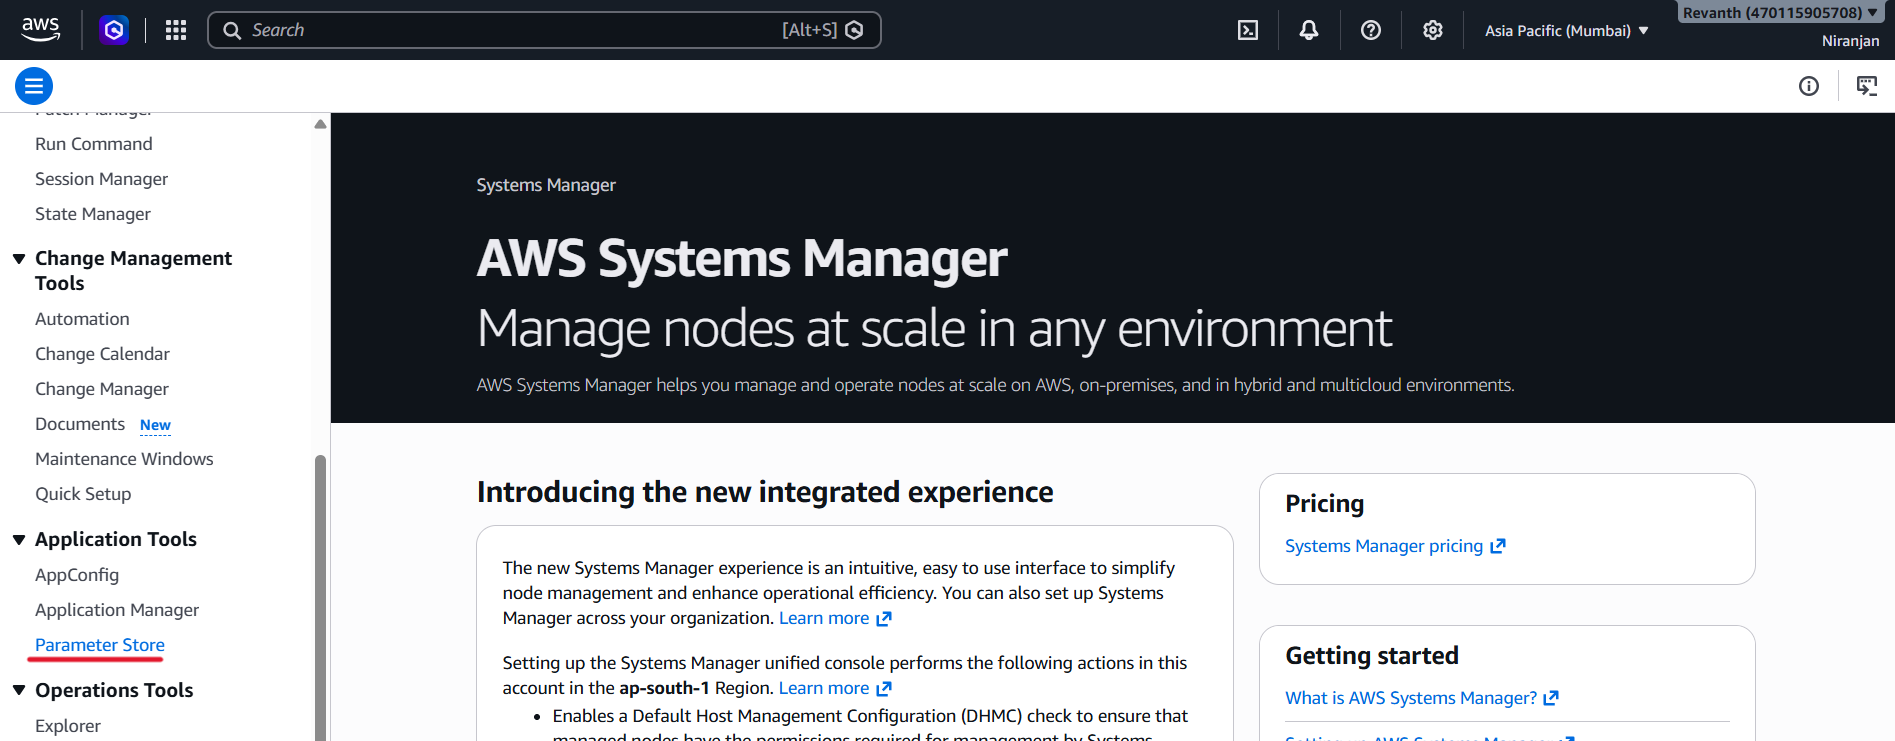
- Make sure you are in the correct AWS Region.
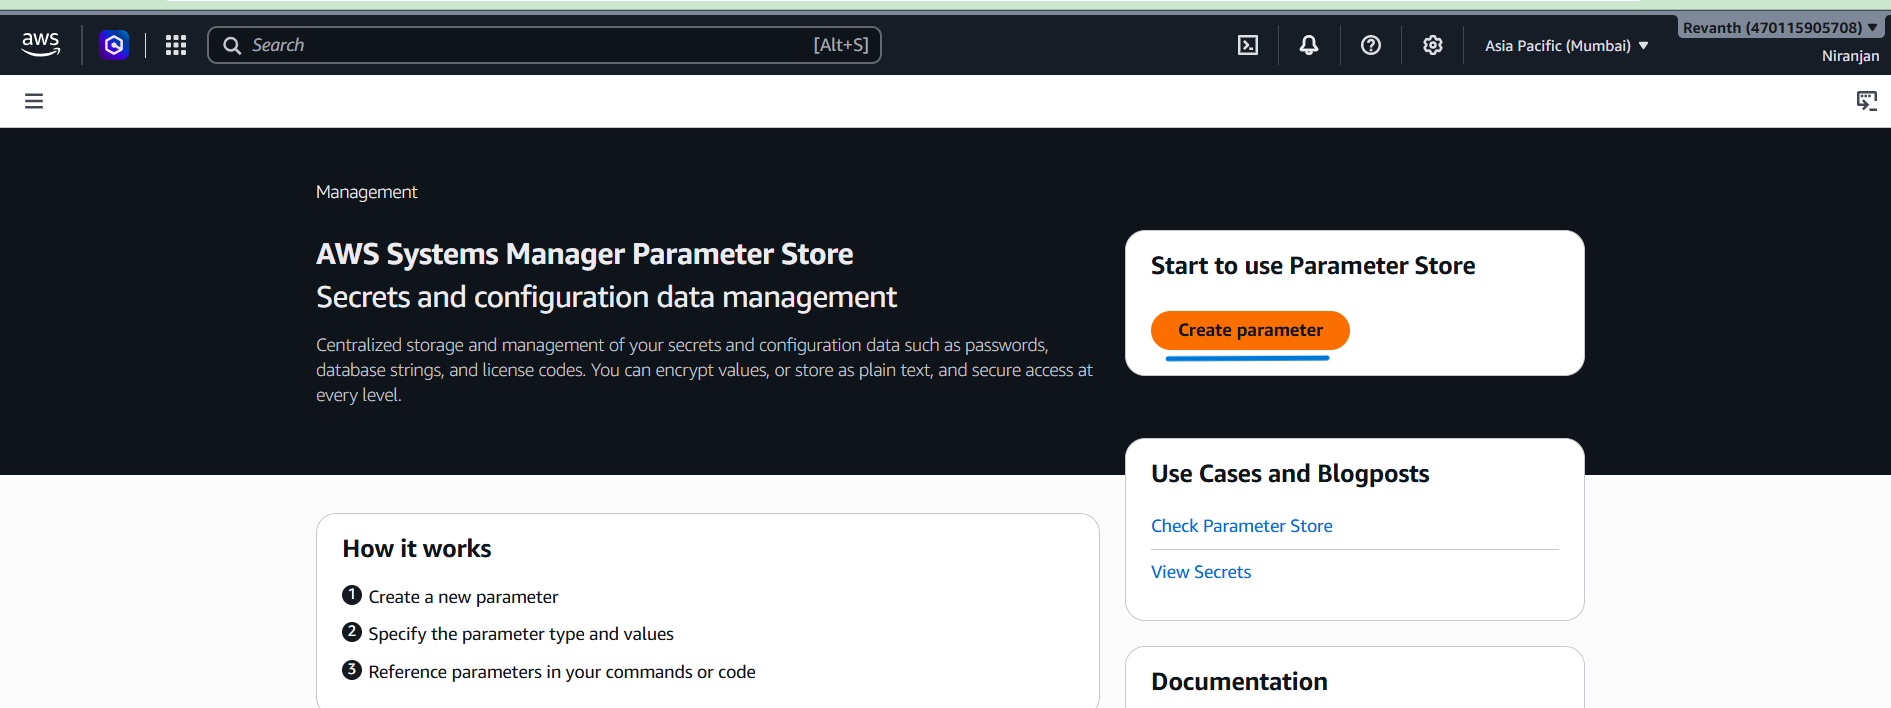
- Click Create parameter.
Step 2: Create the AWS Region Parameter
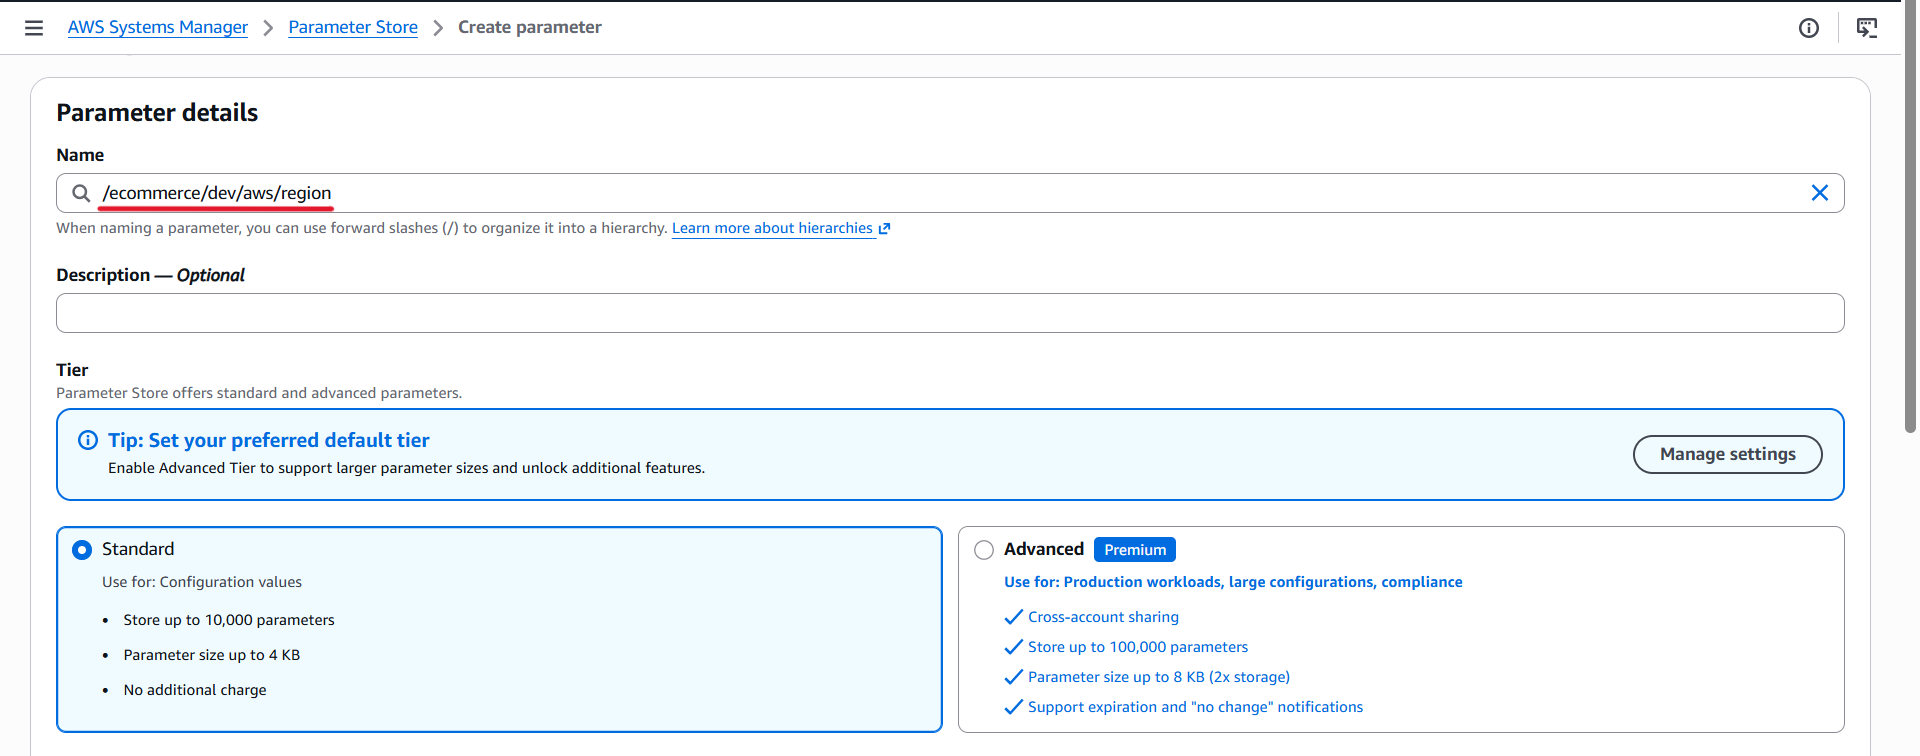
- Name:
/ecommerce/dev/aws/region
- Type: String
- Data type: Text
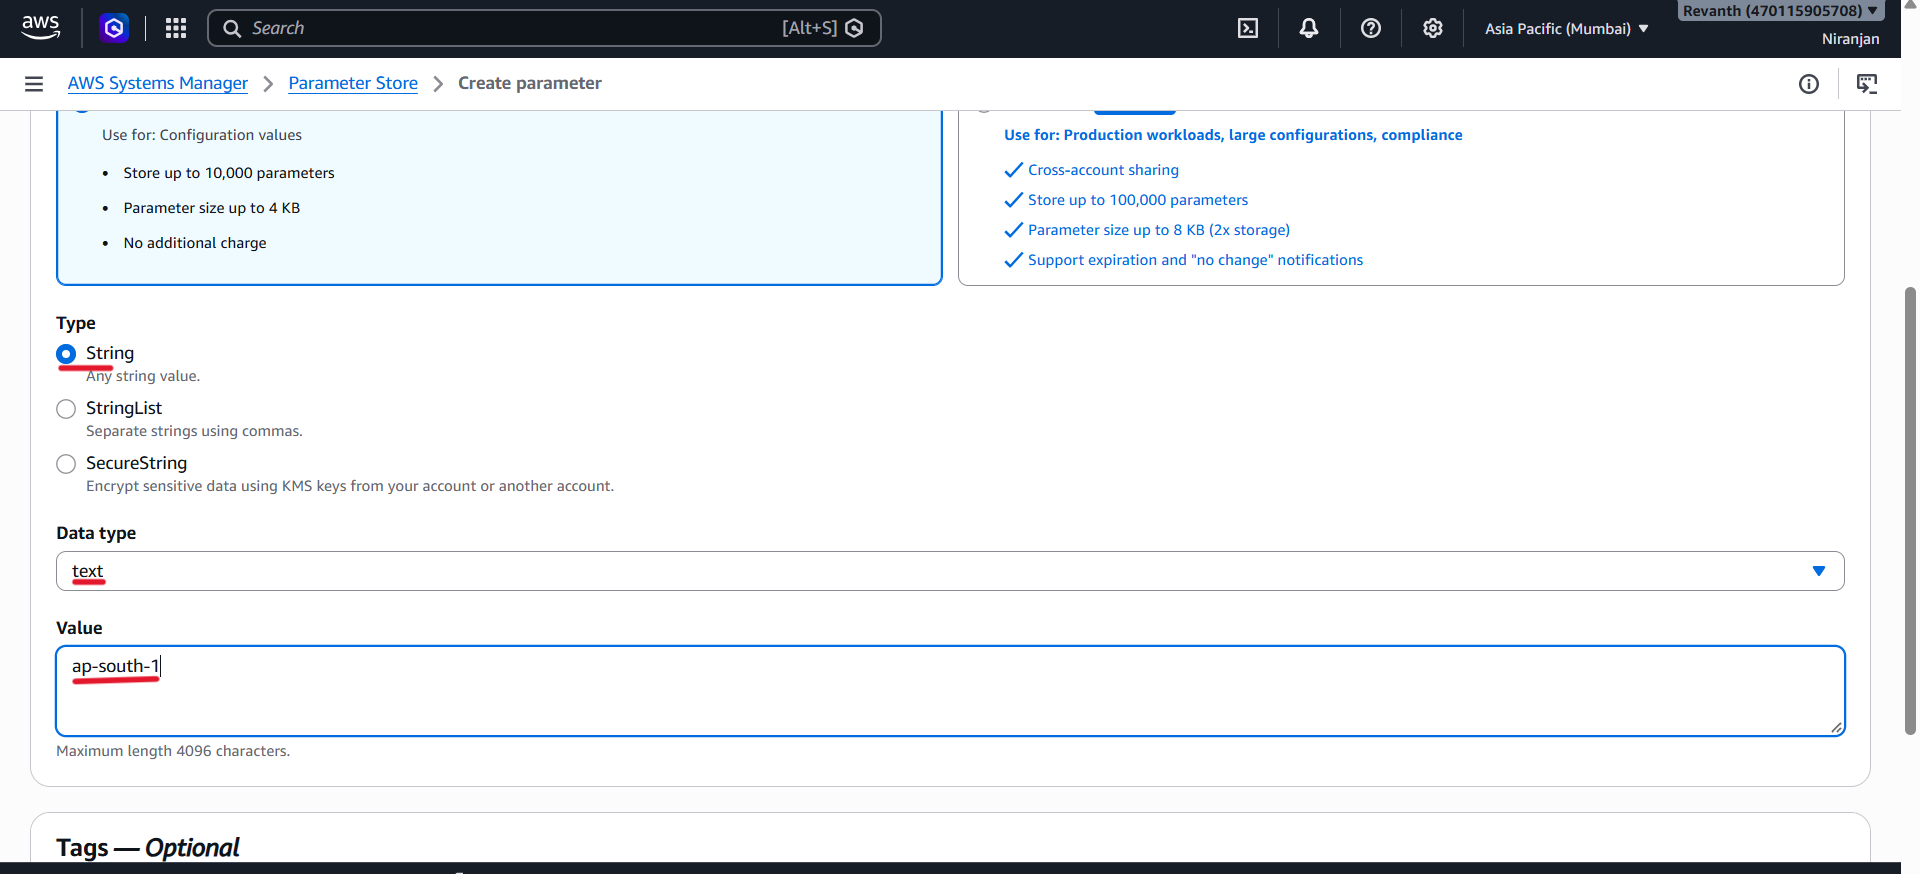
- Value:
ap-south-1 - Replace the value with your actual AWS Region if you are using a different one.
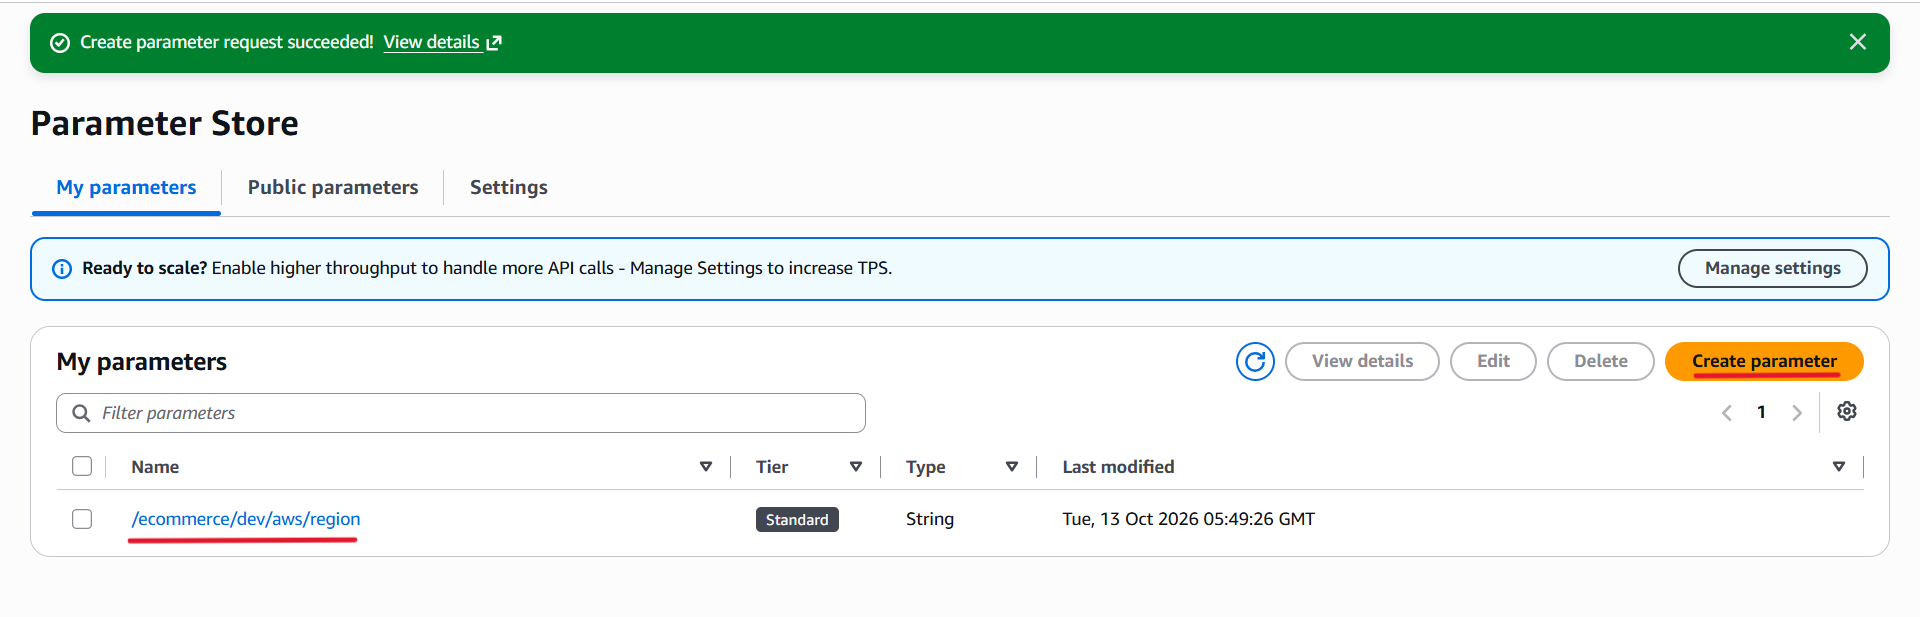
- Click Create parameter.
Step 3: Create the Database Host Parameter
Create another parameter with the following settings.
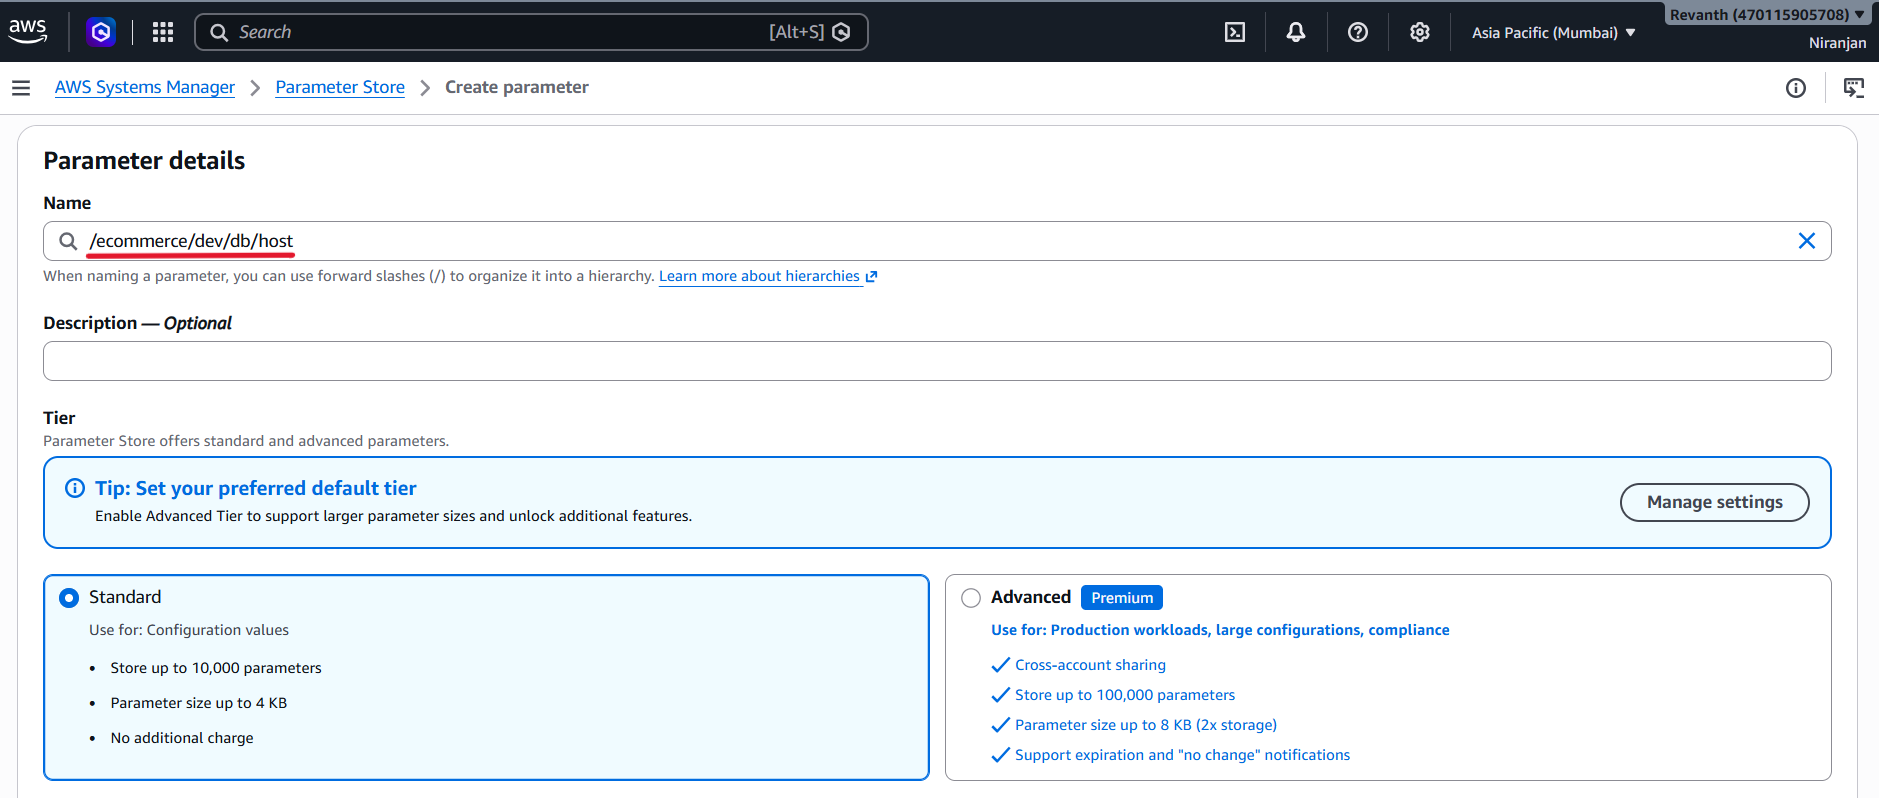
| Setting | Value |
|---|---|
| Name | /ecommerce/dev/db/host |
| Type | String |
| Data type | text |
| Value | Your RDS database endpoint |
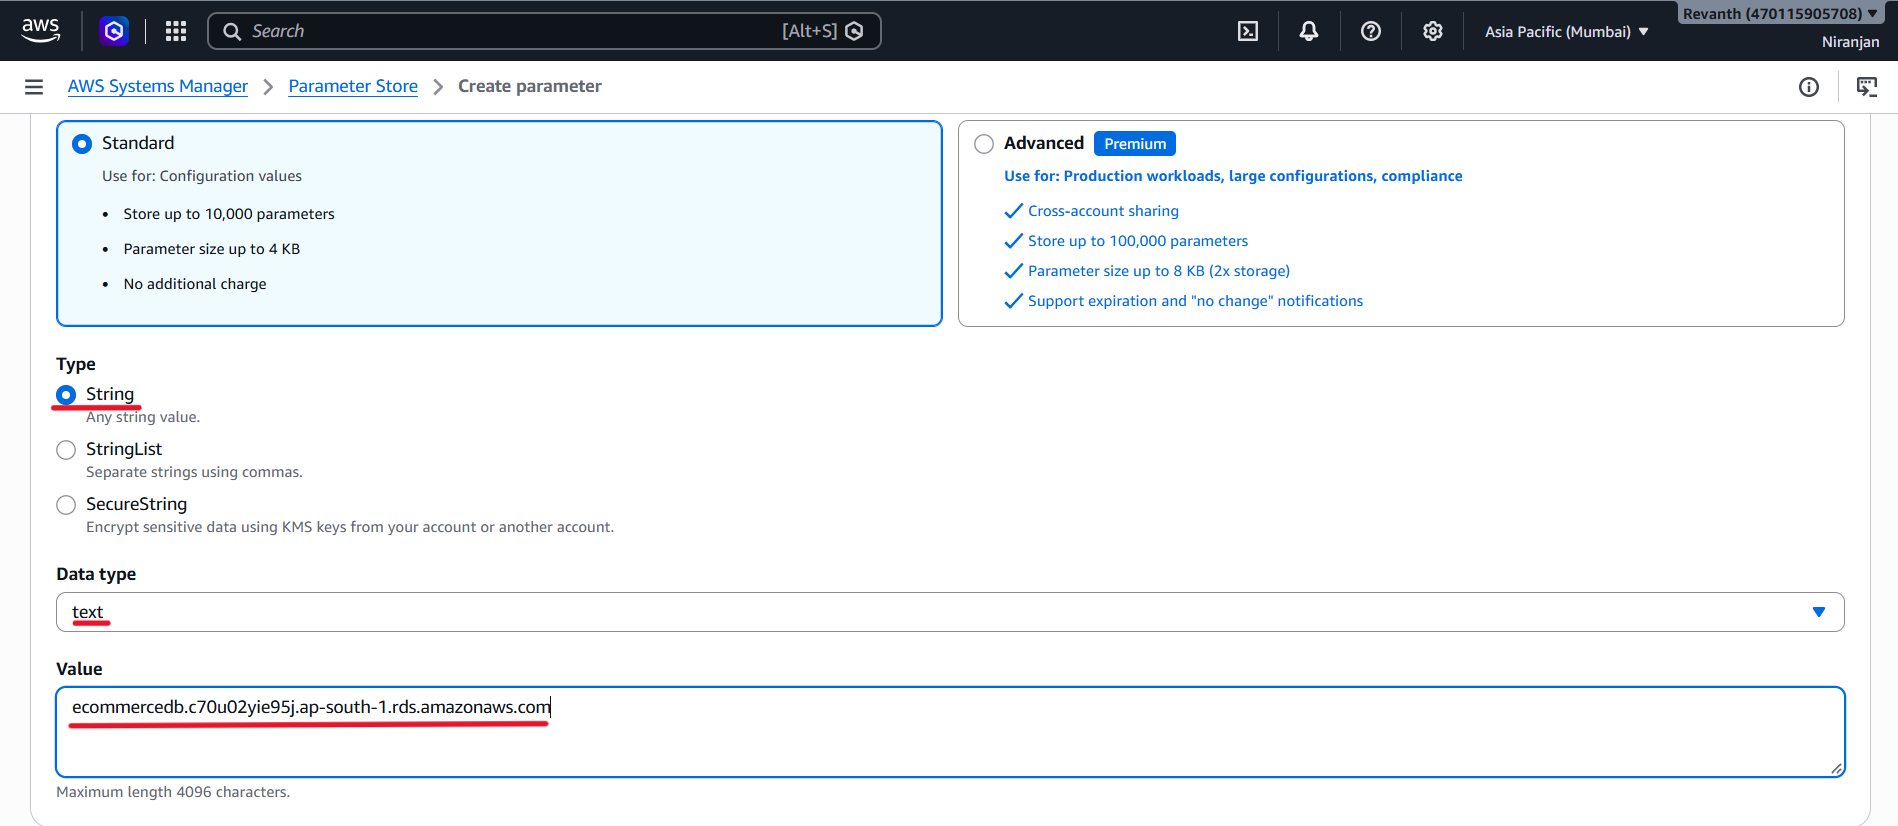
To obtain the endpoint:
- Open Amazon RDS → Databases.
- Select your PostgreSQL database.
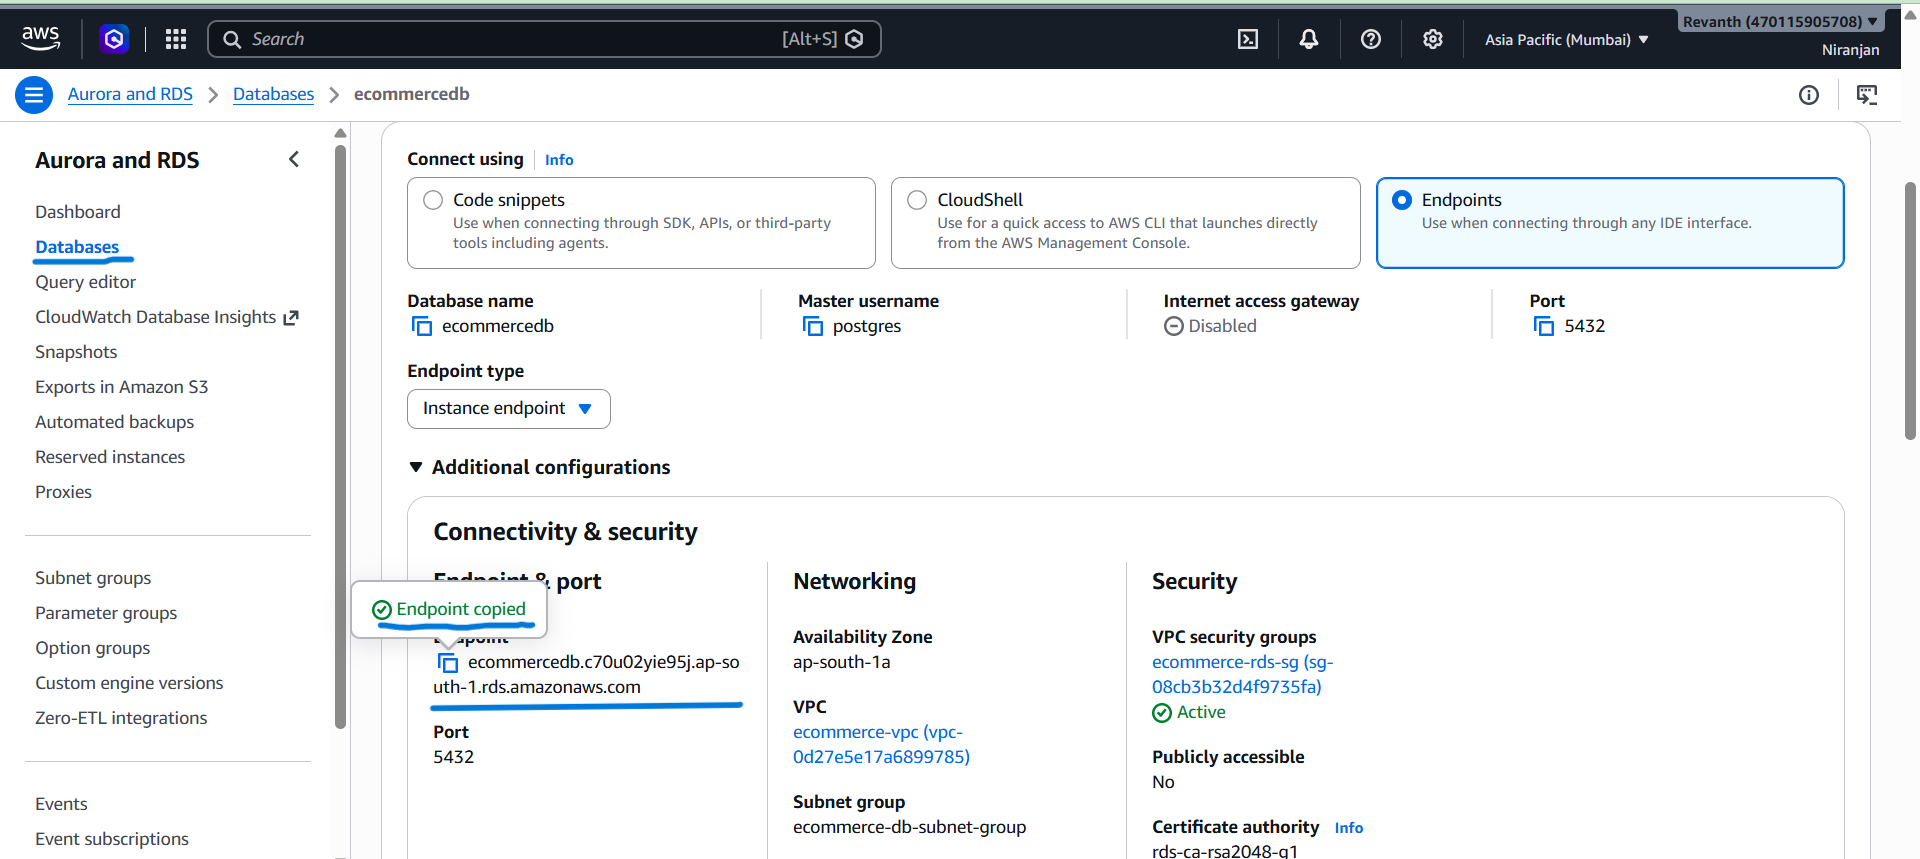
- Copy the endpoint from the database details.
- Paste the endpoint into the parameter's value field.
- Use the hostname provided by RDS. Do not enter the database password in this parameter.
- Click Create parameter.
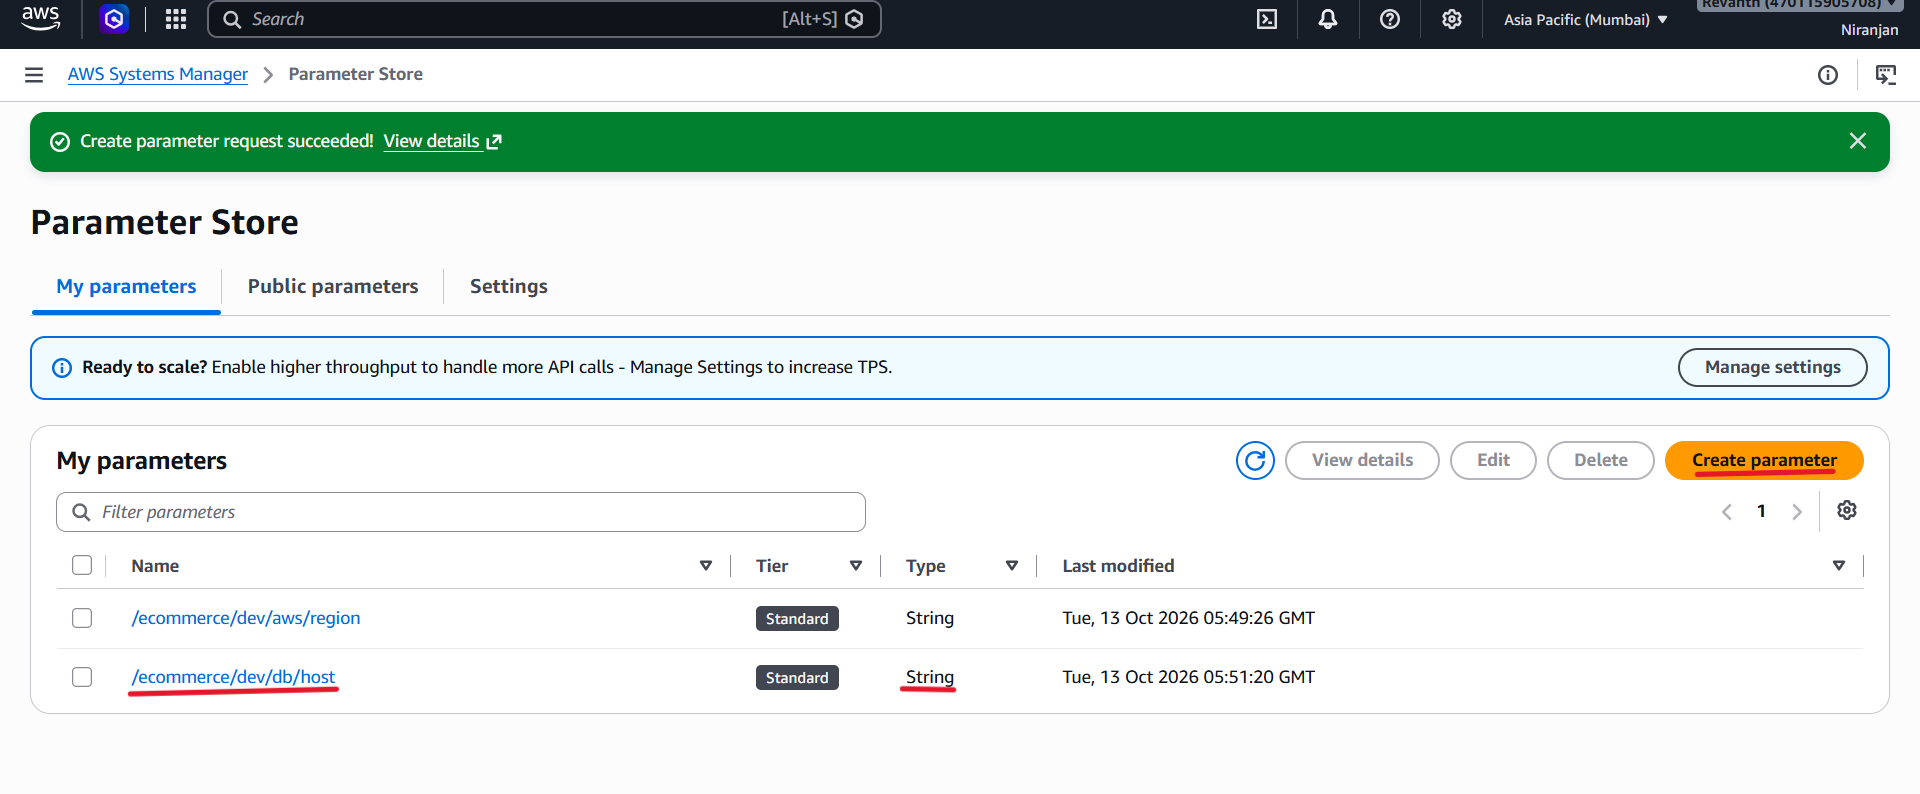
Step 4: Create the Database Password Parameter
- Create another parameter for the database password.
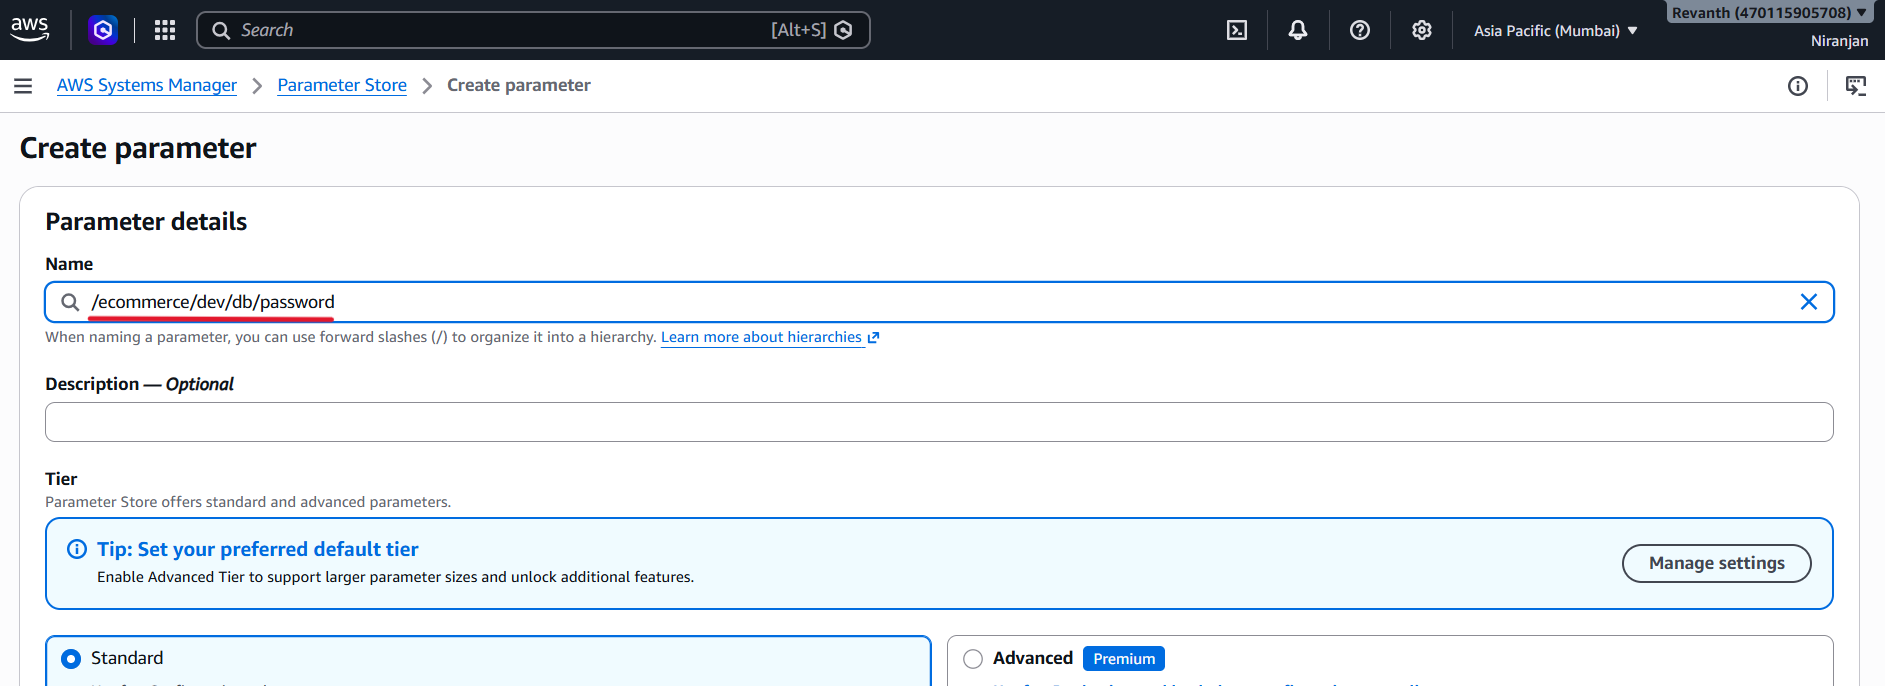
| Setting | Value |
|---|---|
| Name | /ecommerce/dev/db/password |
| Type | SecureString |
| Value | Your RDS master password |
Select SecureString so that the stored value is encrypted using AWS KMS.
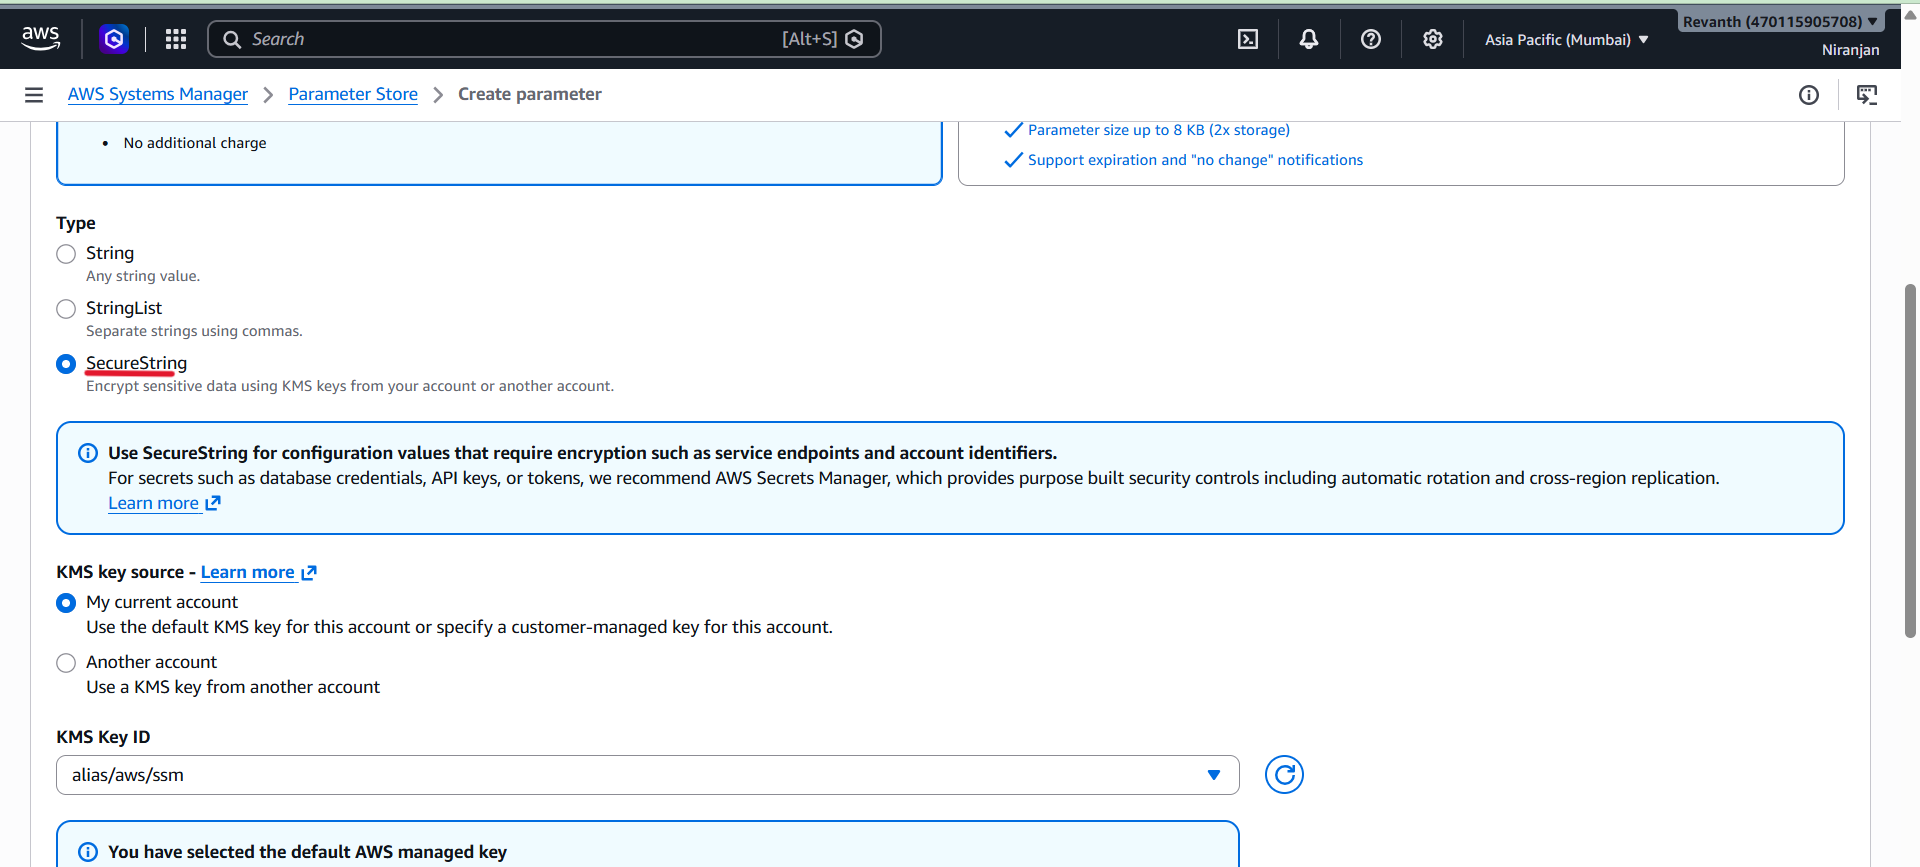
By default, these values are selected:
- KMS key source: My current account
- KMS Key ID: alias/aws/ssm (default AWS-managed key) You don't need to change these settings for our project.
- Enter the actual password configured when you created the RDS database.
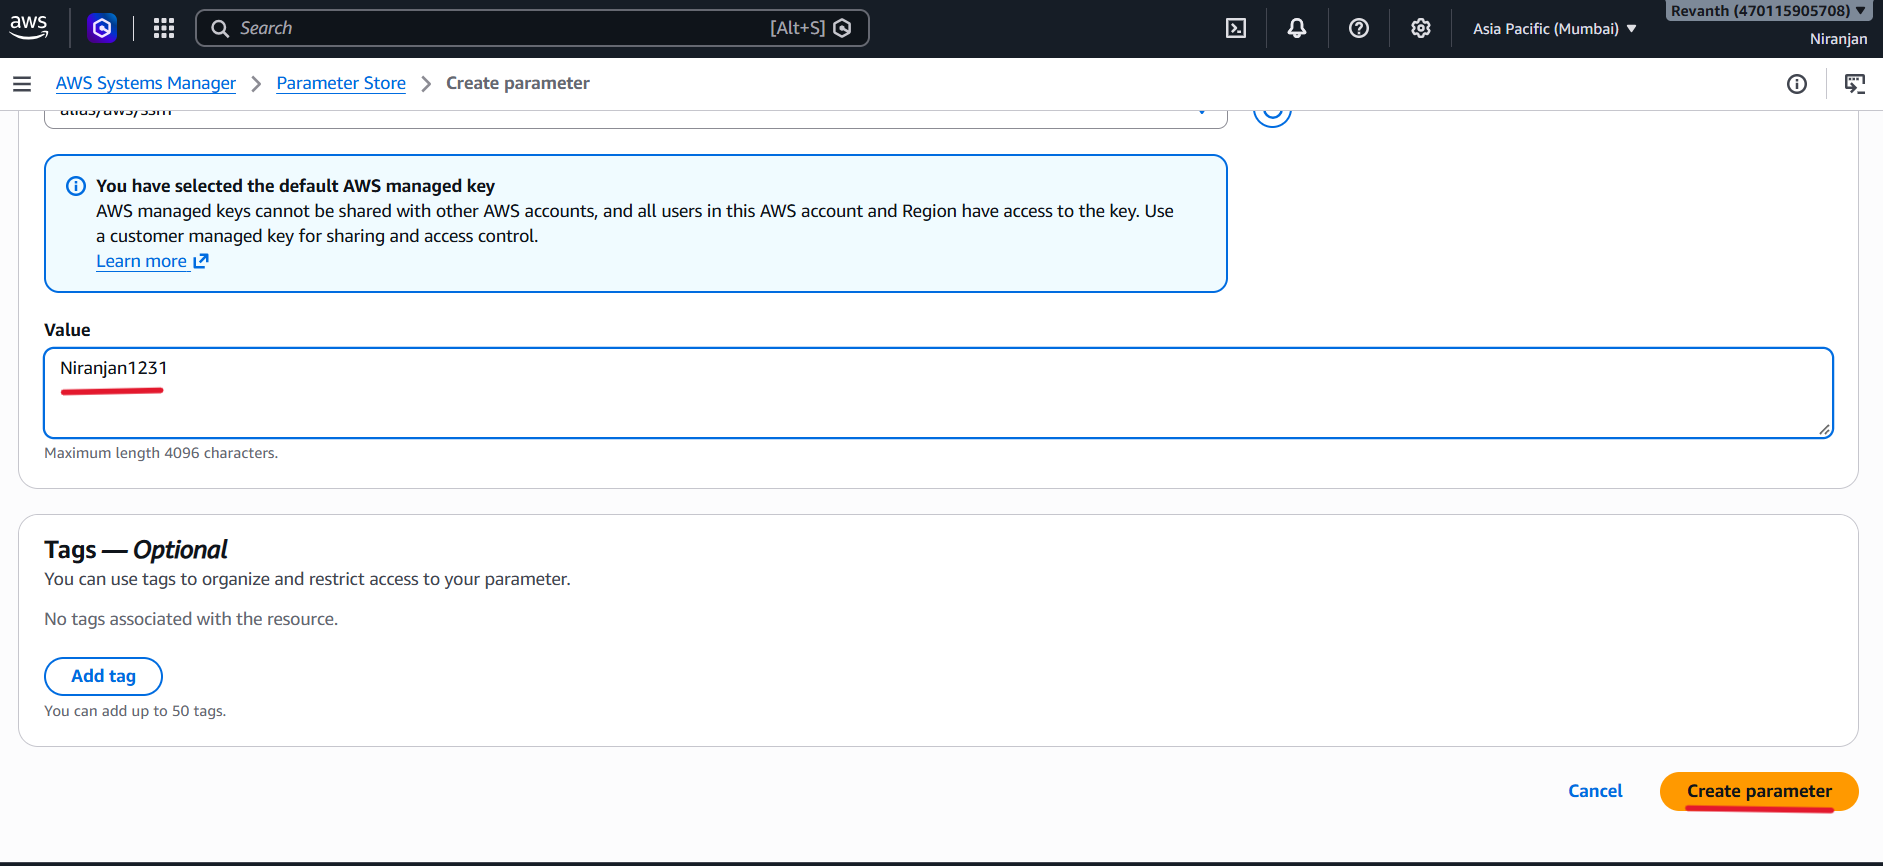
- Click Create parameter.
Important: Never include your real database password in screenshots, published documentation, source control, or public repositories.
Step 5: Verify the Parameters
Open Systems Manager → Parameter Store and confirm that these three parameters exist:
| Parameter name | Type | Purpose |
|---|---|---|
/ecommerce/dev/aws/region |
String | Identifies the AWS Region |
/ecommerce/dev/db/host |
String | Provides the RDS endpoint |
/ecommerce/dev/db/password |
SecureString | Stores the database password securely |
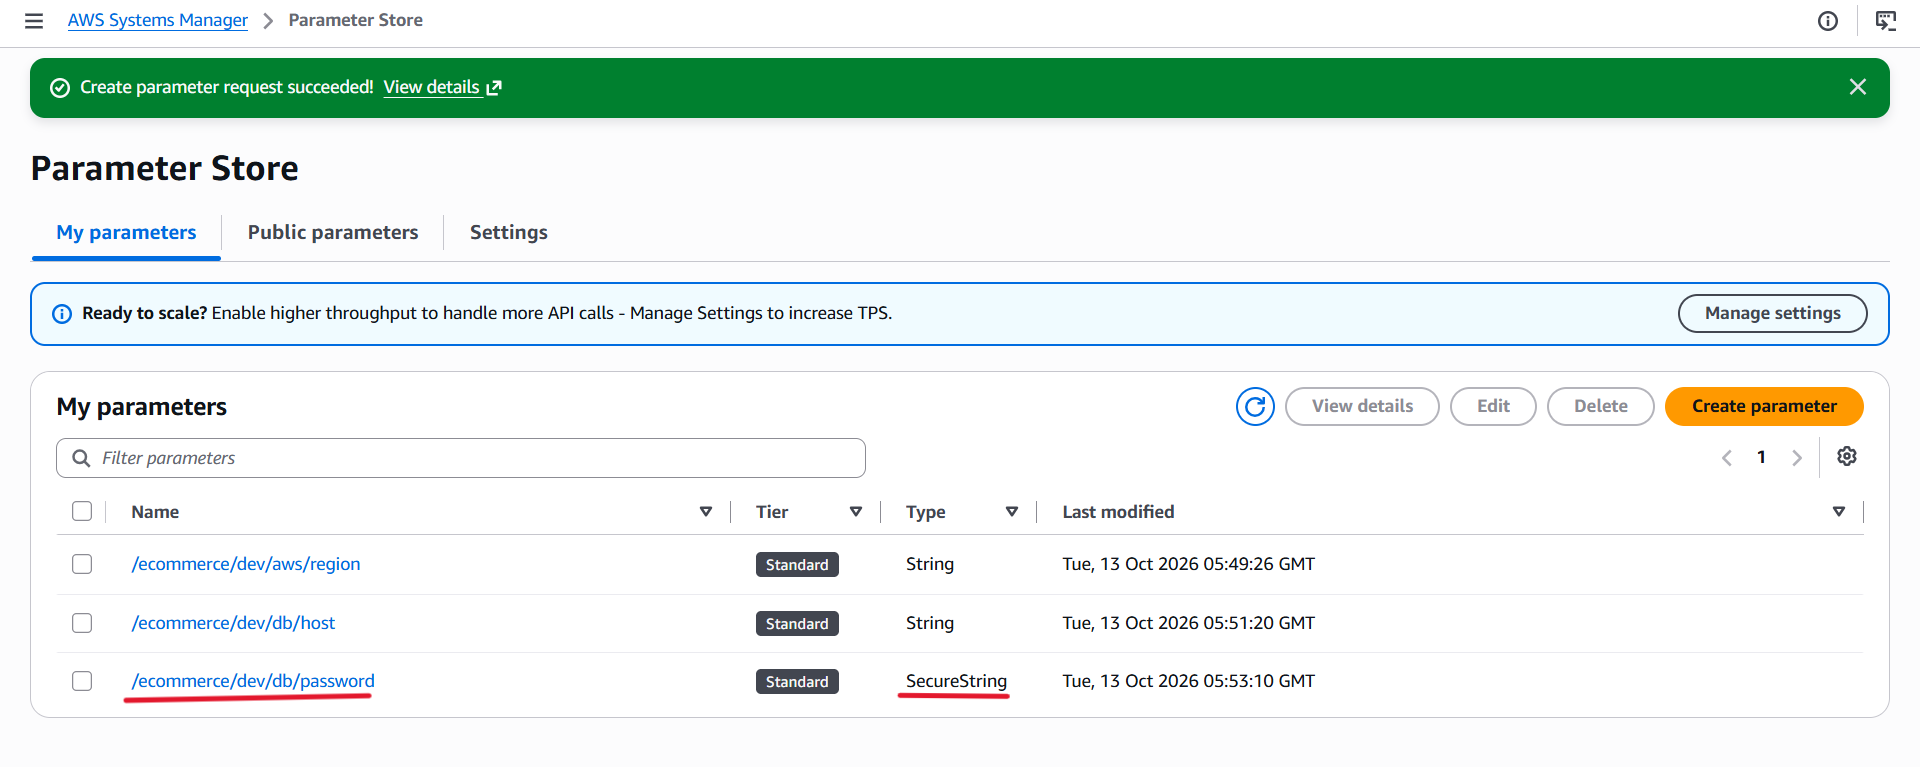
- The backend services will retrieve these values when they run in ECS.
- The
/ecommerce/dev/prefix identifies the application and environment. If you create separate environments in the future, you can use different prefixes for their configuration values.
Note: The ECS task or execution role must have the appropriate permissions to retrieve these parameters. The required permissions will be configured as part of the backend deployment.
Summary
In this module, we prepared the data layer required by the e-commerce application.
We completed the following tasks:
- Uploaded 20 sample product images to Amazon S3.
- Verified that product images can be accessed through CloudFront.
- Created the
ecommerce-productsandecommerce-cartDynamoDB tables. - Updated product image URLs to use CloudFront.
- Loaded 20 sample products into DynamoDB.
- Created a private PostgreSQL database using Amazon RDS.
- Stored the AWS Region, database endpoint, and database password in Systems Manager Parameter Store.
These resources provide the data storage required by our backend services.
Next Steps
- Proceed to Backend Deployment, where we will build container images, push them to Amazon ECR, configure ECS tasks and services, and set up the backend infrastructure.
- If you are taking a break before the next module, remember to stop the RDS database if appropriate for your setup, and start it again before continuing.
Module 5: Backend Services Deployment (ECS and ALB)
Overview
In this module, we will deploy the four backend microservices as Docker containers using Amazon ECS (Elastic Container Service) with AWS Fargate.
We will use an Internal Application Load Balancer (ALB) to distribute incoming requests to the appropriate backend service based on the request path.
The four backend services are:
- Product Service – Port
8001 - Cart Service – Port
8002 - User Service – Port
8003 - Order Service – Port
8004
By the end of this module, all four ECS services should be running and registered as healthy targets behind the internal ALB.
Architecture Overview
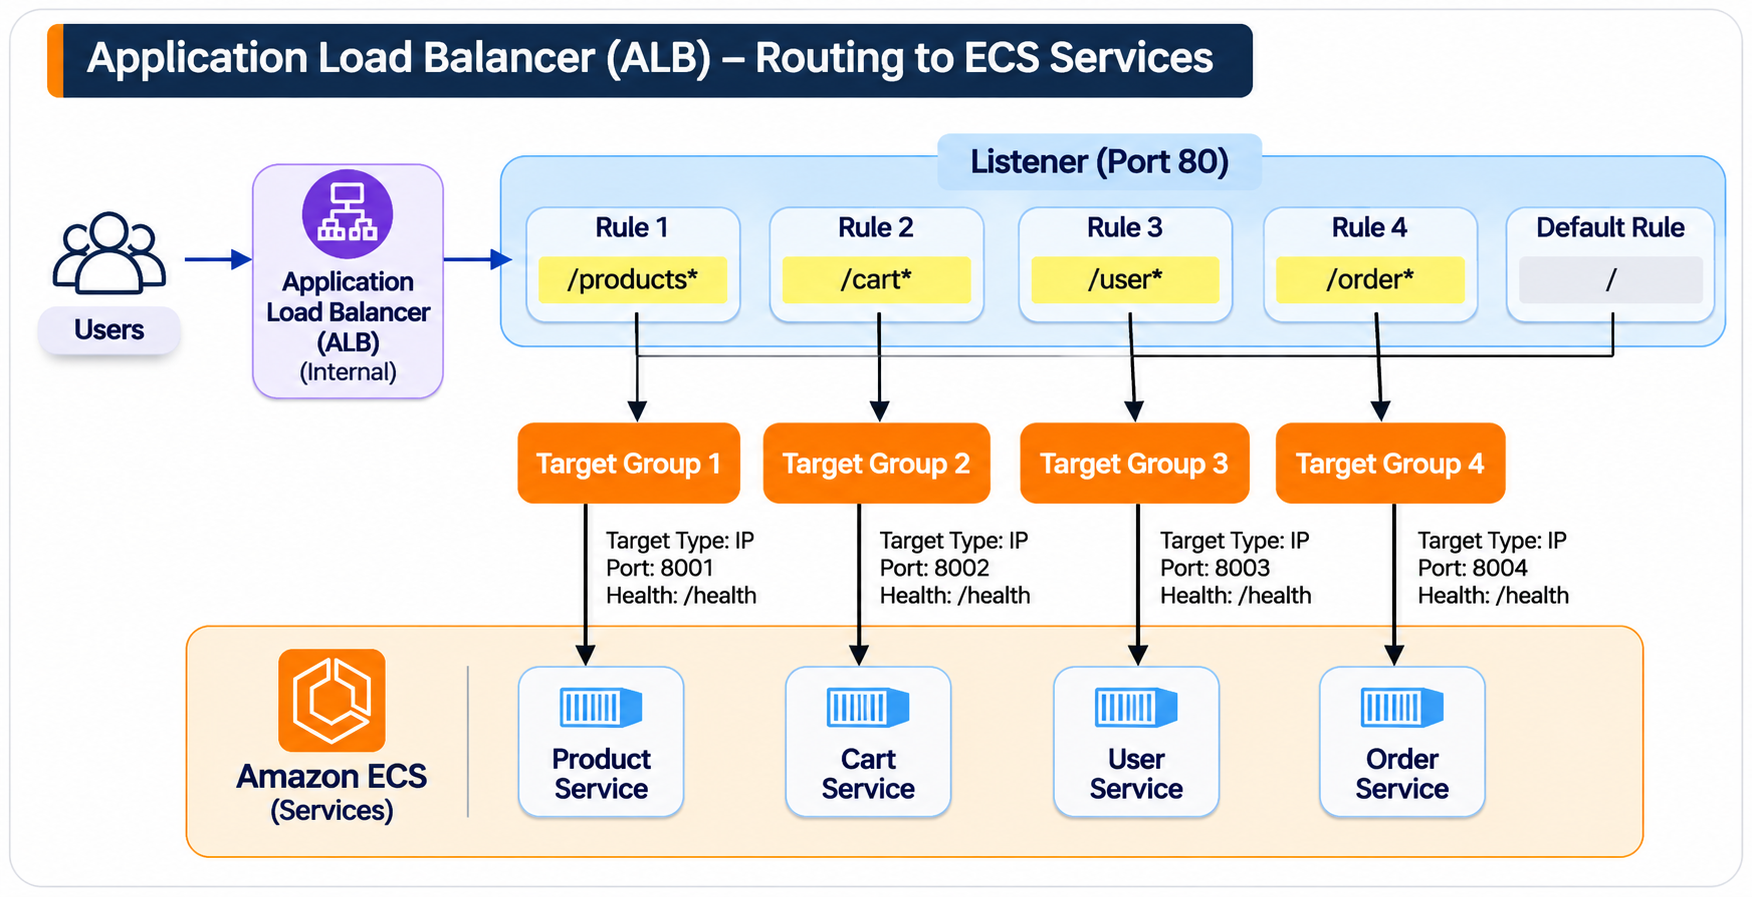
The architecture consists of an internal Application Load Balancer deployed across the two private ECS subnets. It routes requests to the corresponding ECS services using path-based routing rules.
Request routing:
/products*→ Product Service/cart*→ Cart Service/user*→ User Service/order*→ Order Service
Each ECS service runs as a Fargate task in the private ECS subnets. The services are not directly exposed to the internet.
In This Module
- Create an internal Application Load Balancer and configure target groups.
- Configure ALB listener rules for path-based routing.
- Create service URL parameters in AWS Systems Manager Parameter Store.
- Create ECR repositories for all four backend services.
- Build Docker images locally and push them to ECR.
- Create an IAM role and security group for ECS tasks.
- Create ECS task definitions for all four services.
- Create the ECS cluster and ECS services.
- Validate backend service availability.
- Perform cost-saving steps when temporarily stopping the project.
5.1 Create an Internal Application Load Balancer
Before creating the load balancer, we need to create its security group and four target groups.
5.1.1 Create the ALB Security Group
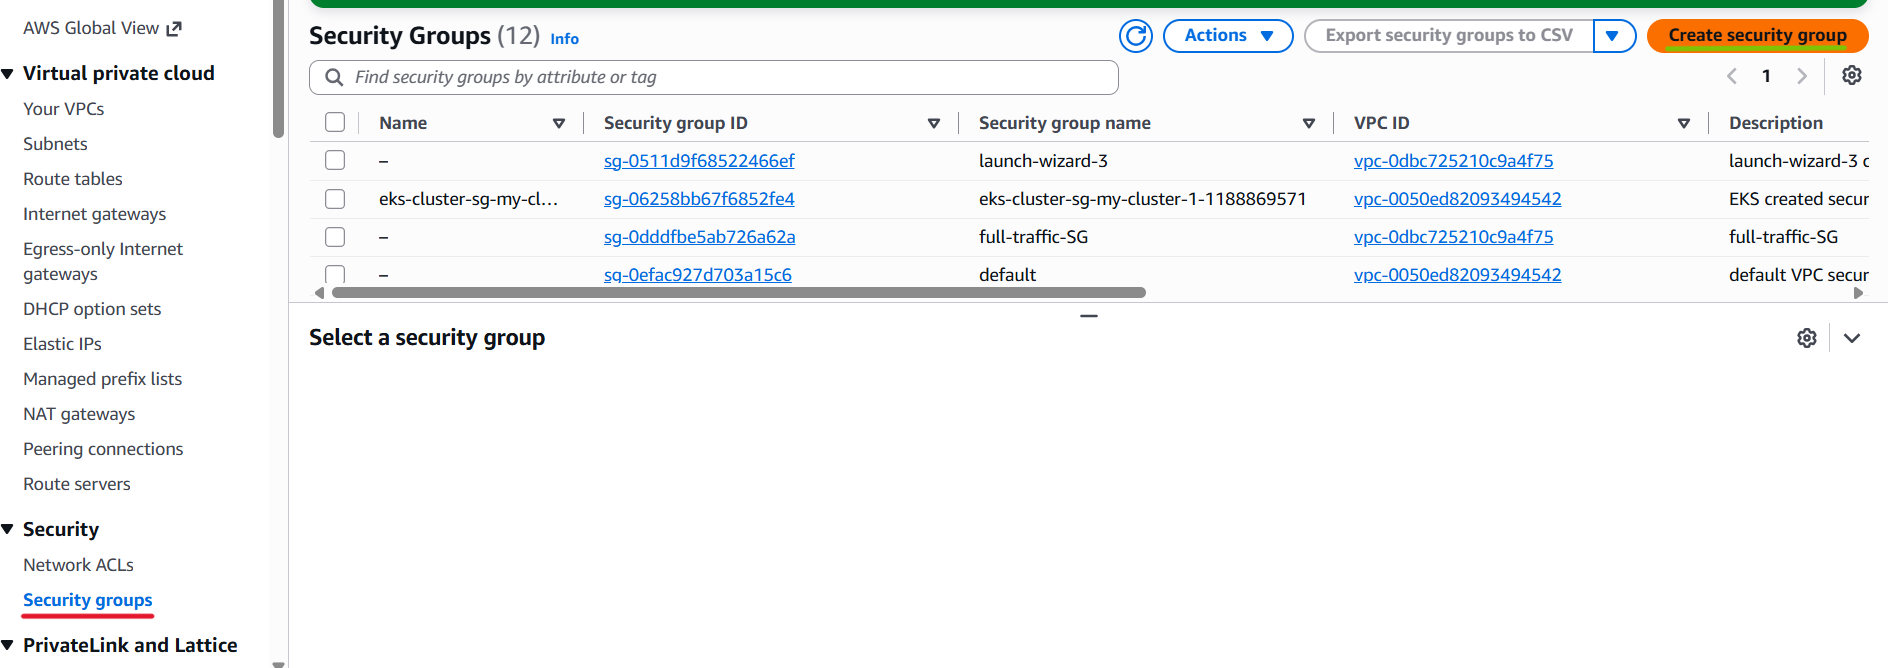
- EC2 Console → Security Groups → Create security group
- Name:
ecommerce-alb-sg
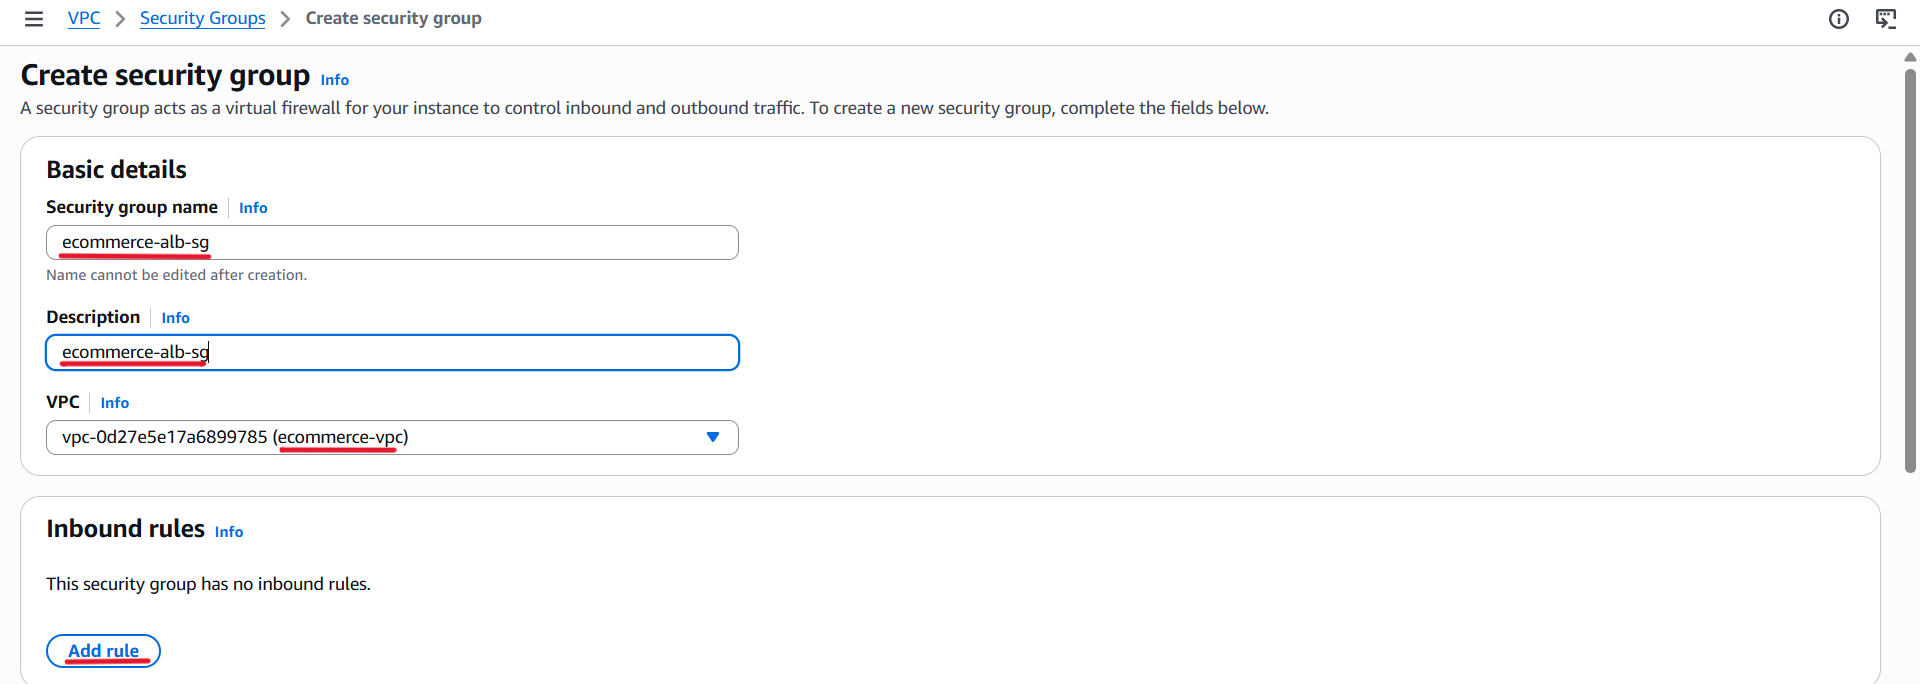
- Description:
ecommerce-alb-sg - VPC: Select
ecommerce-vpc - Inbound rules:
- Type: HTTP
- Port: 80
- Source:
10.10.0.0/16(VPC CIDR) - Description: Allow HTTP traffic from within the VPC.
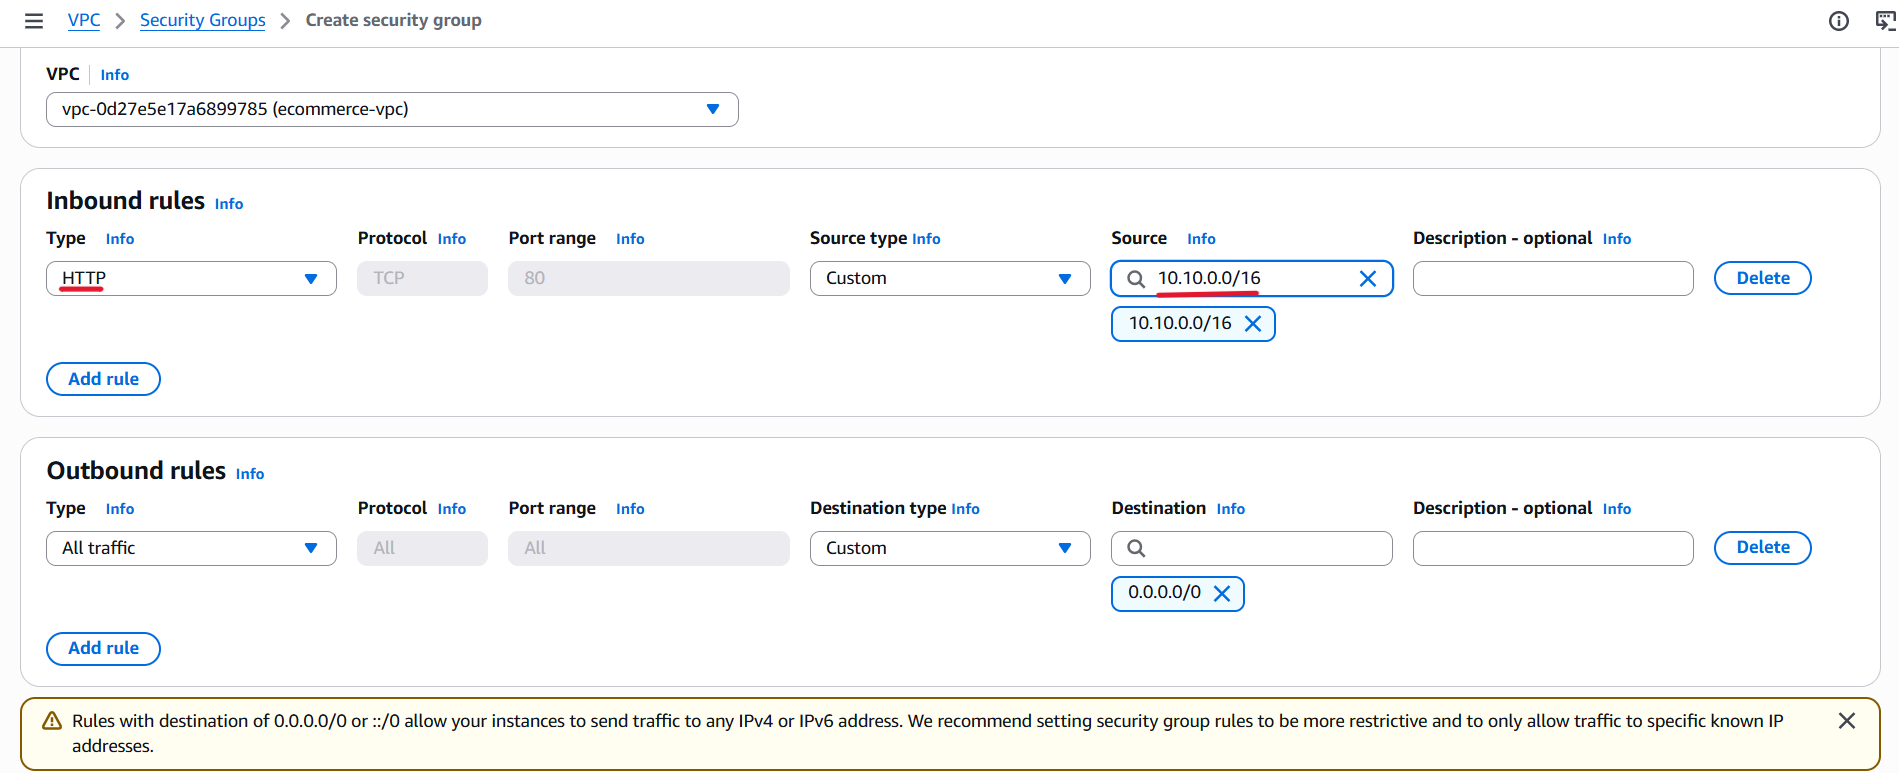
- Outbound rules: Keep the default rule (All traffic).
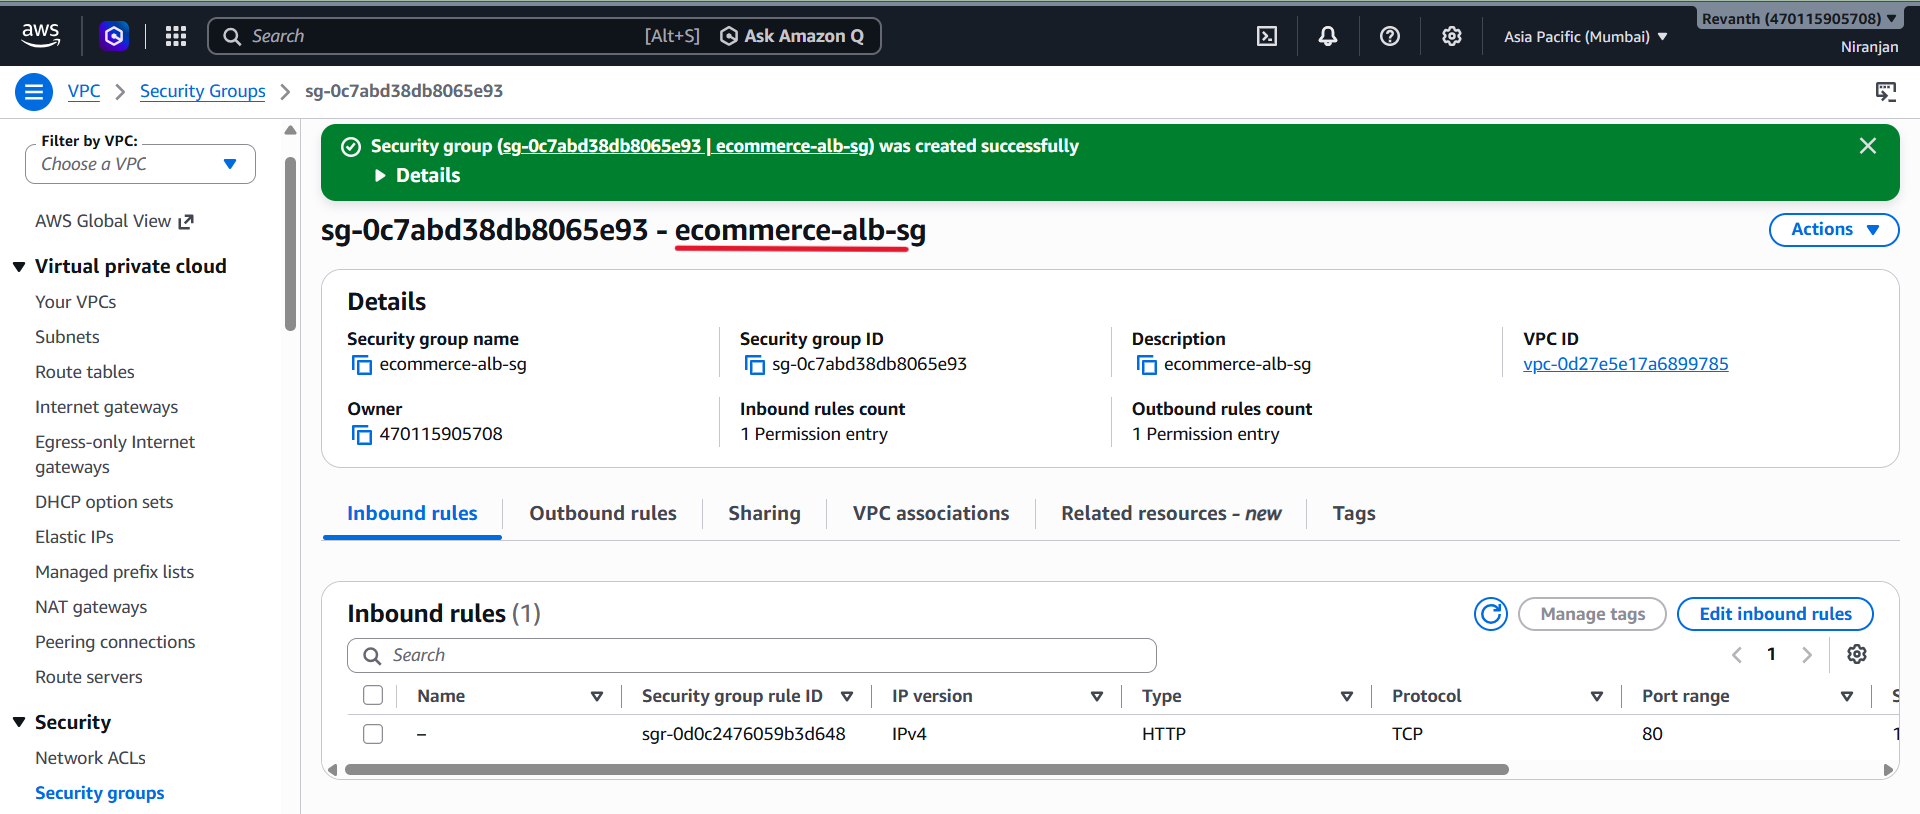
- Click Create security group.
Why do we allow traffic from the VPC CIDR?
- This is an internal load balancer. Later, API Gateway will connect to this ALB using the VPC Link feature. The VPC Link creates network interfaces inside our VPC, and traffic reaches the ALB through those interfaces.
- For this setup, we allow HTTP traffic from the VPC CIDR because the VPC Link network interface IP addresses are not known at this stage.
- For a more restrictive production configuration, you can update the security group later to allow traffic only from the appropriate VPC Link security group or source.
5.1.2 Create Target Groups
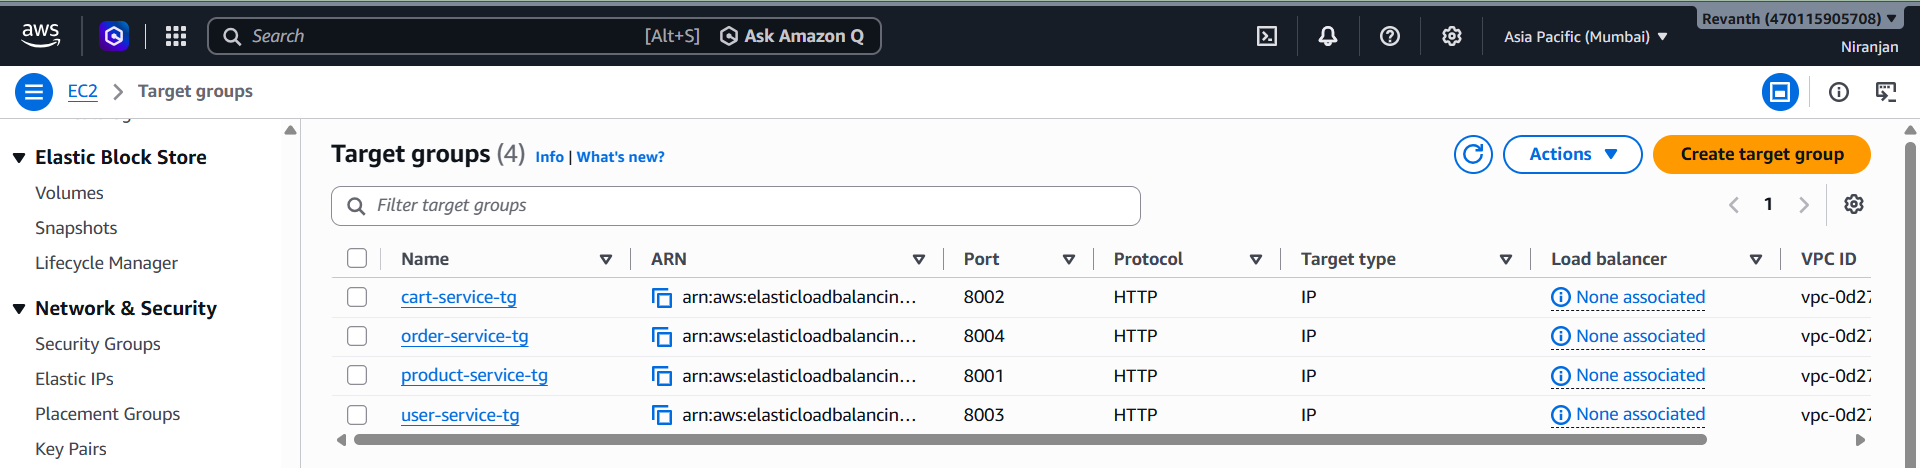
We need to create four target groups, one for each backend service.
For the first target group:
- EC2 Console → Load Balancing → Target Groups → Create target group
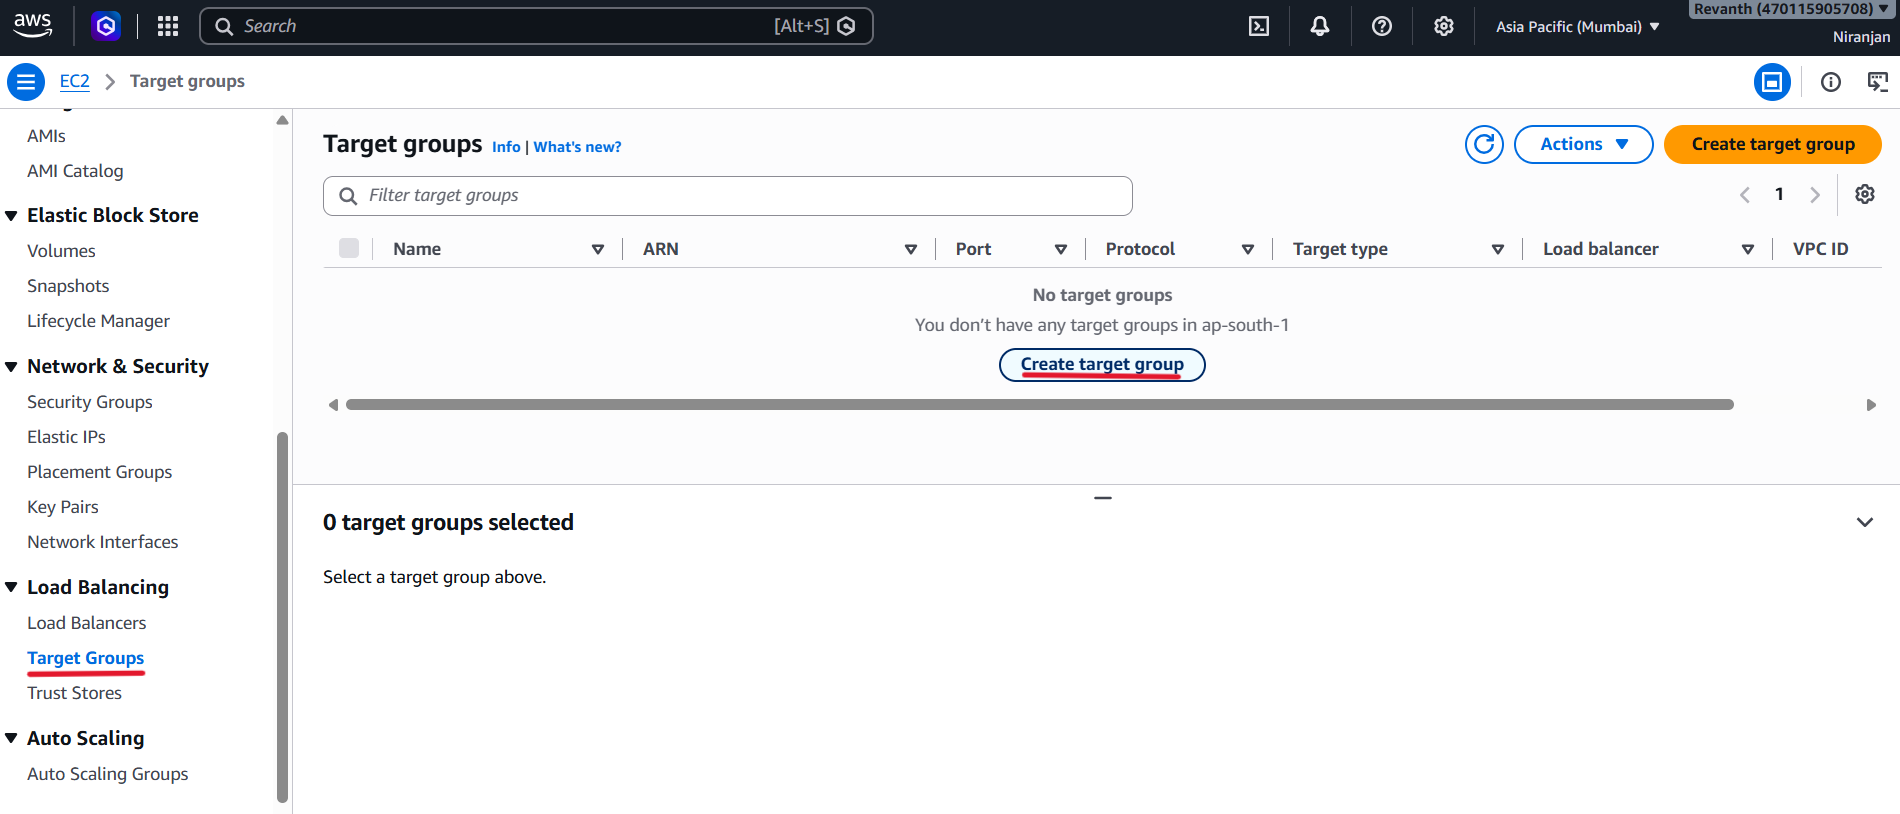
- Target type: IP addresses
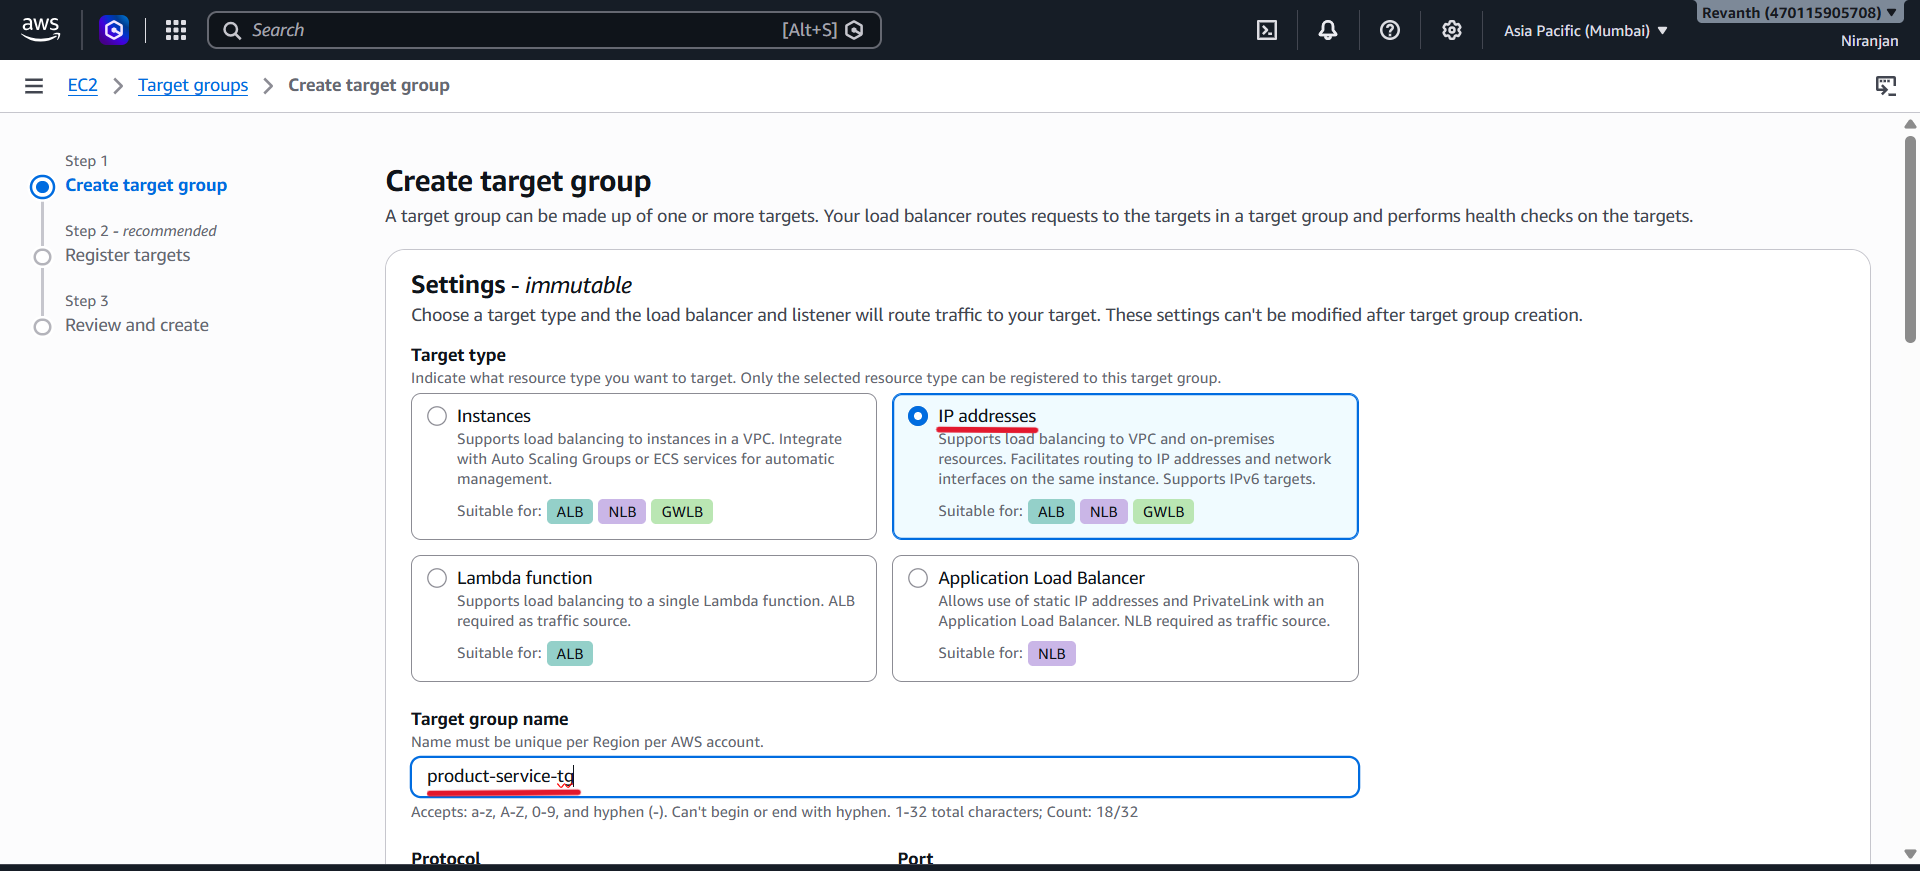
- Target group name:
product-service-tg - Protocol: HTTP
- Port:
8001
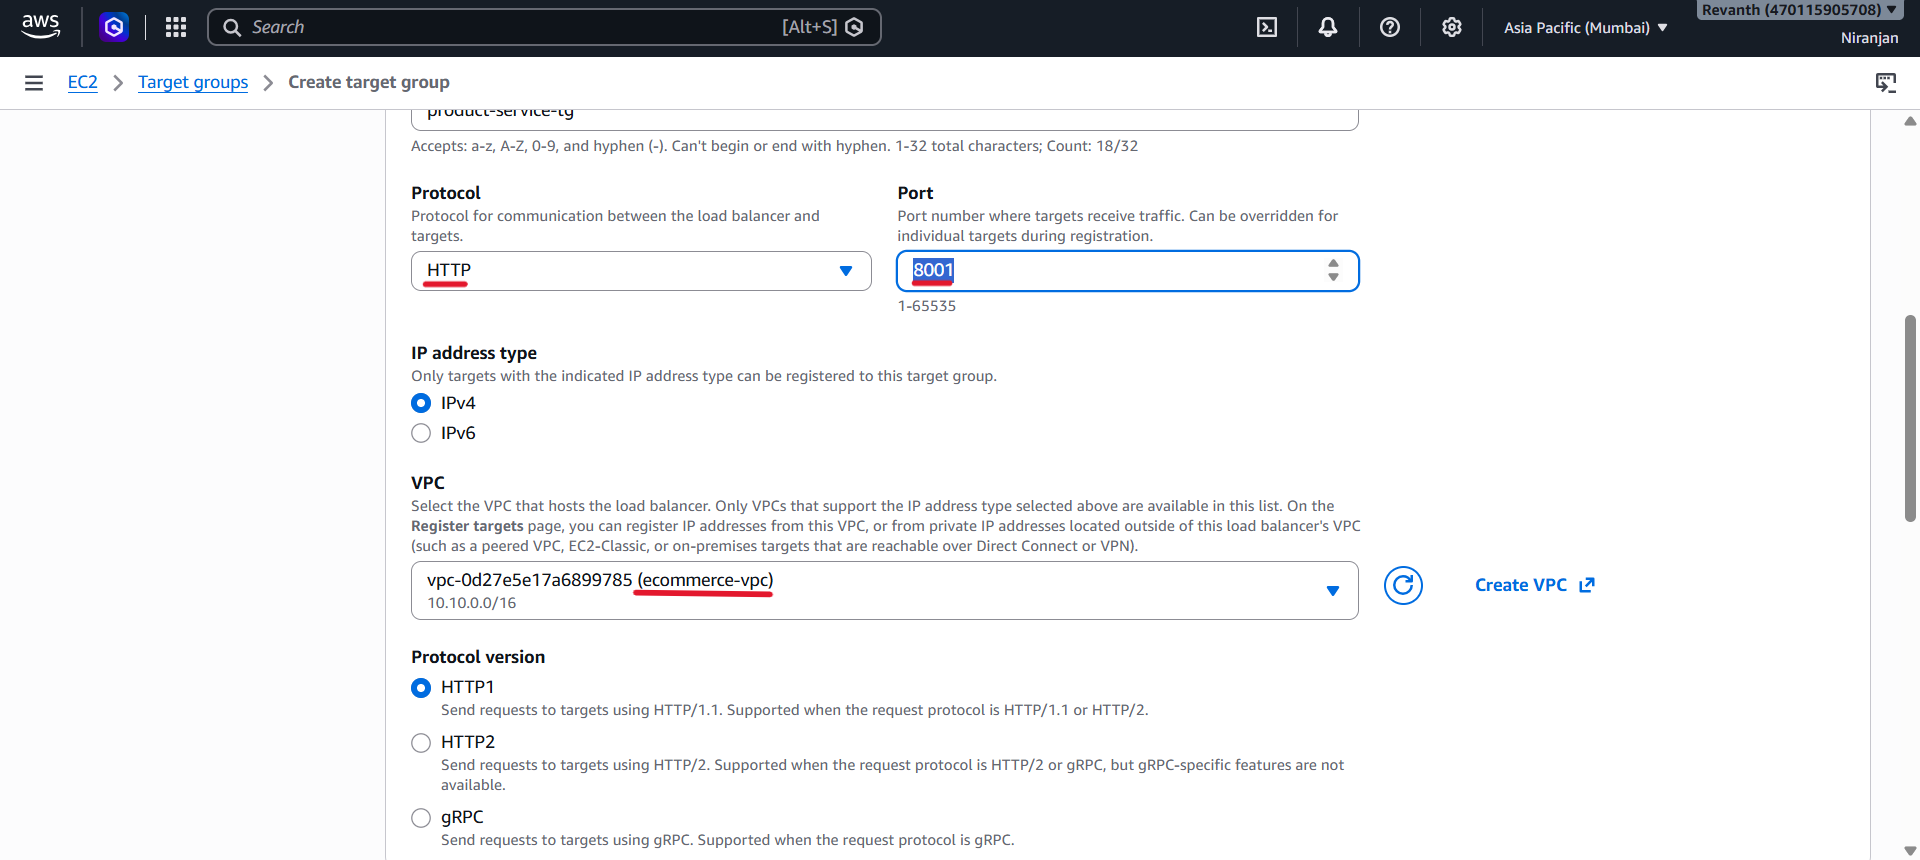
- VPC: Select
ecommerce-vpc - Health check path:
/health
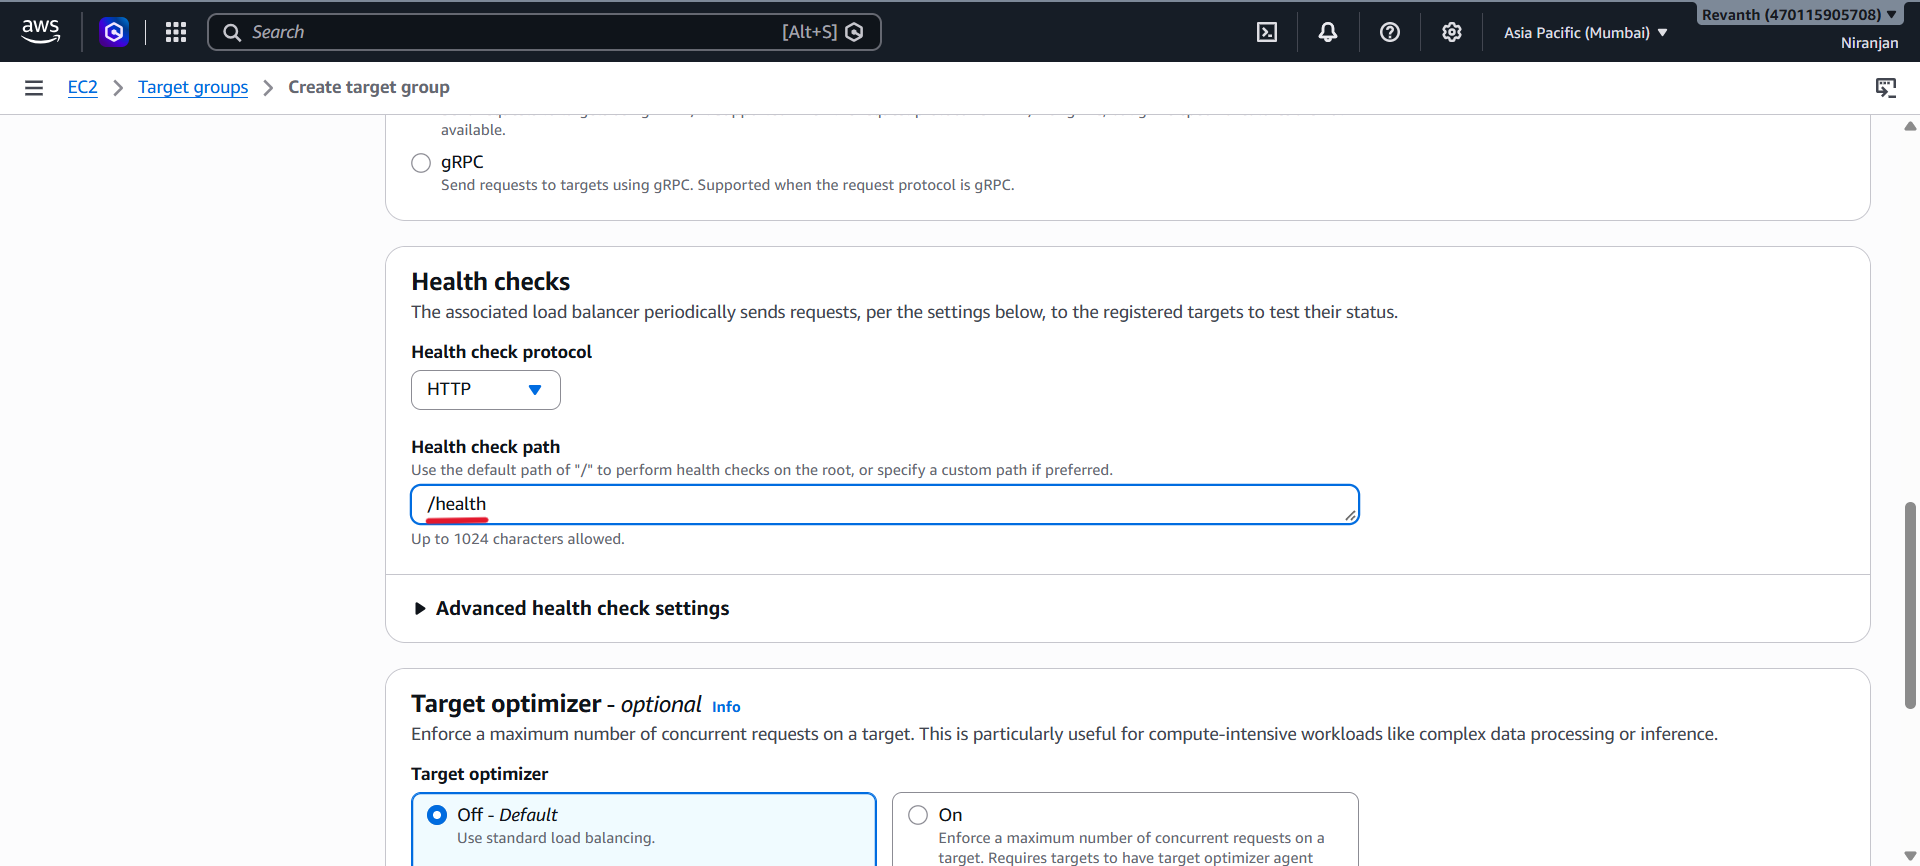
- Click Create target group.
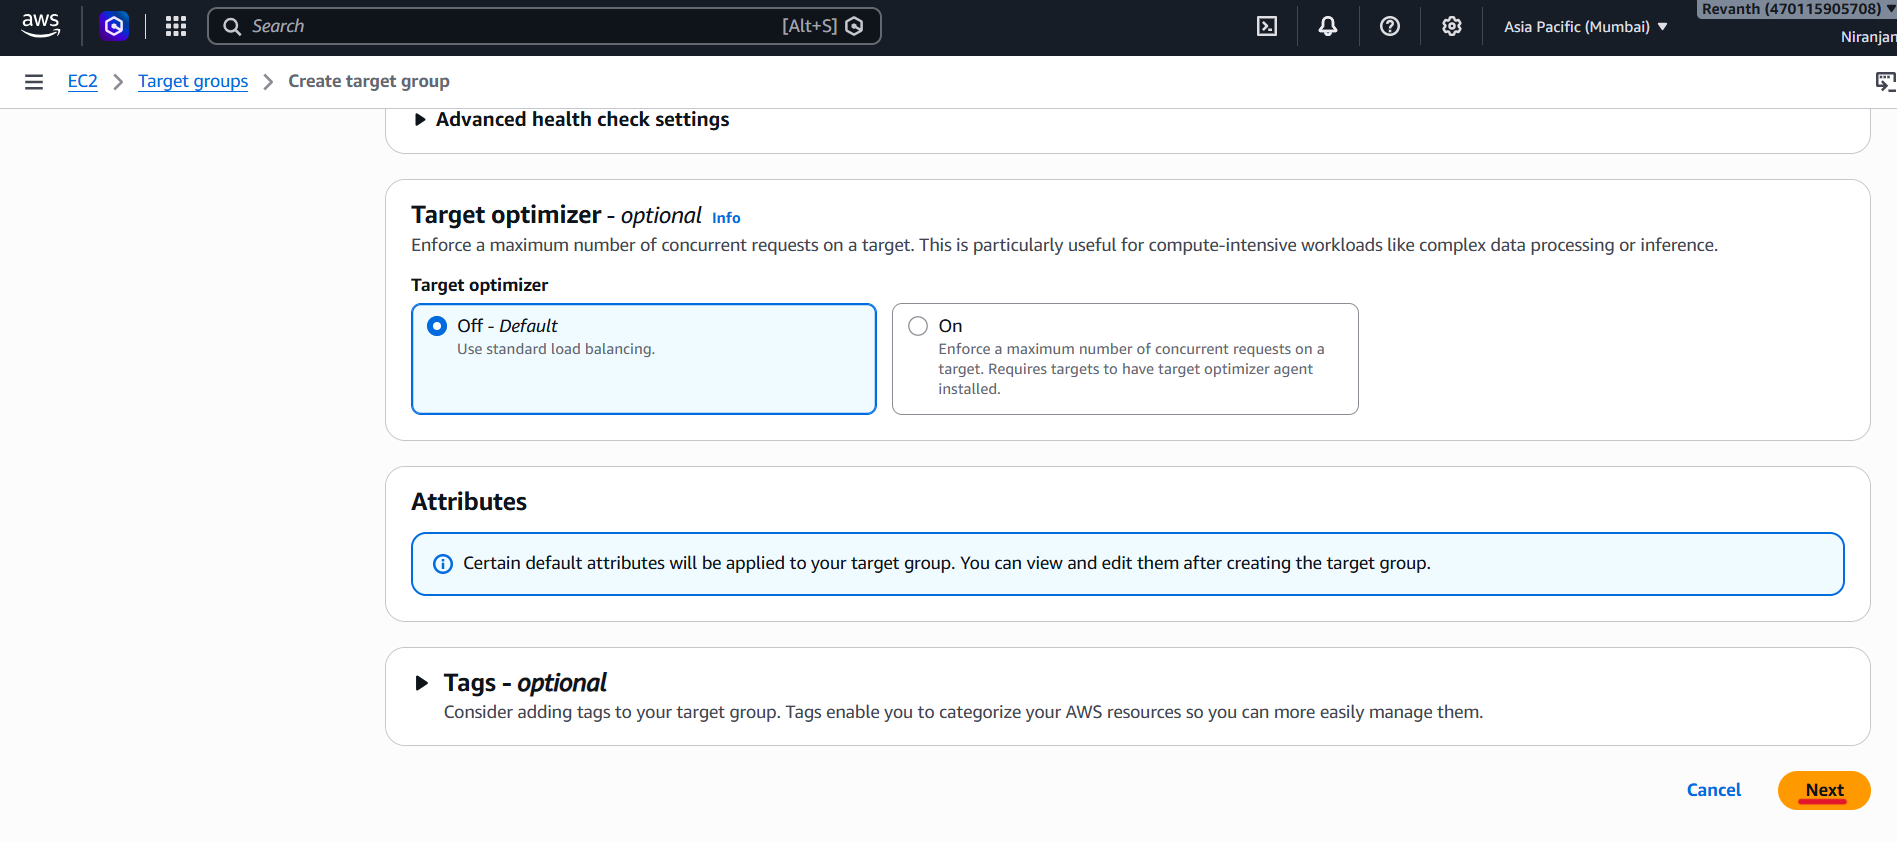
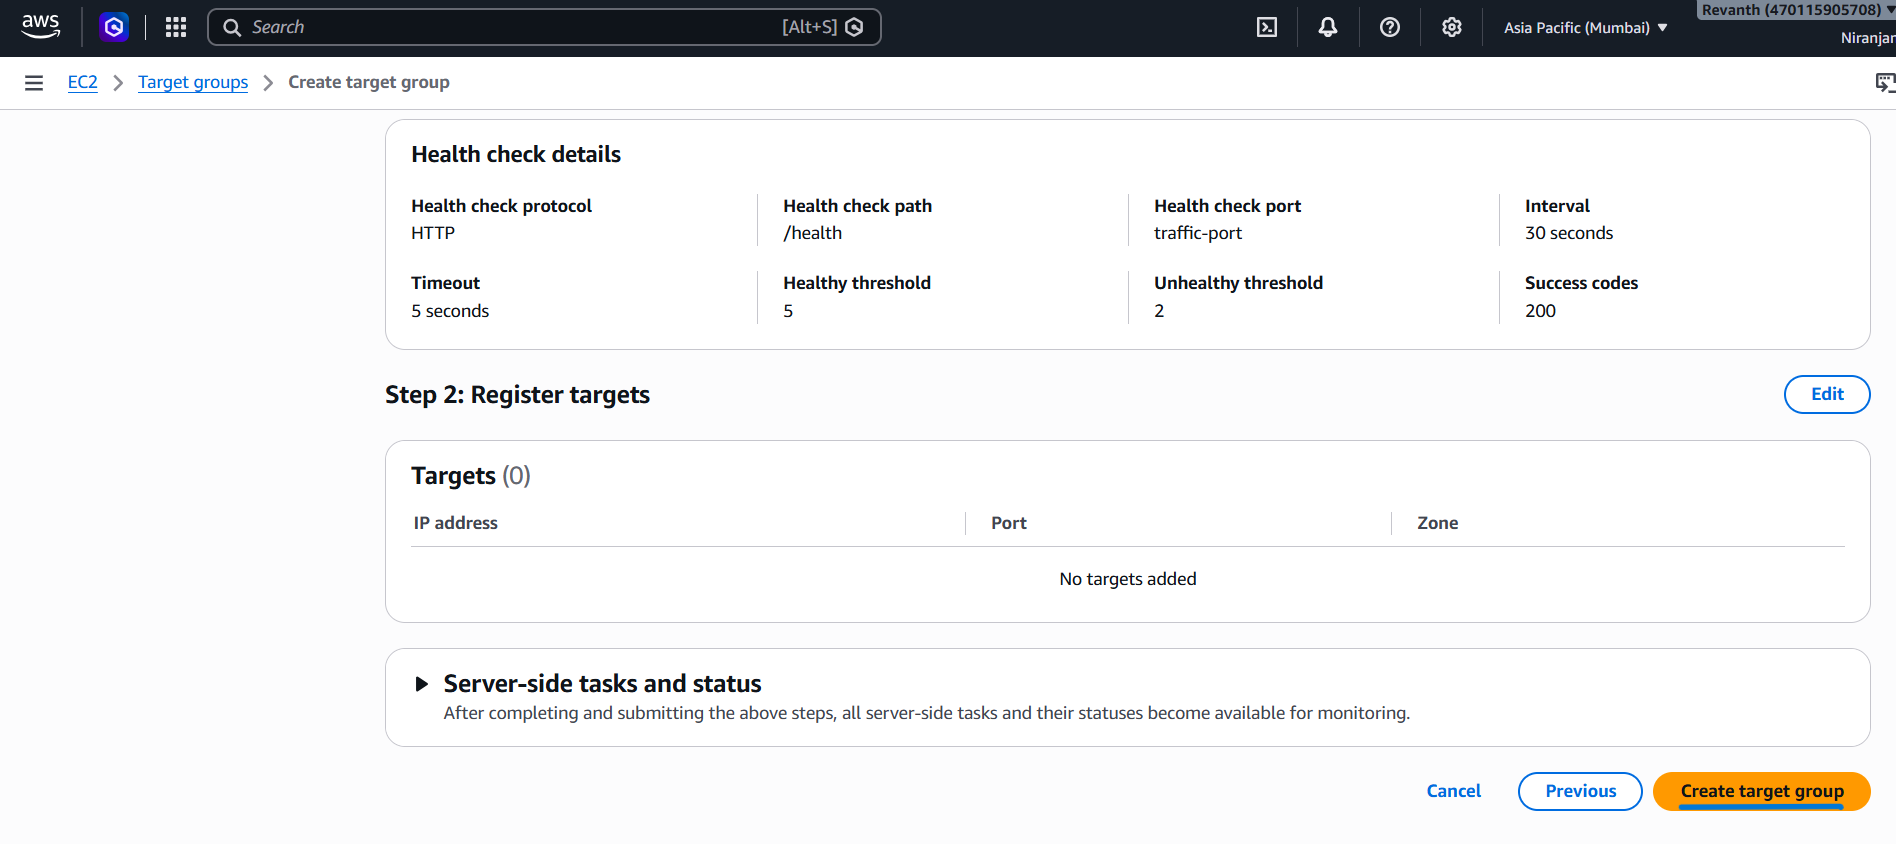
- Review all the configurations
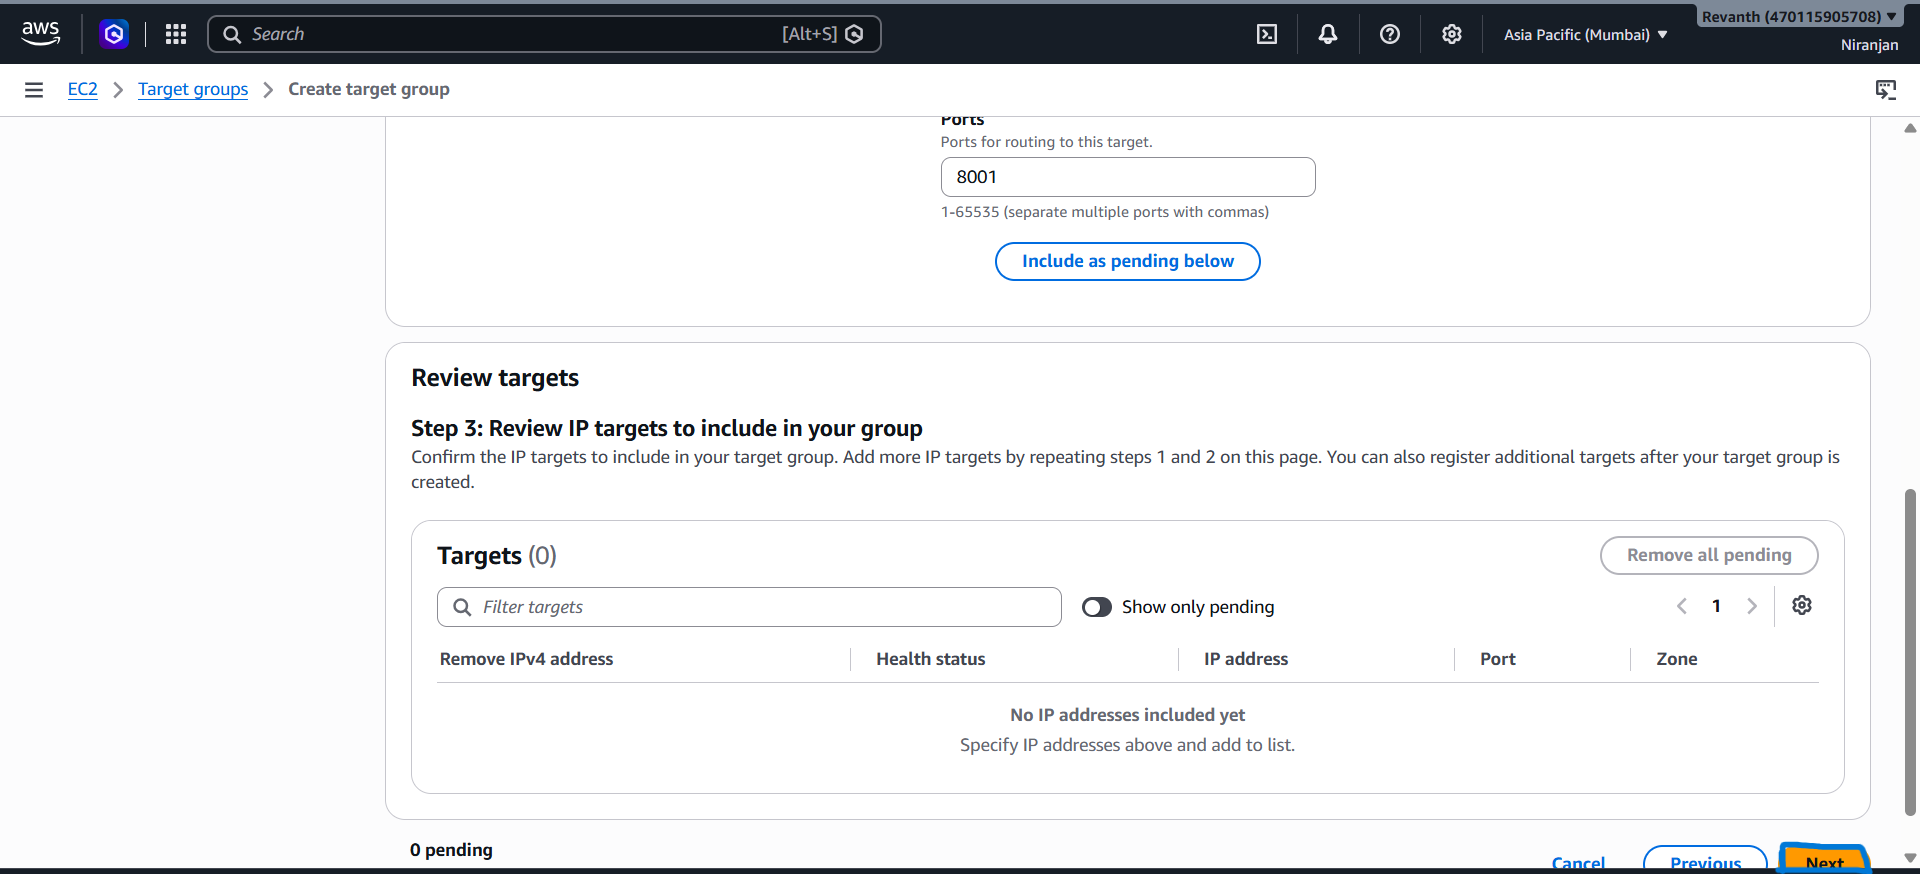
- Click Create target group.
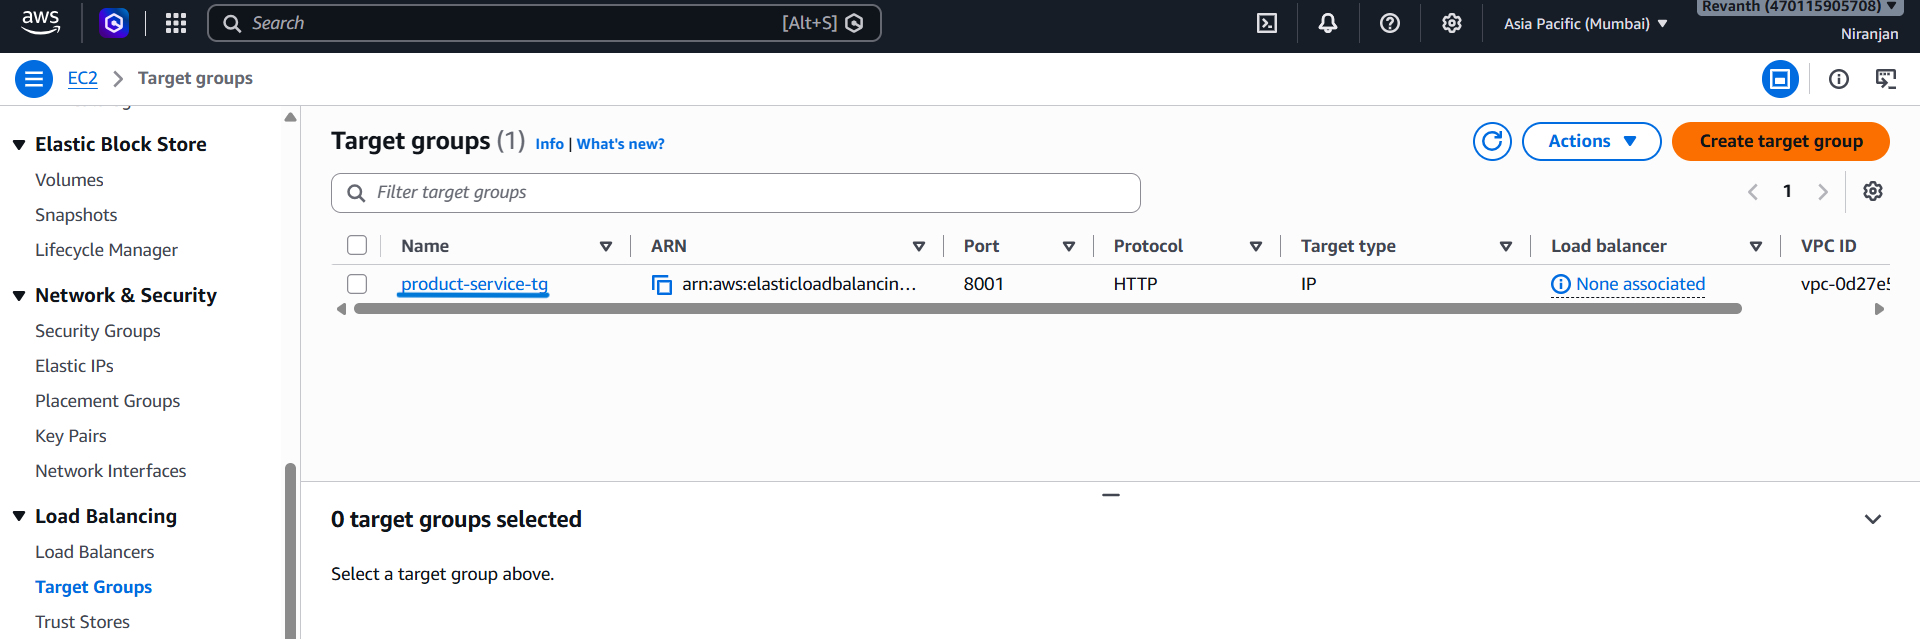
- Product Service Target Group
- The health check endpoint
/healthis used to verify whether the backend service is running. In this project, the service responds with HTTP200 OKwhen it is healthy.
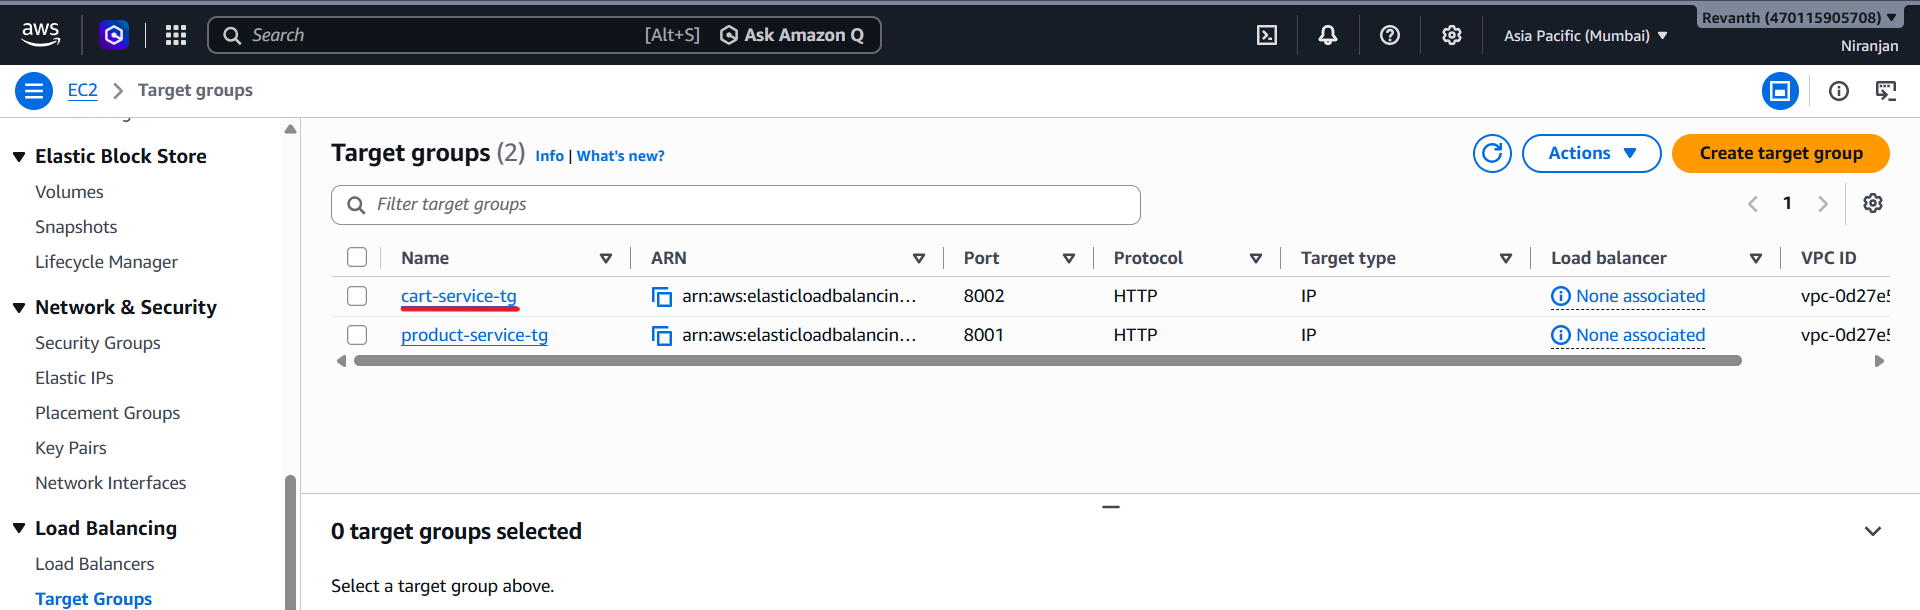
Create the remaining three target groups using the following configurations:
Cart Service Target Group
- Target group name:
cart-service-tg
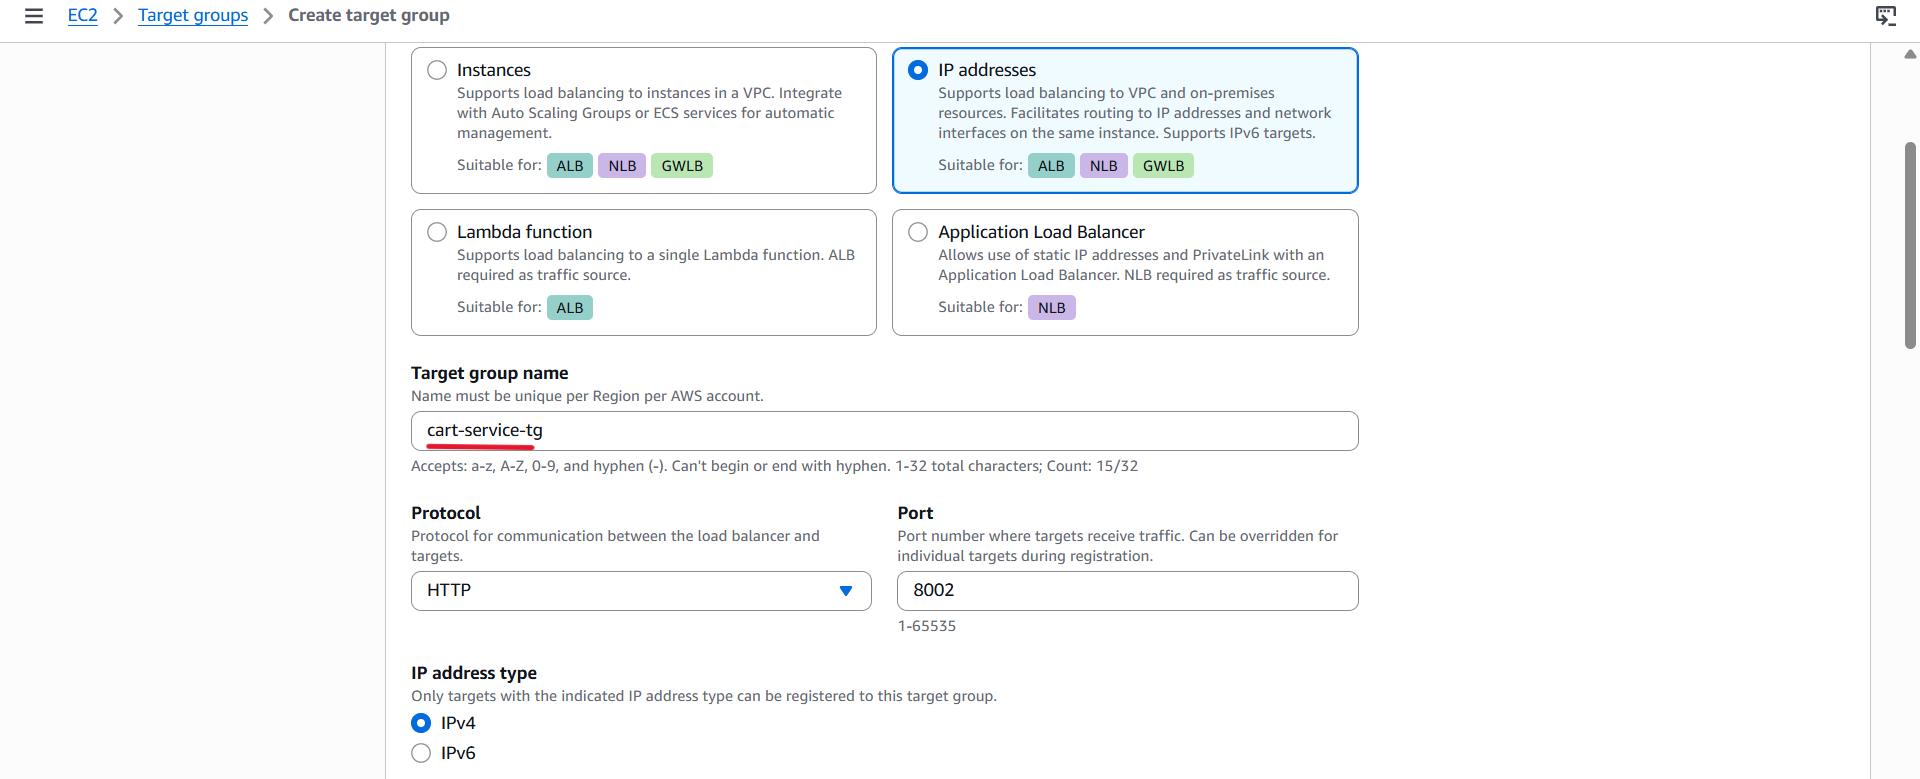
- Protocol: HTTP
- Port:
8002
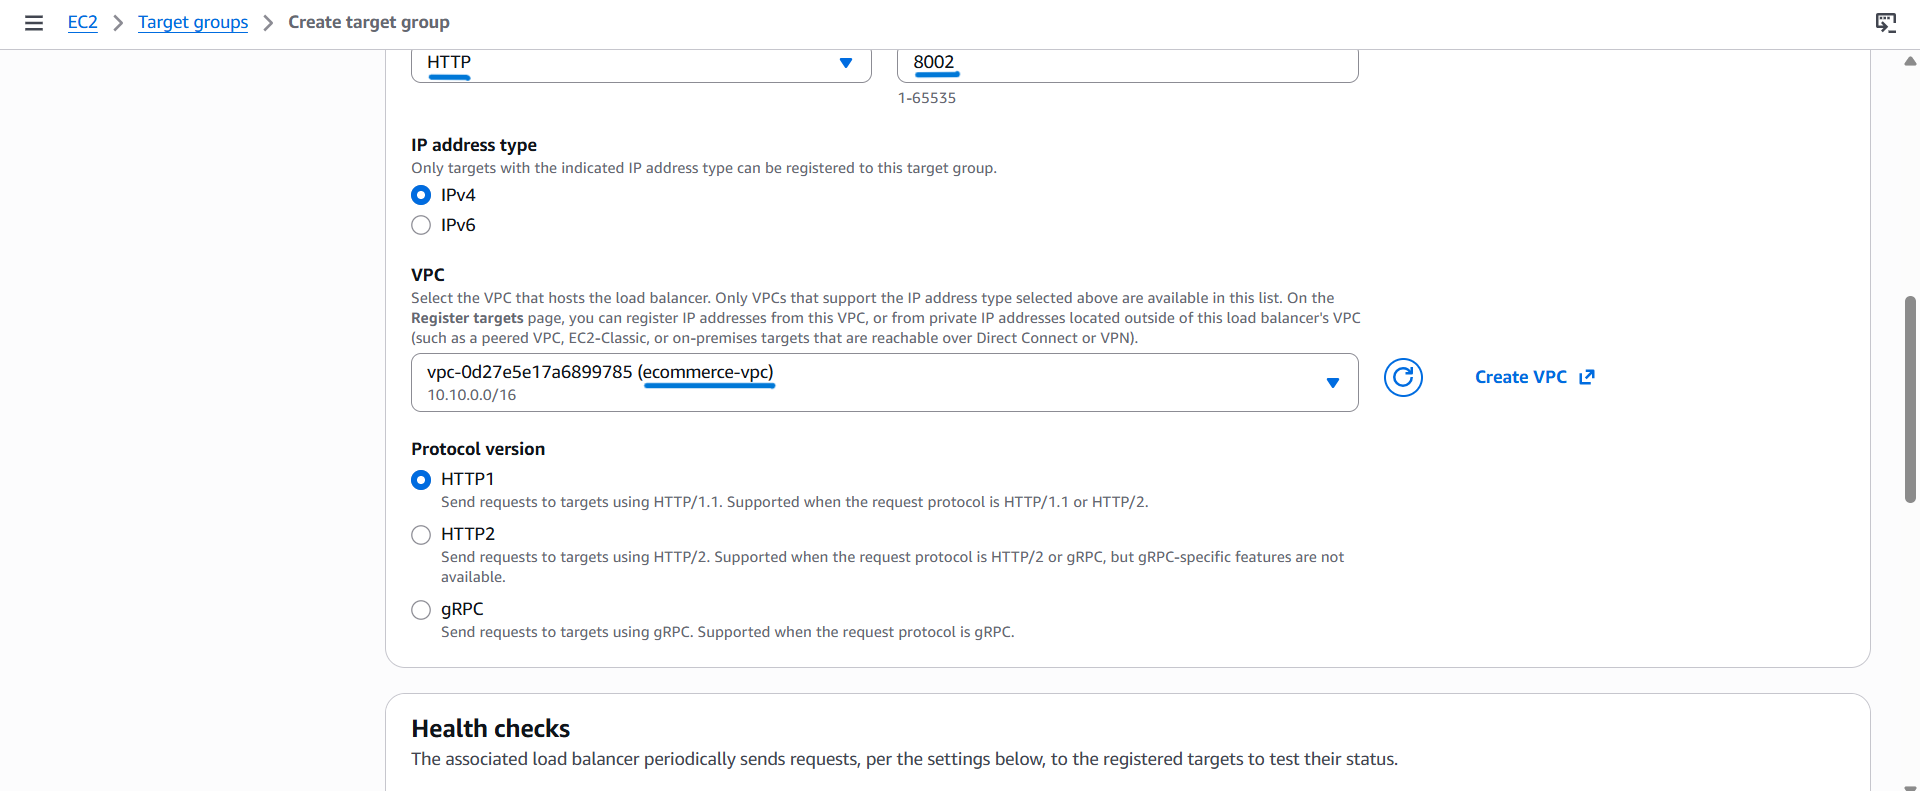
- VPC:
ecommerce-vpc
- Health check path:
/health - Review all the configurations and click Create target group.
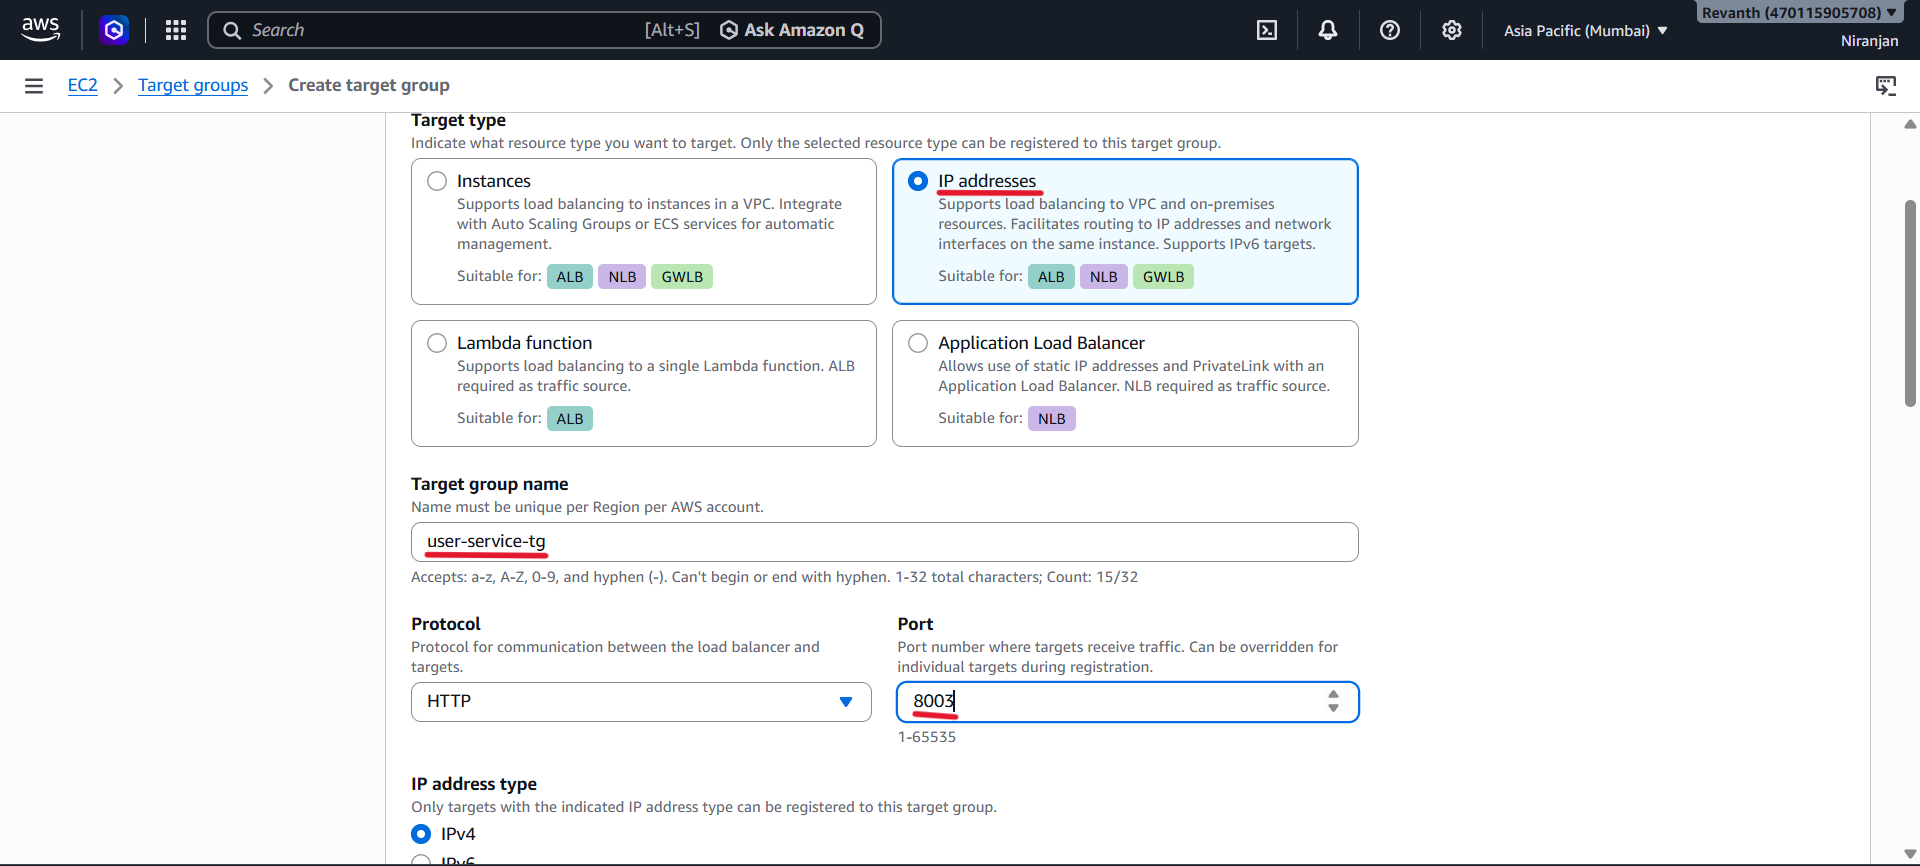
User Service Target Group
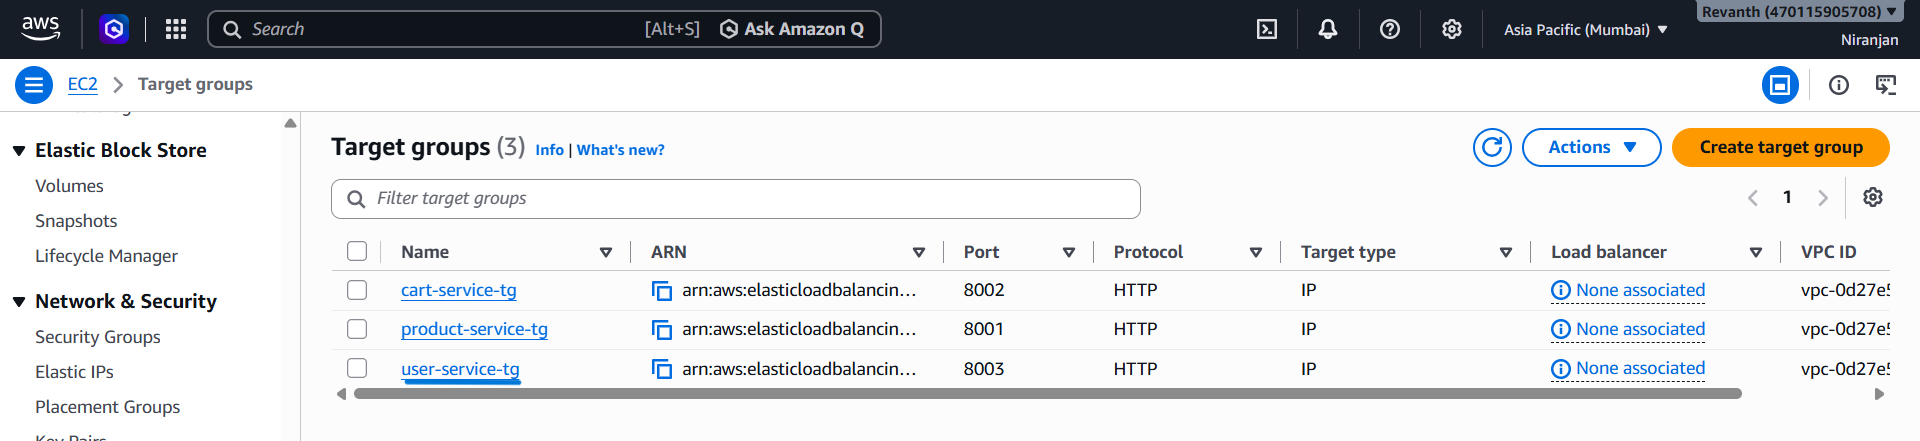
- Target group name:
user-service-tg - Protocol: HTTP
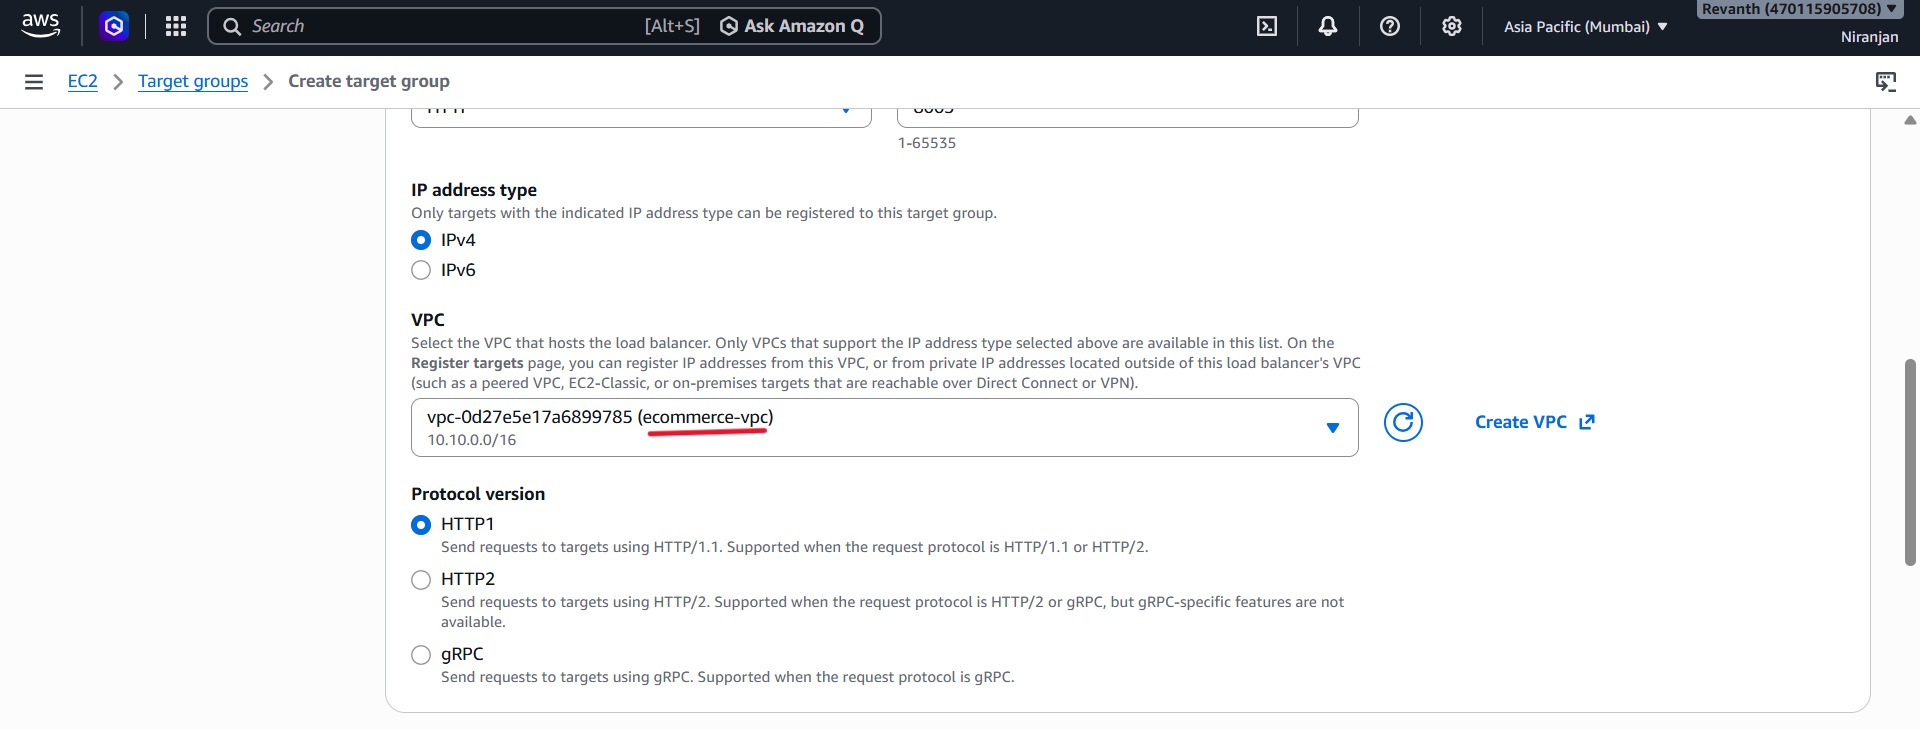
- Port:
8003
- VPC:
ecommerce-vpc
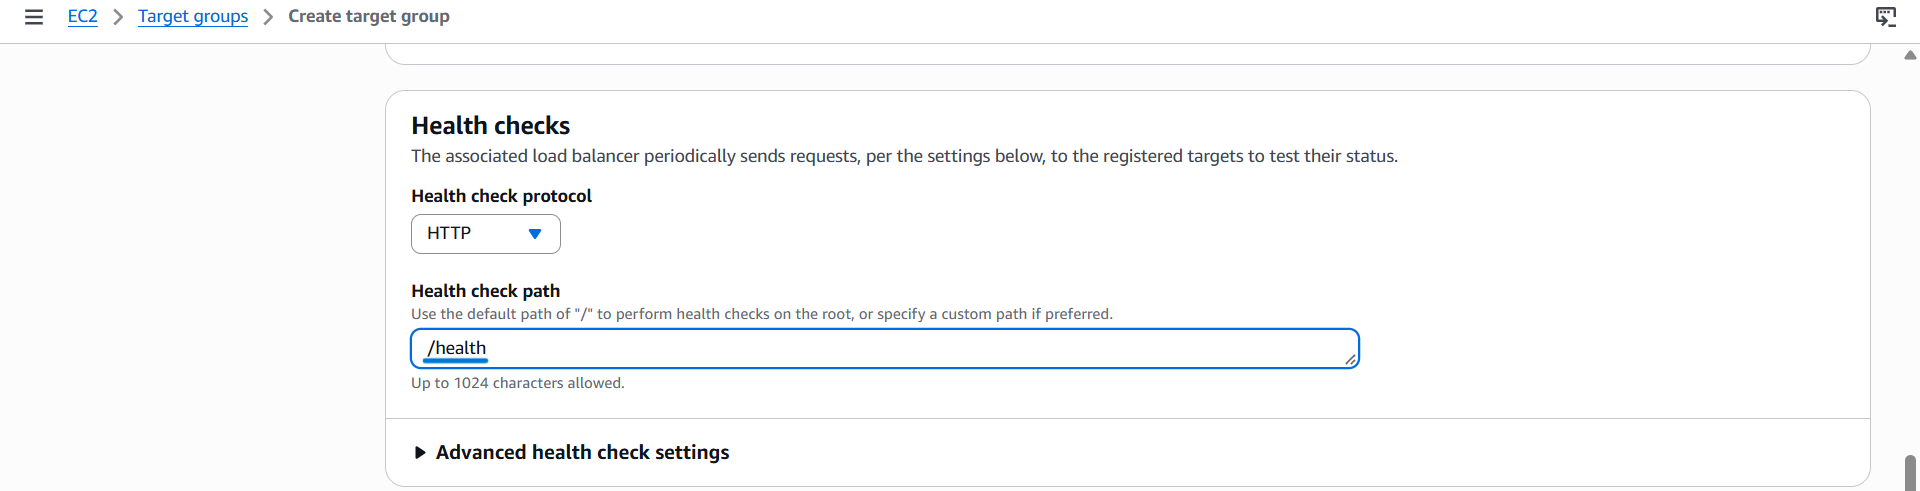
- Health check path:
/health
- Review all the configurations and click Create target group.
Order Service Target Group
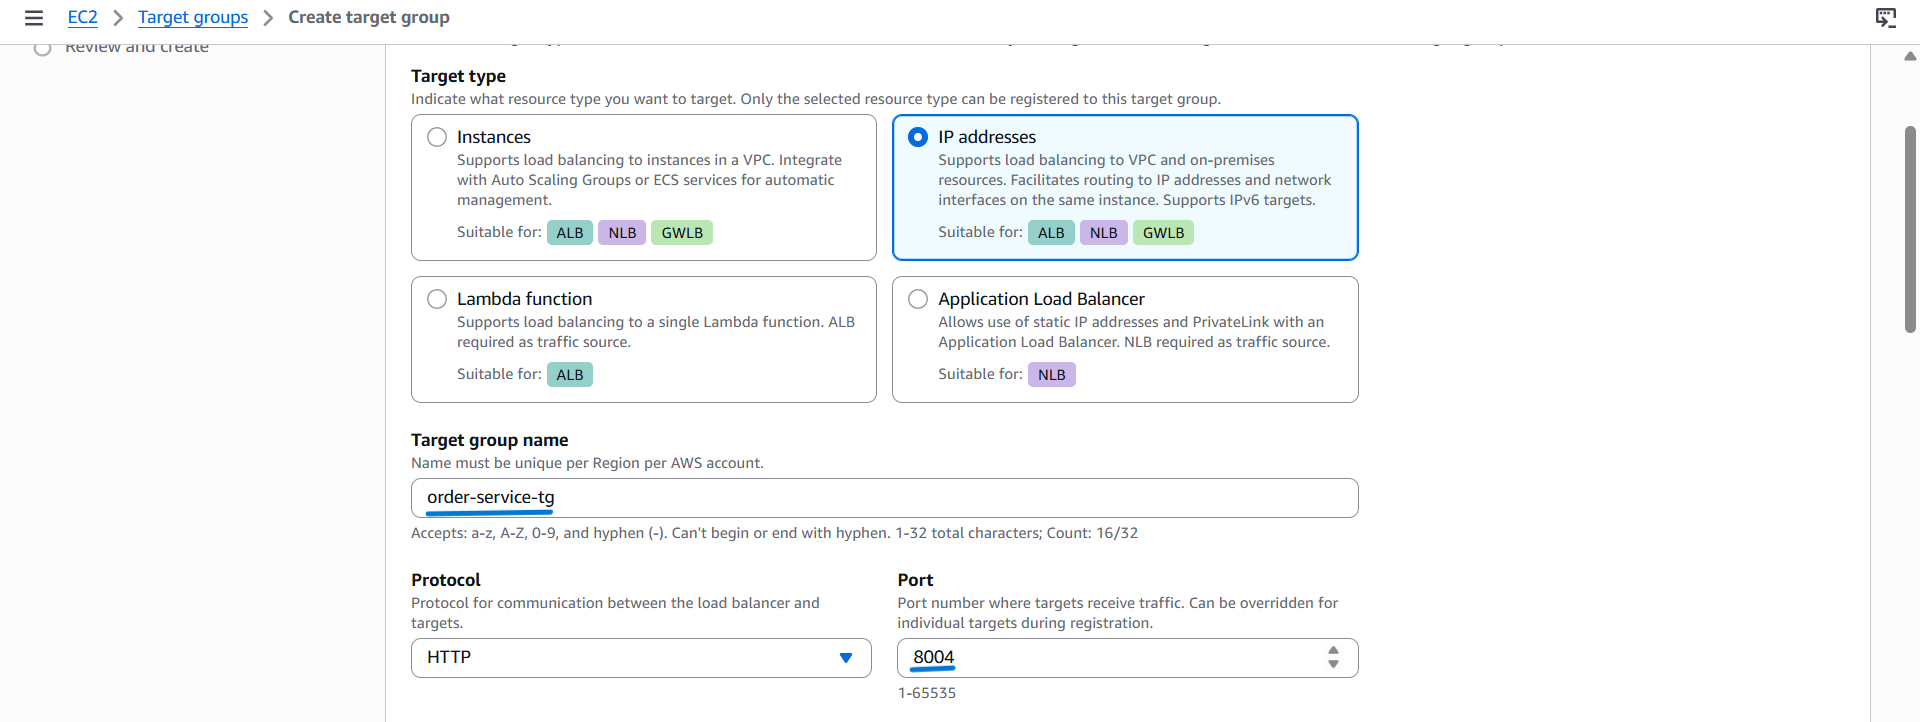
- Target group name:
order-service-tg - Protocol: HTTP
- Port:
8004
- VPC:
ecommerce-vpc
- Health check path:
/health
- Review all the configurations and click Create target group.
Target Group Validation
| Service | Target Group | Port | Health Check |
|---|---|---|---|
| Product | product-service-tg |
8001 | /health |
| Cart | cart-service-tg |
8002 | /health |
| User | user-service-tg |
8003 | /health |
| Order | order-service-tg |
8004 | /health |
5.1.3 Create the Application Load Balancer
After creating all four target groups, we can create the internal Application Load Balancer.
- EC2 Console → Load Balancers → Create load balancer
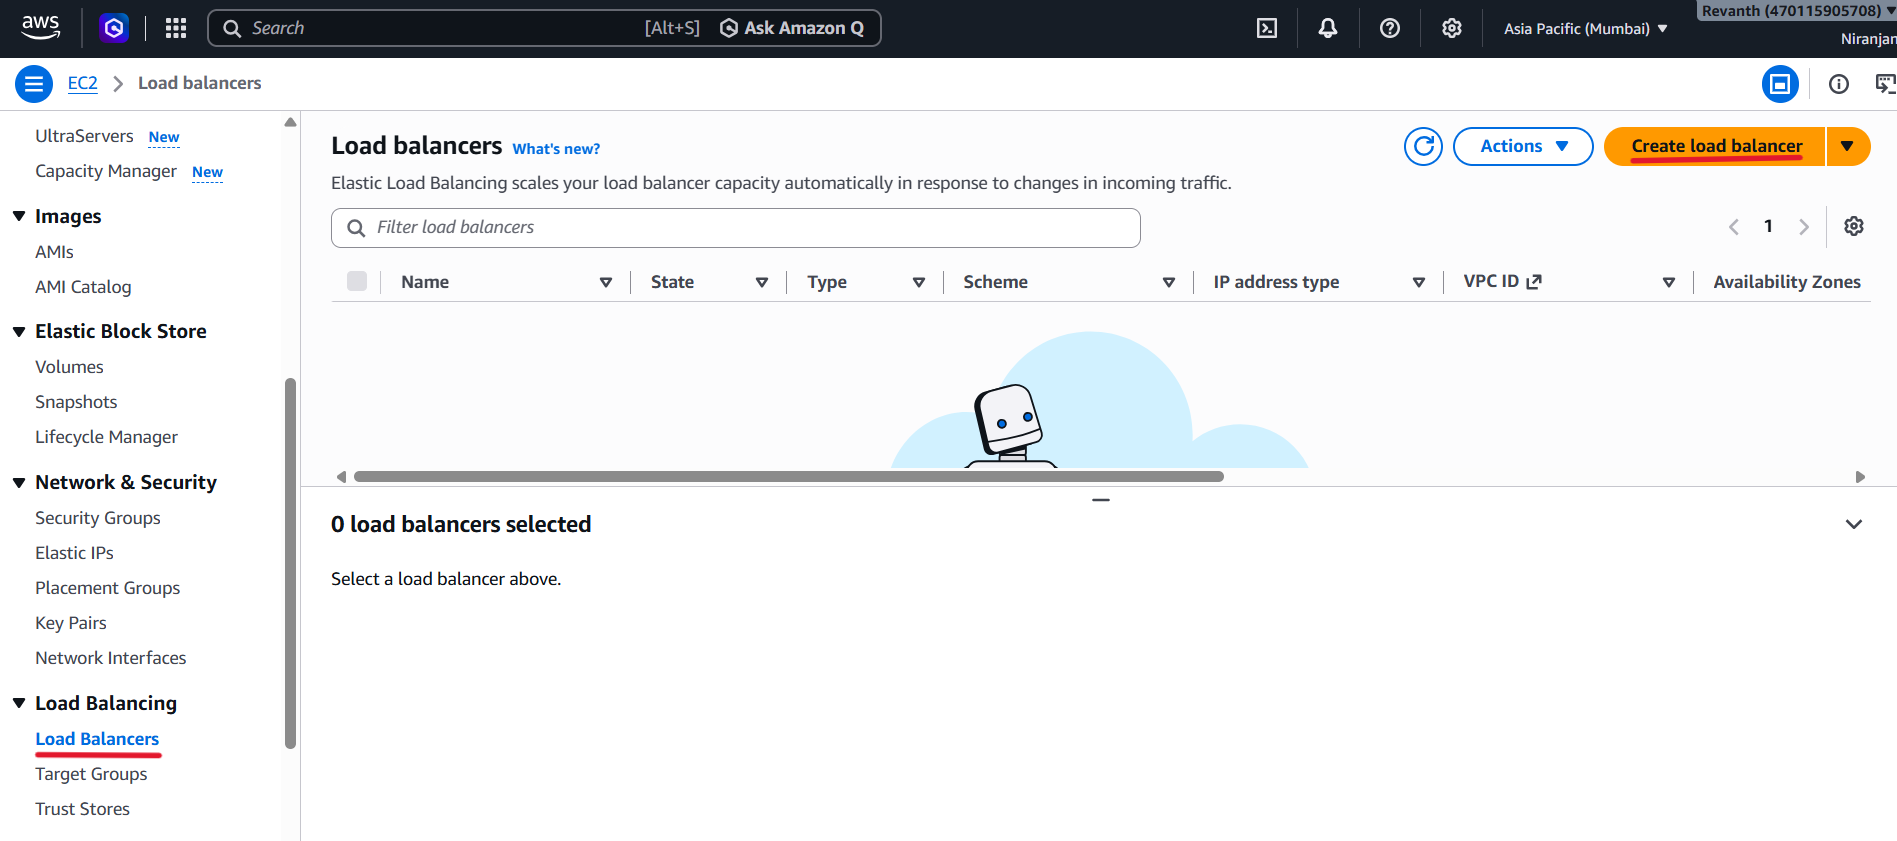
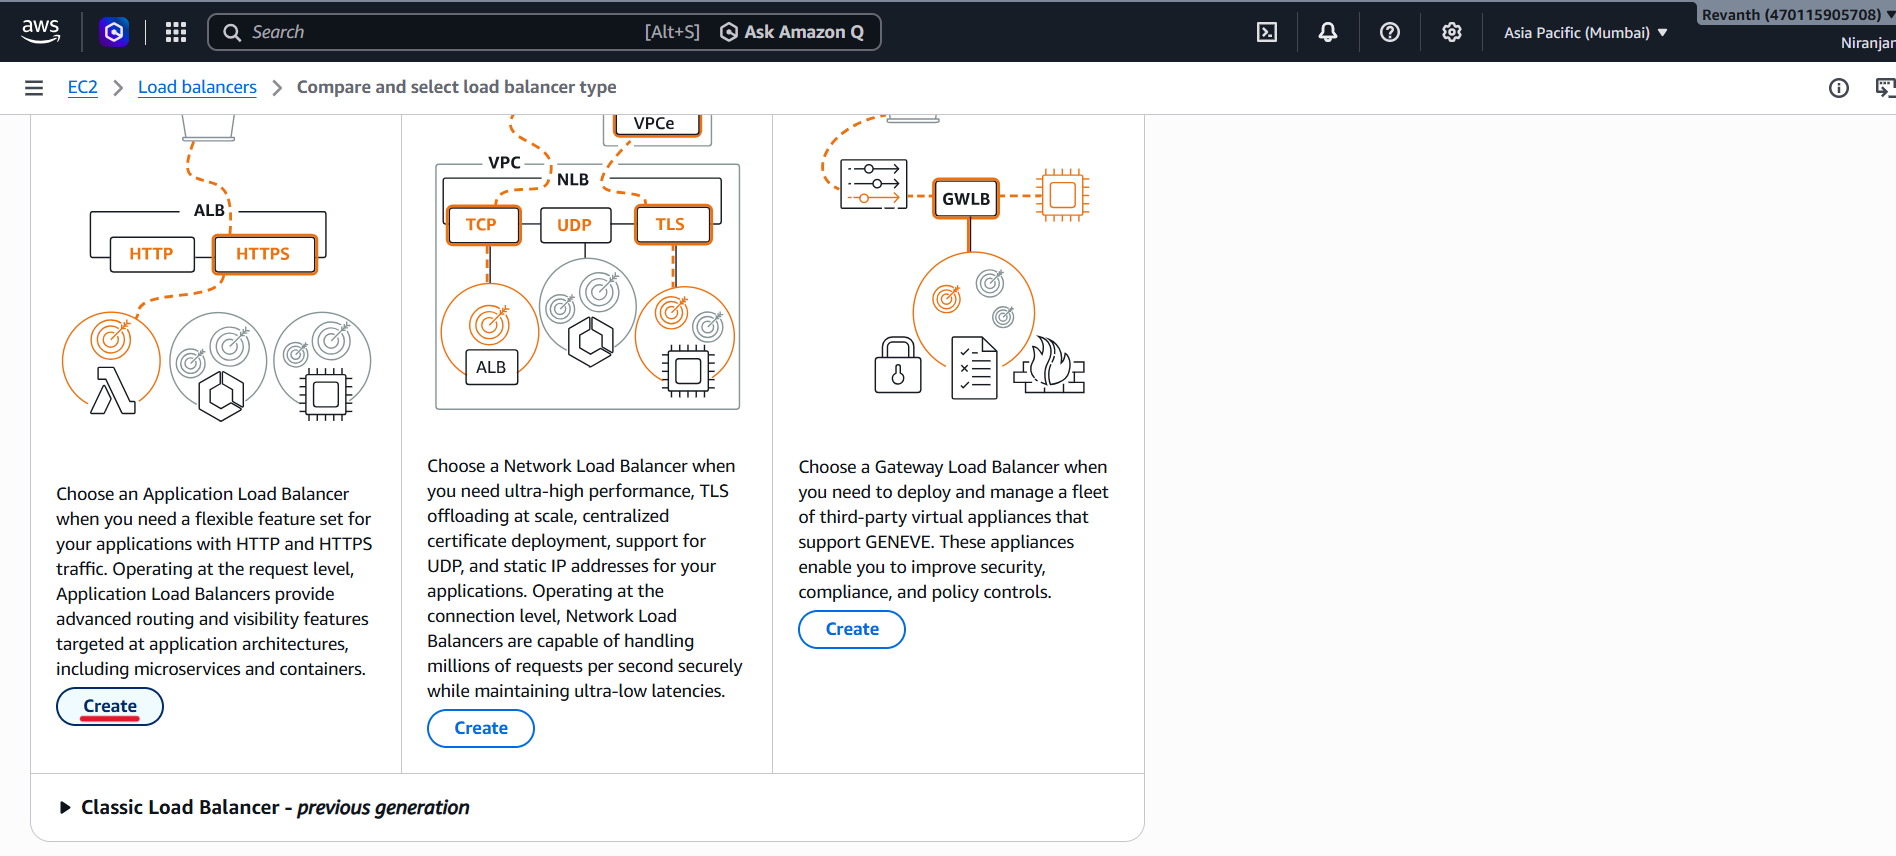
- Select Application Load Balancer and click Create.
Basic Configuration
- Name:
ecommerce-internal-alb
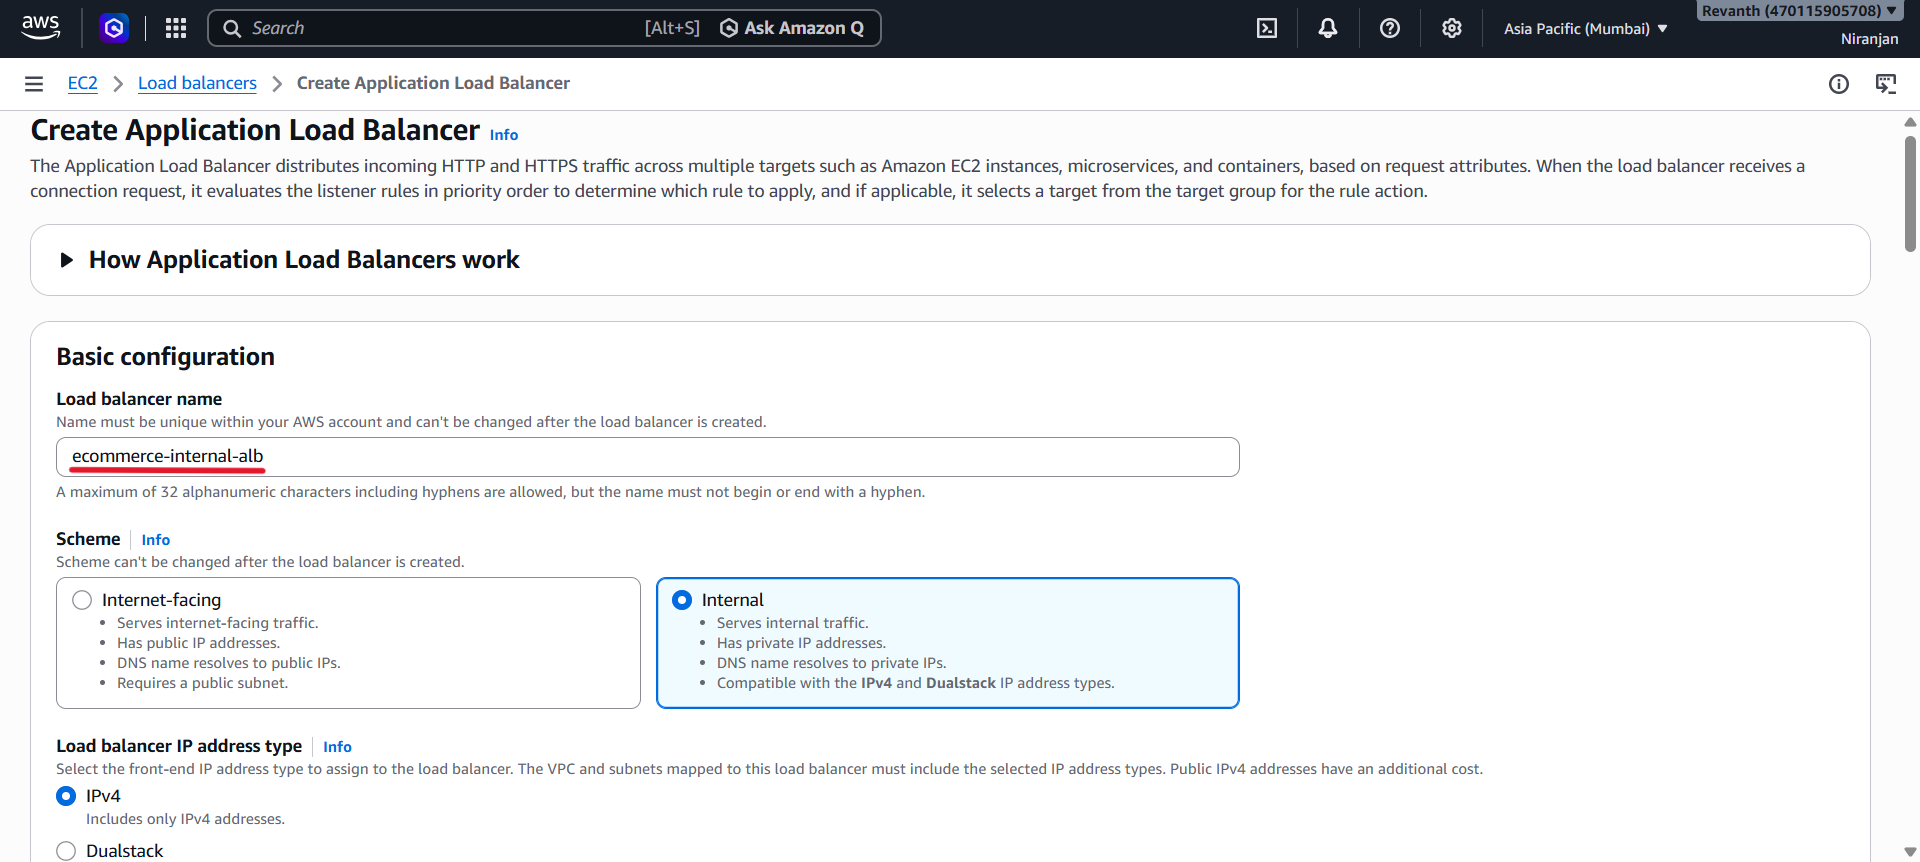
- Scheme: Internal
- IP address type: IPv4
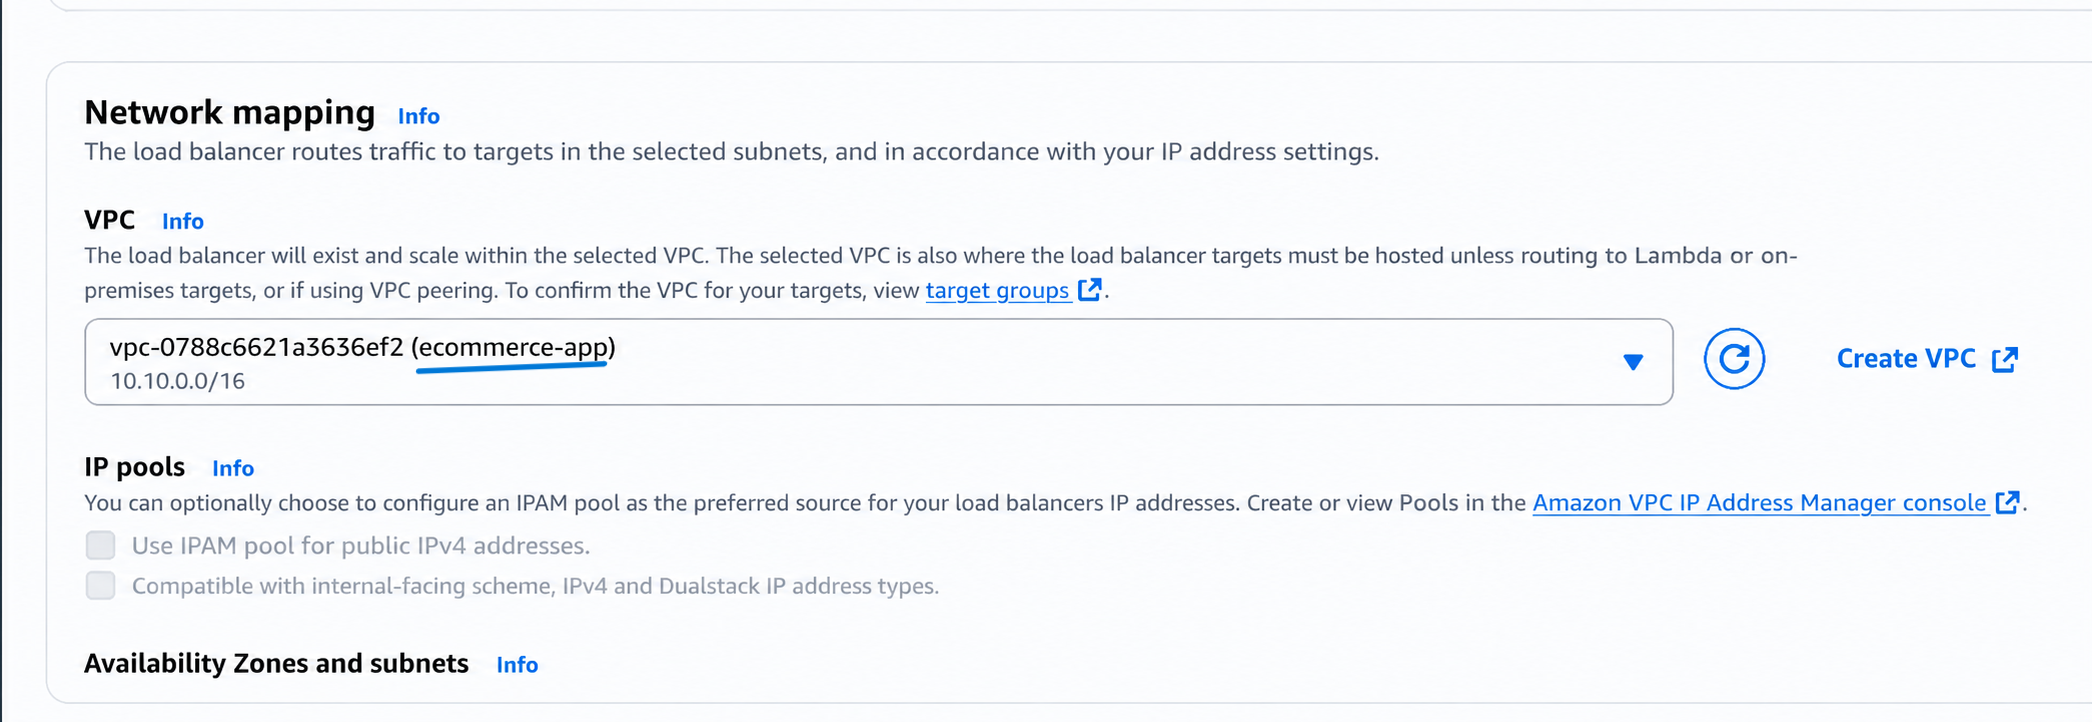
Network Mapping
- VPC: Select
ecommerce-vpc.
- Availability Zones: Select both Availability Zones.
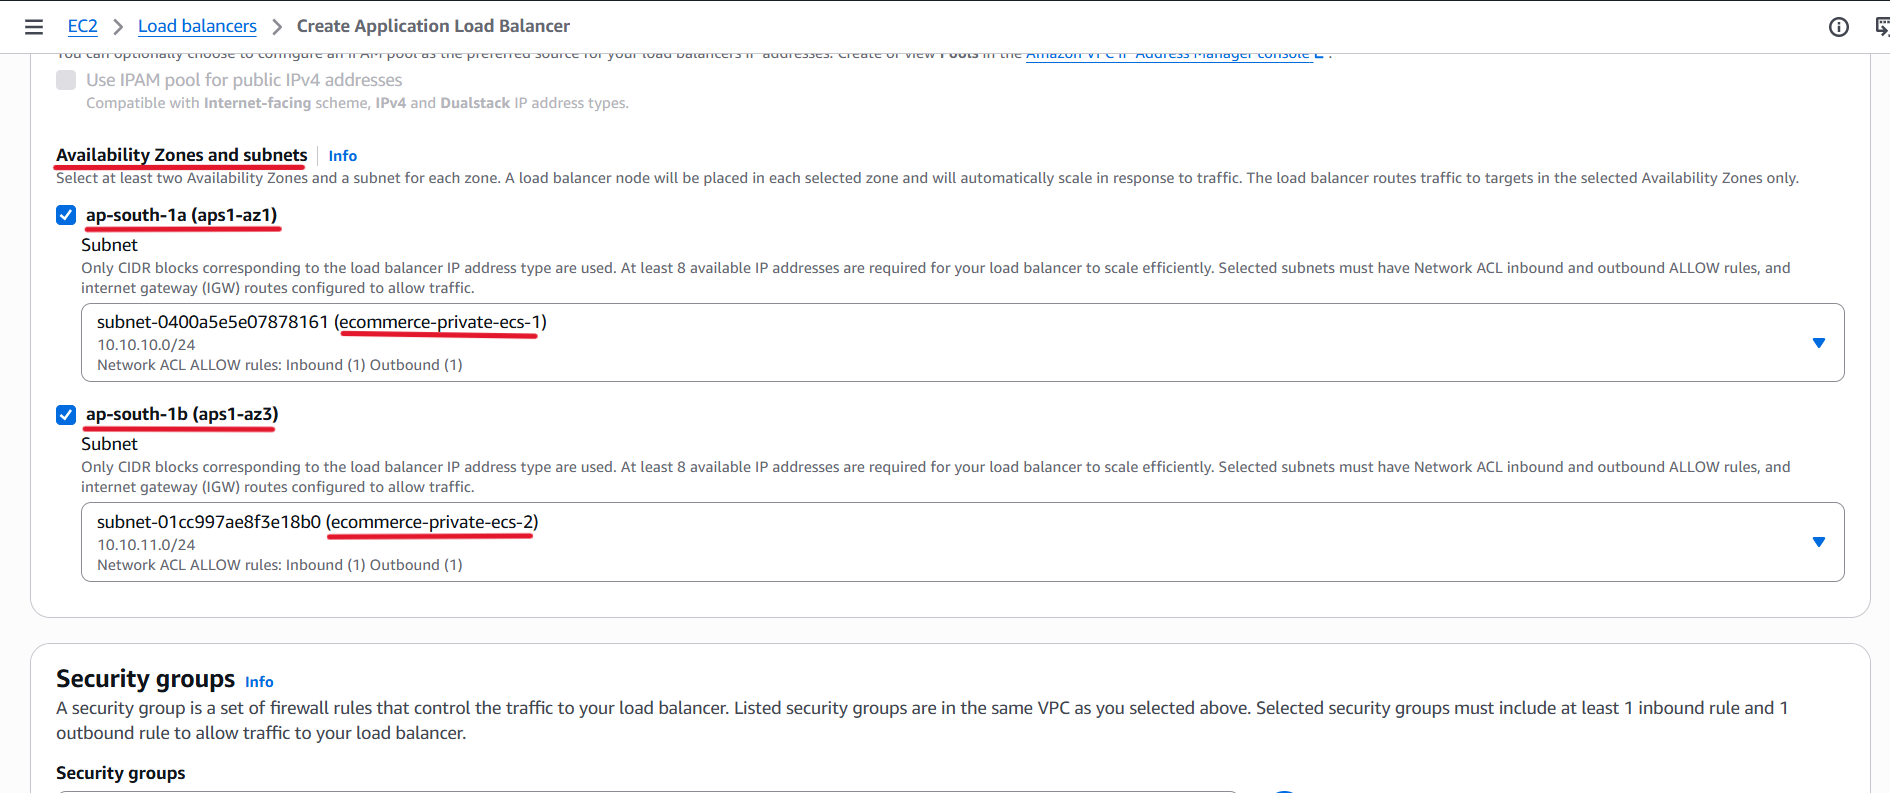
- Subnets: Select both private ECS subnets:
10.10.10.0/2410.10.11.0/24
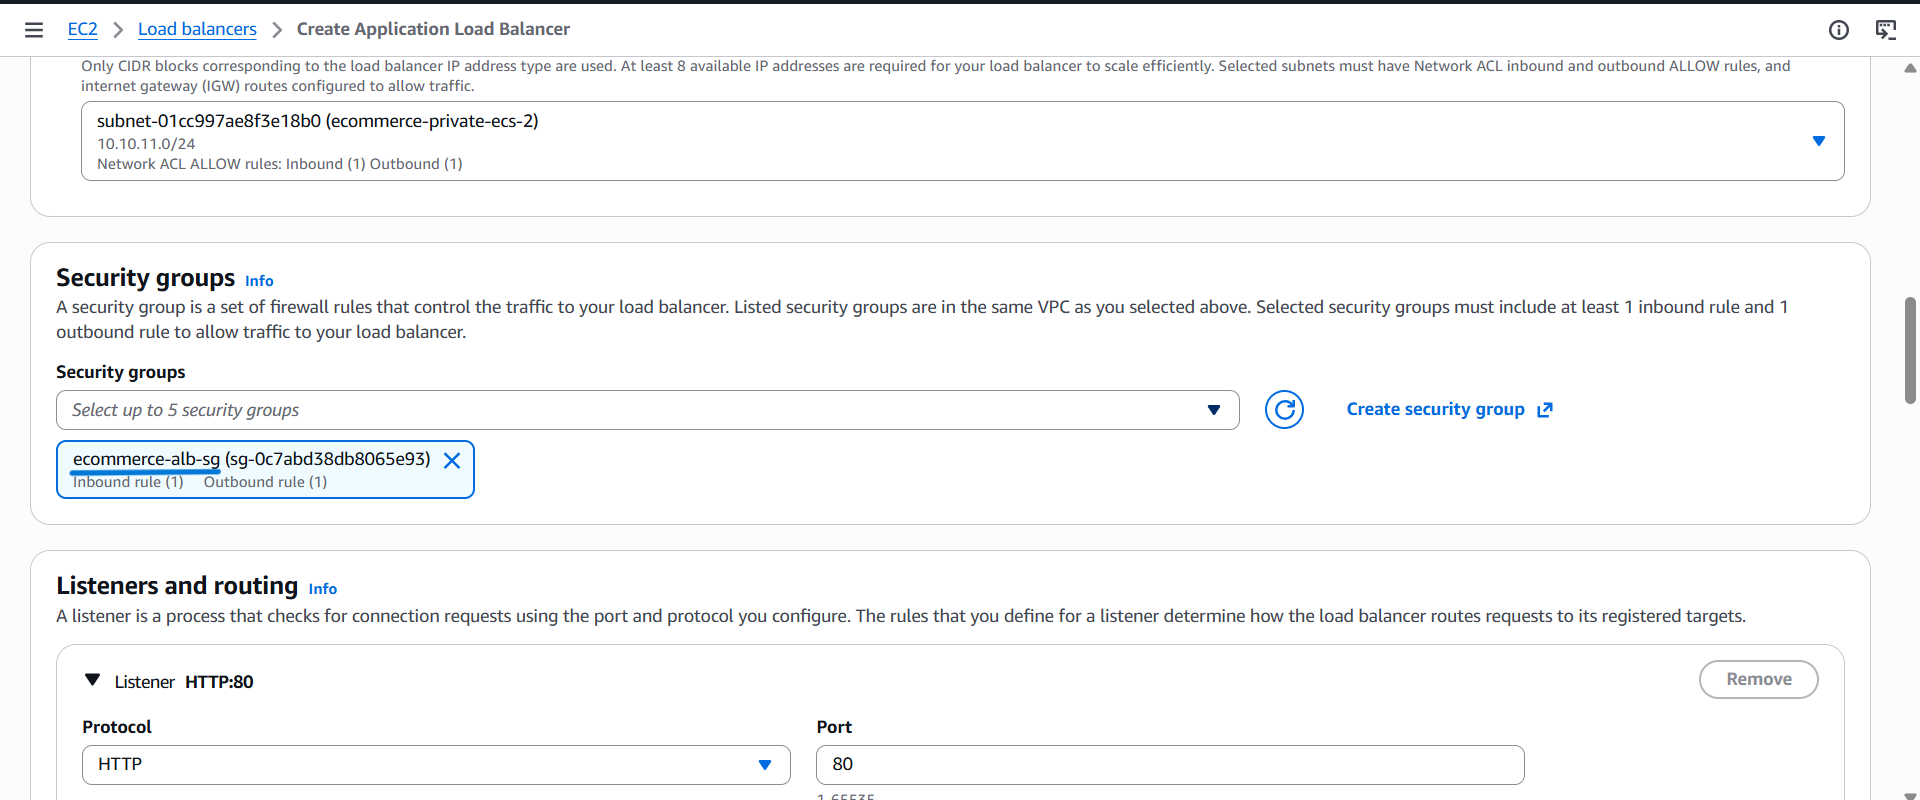
Security Groups
- Select the existing security group:
ecommerce-alb-sg.
Listeners and Routing
- Listener protocol: HTTP
- Listener port:
80
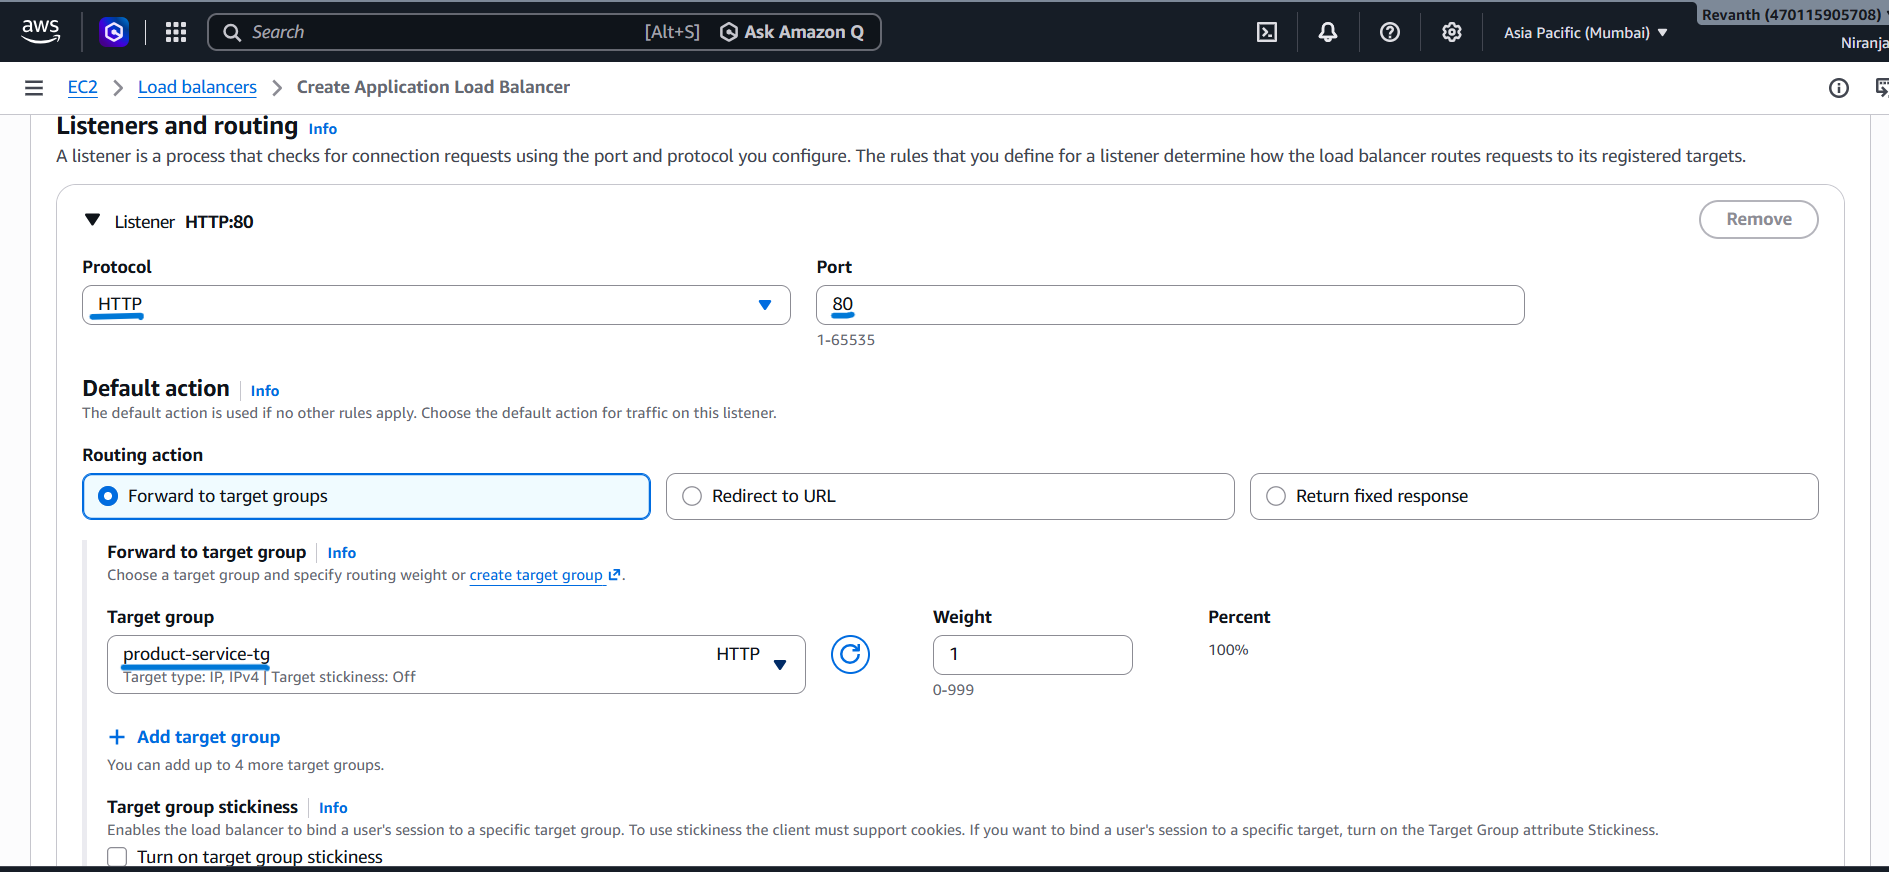
- Default action: Forward to
product-service-tg.
The default rule forwards requests to the Product Service. We will configure additional path-based routing rules in the next step.
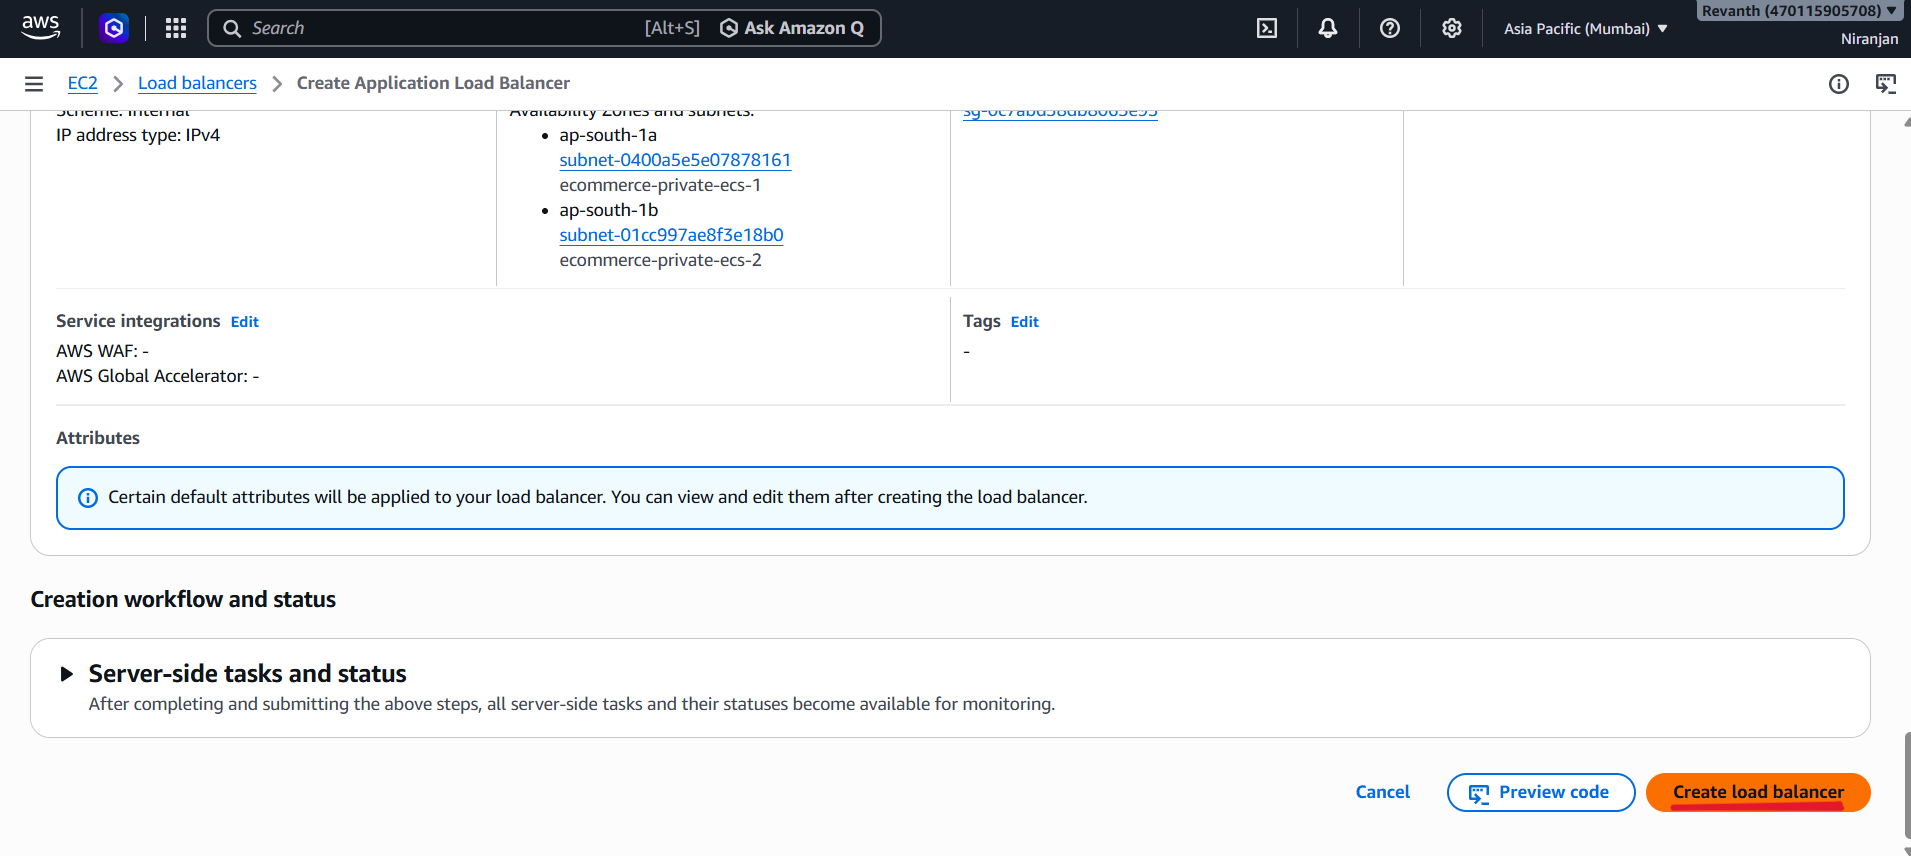
- Click Create load balancer.
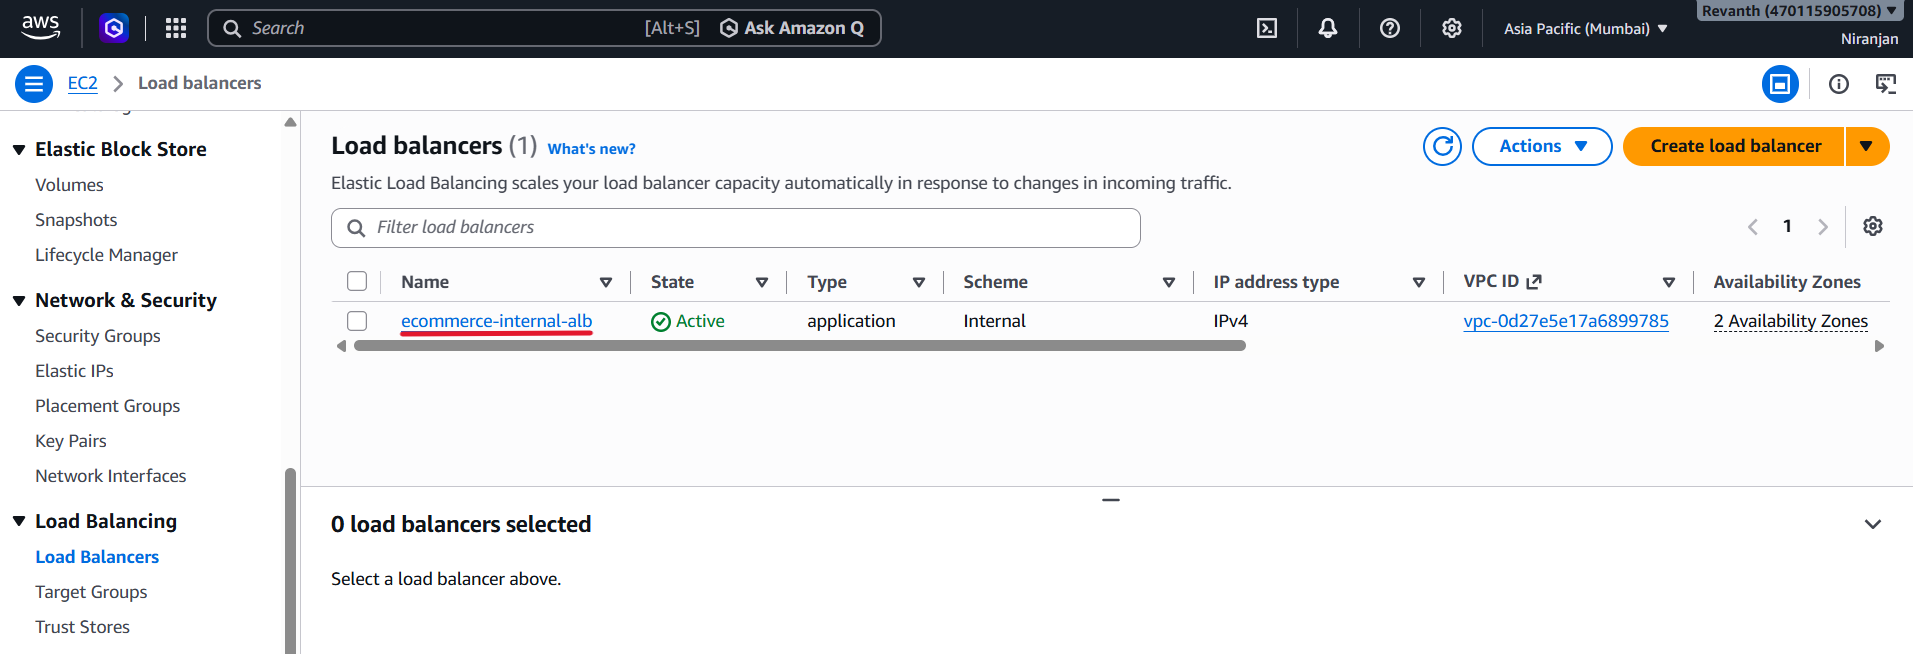
Note: It may take a few minutes for the load balancer to become active.
5.1.4 Configure ALB Listener Rules
After creating the ALB, we need to configure listener rules to route requests to the appropriate backend services.
- EC2 Console → Load Balancers → Select
ecommerce-internal-alb - Open the Listeners tab.
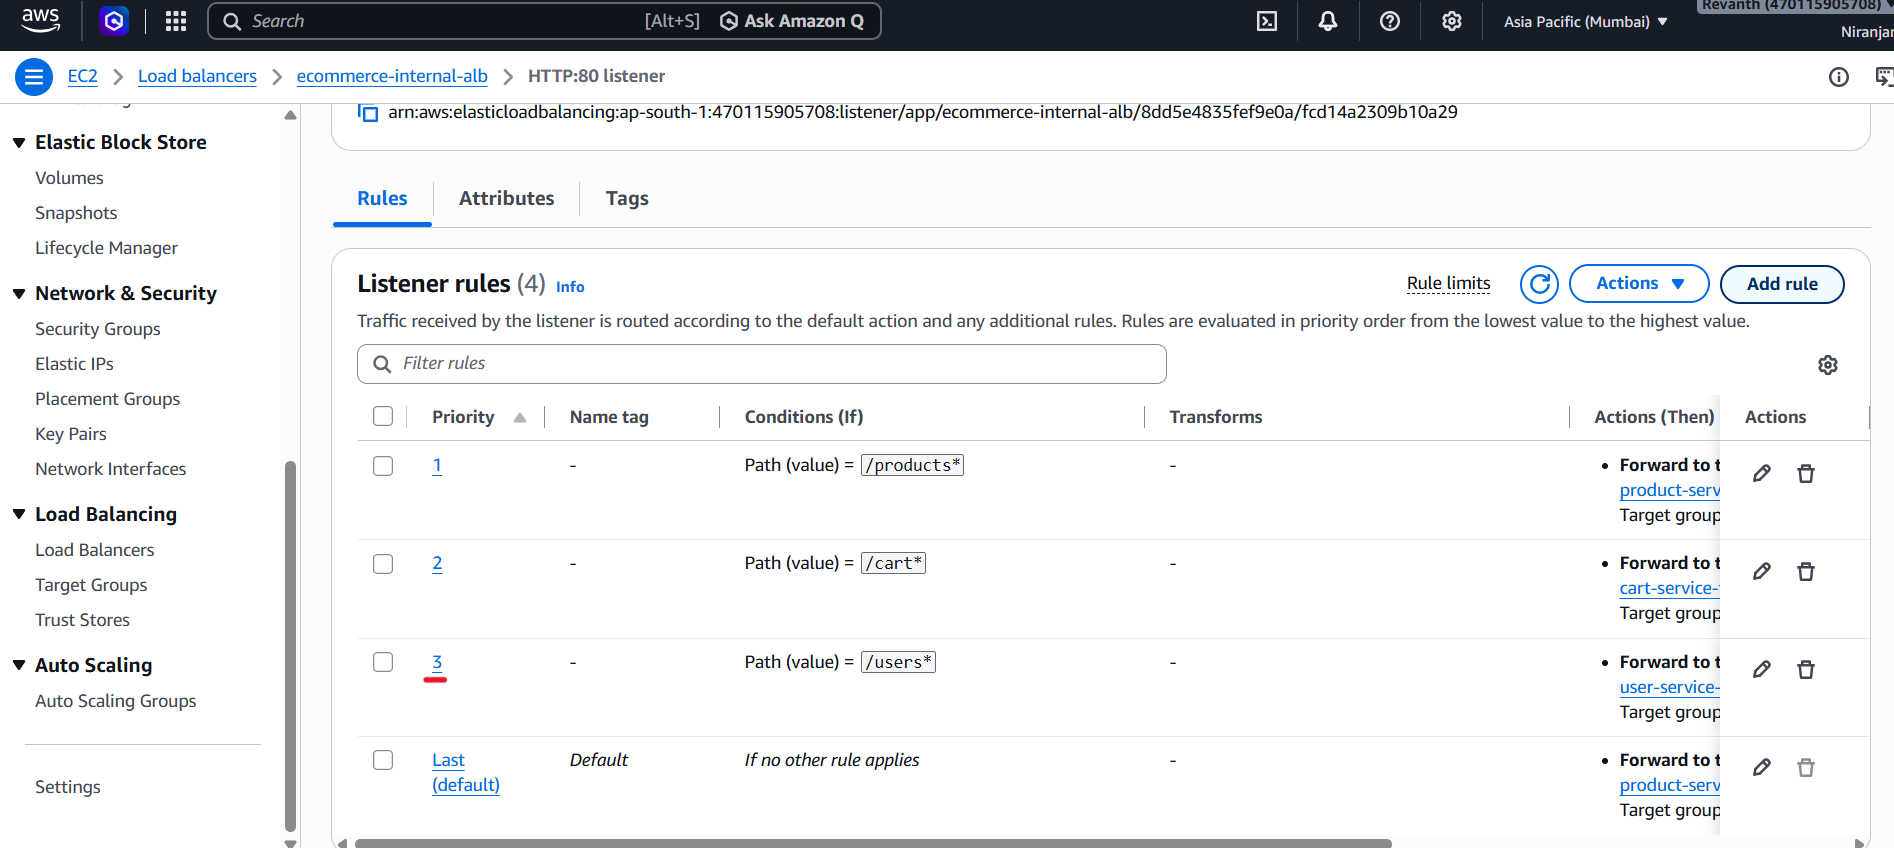
- Select the HTTP:80 listener.
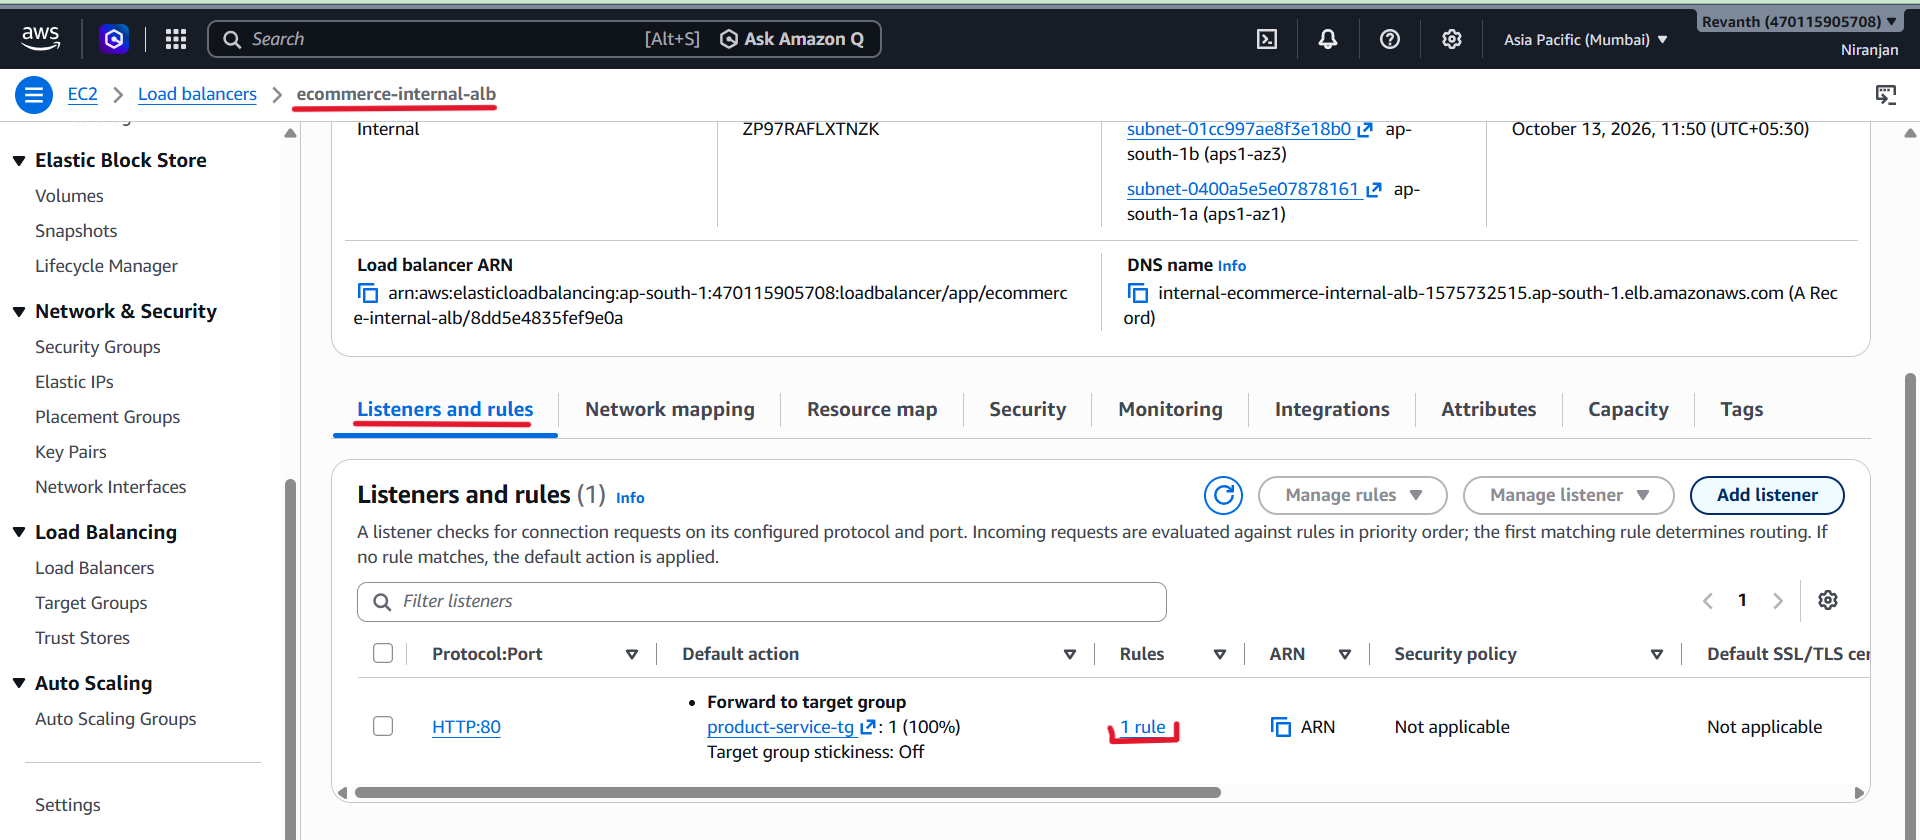
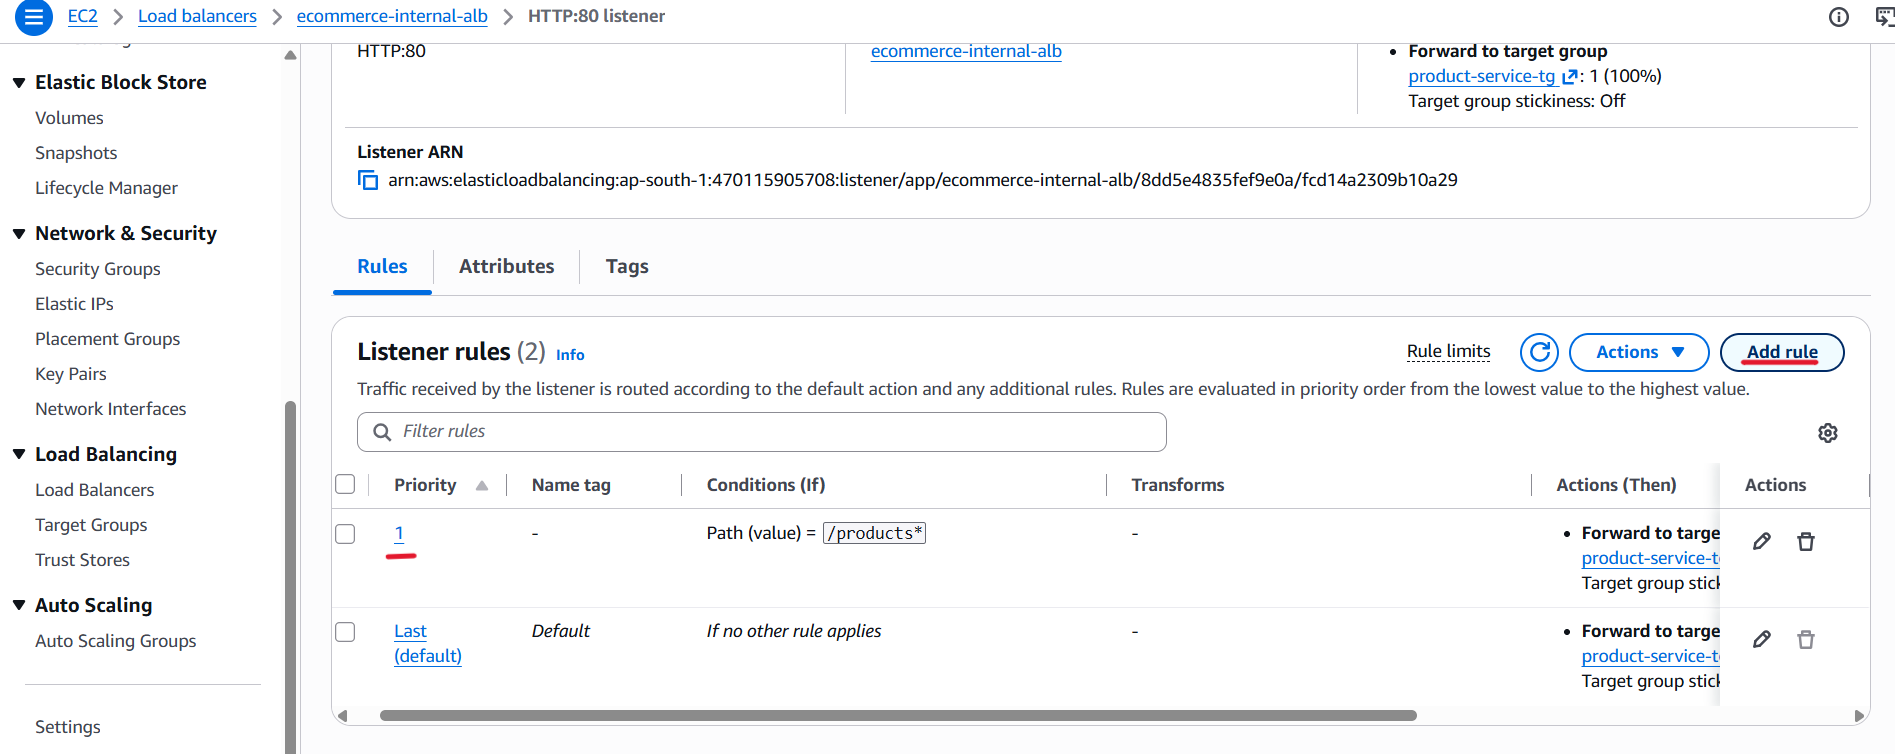
- Under the Rules column, click 1 rule for the
HTTP:80listener. - On the Listener rules page, select Add rule to create a new routing rule.
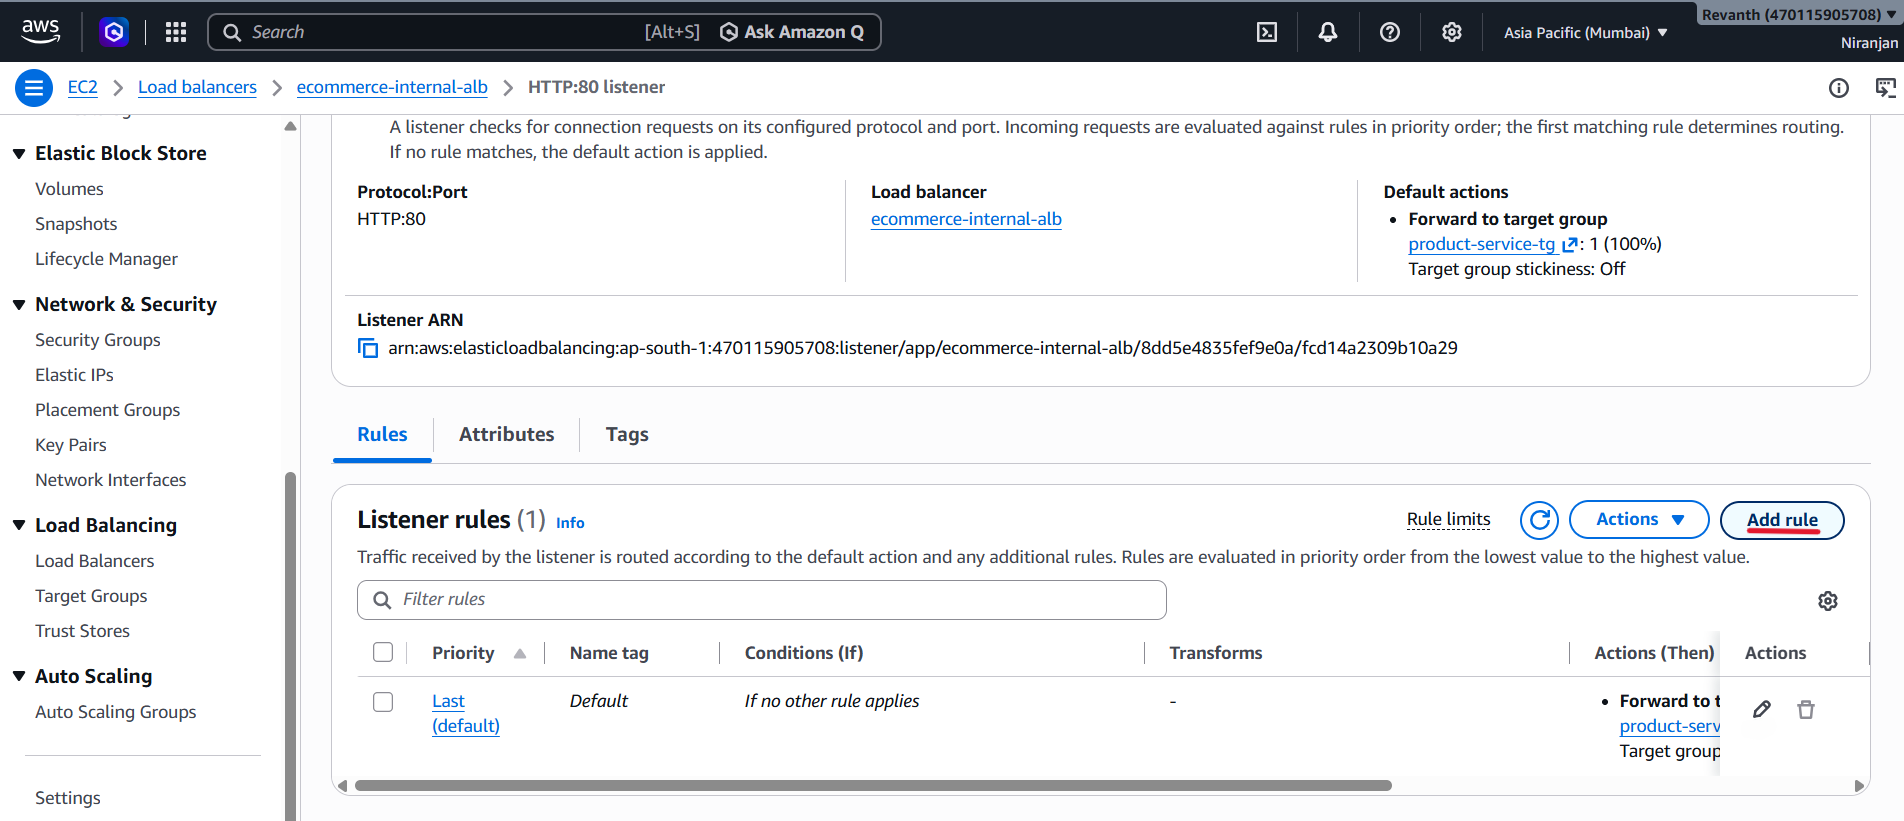
- Add the following path-based routing rules.
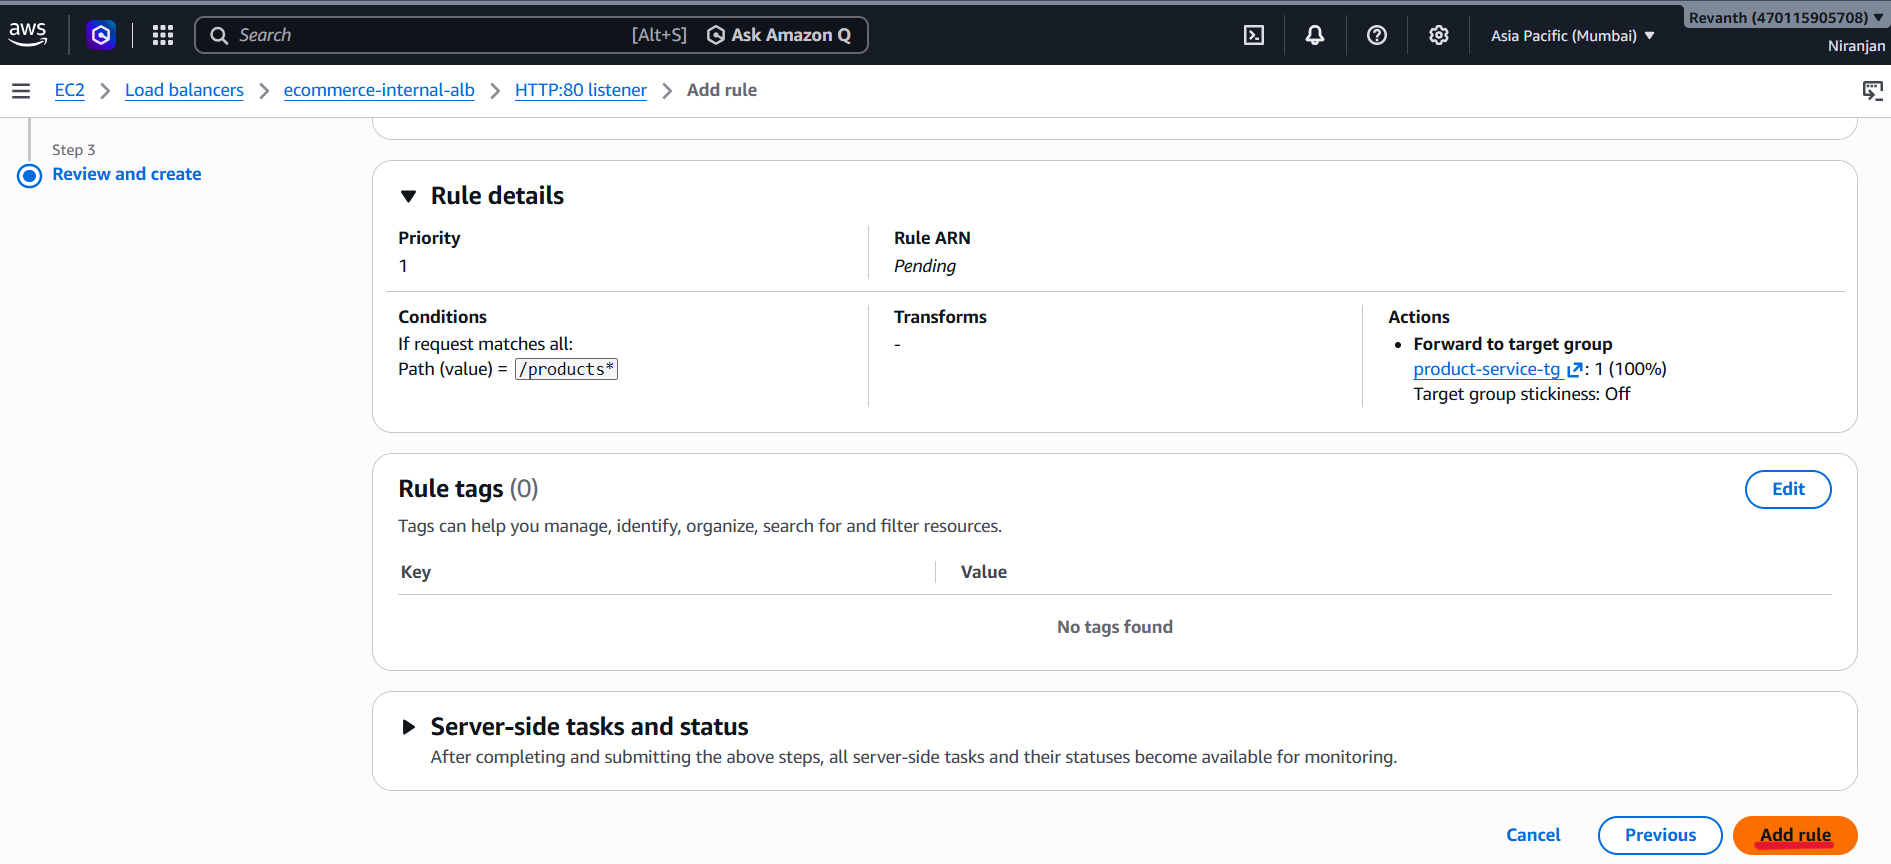
Rule 1 – Product Service
- Condition: Path
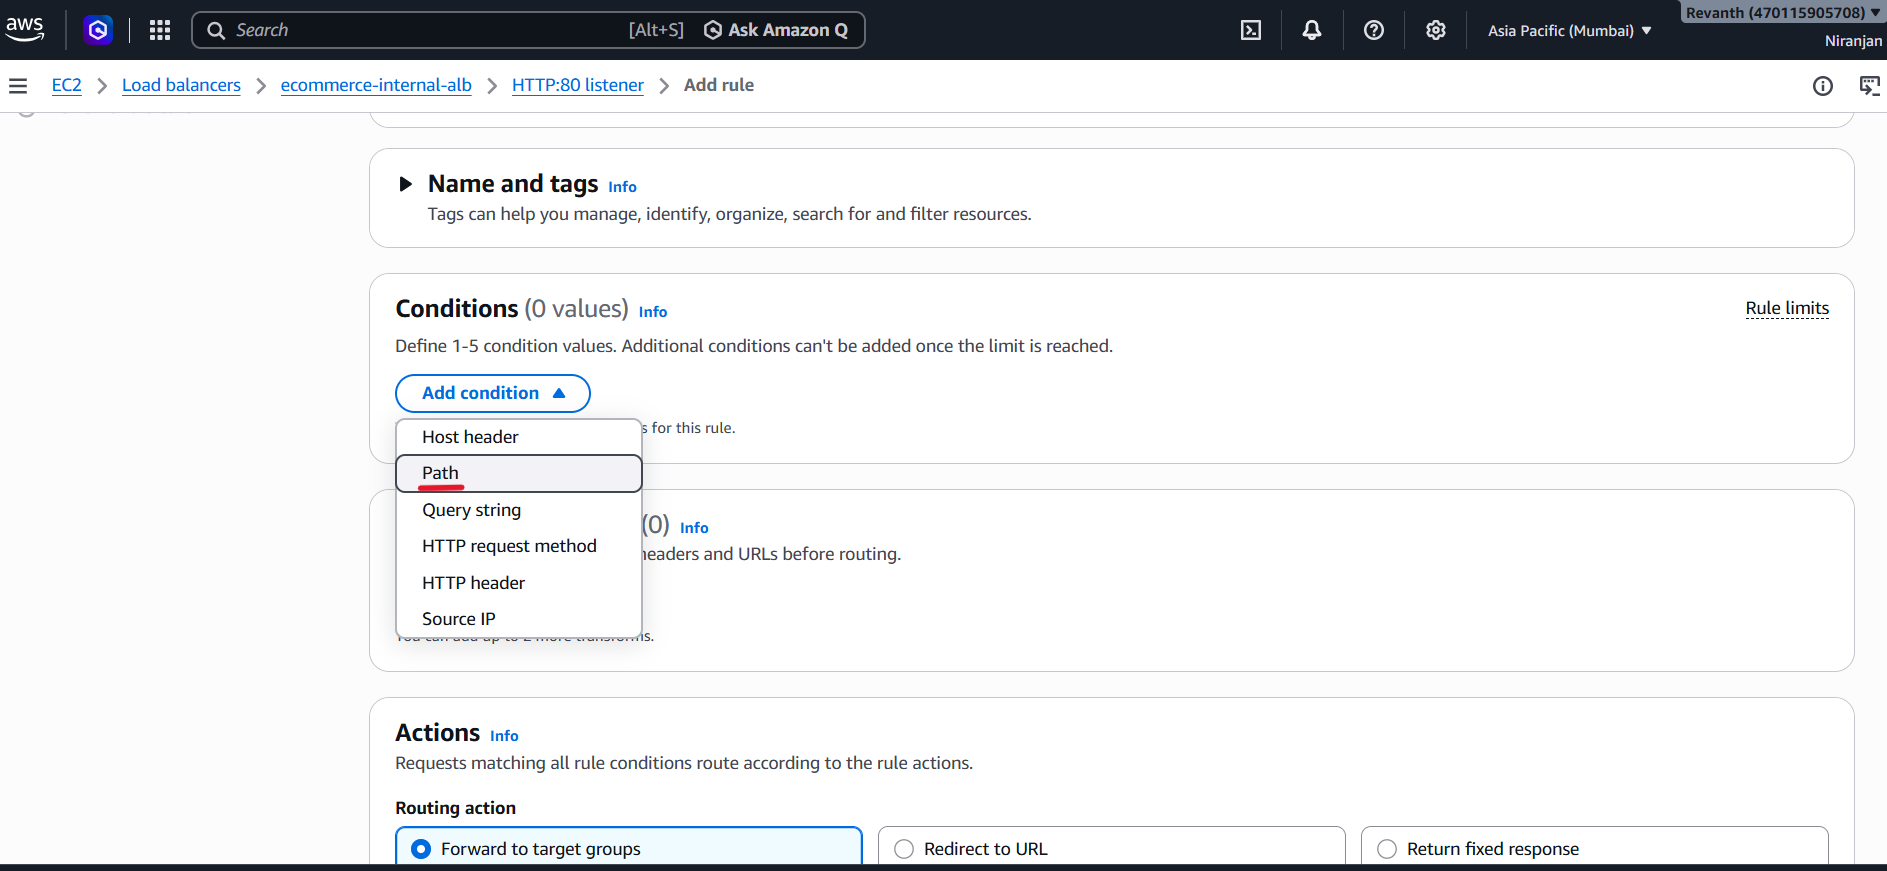
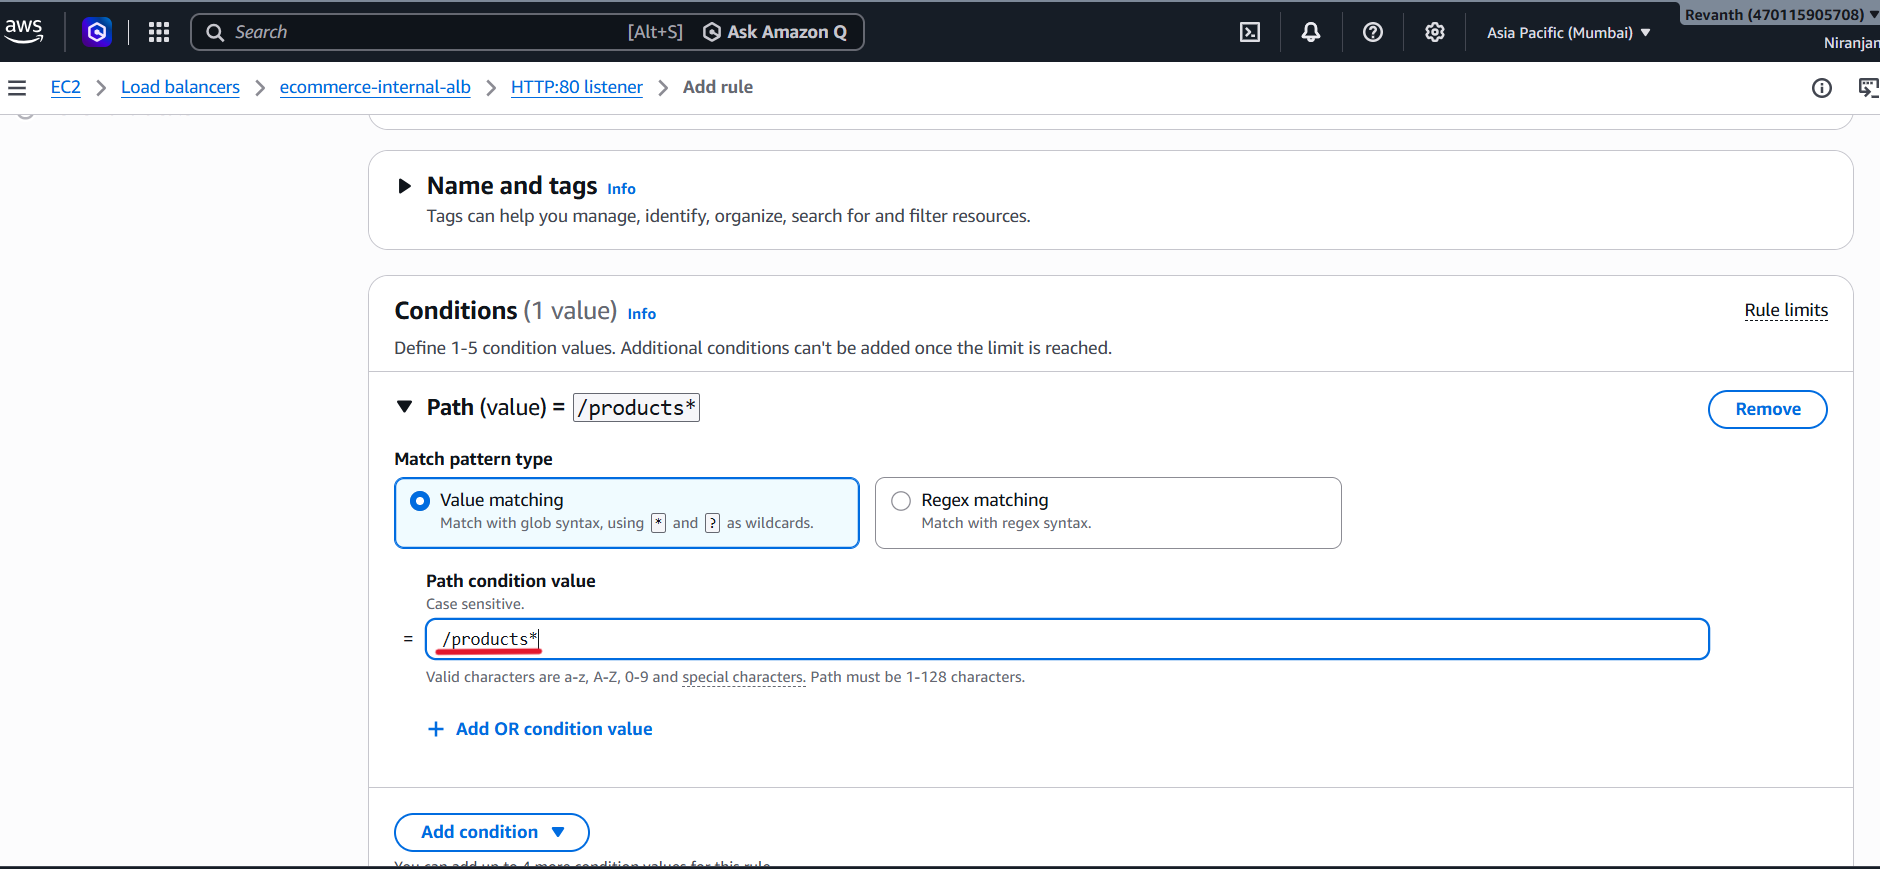
- Path pattern:
/products*
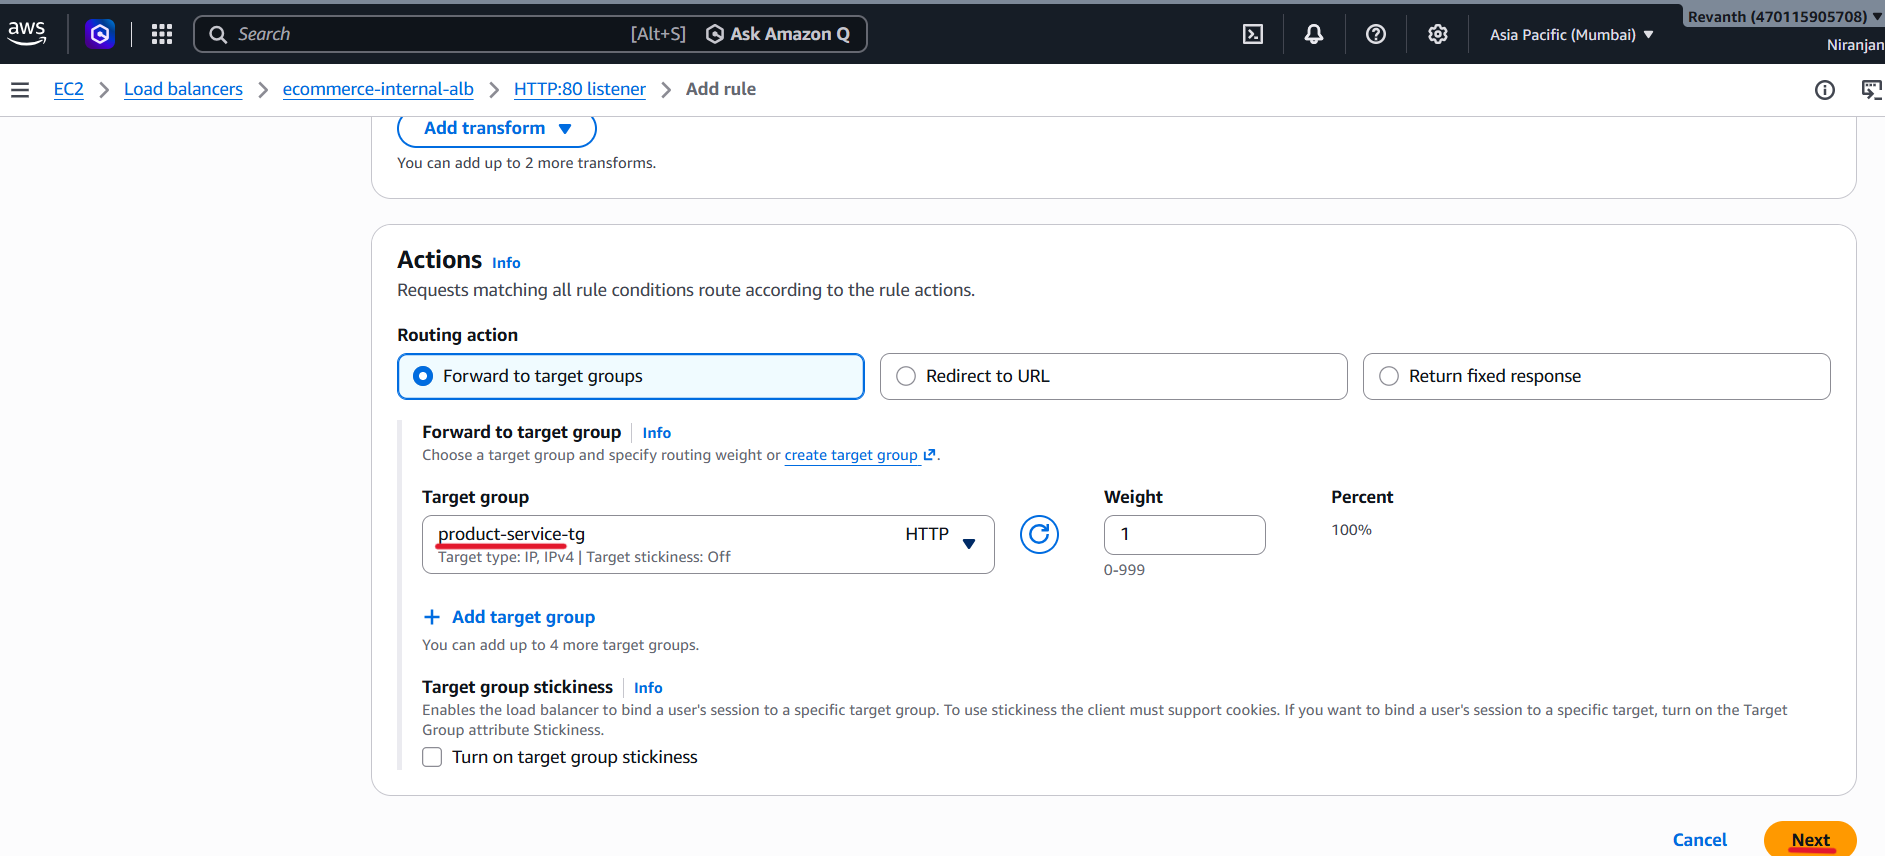
- Action: Forward to
product-service-tg
- Priority:
1
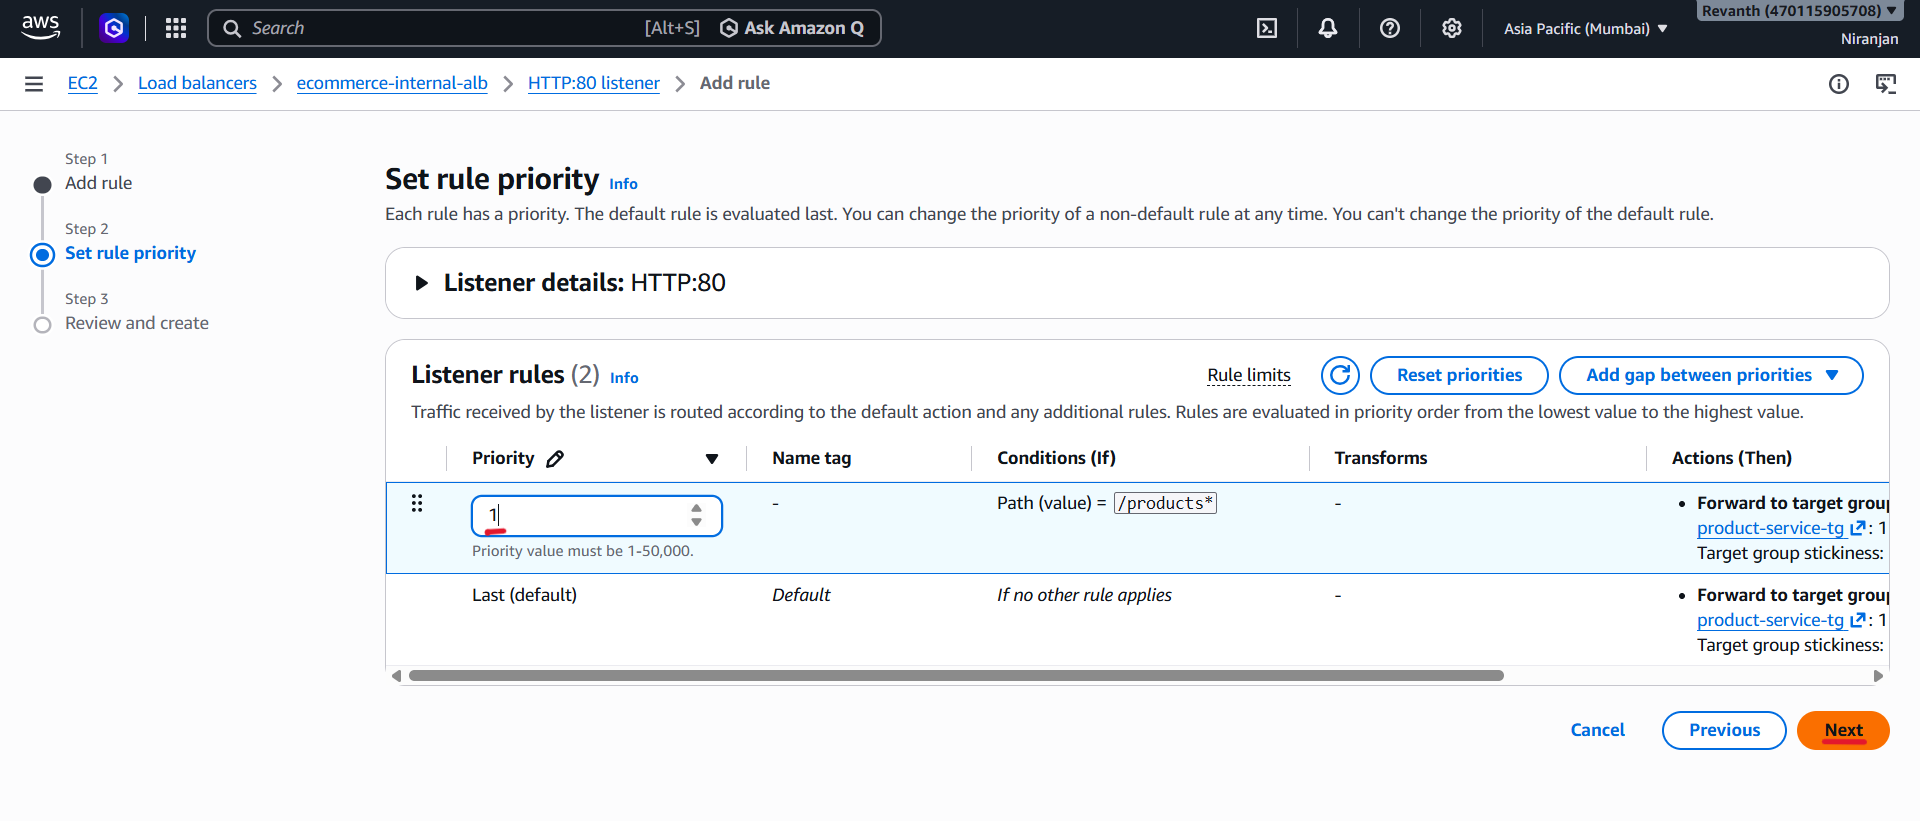
- Click Next and review the configuration.
- Click Create rule.
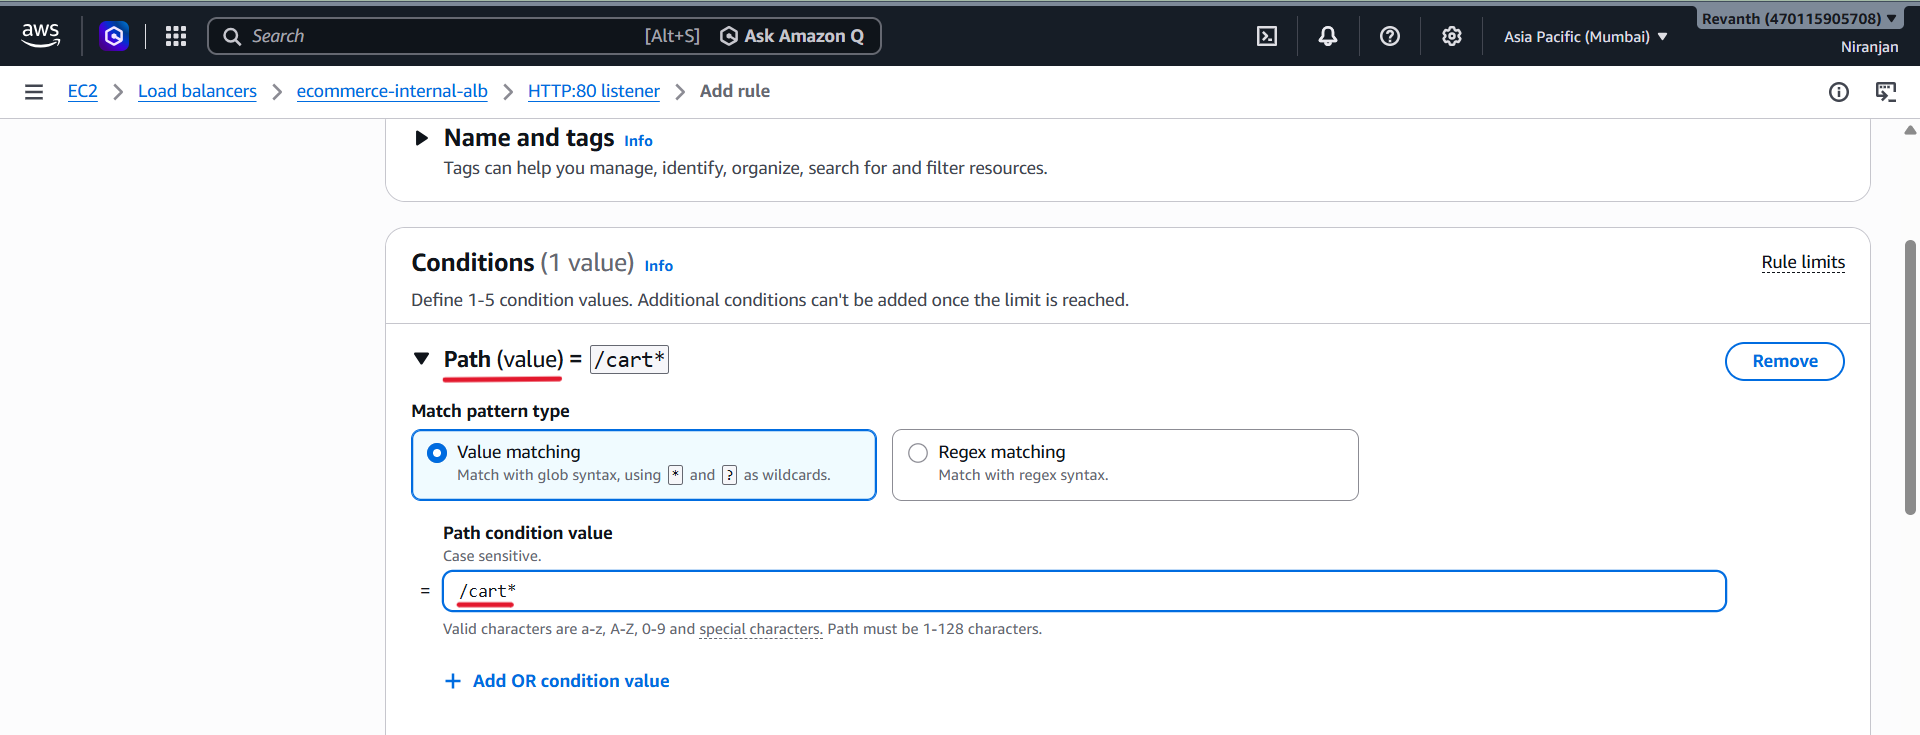
Rule 2 – Cart Service
- Condition: Path
- Path pattern:
/cart*
- Action: Forward to
cart-service-tg
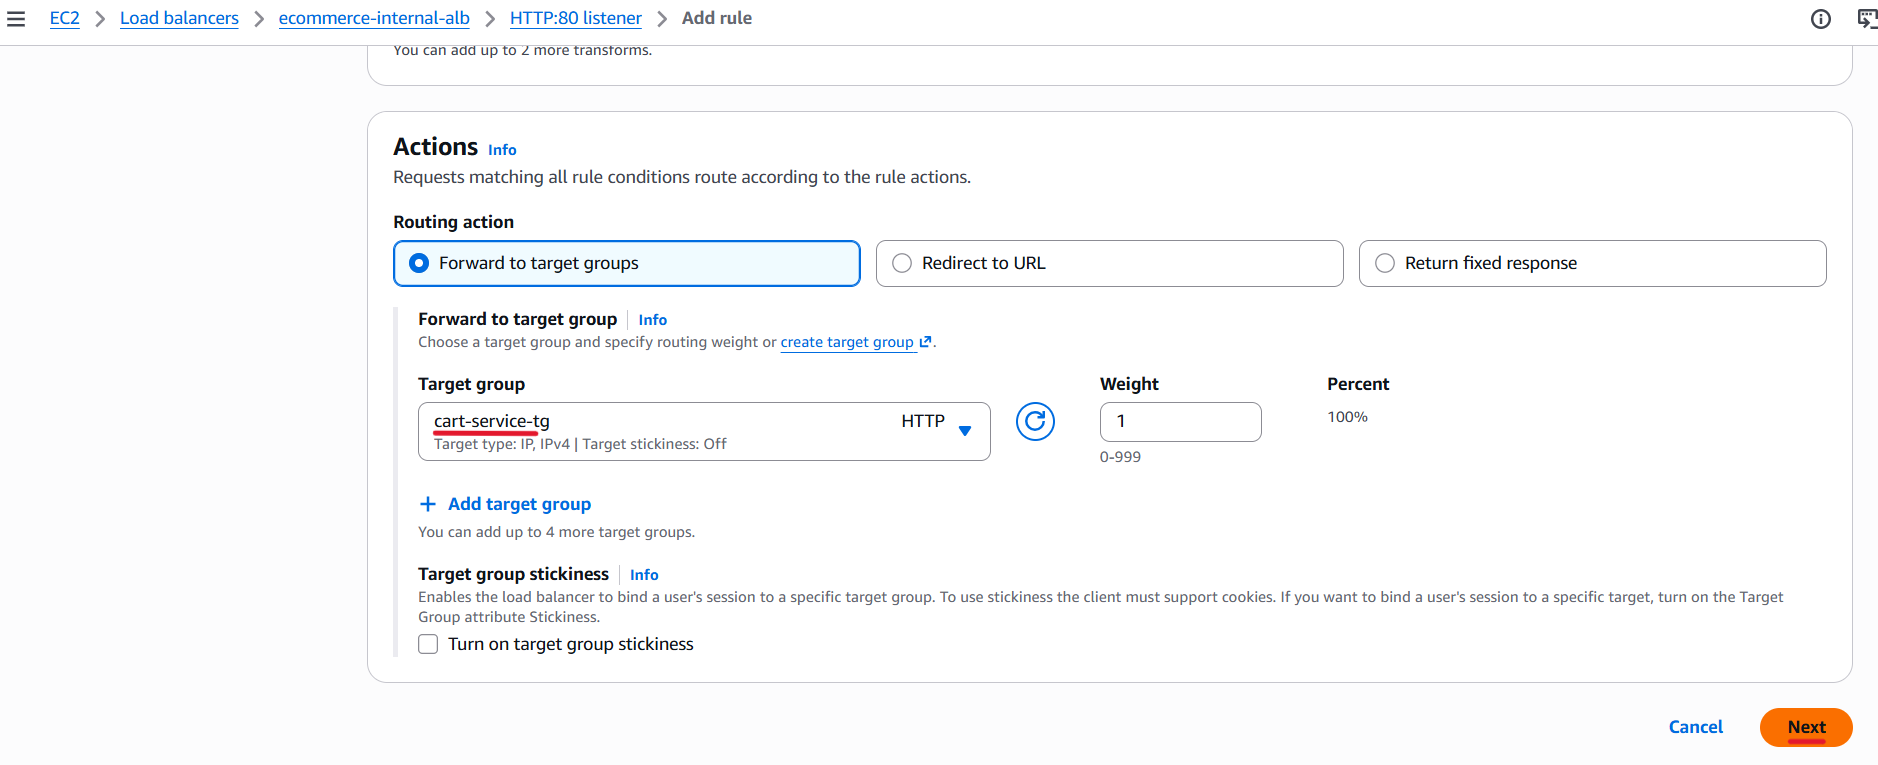
- Priority:
2
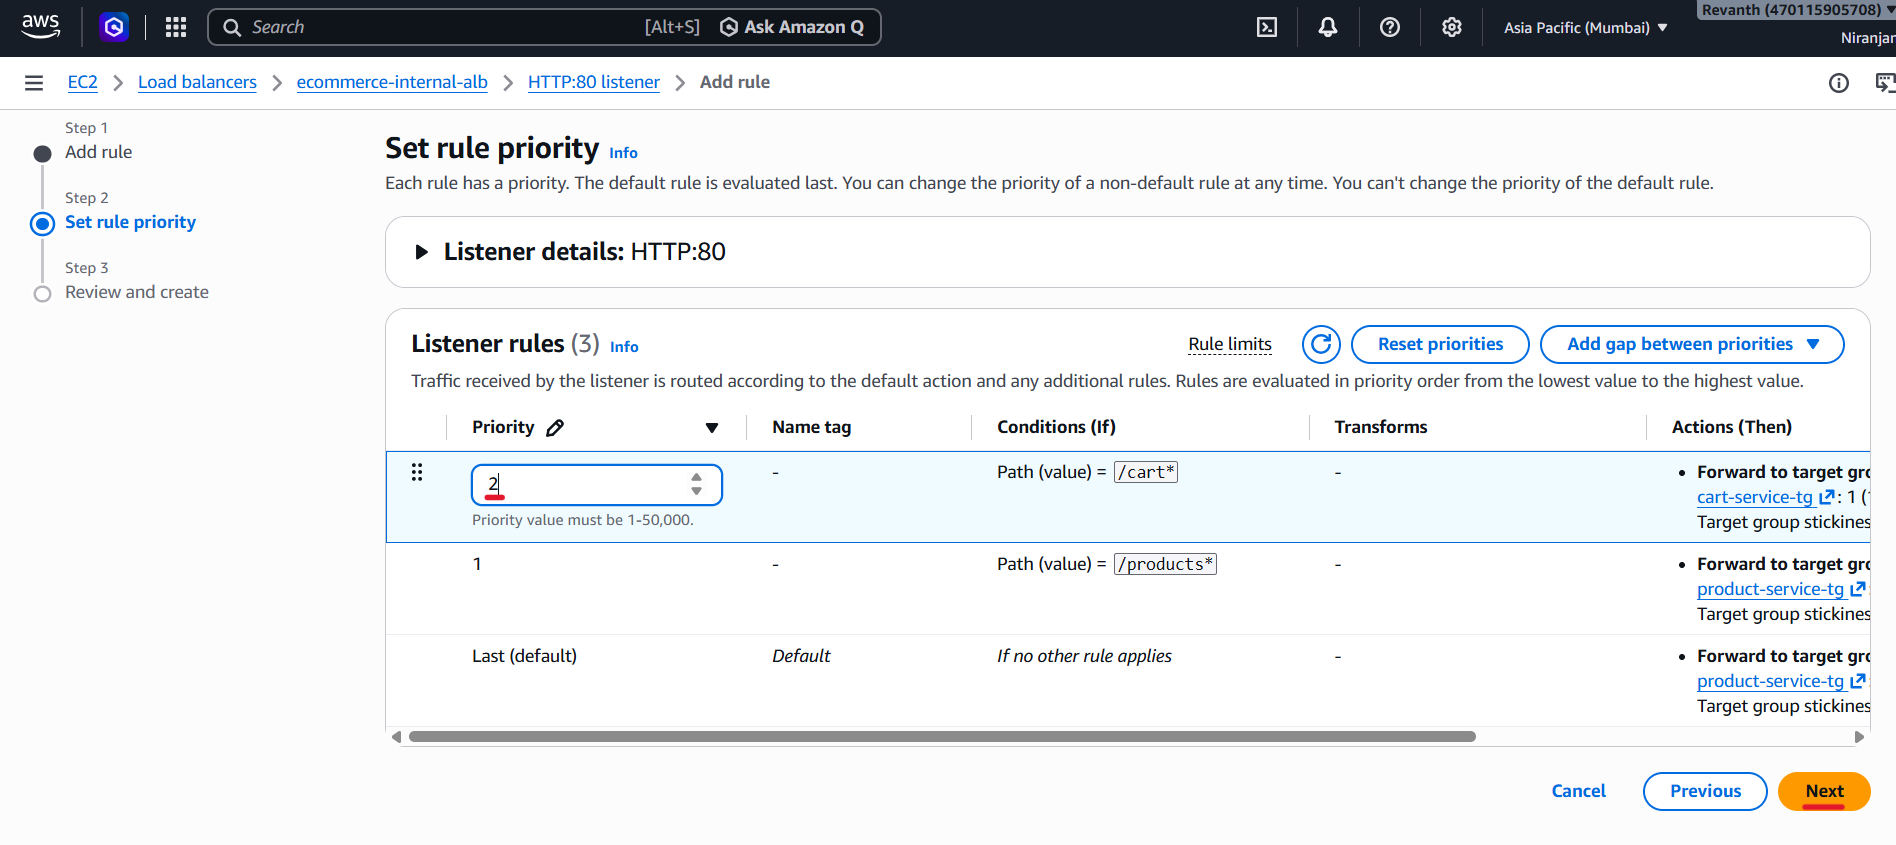
- Click Next and review the configuration.
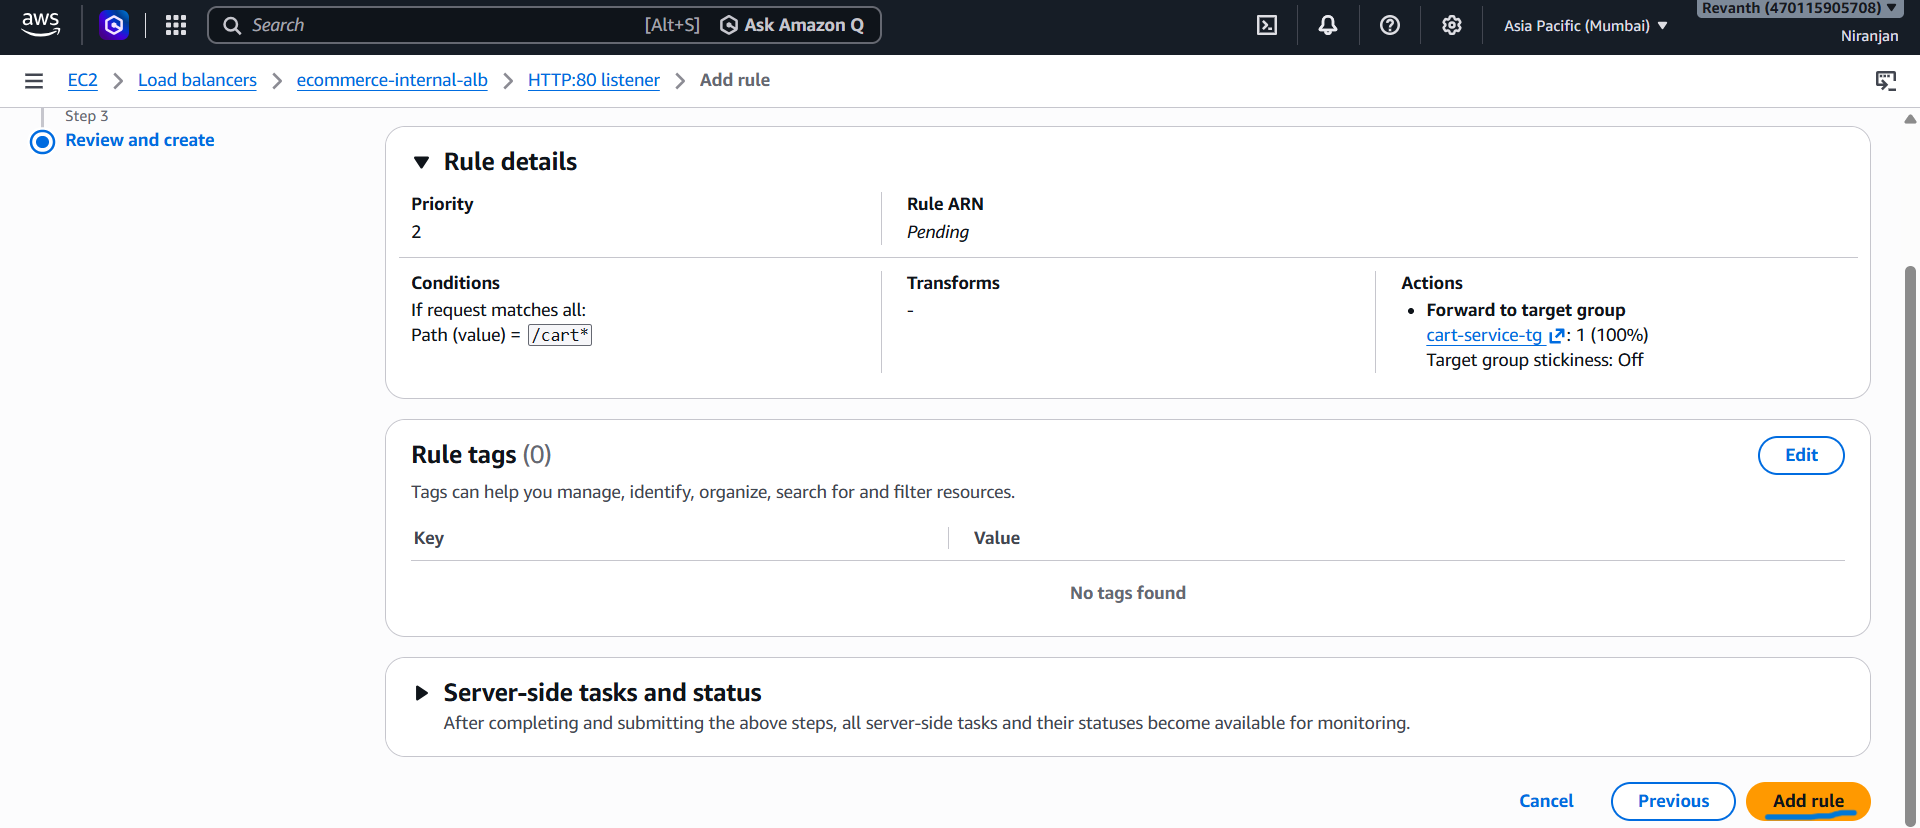
- Click Create rule.
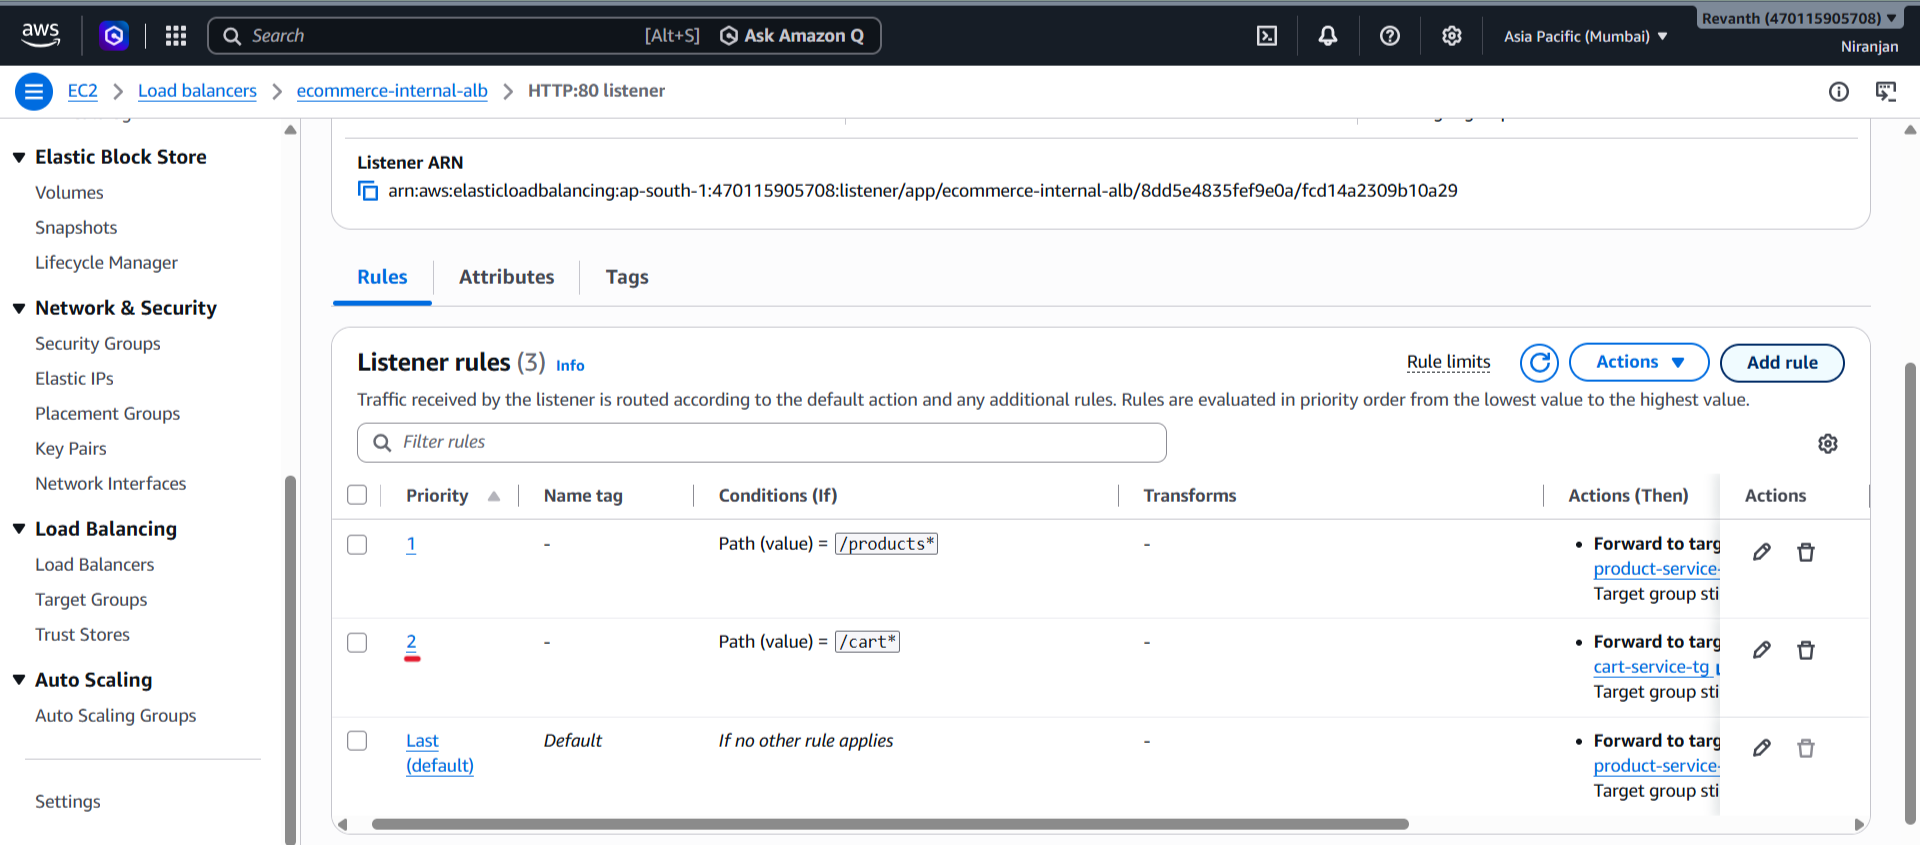
Rule 3 – User Service
- Condition: Path
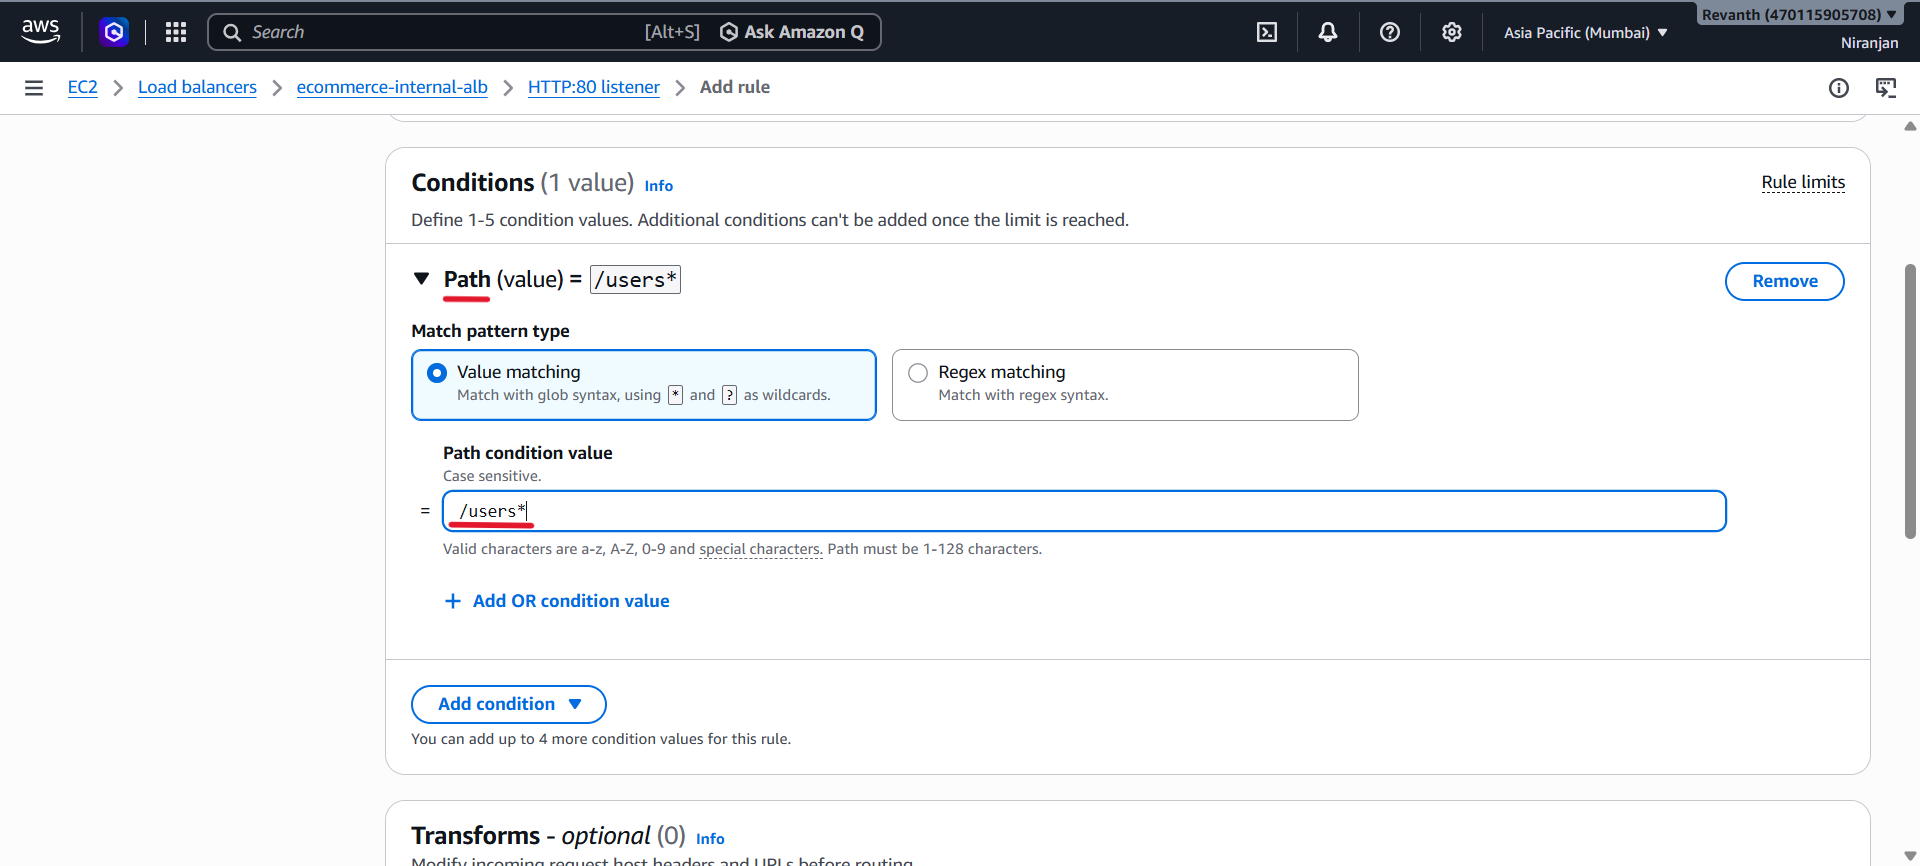
- Path pattern:
/user*
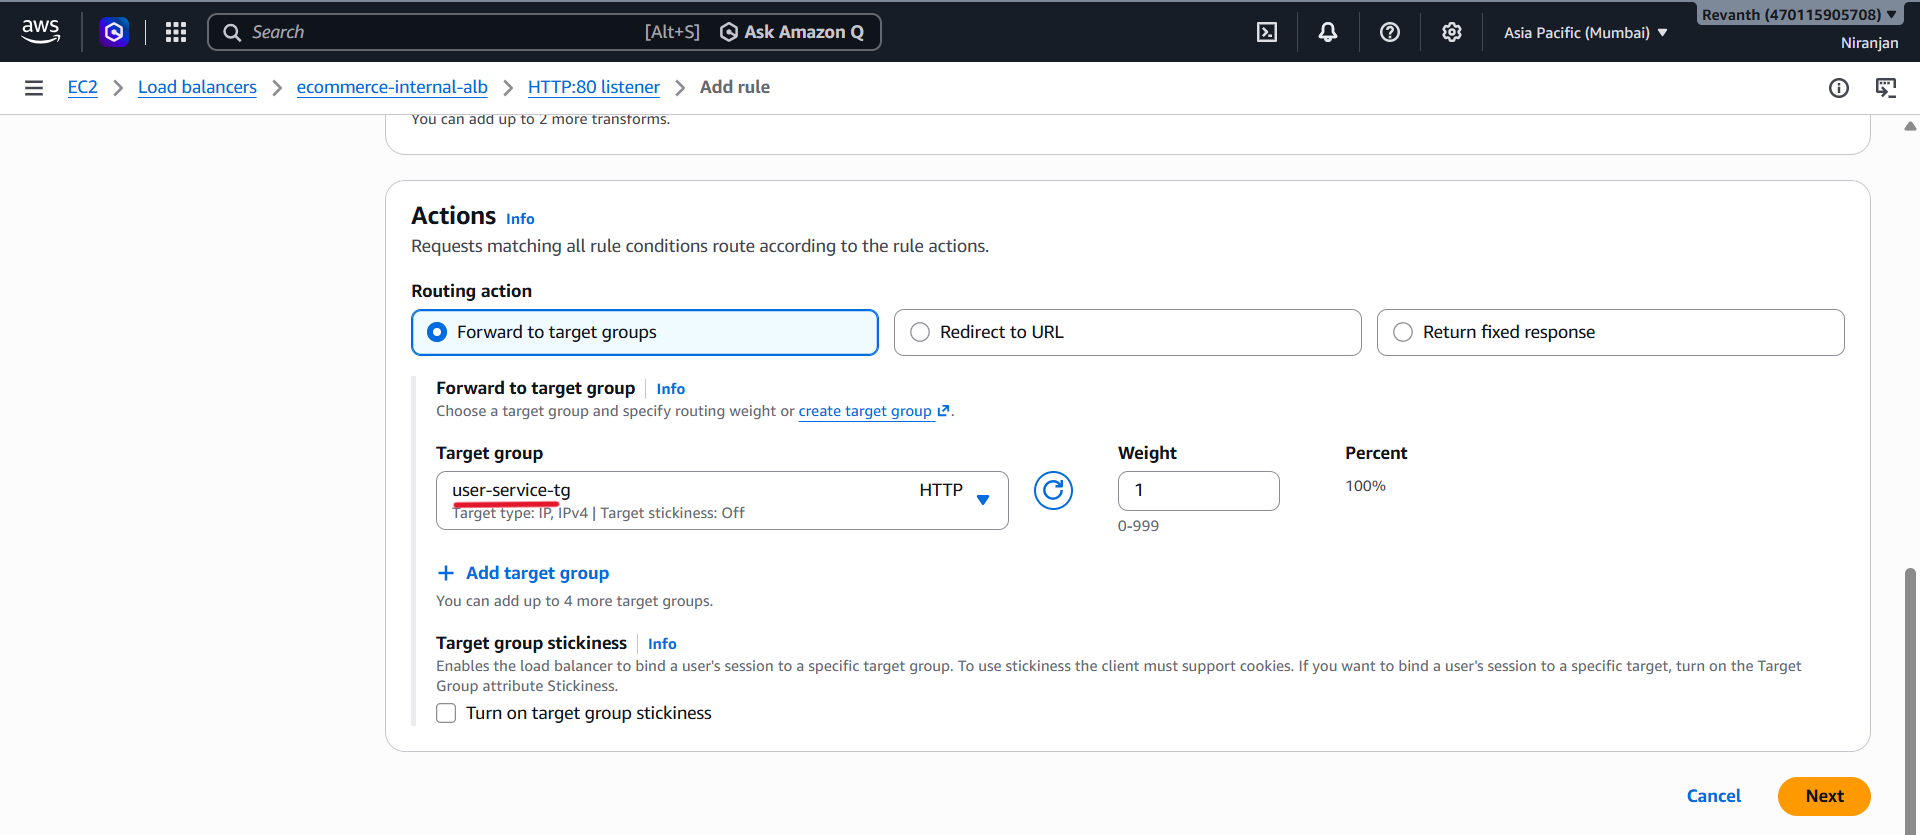
- Action: Forward to
user-service-tg
- Priority:
3
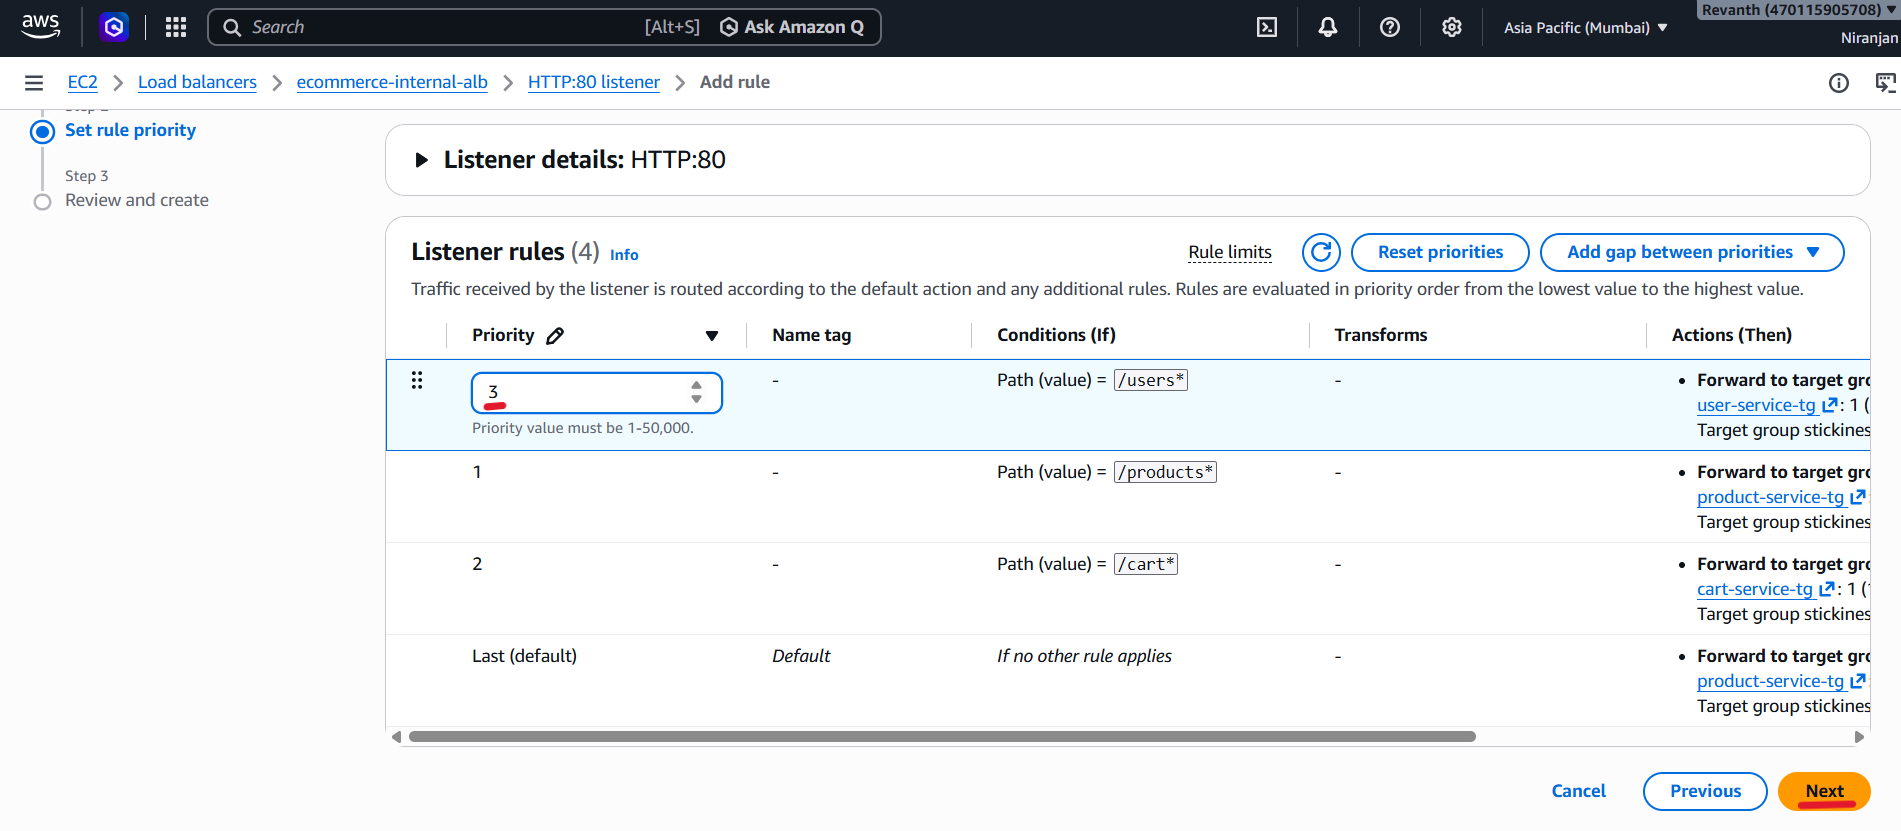
- Click Next and review the configuration.
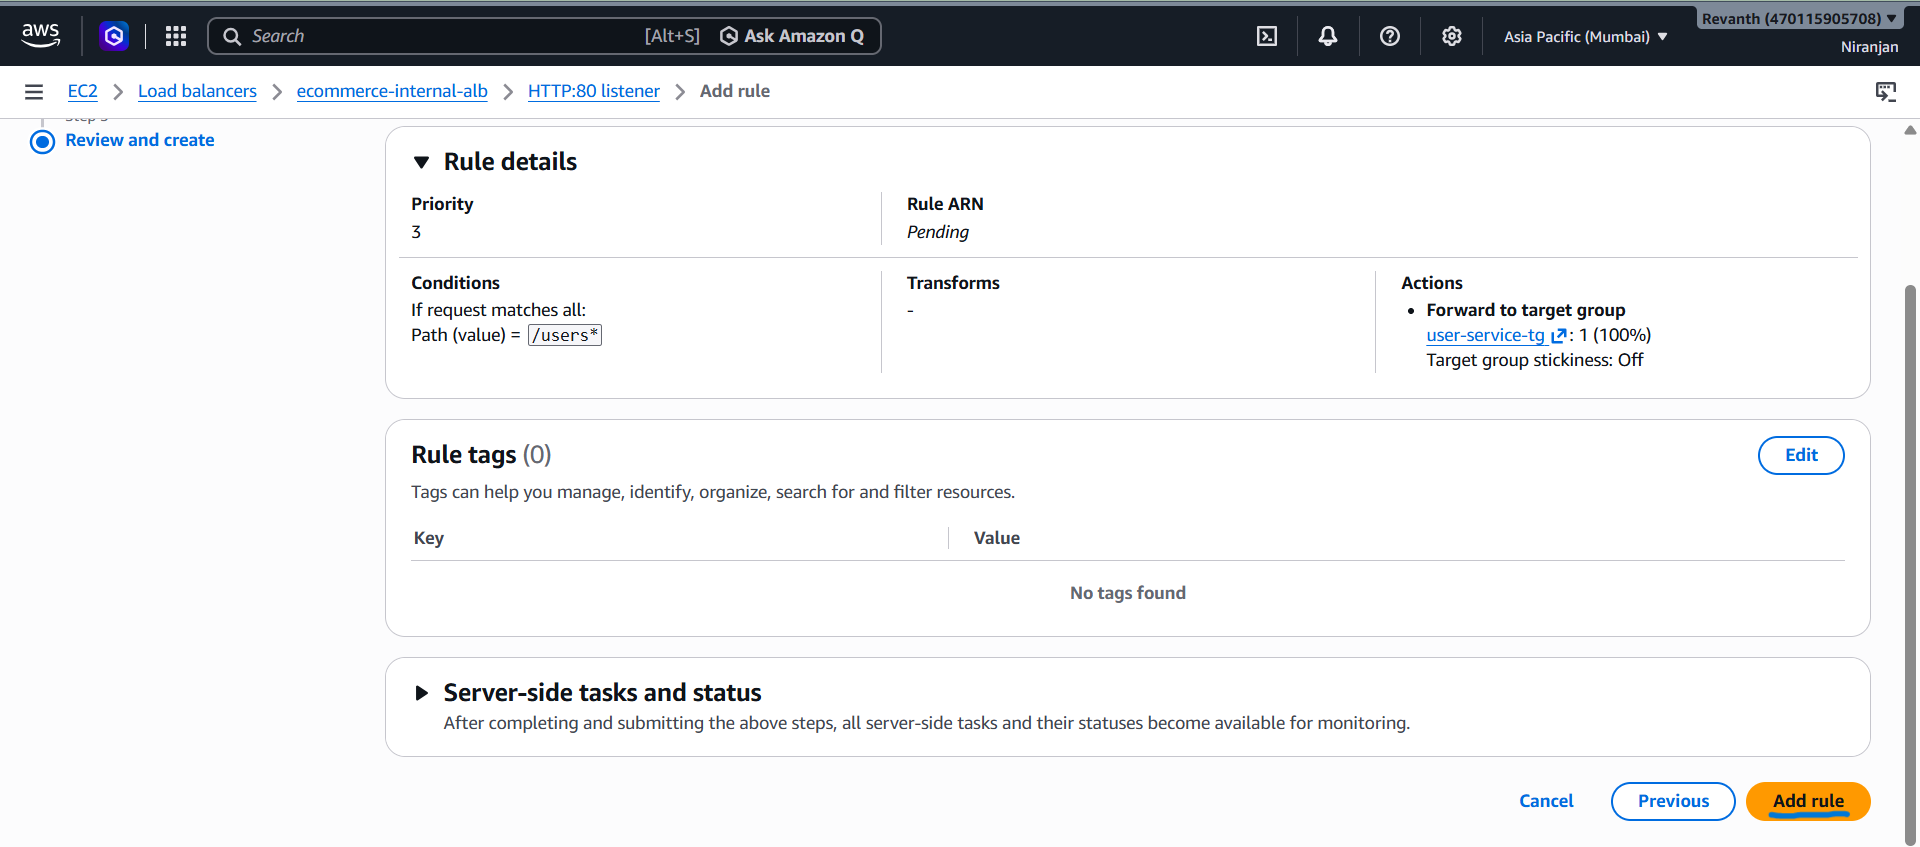
- Click Create rule.
Rule 4 – Order Service
- Condition: Path
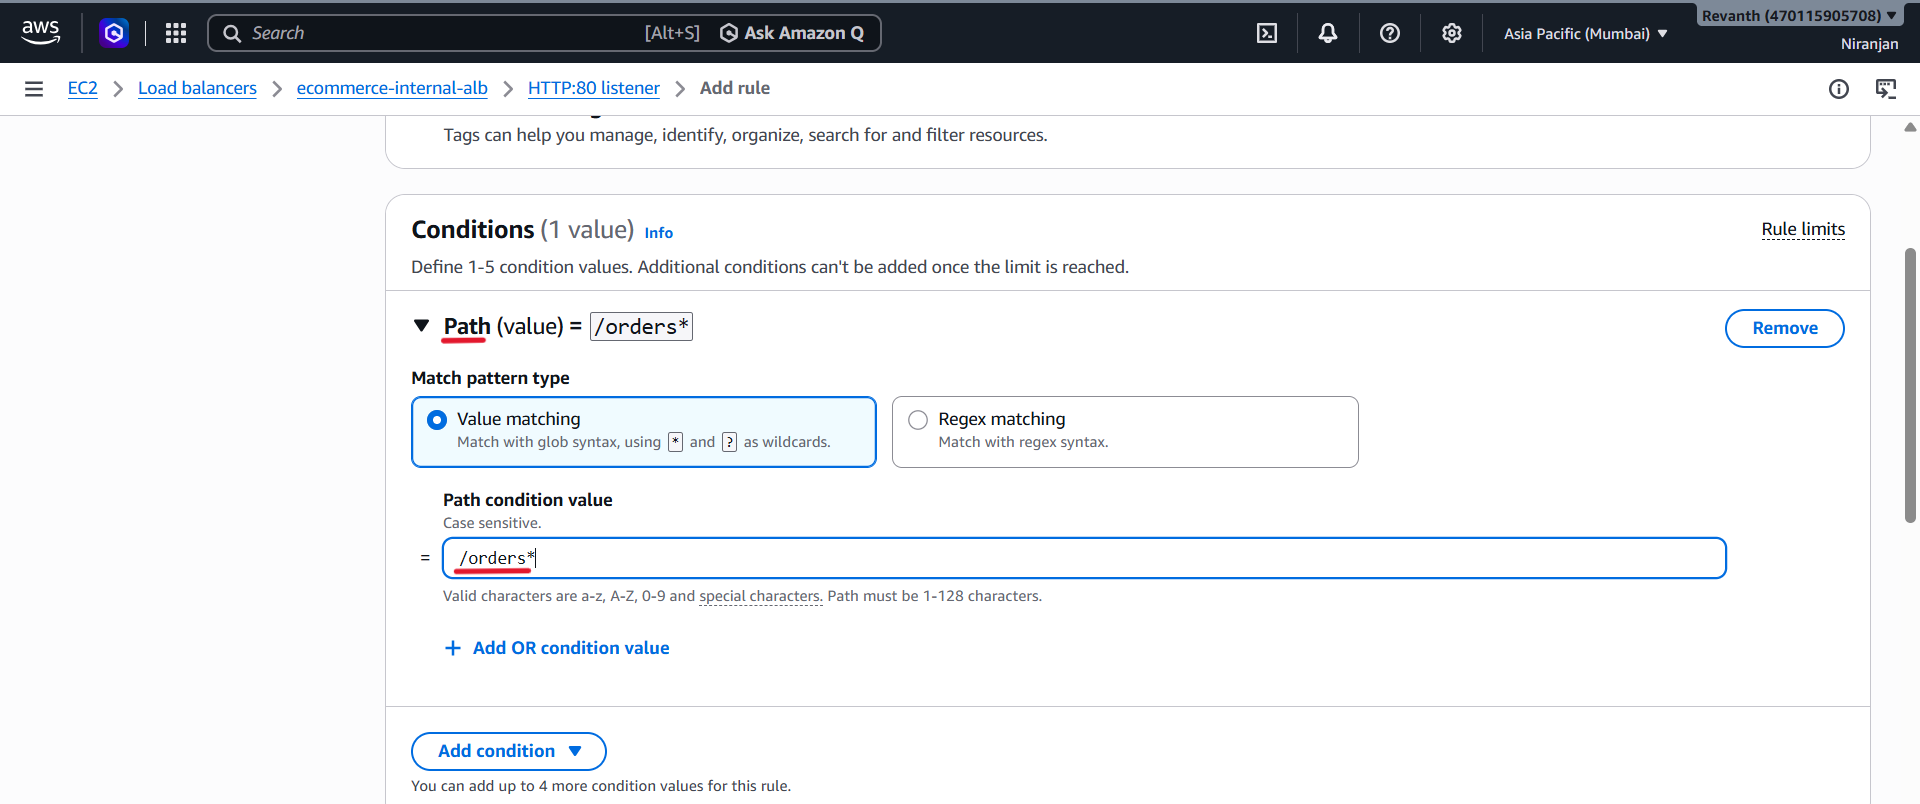
- Path pattern:
/order*
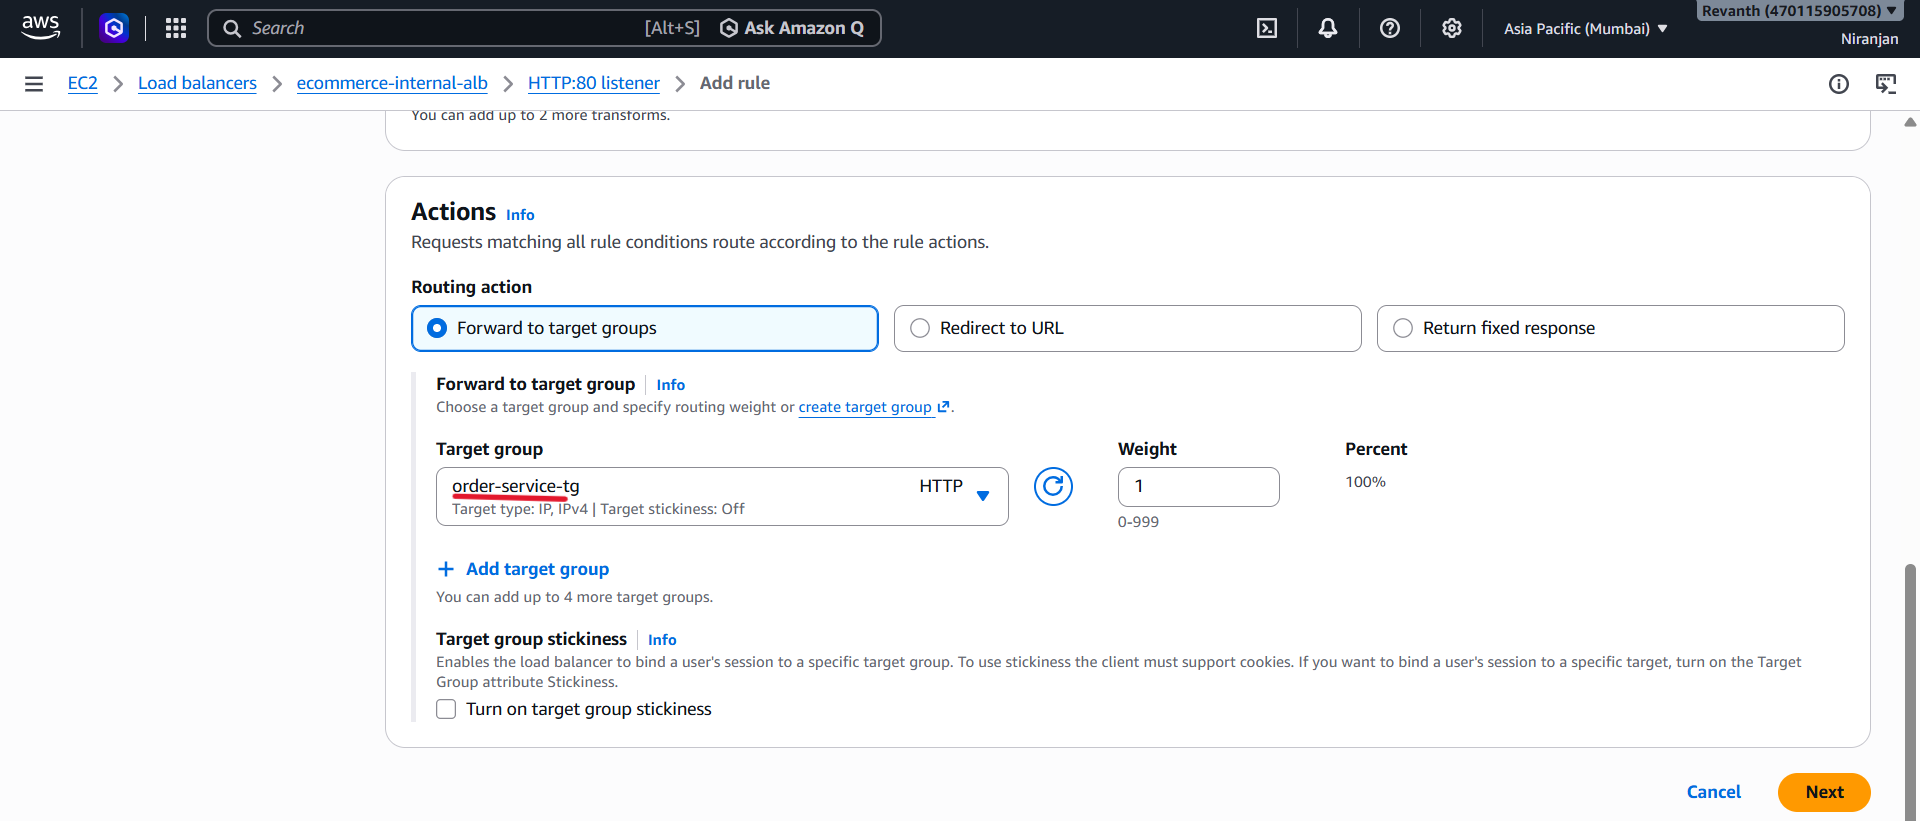
- Action: Forward to
order-service-tg
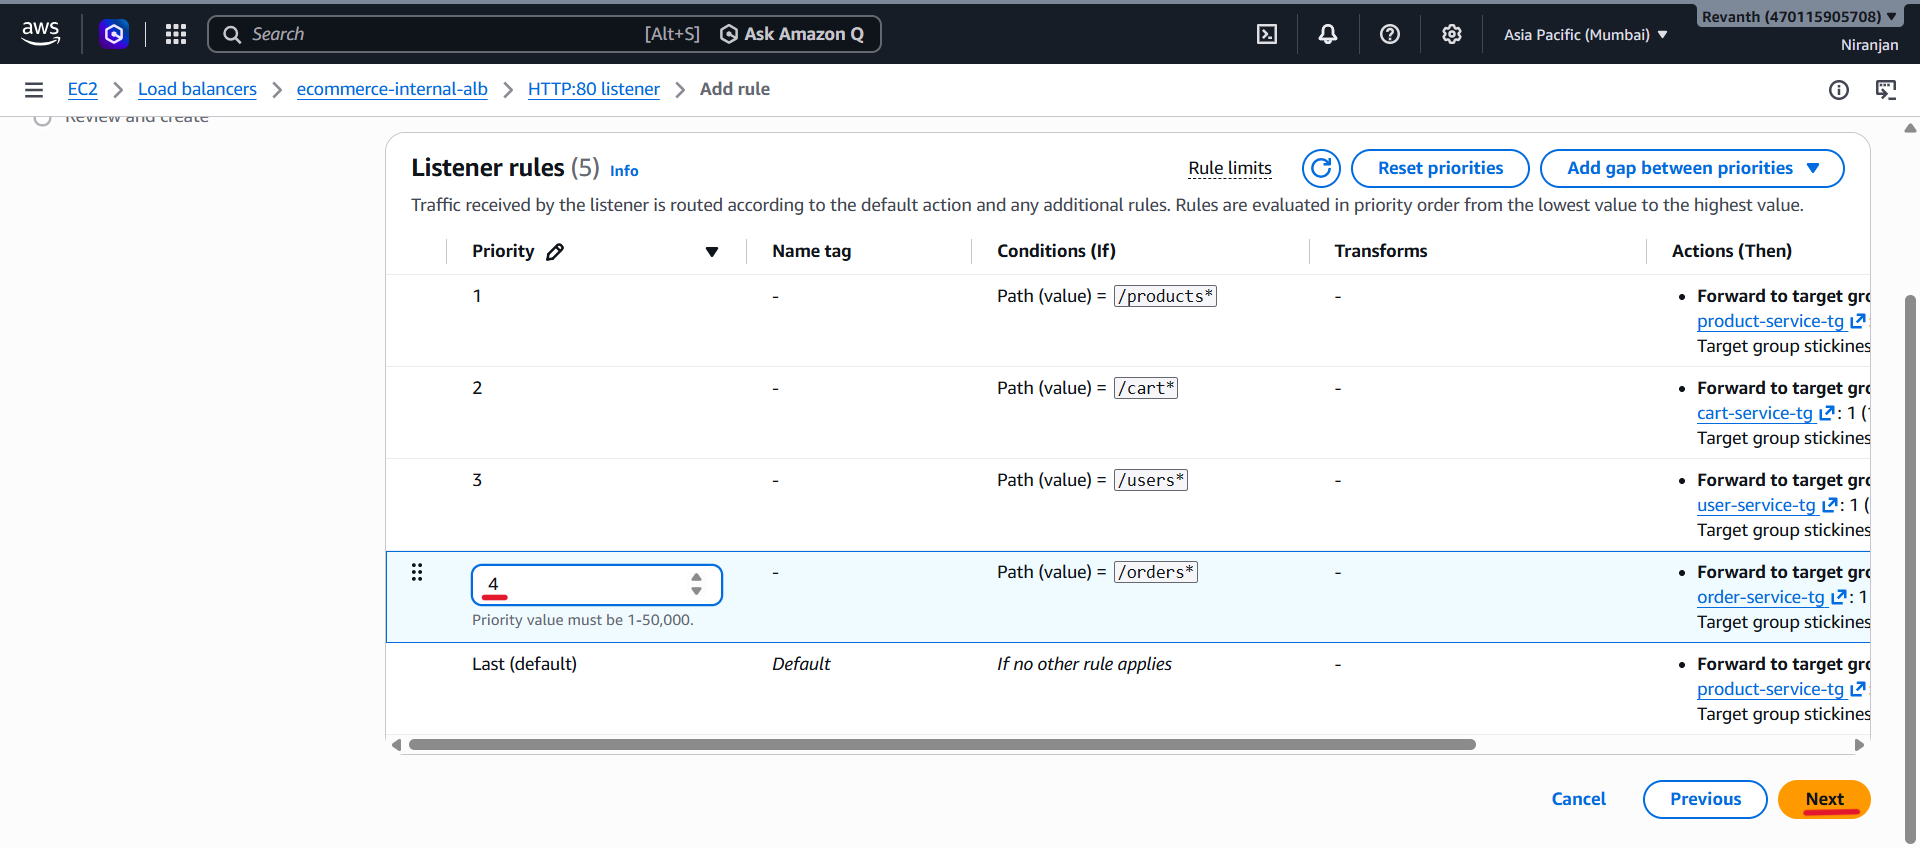
- Priority:
4 - Click Next and review the configuration.
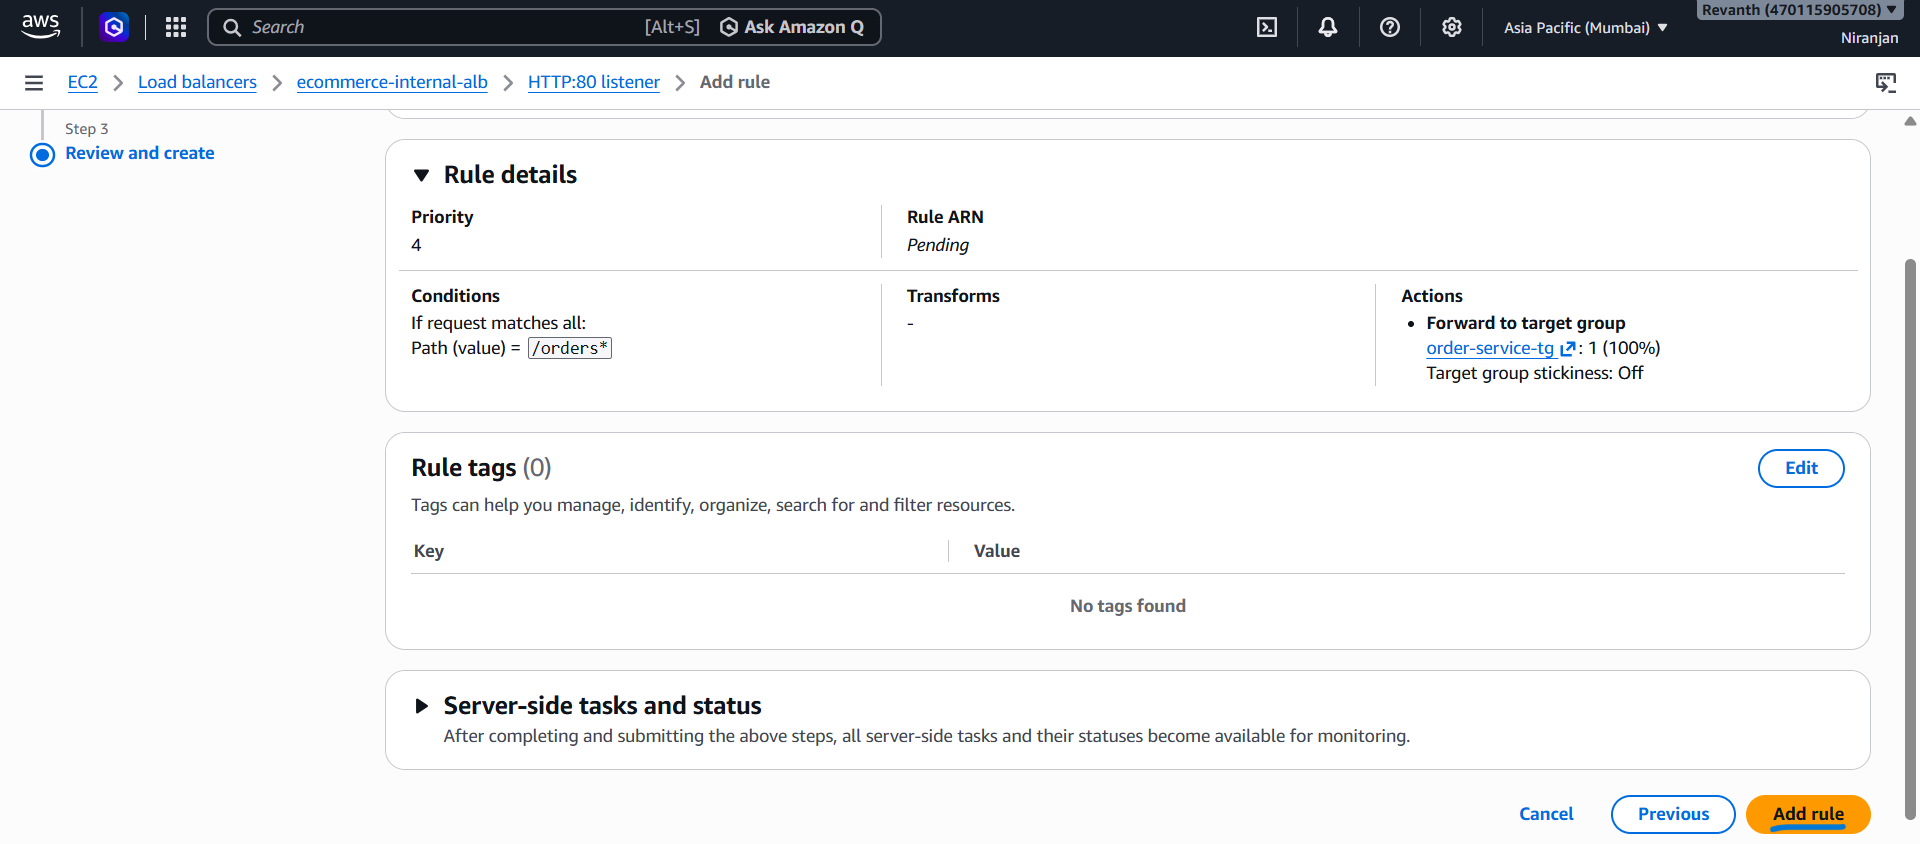
- Click Create rule.
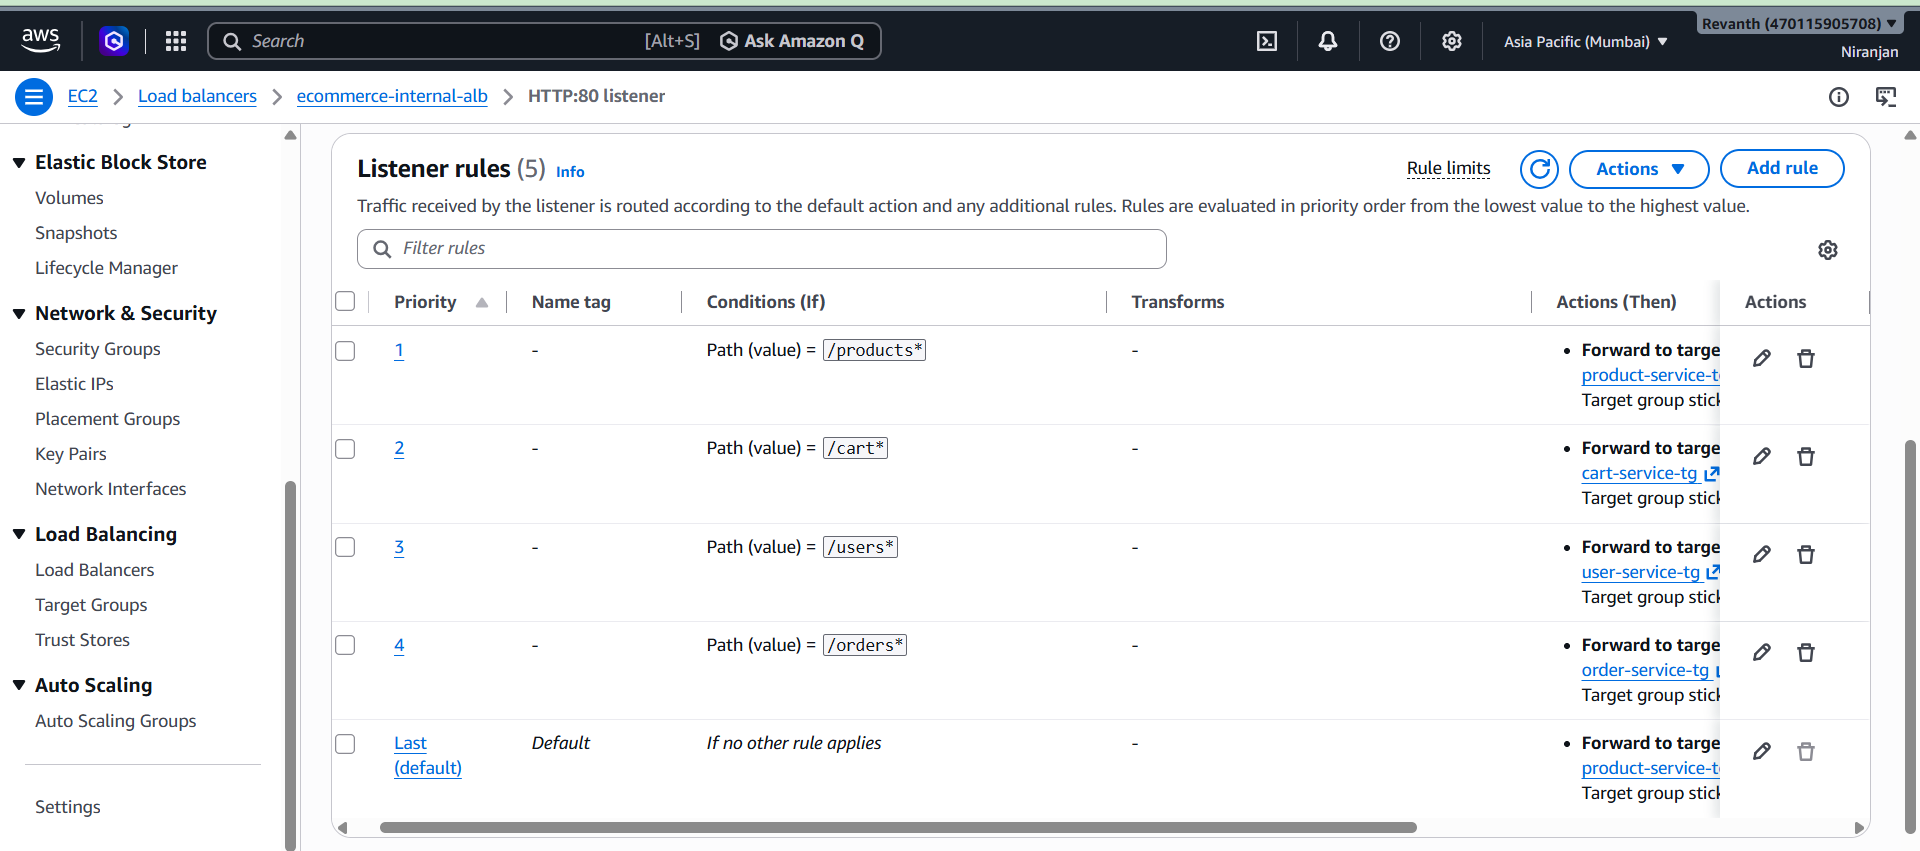
- Save the listener rules.
Listener Rule Validation
| Priority | Path Pattern | Forward To |
|---|---|---|
| 1 | /products* |
product-service-tg |
| 2 | /cart* |
cart-service-tg |
| 3 | /user* |
user-service-tg |
| 4 | /order* |
order-service-tg |
| Default | All other requests | product-service-tg |
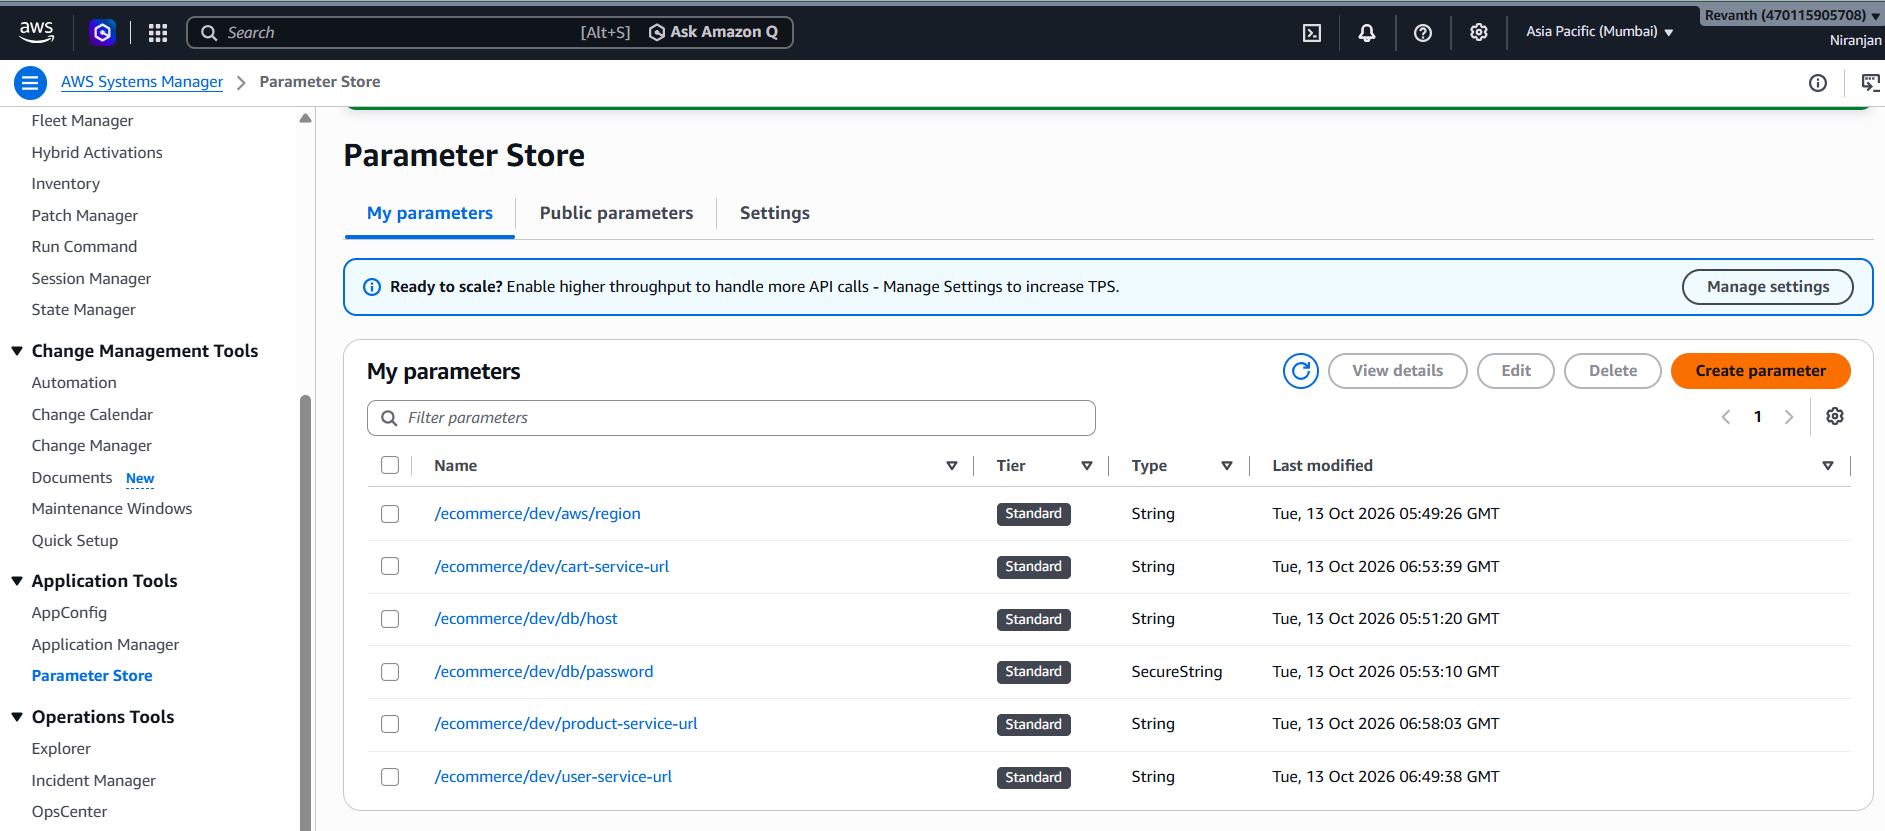
5.2 Create Service URL Parameters in Parameter Store
The backend services need to know the internal ALB URL to communicate with the other backend services.
We will store the ALB DNS name in AWS Systems Manager Parameter Store.
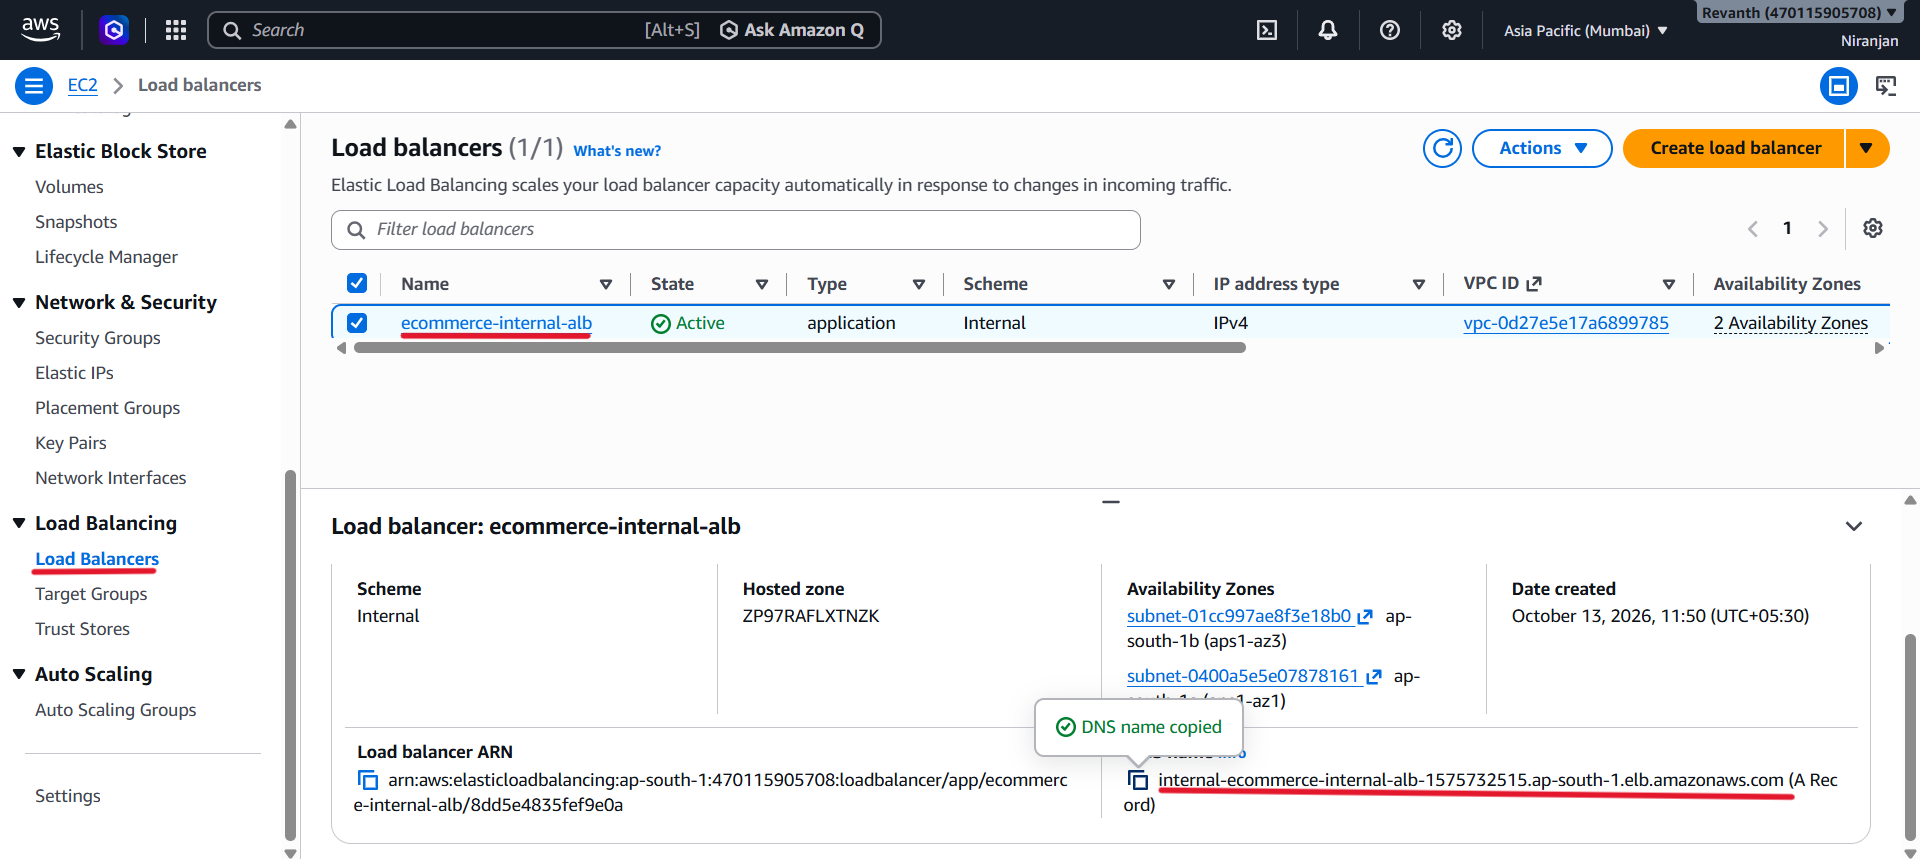
5.2.1 Get the Internal ALB DNS Name
- EC2 Console → Load Balancers
- Select
ecommerce-internal-alb. - Copy the DNS name from the load balancer details.
- Add the HTTP protocol before the DNS name.
The parameter value should look like this:
http://<internal-alb-dns-name>
5.2.2 Create the Product Service URL Parameter
- Systems Manager Console → Parameter Store → Create parameter
- Name:
/ecommerce/dev/product-service-url
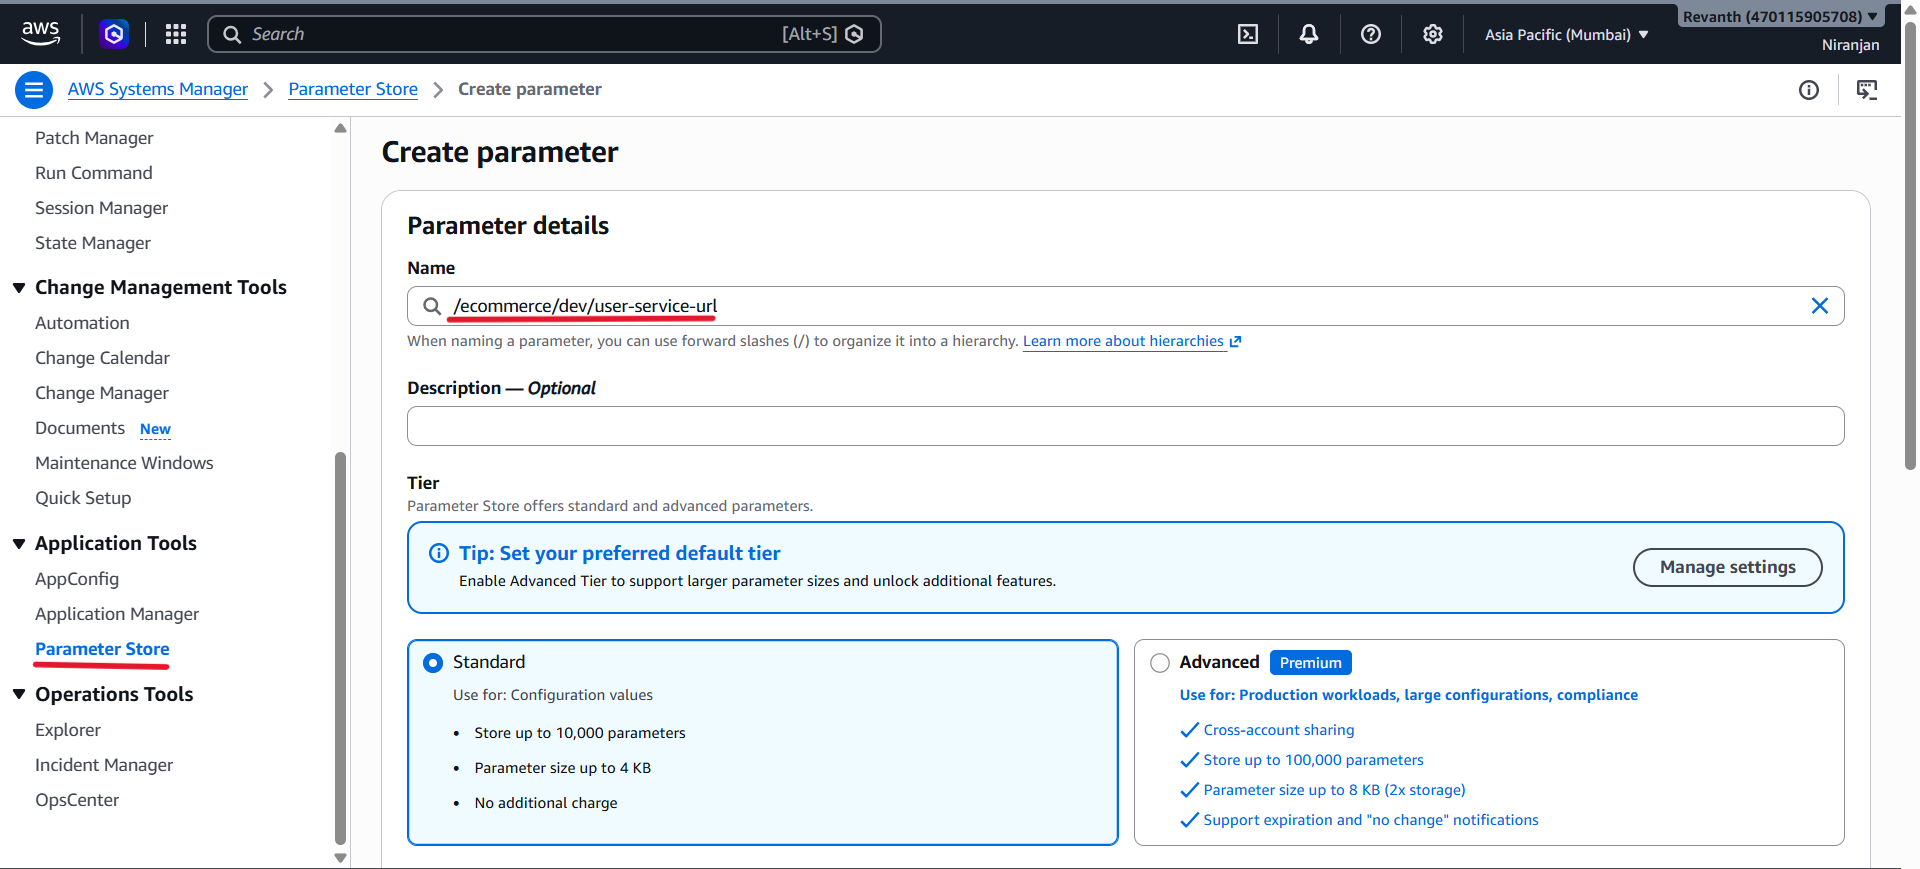
- Type: String
- Value:
http://<internal-alb-dns-name>
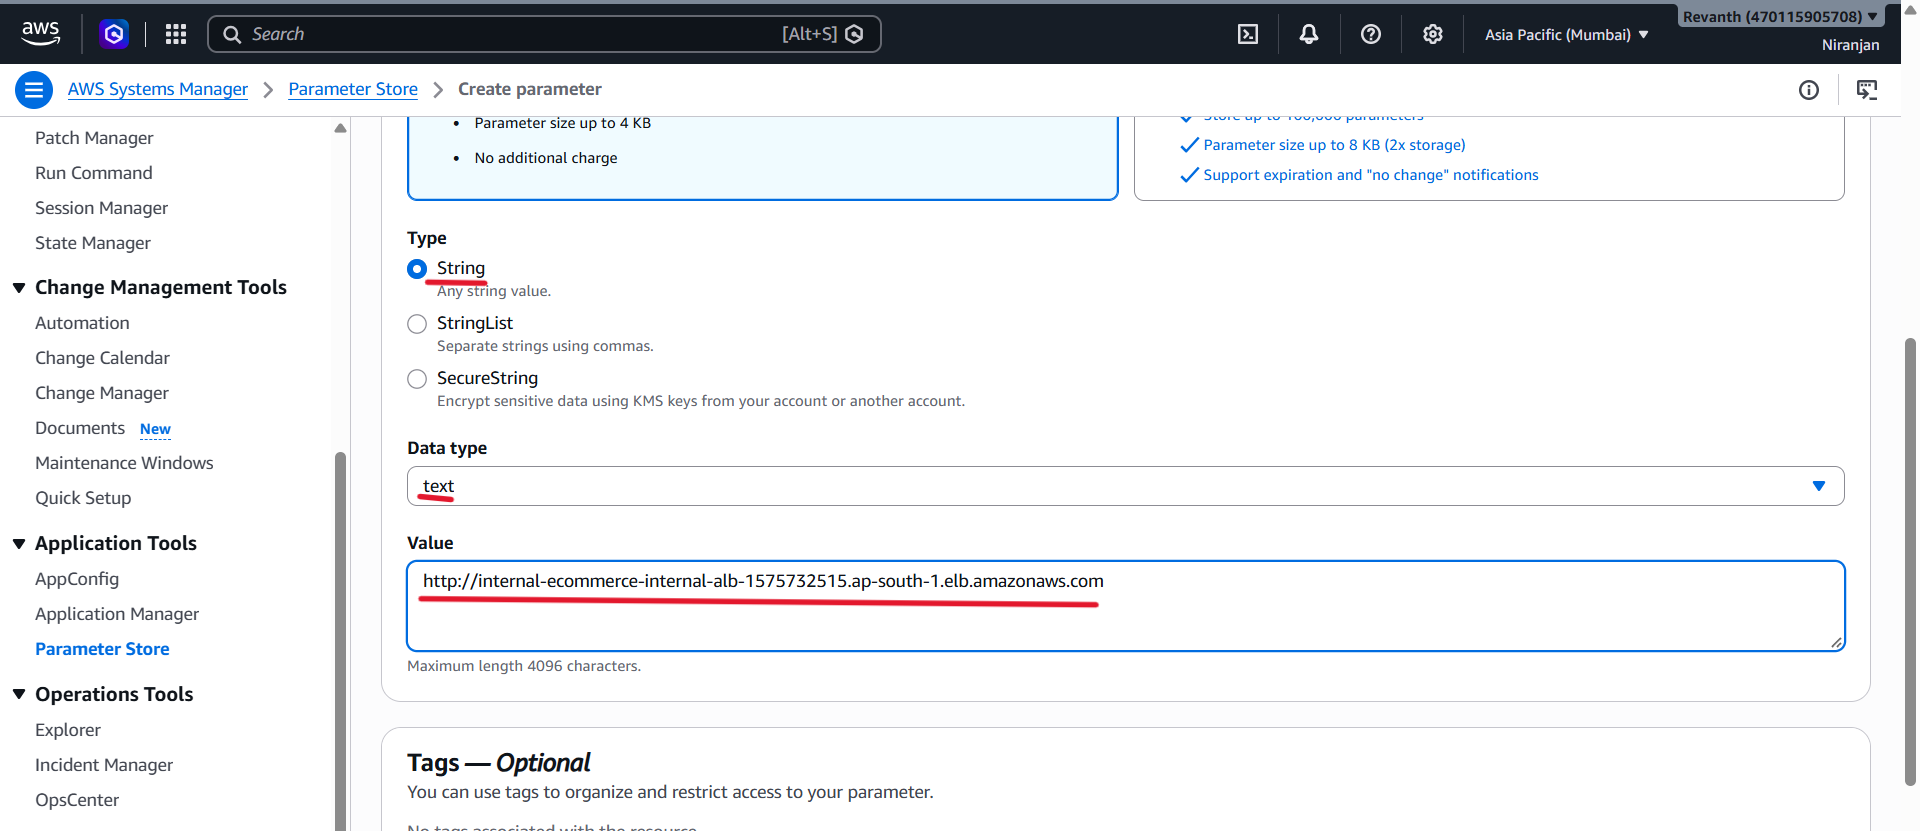
- Click Create parameter.
5.2.3 Create the Remaining Service URL Parameters
Repeat the same steps for the other three services.
Cart Service
- Name:
/ecommerce/dev/cart-service-url
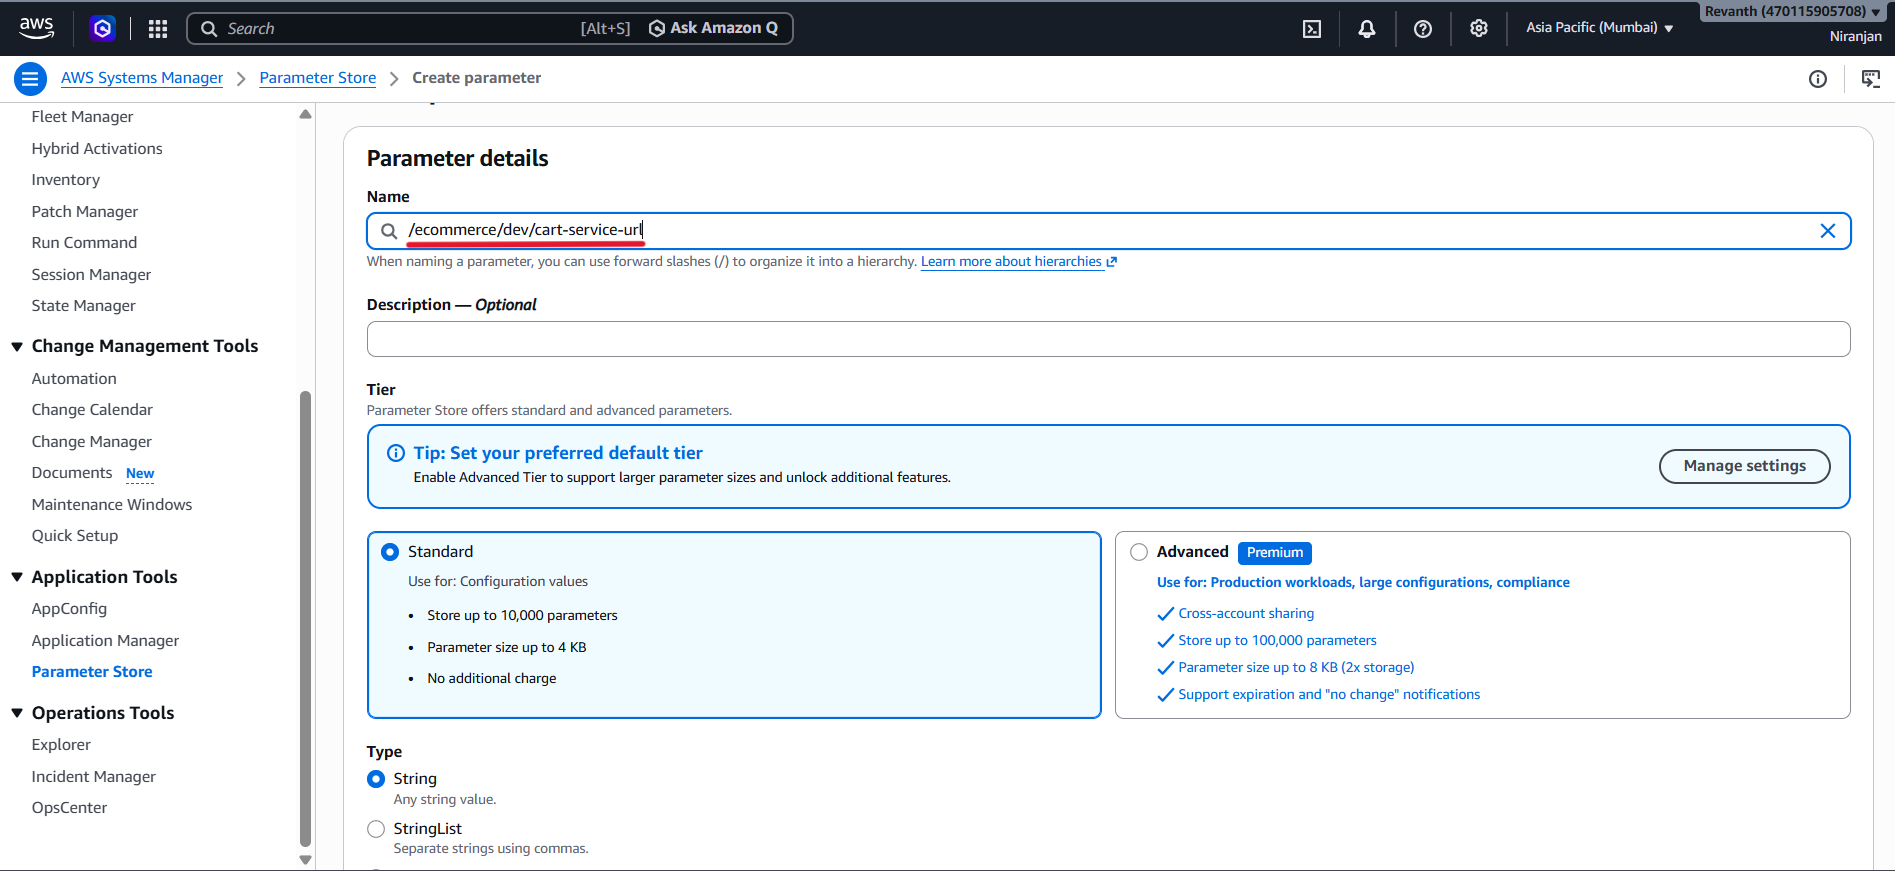
- Type: String
- Value:
http://<internal-alb-dns-name>
User Service
- Name:
/ecommerce/dev/user-service-url
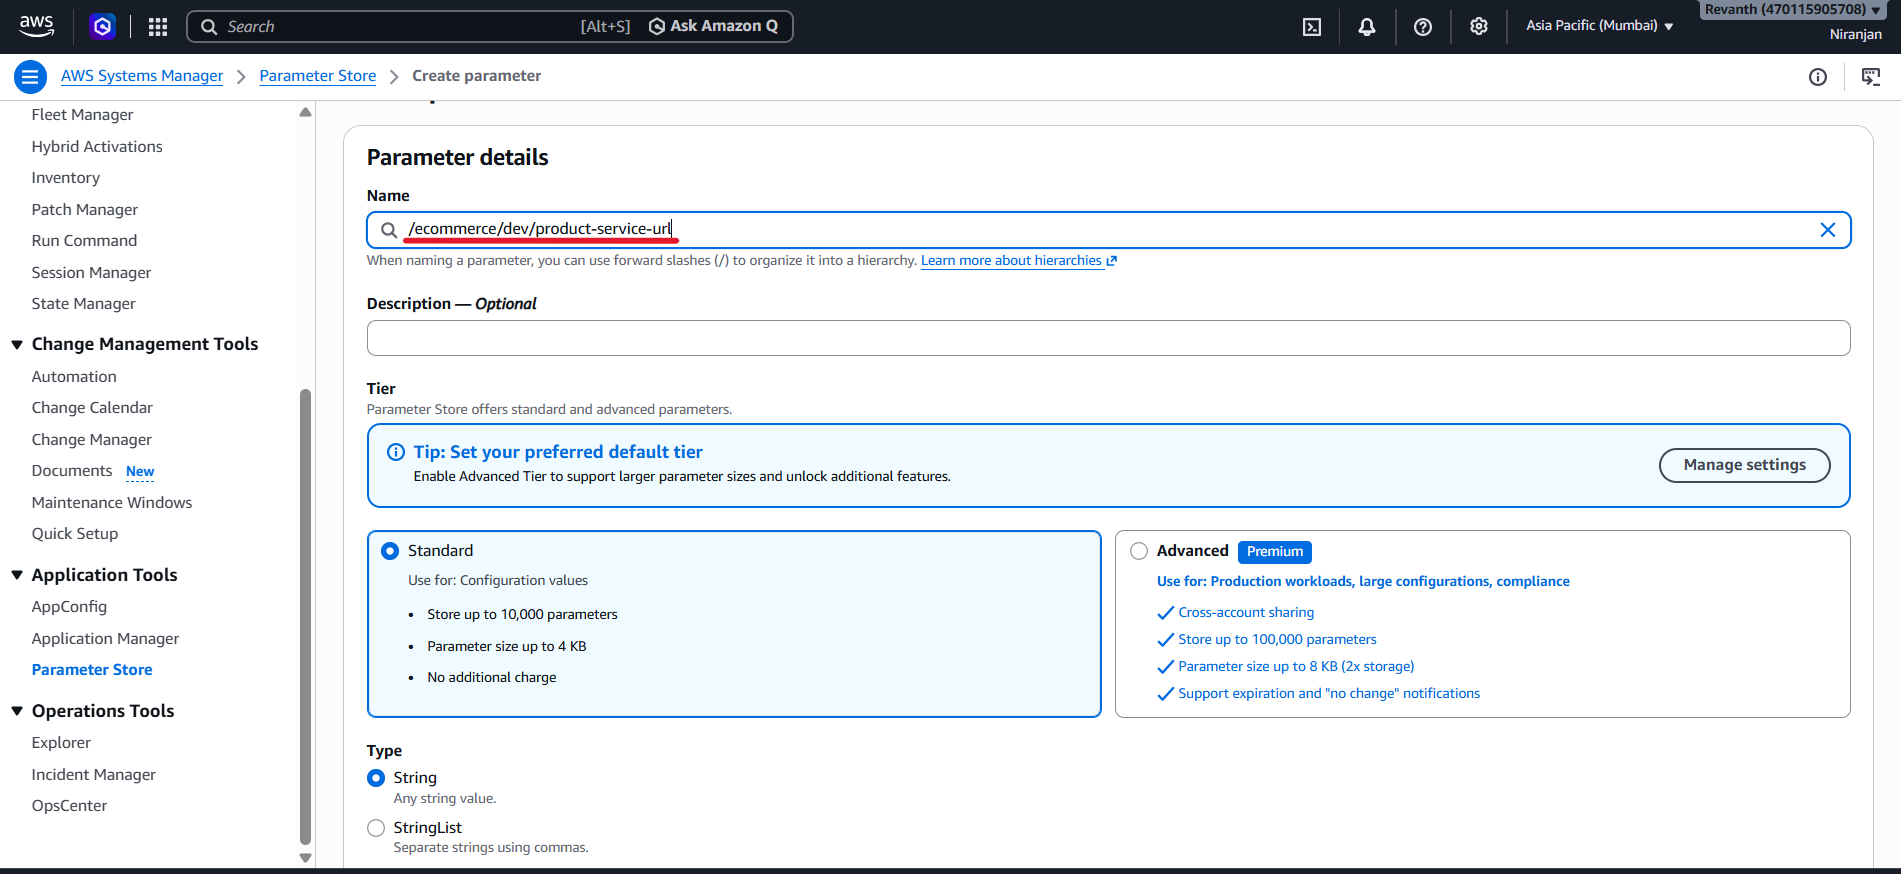
- Type: String
- Value:
http://<internal-alb-dns-name>
Order Service
- Name:
/ecommerce/dev/order-service-url
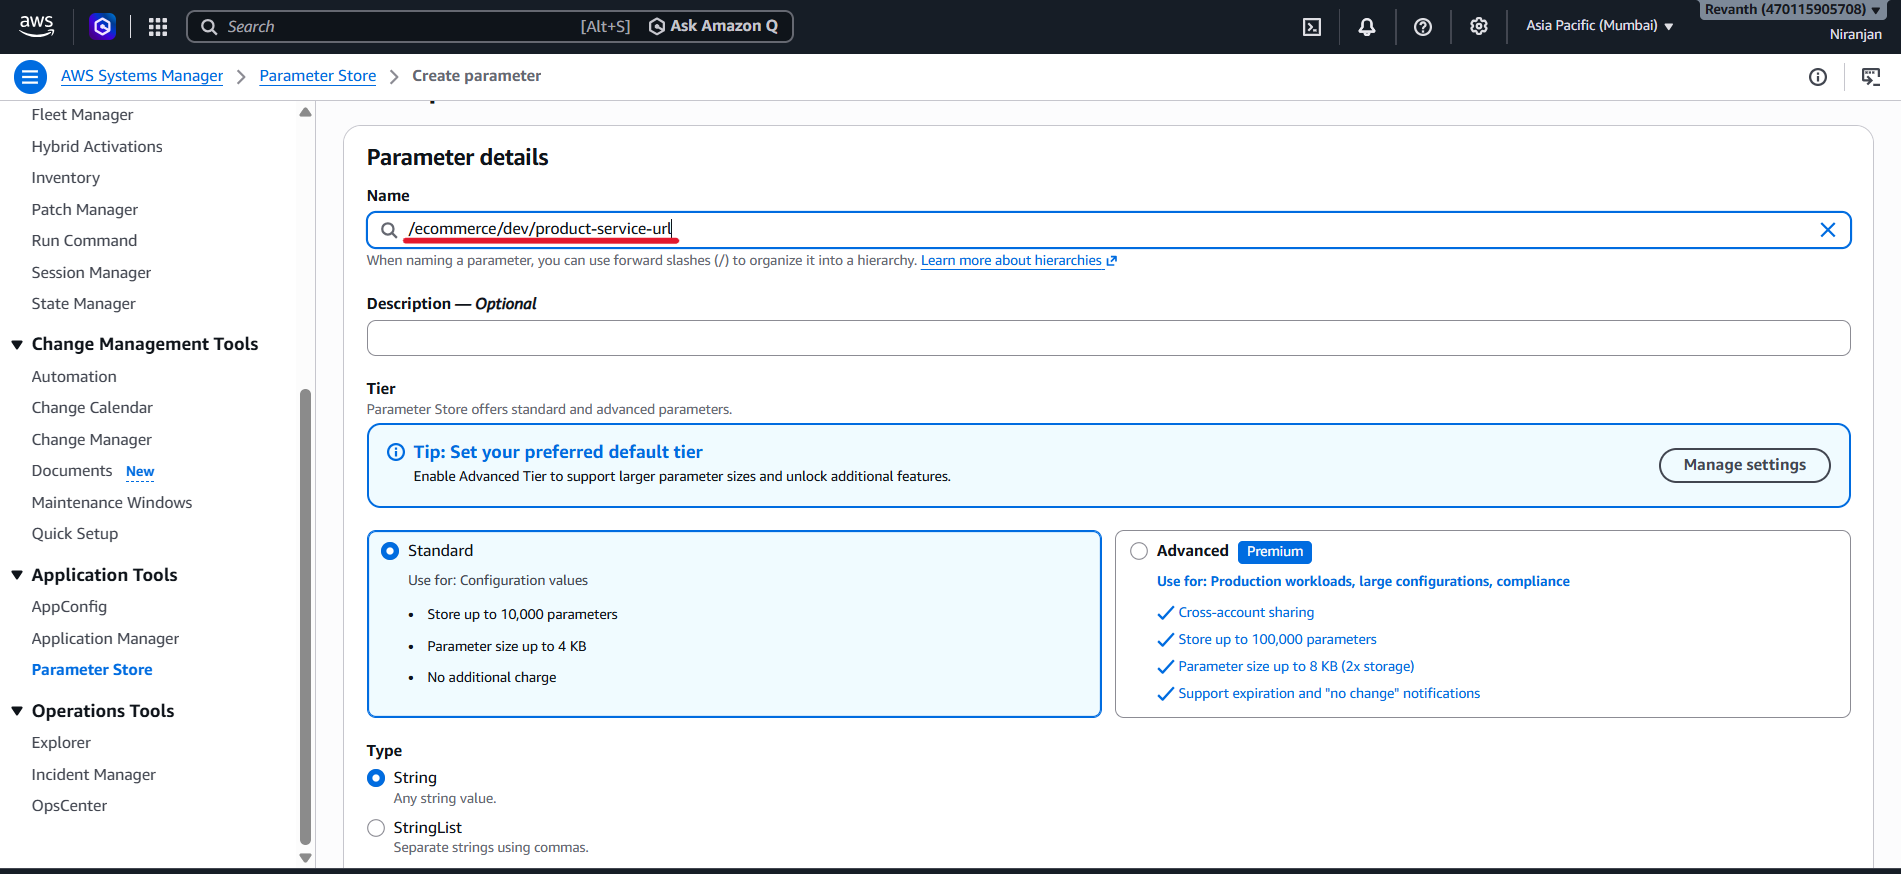
- Type: String
- Value:
http://<internal-alb-dns-name>
Important: All four parameters use the same internal ALB DNS name. The ALB identifies the destination service based on the request path.
5.3 Create ECR Repositories
Amazon ECR (Elastic Container Registry) is a fully managed container image registry that stores Docker images.
We will create a separate ECR repository for each backend service. This makes it easier to manage and update images independently.
5.3.1 Create the Product Service Repository
- AWS Console → Elastic Container Registry (ECR)
- Open Repositories.
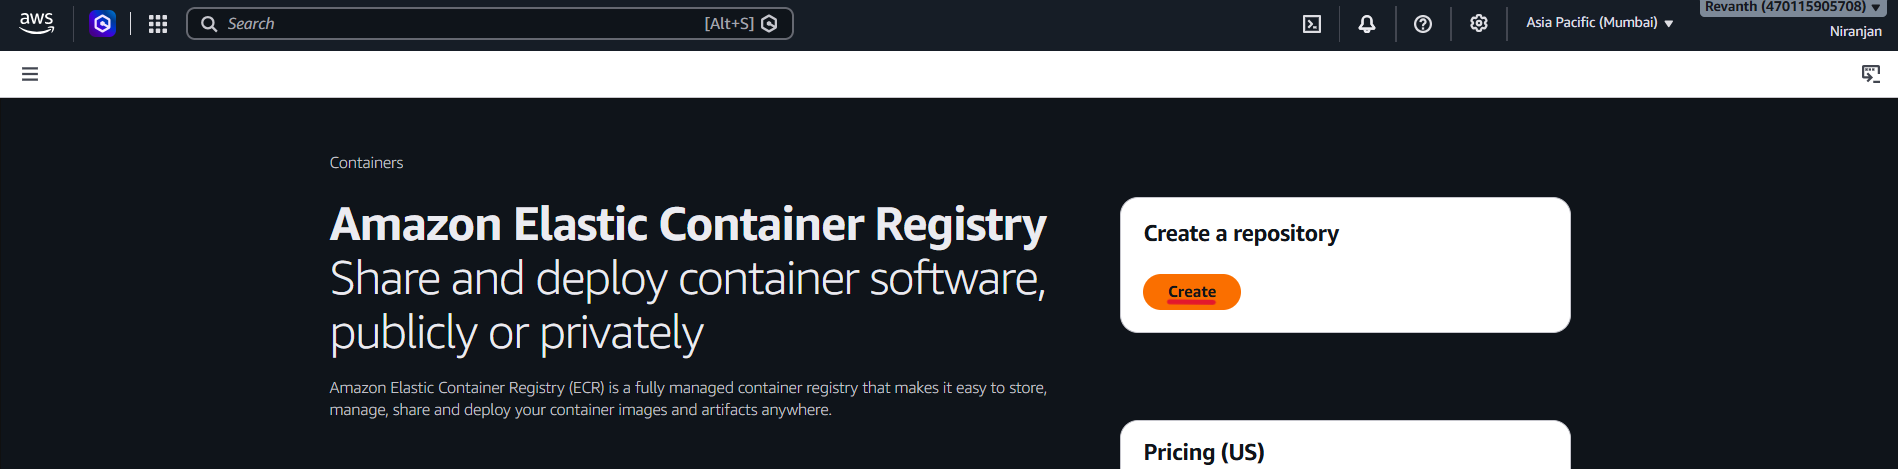
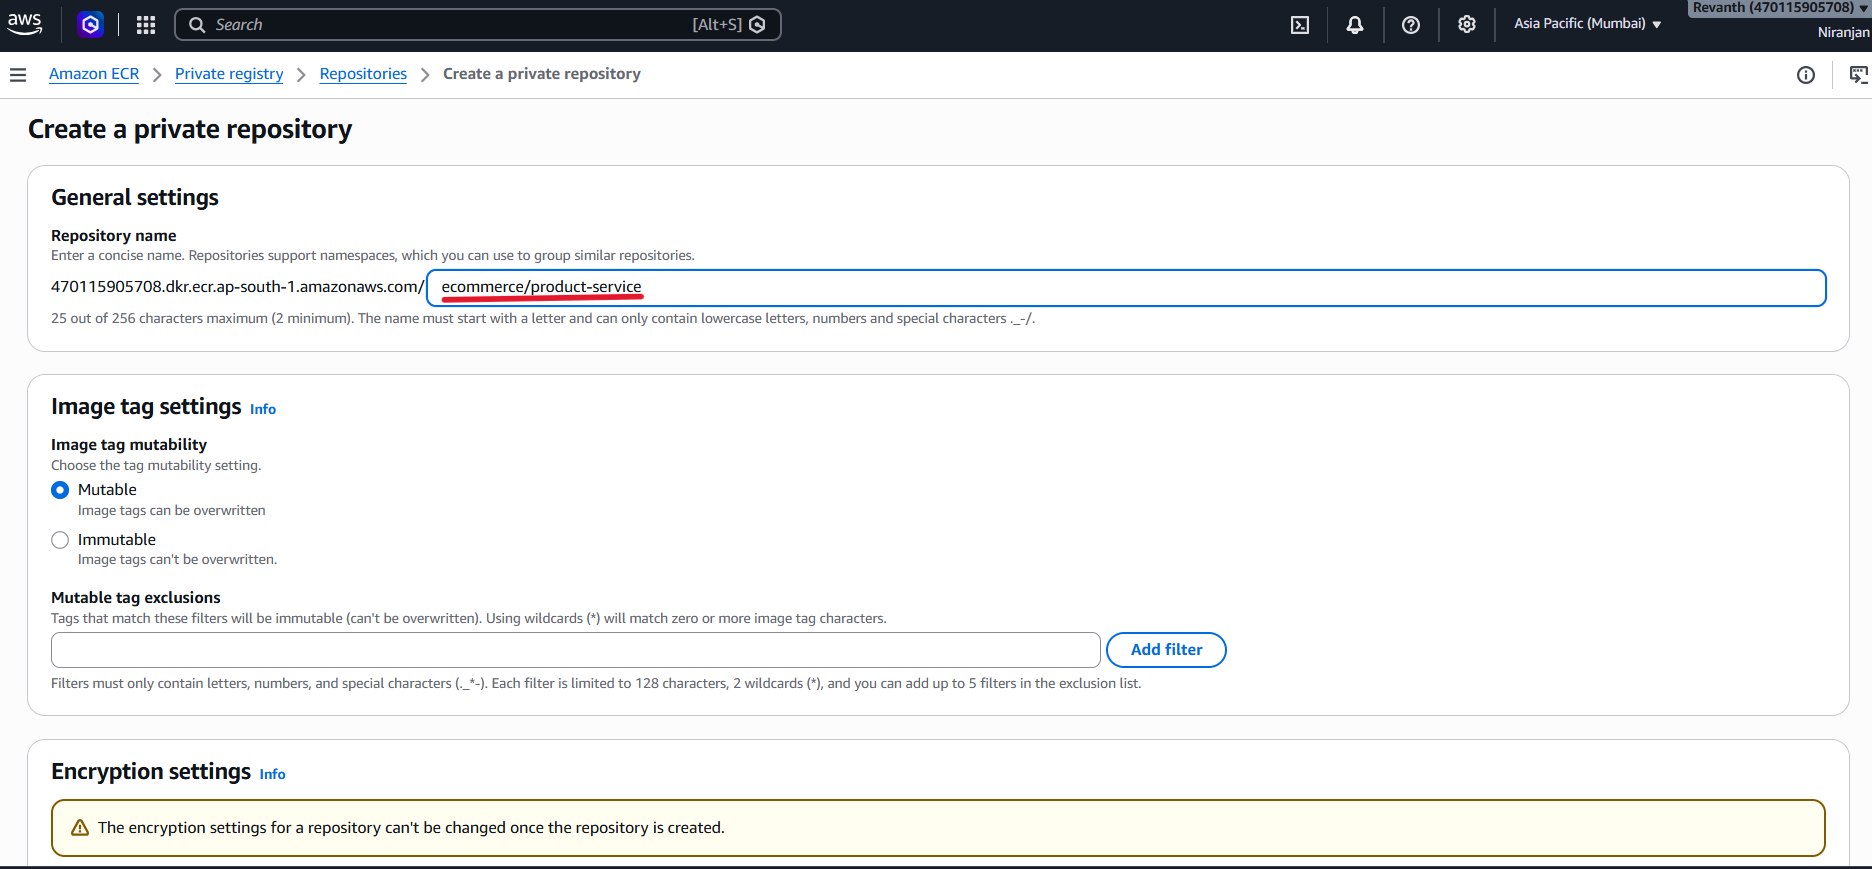
- Click Create repository.
- Repository name:
ecommerce/product-service
- Keep the remaining settings as default.
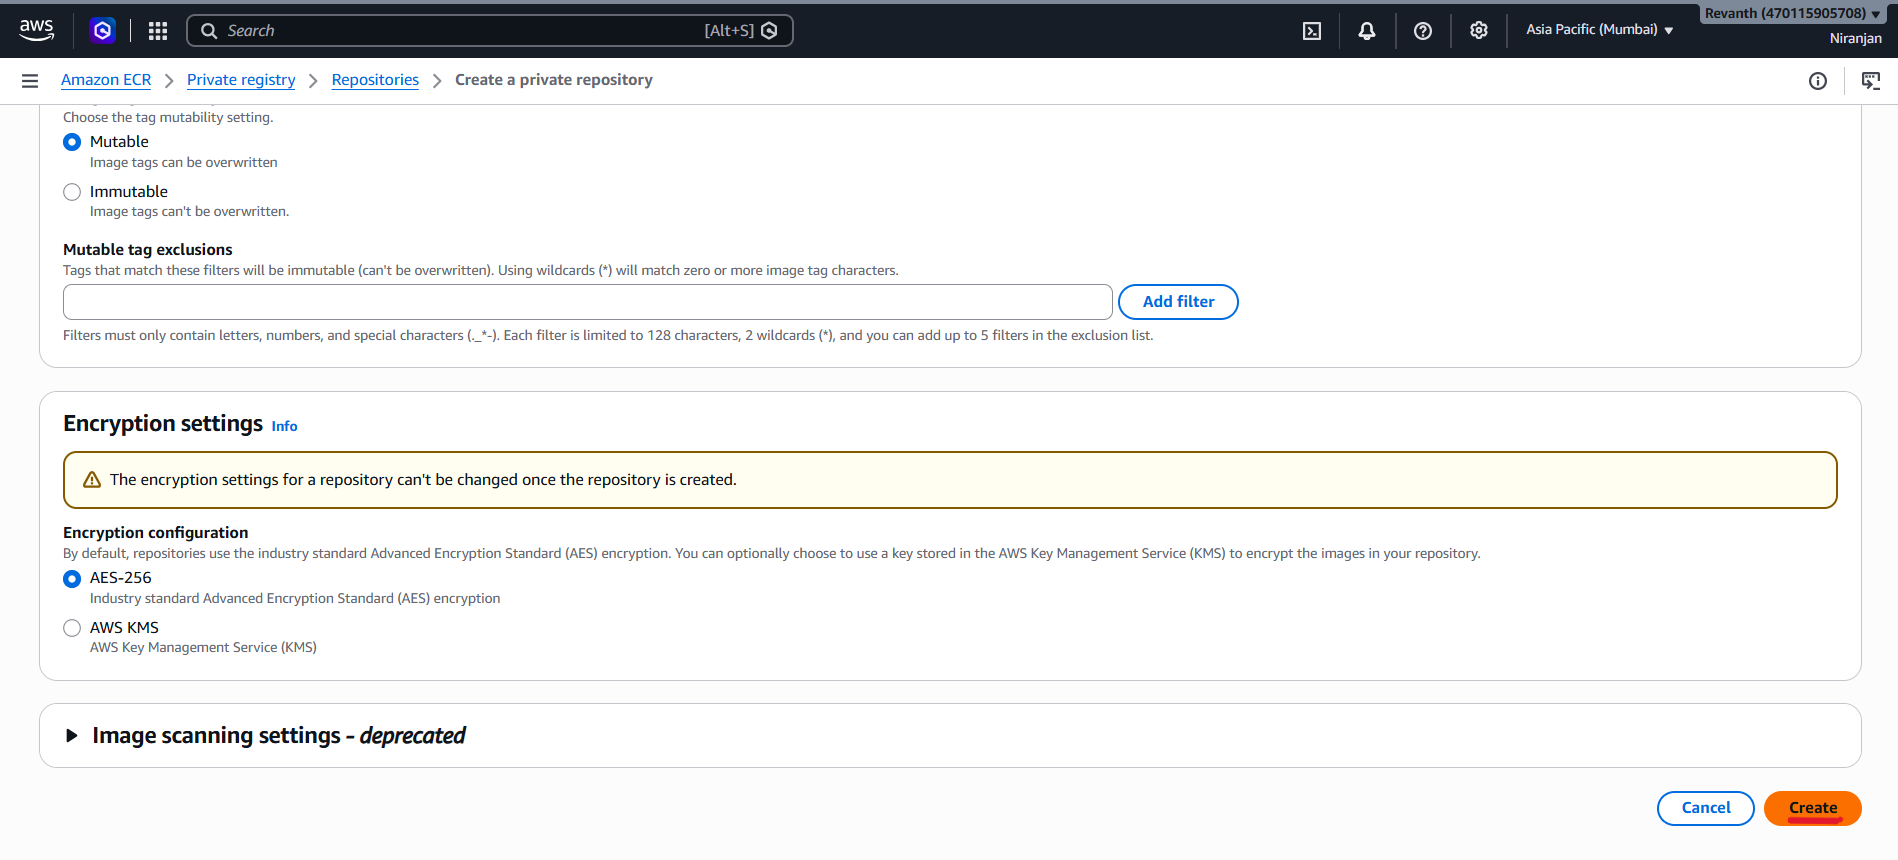
- Click Create repository.
5.3.2 Create the Remaining Repositories
Repeat the same steps for the other three services.
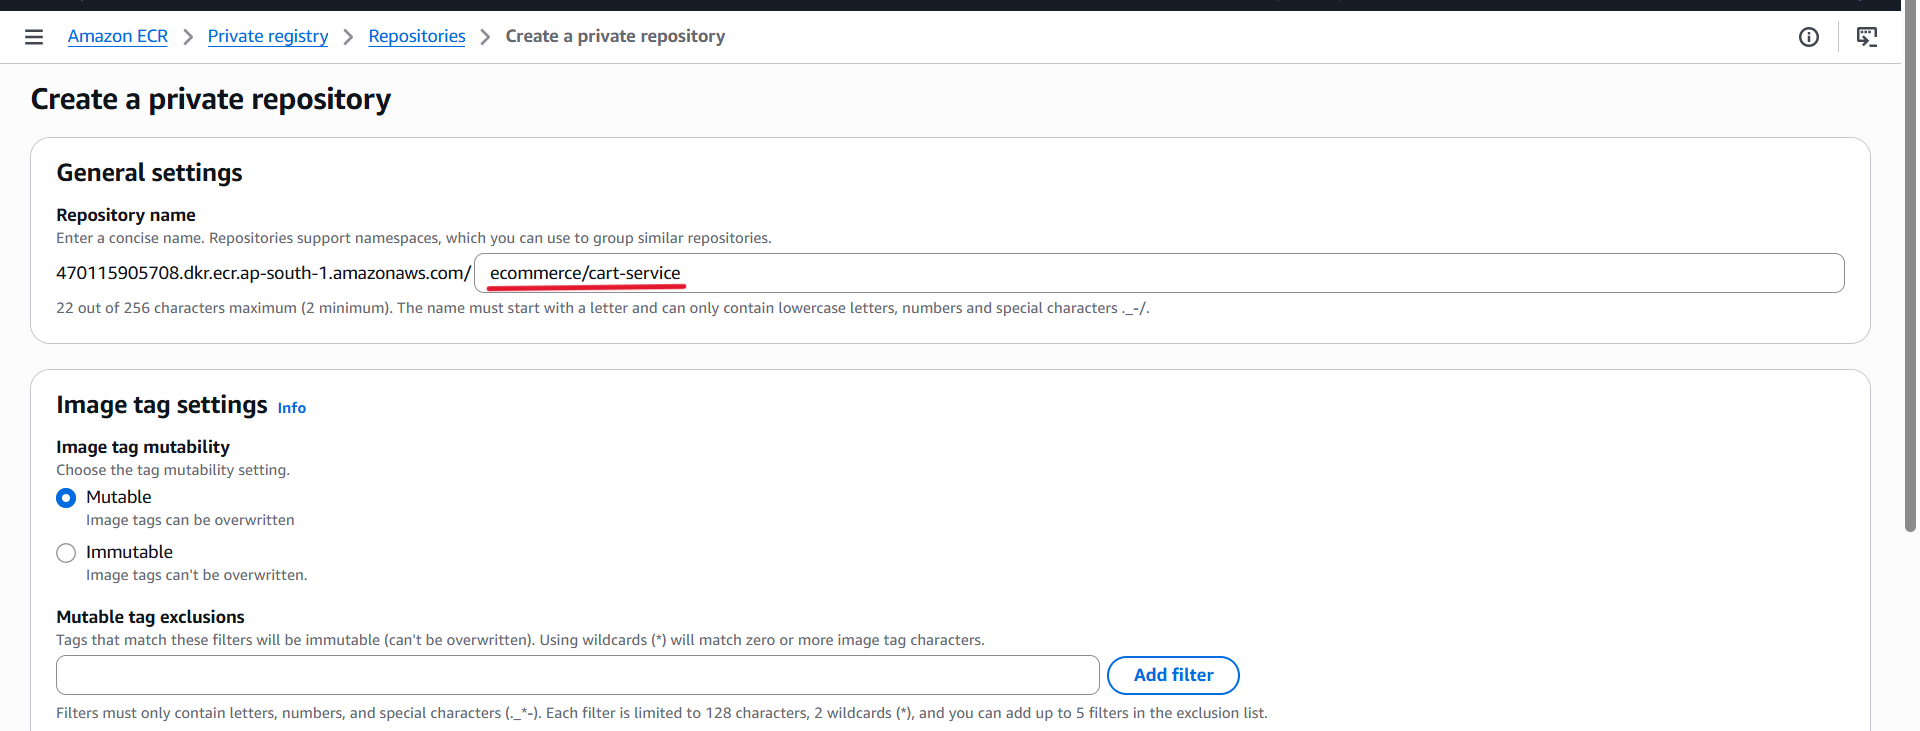
- ecommerce/cart-service
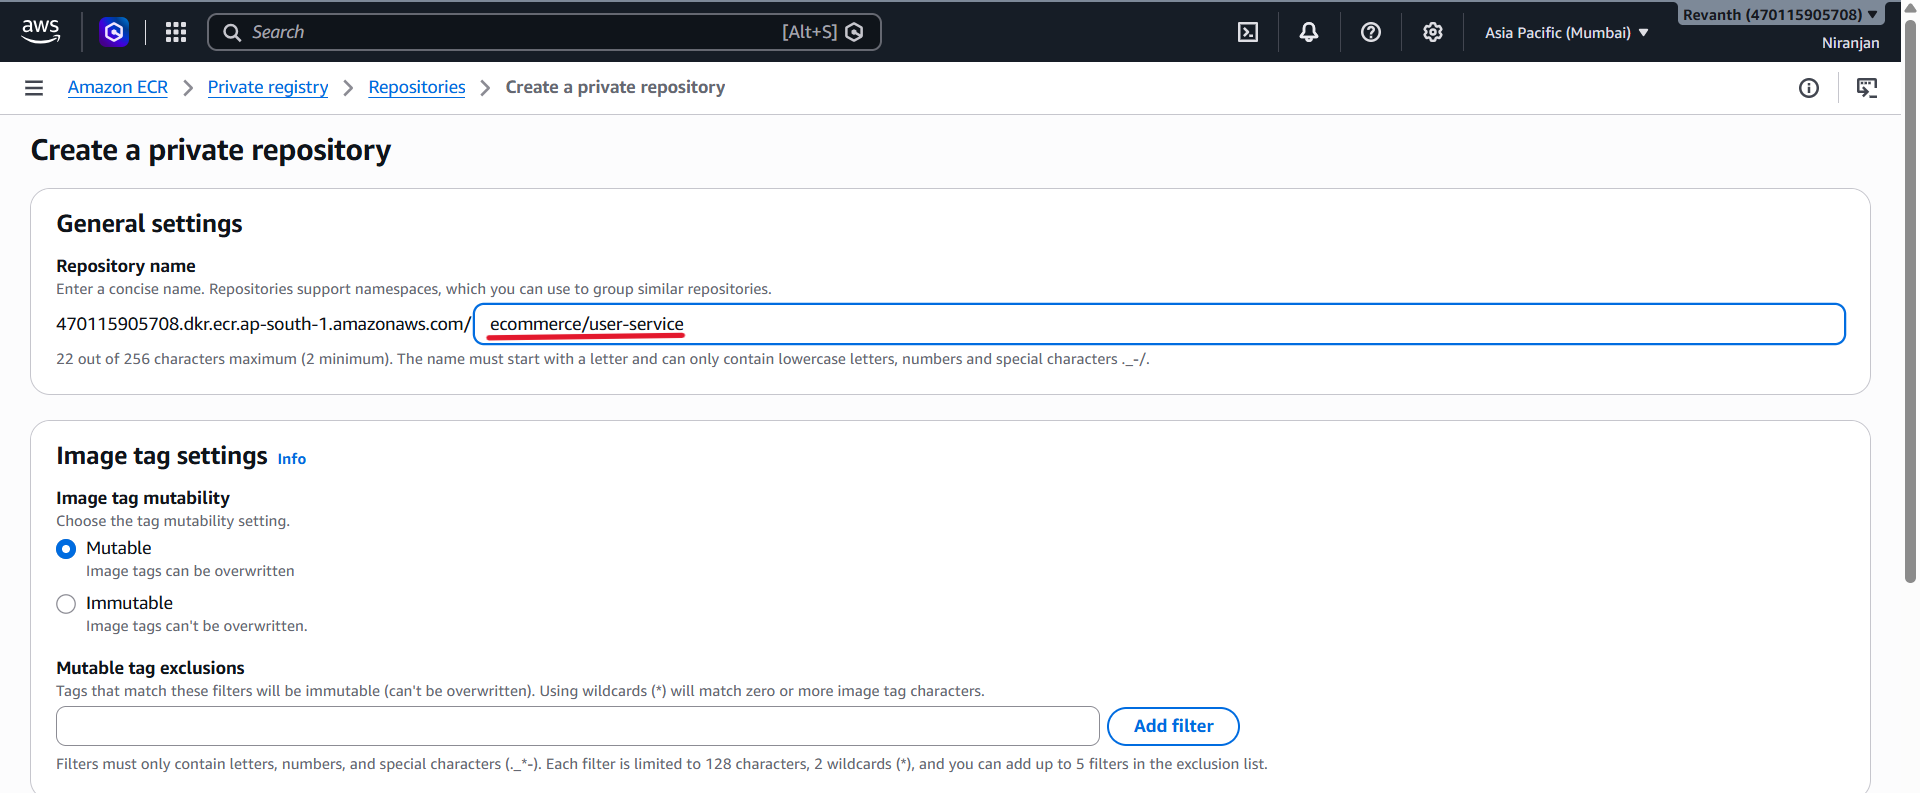
- ecommerce/user-service
- ecommerce/order-service
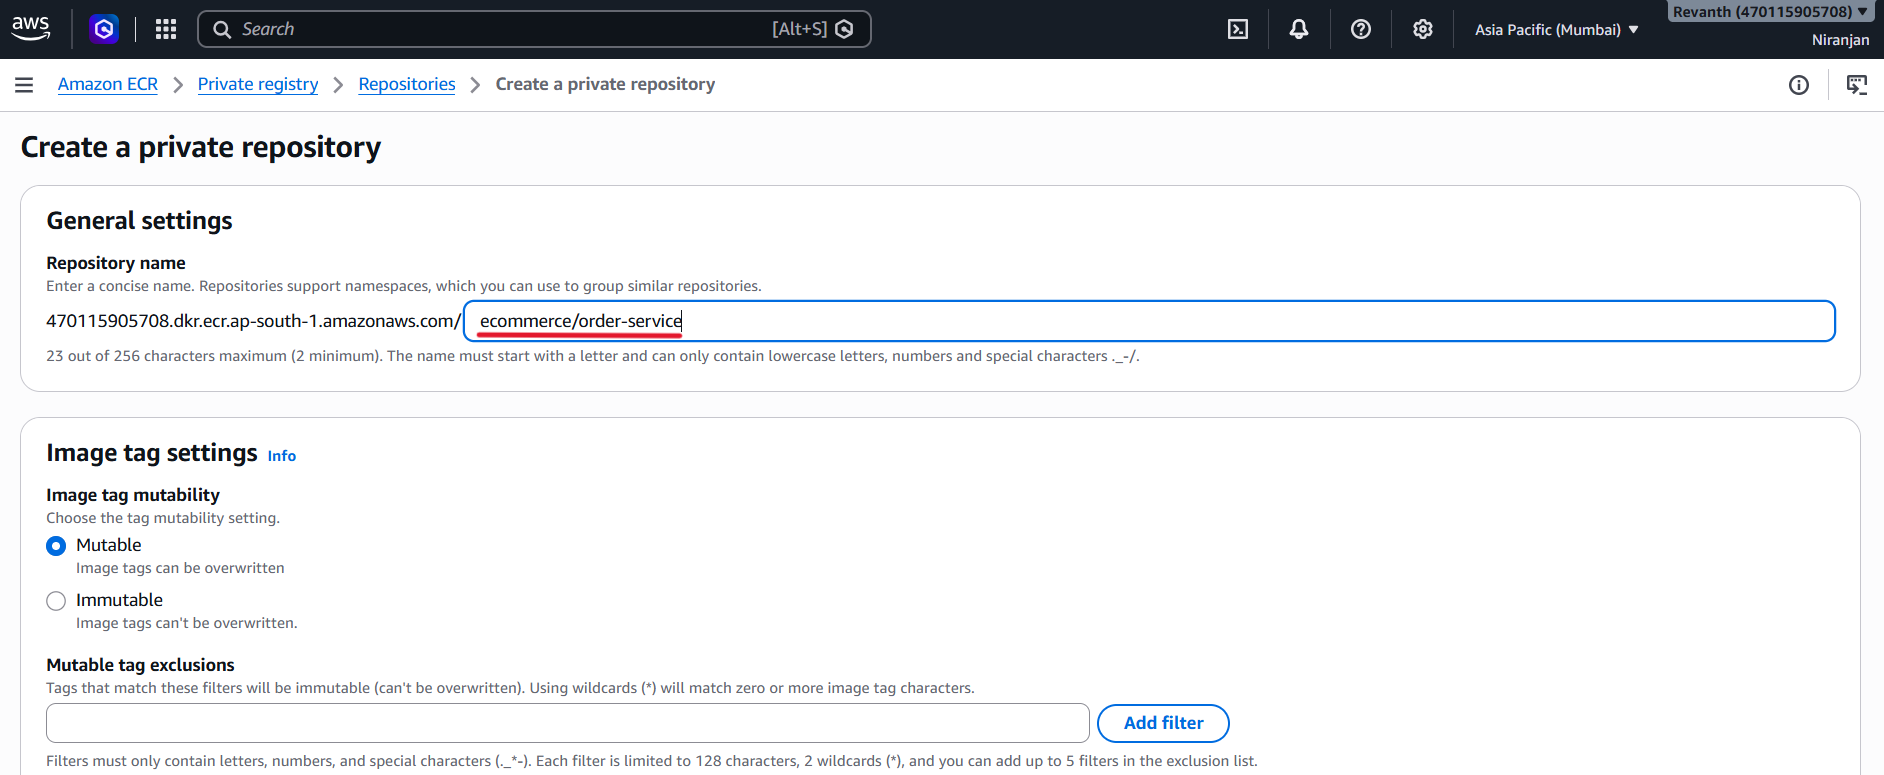
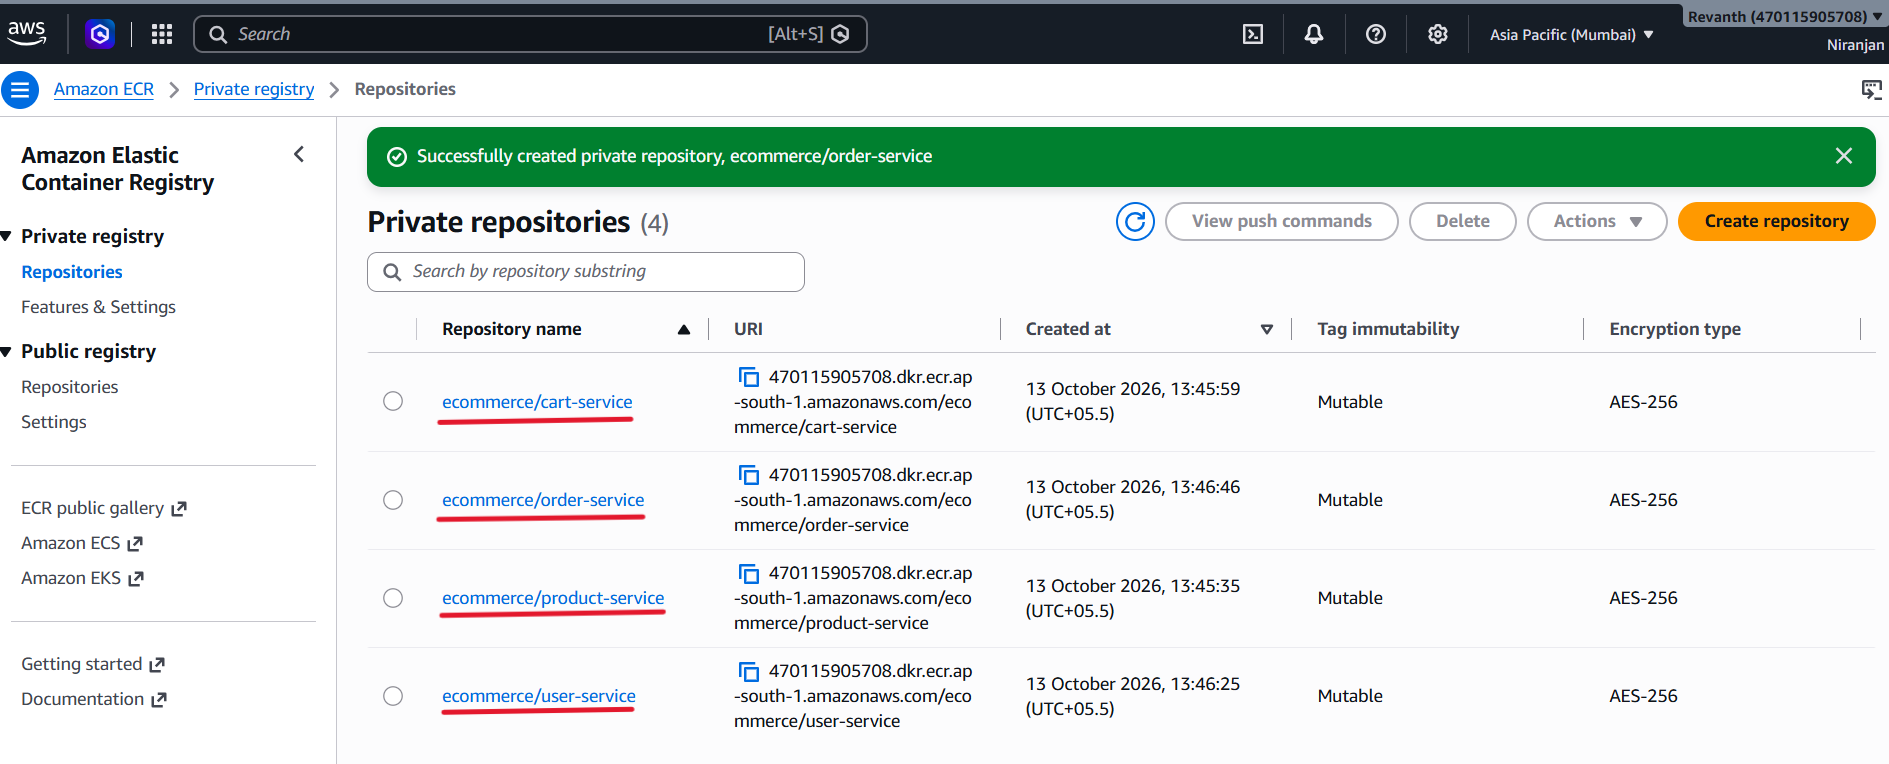
Verify that all four repositories have been created successfully.
| Service | ECR Repository Name |
|---|---|
| Product Service | ecommerce/product-service |
| Cart Service | ecommerce/cart-service |
| User Service | ecommerce/user-service |
| Order Service | ecommerce/order-service |
5.4 Build and Push Docker Images to ECR
Now that the ECR repositories are ready, we need to build Docker images from our local source code and push them to the corresponding repositories.
Important: Run all the commands in this section from your local workstation, where the project source code is available.
5.4.1 Get the ECR Registry URL
The ECR registry URL follows this format:
<account-id>.dkr.ecr.<your-region>.amazonaws.com
Where:
- Account ID: Your 12-digit AWS account ID.
- Region: Your AWS region, for example,
ap-south-1.
You can get the registry URL from:
ECR Console → Repositories → Select a repository → Copy URI
The registry URL is the part before the repository name.
5.4.2 Authenticate Docker with ECR
- Before pushing images, we need to authenticate Docker with our ECR registry.
- Run the following command:
aws ecr get-login-password --region <your-region> | docker login --username AWS --password-stdin <account-id>.dkr.ecr.<your-region>.amazonaws.com

- Replace the account ID and region with your actual AWS details.
- For this project, the AWS region is:
ap-south-1
After running the command, you should see:
Login Succeeded
5.4.3 Build and Push the Product Service Image
- First, navigate to the Product Service directory:
cd services/product-service

- Make sure that the directory contains the Dockerfile.
Step 1: Build the Docker image
docker build -t ecommerce/product-service .
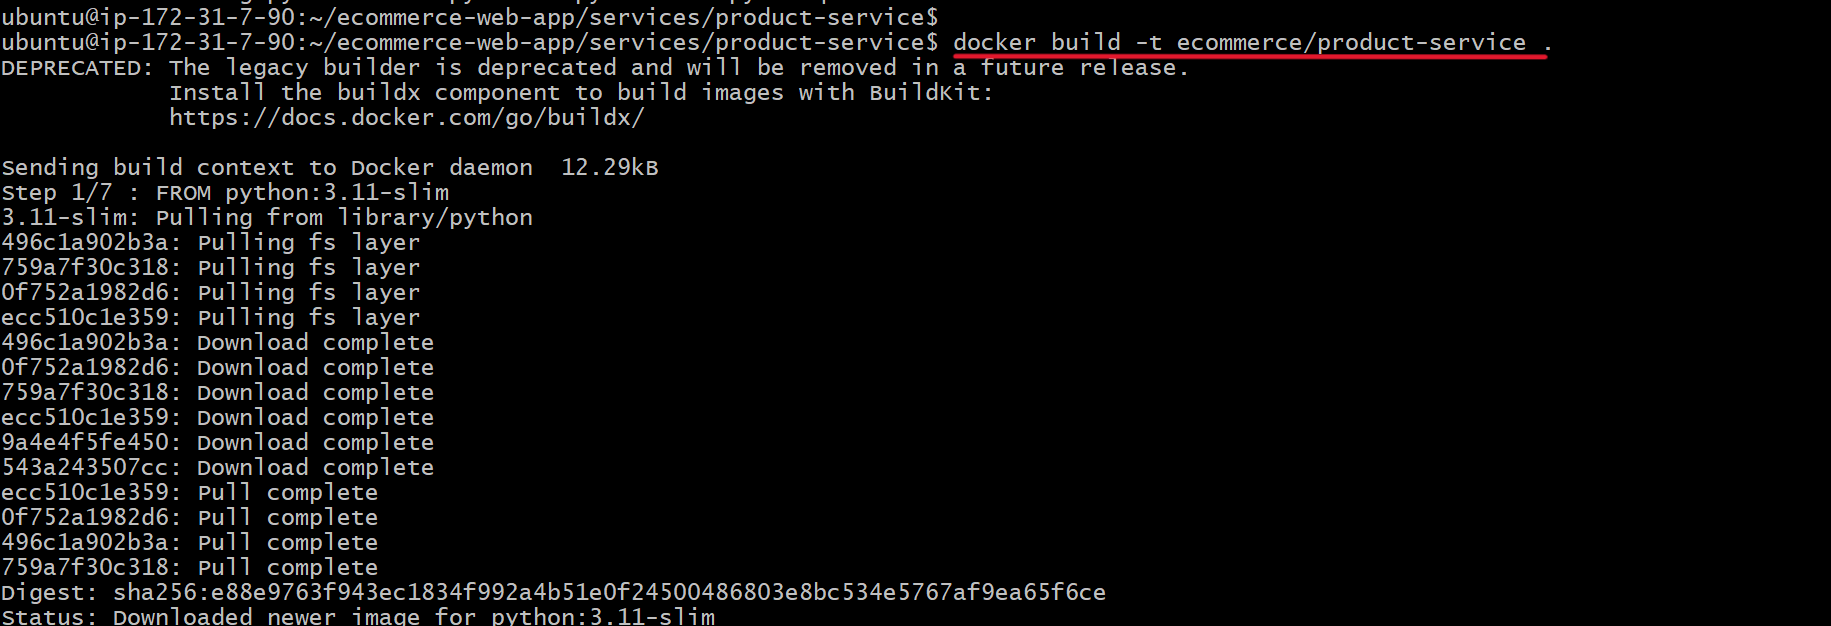
- The command builds the Docker image using the Dockerfile in the current directory.
Step 2: Tag the Docker image
docker tag ecommerce/product-service:latest <account-id>.dkr.ecr.<your-region>.amazonaws.com/ecommerce/product-service:latest
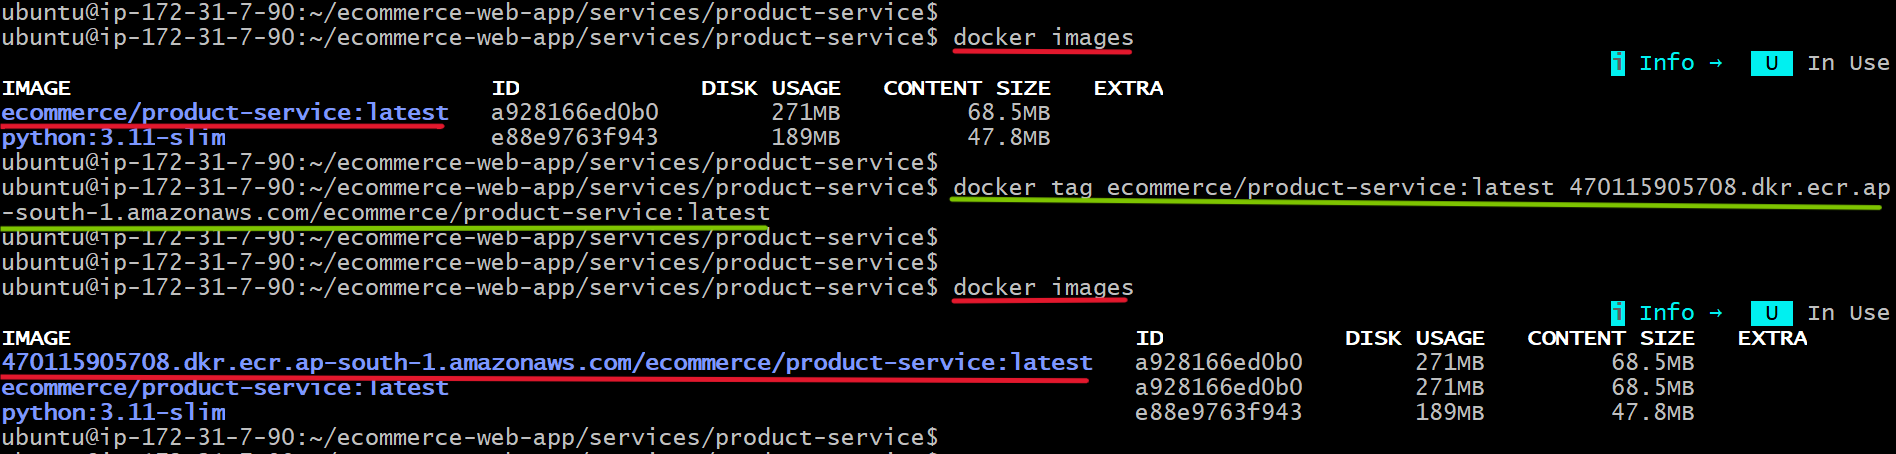
- Replace the account ID and region with your actual values.
Step 3: Push the image to ECR
docker push <account-id>.dkr.ecr.<your-region>.amazonaws.com/ecommerce/product-service:latest
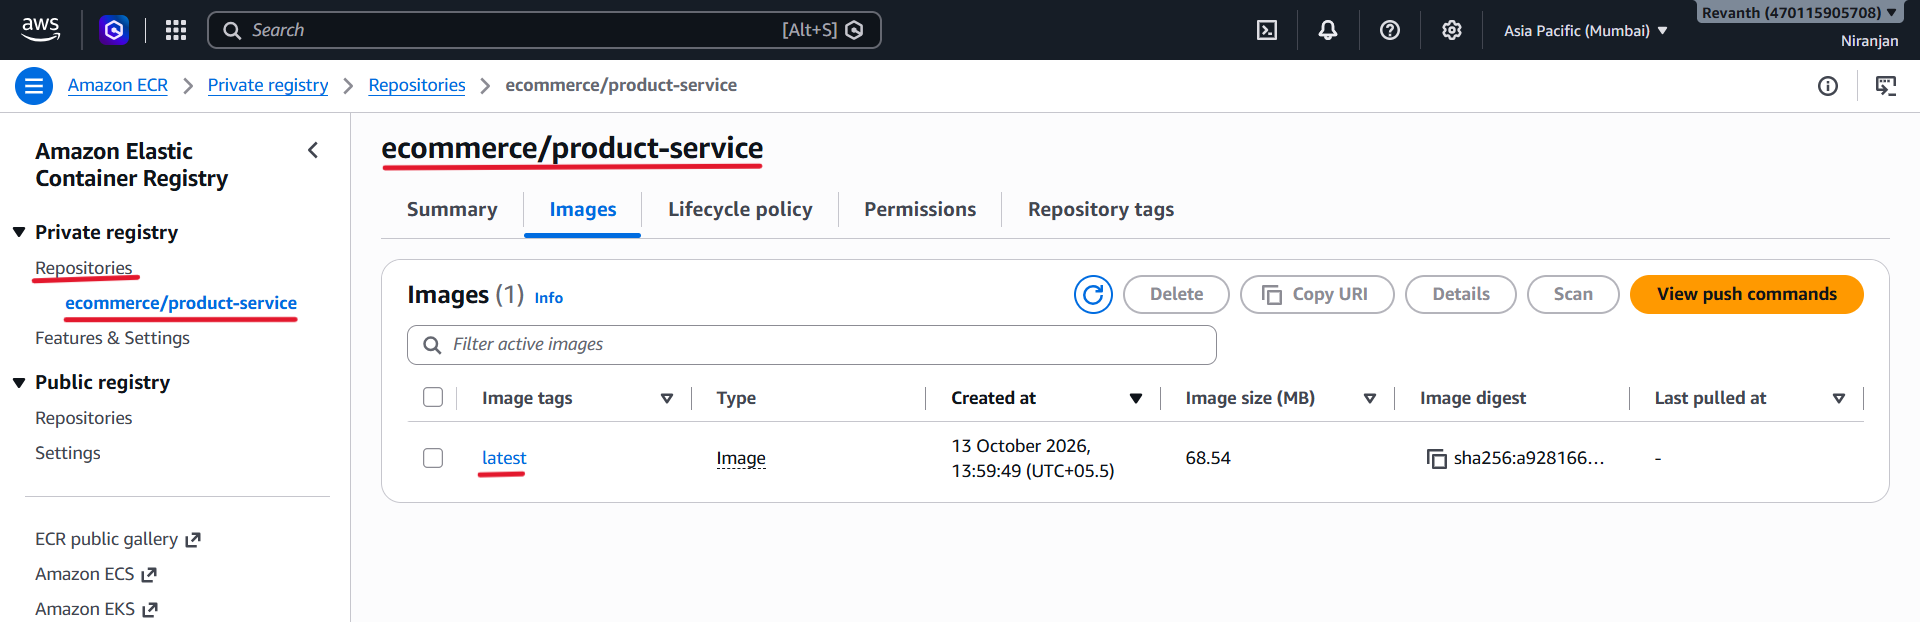
- After the push completes, open the Product Service repository in ECR and verify that the
latestimage is available.
5.4.4 Build and Push the Cart Service Image
- Navigate to the Cart Service directory:
cd ../cart-service
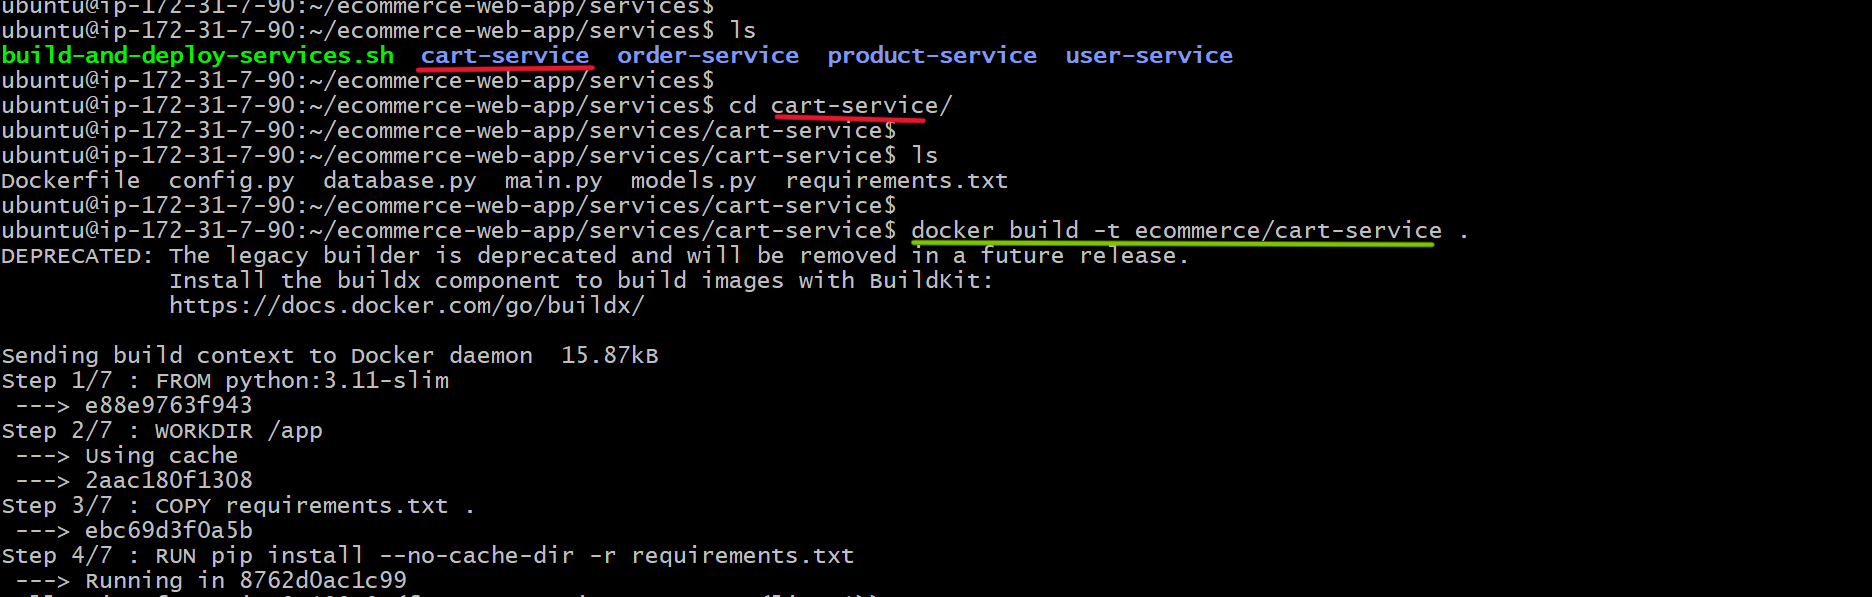
- Build the Docker image:
docker build -t ecommerce/cart-service .
- Tag the image:
docker tag ecommerce/cart-service:latest <account-id>.dkr.ecr.<your-region>.amazonaws.com/ecommerce/cart-service:latest
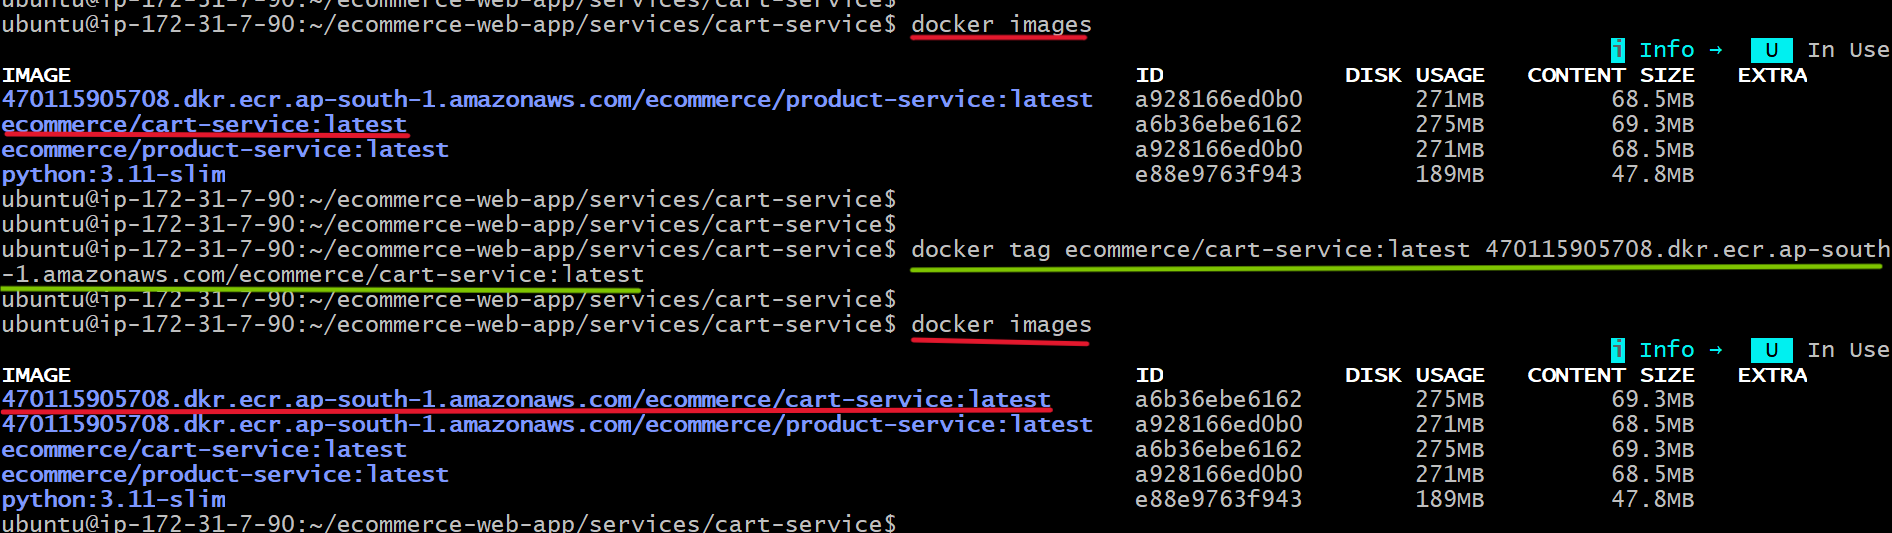
Push the image:
docker push <account-id>.dkr.ecr.<your-region>.amazonaws.com/ecommerce/cart-service:latest
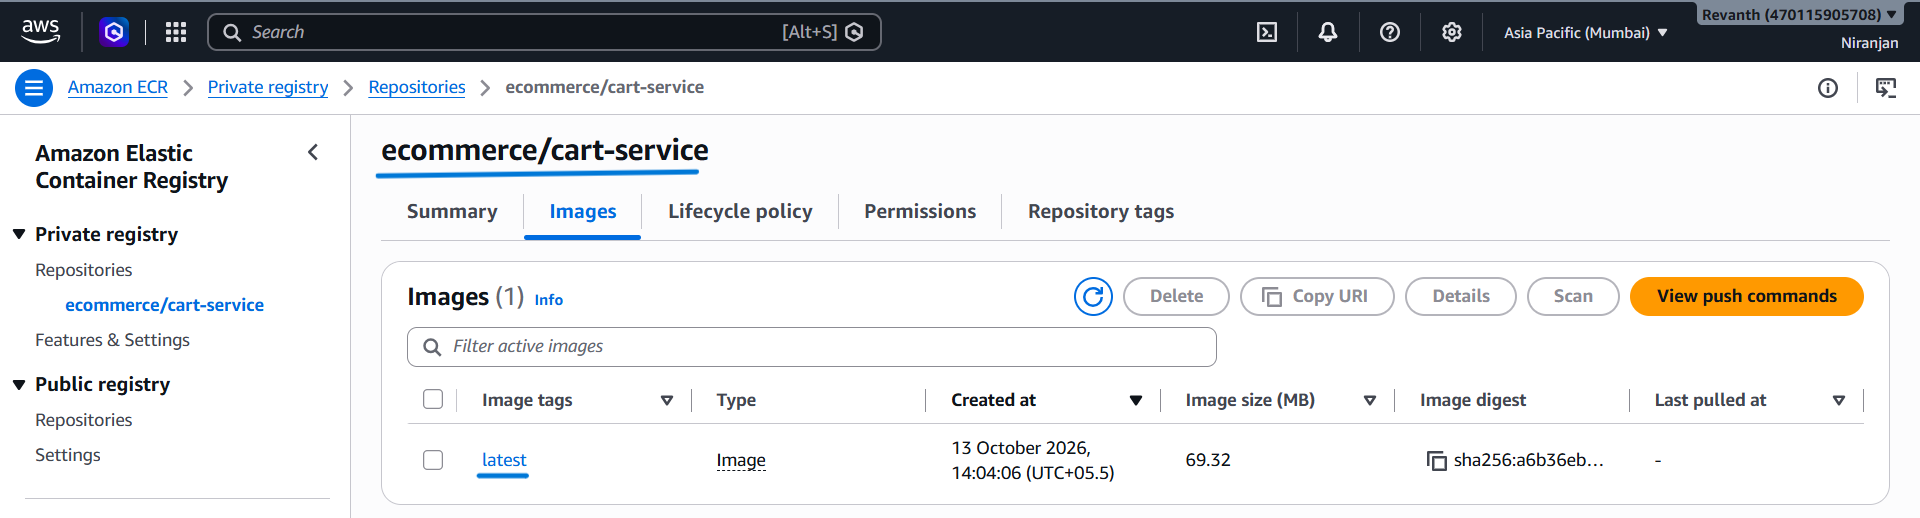
- After the push completes, open the repository in ECR and verify that the
latestimage is available.
5.4.5 Build and Push the User Service Image
Navigate to the User Service directory:
cd ../user-service
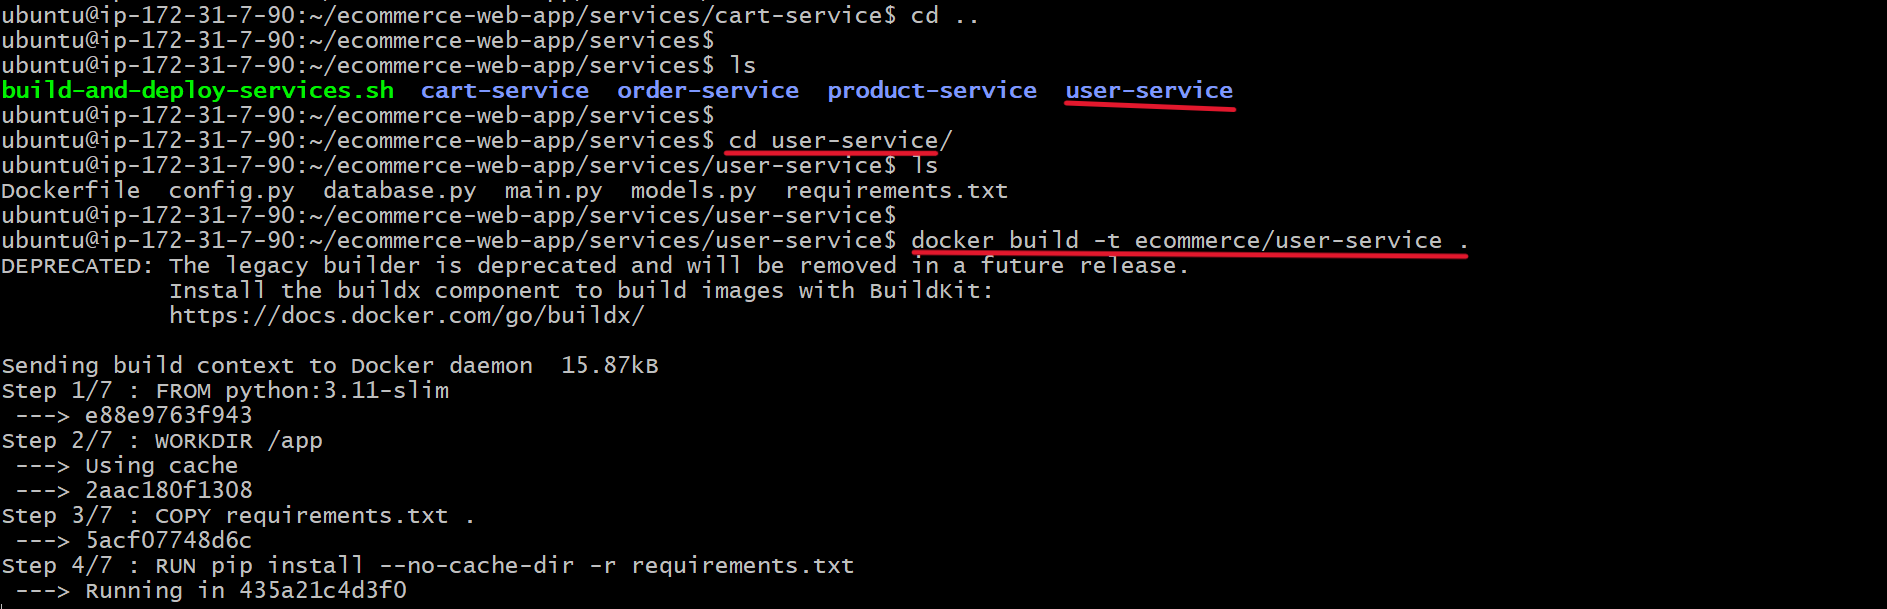
- Build the Docker image.
docker build -t ecommerce/user-service .
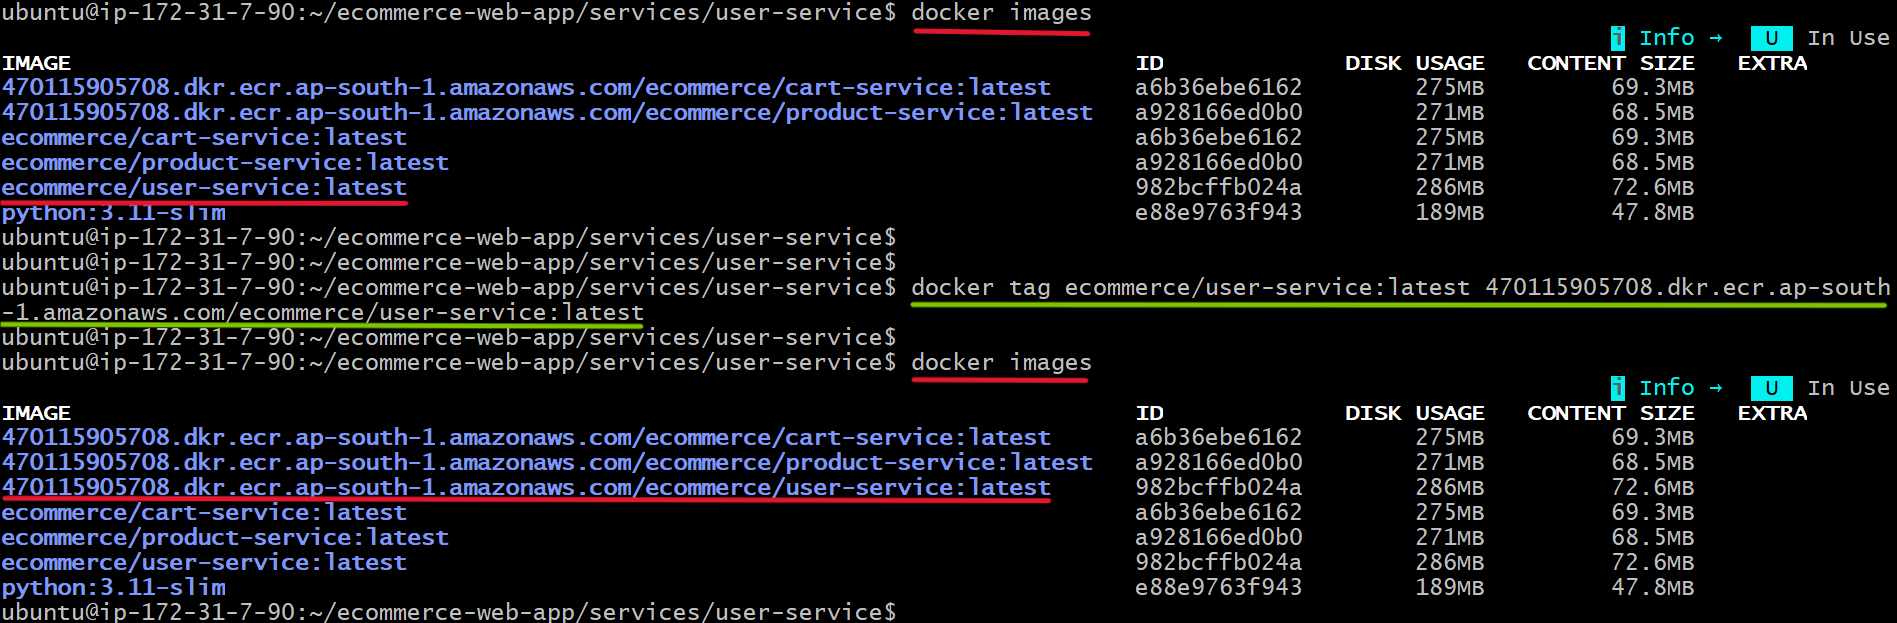
- Tag the image:
docker tag ecommerce/user-service:latest <account-id>.dkr.ecr.<your-region>.amazonaws.com/ecommerce/user-service:latest
- Push the image:
docker push <account-id>.dkr.ecr.<your-region>.amazonaws.com/ecommerce/user-service:latest
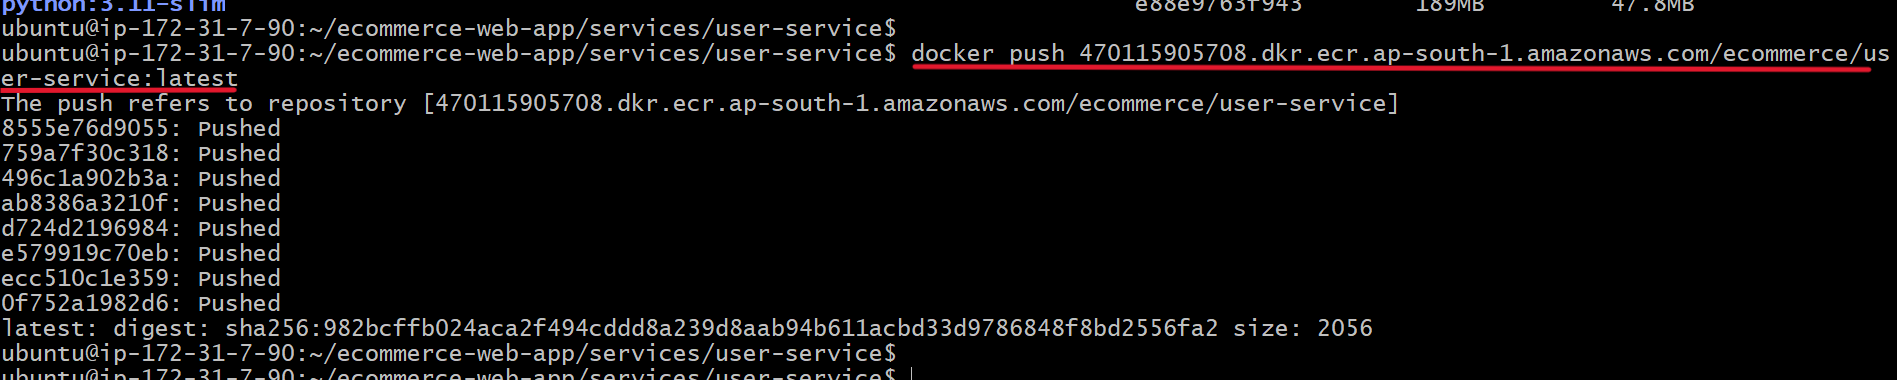
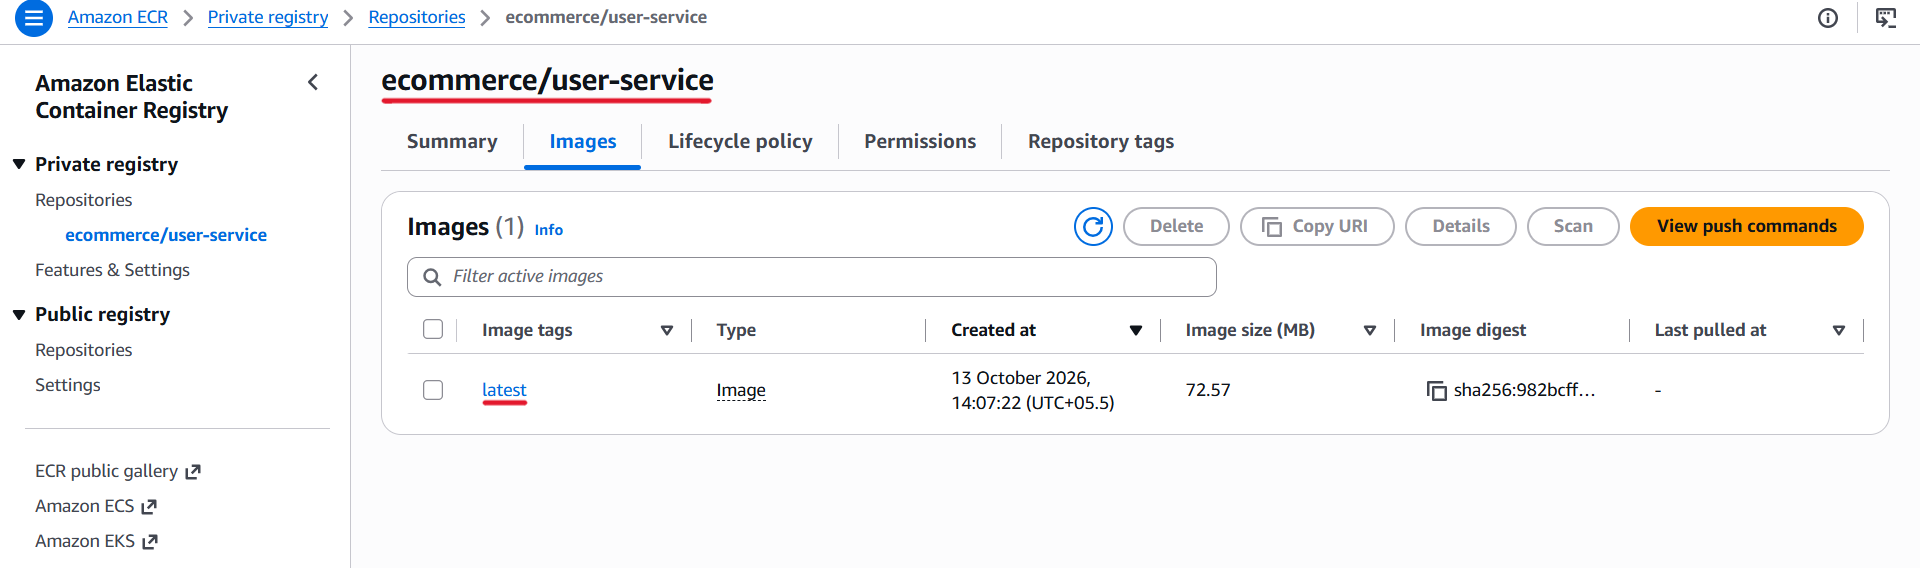
- After the push completes, open the repository in ECR and verify that the
latestimage is available.
5.4.6 Build and Push the Order Service Image
Navigate to the Order Service directory:
cd ../order-service
- Build the Docker image.
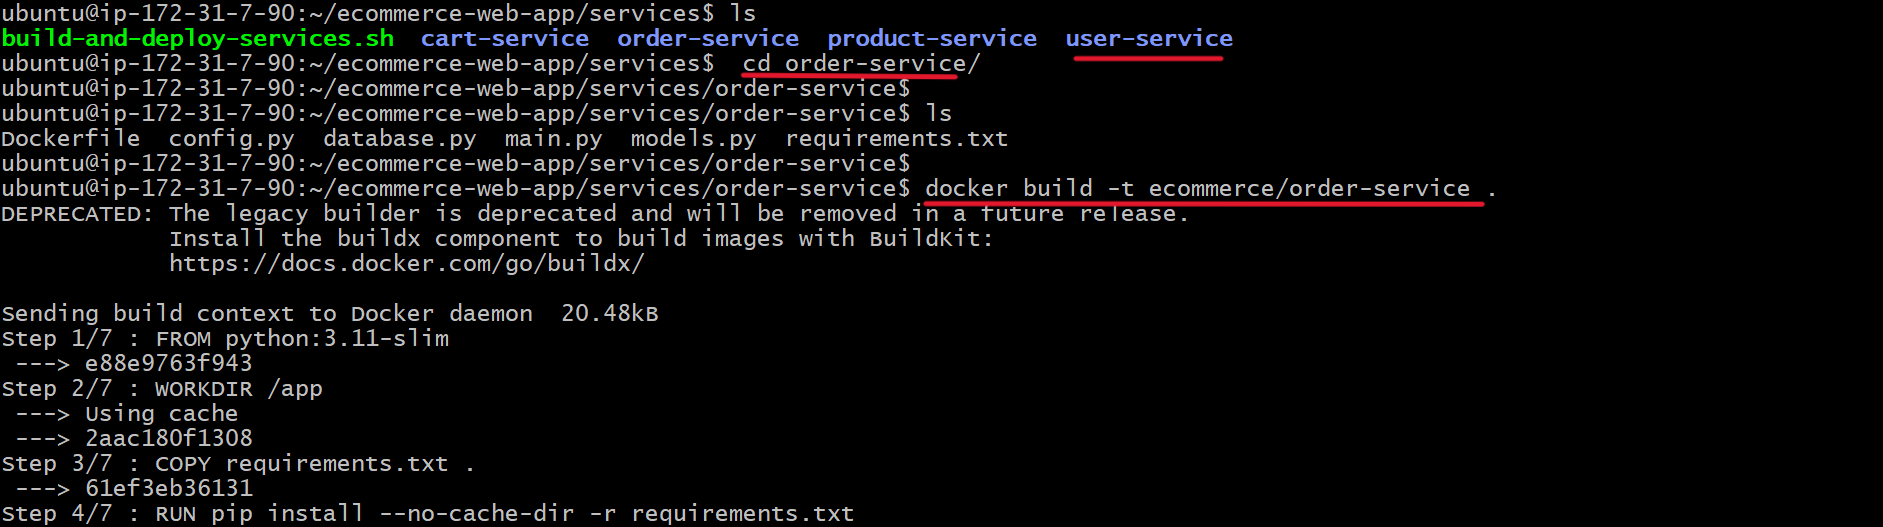
docker build -t ecommerce/order-service .
- Tag the image:
docker tag ecommerce/order-service:latest <account-id>.dkr.ecr.<your-region>.amazonaws.com/ecommerce/order-service:latest
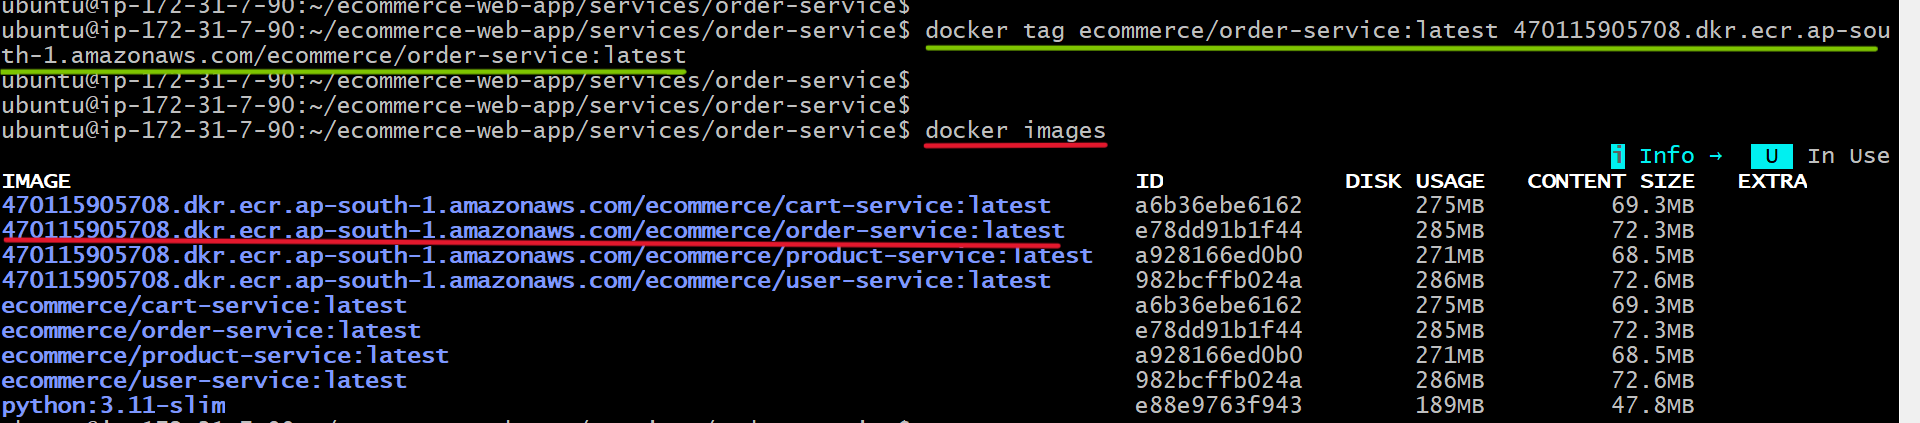
- Push the image:
docker push <account-id>.dkr.ecr.<your-region>.amazonaws.com/ecommerce/order-service:latest

- After the push completes, open the repository in ECR and verify that the
latestimage is available.
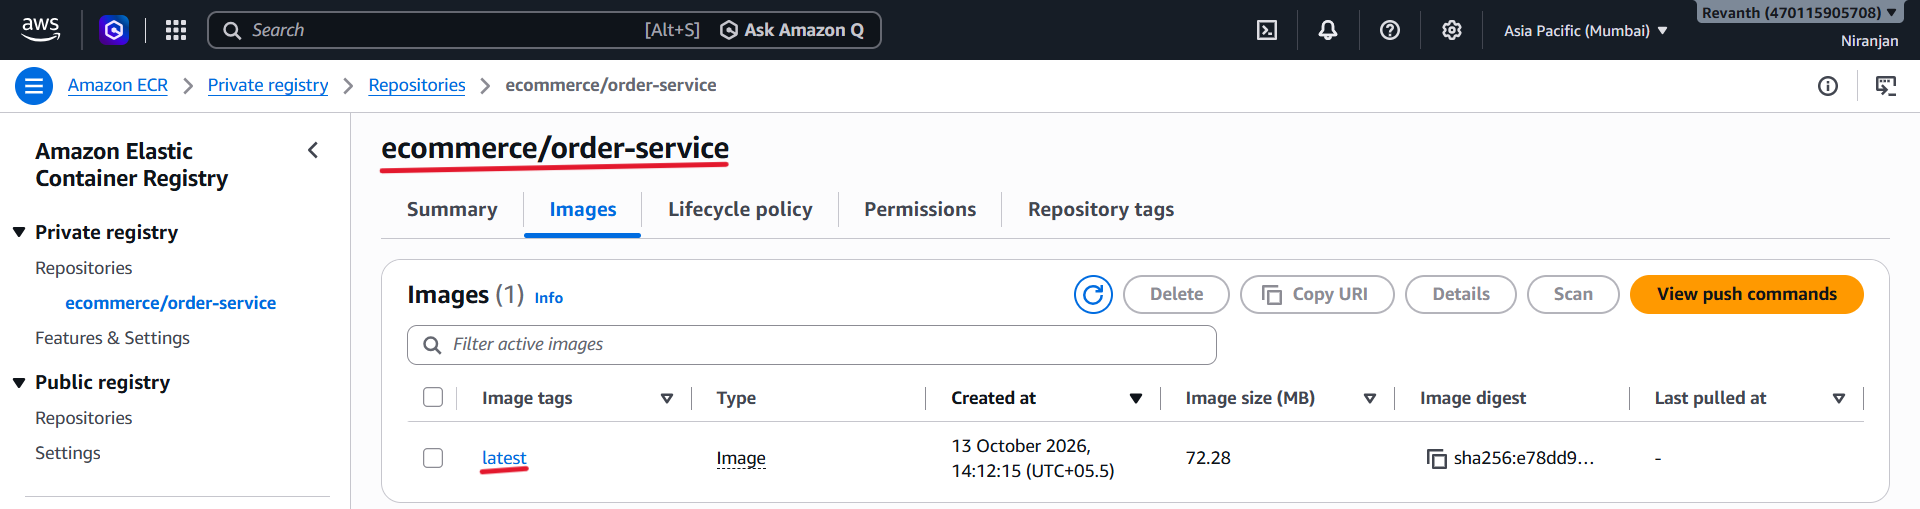
5.4.7 Verify All Images in ECR
Open the ECR console and verify that all four repositories contain their respective latest images.
5.5 Create an IAM Role for ECS Tasks
The backend containers need permission to communicate with other AWS services such as DynamoDB, Systems Manager Parameter Store, CloudWatch Logs, S3, and SNS.
We will create an IAM role and attach the required permissions to it.
5.5.1 Create the ECS Task Role
- IAM Console → Roles → Create role
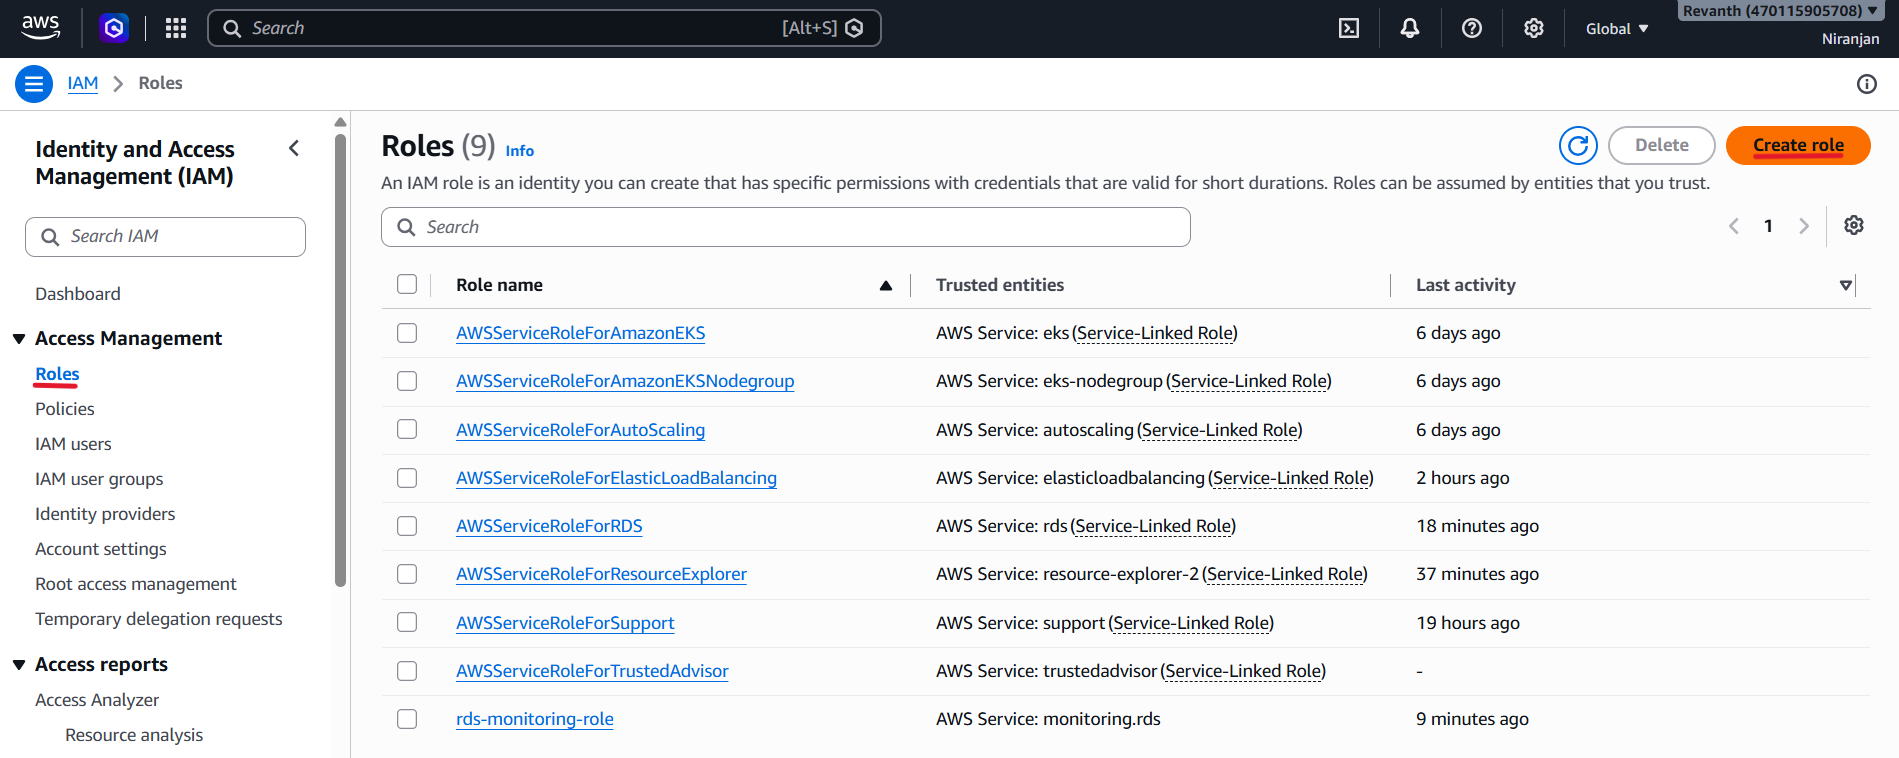
- Trusted entity type: AWS service
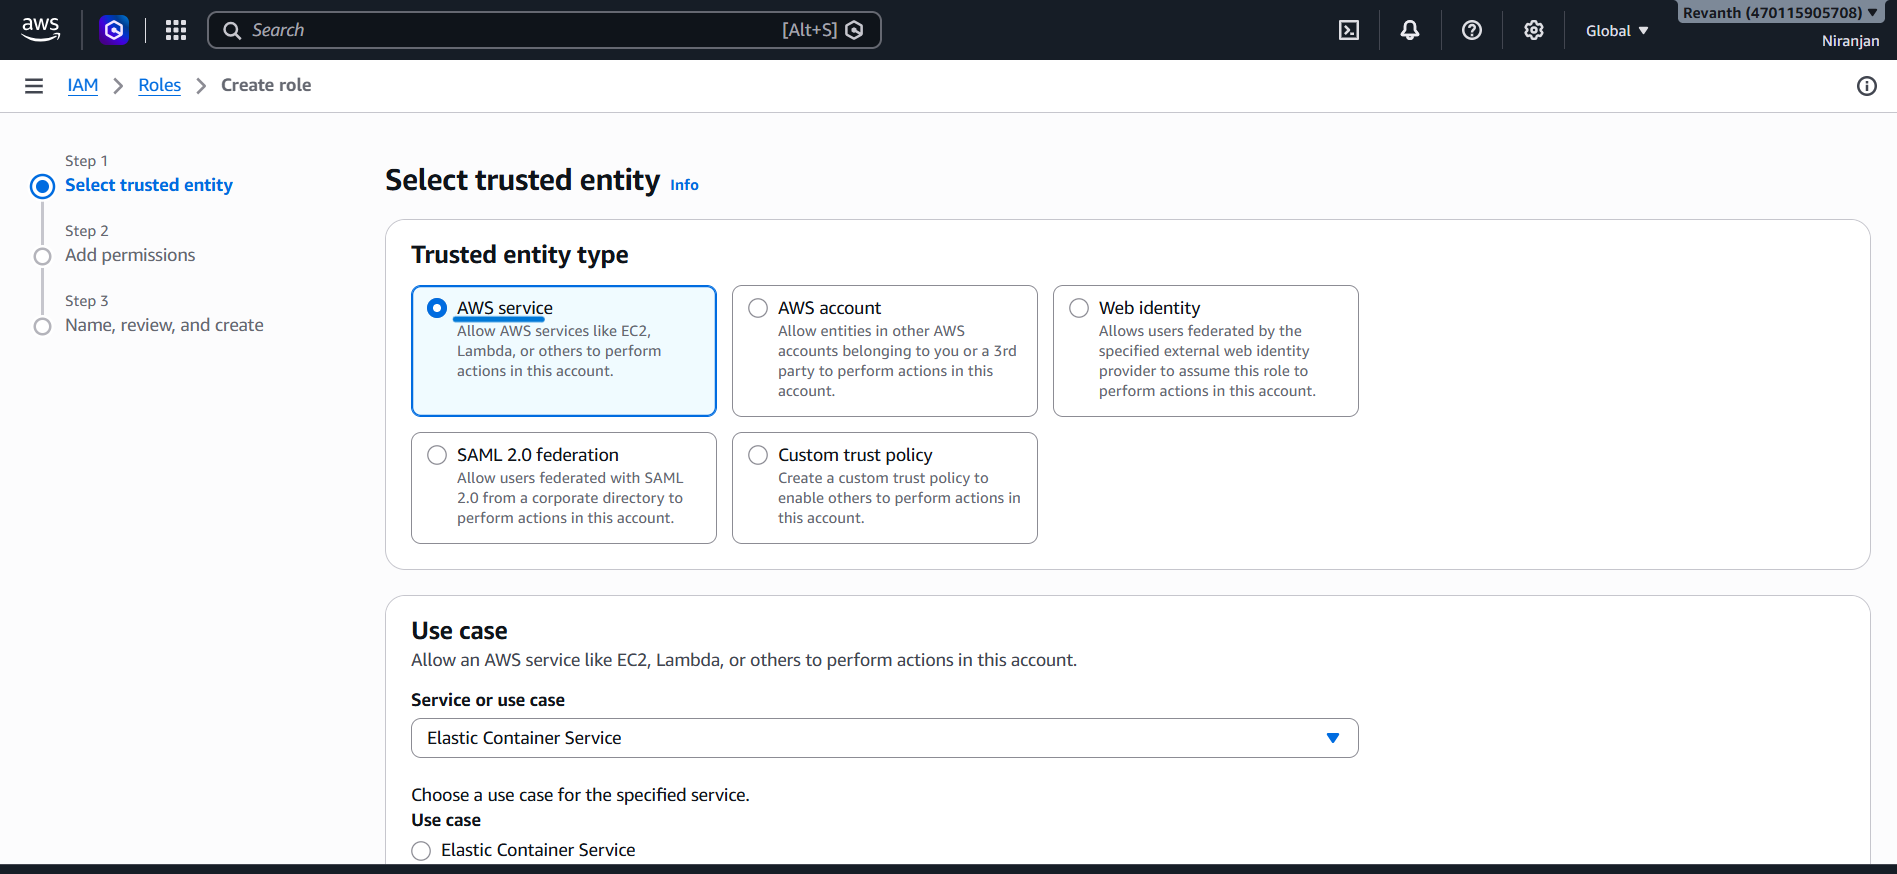
- Service: Elastic Container Service
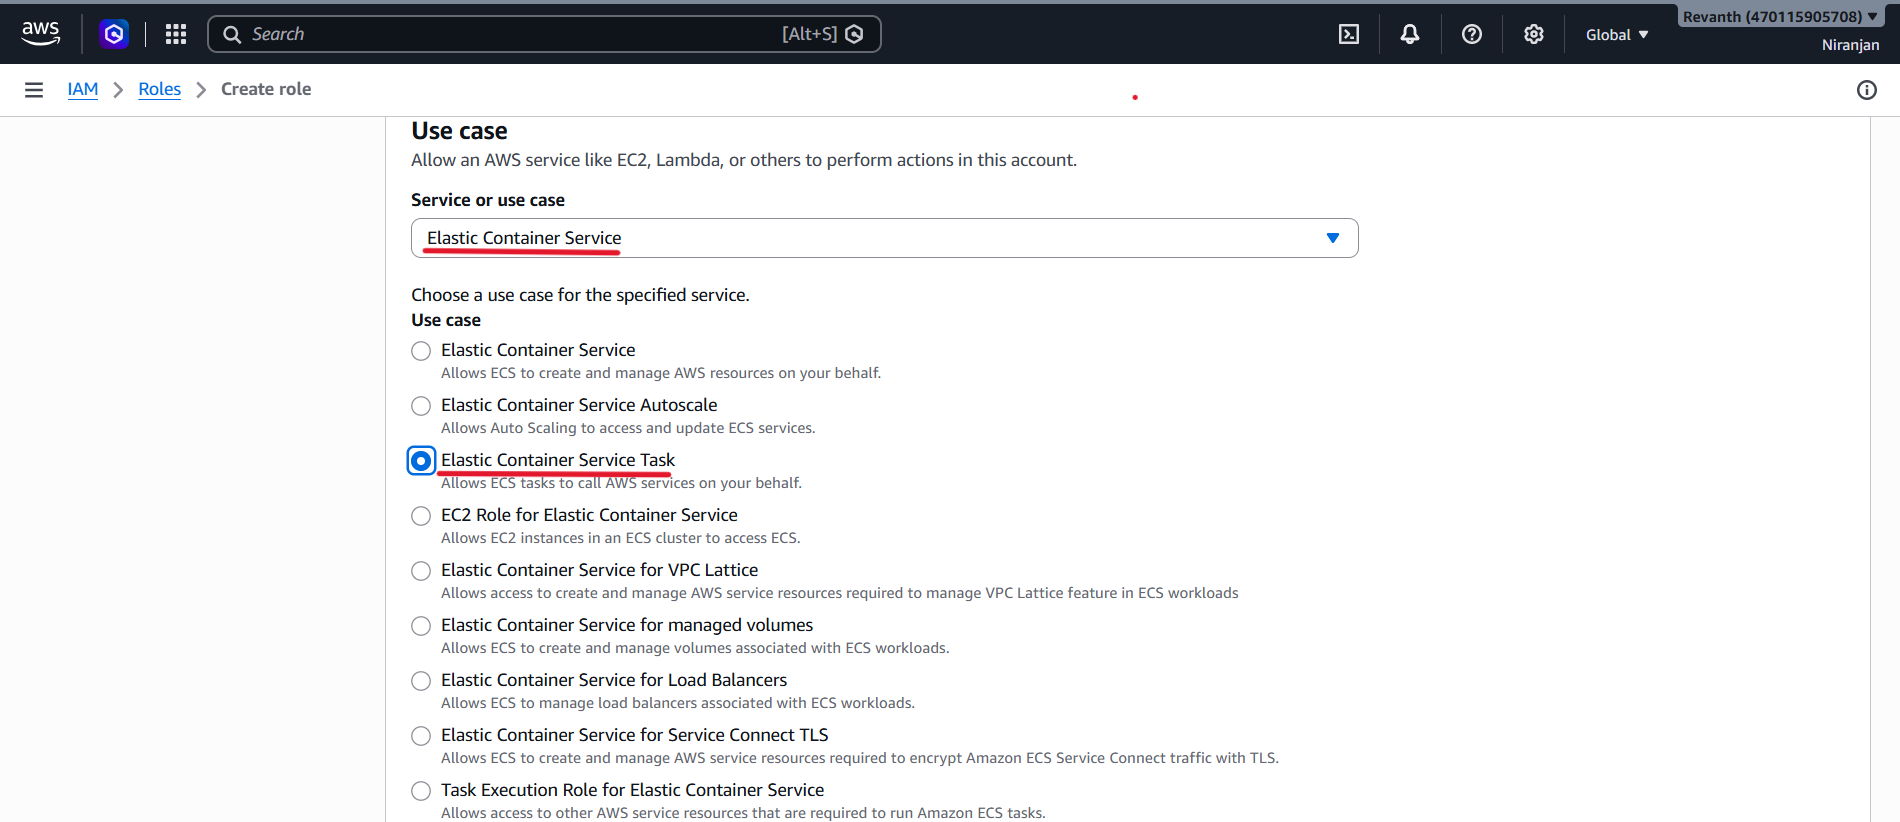
- Use case: Elastic Container Service Task
- Click Next.
5.5.2 Attach Permissions Policies
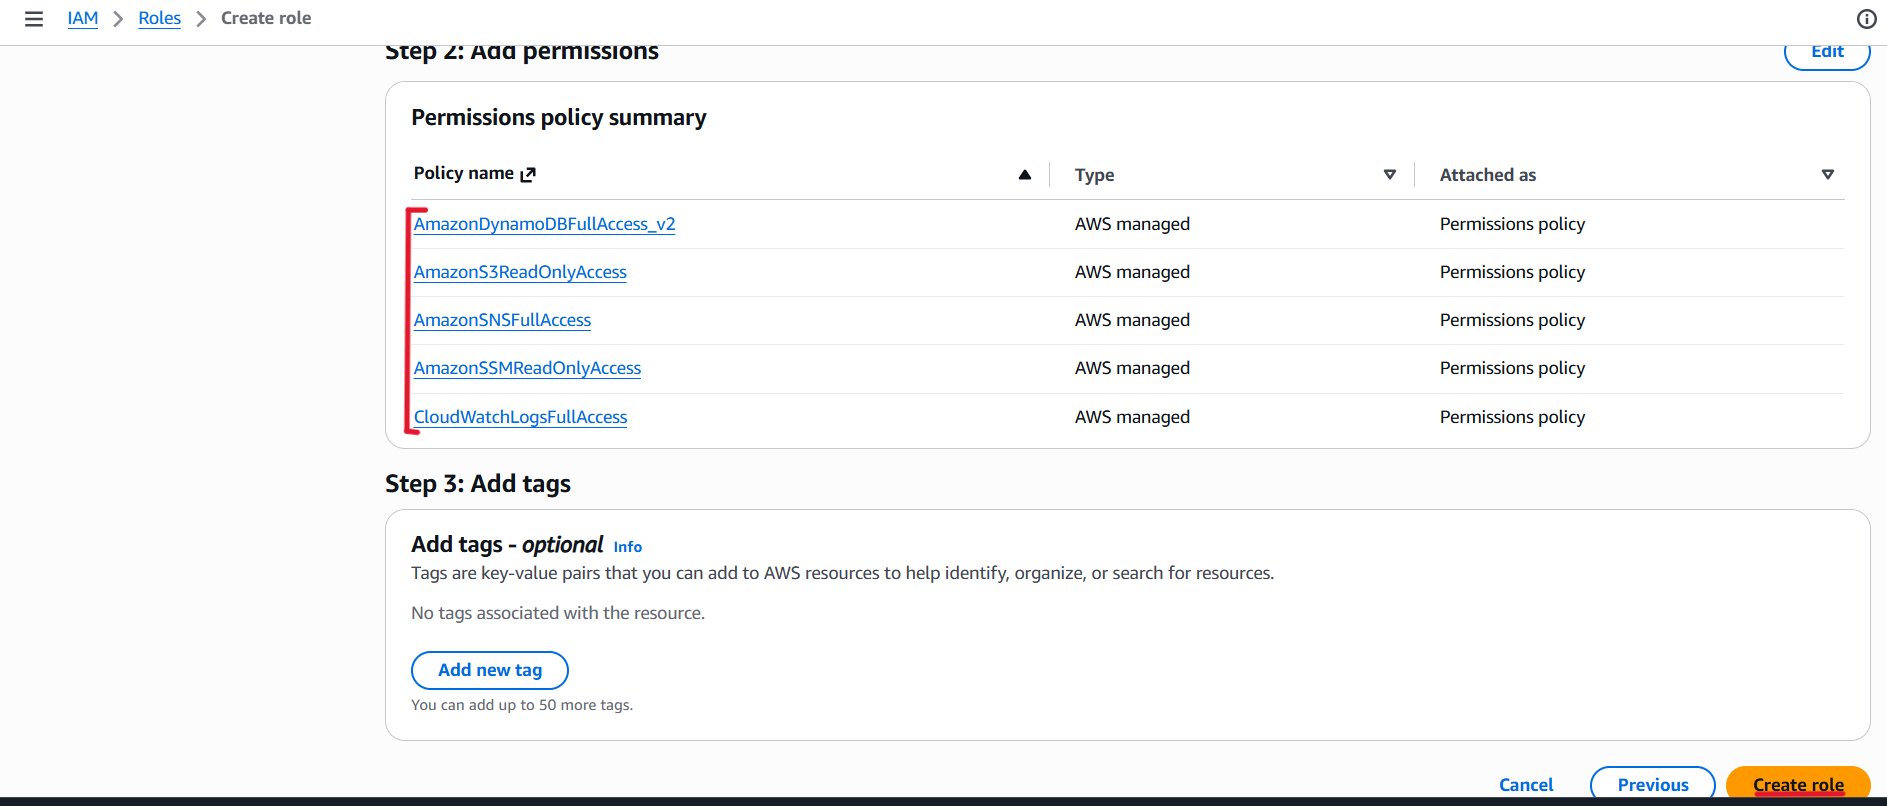
Attach the following AWS managed policies:
AmazonDynamoDBFullAccessAmazonSSMReadOnlyAccessCloudWatchLogsFullAccessAmazonS3ReadOnlyAccessAmazonSNSFullAccess
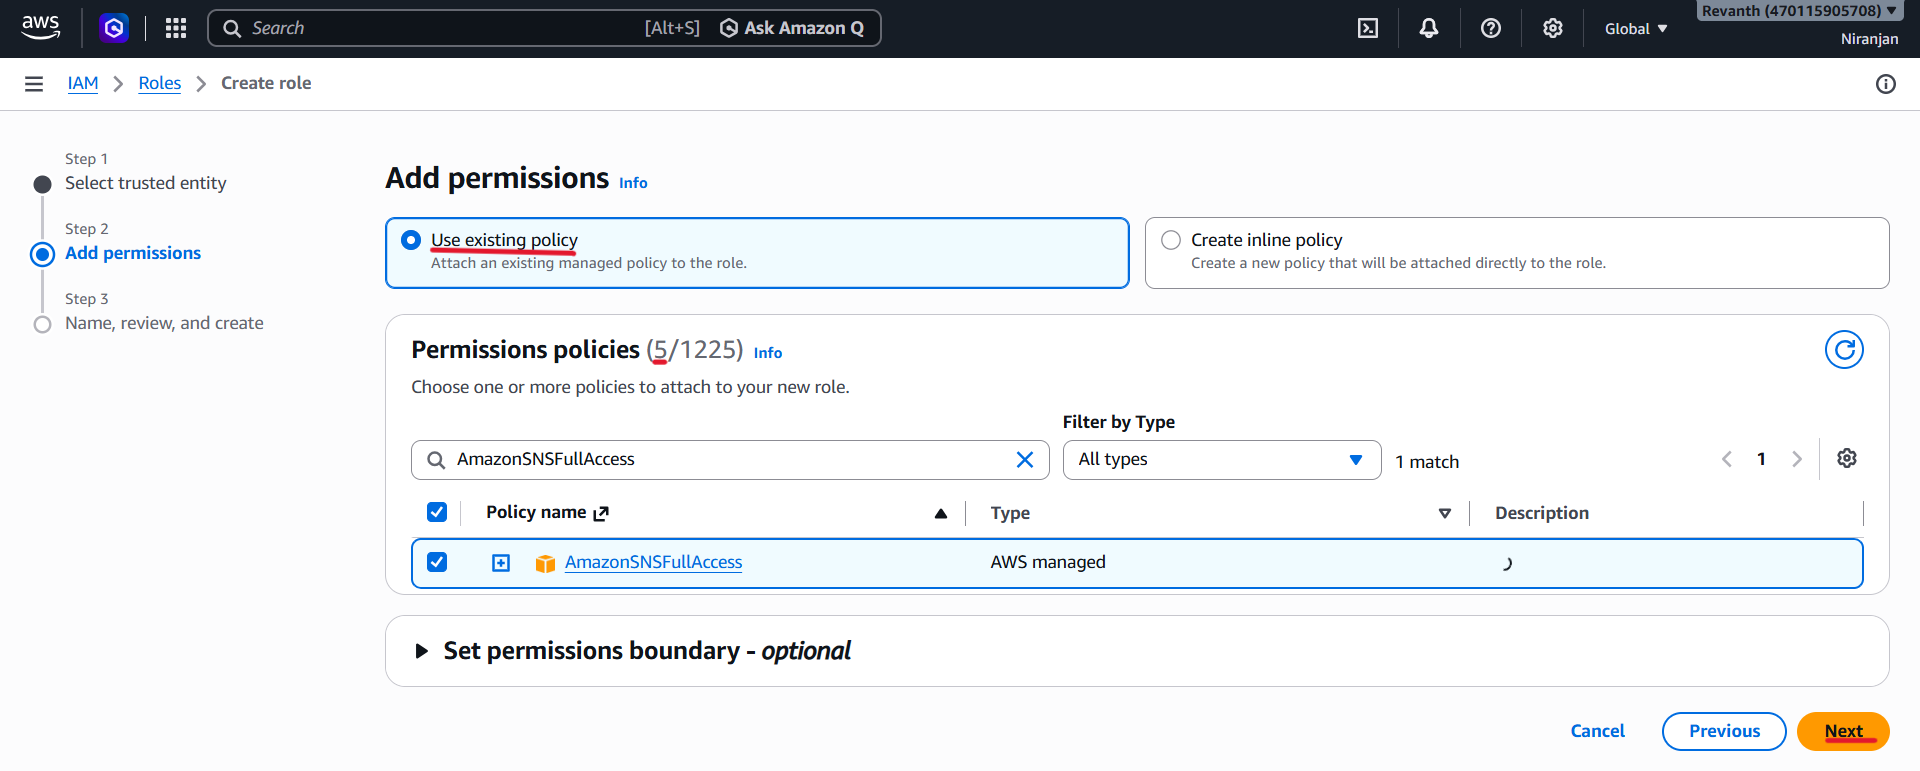
These permissions are used for:
- DynamoDB: Read and write application data.
- Systems Manager: Read configuration values from Parameter Store.
- CloudWatch Logs: Send application logs to CloudWatch.
- S3: Read objects when required by the application.
- SNS: Send notifications from the Order Service.
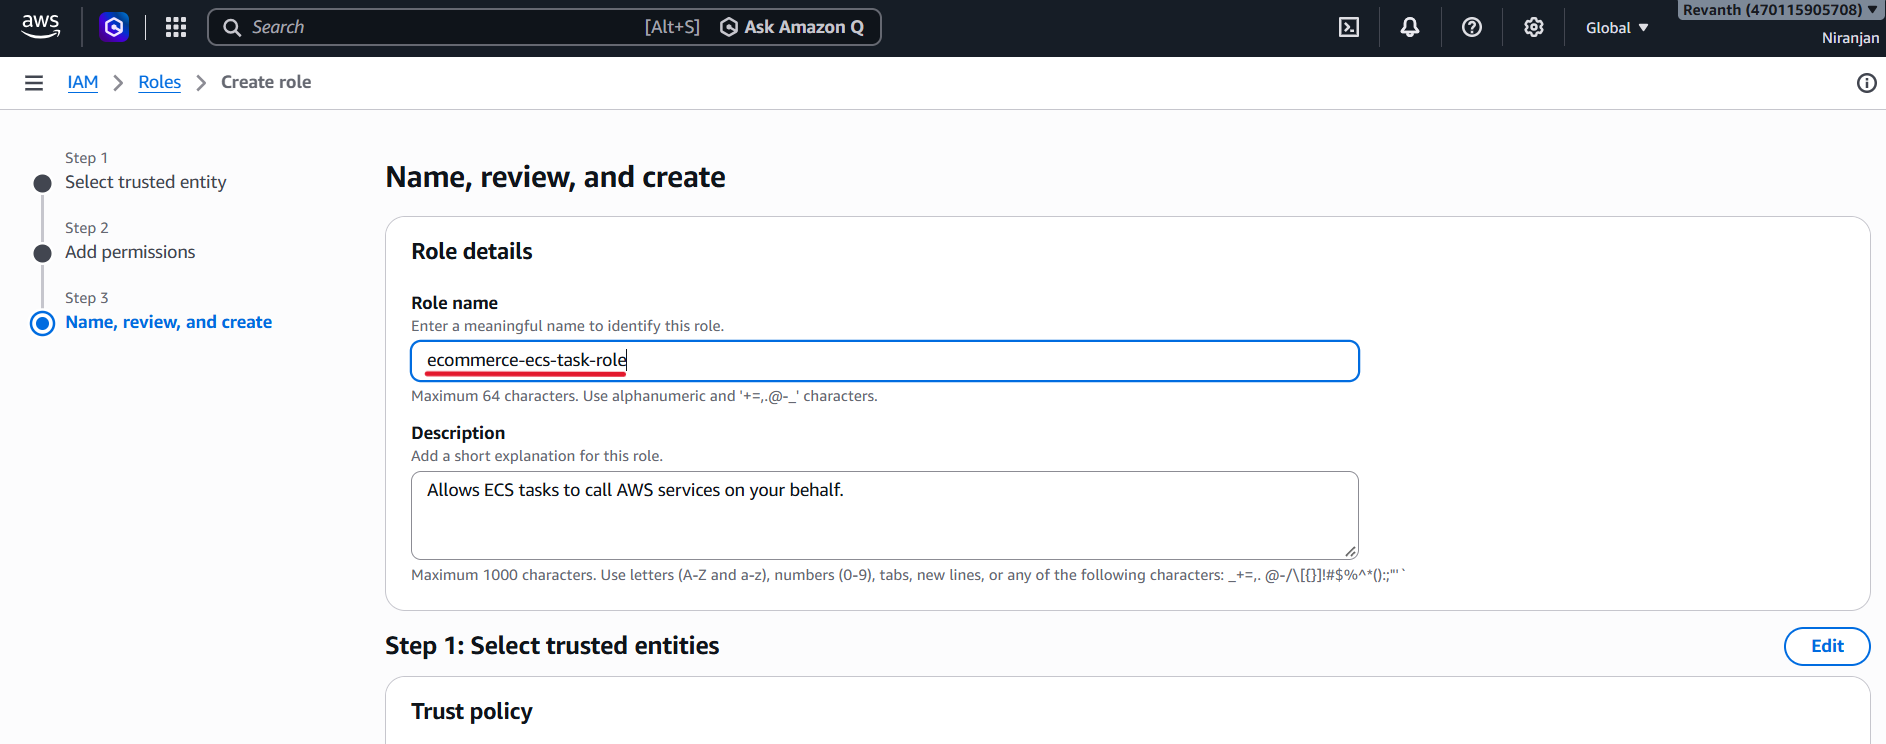
- Role name:
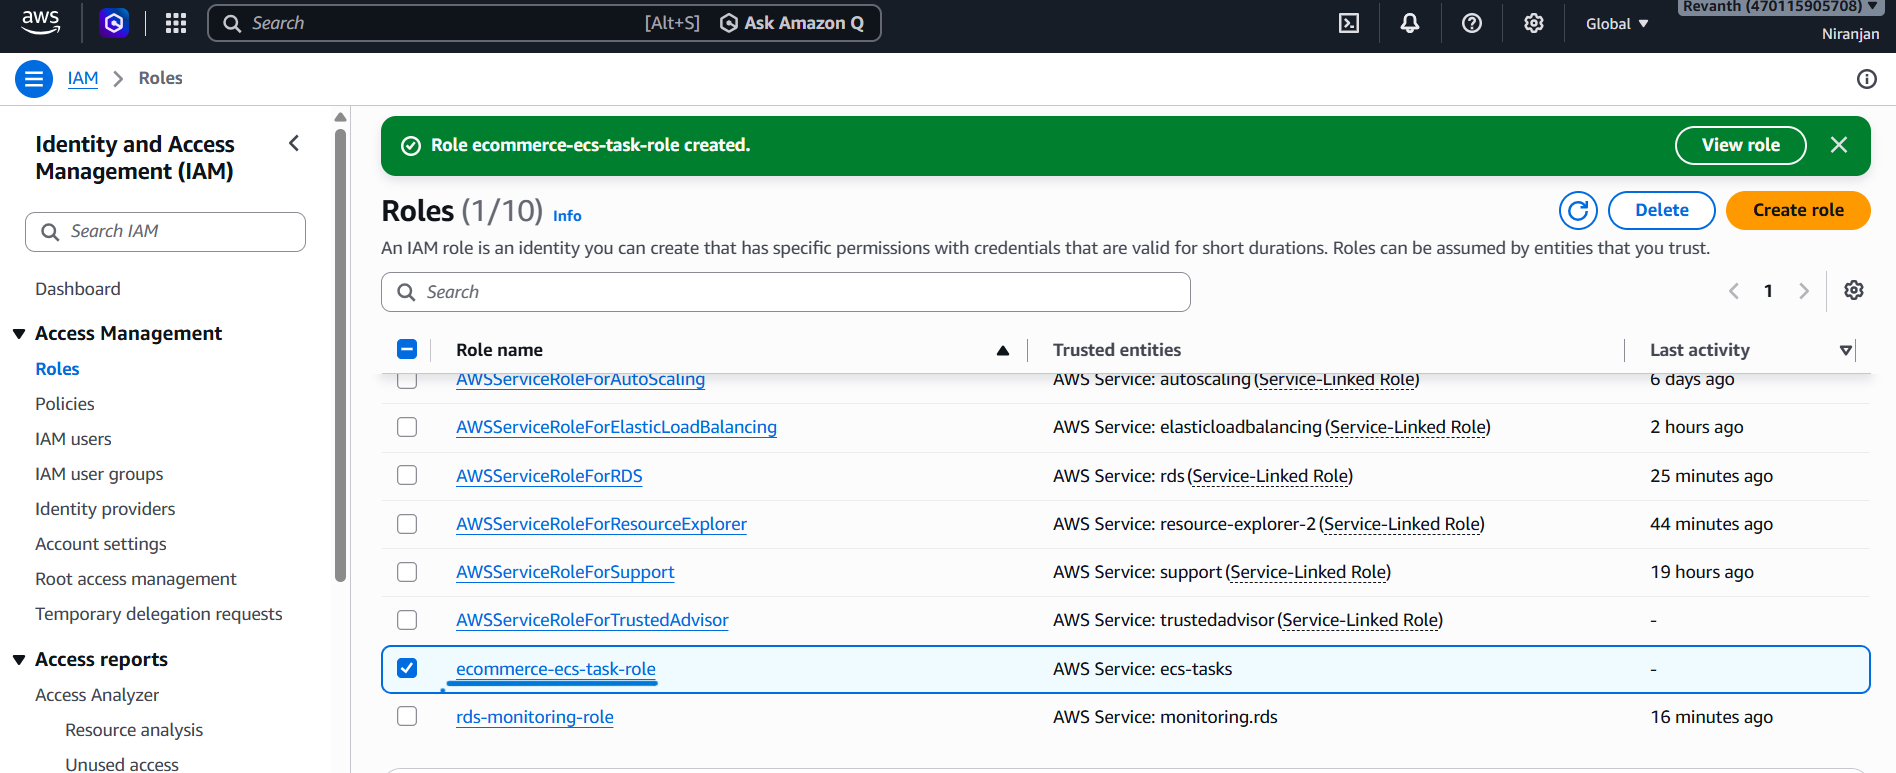
ecommerce-ecs-task-role
- Review the permissions and click Create role.
Important: For this development exercise, we are using one common task role for all four services. In a production environment, create separate IAM roles with only the permissions required by each service. Avoid granting unnecessary permissions such as full access when a more restrictive policy is sufficient.
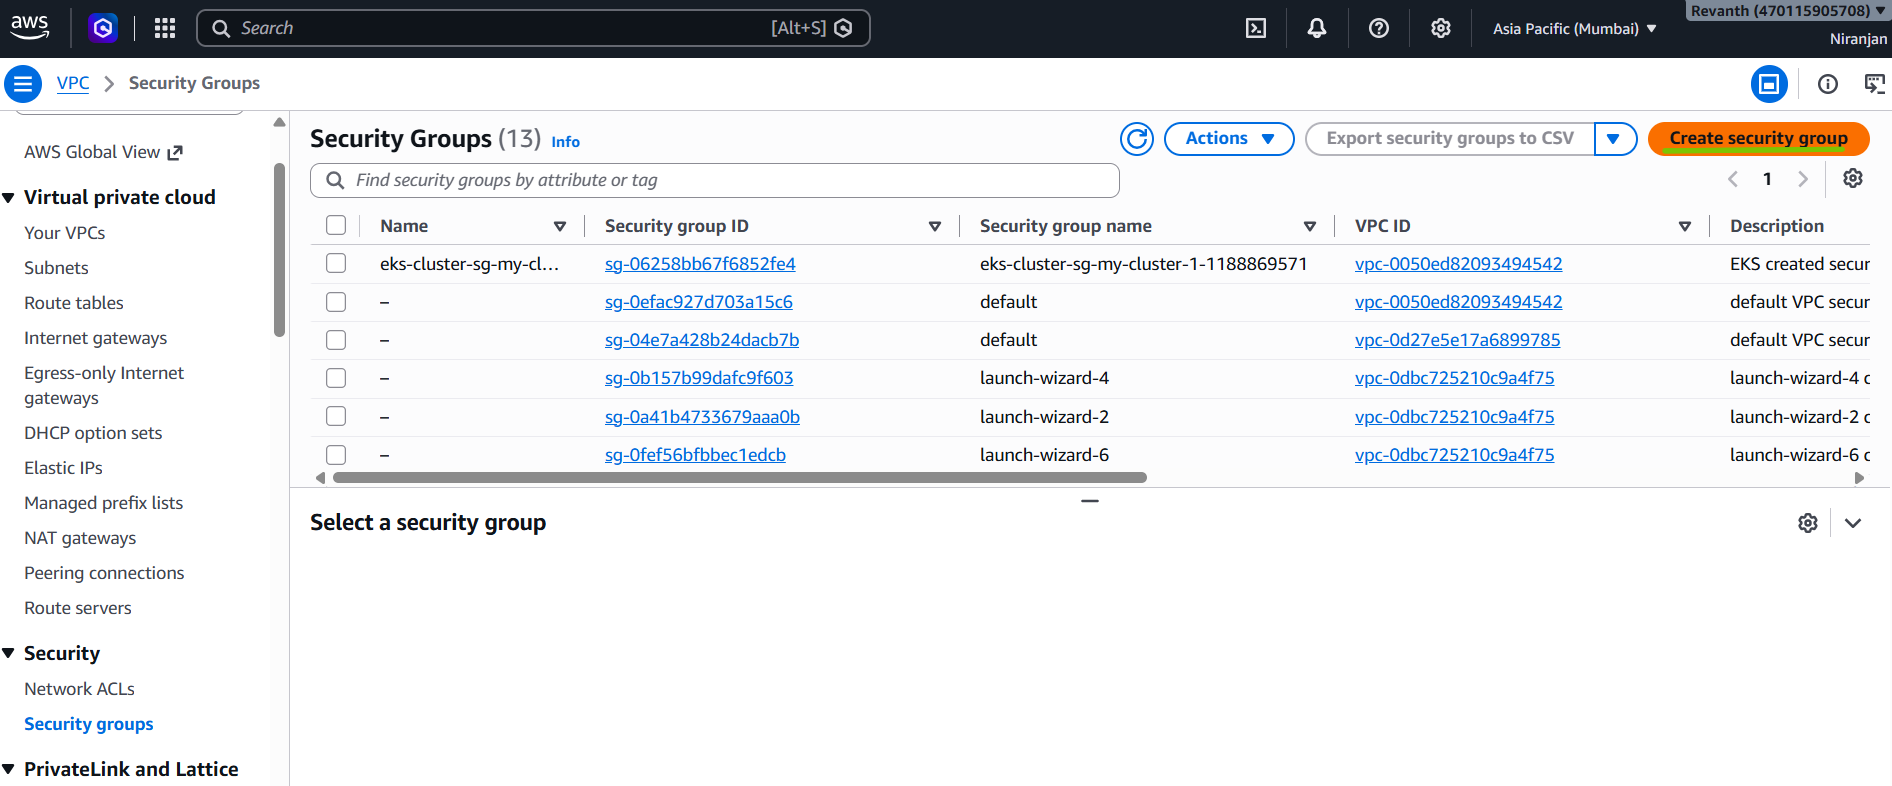
5.6 Create the ECS Tasks Security Group
The ECS tasks need to receive traffic from the internal Application Load Balancer.
We will create a security group that allows traffic on ports 8001 to 8004 from the ALB security group.
5.6.1 Create the Security Group
- VPC Console → Security Groups → Create security group
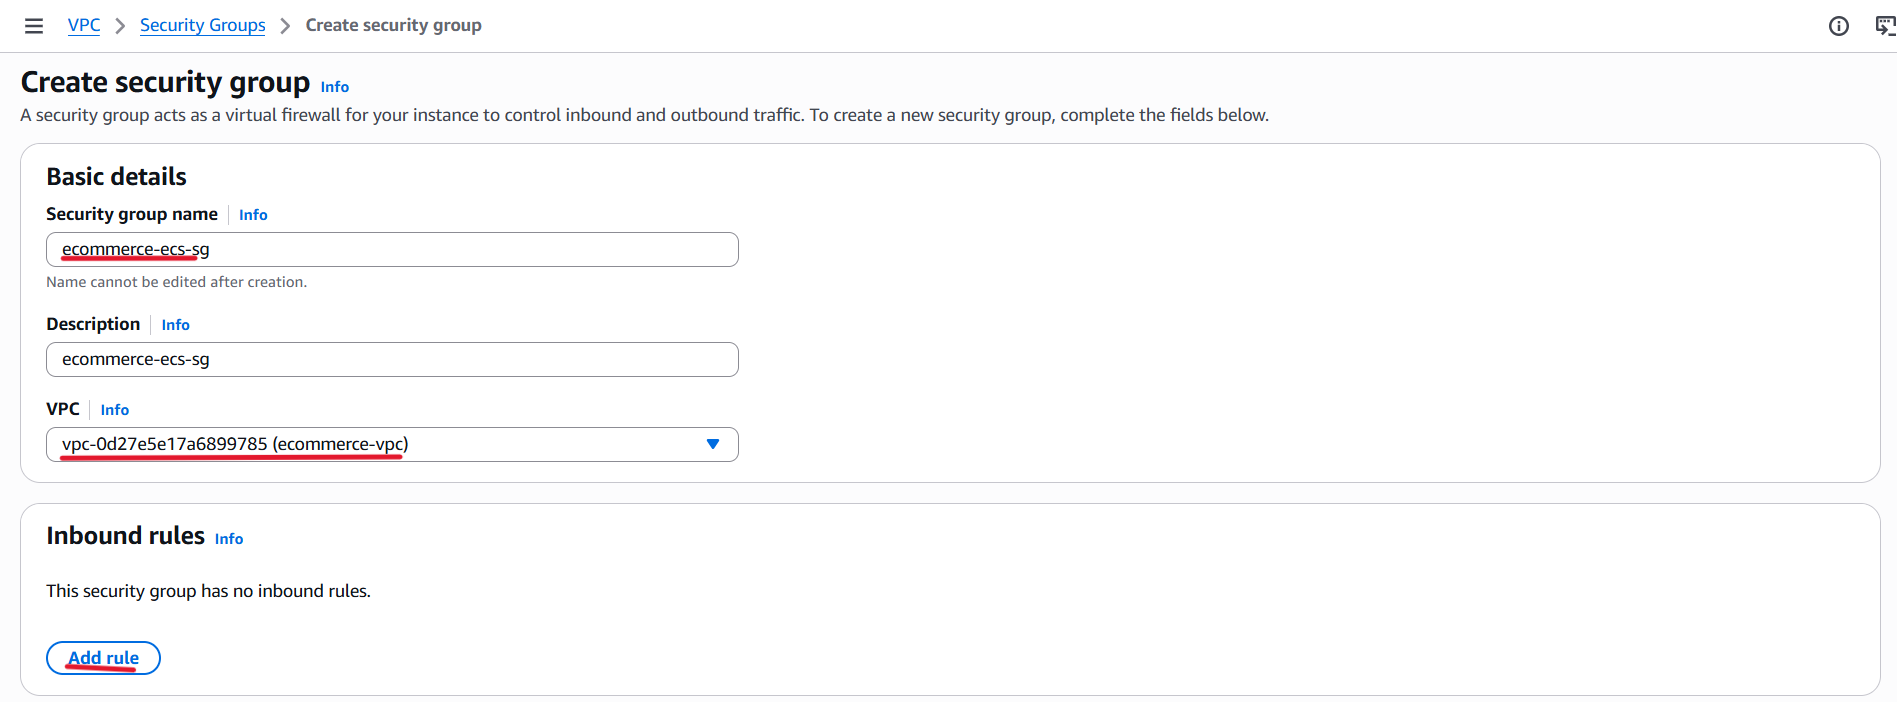
- Name:
ecommerce-ecs-sg - Description:
Security group for ECS tasks - VPC: Select
ecommerce-vpc.
5.6.2 Configure Inbound Rules
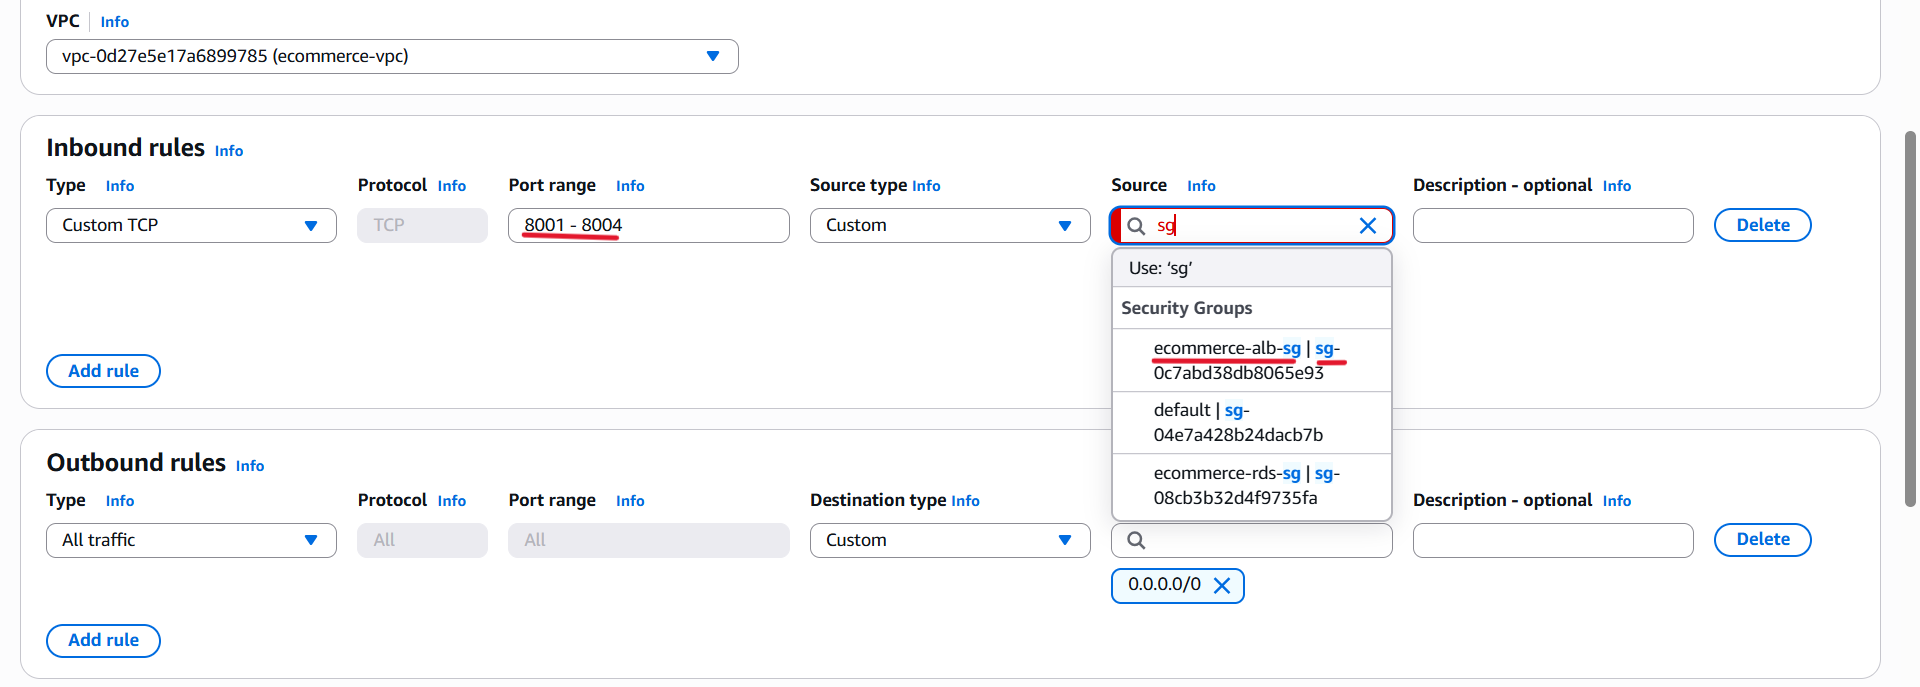
Add the following inbound rules:
| Type | Port | Source |
|---|---|---|
| Custom TCP | 8001 | ecommerce-alb-sg |
| Custom TCP | 8002 | ecommerce-alb-sg |
| Custom TCP | 8003 | ecommerce-alb-sg |
| Custom TCP | 8004 | ecommerce-alb-sg |
Alternatively, you can configure a single custom TCP port range from 8001-8004, using ecommerce-alb-sg as the source.
5.6.3 Configure Outbound Rules
Keep the default outbound rule:
- Type: All traffic
- Destination:
0.0.0.0/0
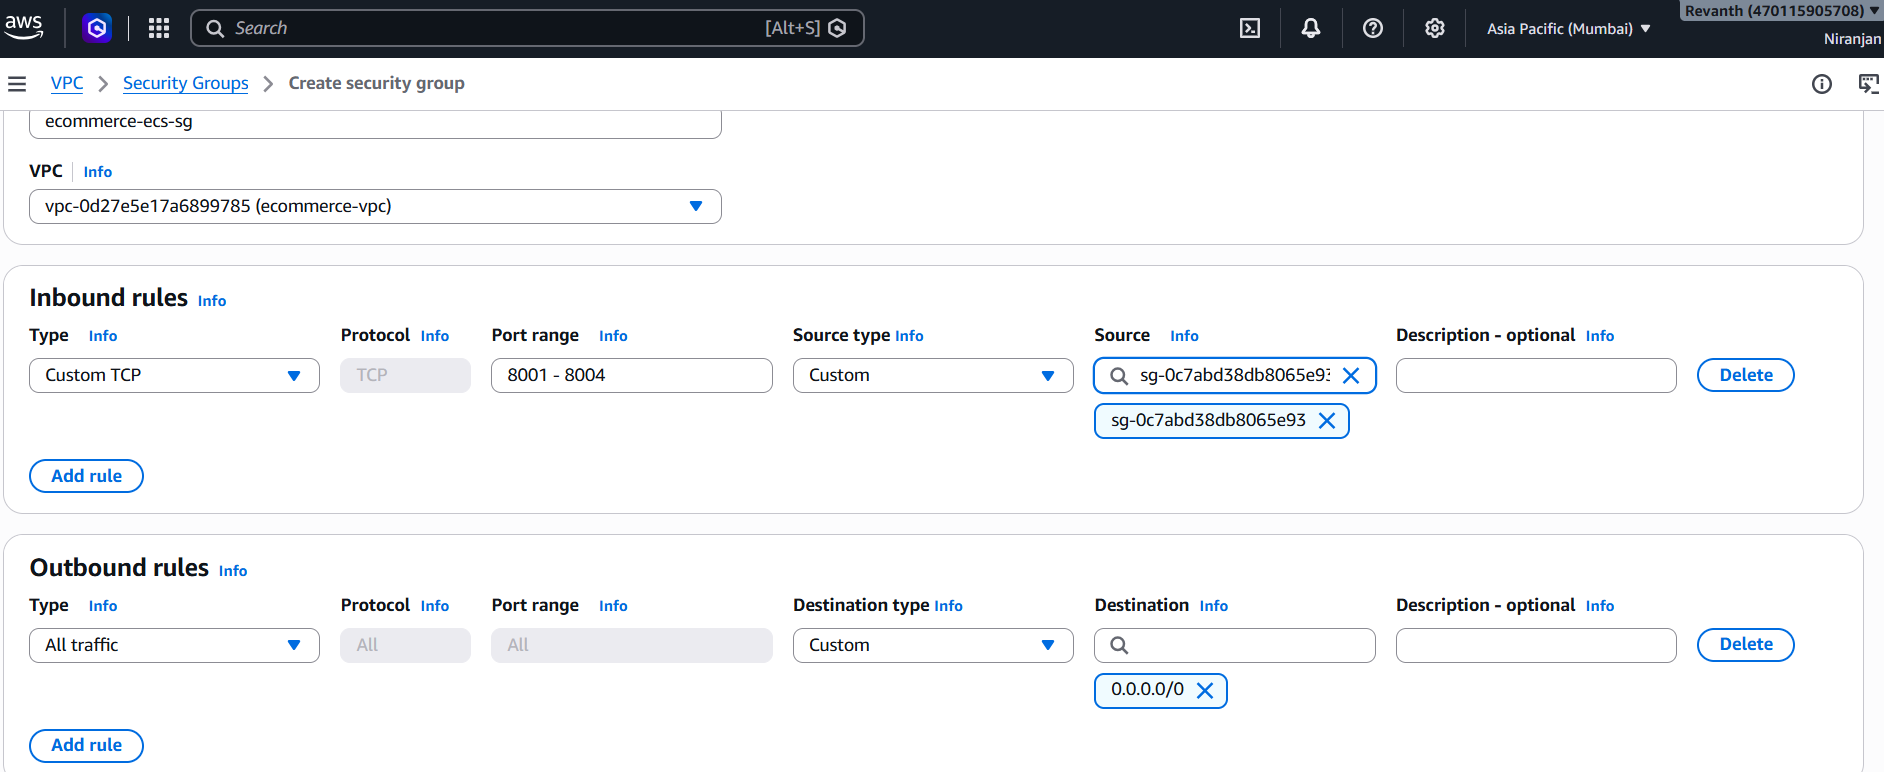
The ECS tasks need outbound connectivity to communicate with AWS services and other required endpoints. The private ECS subnets use the NAT Gateway for internet access.
- Click Create security group.
5.7 Create ECS Task Definitions
An ECS task definition is a blueprint that tells Amazon ECS how to run a container.
It defines important configuration details such as:
- Docker image URI.
- Container name.
- Container port.
- CPU and memory allocation.
- IAM task role.
- Environment variables.
- CloudWatch logging configuration.
We will create four separate task definitions, one for each backend service.
5.7.1 Create the Product Service Task Definition
ECS Console → Task definitions → Create new task definition
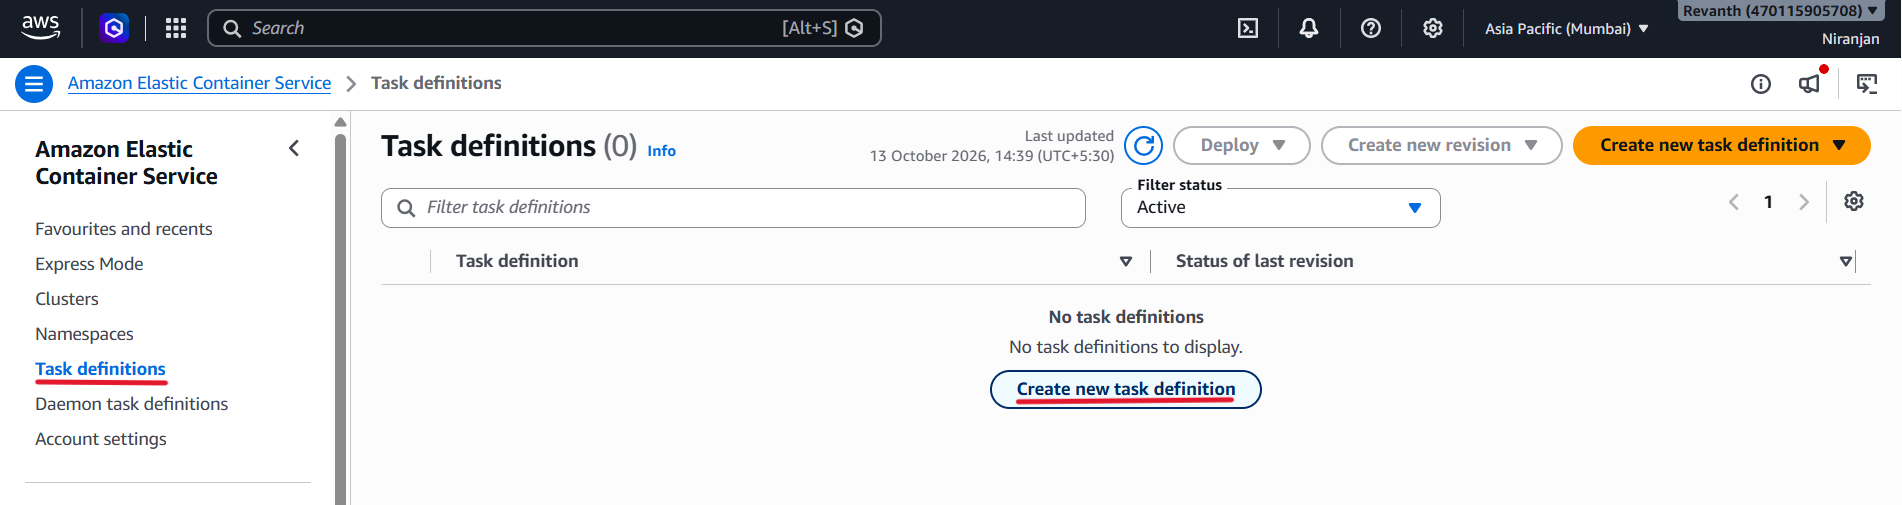
Task Definition Configuration
- Task definition family:
ecommerce-product-service
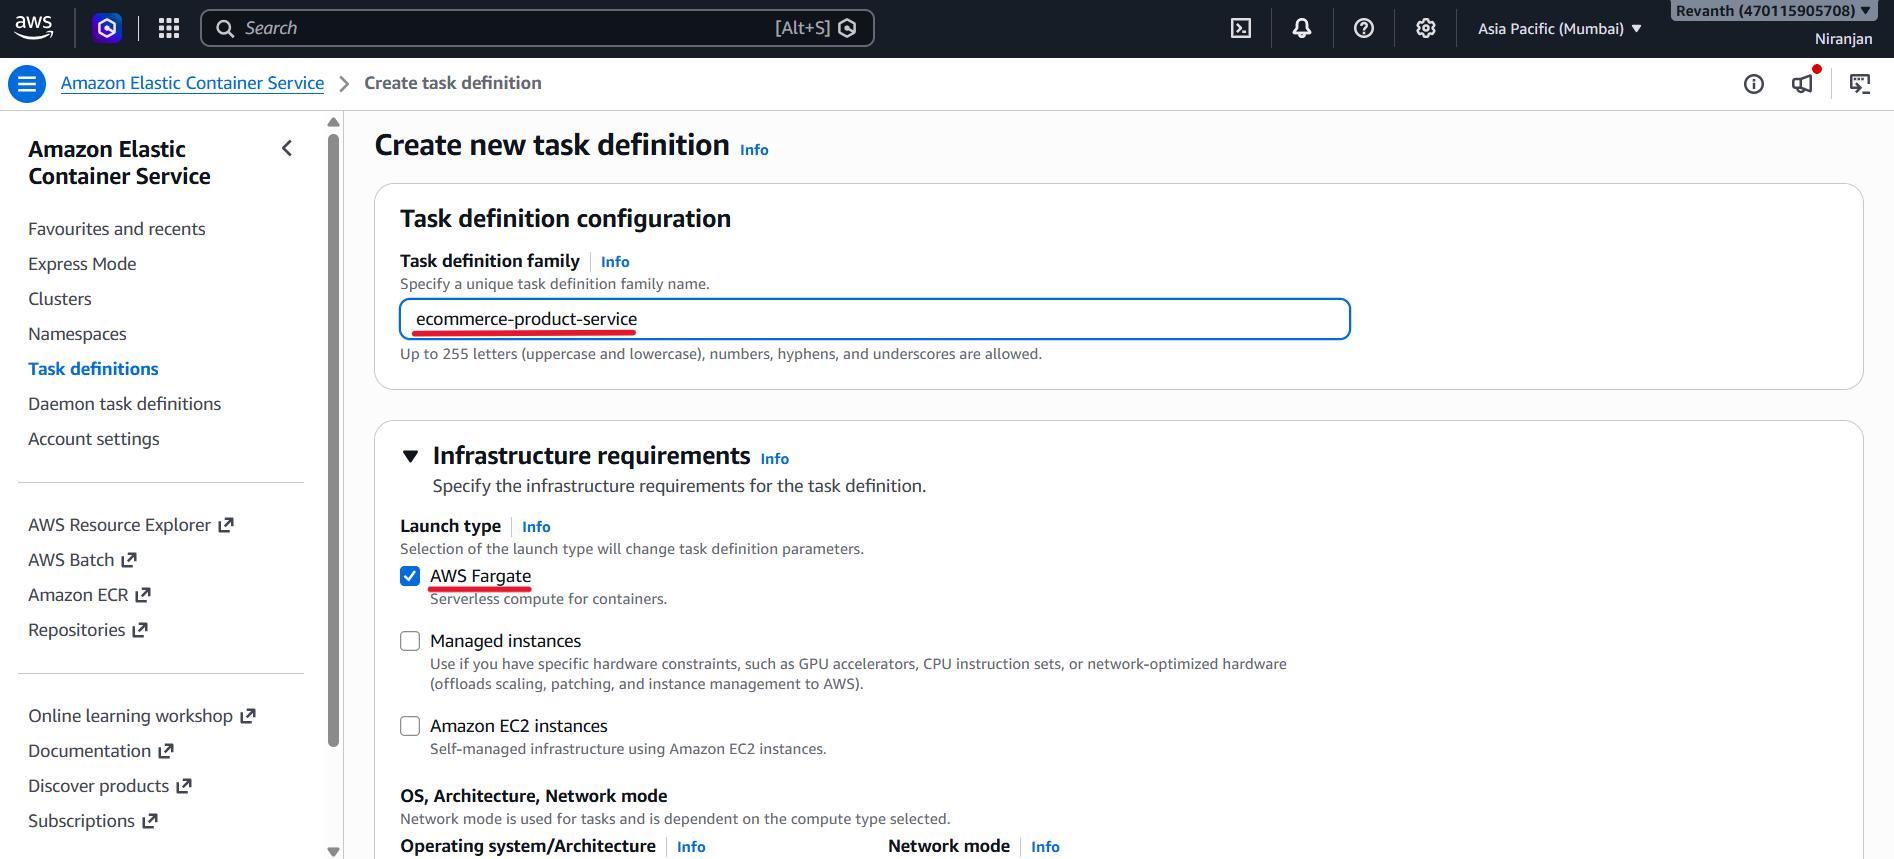
- Launch type: AWS Fargate
- Operating system/Architecture: Linux/X86_64
- CPU:
0.25 vCPU - Memory:
0.5 GB
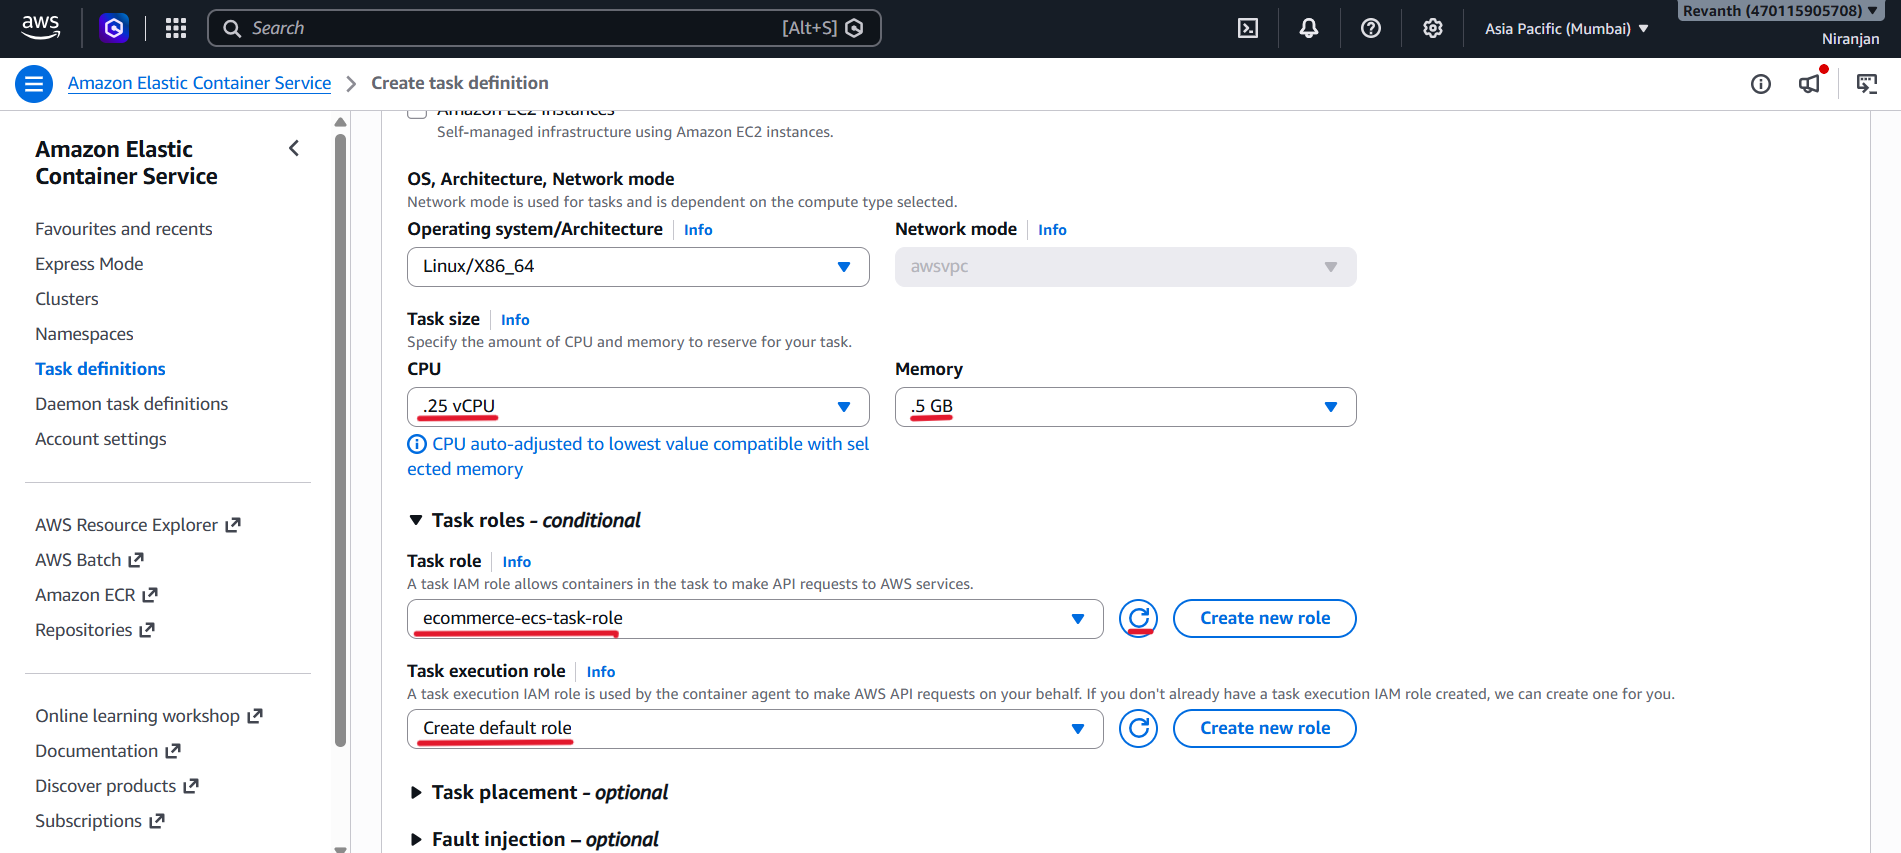
- Task role: Select
ecommerce-ecs-task-role. - Task execution role: Select Create default role.
- The task role provides permissions for the application to access AWS services. The task execution role allows ECS to perform tasks such as pulling images from ECR and sending logs to CloudWatch.
- AWS will create the default execution role if it does not already exist. We will reuse it for the remaining task definitions.
Container Configuration
- Container name:
product-service
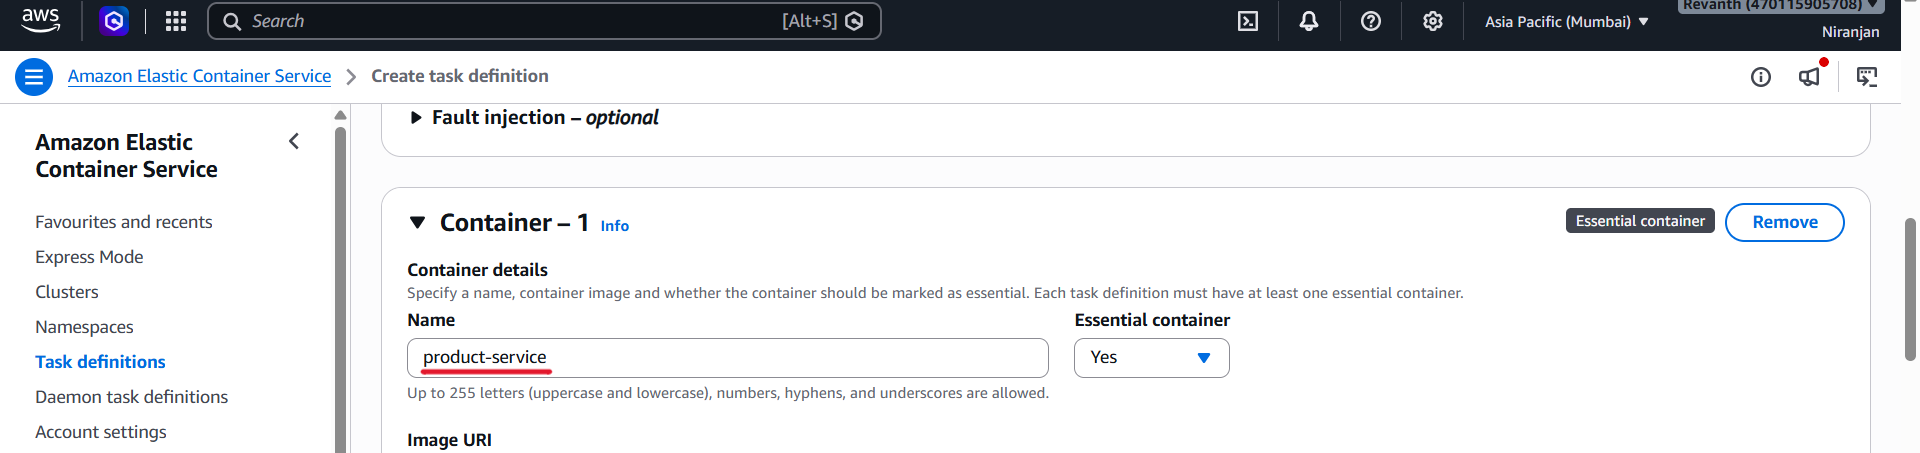
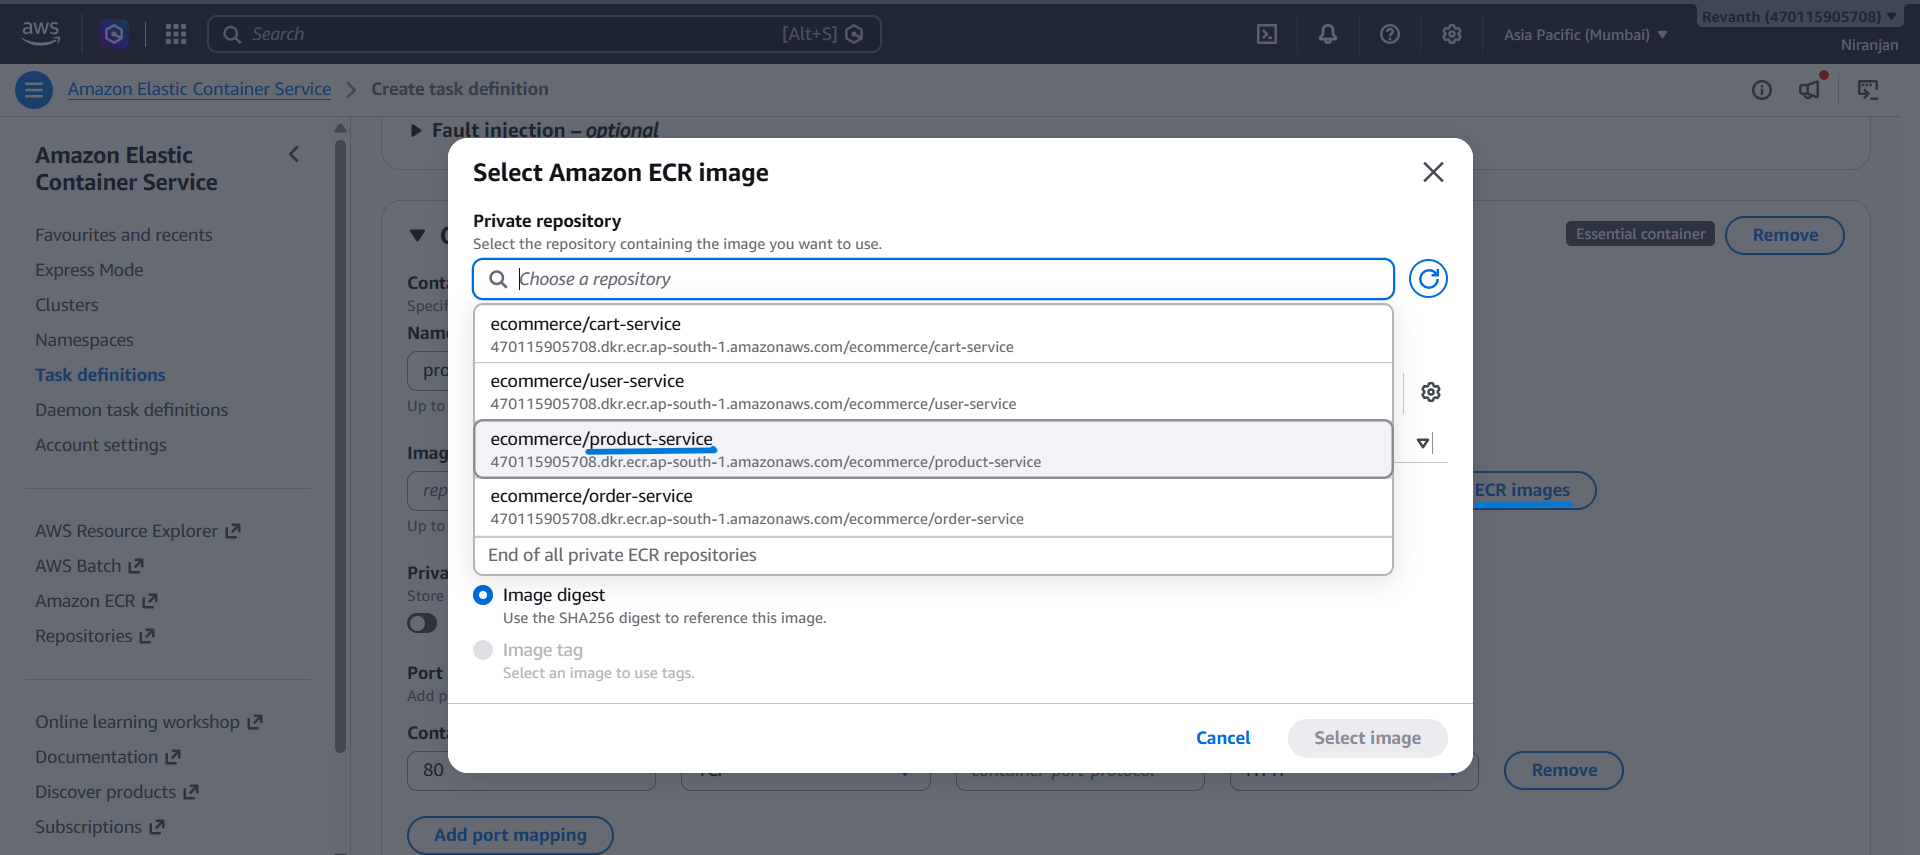
- Click Browse containers
- select the
ecommerce/product-servicerepository.
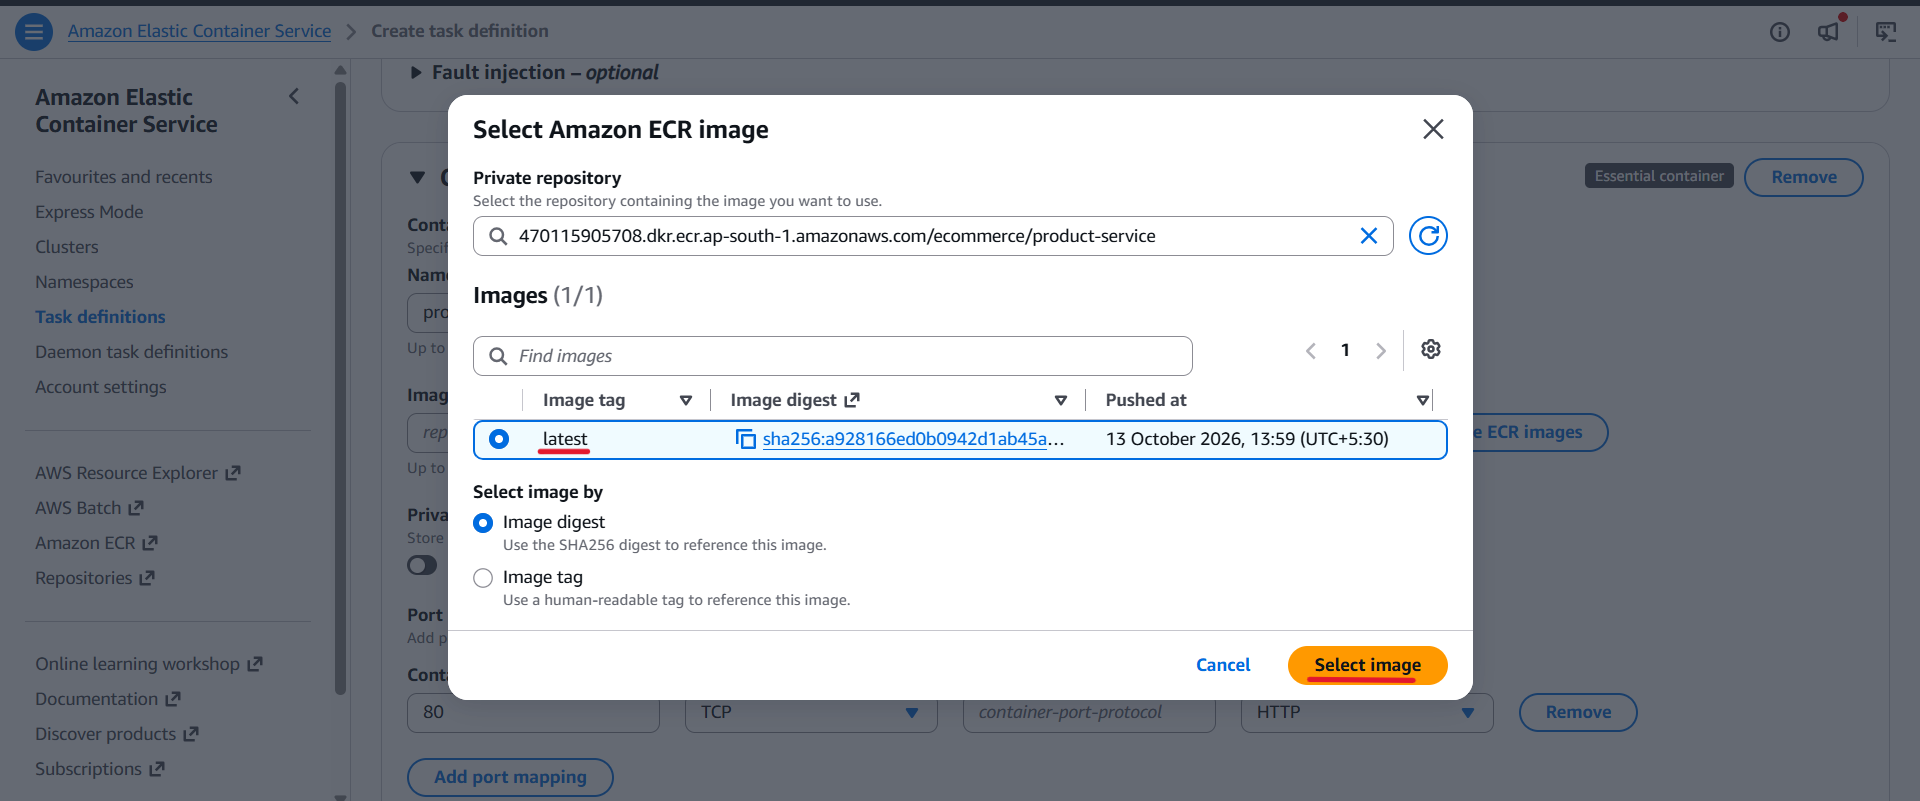
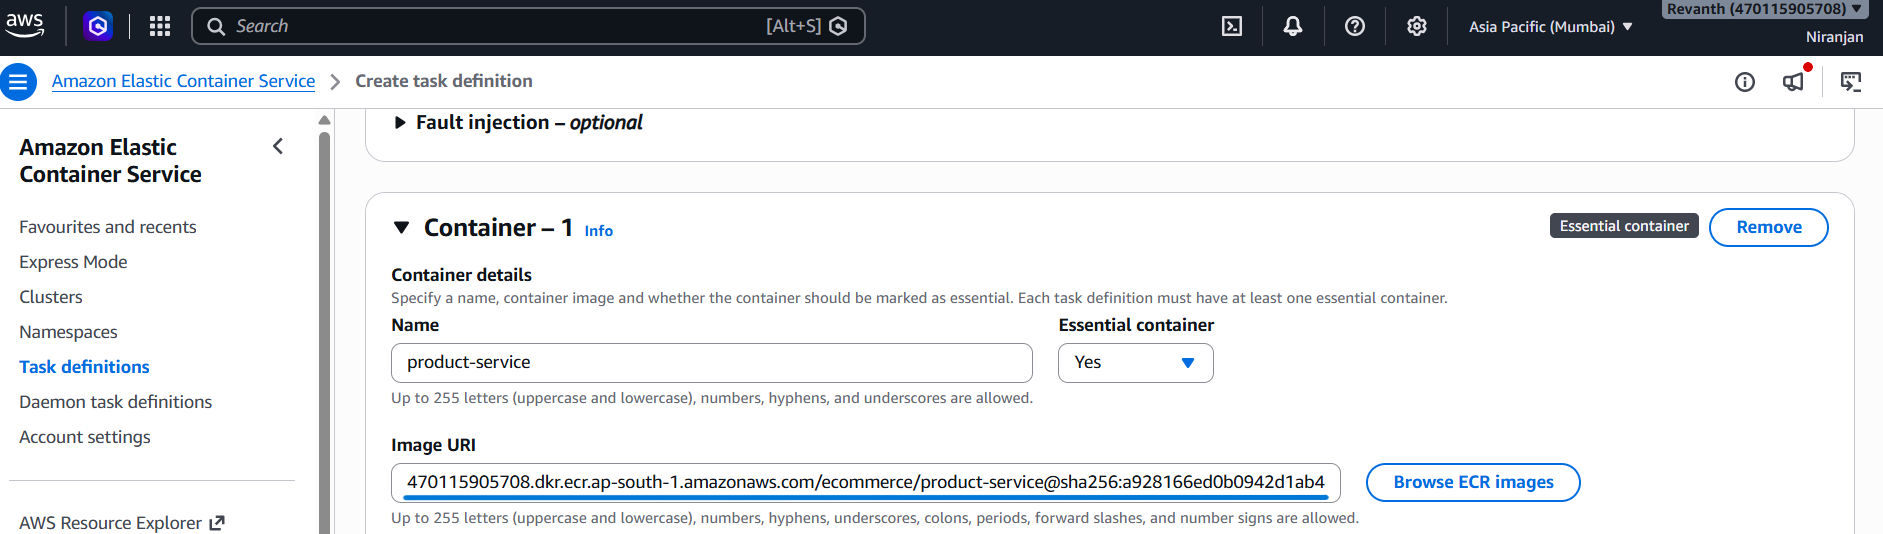
- Image URI: Select the
latestimage from:
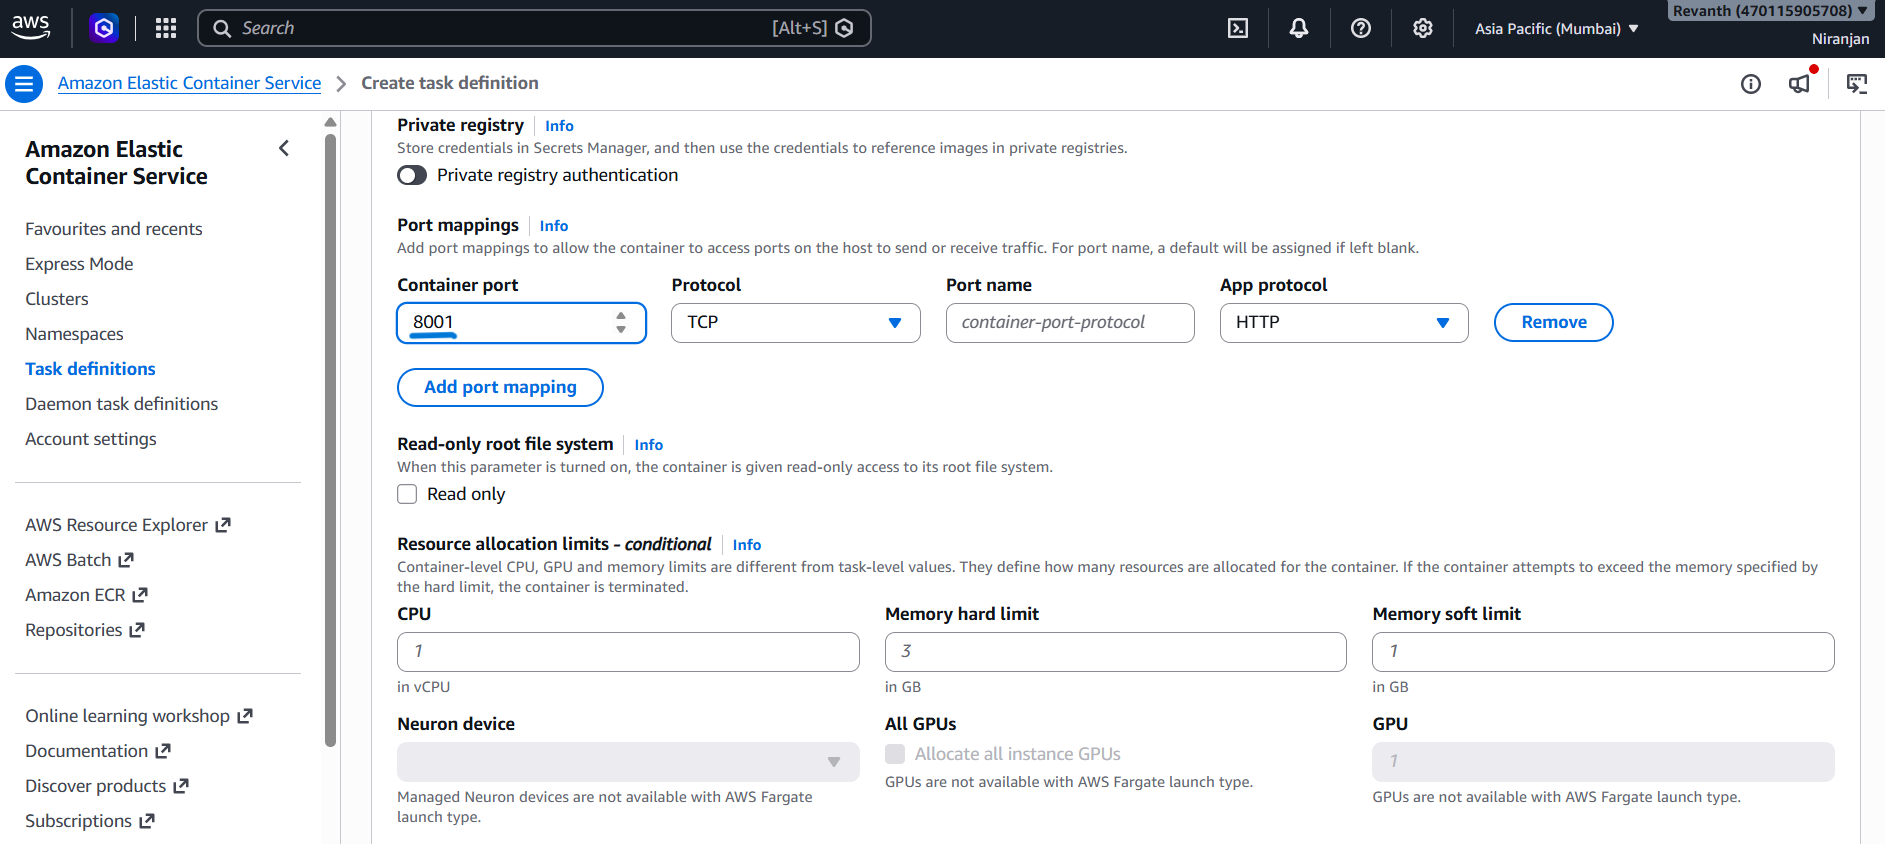
- Port mapping:
- Container port:
8001 - Protocol: TCP
- Container port:
Environment Variables
- Add the following environment variables:
| Key | Value |
|---|---|
ENVIRONMENT |
dev |
AWS_REGION |
ap-south-1 |
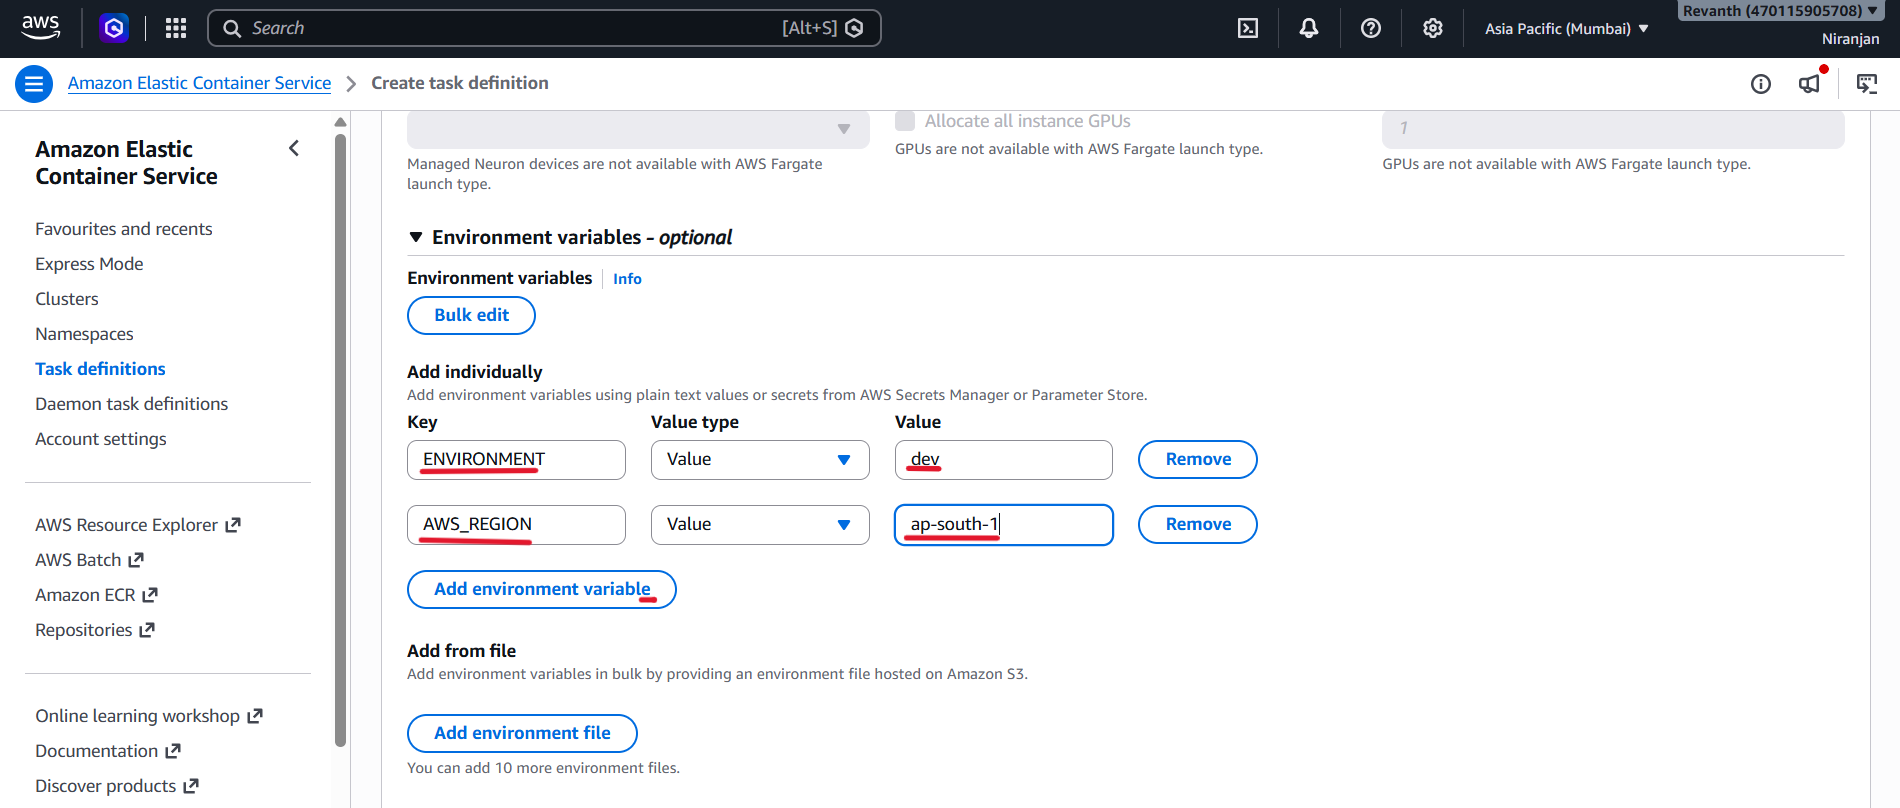
- Replace the region with your actual AWS region if it is different.
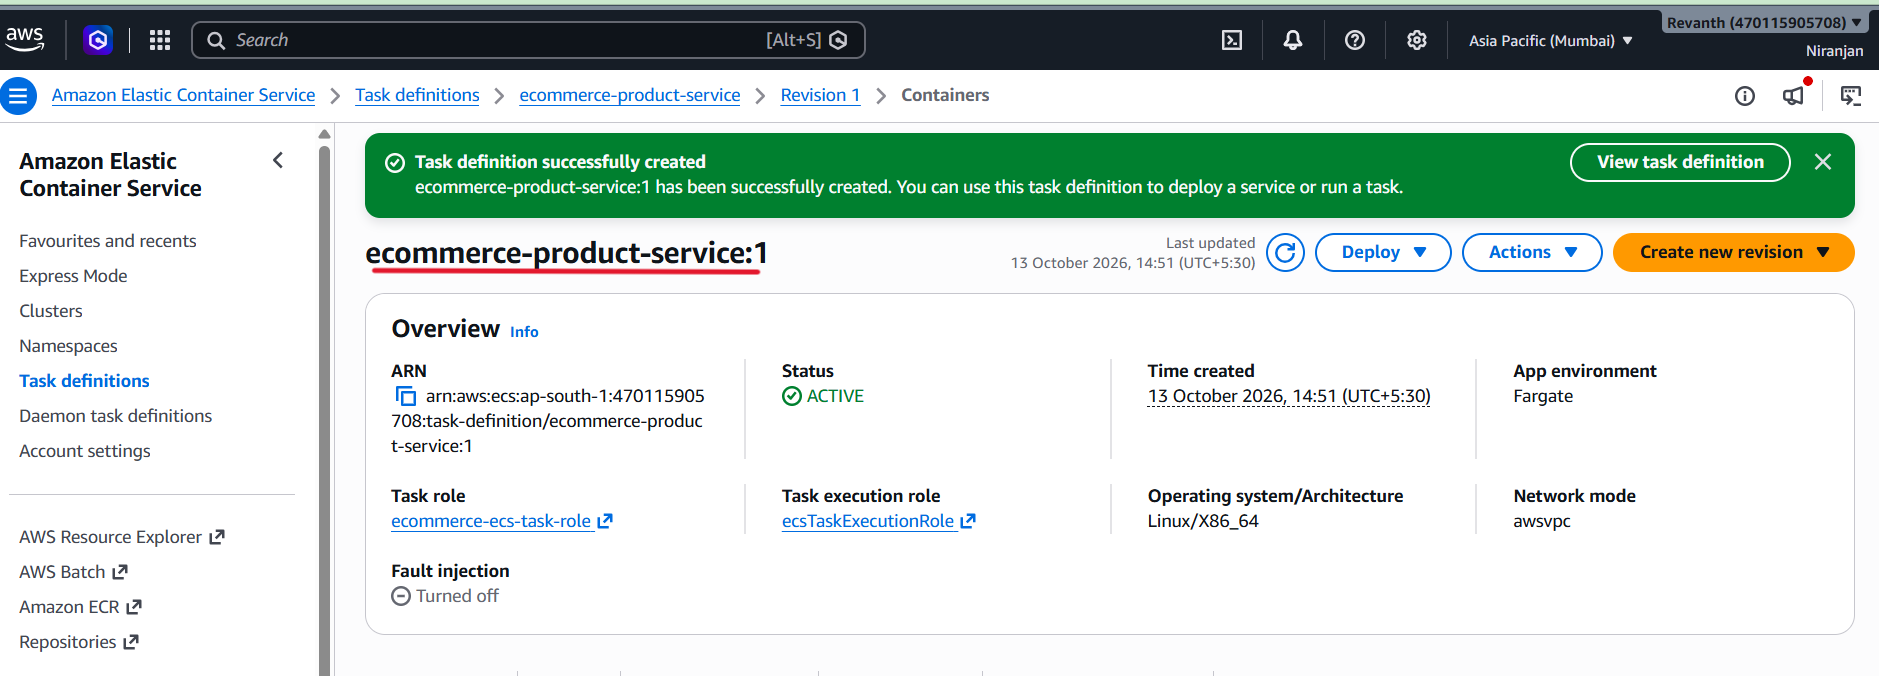
- Review the configuration and click Create task definition.
5.7.2 Create the Cart Service Task Definition
Repeat the same process with the following service-specific details:
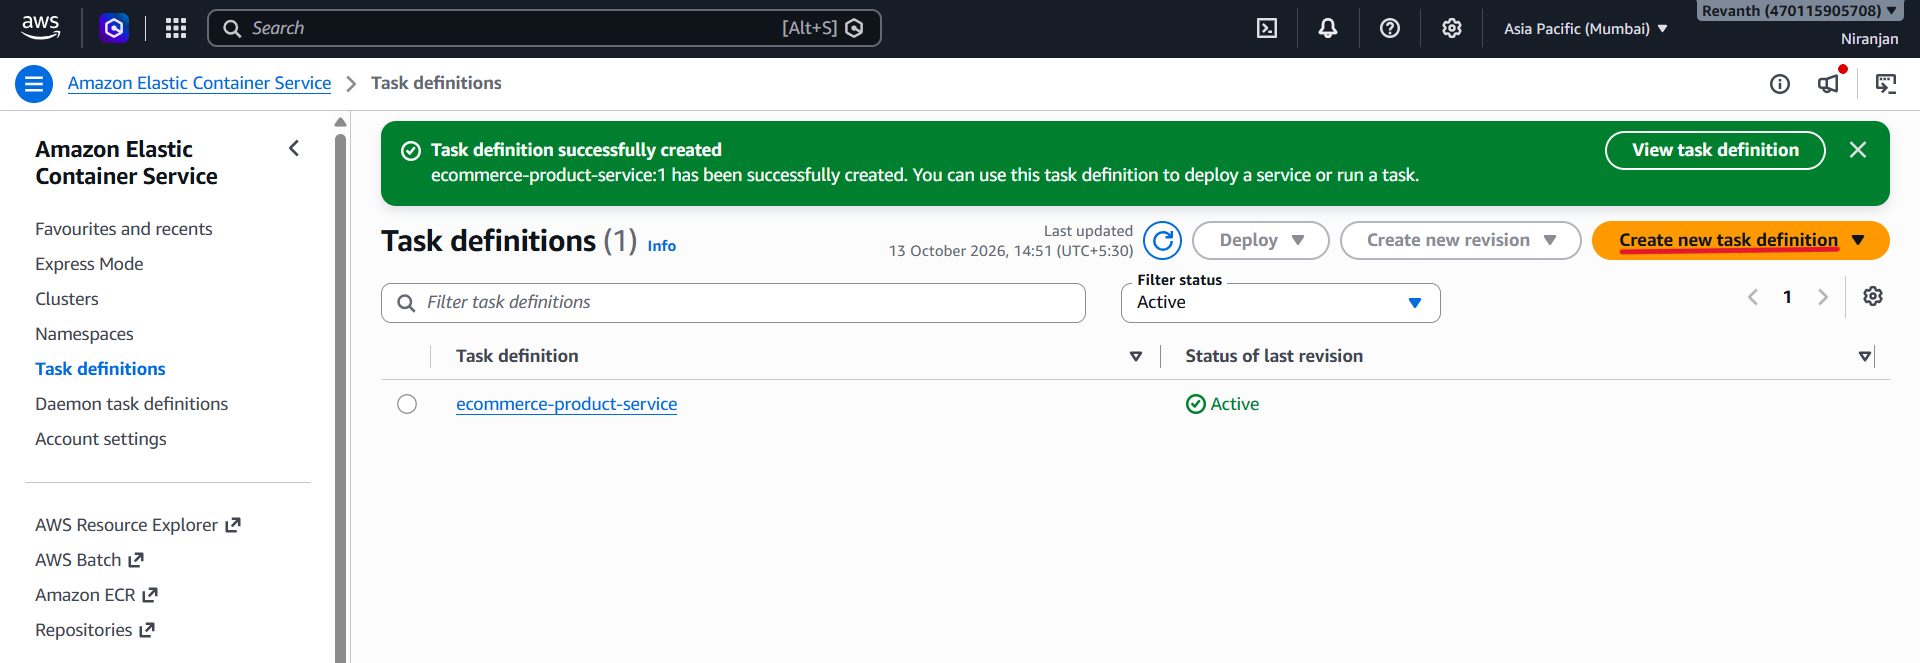
- Task definition family:
ecommerce-cart-service
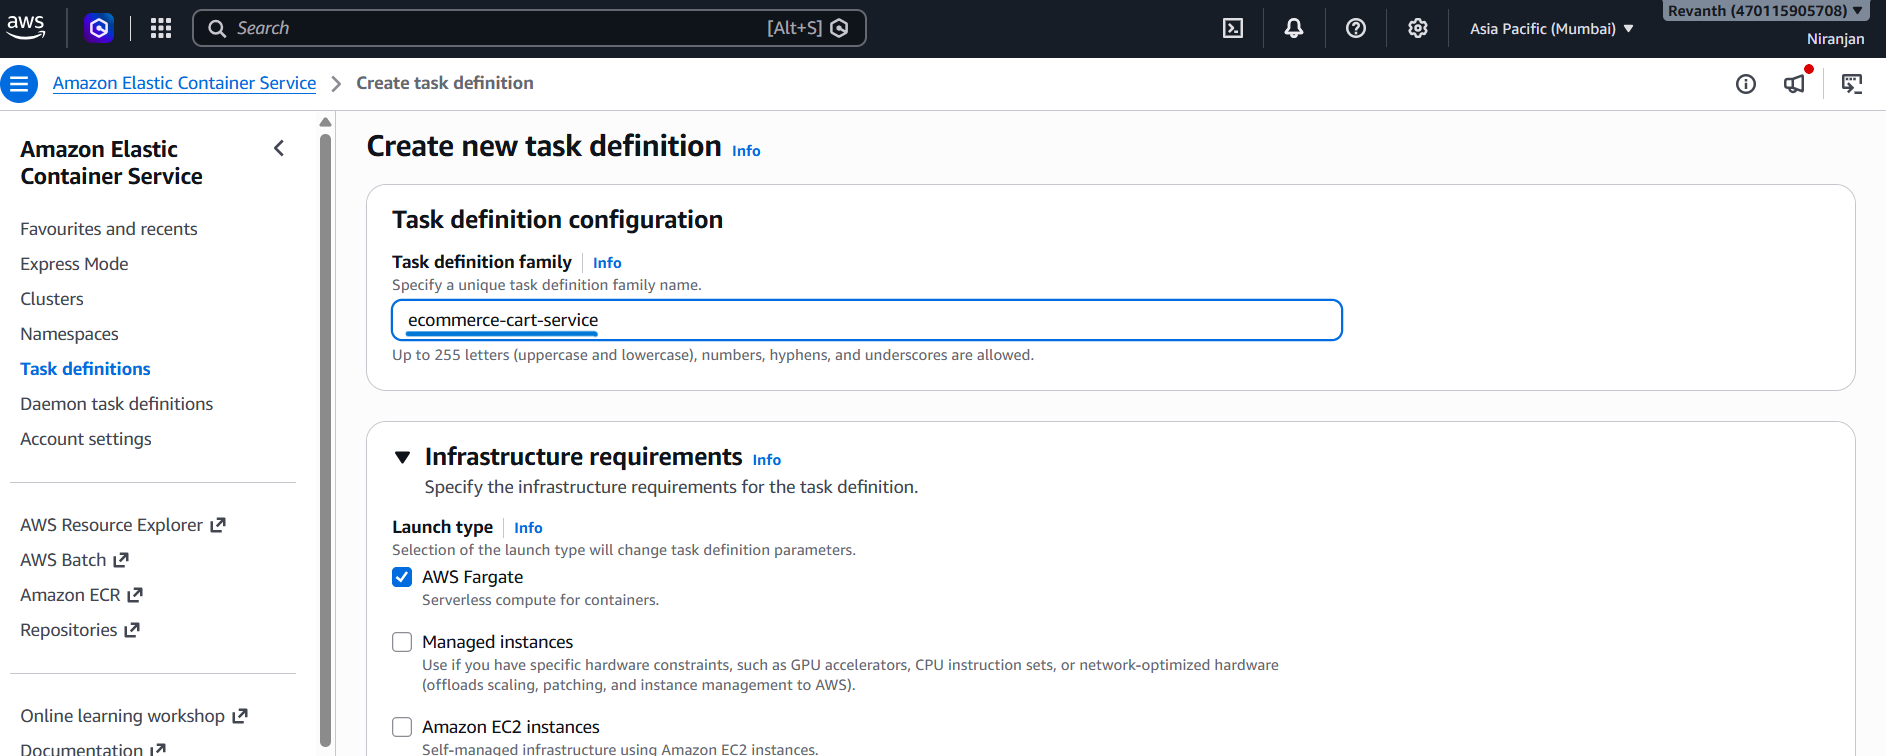
- Operating system/Architecture: Linux/X86_64
- CPU:
0.25 vCPU - Memory:
0.5 GB
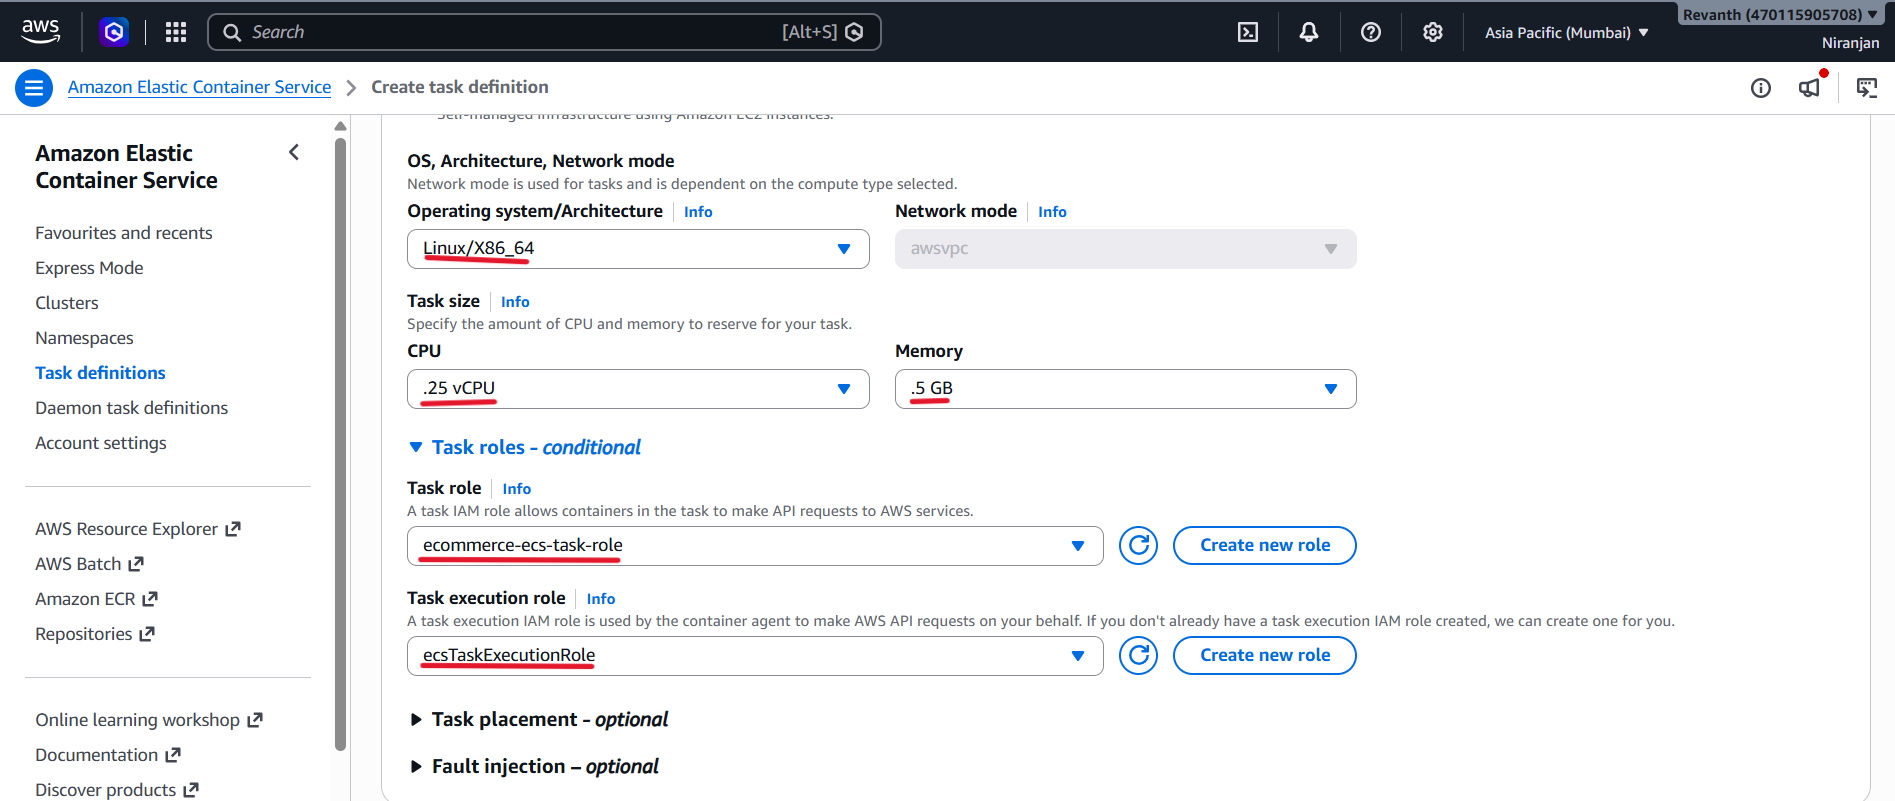
- Earlier, select Create default role to allow AWS to create the default ECS task execution role.
- AWS has now created the role named
ecsTaskExecutionRole. - Select the existing
ecsTaskExecutionRolefrom the Task execution role dropdown. - Container name:
cart-service
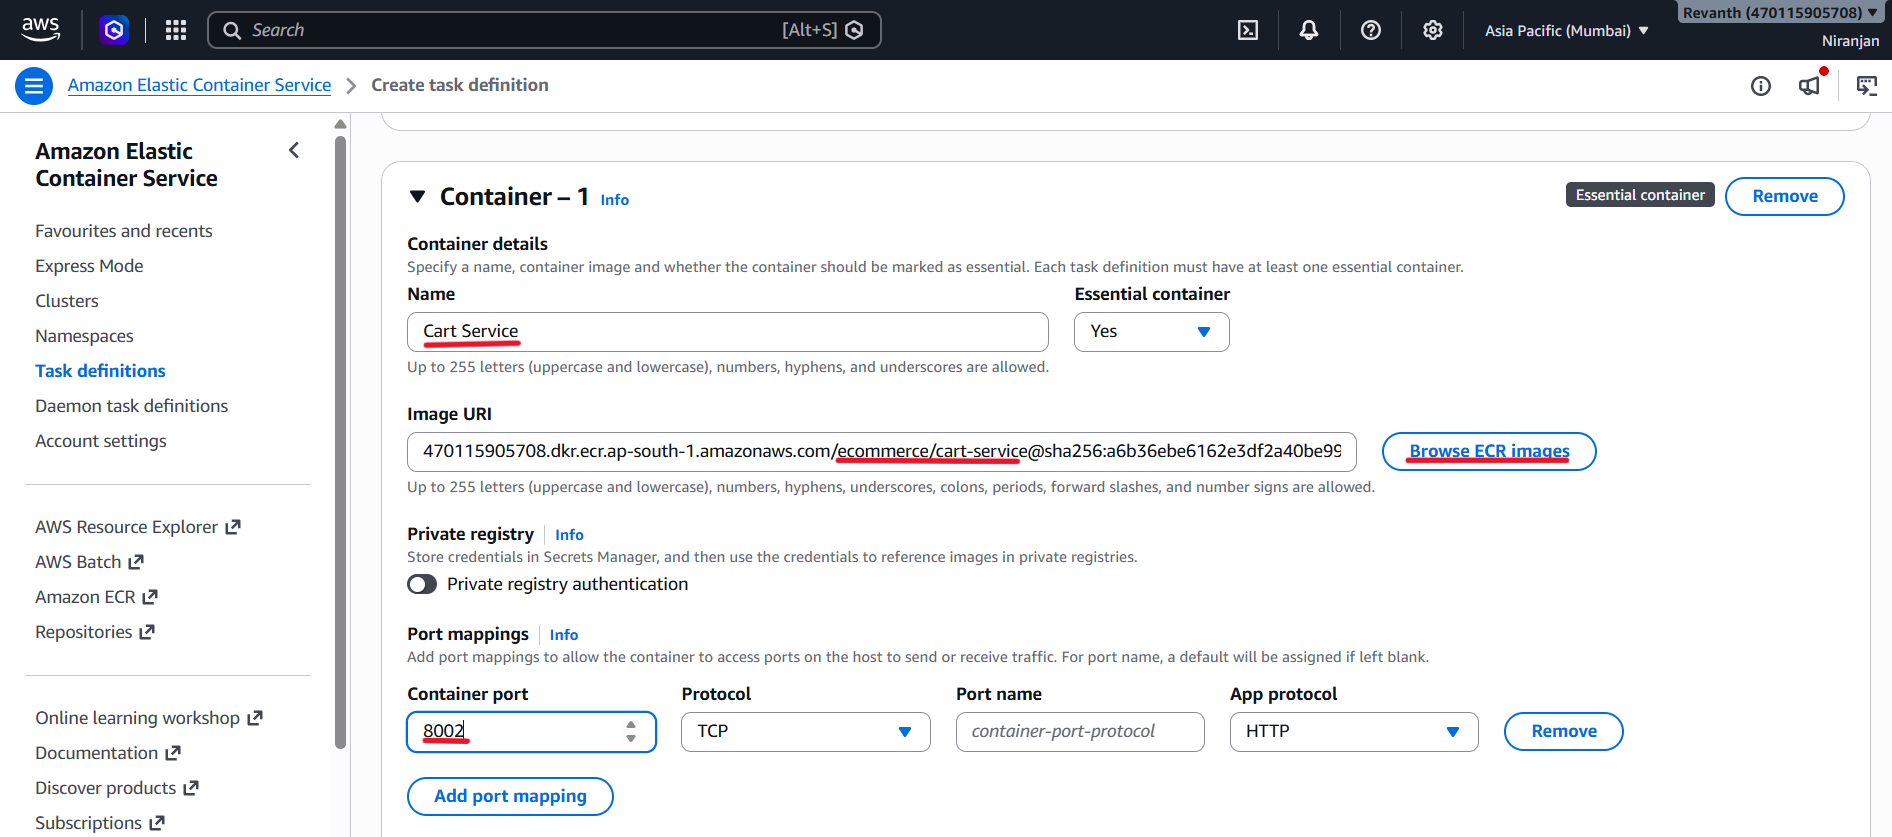
- Image:
ecommerce/cart-service:latest - Container port:
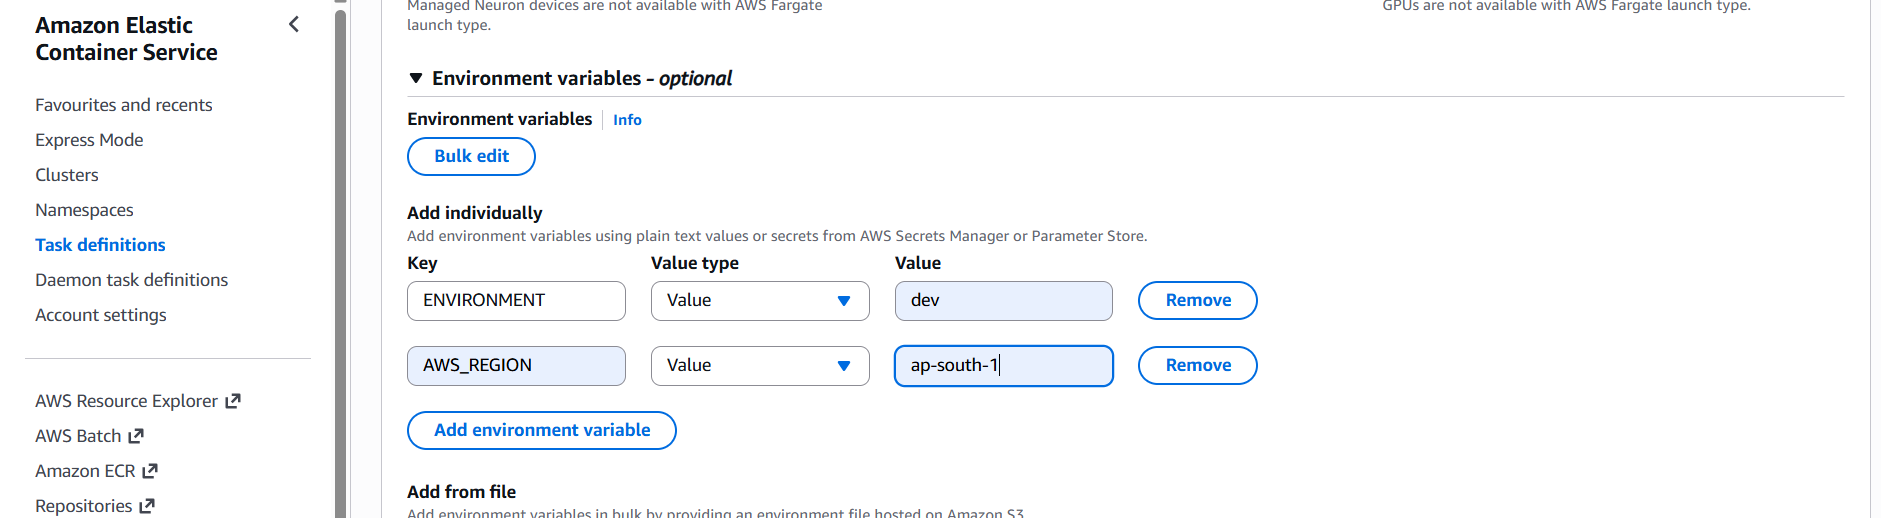
8002 - Environment variable:
ENVIRONMENT = dev - Environment variable:
AWS_REGION = ap-south-1
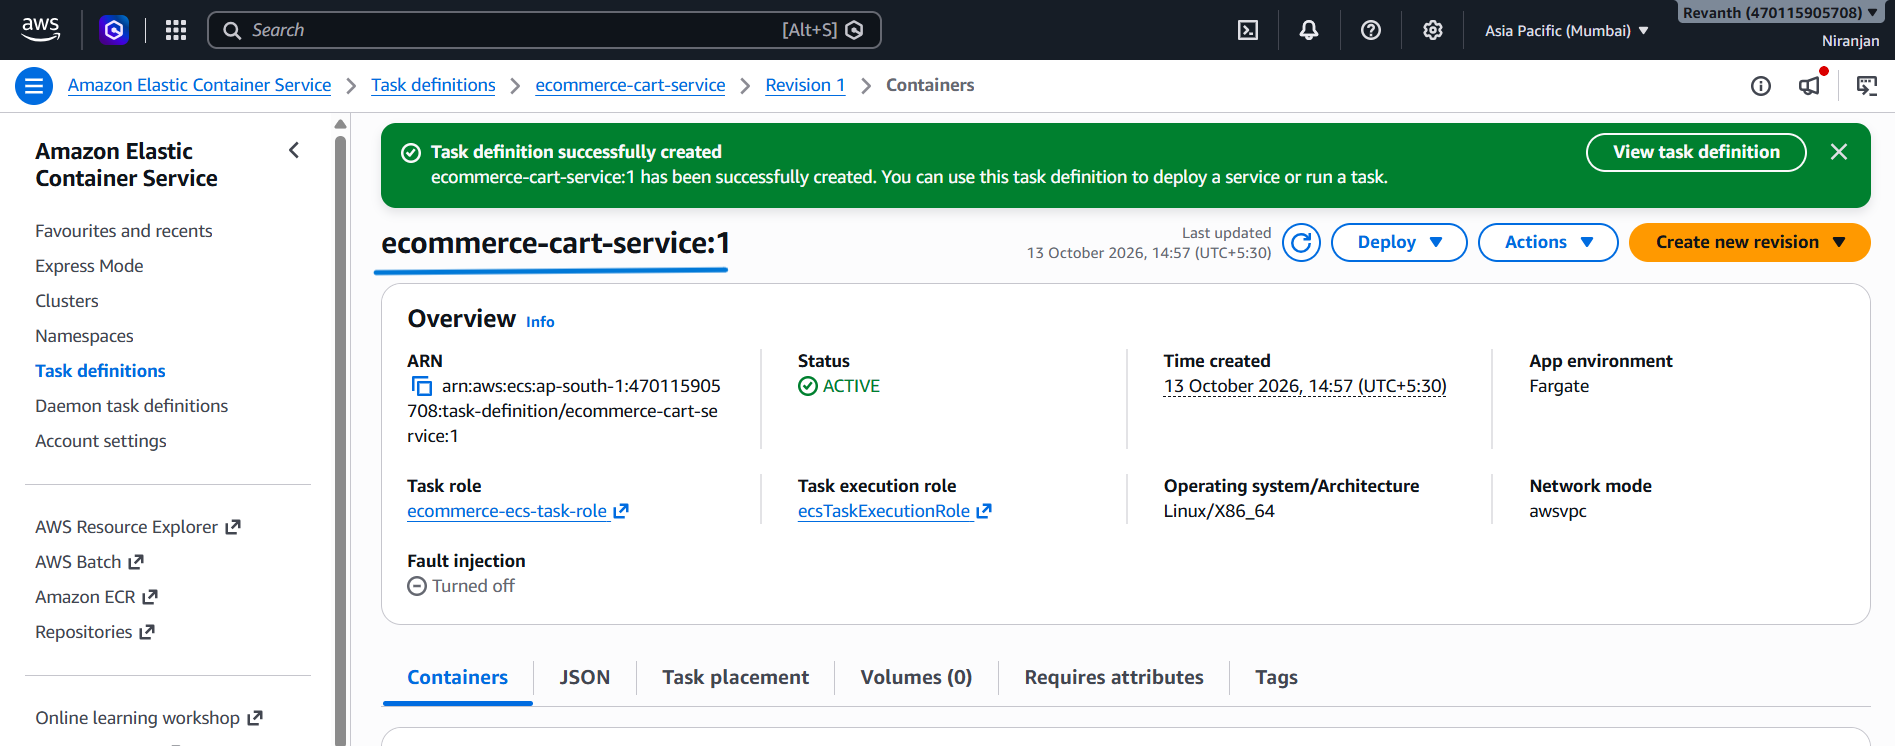
- Click Create task definition.
5.7.3 Create the User Service Task Definition
Repeat the same process with these details:
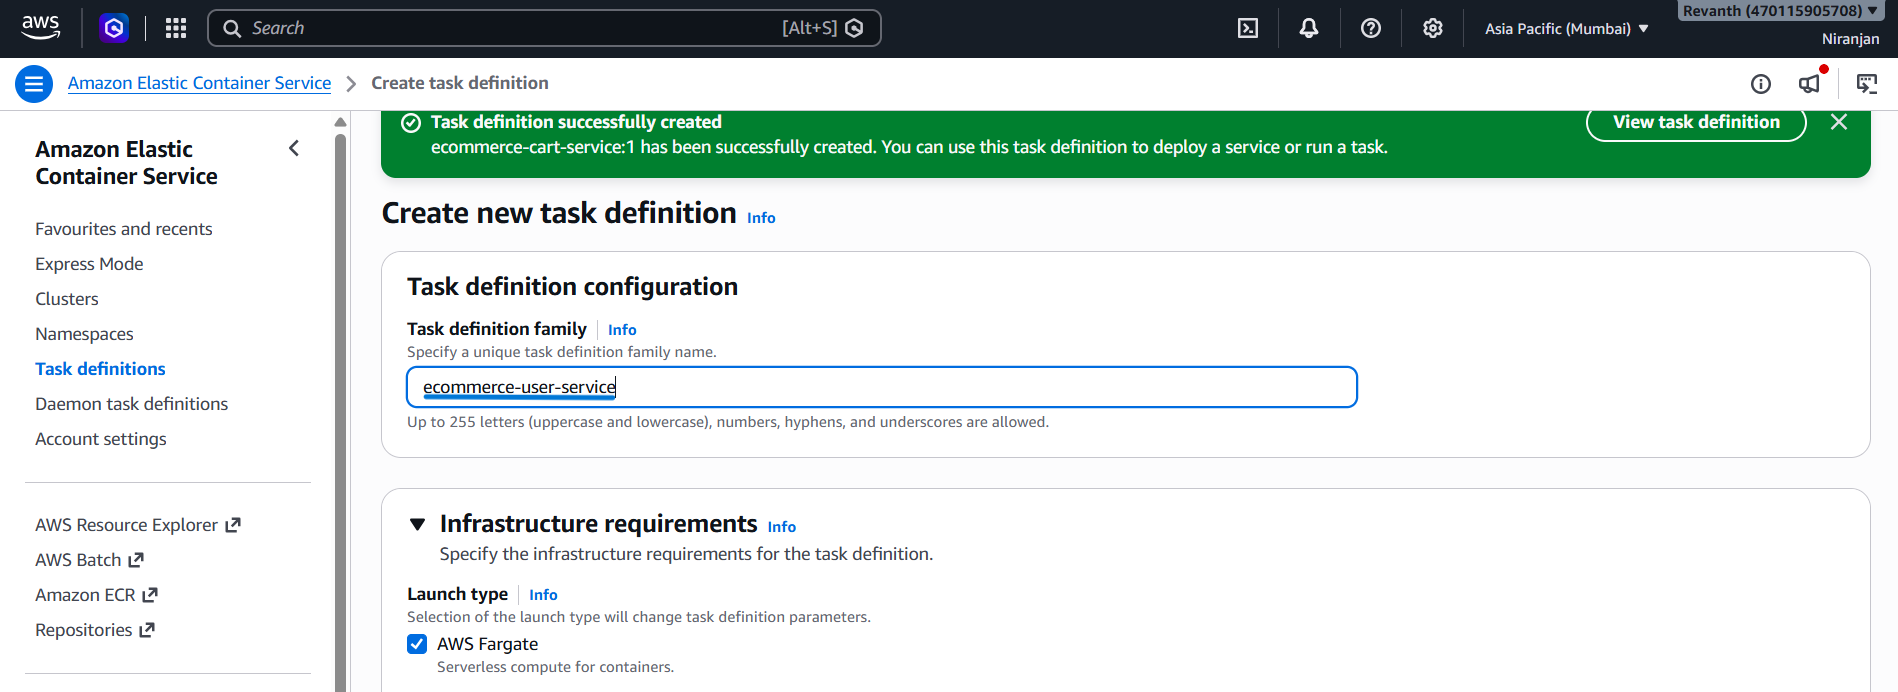
- Task definition family:
ecommerce-user-service
- Operating system/Architecture: Linux/X86_64
- CPU:
0.25 vCPU - Memory:
0.5 GB
Select the existing
ecsTaskExecutionRolefrom the Task execution role dropdown.Container name:
user-serviceImage:
ecommerce/user-service:latest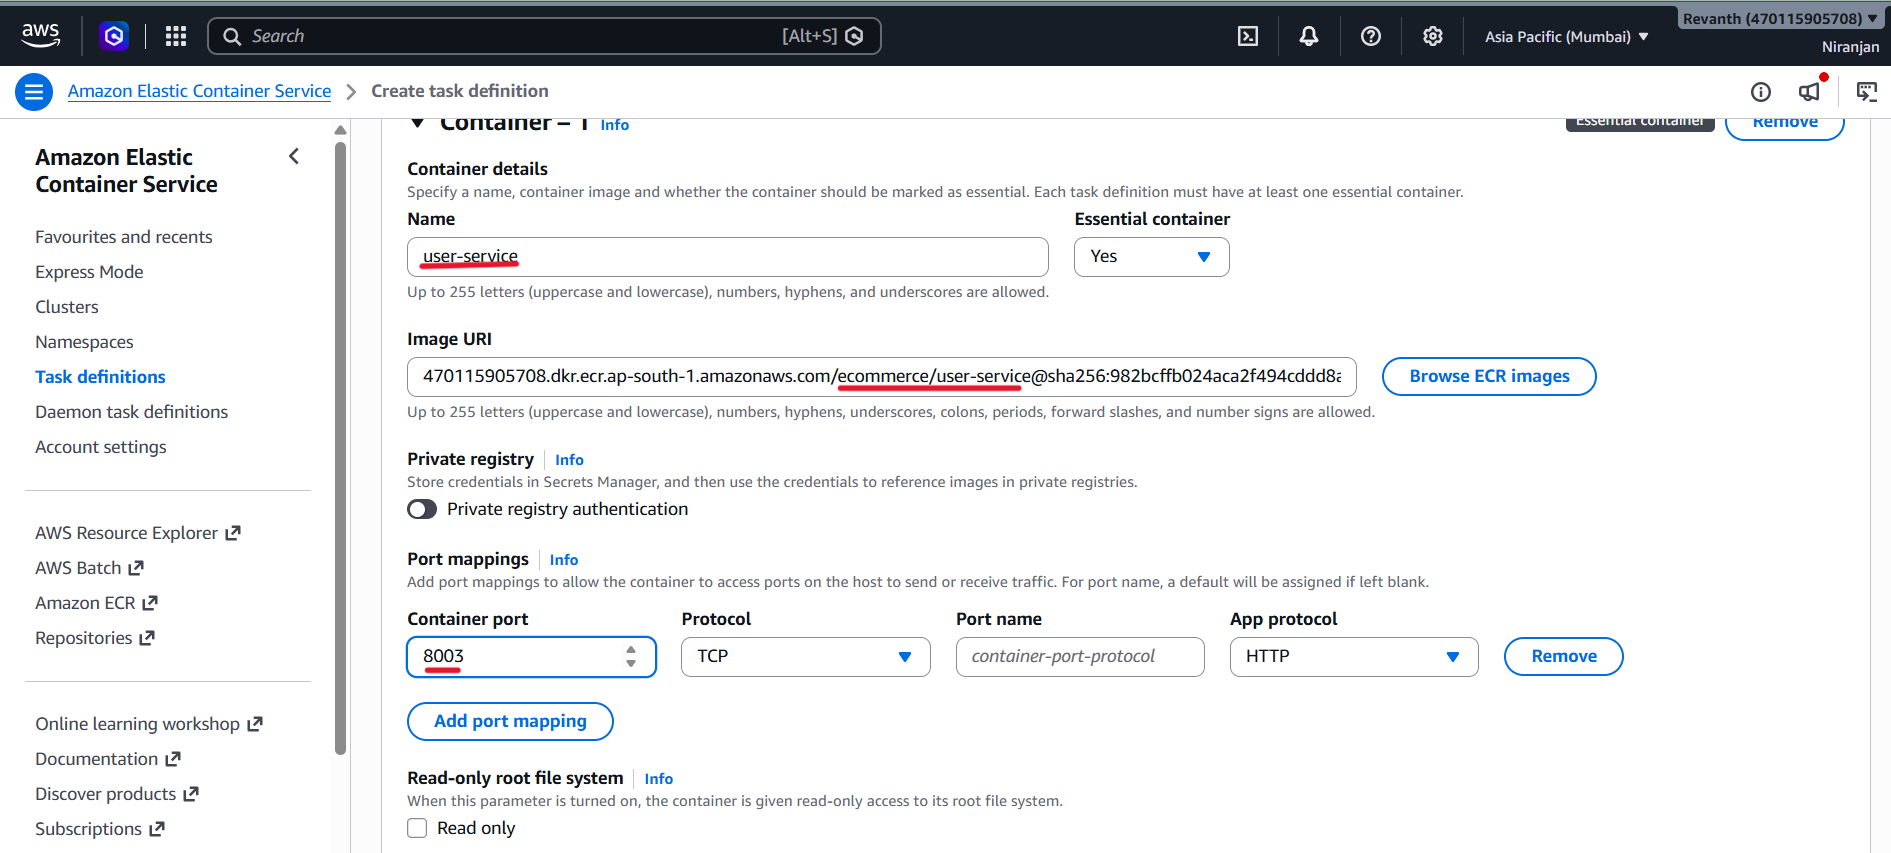
Container port:
8003Environment variable:
ENVIRONMENT = dev
- Environment variable:
AWS_REGION = ap-south-1 - Click Create task definition.
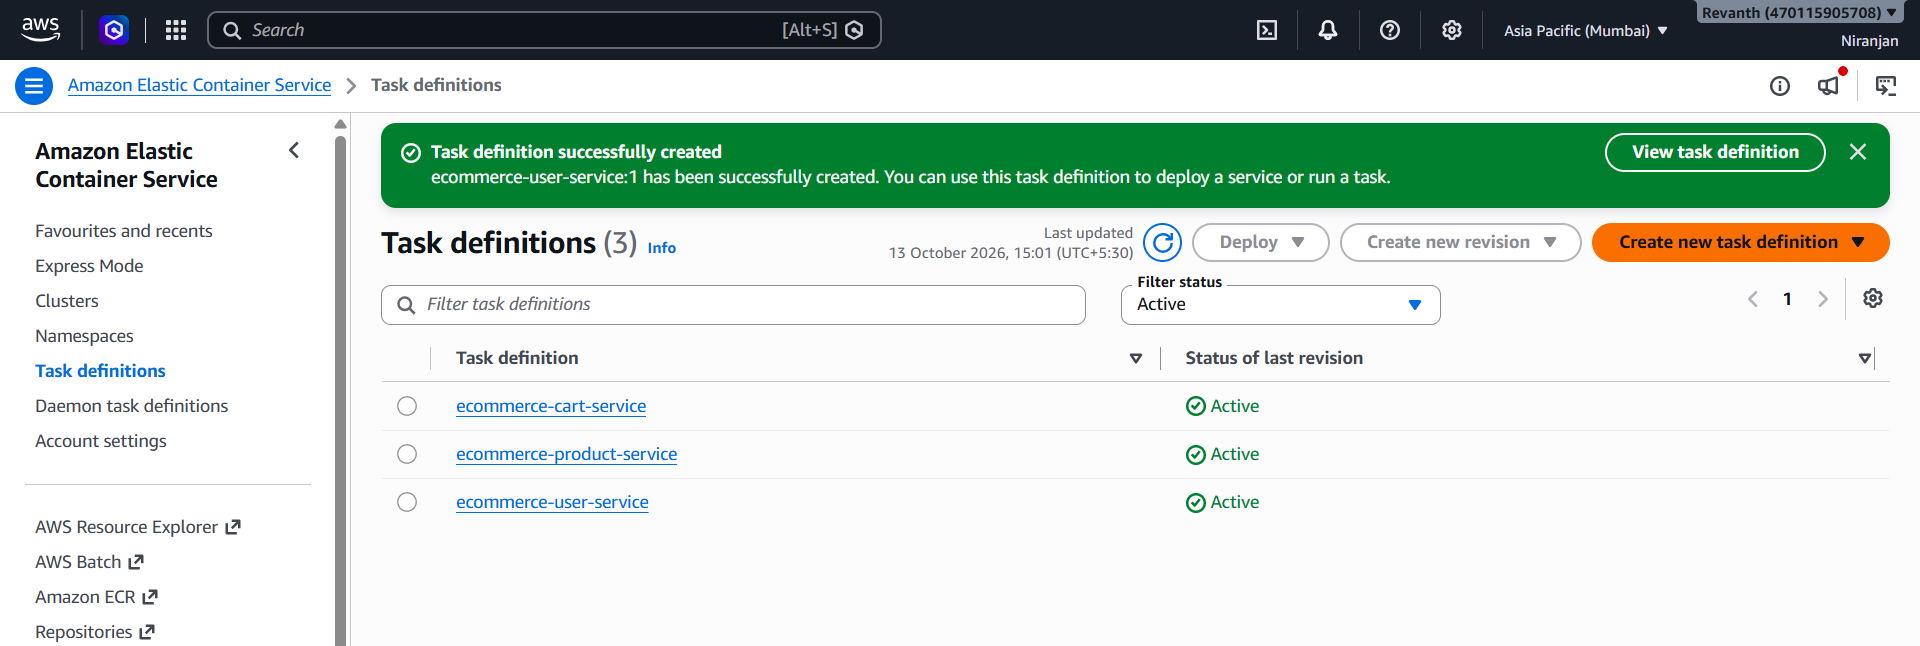
5.7.4 Create the Order Service Task Definition
Repeat the same process with these details:
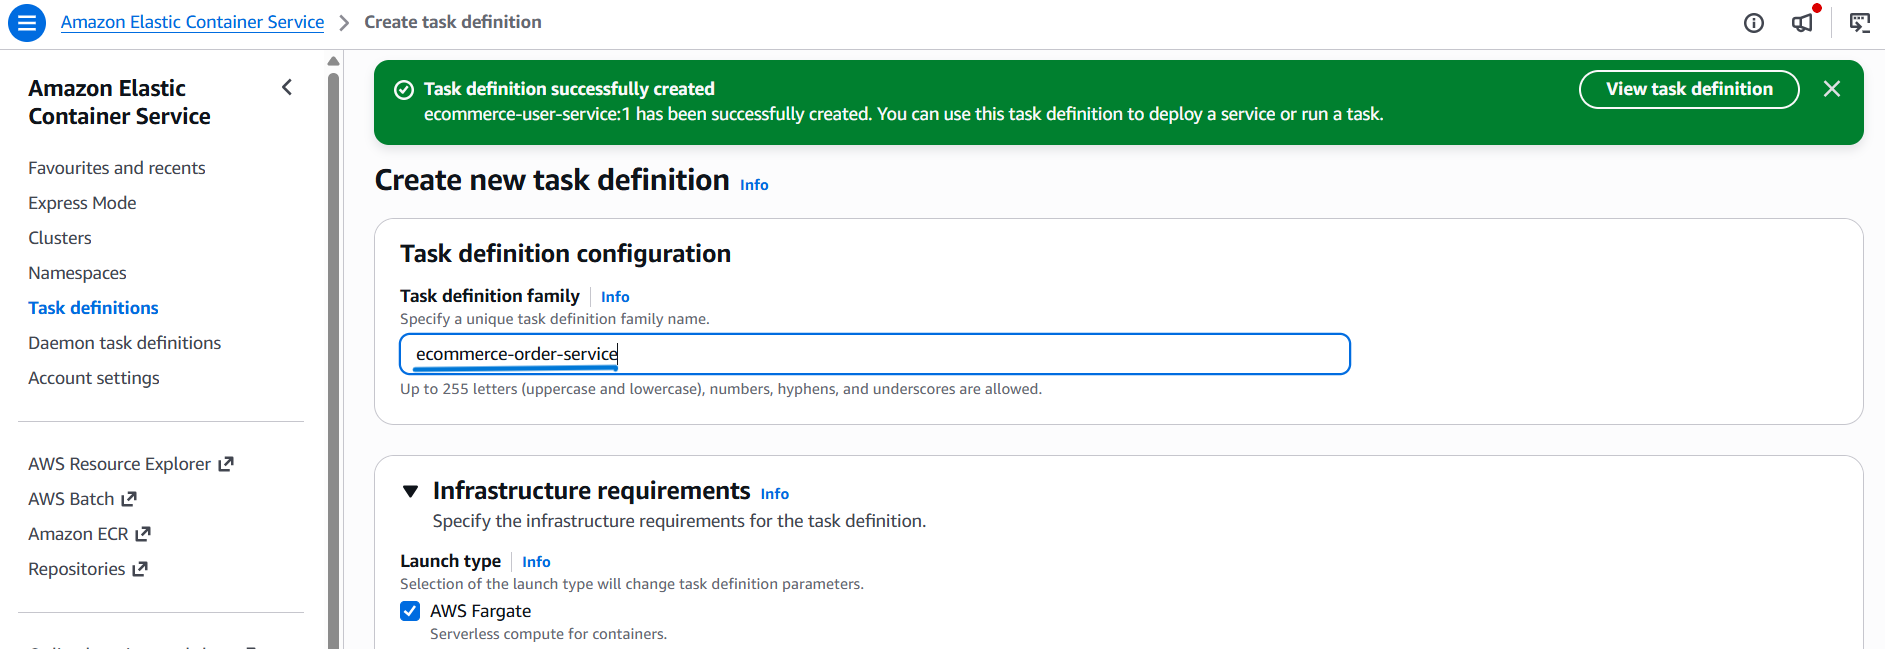
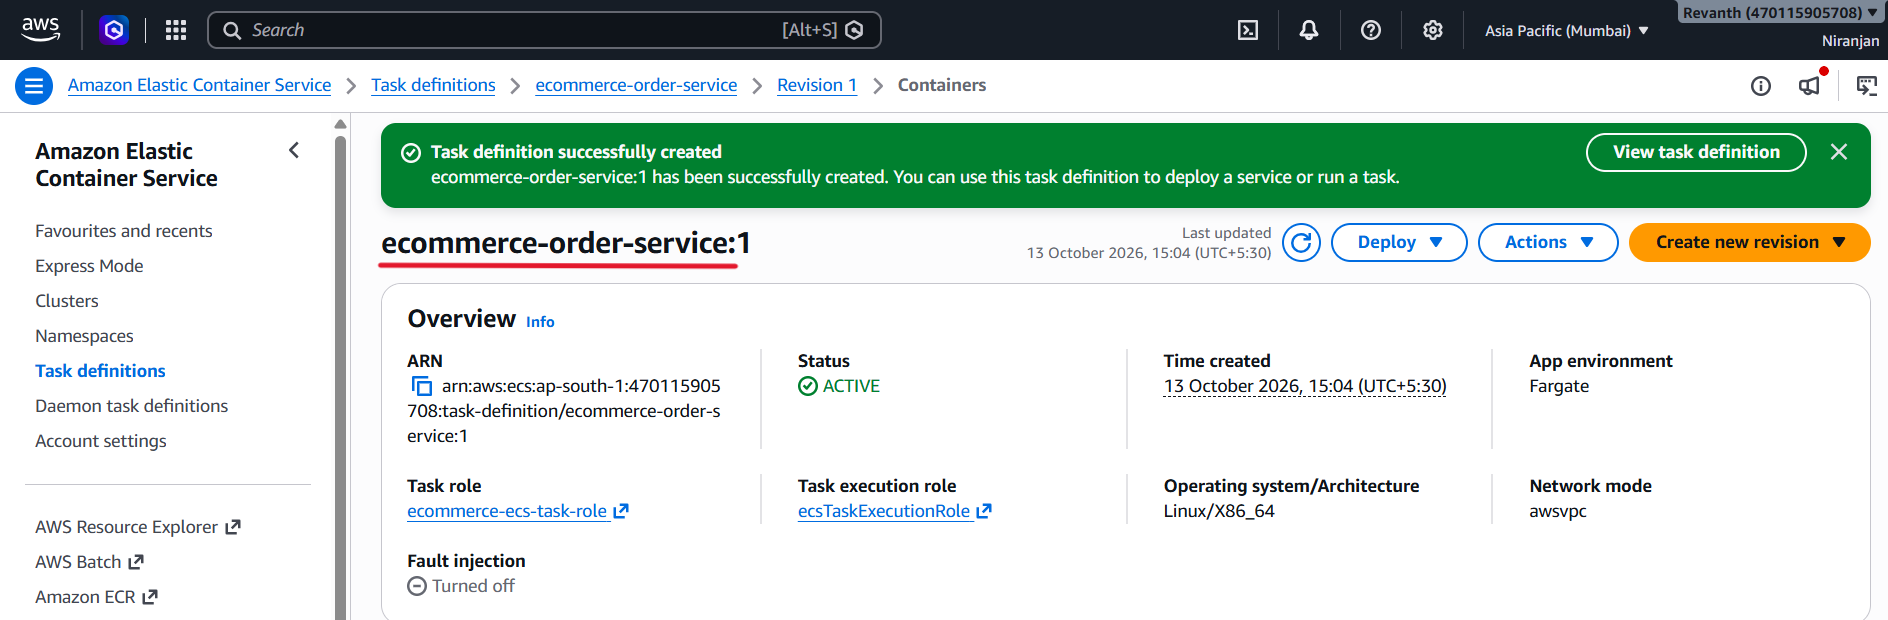
- Task definition family:
ecommerce-order-service
- Operating system/Architecture: Linux/X86_64
- CPU:
0.25 vCPU - Memory:
0.5 GB
- Select the existing
ecsTaskExecutionRolefrom the Task execution role dropdown. - Container name:
order-service - Image:
ecommerce/order-service:latest
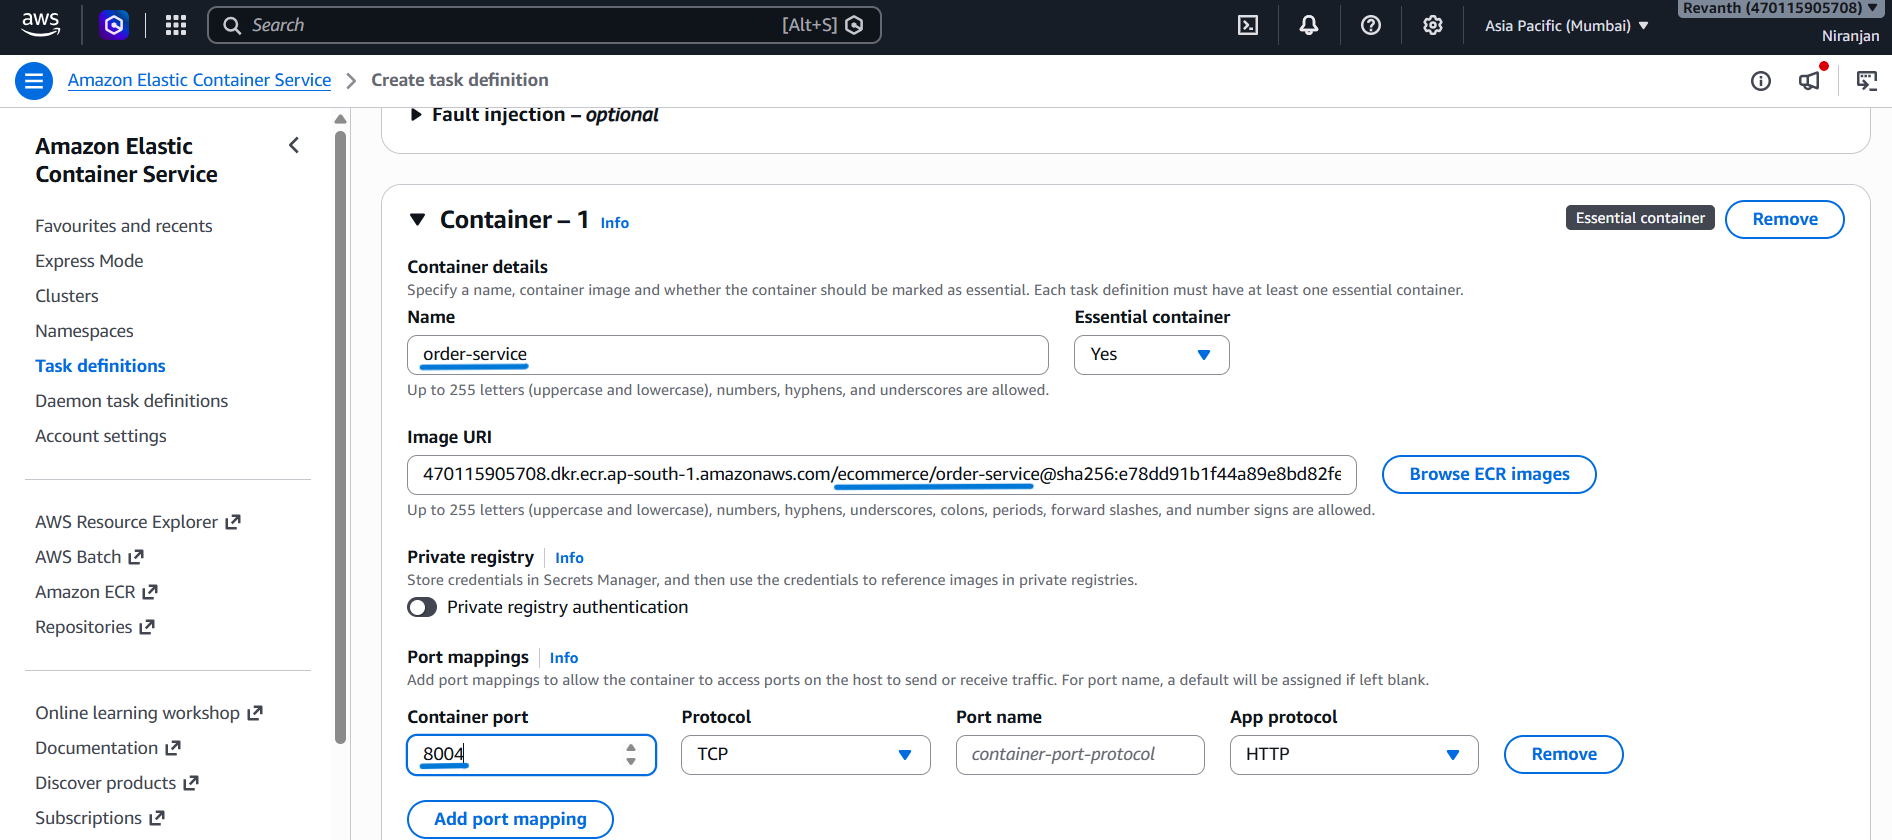
- Container port:
8004
- Environment variable:
ENVIRONMENT = dev - Environment variable:
AWS_REGION = ap-south-1 - Click Create task definition.
5.7.5 Verify All Task Definitions
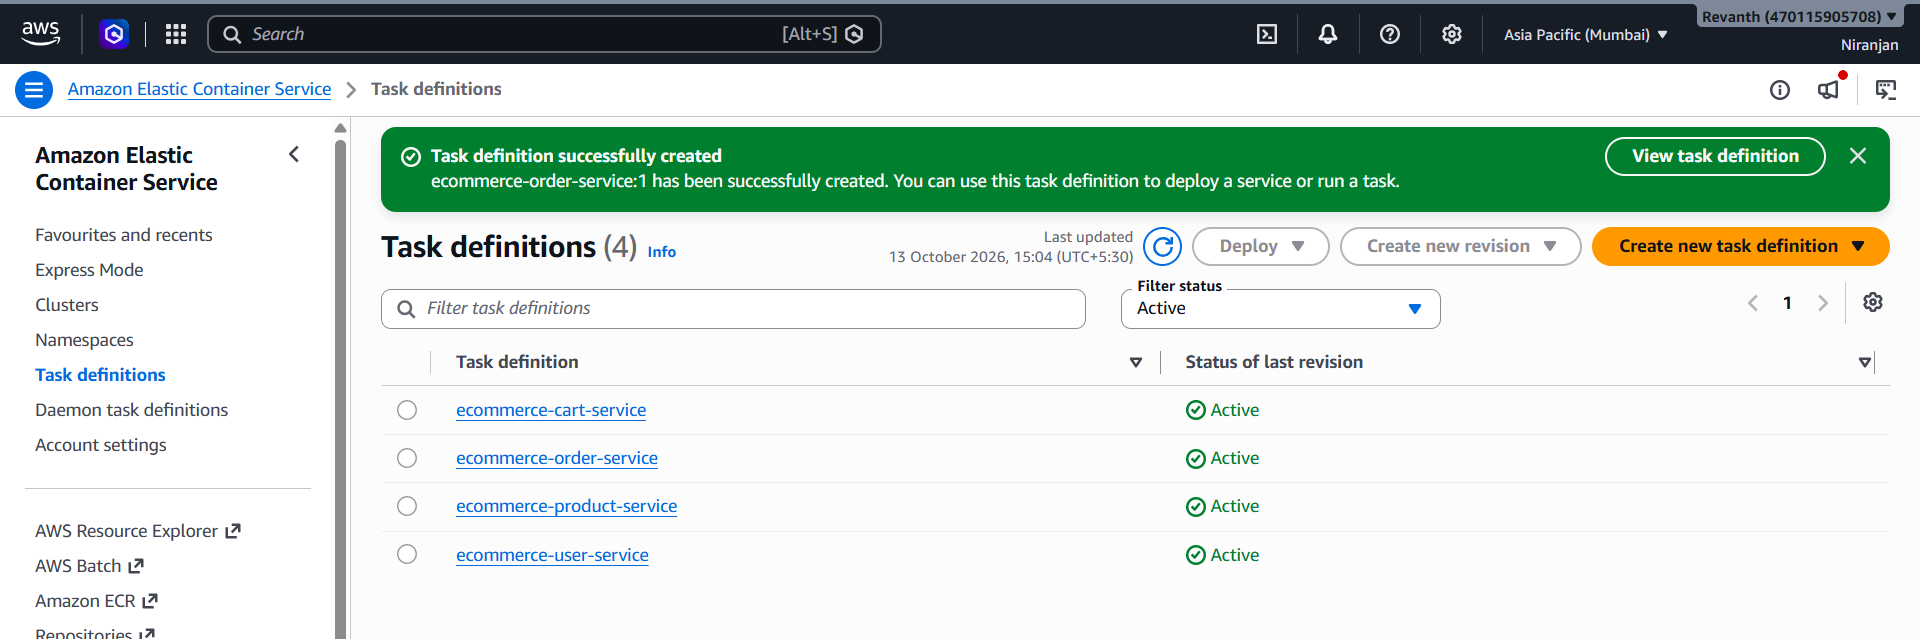
After creating all four task definitions, verify that they are available in the ECS console.
| Service | Task Definition | CPU | Memory | Container Port |
|---|---|---|---|---|
| Product | ecommerce-product-service |
0.25 vCPU | 0.5 GB | 8001 |
| Cart | ecommerce-cart-service |
0.25 vCPU | 0.5 GB | 8002 |
| User | ecommerce-user-service |
0.25 vCPU | 0.5 GB | 8003 |
| Order | ecommerce-order-service |
0.25 vCPU | 0.5 GB | 8004 |
5.8 Create the ECS Cluster and Services
Now that all four task definitions are ready, we can create the ECS cluster and launch the backend services.
5.8.1 Create the ECS Cluster
- ECS Console → Clusters → Create cluster
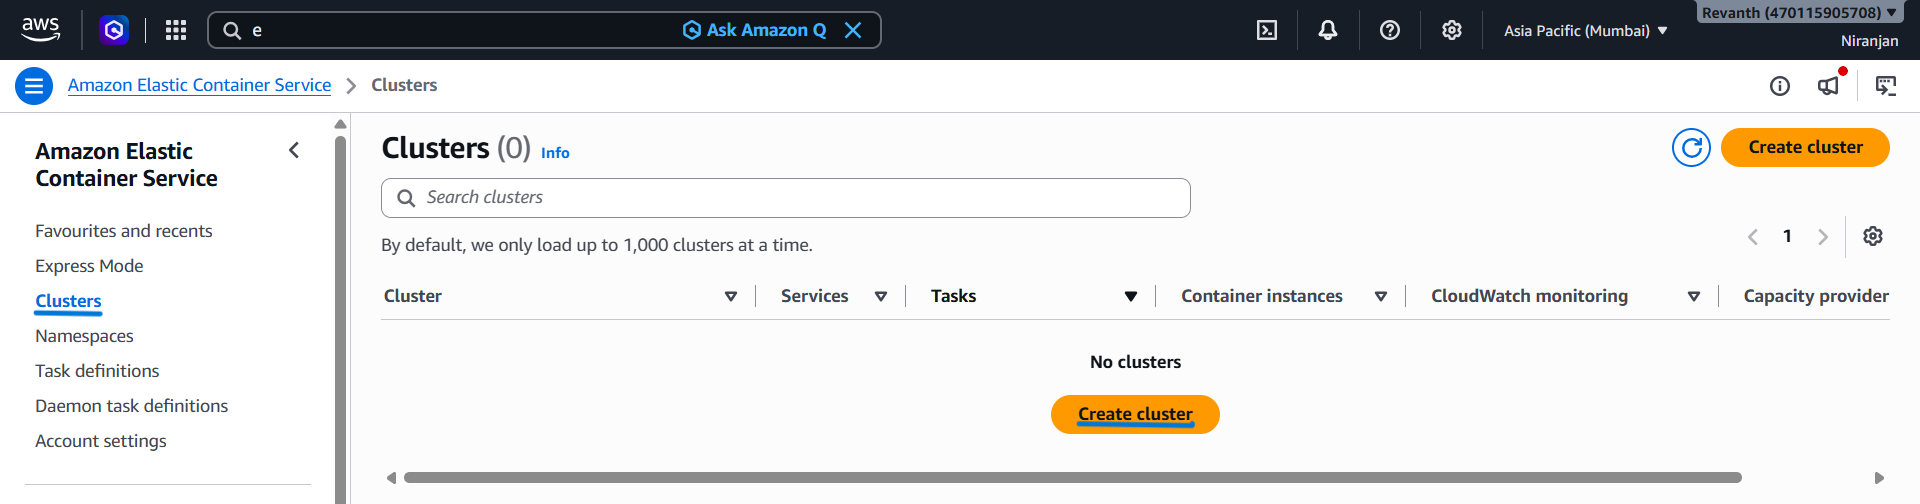
- Cluster name:
ecommerce-cluster
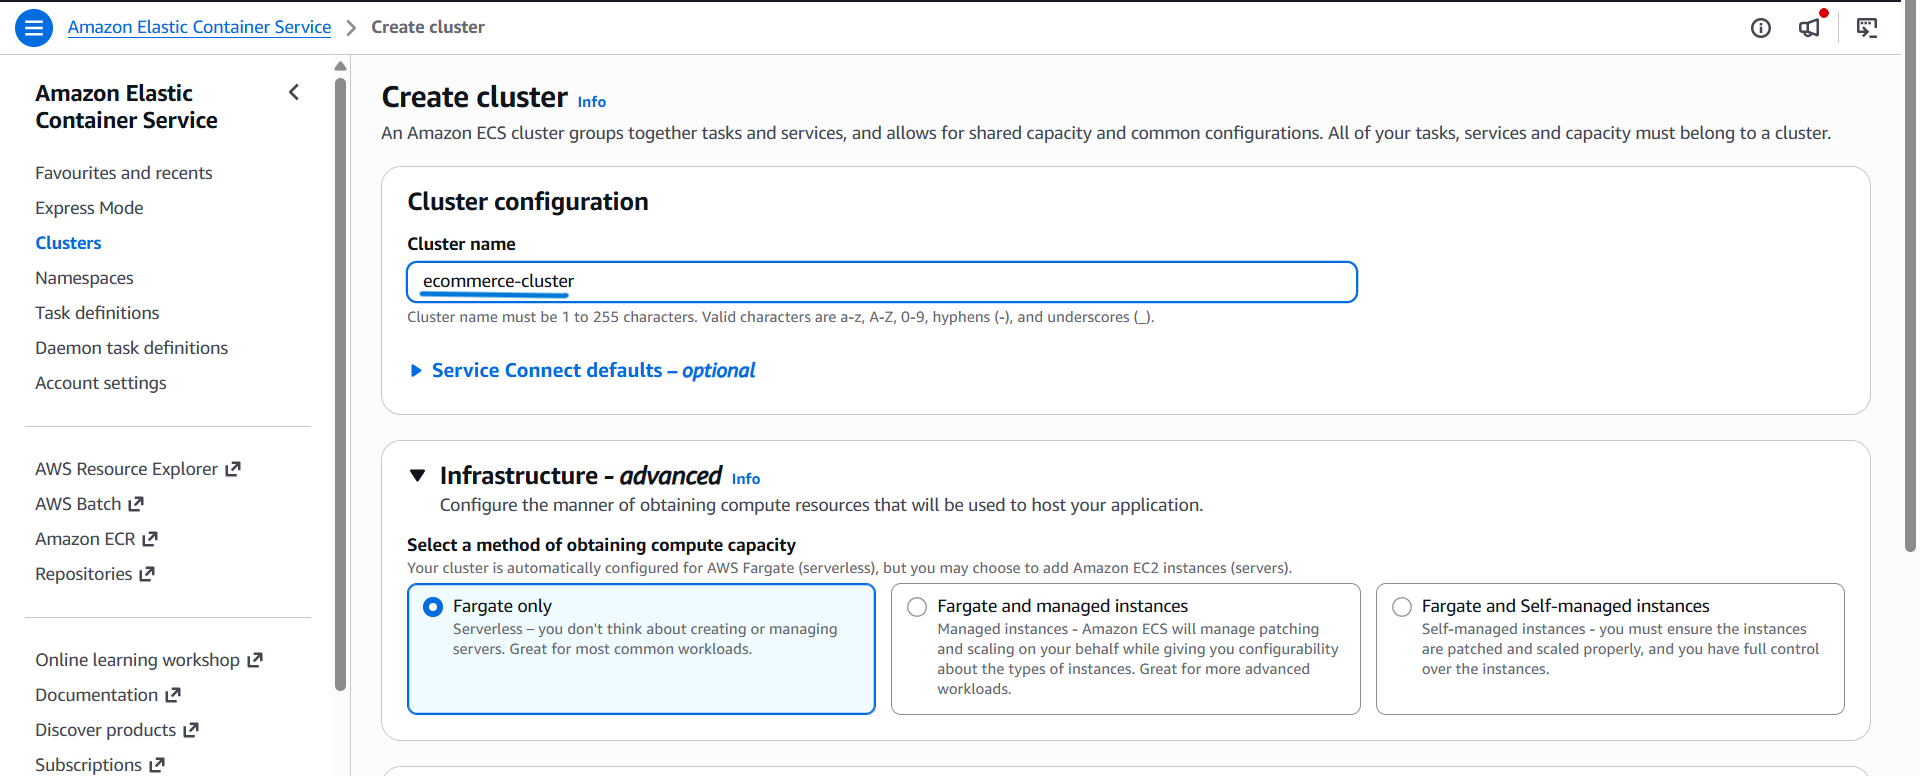
- Infrastructure: Fargate only.
- Keep the remaining settings as default.
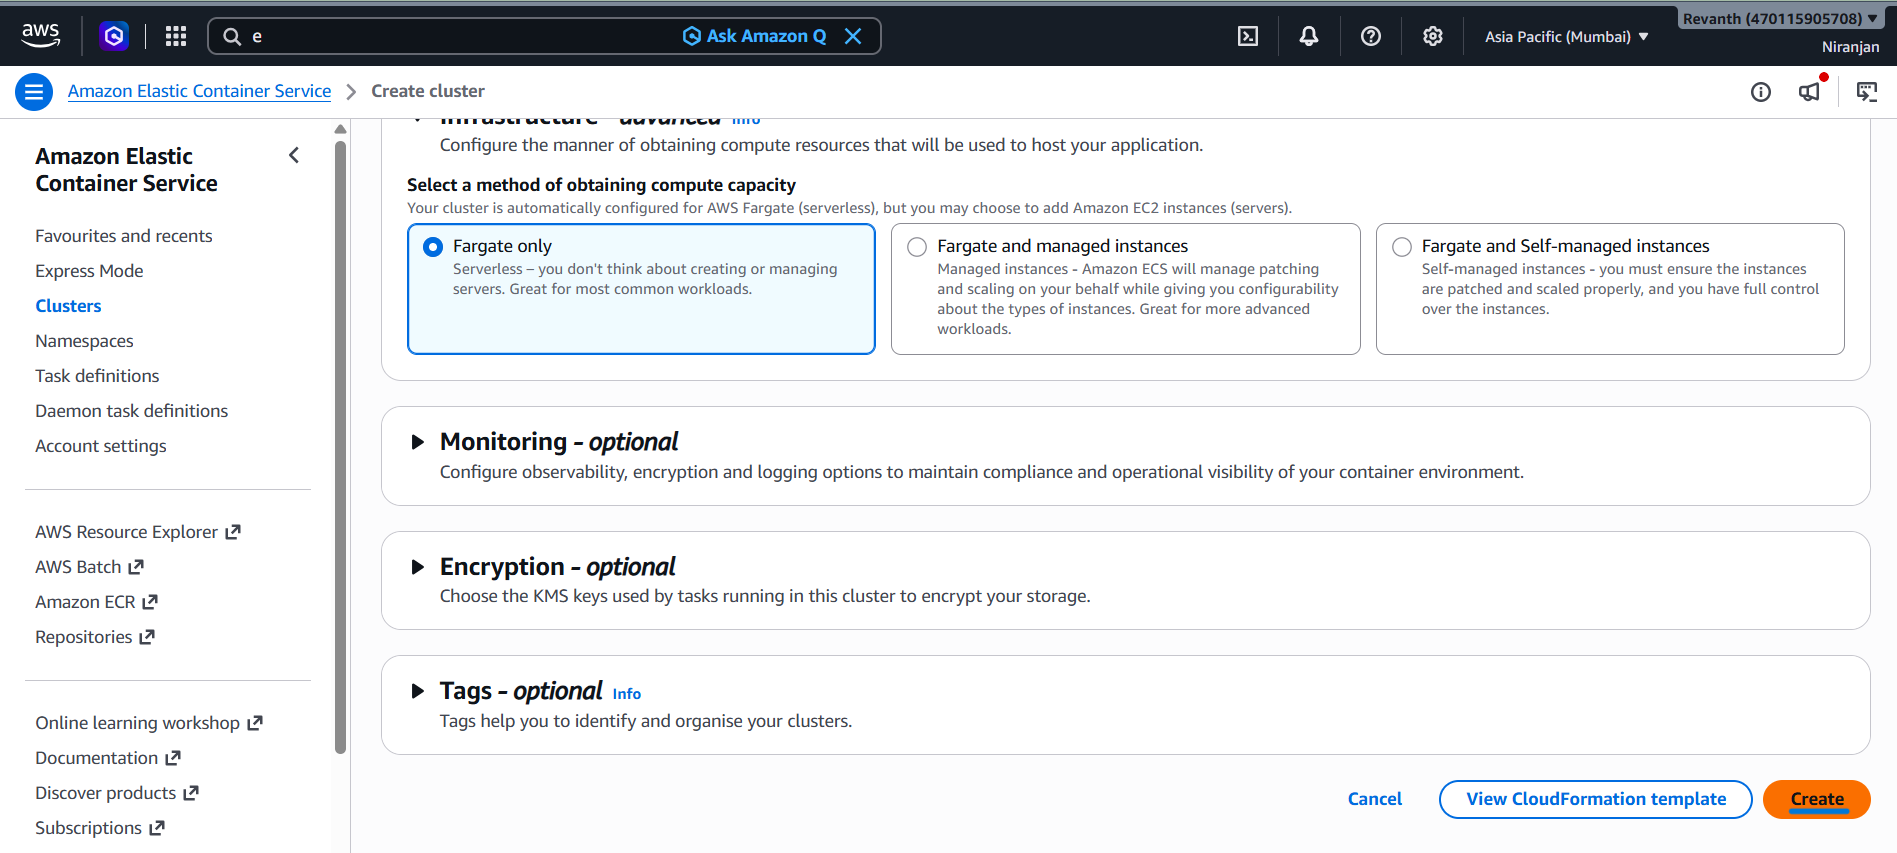
- Click Create cluster.
AWS Fargate manages the underlying compute infrastructure required to run the containers. We do not need to create or manage EC2 instances for the ECS tasks.
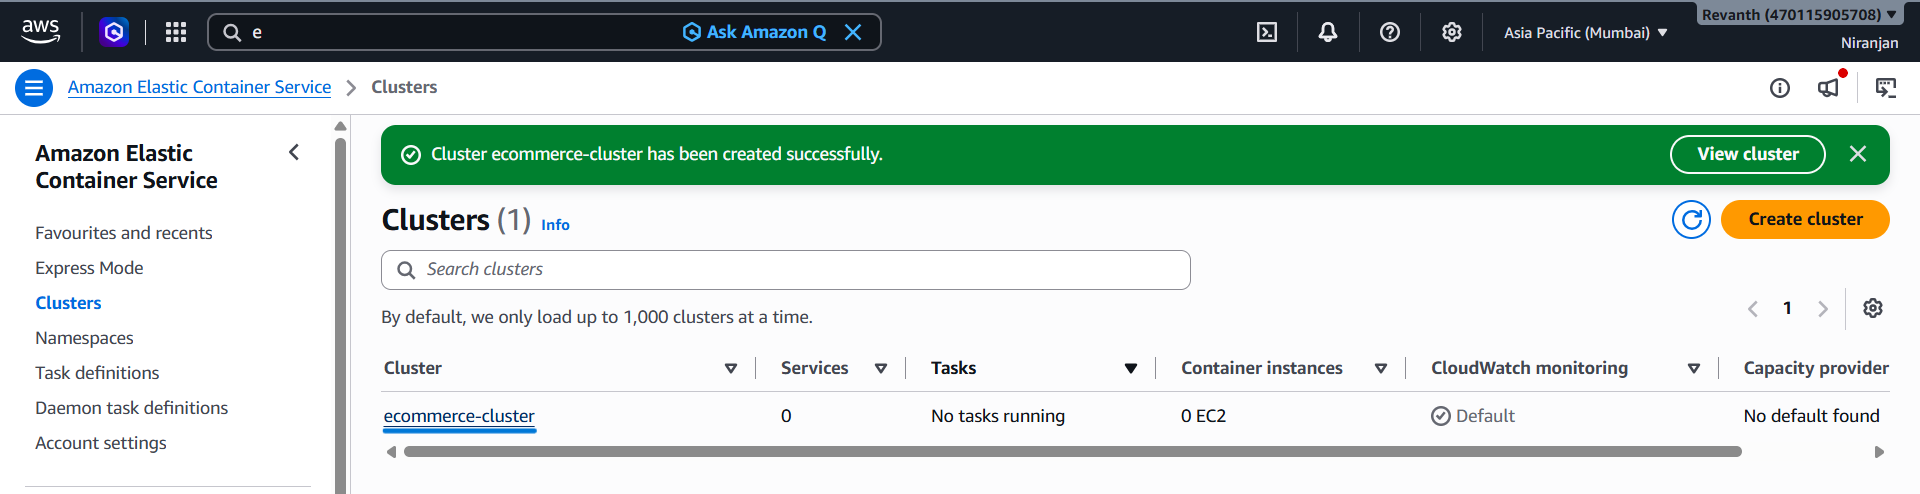
5.8.2 Create the Product Service
- Open
ecommerce-cluster.
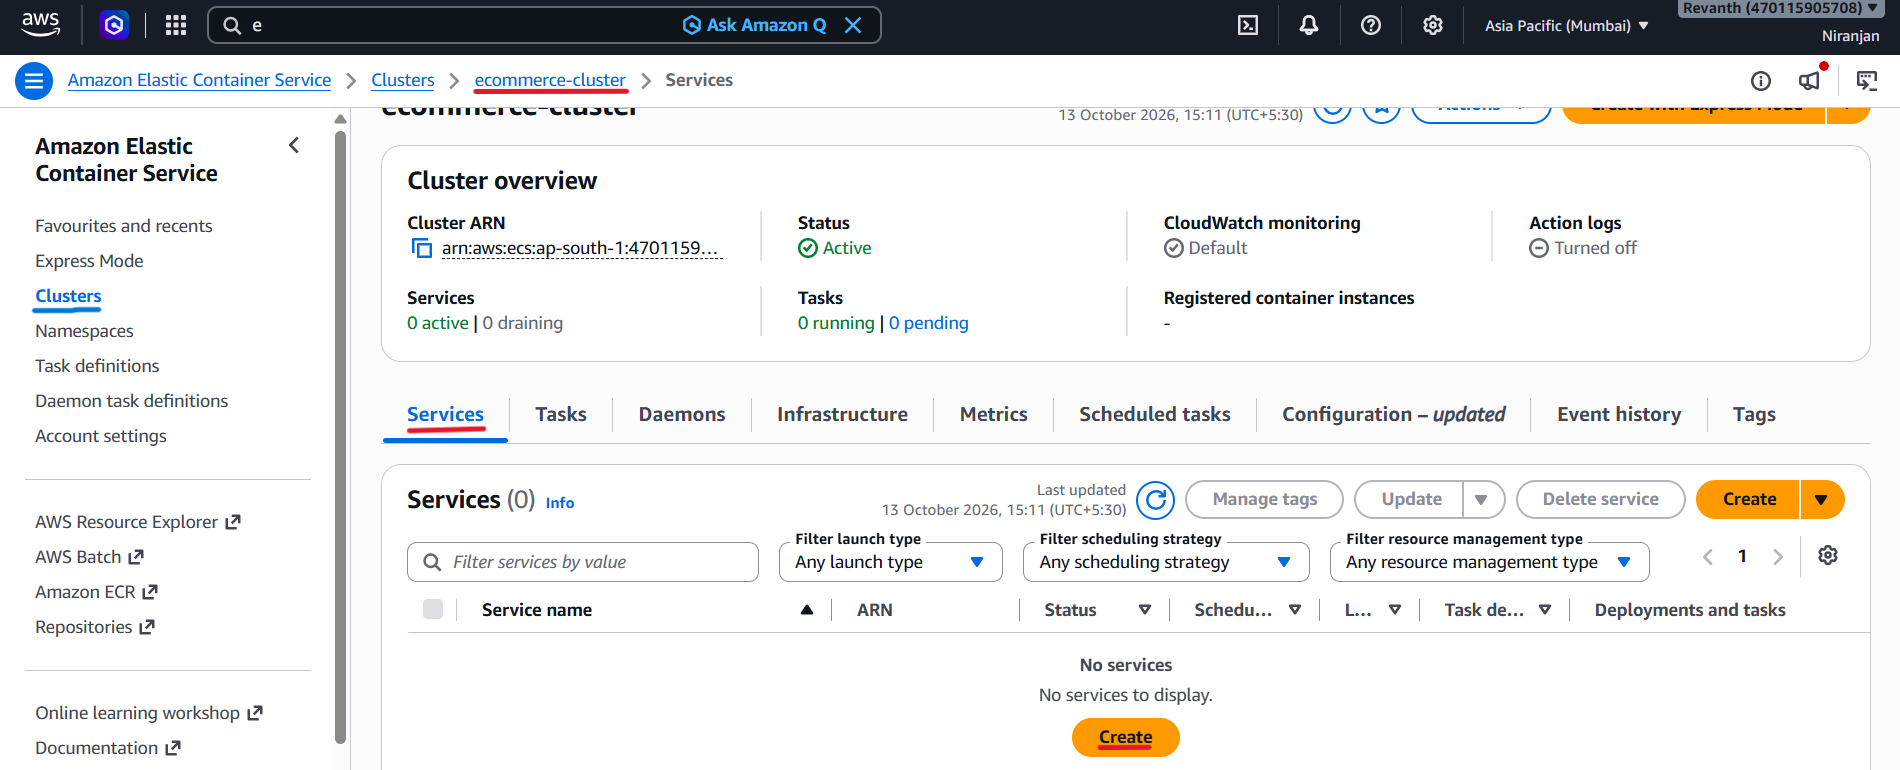
- Go to Services → Create.
Deployment Configuration
- Task definition: Select
ecommerce-product-service - Task definition revision: Select the latest revision.
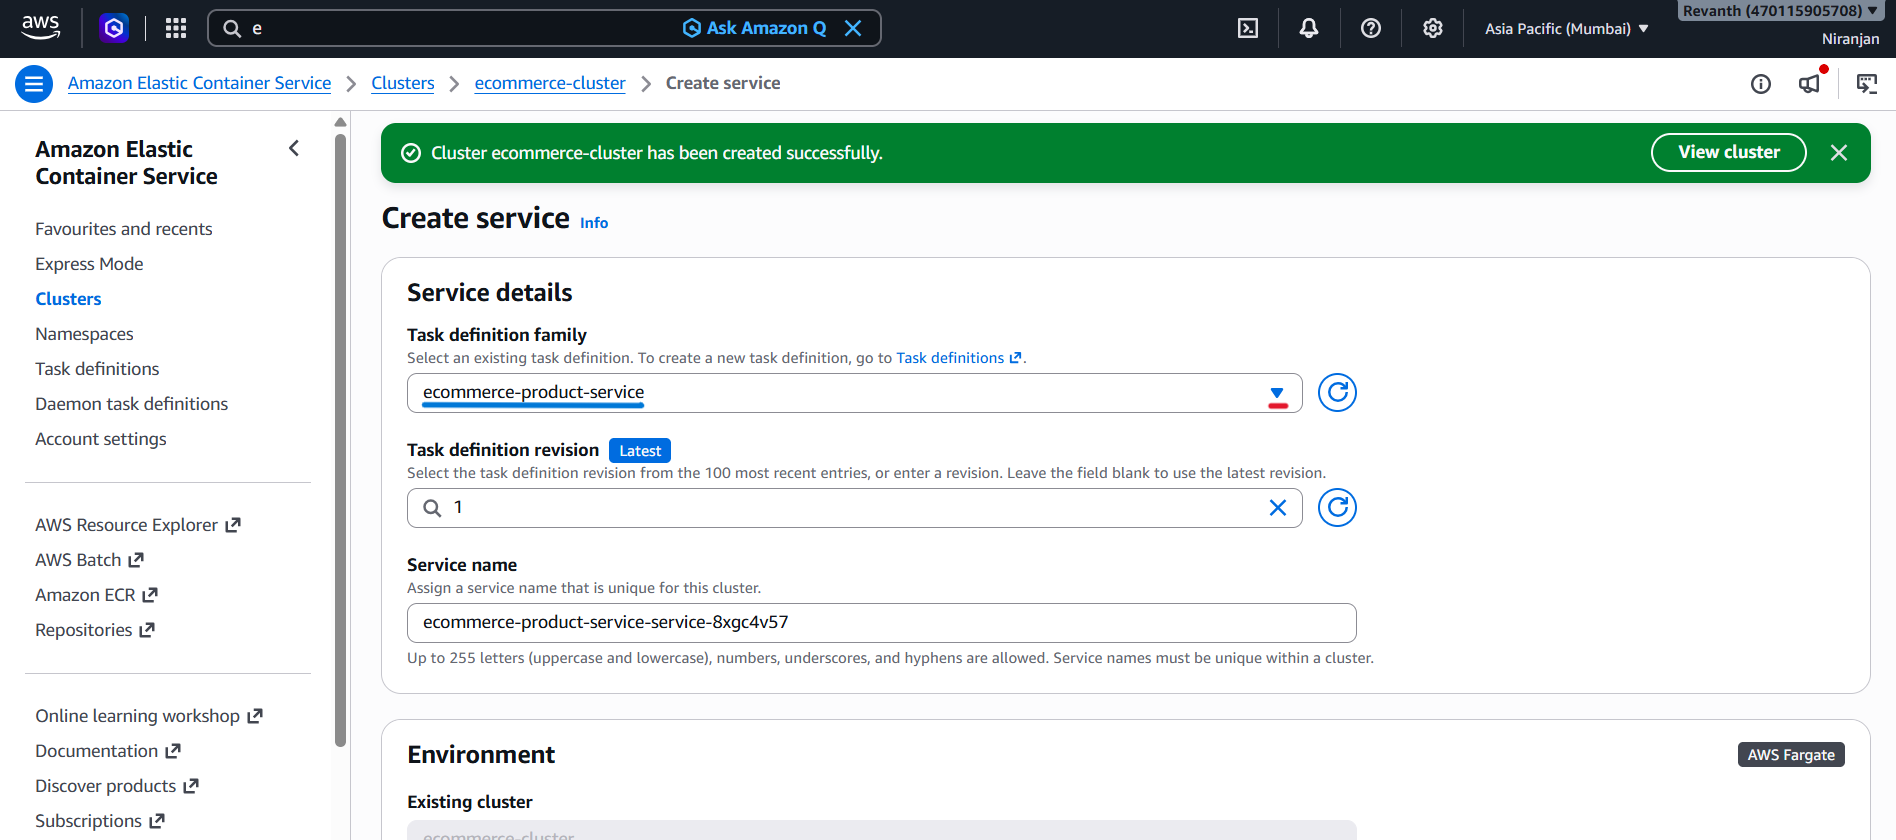
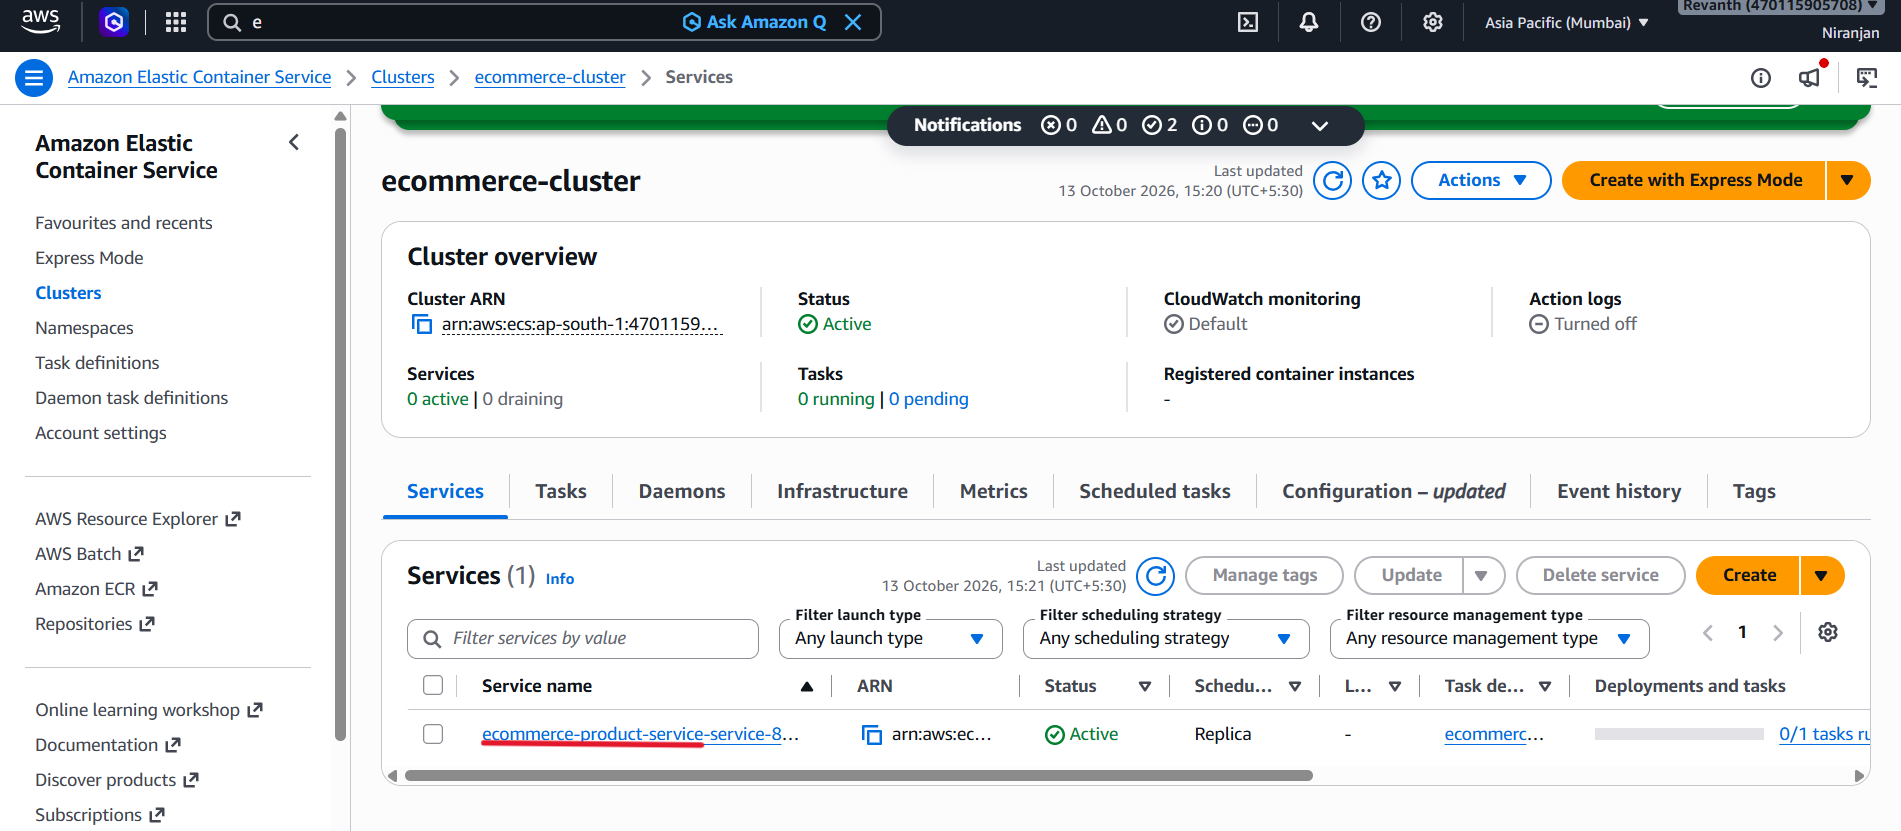
- Service name: Once you select the task definition, AWS may automatically populate a service name with a generated suffix. You can keep the automatically generated name.
- Compute option: Fargate.
- Desired tasks:
1
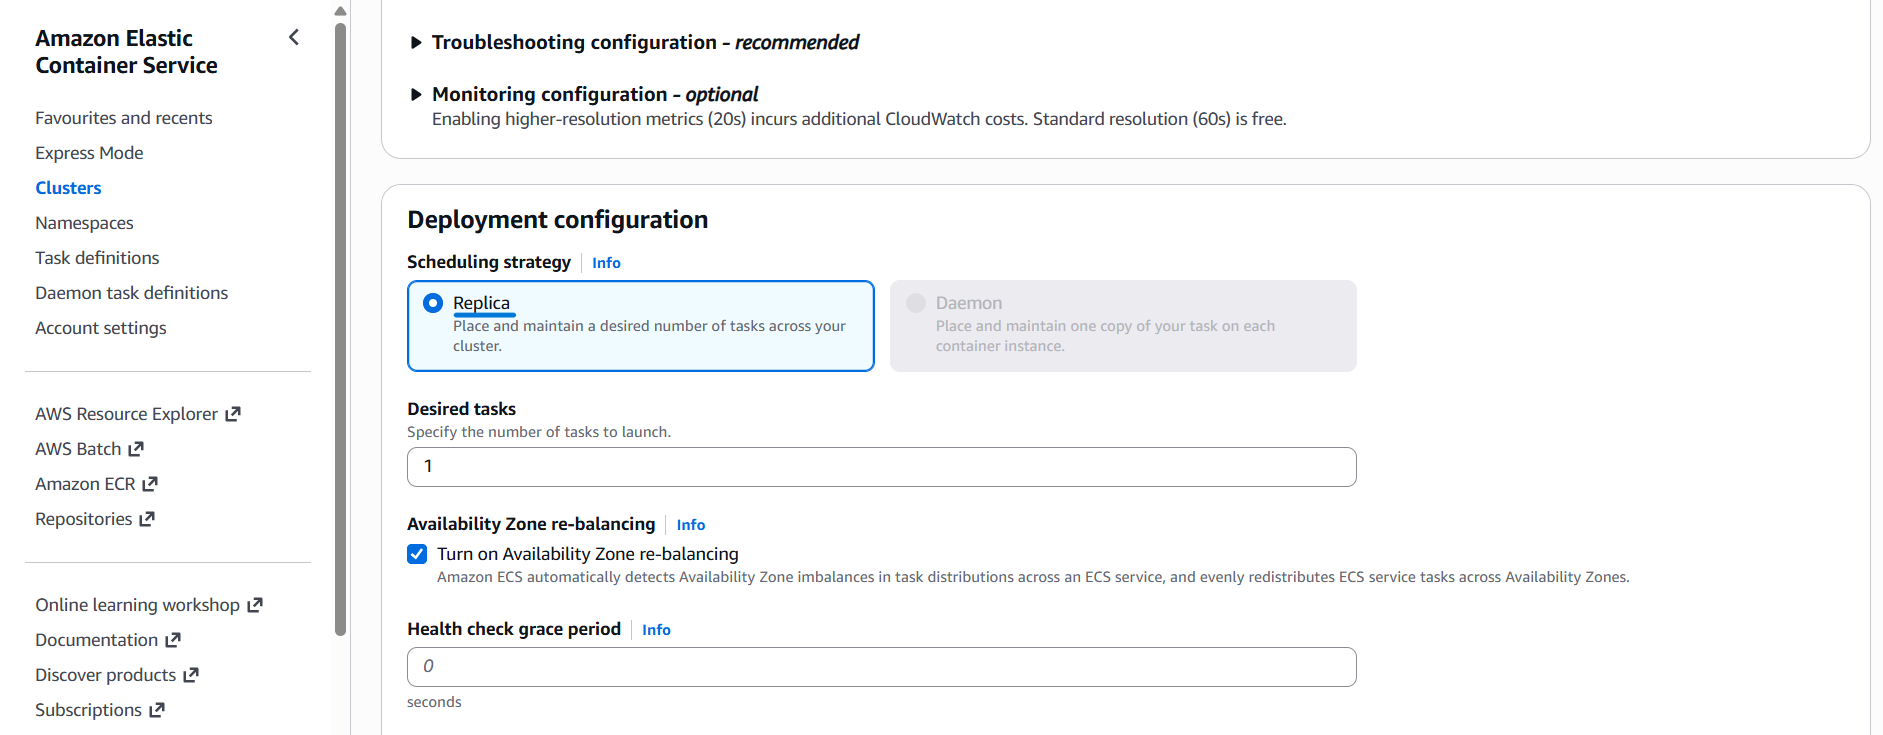
- For this development and testing project, we will run one task per service. In production, multiple tasks may be required for high availability and scalability.
Networking Configuration
- VPC: Select
ecommerce-vpc.
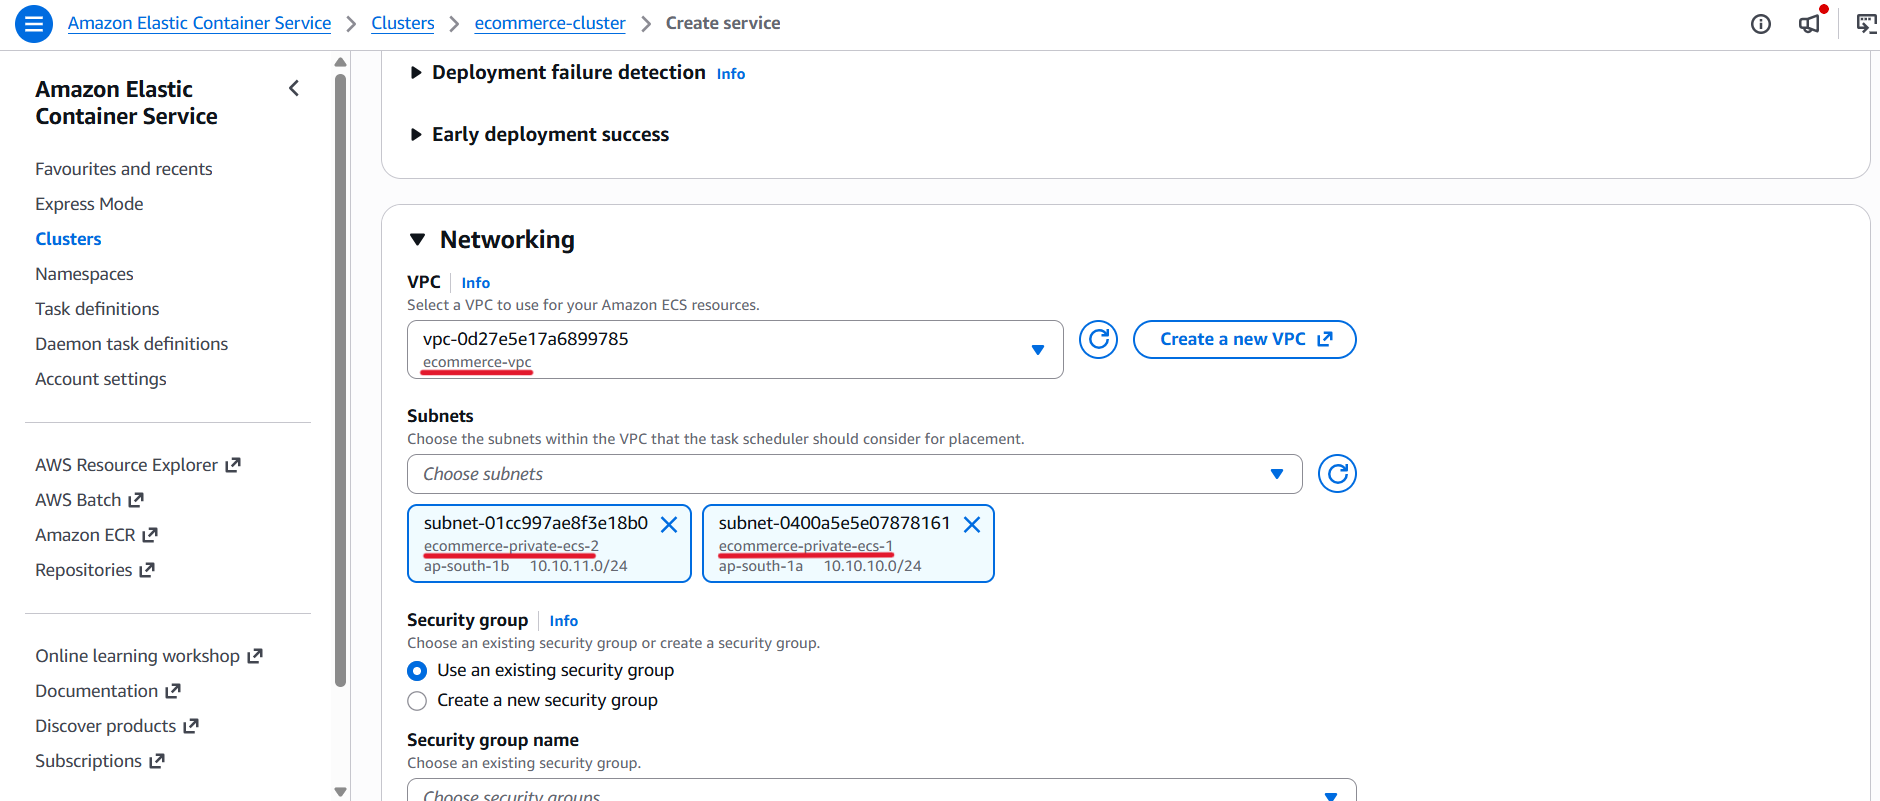
- Subnets: Select only the two private ECS subnets:
10.10.10.0/2410.10.11.0/24
- Security group: Select
ecommerce-ecs-sg.
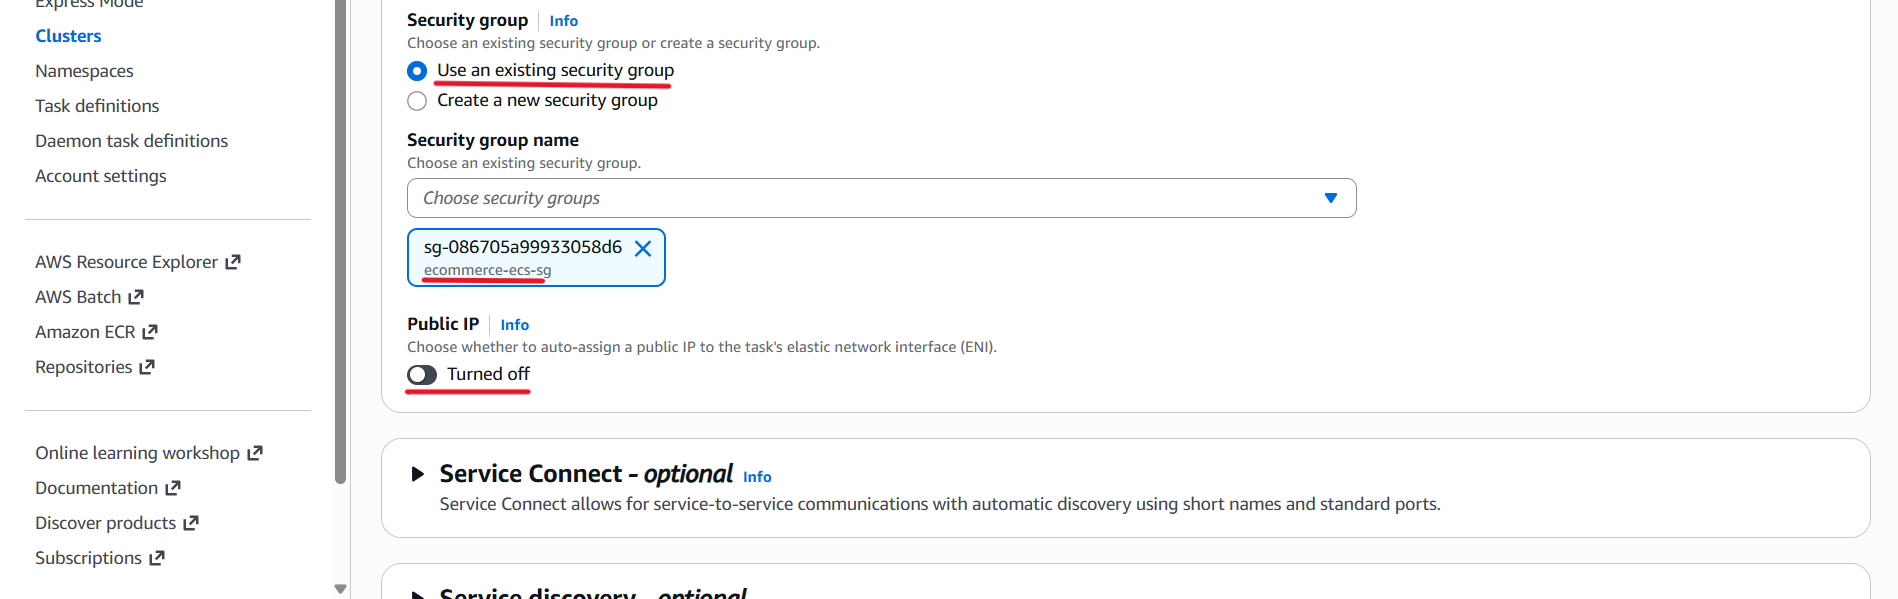
- Public IP: Turned off.
The ECS services should not be directly accessible from the internet. They will receive traffic through the internal ALB.
Load Balancing Configuration
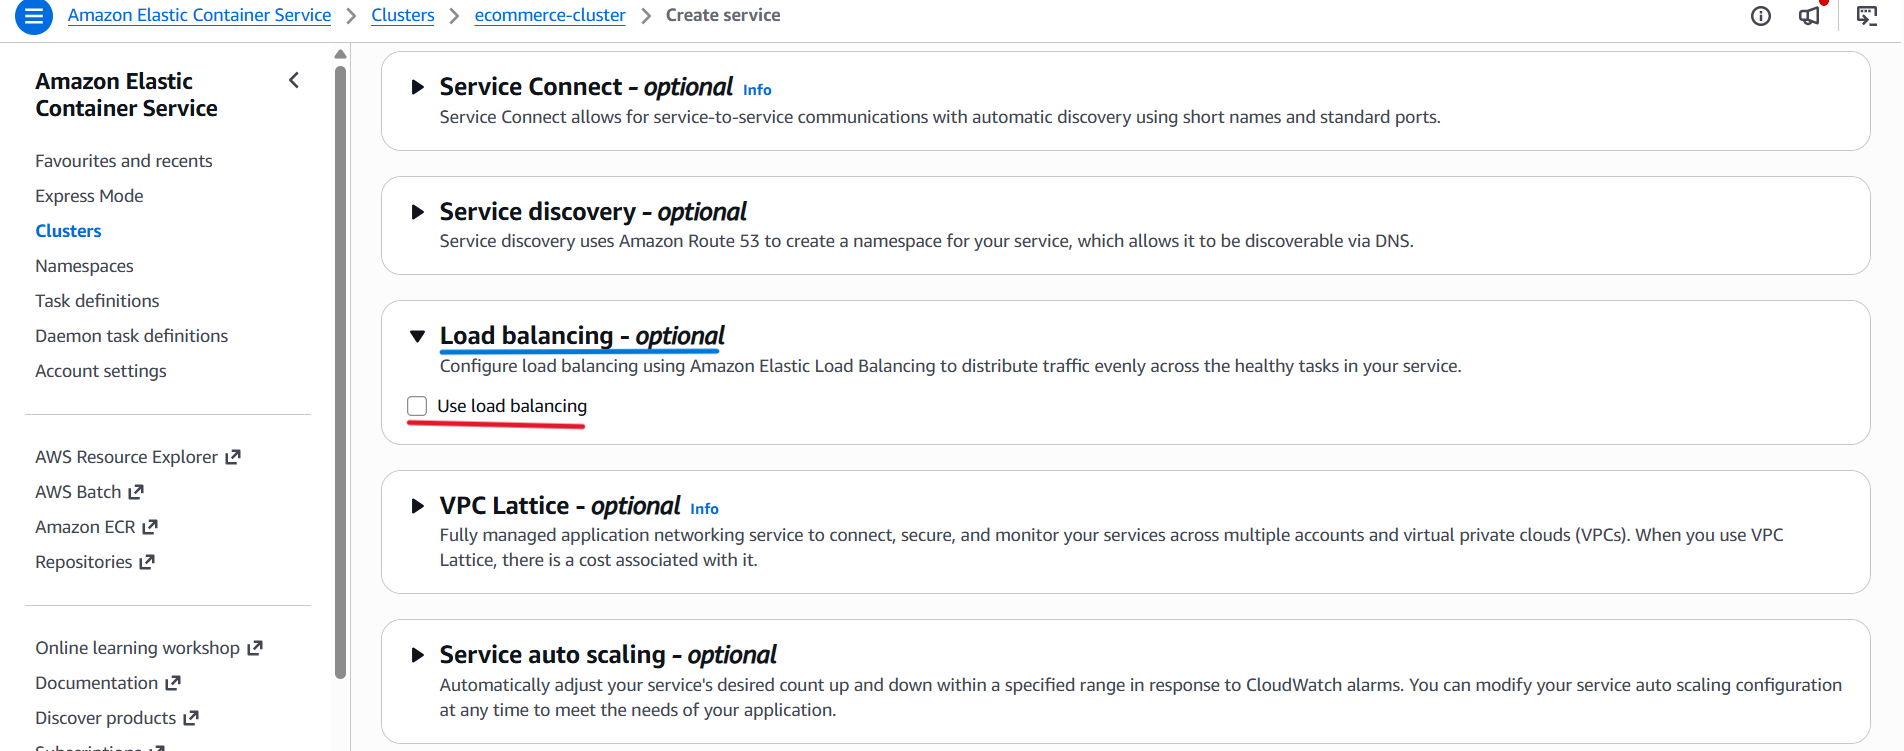
- Enable Use load balancing.
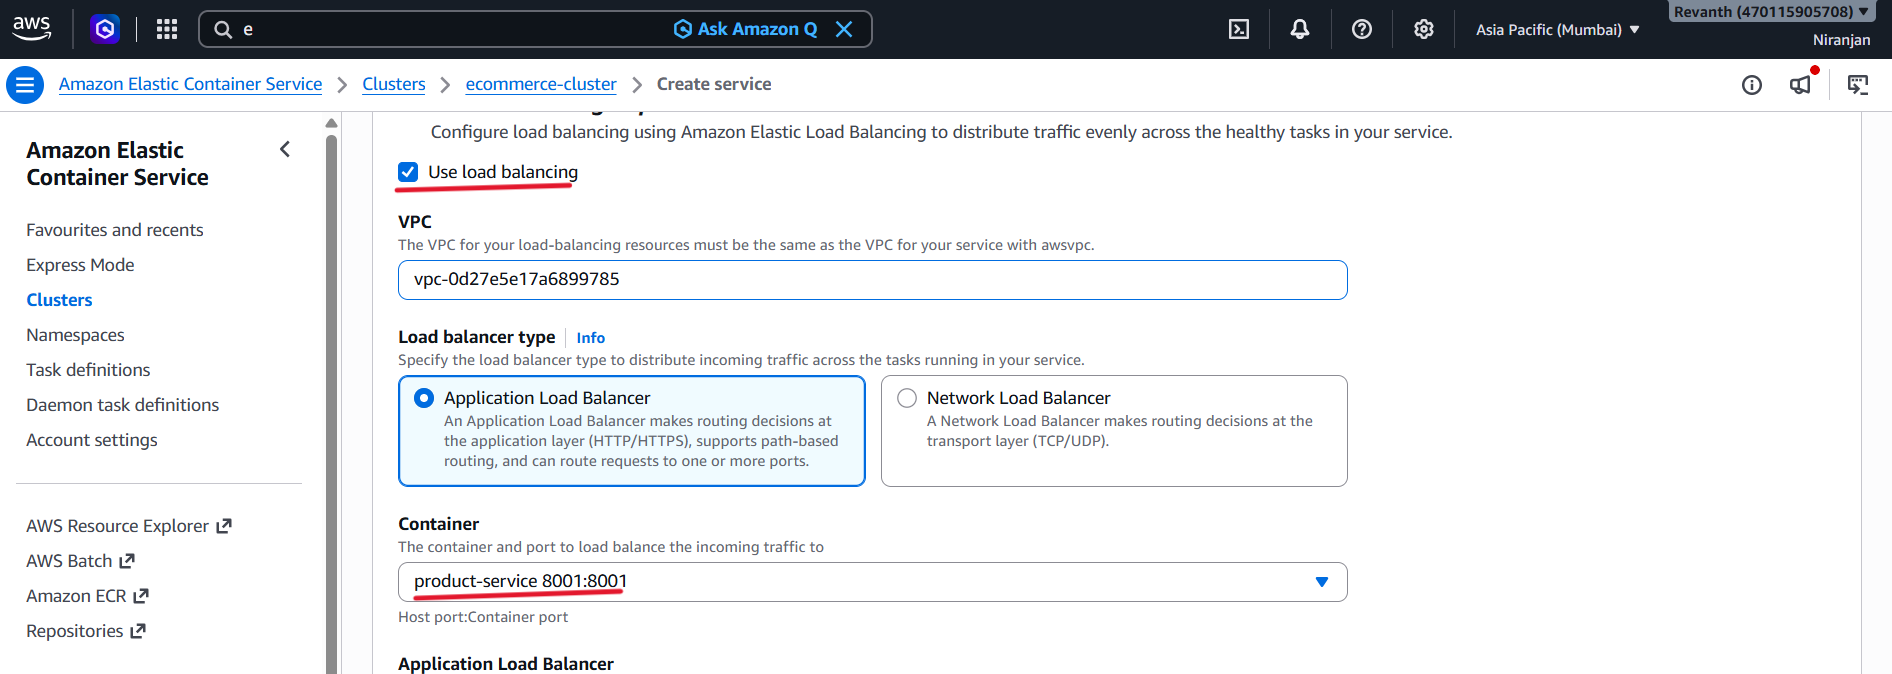
- Load balancer type: Application Load Balancer
- Container: Select
product-service. - Container port: Verify
8001:8001(Host port: 8001, Container port: 8001). - Load balancer: Select
ecommerce-internal-alb.
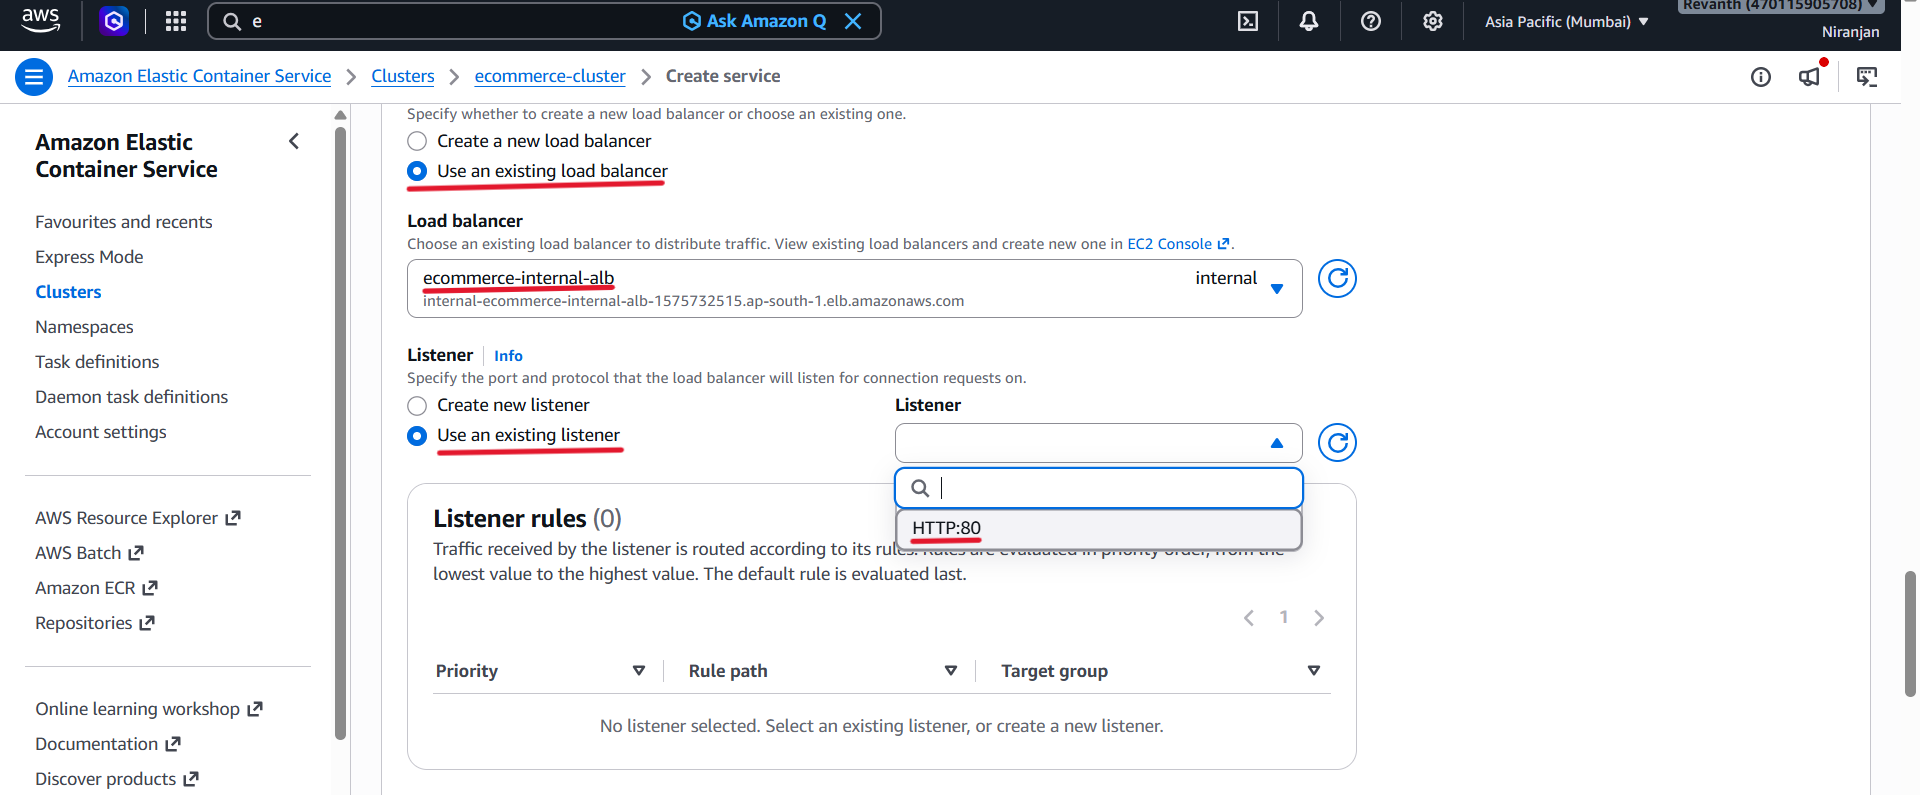
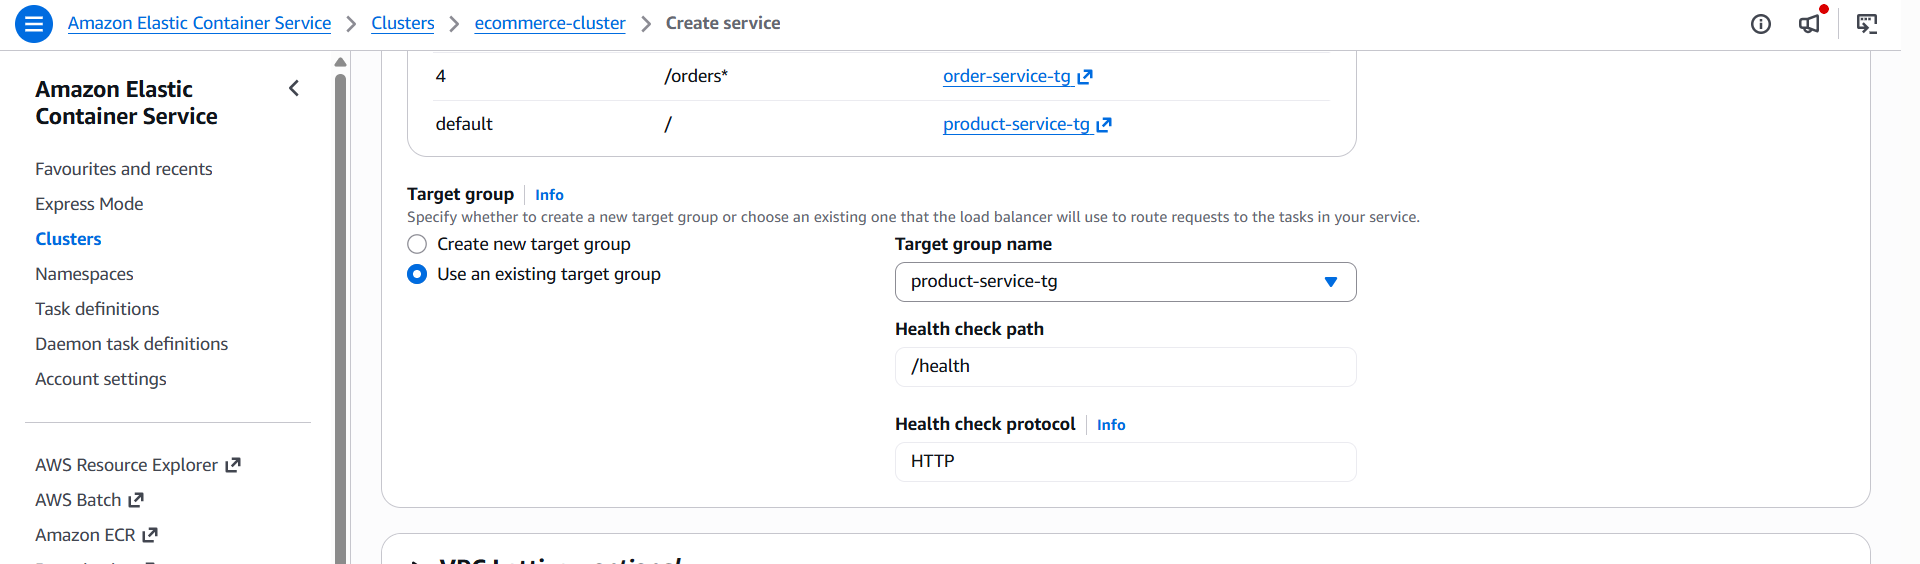
- Listener: Select the existing HTTP:80 listener.
- Target group: Select
product-service-tg.
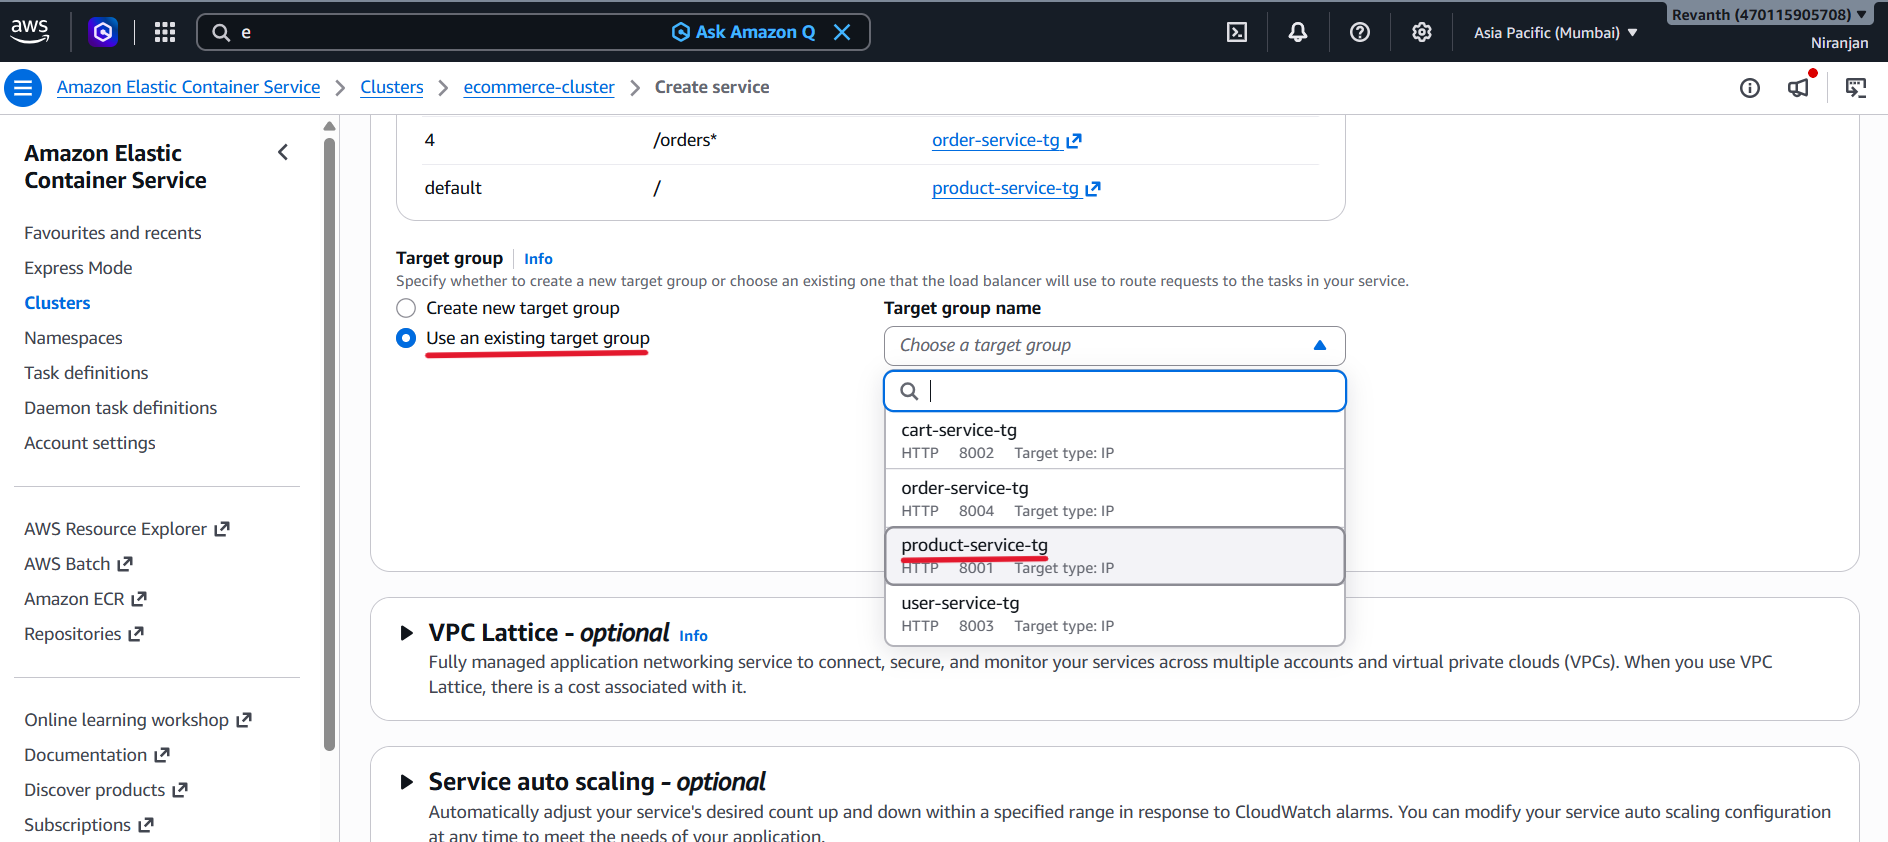
- Review the configuration and click Create service.
5.8.3 Create the Cart Service
Repeat the same steps to create the Cart Service.
Use the following service-specific details:
- Task definition:
ecommerce-cart-service
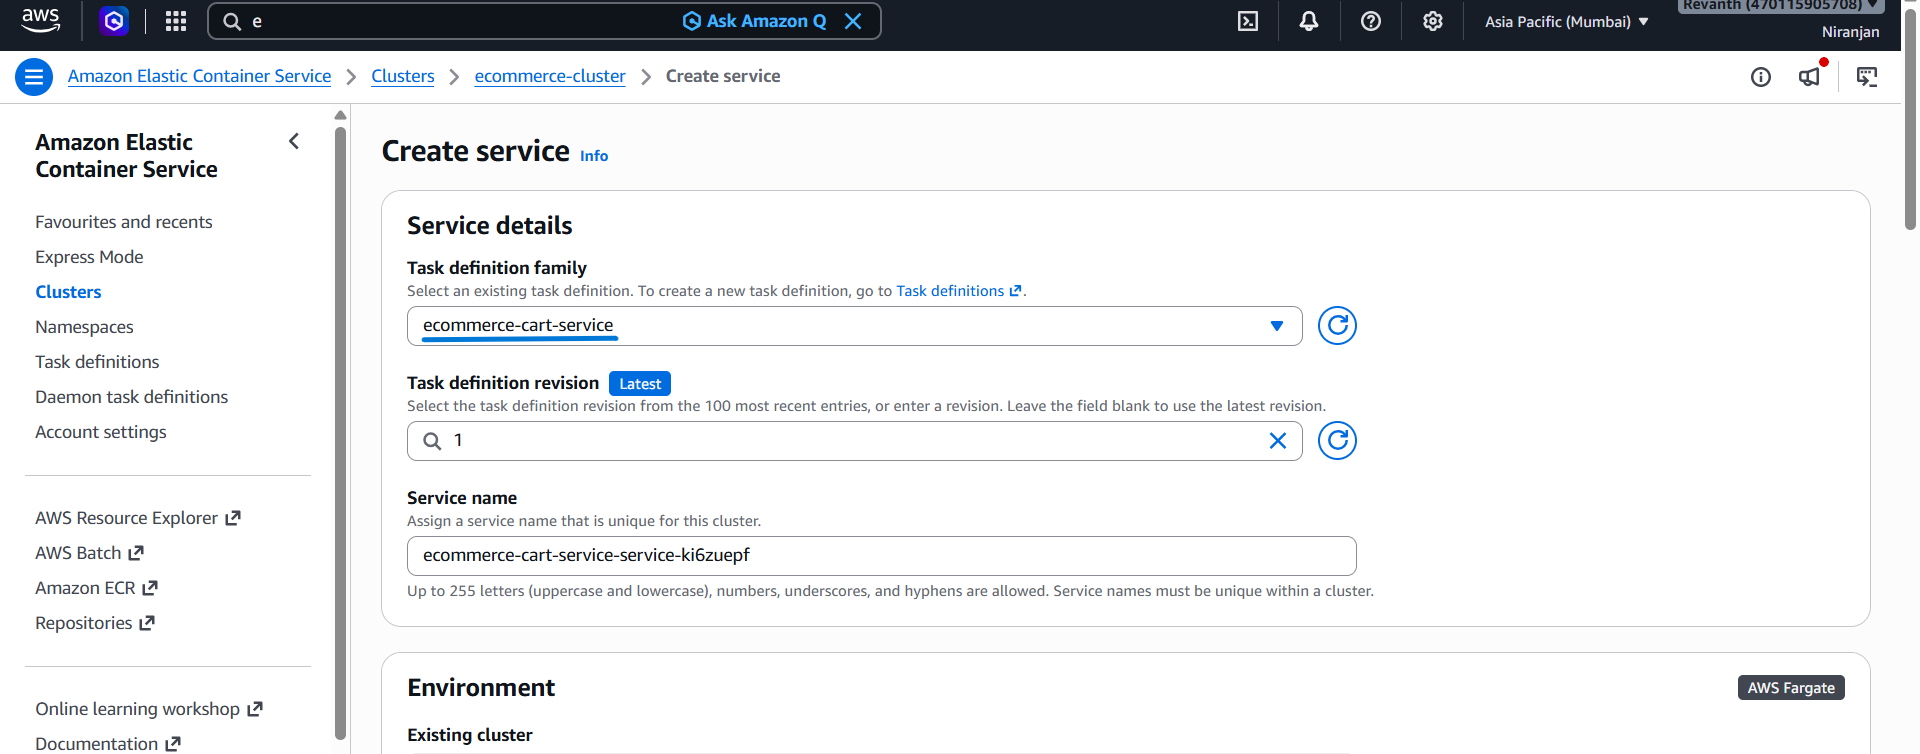
- Service name: You can keep the automatically generated name.
- Desired tasks:
1 - VPC:
ecommerce-vpc
- Subnets: Both private ECS subnets
- Security group:
ecommerce-ecs-sg - Public IP: Off
- Load balancer type: Application Load Balancer
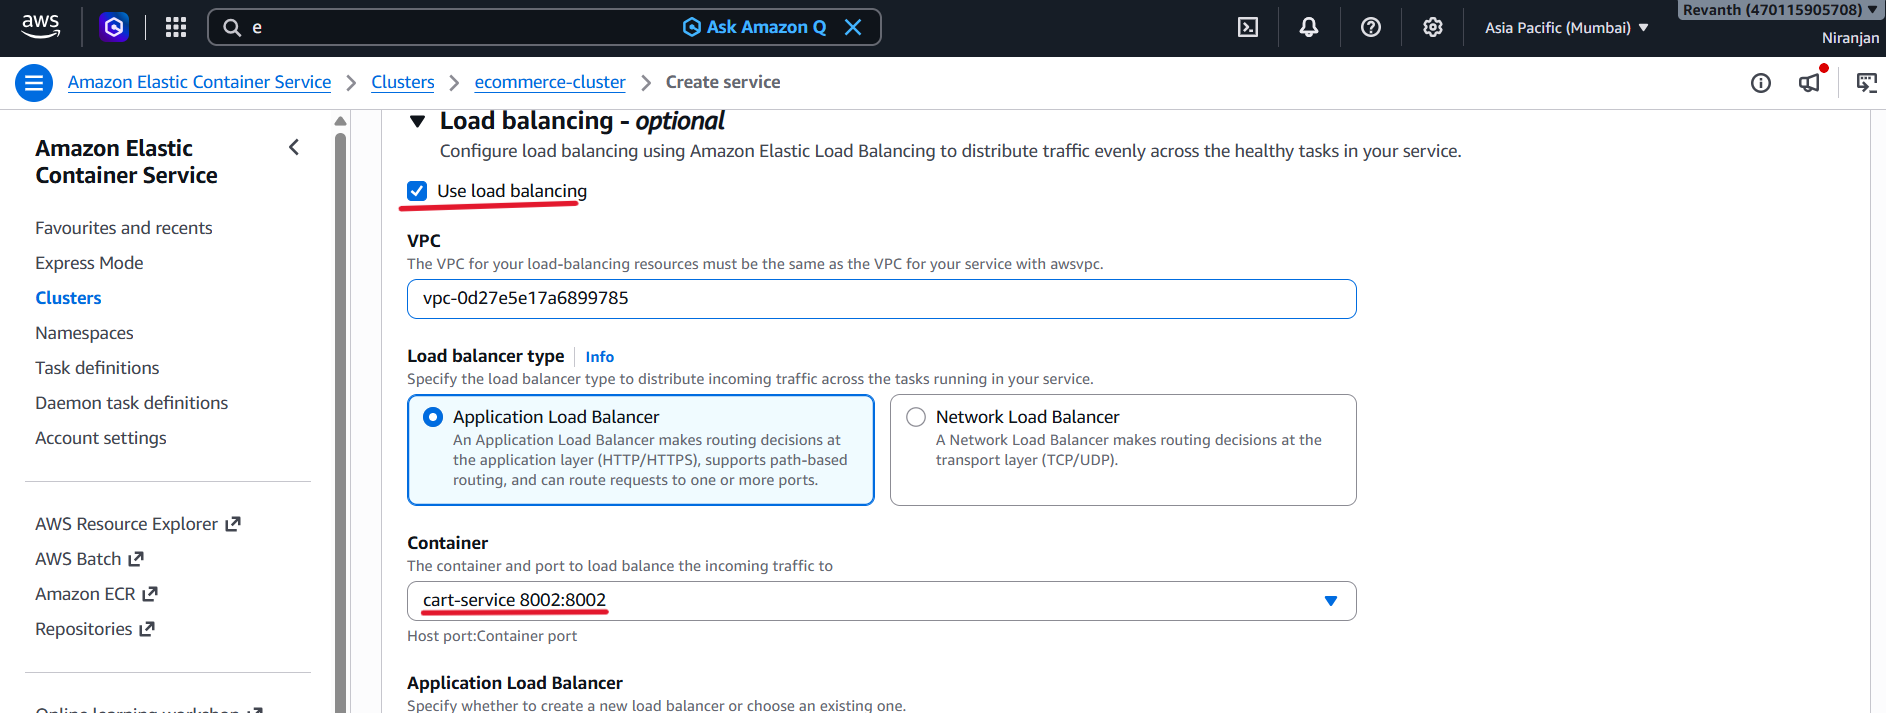
- Container: Select
cart-service. - Container port: Verify
8002:8002(Host port: 8002, Container port: 8002). - Load balancer:
ecommerce-internal-alb
- Listener: Existing HTTP:80 listener
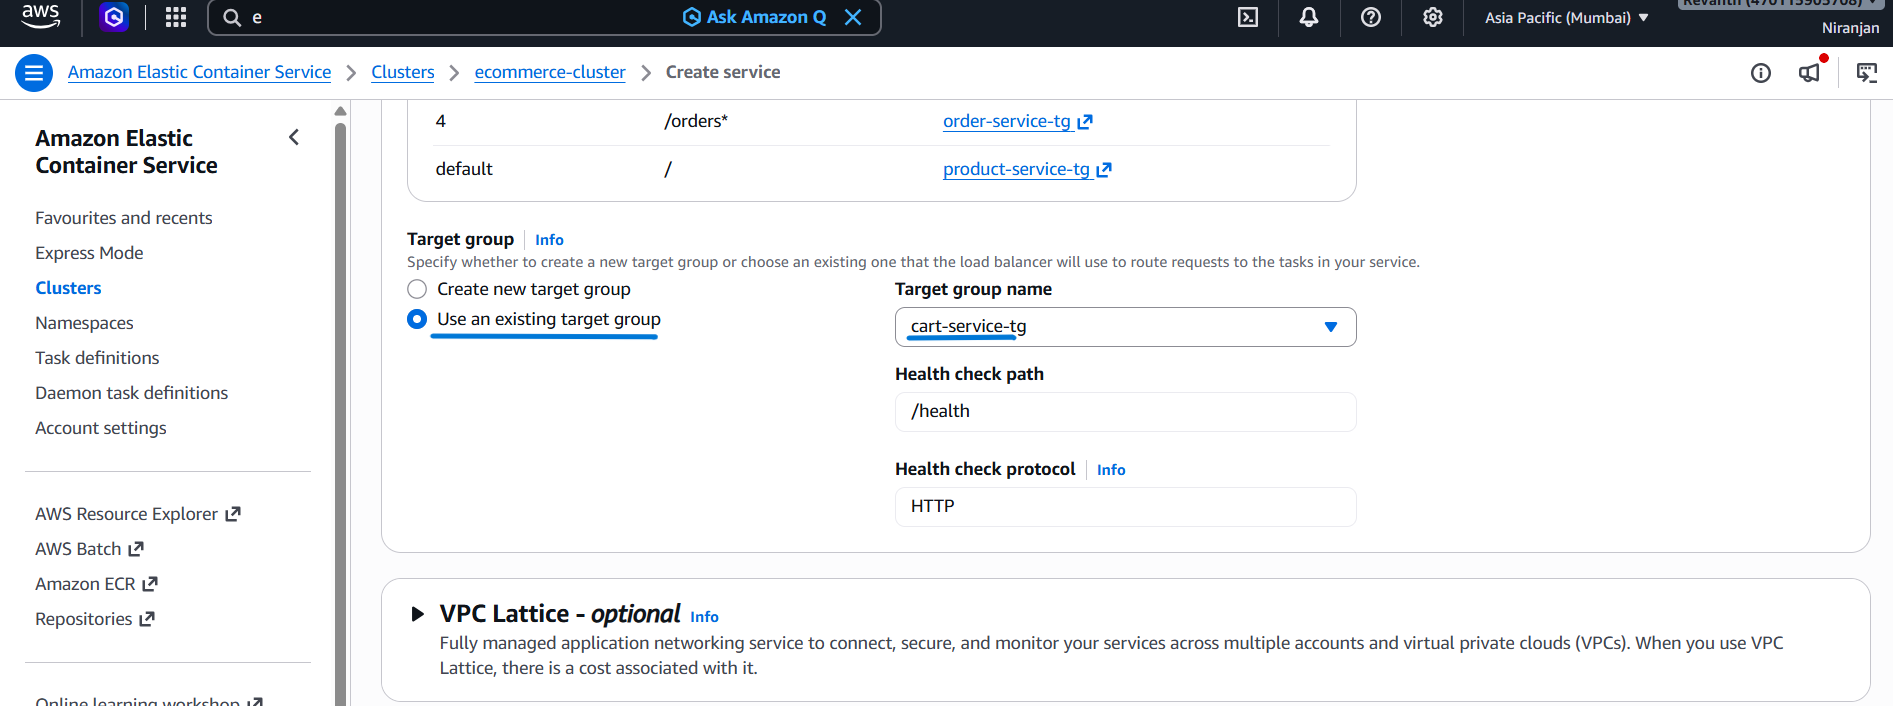
- Target group:
cart-service-tg - Click Create service.
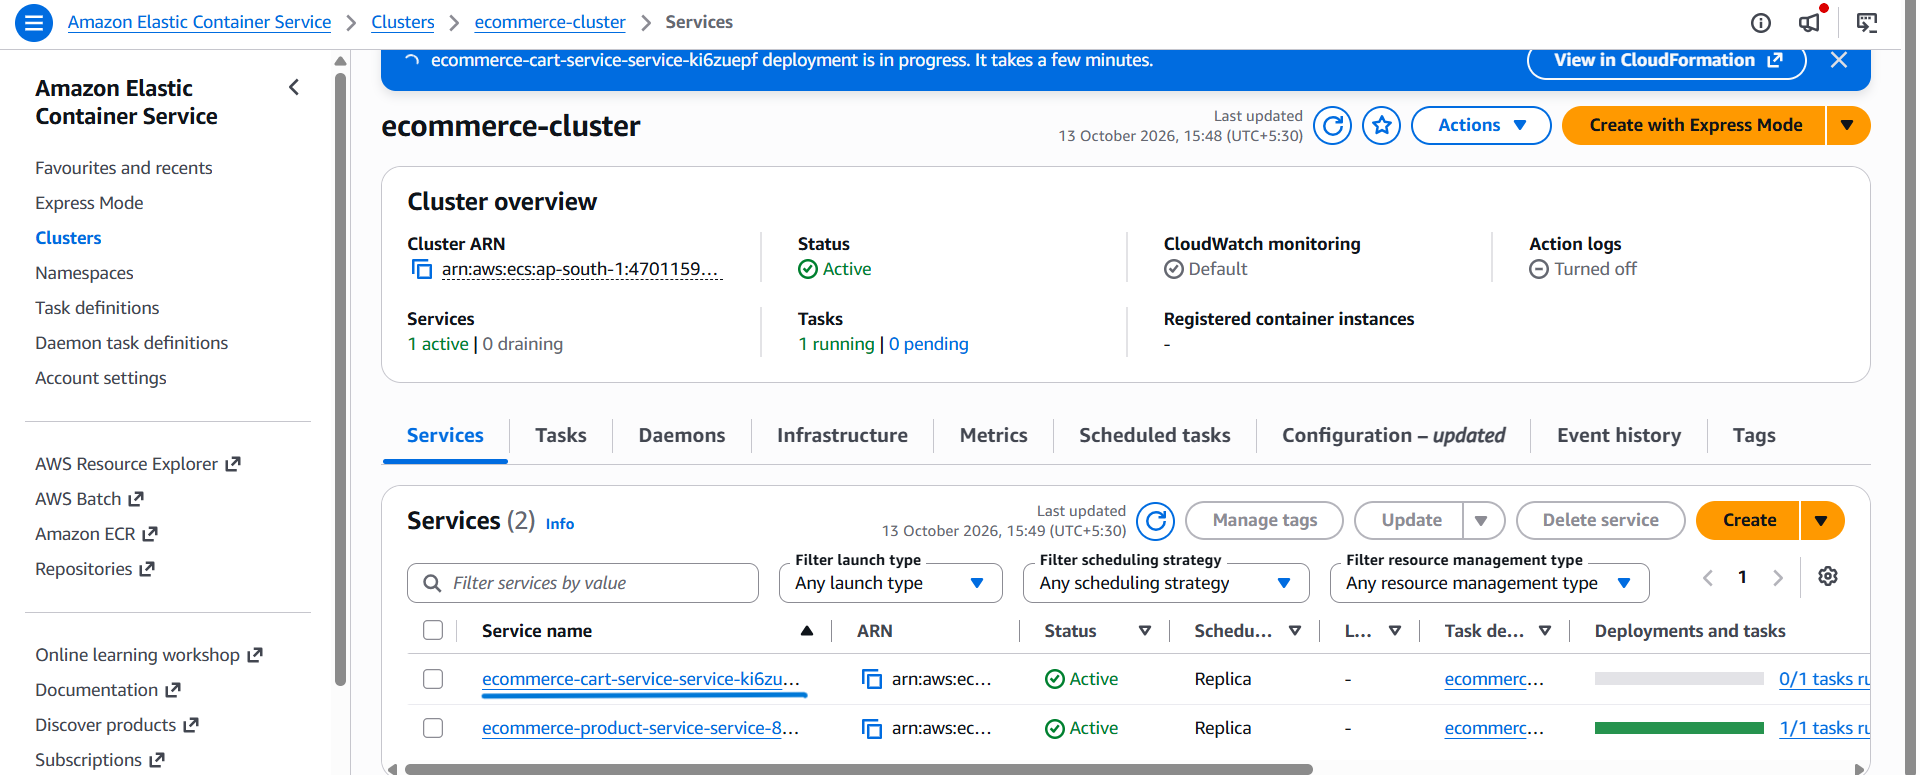
5.8.4 Create the User Service
Repeat the same steps using:
- Task definition:
ecommerce-user-service
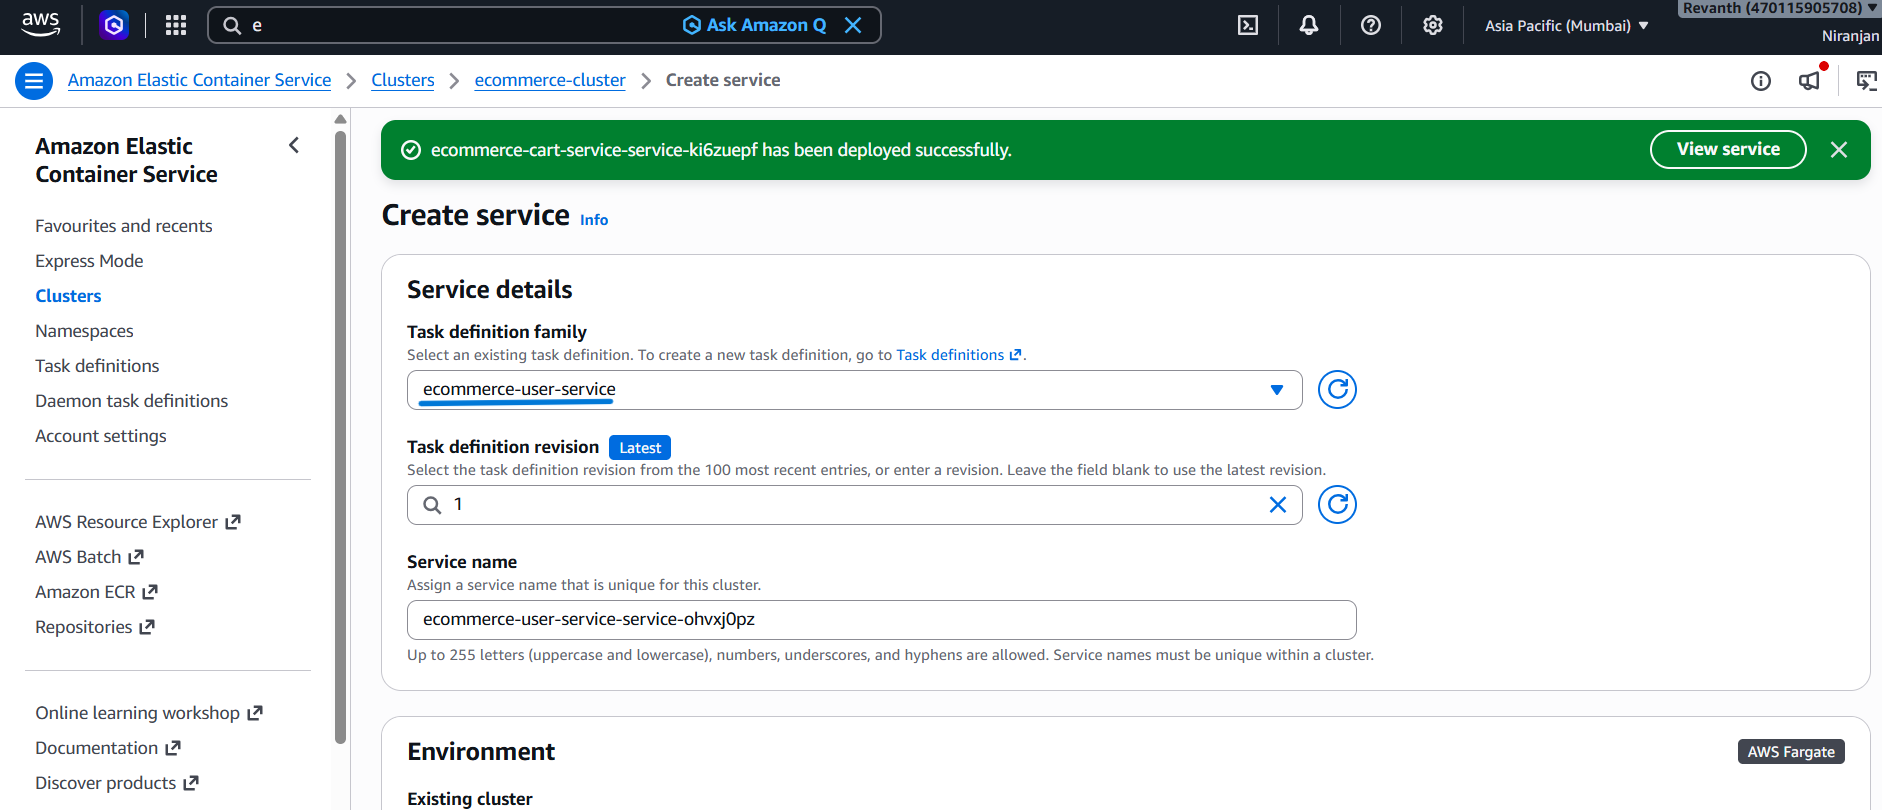
- Desired tasks:
1 - VPC:
ecommerce-vpc
- Subnets: Both private ECS subnets
- Security group:
ecommerce-ecs-sg
- Public IP: Off
- Load balancer type: Application Load Balancer
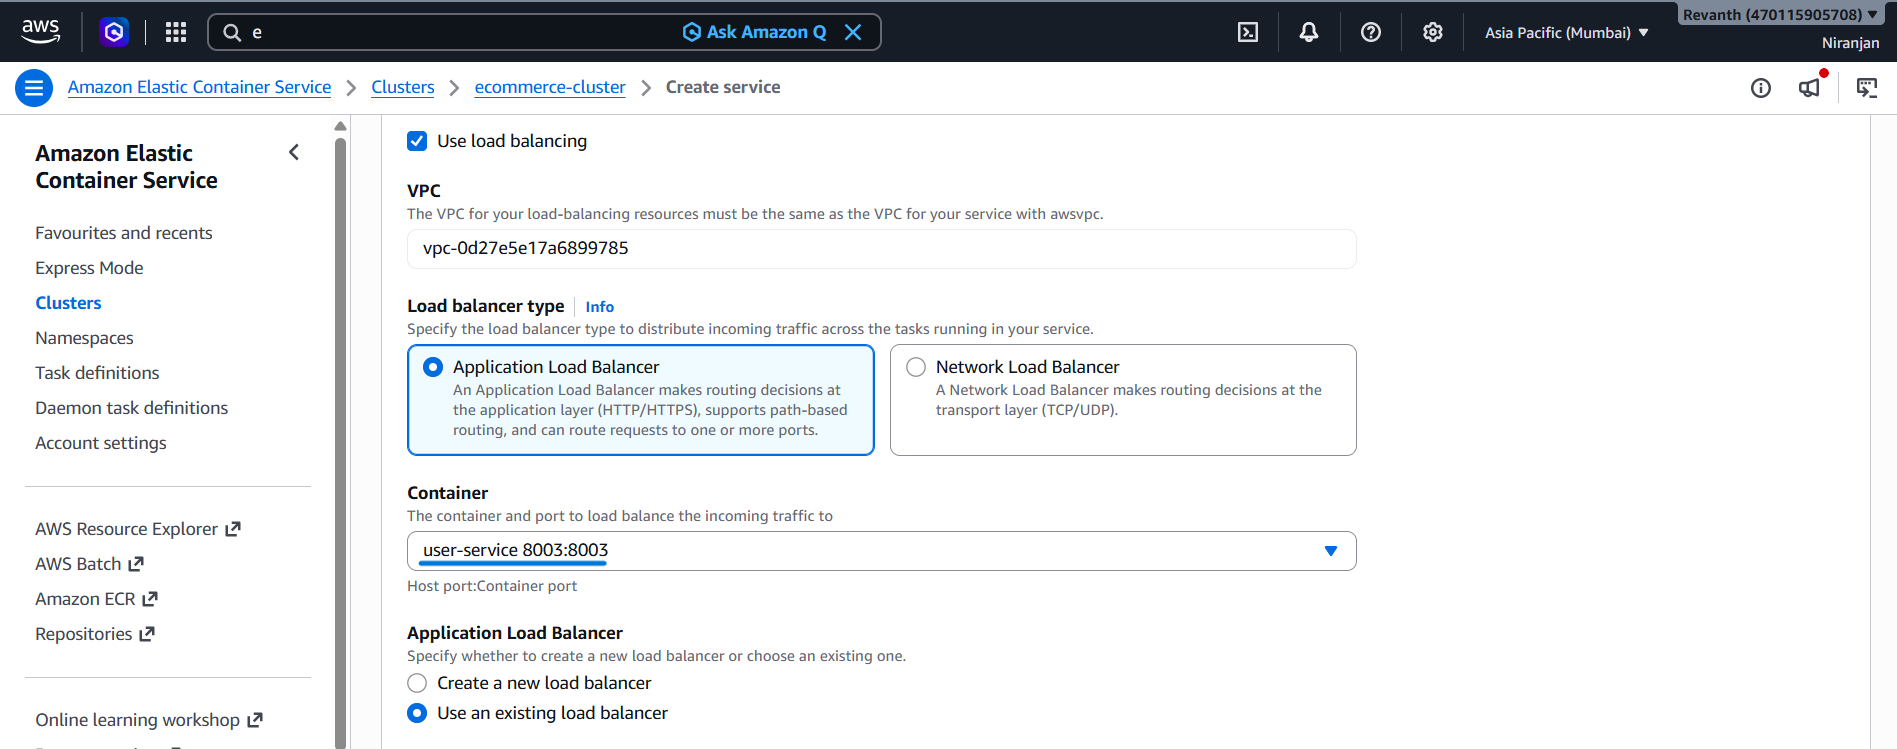
- Container: Select
user-service. - Container port: Verify
8003:8003(Host port: 8003, Container port: 8003). - Load balancer:
ecommerce-internal-alb
- Listener: Existing HTTP:80 listener
- Target group:
user-service-tg
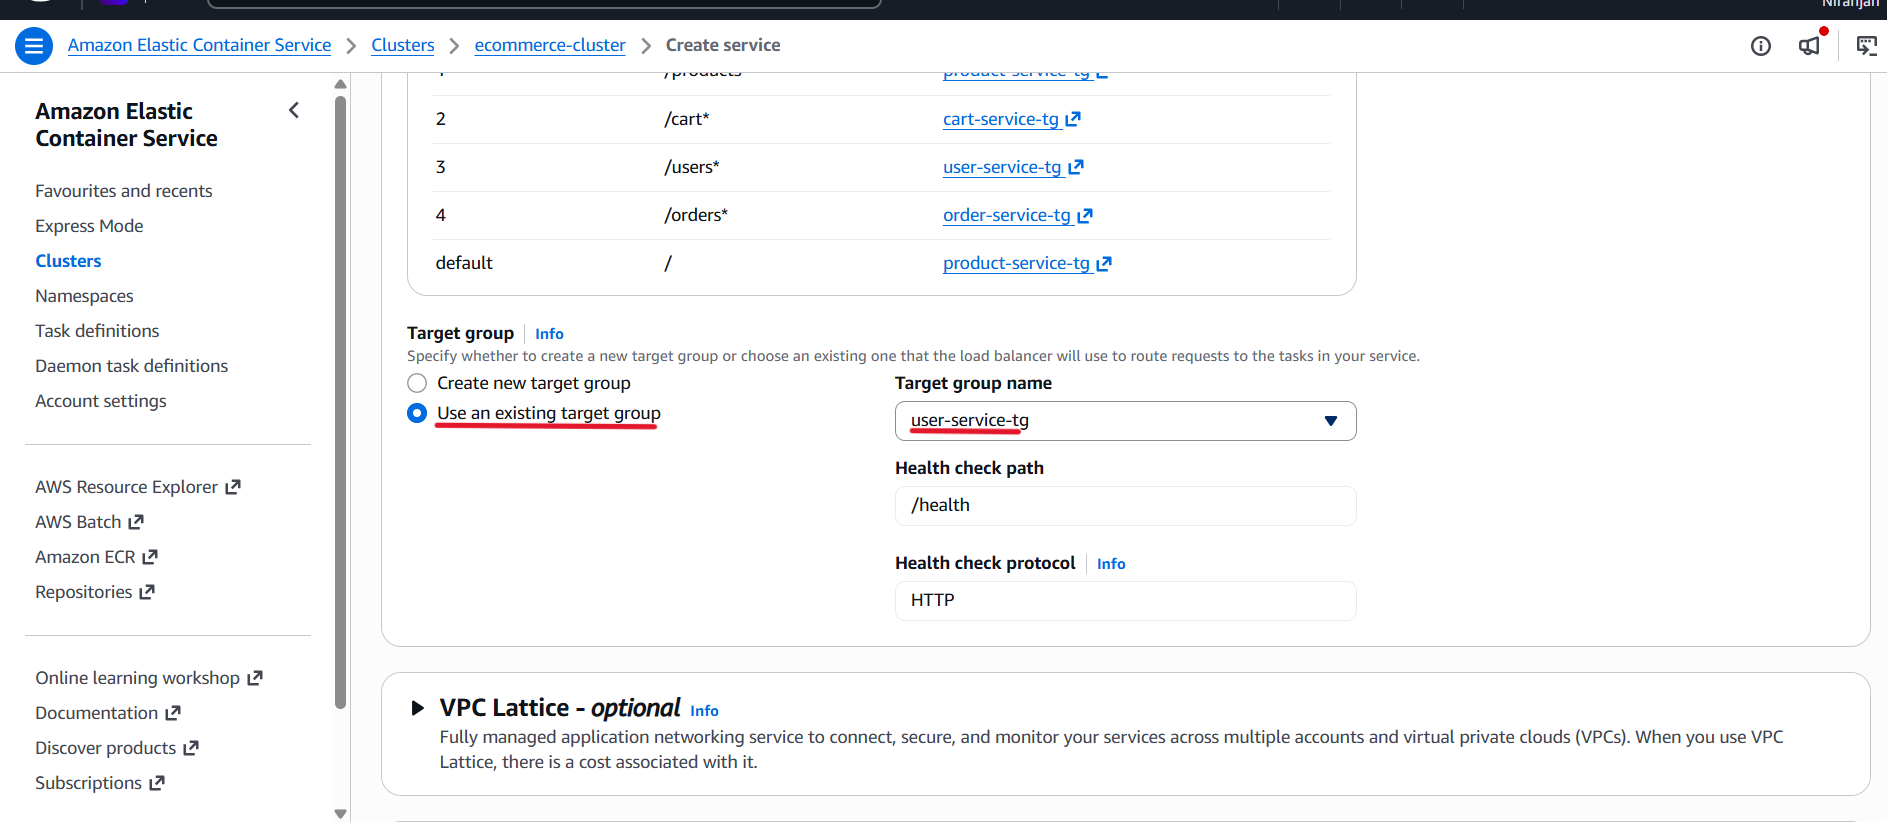
- Click Create service.
5.8.5 Create the Order Service
Repeat the same steps using:
- Task definition:
ecommerce-order-service
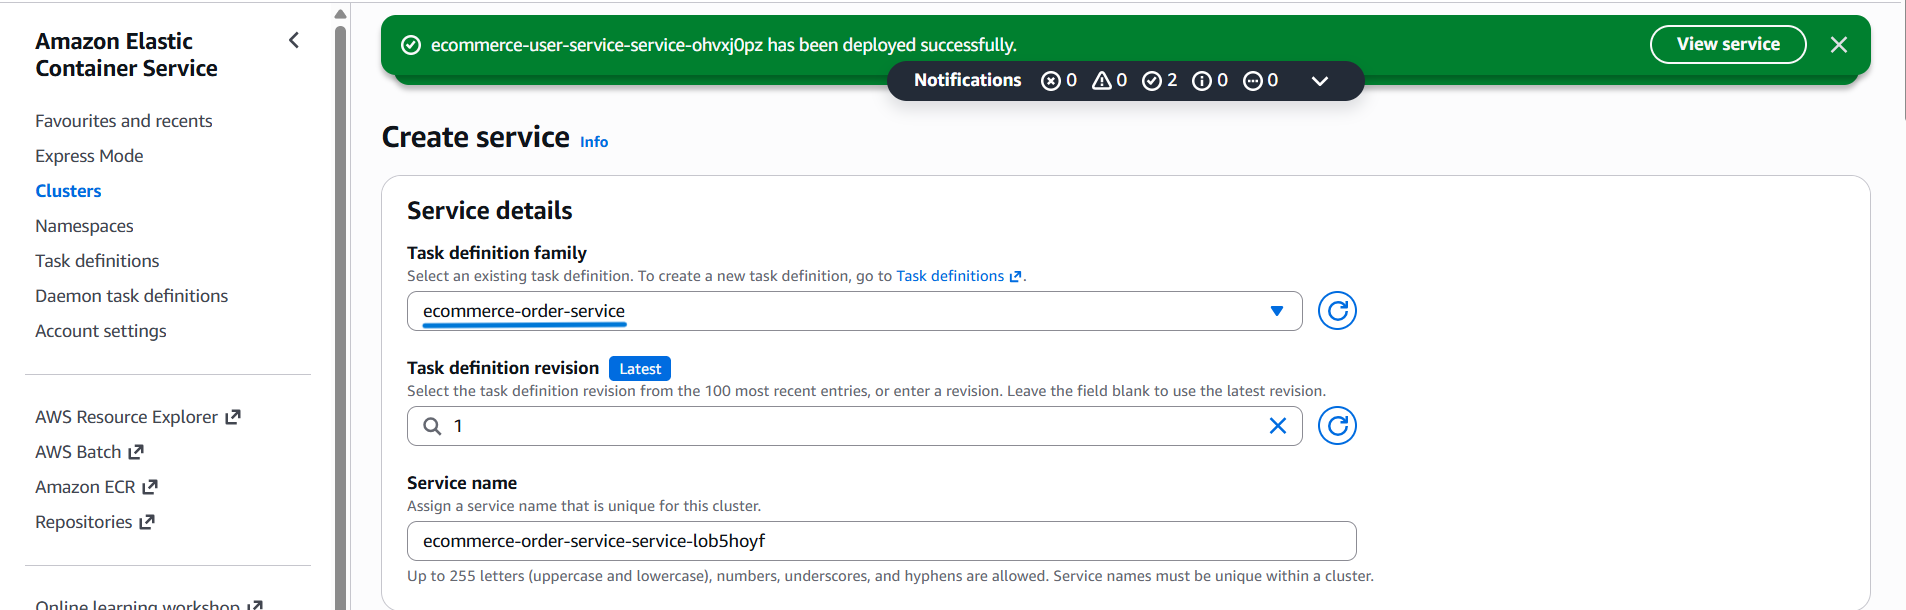
- Desired tasks:
1 - VPC:
ecommerce-vpc
- Subnets: Both private ECS subnets
- Security group:
ecommerce-ecs-sg
- Public IP: Off
- Load balancer type: Application Load Balancer
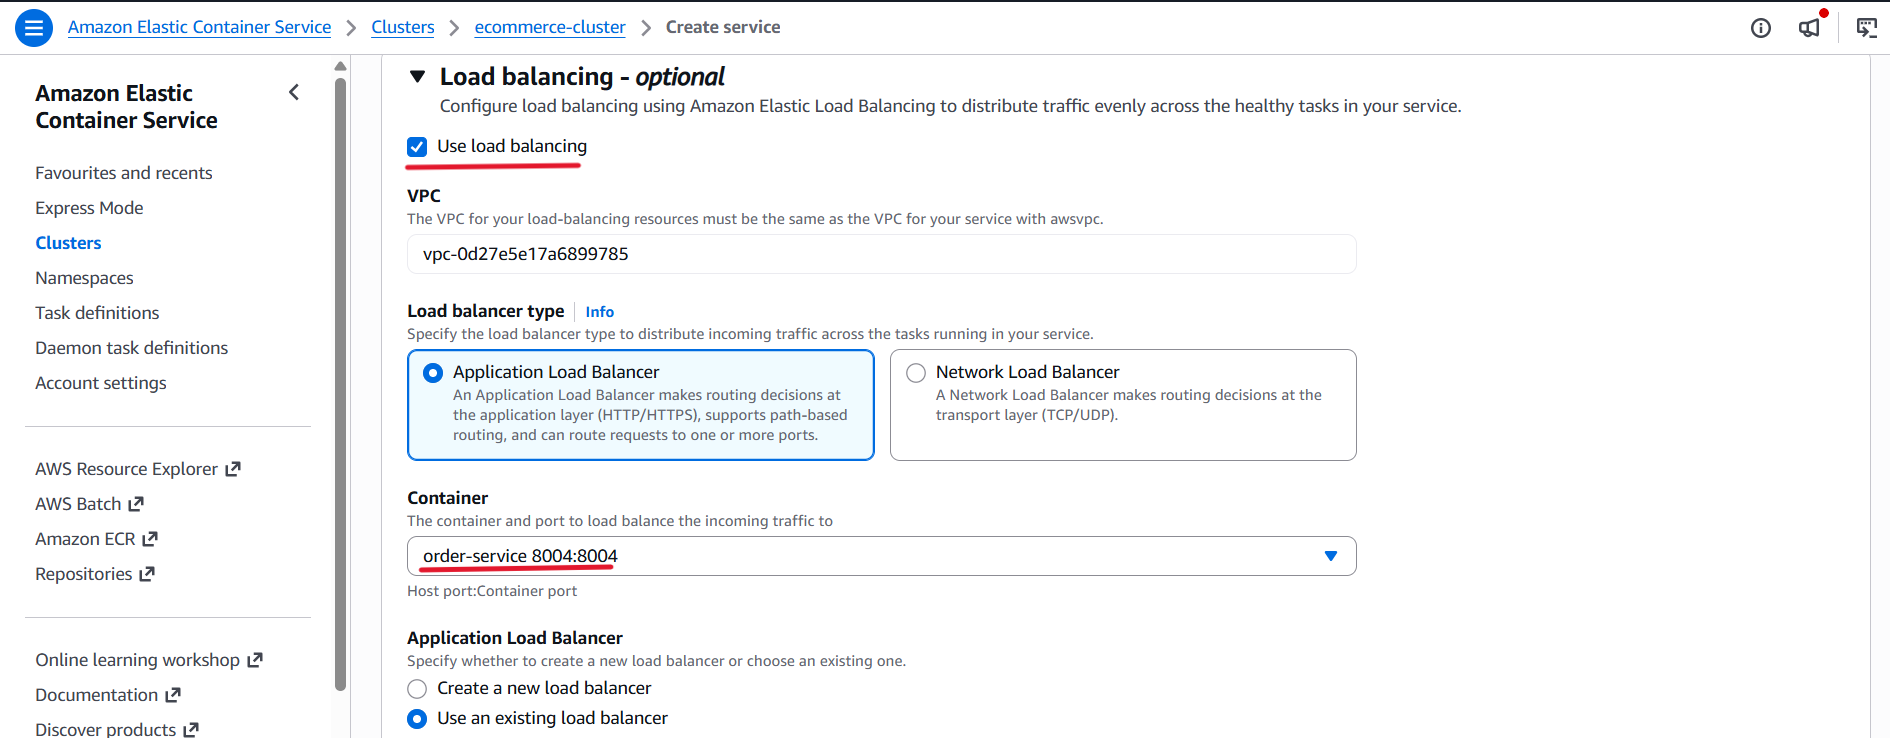
- Container: Select
order-service. - Container port: Verify
8004:8004(Host port: 8004, Container port: 8004). - Load balancer:
ecommerce-internal-alb
- Listener: Existing HTTP:80 listener
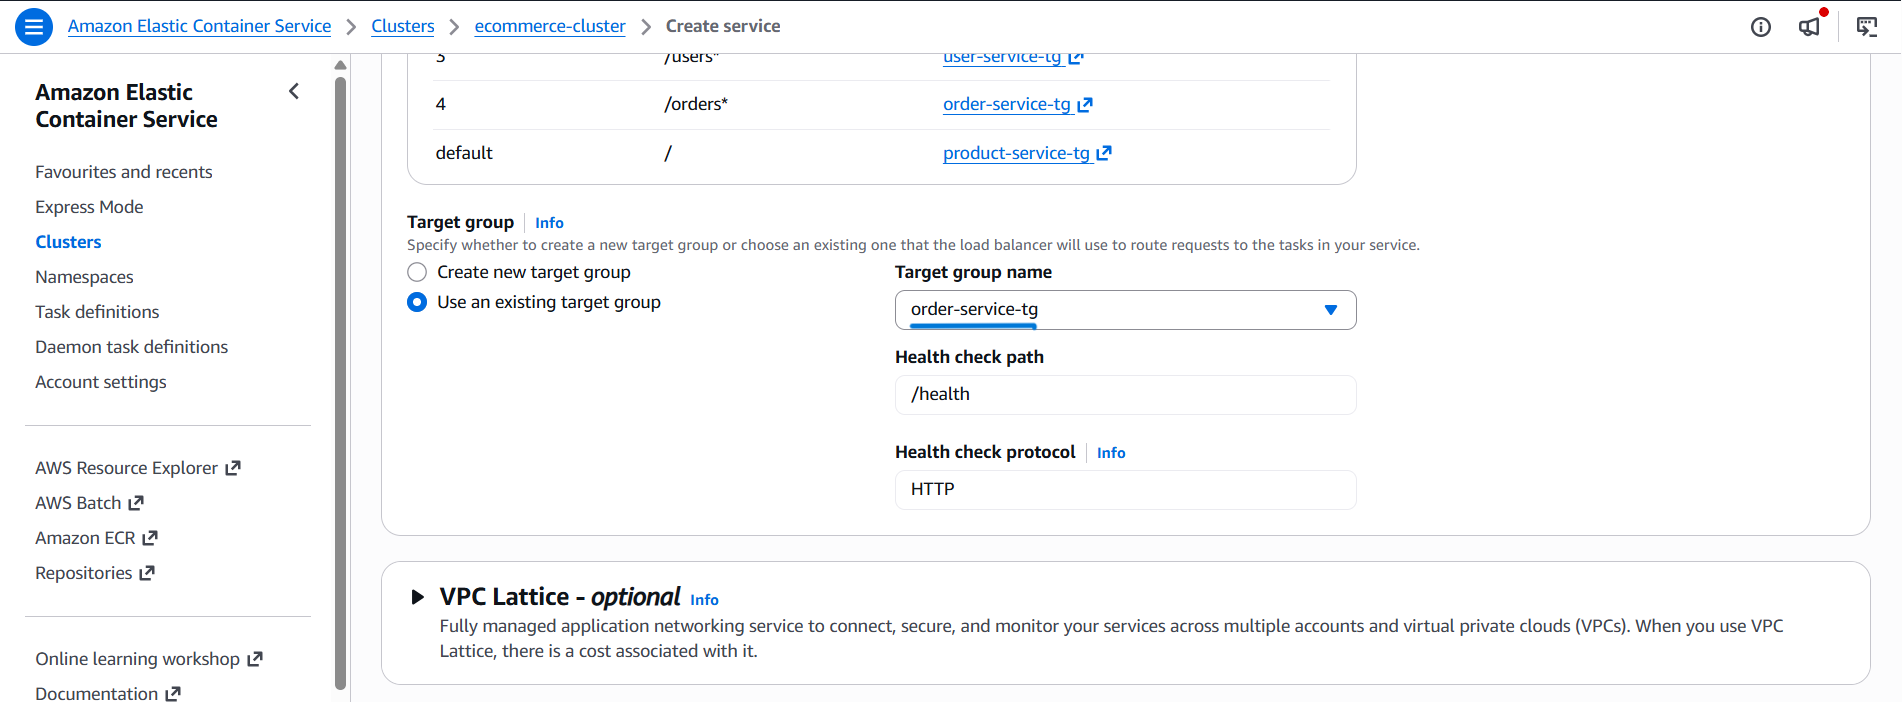
- Target group:
order-service-tg - Click Create service.
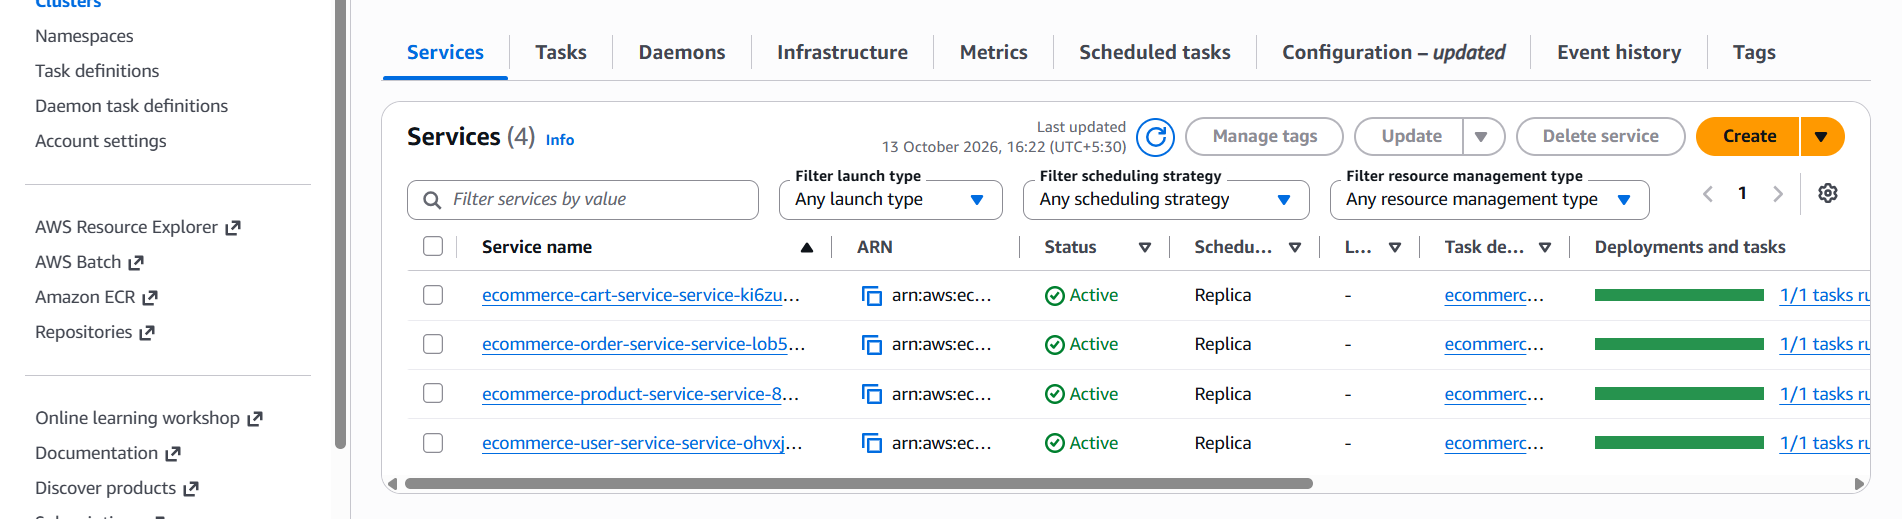
5.8.6 Verify ECS Service Status
After creating all four services, wait for the ECS tasks to start.
Open:
ECS Console → Clusters → ecommerce-cluster → Services
Verify that all four services show a running task.
For this development setup, each service should have:
- Desired tasks: 1
- Running tasks: 1
It may take a few minutes for all services to reach the running state.
5.8.7 Verify ALB Target Group Health
We should also verify that the ECS tasks are registered as healthy targets behind the ALB.
- EC2 Console → Target Groups
- Open
product-service-tg. - Go to the Targets tab.
- Verify that the registered target is Healthy.
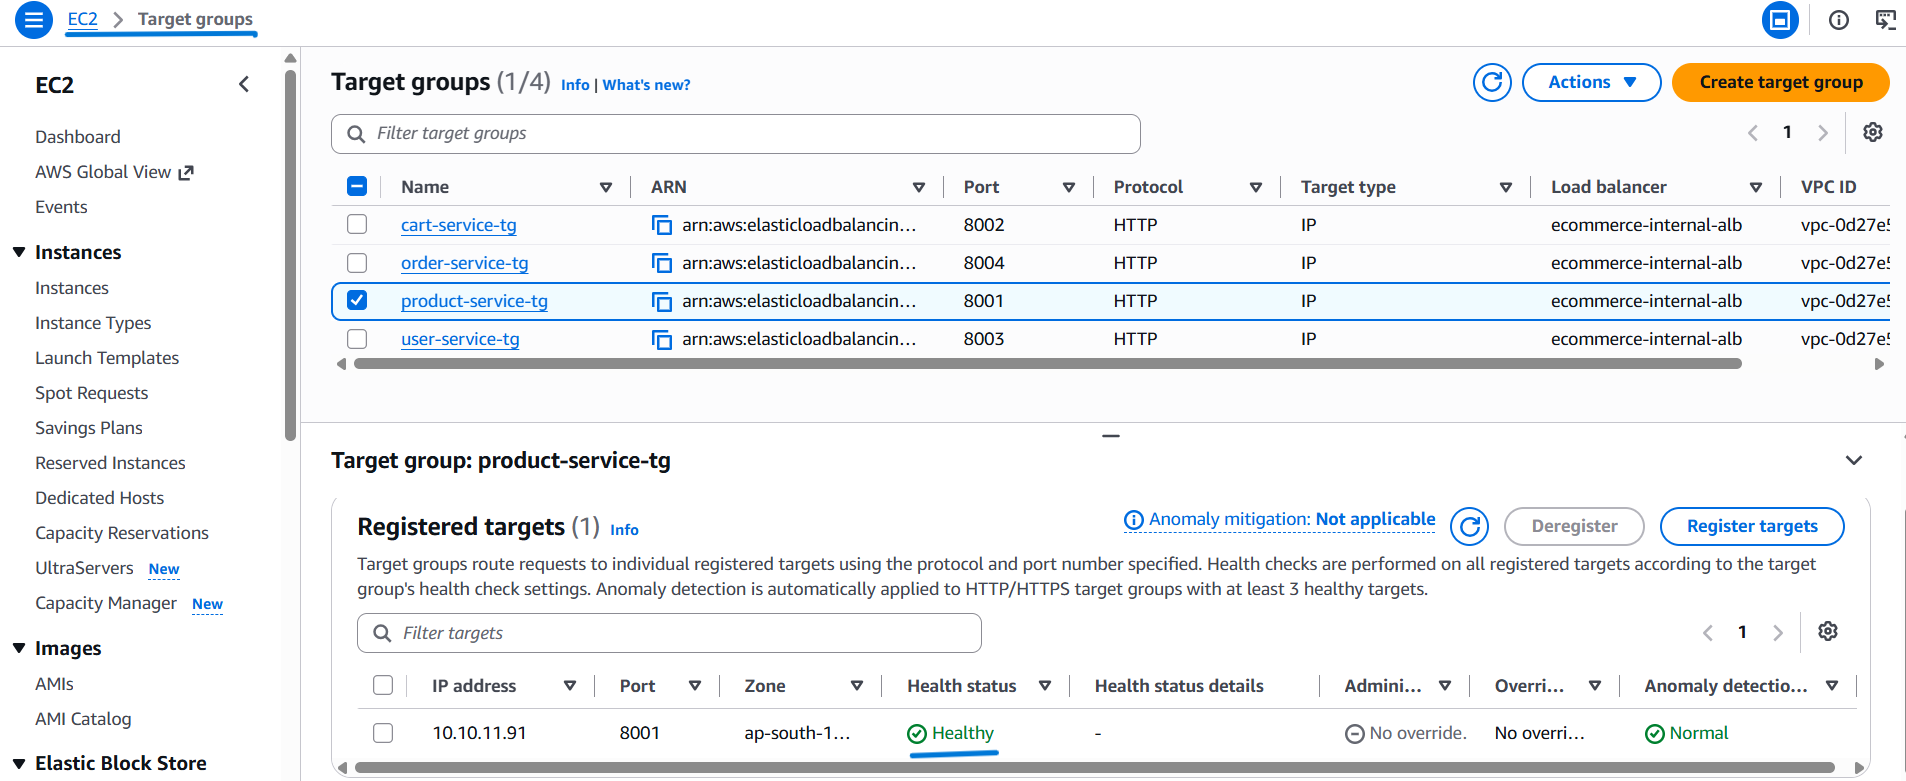
- Repeat the same verification for:
cart-service-tg
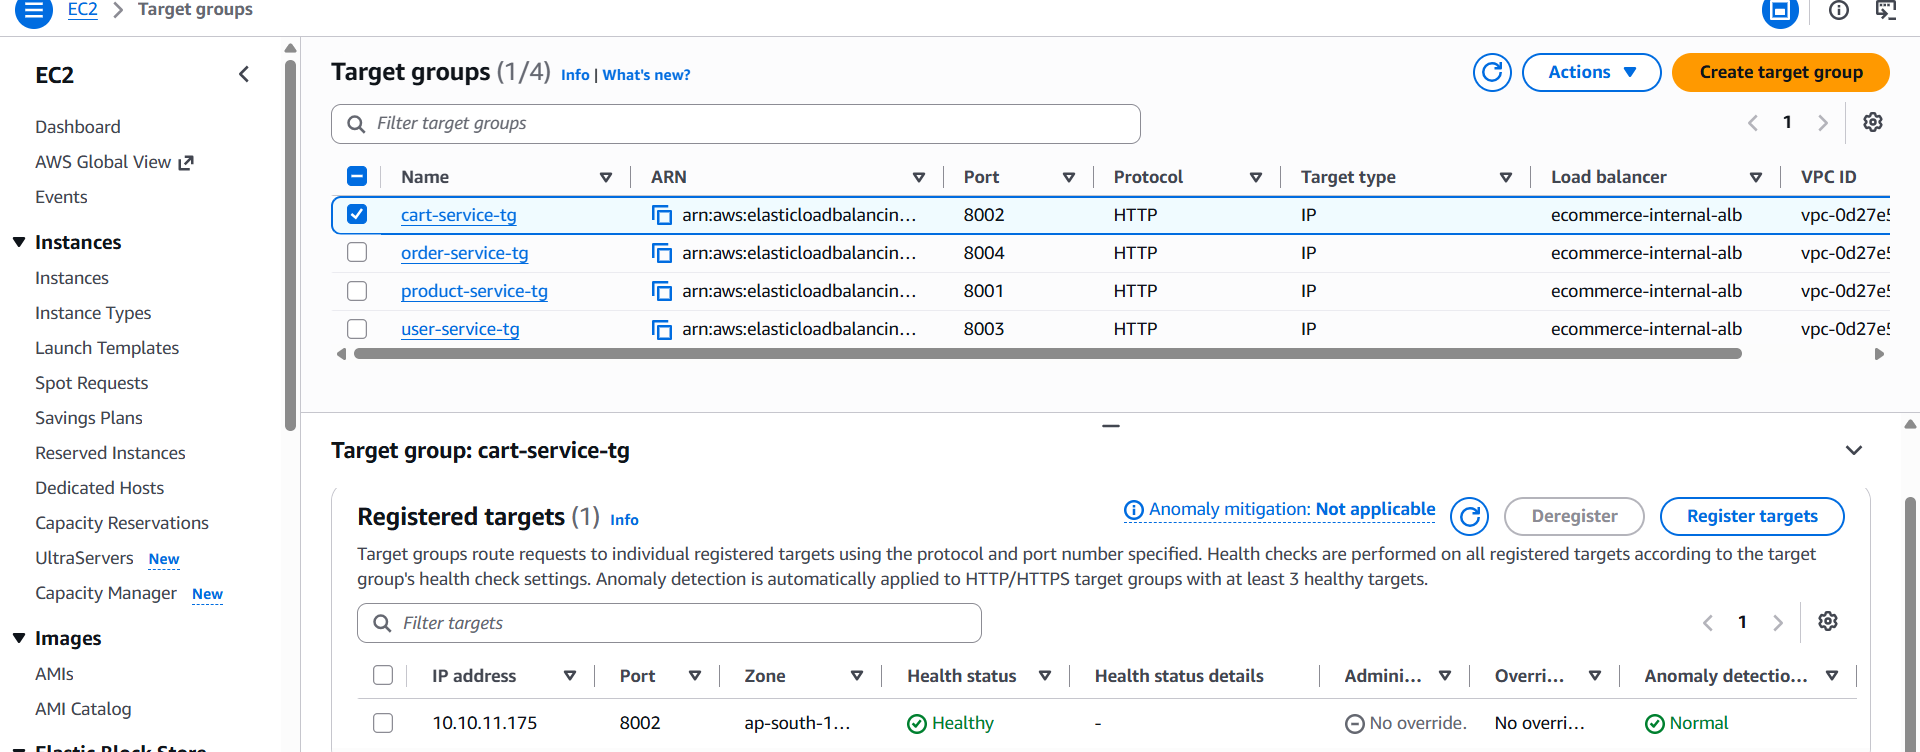
user-service-tg
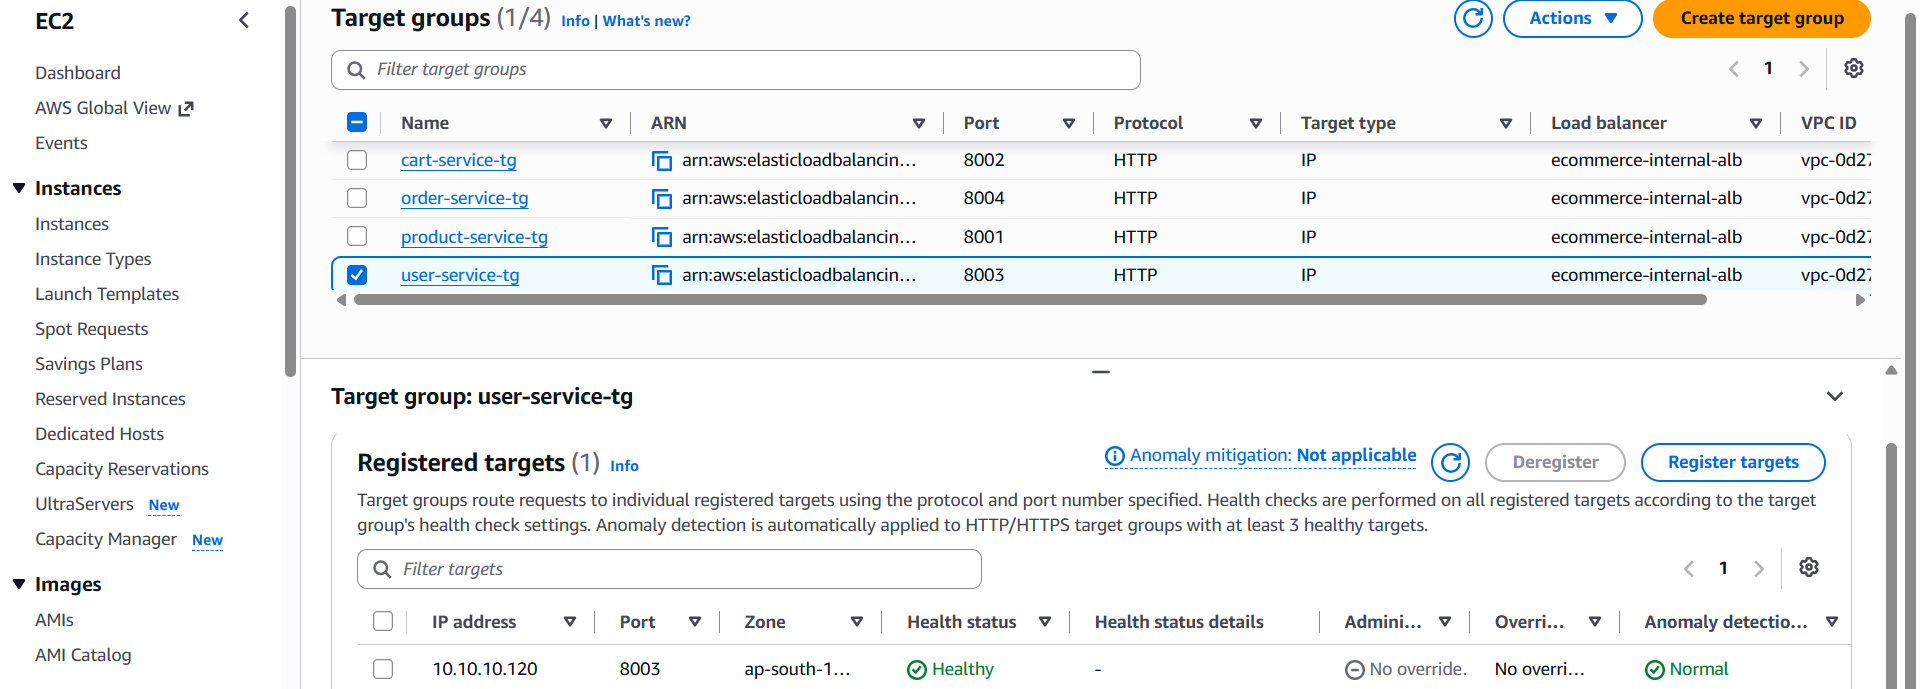
order-service-tg
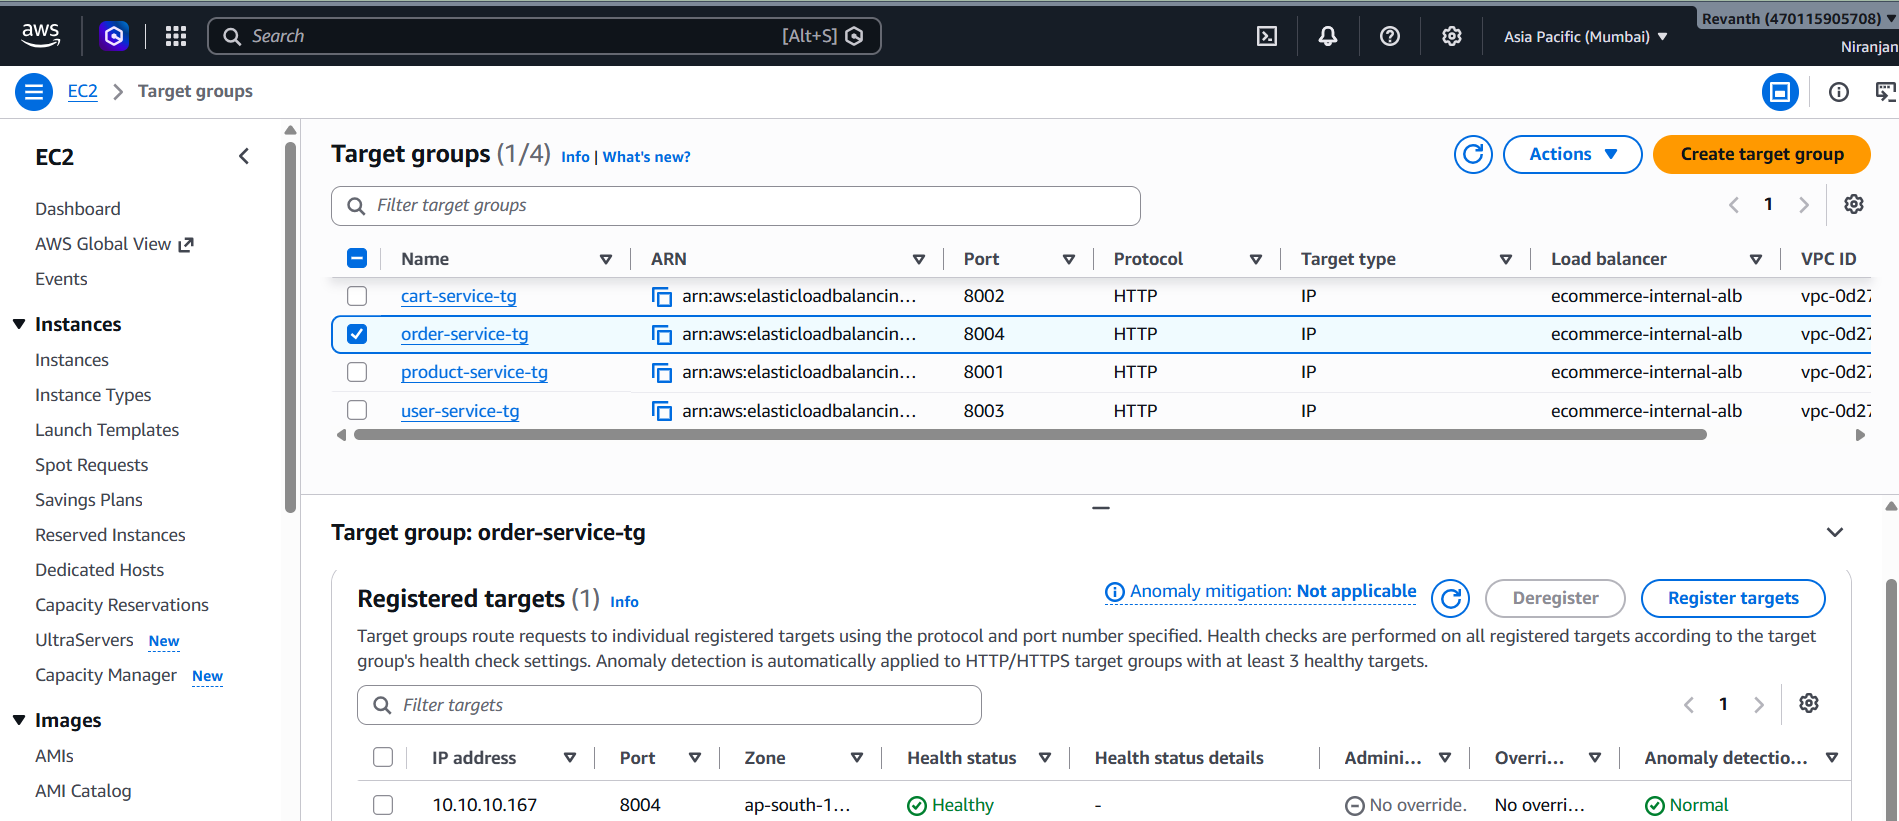
All four target groups should show healthy targets.
5.9 Test Backend Service Connectivity
- At this stage, all four ECS services are running behind the internal ALB.
- However, the ALB is internal, so it cannot be accessed directly from the public internet.
- To test the backend connectivity, we will temporarily launch a test EC2 instance inside the same VPC.
5.9.1 Launch a Test EC2 Instance
- EC2 Console → Instances → Launch instances
- Name:
test-ec2-instance - AMI: Select Amazon Linux.
- Instance type: Select an appropriate instance type, such as
t3.micro. - Key pair: Select an existing key pair or create a new one.
- VPC: Select
ecommerce-vpc.
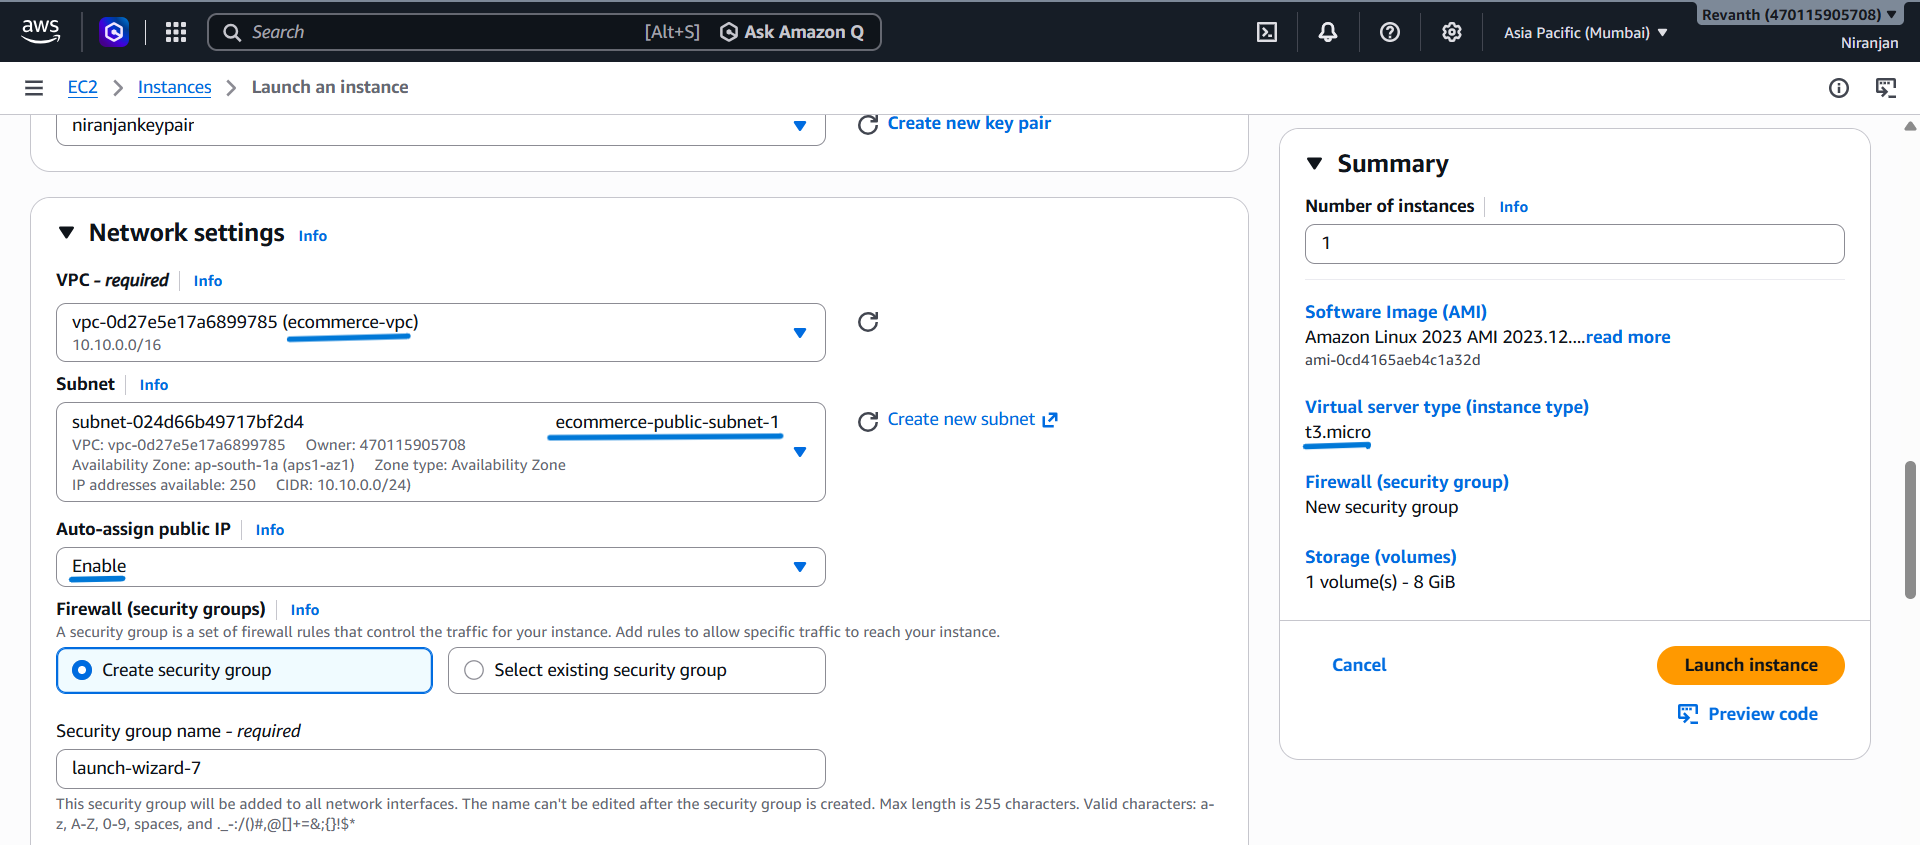
- Subnet: Select one of the public subnets.
- Auto-assign public IP: Enable.
- Configure the security group to allow SSH access for the temporary test instance.
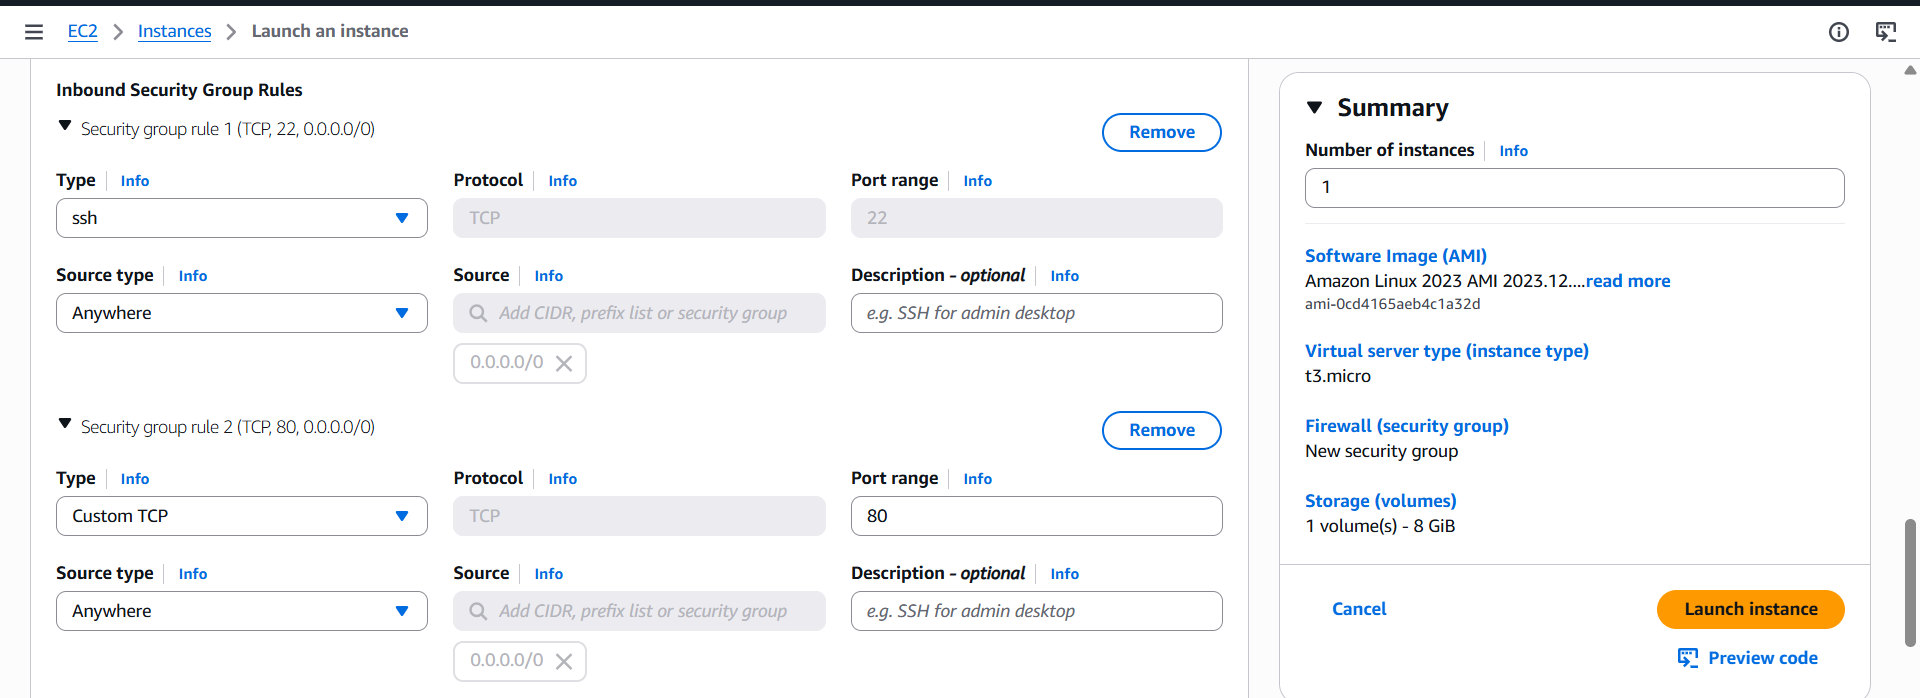
- Launch the instance.
Security note: For this temporary testing instance, restrict SSH access to your own public IP wherever possible instead of allowing SSH from anywhere. Terminate the instance after testing.
5.9.2 Connect to the Test EC2 Instance
- Open the EC2 instance.
- Click Connect.
- Select EC2 Instance Connect.
- Click Connect to open the browser-based terminal.
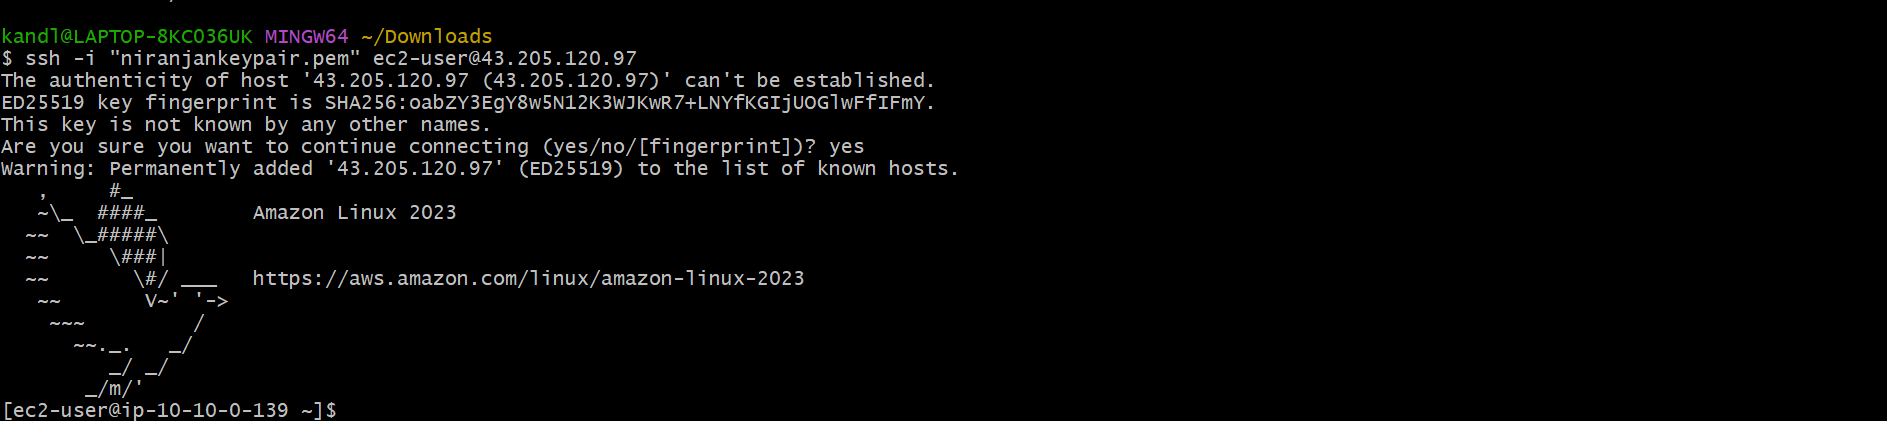
5.9.3 Test the Product Service
- First, copy the internal ALB DNS name:
EC2 Console → Load Balancers → ecommerce-internal-alb
- From the test EC2 terminal, execute:
curl http://<internal-alb-dns-name>/products
- Replace
<internal-alb-dns-name>with your actual ALB DNS name.
The request follows this path:
- The test EC2 instance sends an HTTP request to the internal ALB.
- The ALB receives the request on port 80.
- The listener matches the
/products*path rule. - The request is forwarded to
product-service-tg. - The Product Service running on ECS receives the request.
- The Product Service retrieves product information from DynamoDB and returns the response.
- If the request returns the product data, it confirms that the Product Service is reachable through the internal ALB and can retrieve the product information.
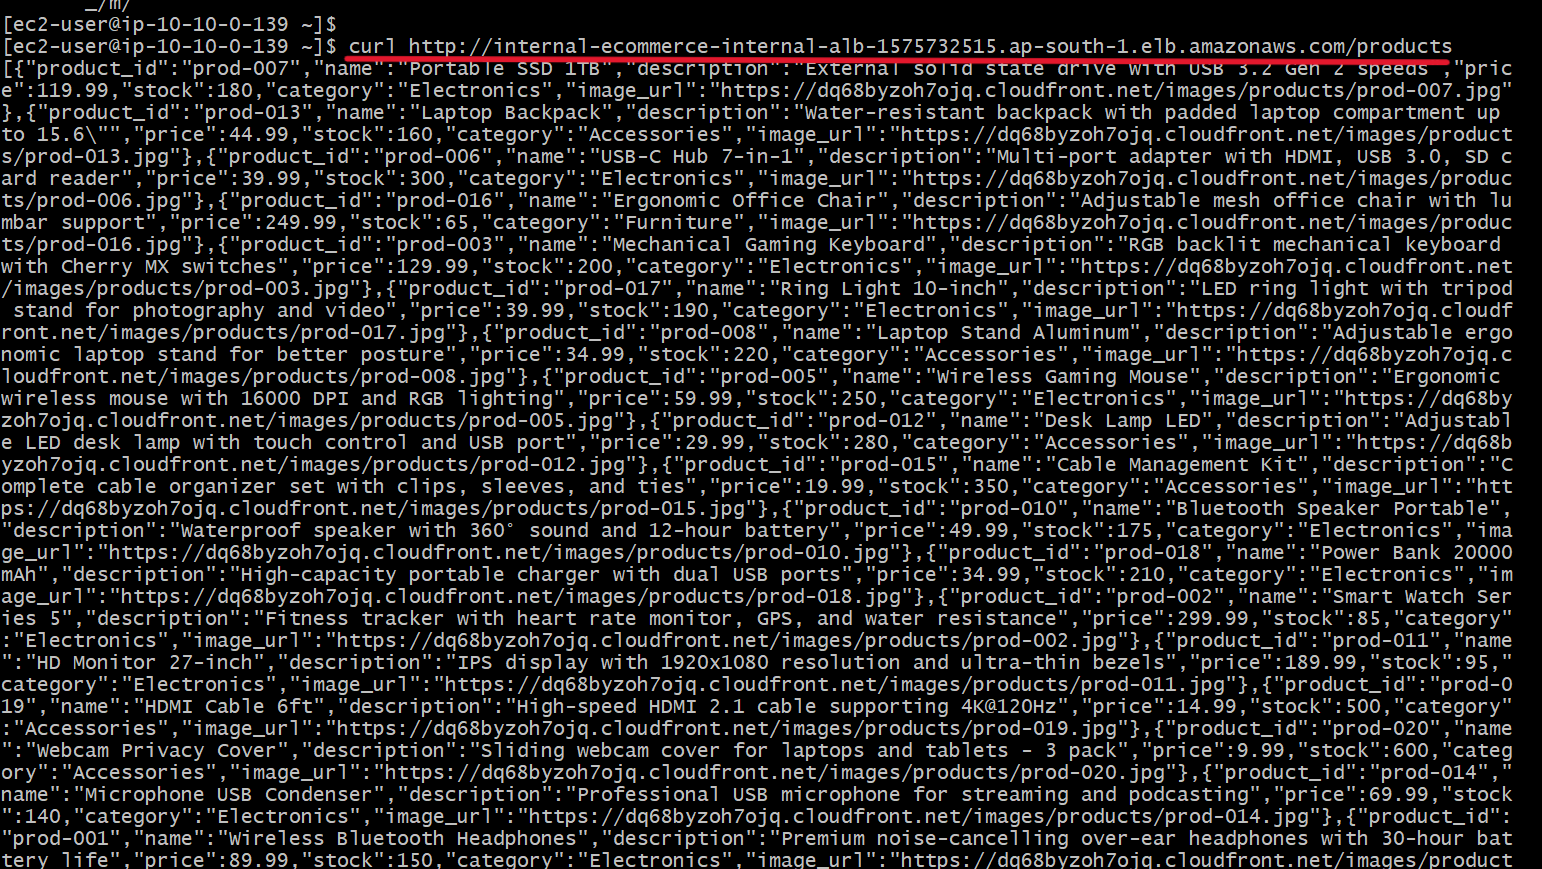
Curl Command Returning Product Data
Note: The other backend services may require authentication headers or additional request details. We will validate their application functionality during the later integration steps.
5.9.4 Terminate the Test EC2 Instance
After successfully testing the backend connectivity:
- EC2 Console → Instances
- Select
test-ec2-instance. - Choose Instance state → Terminate instance.
- Confirm the termination.
This instance was created only for temporary connectivity testing. Do not keep it running unnecessarily.
5.10 Cost-Saving Steps When Pausing the Project
This project uses AWS resources that may continue to incur charges even when we are not actively working on the application.
If you are unable to continue with the remaining modules for the day, perform the following steps before stopping.
5.10.1 Stop the RDS Database
- RDS Console → Databases
- Select your database instance.
- Choose Actions → Stop temporarily (if the option is available).
- Confirm the action.
RDS may continue to incur storage and other applicable charges even when stopped.
5.10.2 Set ECS Desired Tasks to Zero
We should stop the running ECS tasks to avoid unnecessary compute charges.
Repeat the following steps for all four ECS services:
- ECS Console → Clusters → ecommerce-cluster
- Select the service.
- Click Update.
- Change Desired tasks to
0. - Update the service.
Repeat this for:
ecommerce-product-serviceecommerce-cart-serviceecommerce-user-serviceecommerce-order-service
This scales the services down to zero running tasks.
5.10.3 Delete the NAT Gateway
The NAT Gateway incurs charges while it is provisioned. The associated Elastic IP may also have applicable charges.
If you are pausing the project for an extended period:
- VPC Console → NAT Gateways
- Select the NAT Gateway.
- Choose Delete NAT Gateway.
- Confirm the deletion.
Release the associated Elastic IP if it is no longer required.
Important: Deleting the NAT Gateway will affect the route table used by the private ECS subnets.
5.10.4 Update the Route Table When Recreating the NAT Gateway
When you resume the project on another day, you need to recreate the NAT Gateway.
Follow these steps:
- Create a new NAT Gateway in one of the public subnets.
- Allocate and associate a new Elastic IP.
- Wait until the NAT Gateway reaches the Available state.
- Open VPC Console → Route Tables.
- Select the route table associated with the private ECS subnets.
- Open the Routes tab.
- Click Edit routes.
- Remove the old route that points to the deleted NAT Gateway and is showing a
blackholestatus. - Add the new route:
- Destination:
0.0.0.0/0 - Target: Select the newly created NAT Gateway.
- Destination:
- Save the changes.
[Private Route Table Showing the New NAT Gateway Route]
5.10.5 Resume the Project
When you are ready to continue:
- Make sure the NAT Gateway is in the Available state.
- Verify that the private ECS route table points to the new NAT Gateway.
- Start the RDS database and wait until its status becomes Available.
- Open the ECS cluster.
- Update each of the four ECS services.
- Set Desired tasks back to
1. - Wait until all four ECS services are running.
- Verify that all four ALB target groups show healthy targets.
After completing these steps, the project should return to its previous working state.
Important: NAT Gateway deletion and recreation can change the Elastic IP and incur additional charges. Also review other running AWS resources and billing before leaving the project idle.
Module 5 Summary
In this module, we successfully configured the backend infrastructure for our e-commerce application.
We completed the following tasks:
- Created an internal Application Load Balancer.
- Created four ALB target groups for the backend services.
- Configured path-based routing rules using the HTTP listener.
- Stored the internal ALB URL in AWS Systems Manager Parameter Store.
- Created four Amazon ECR repositories.
- Built and pushed the four Docker images to ECR.
- Created the IAM task role with the required AWS permissions.
- Created the ECS security group.
- Created four ECS task definitions using AWS Fargate.
- Created the ECS cluster and deployed all four backend services.
- Verified that the ECS tasks were running and the ALB target groups were healthy.
- Tested Product Service connectivity using a temporary EC2 instance.
Our backend services are now deployed and running behind the internal Application Load Balancer.
In the next module, we will configure Amazon API Gateway and connect it to the internal ALB using VPC Link, allowing external clients to access our backend APIs.
Next Module: API Gateway Configuration
Module 6: API Gateway Configuration
Overview
- In this module, we will create an Amazon API Gateway HTTP API and integrate it with our internal Application Load Balancer (ALB).
- Since our ALB is internal and resides inside the private subnets of our VPC, it cannot be accessed directly from the internet. To securely connect API Gateway with the internal ALB, we will use VPC Link.
- We will also configure authentication using Amazon Cognito JWT Authorizer, allowing public access to the product endpoint while protecting the remaining backend APIs.
In This Module
- Create a security group for VPC Link.
- Create a VPC Link to connect API Gateway with our VPC.
- Create an HTTP API Gateway.
- Configure a private HTTP integration with the internal ALB.
- Create a Cognito JWT Authorizer.
- Configure API routes.
- Configure CORS.
- Test the API Gateway endpoints.
Architecture
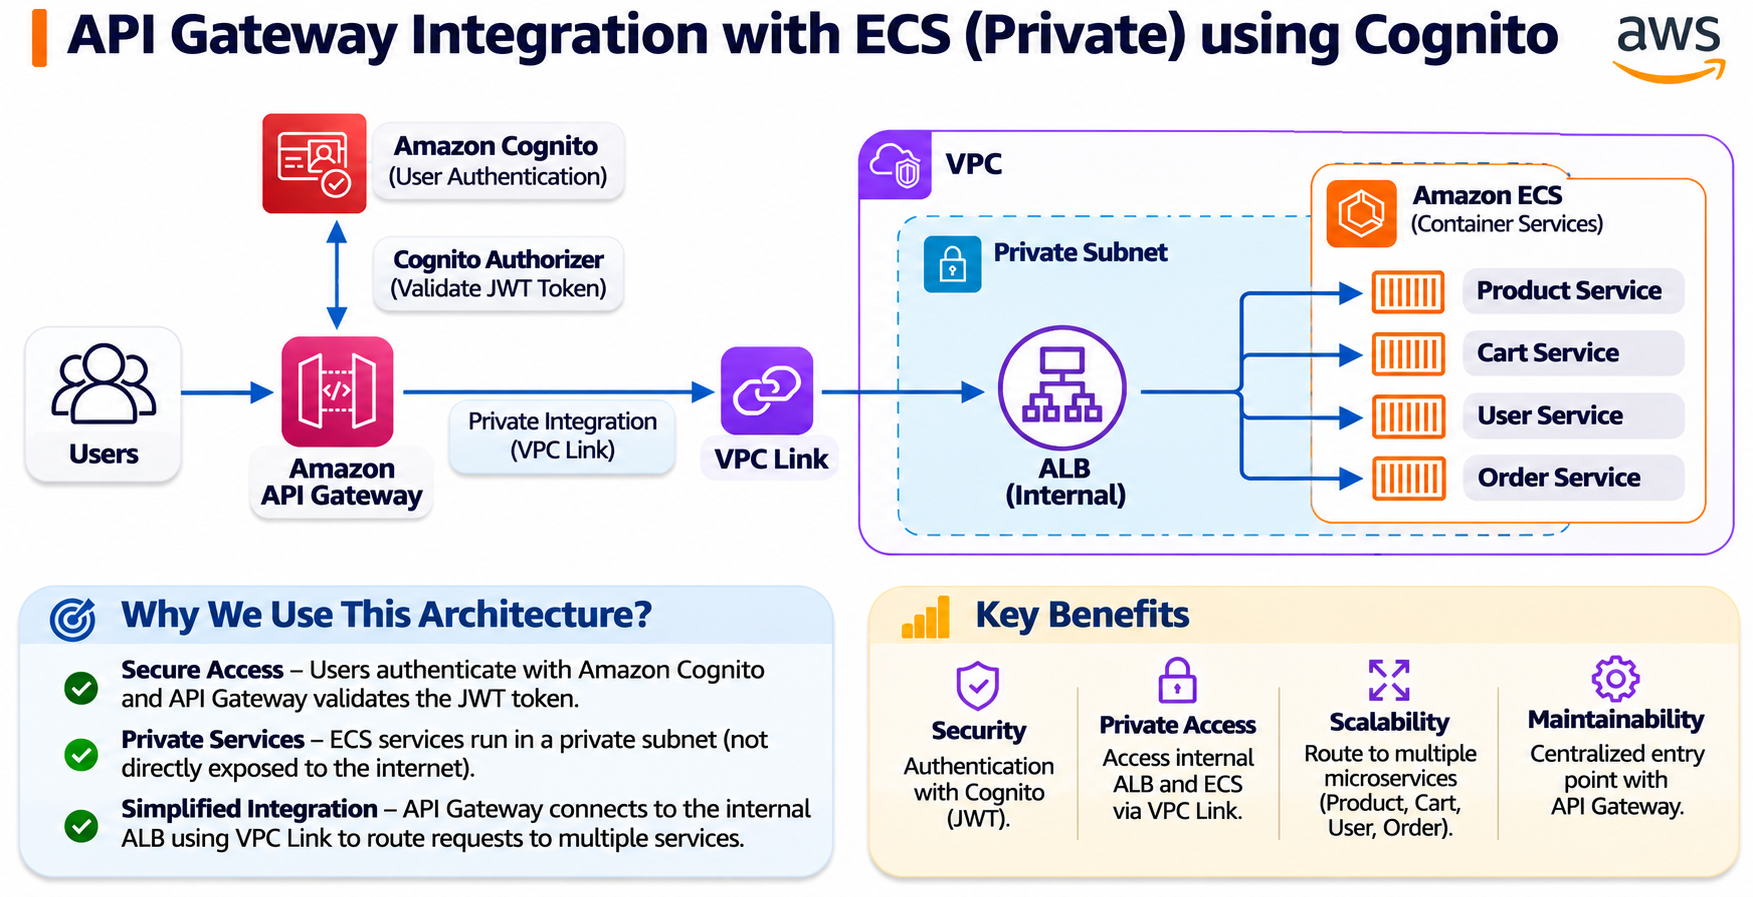
The API Gateway will expose three routes:
- GET /products – Public endpoint. No authentication required.
- ANY /{proxy+} – Handles the remaining API requests and requires Cognito JWT authentication.
- OPTIONS /{proxy+} – Handles CORS preflight requests without authentication.
The API Gateway forwards requests to the internal ALB through VPC Link. The ALB then uses its path-based routing rules to forward requests to the appropriate ECS microservices.
6.1 Create VPC Link
- Before creating API Gateway, we need to establish a private connection between API Gateway and our internal ALB.
- For this, AWS provides a feature called VPC Link.
- VPC Link allows API Gateway to communicate privately with resources inside our VPC, such as an internal Application Load Balancer.
6.1.1 Create a Security Group for VPC Link
First, we need to create a security group that will be associated with the VPC Link.
- VPC Console → Security Groups → Create security group
- Security group name:
ecommerce-vpclink-sg
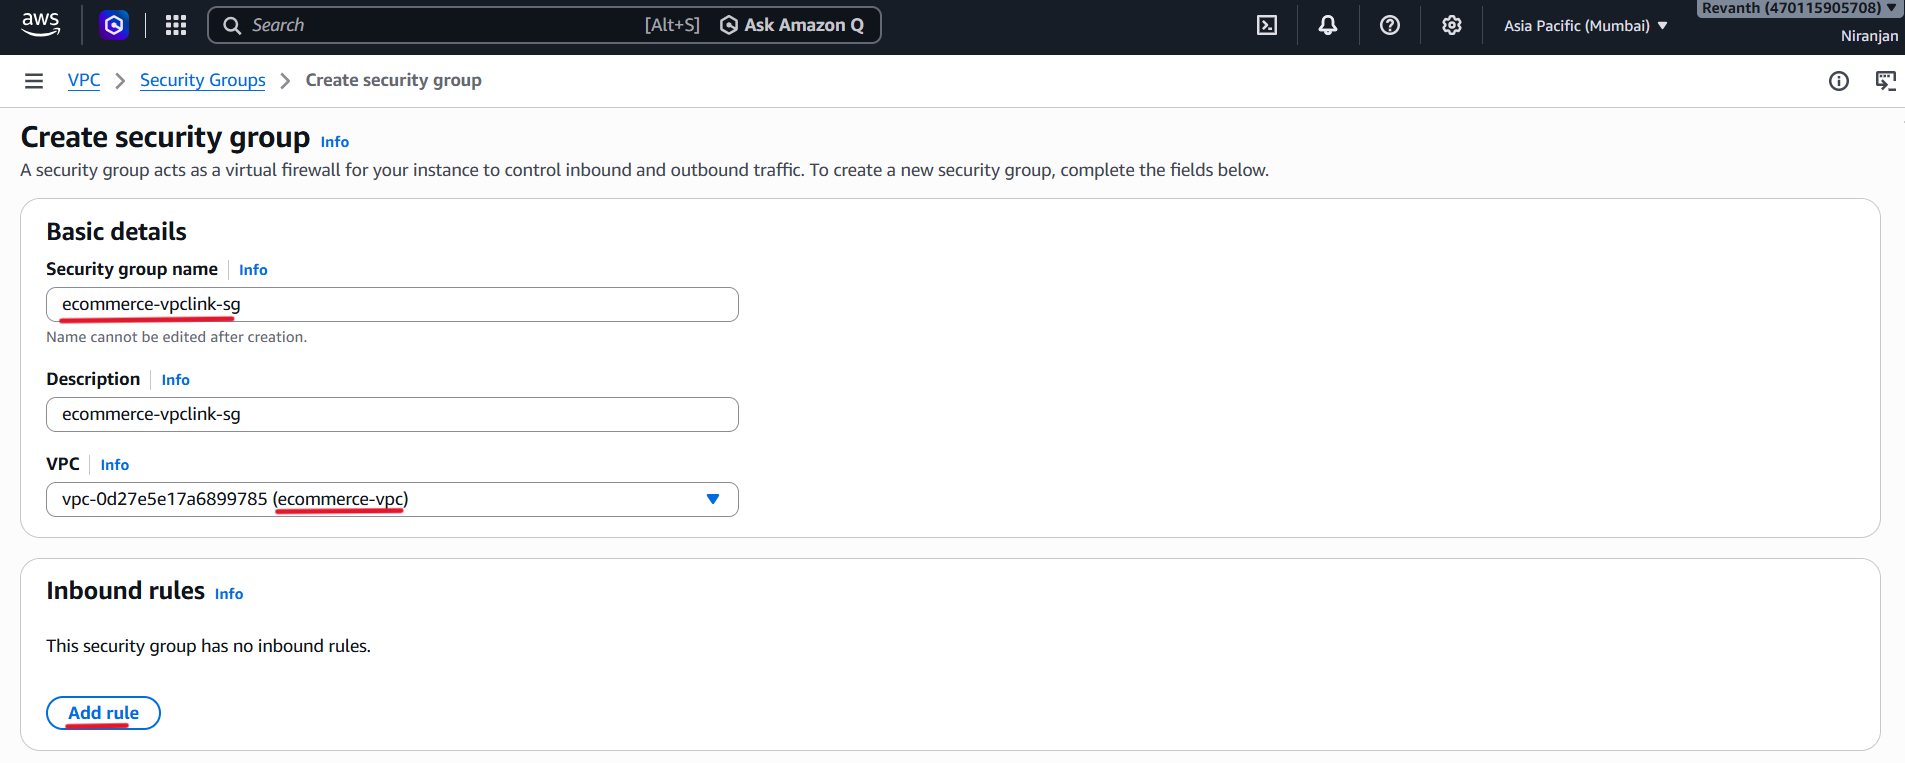
- Description:
ecommerce-vpclink-sg - VPC: Select
ecommerce-vpc.
Inbound rules:
Add the following rules:
- Type: HTTP
- Port:
80 - Source:
0.0.0.0/0

Add another rule:
- Type: HTTPS
- Port:
443 - Source:
0.0.0.0/0
Outbound rules:
- Keep the default outbound rule allowing all traffic.
- Click Create security group.
6.1.2 Create VPC Link
After creating the security group, we can create the VPC Link from the API Gateway console.
- API Gateway Console → VPC Links → Create VPC Link
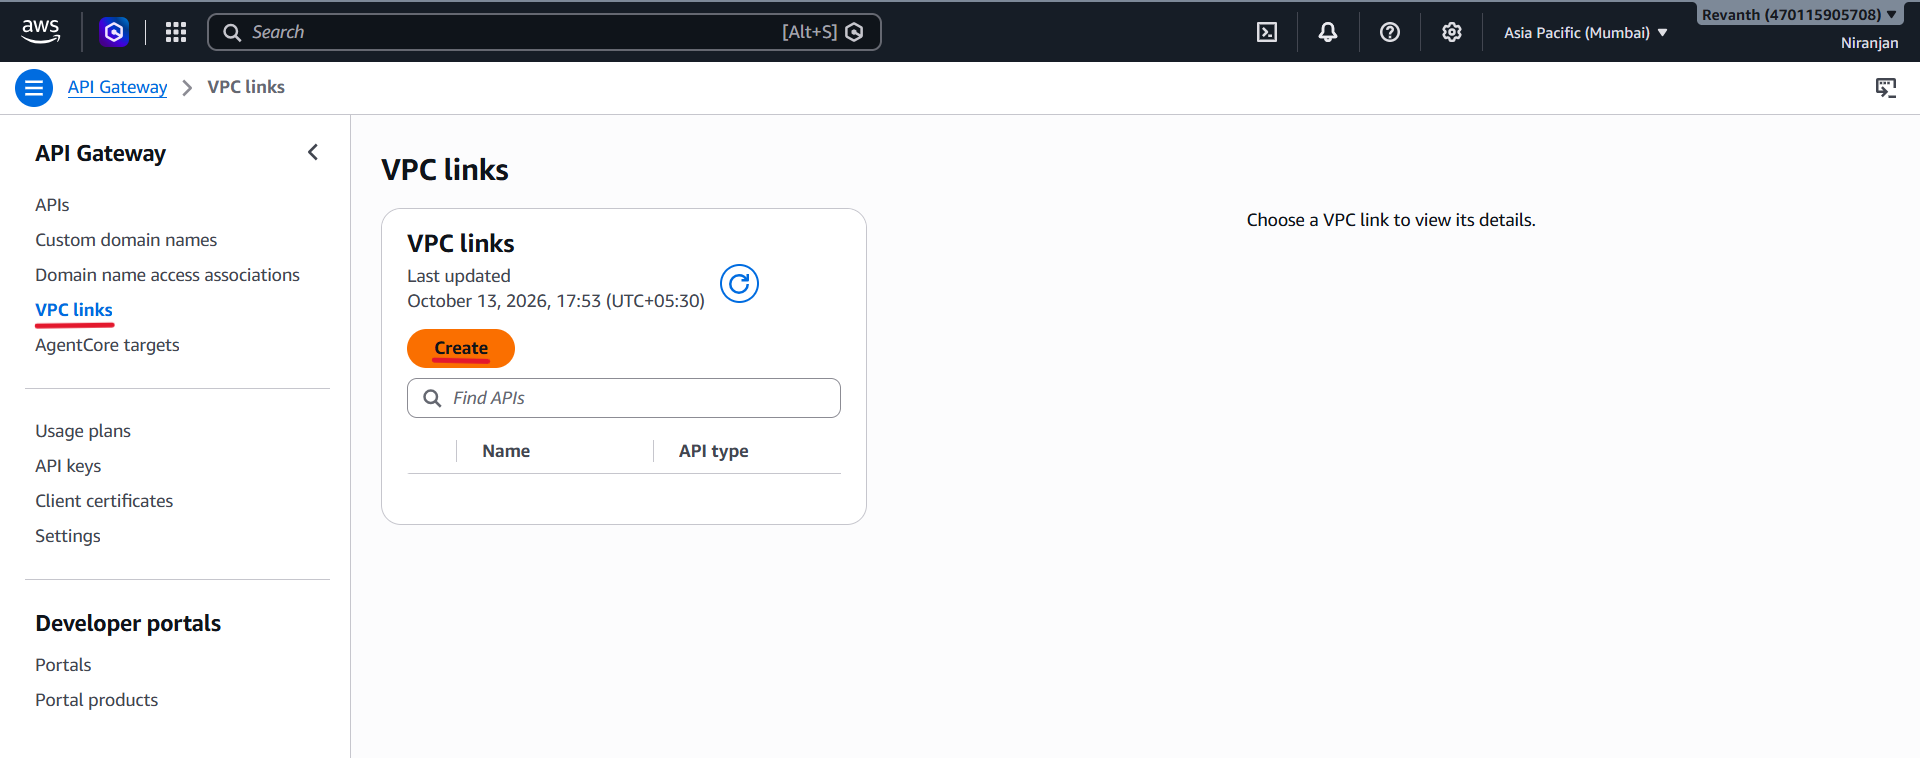
- VPC Link version: Select VPC Link for HTTP APIs (V2).
- Name:
ecommerce-vpc-link
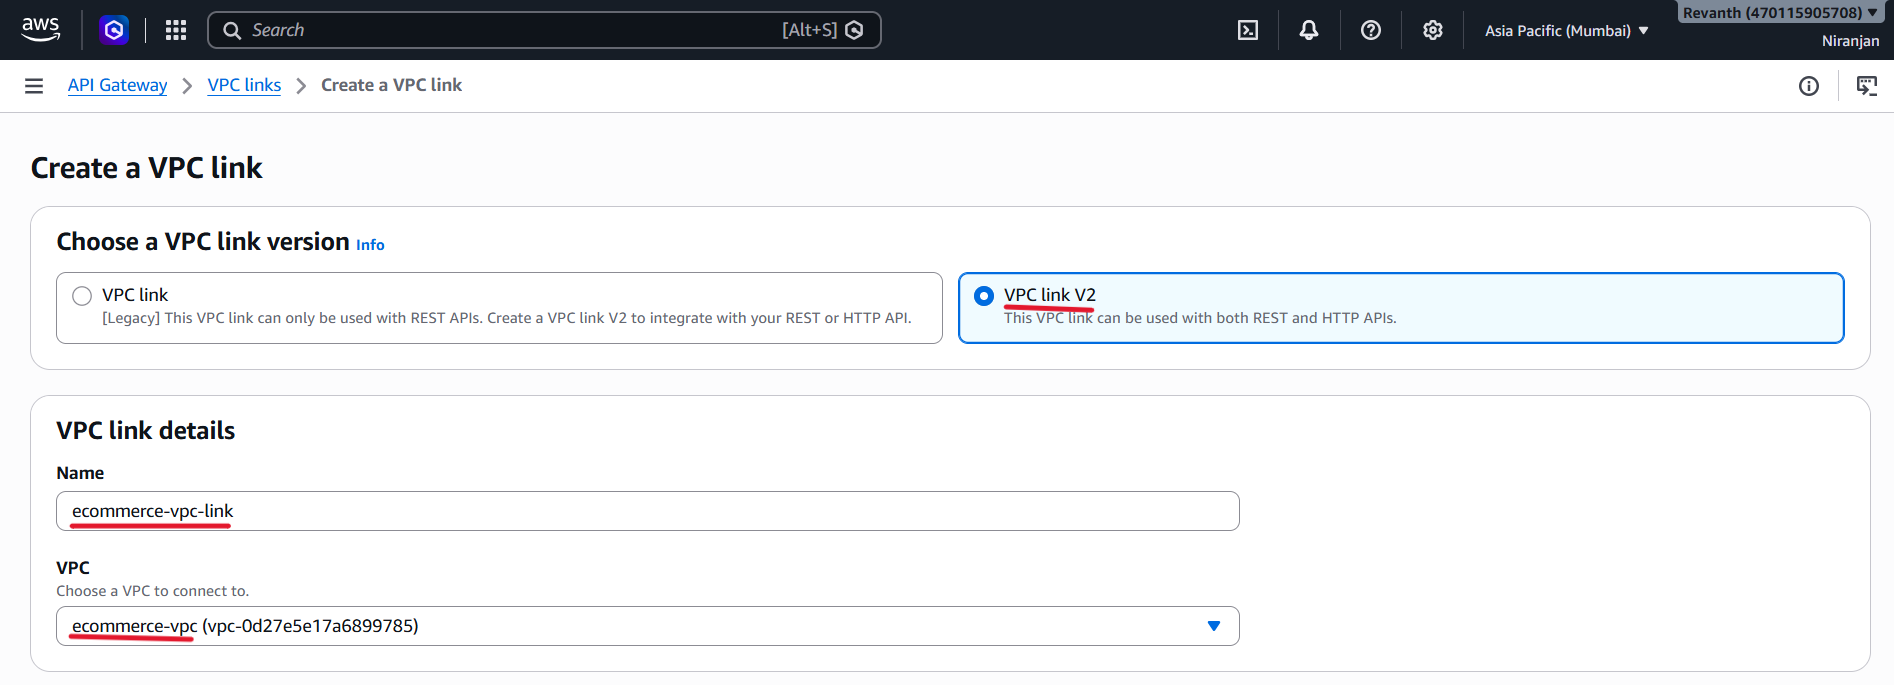
- VPC: Select
ecommerce-vpc. - Subnets: Select both private ECS subnets:
ecommerce-private-ecs-1ecommerce-private-ecs-2
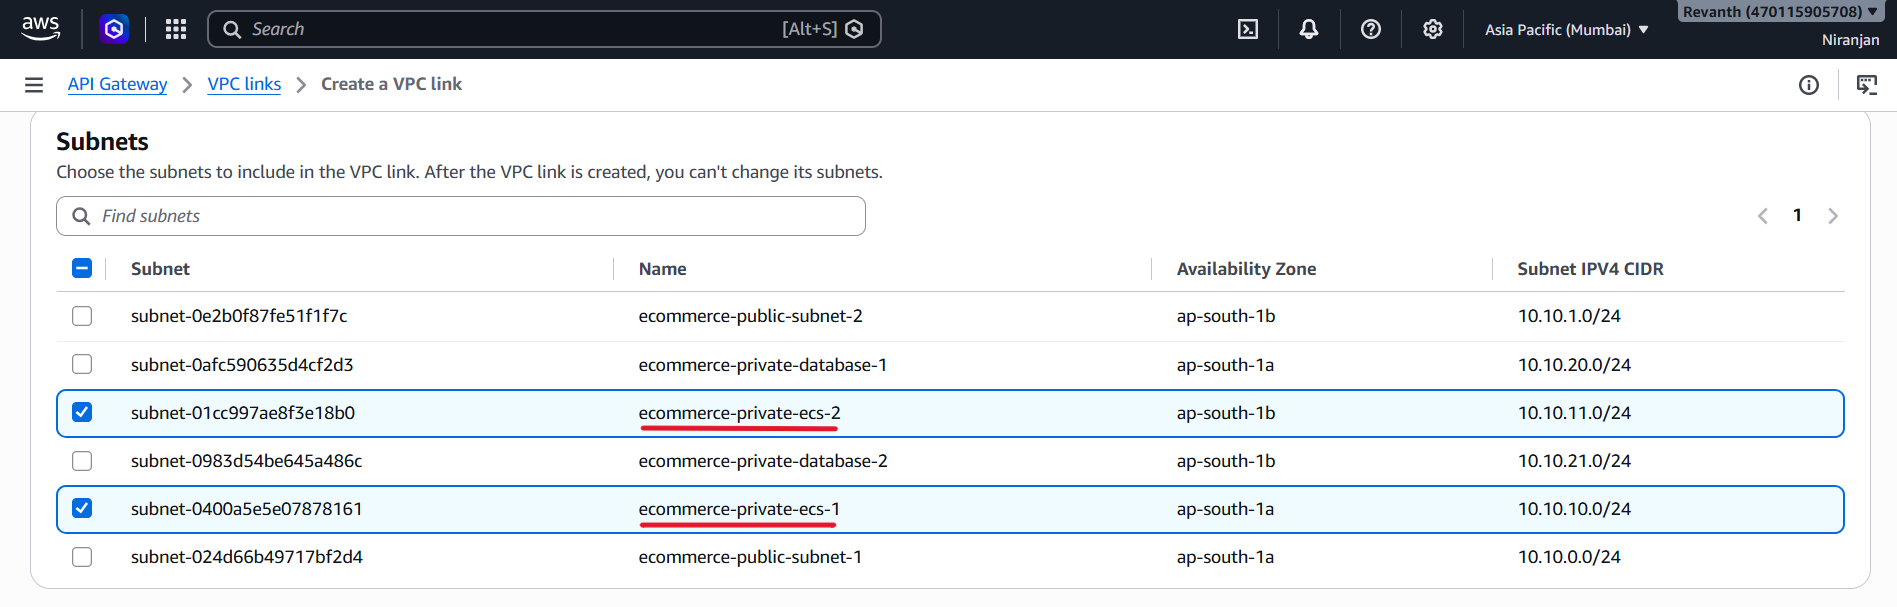
- Security groups: Select
ecommerce-vpclink-sg.
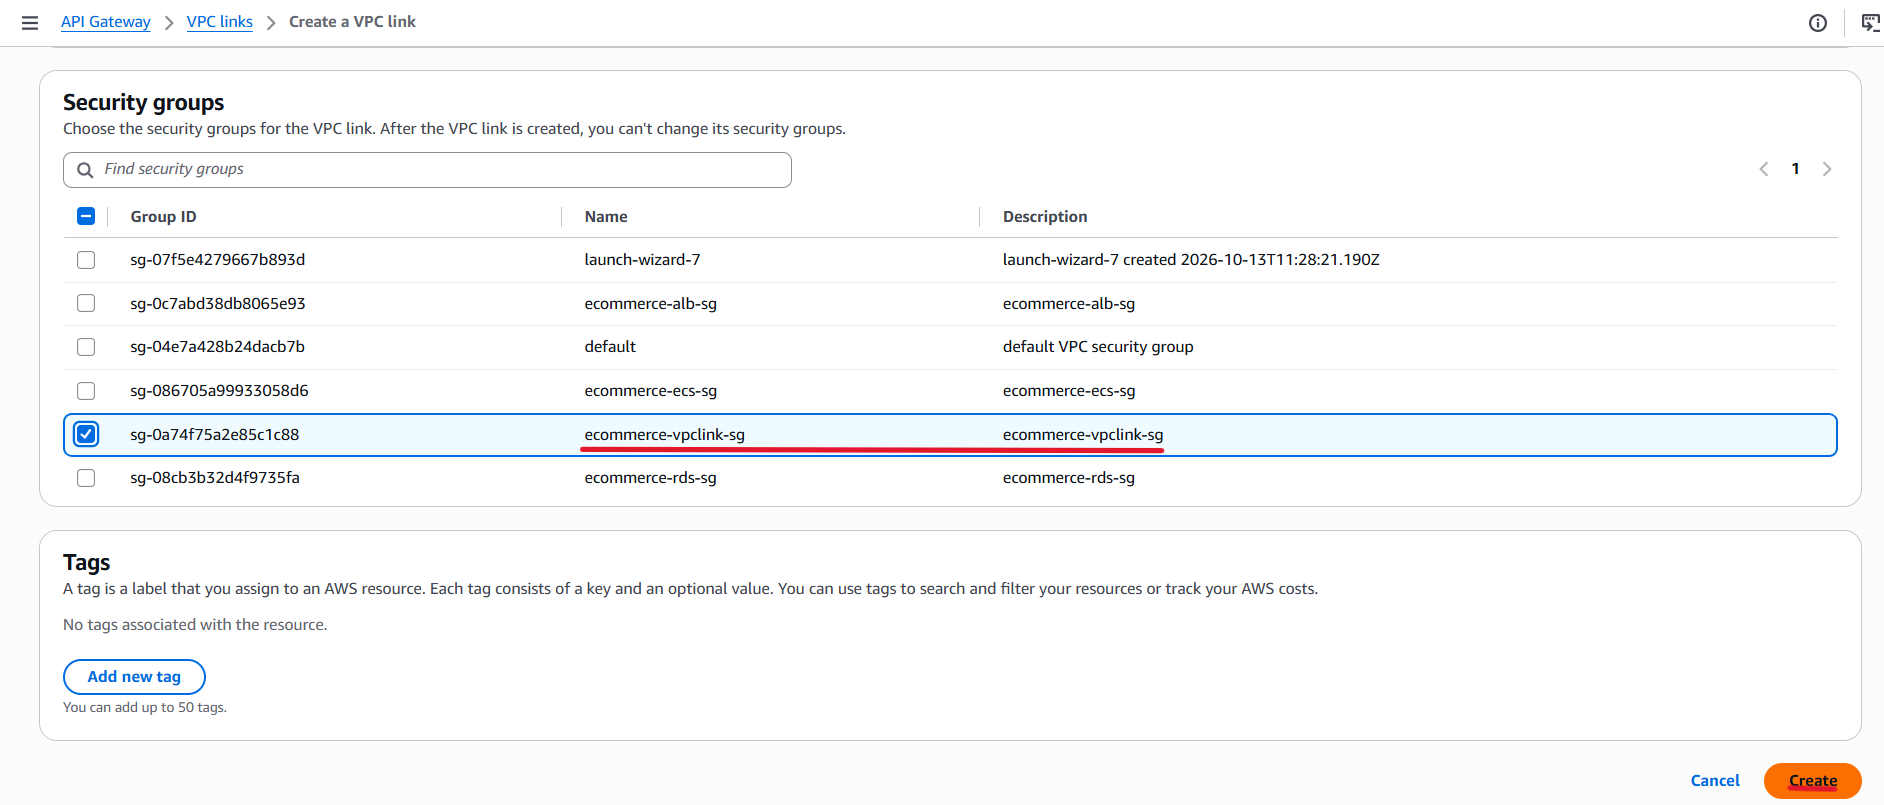
- Click Create.
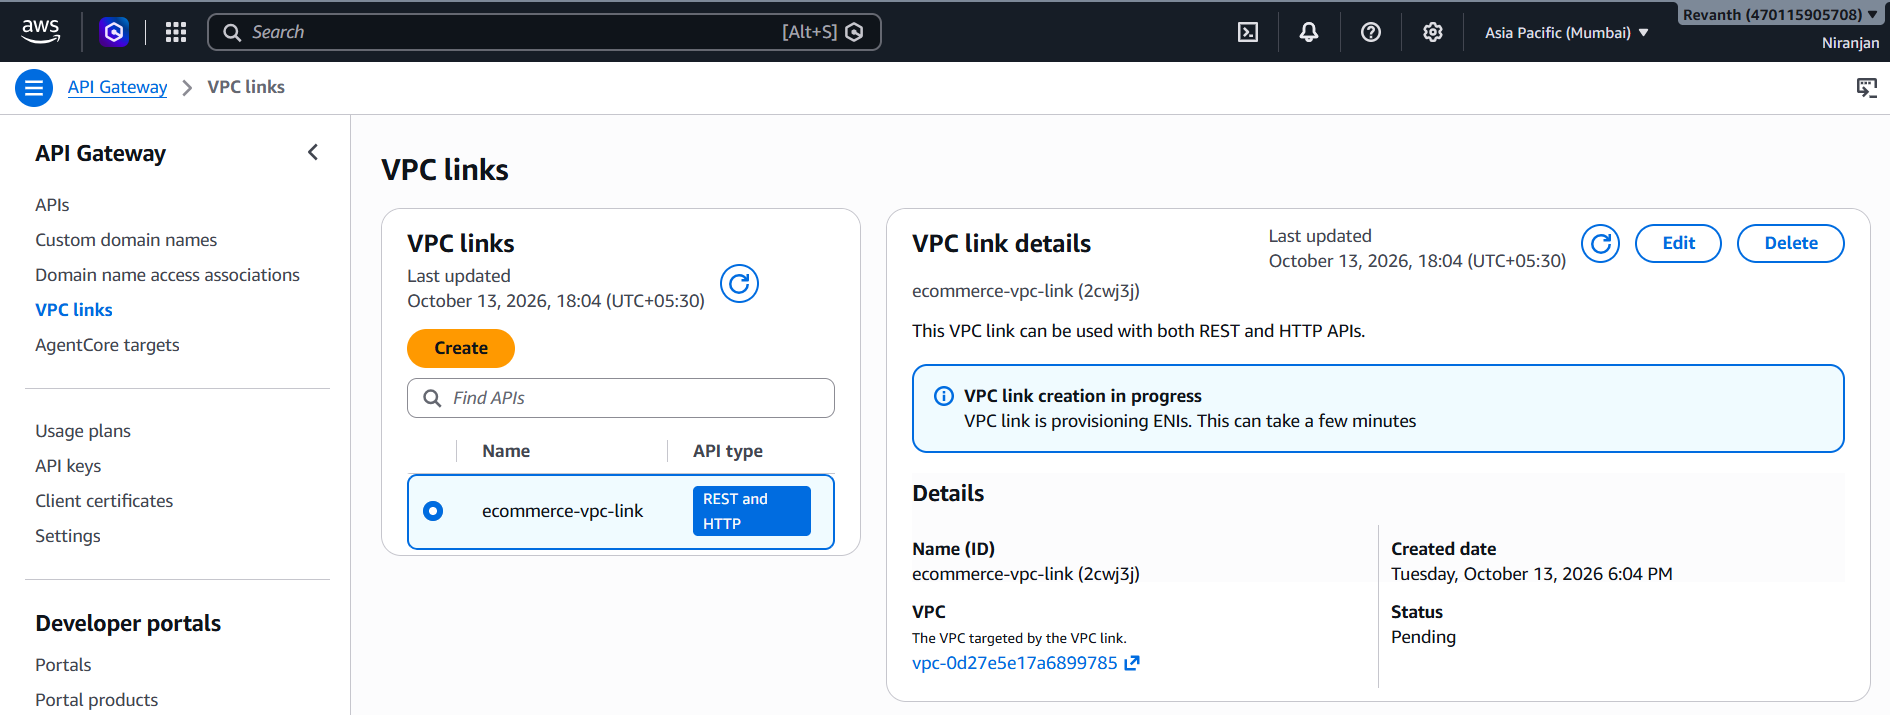
Note: VPC Link creation may take a few minutes. Wait until its status changes to Available before proceeding.
6.2 Create HTTP API Gateway
- Once the VPC Link is available, the next step is to create the HTTP API.
- We are using HTTP API because it provides a simpler and faster API Gateway option for our project.
- API Gateway Console → APIs → Create API
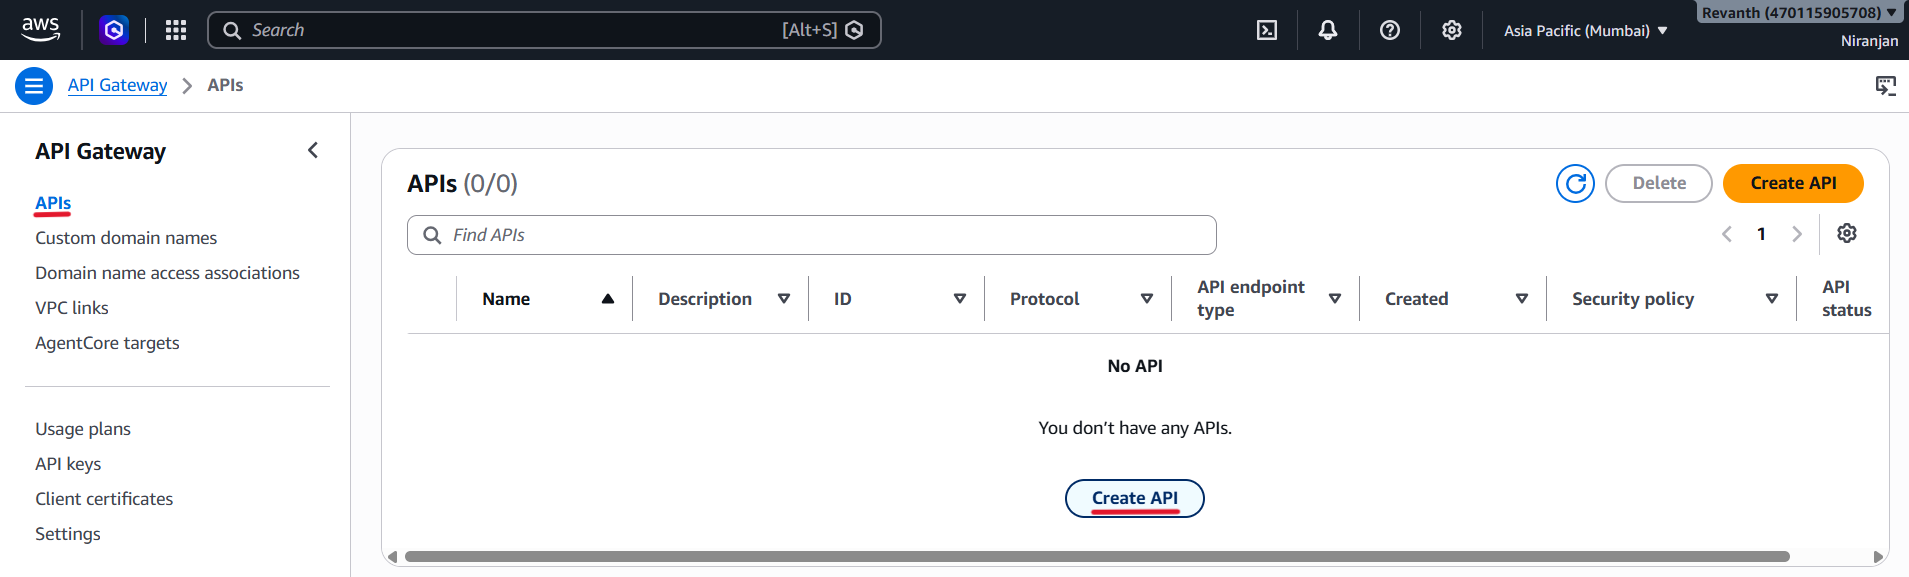
- Under HTTP API, click Build.
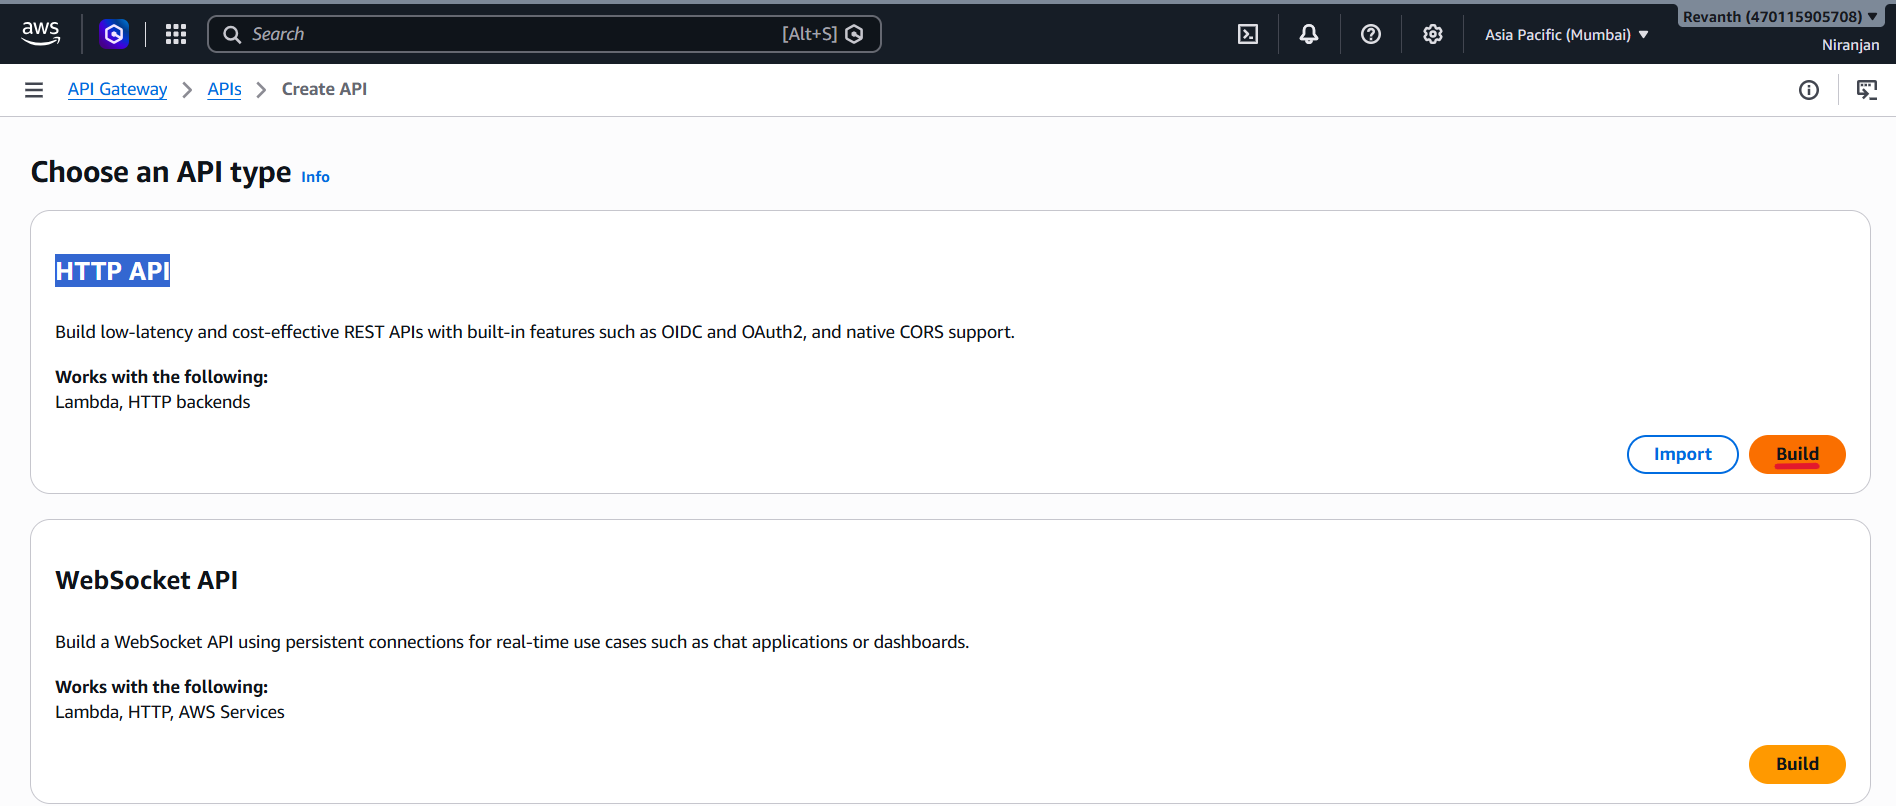
- API name:
ecommerce-api-http
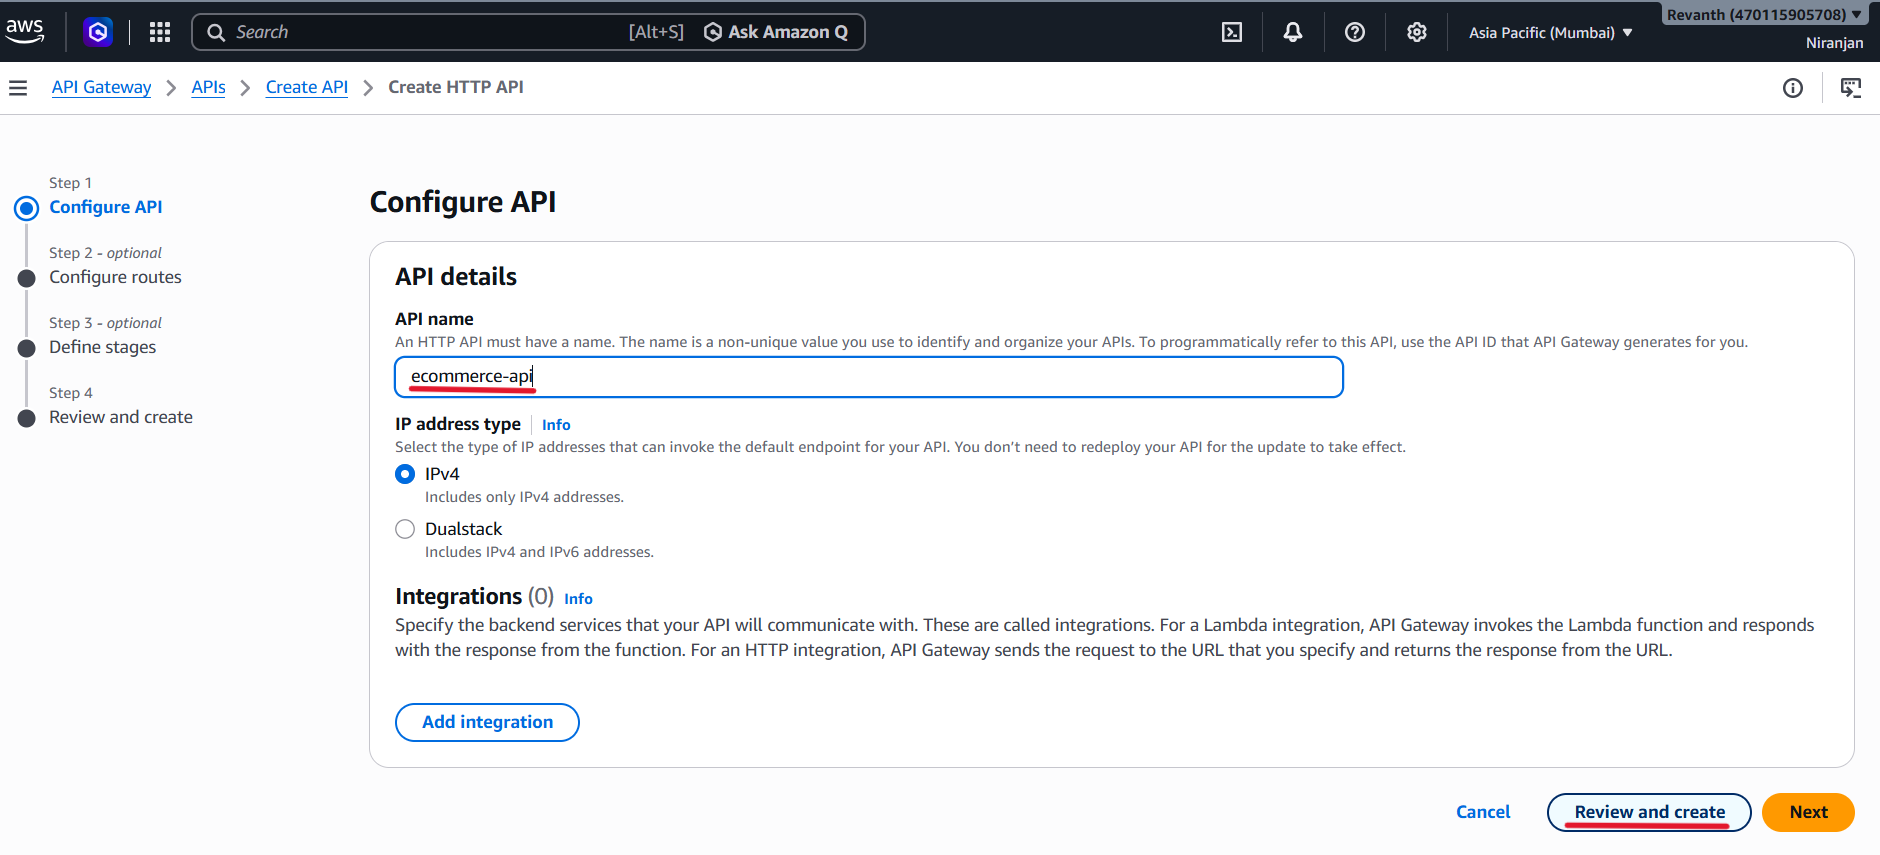
- Skip adding integrations for now. We will configure the integration manually in the next step.
- Click Review and create.
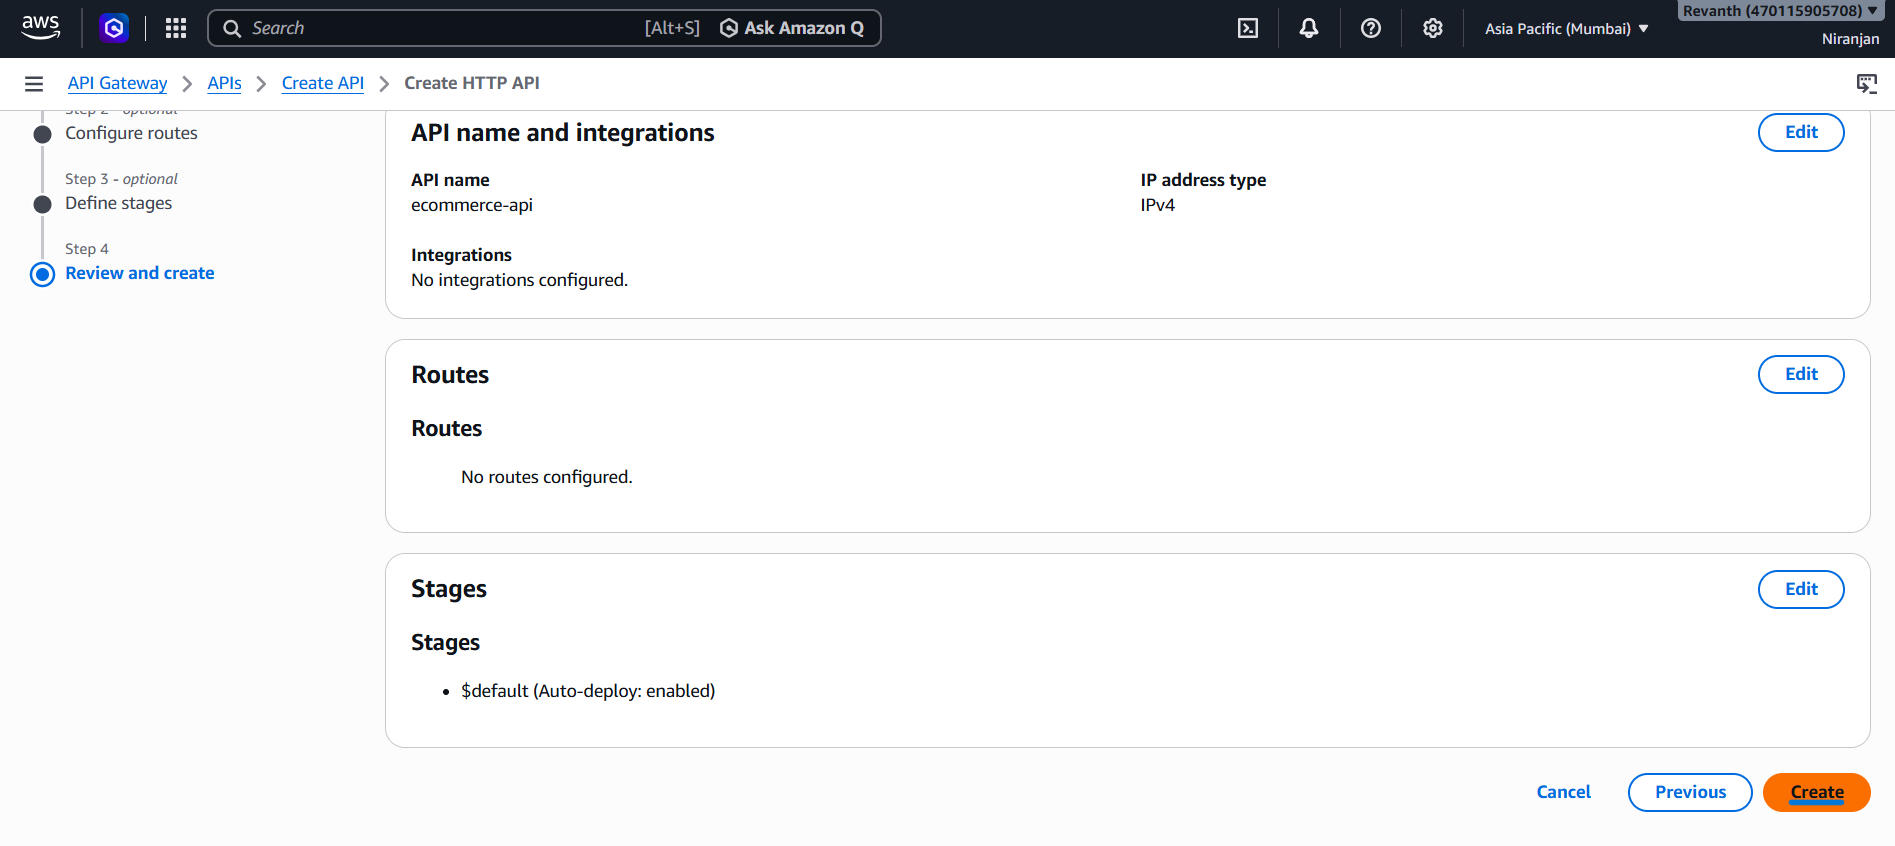
- Click Create.
After creating the API, configure the default stage.
6.3 Create HTTP Integration
- Now we need to connect API Gateway to our internal Application Load Balancer.
- For this, we will create a Private Resource Integration using the VPC Link created earlier.
- We only need one integration because all our backend services are accessible through the same internal ALB.
- Open your API Gateway.
- Navigate to Develop → Integrations → Manage integrations.
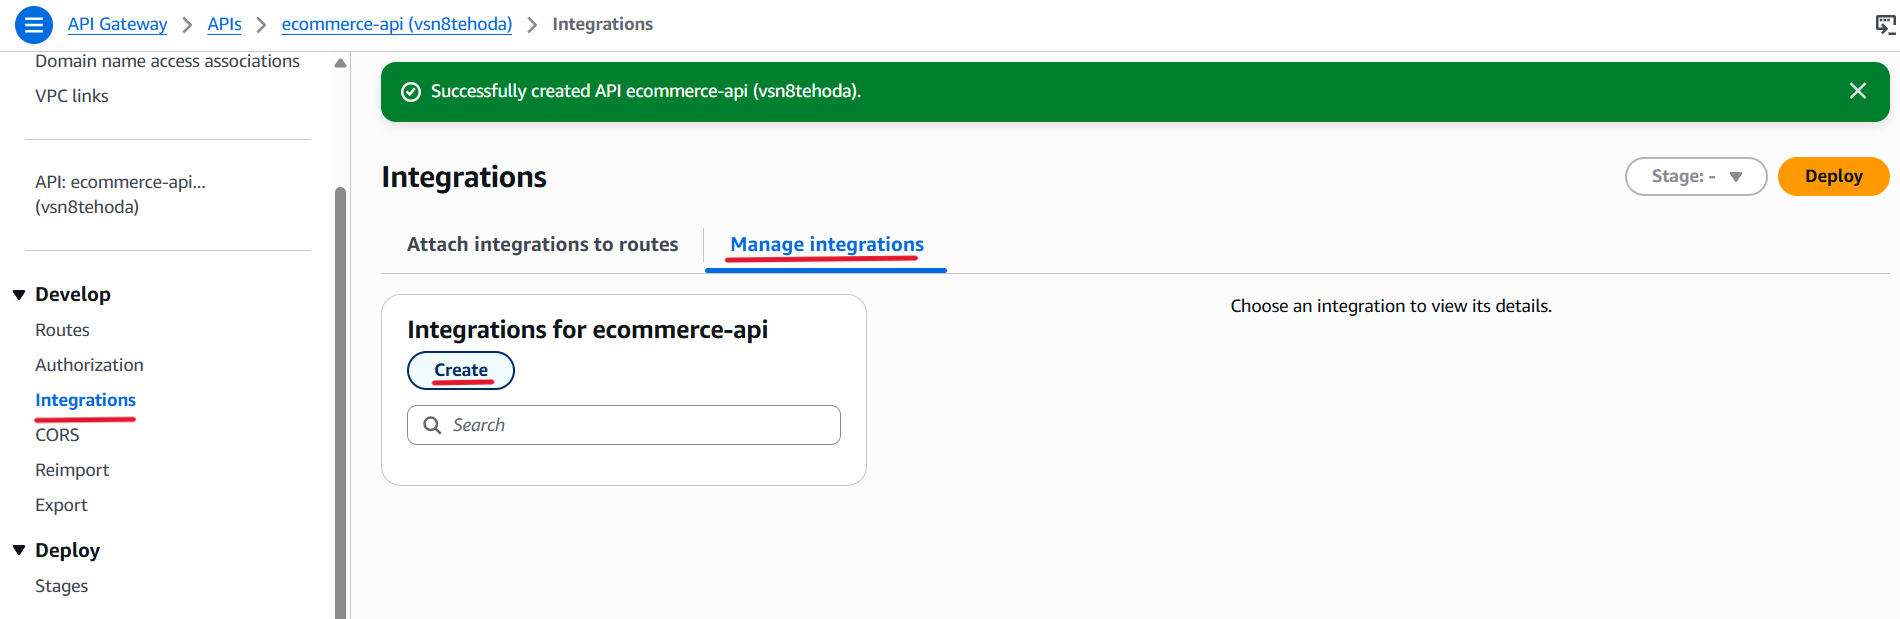
- Click Create.
Configure the following settings:
- Integration type: Private resource.
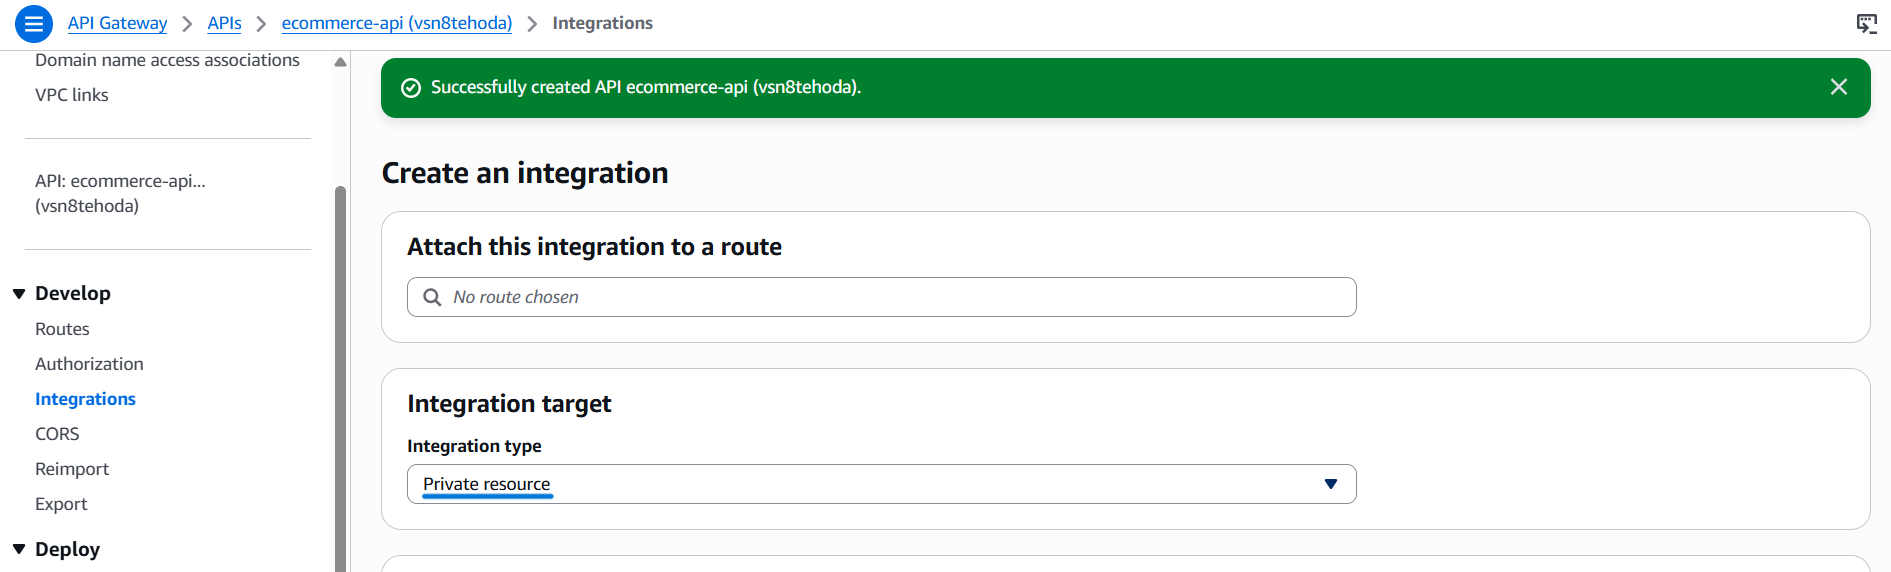
- Selection method: Select Select manually.
- Target service: ALB/NLB.
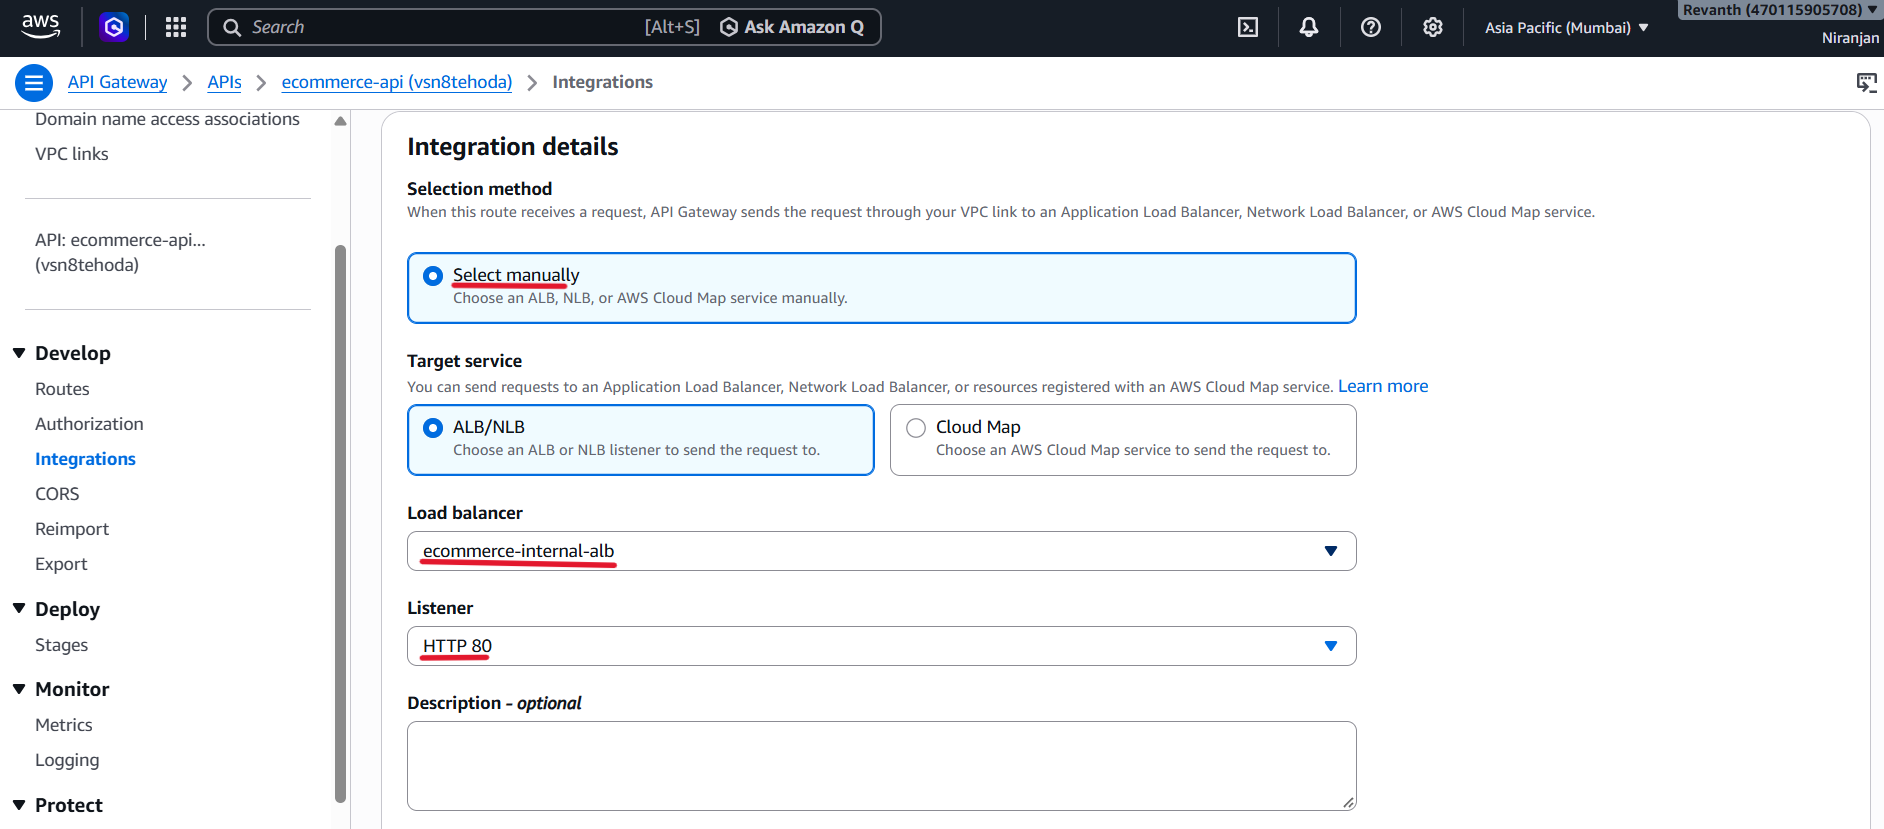
- Load balancer: Select
ecommerce-internal-alb. - Listener: Select
HTTP:80. - Connectivity type: Select VPC Link.
- VPC Link: Select
ecommerce-vpc-link.
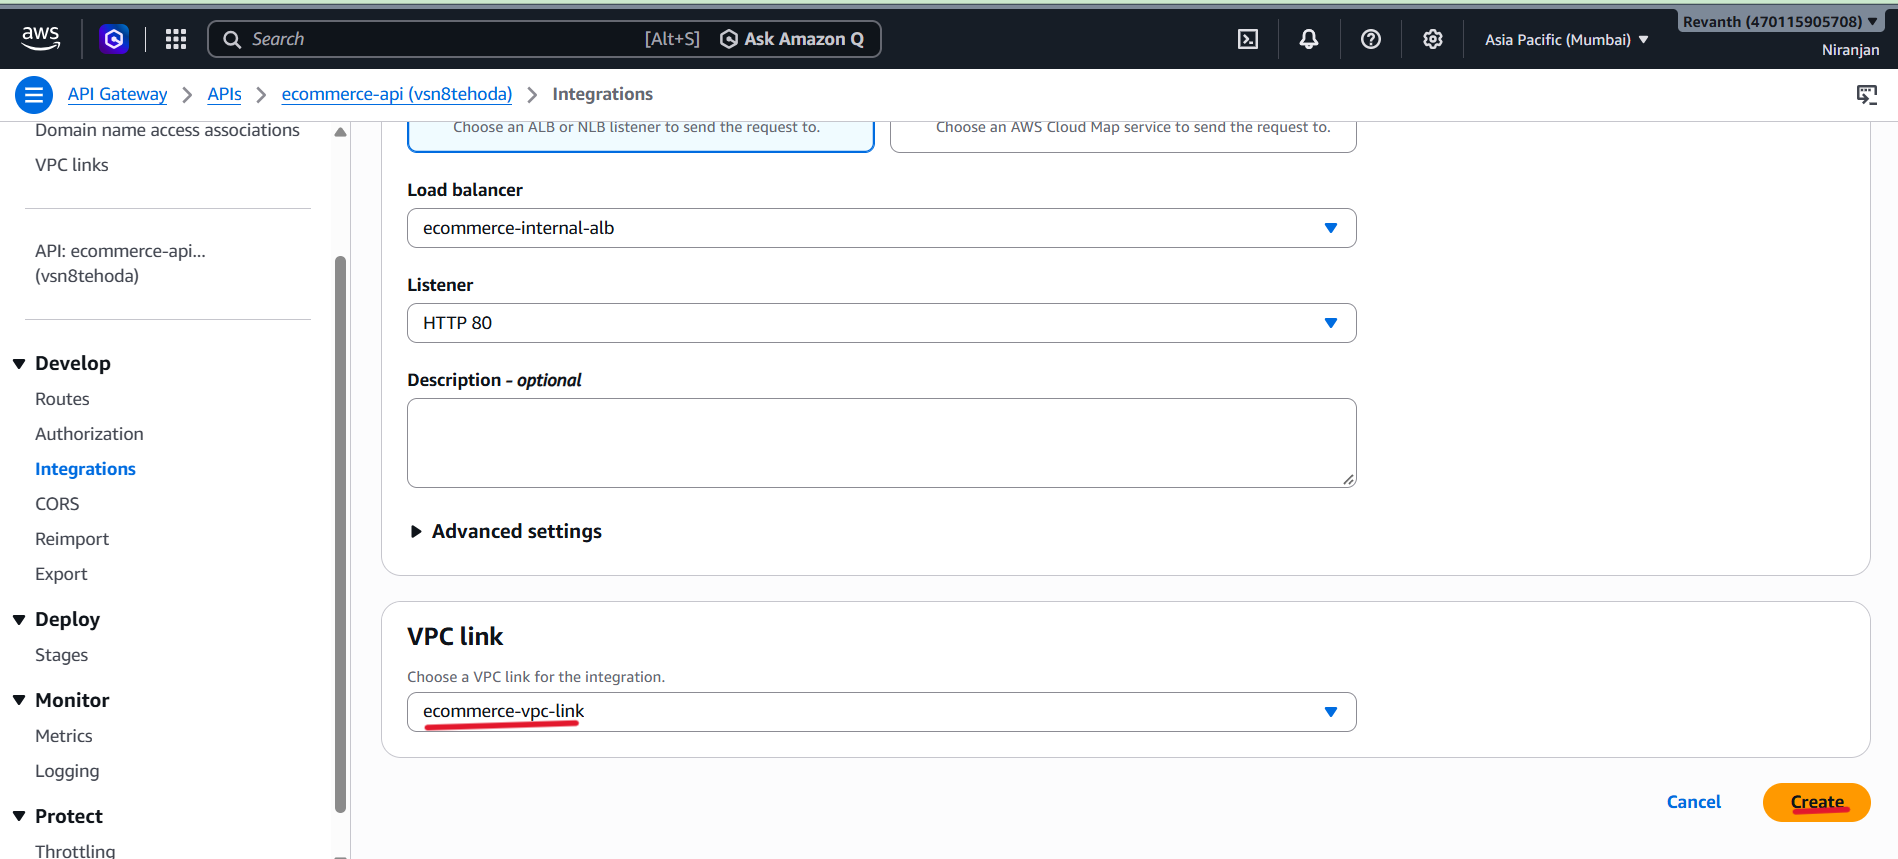
- Keep the remaining settings as default.
- Click Create
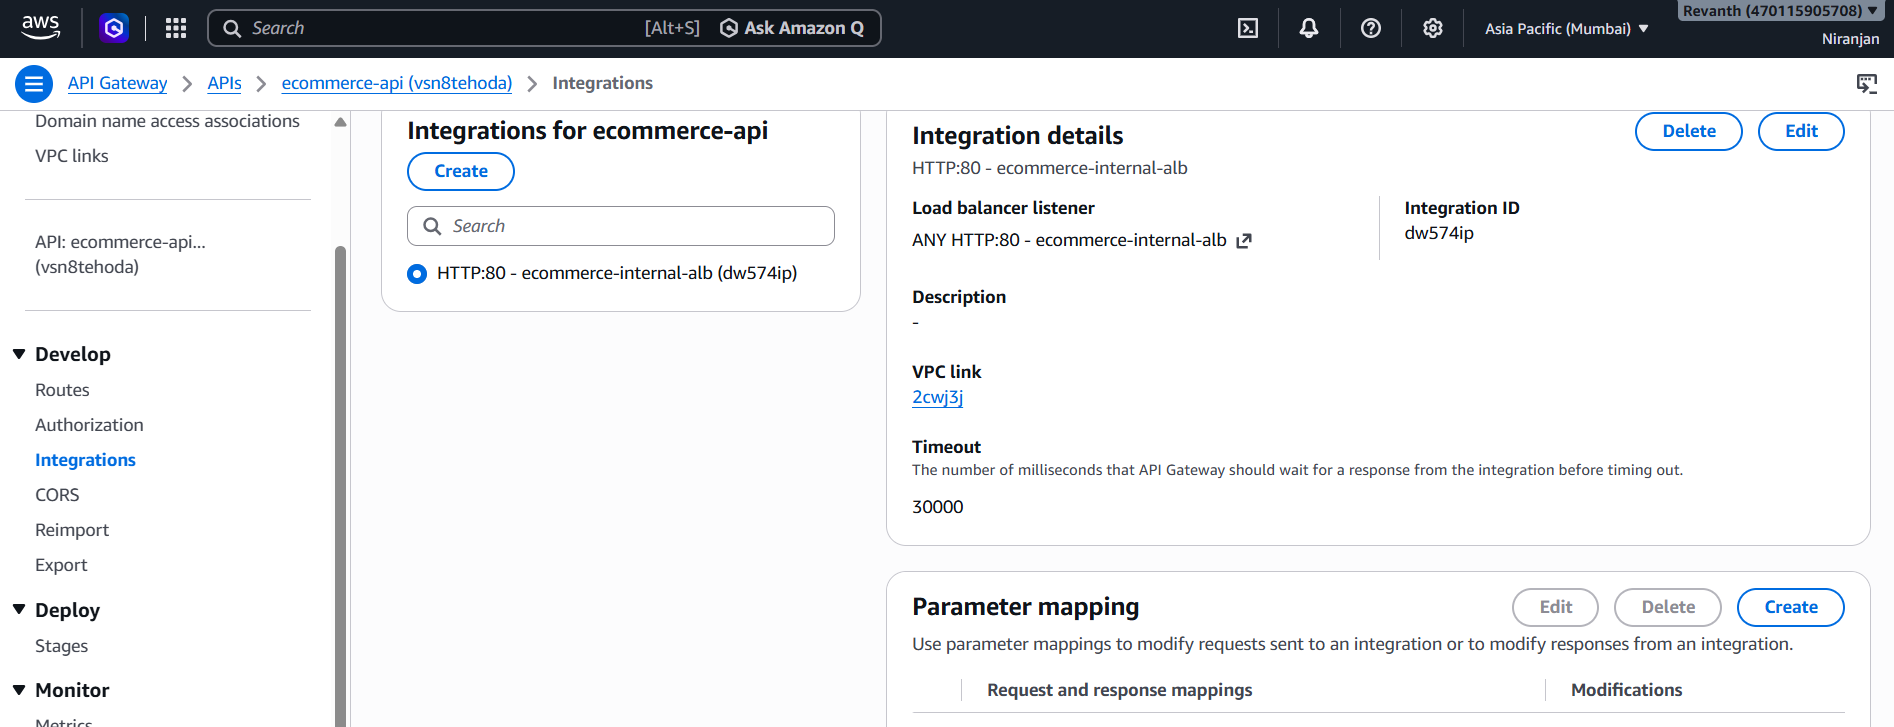
- The Private Resource Integration has been created.
- You can verify these details:
- Integration: HTTP:80 - ecommerce-internal-alb
- Load balancer listener: ANY HTTP:80 - ecommerce-internal-alb
- VPC Link: 2cwj3j
- Timeout: 30000 ms
Note: This single integration connects API Gateway to the internal ALB. We will reuse it for all three API routes. The ALB will handle path-based routing to the appropriate backend microservices.
6.4 Create Cognito JWT Authorizer
- Next, we need to configure authentication for our protected API endpoints.
- We will use the existing Amazon Cognito User Pool created in Module 2.
- API Gateway supports JWT authorization, allowing it to validate the JWT tokens issued by Cognito.
Create the JWT Authorizer
- Open your API Gateway.
- Navigate to Authorization → Authorizers.
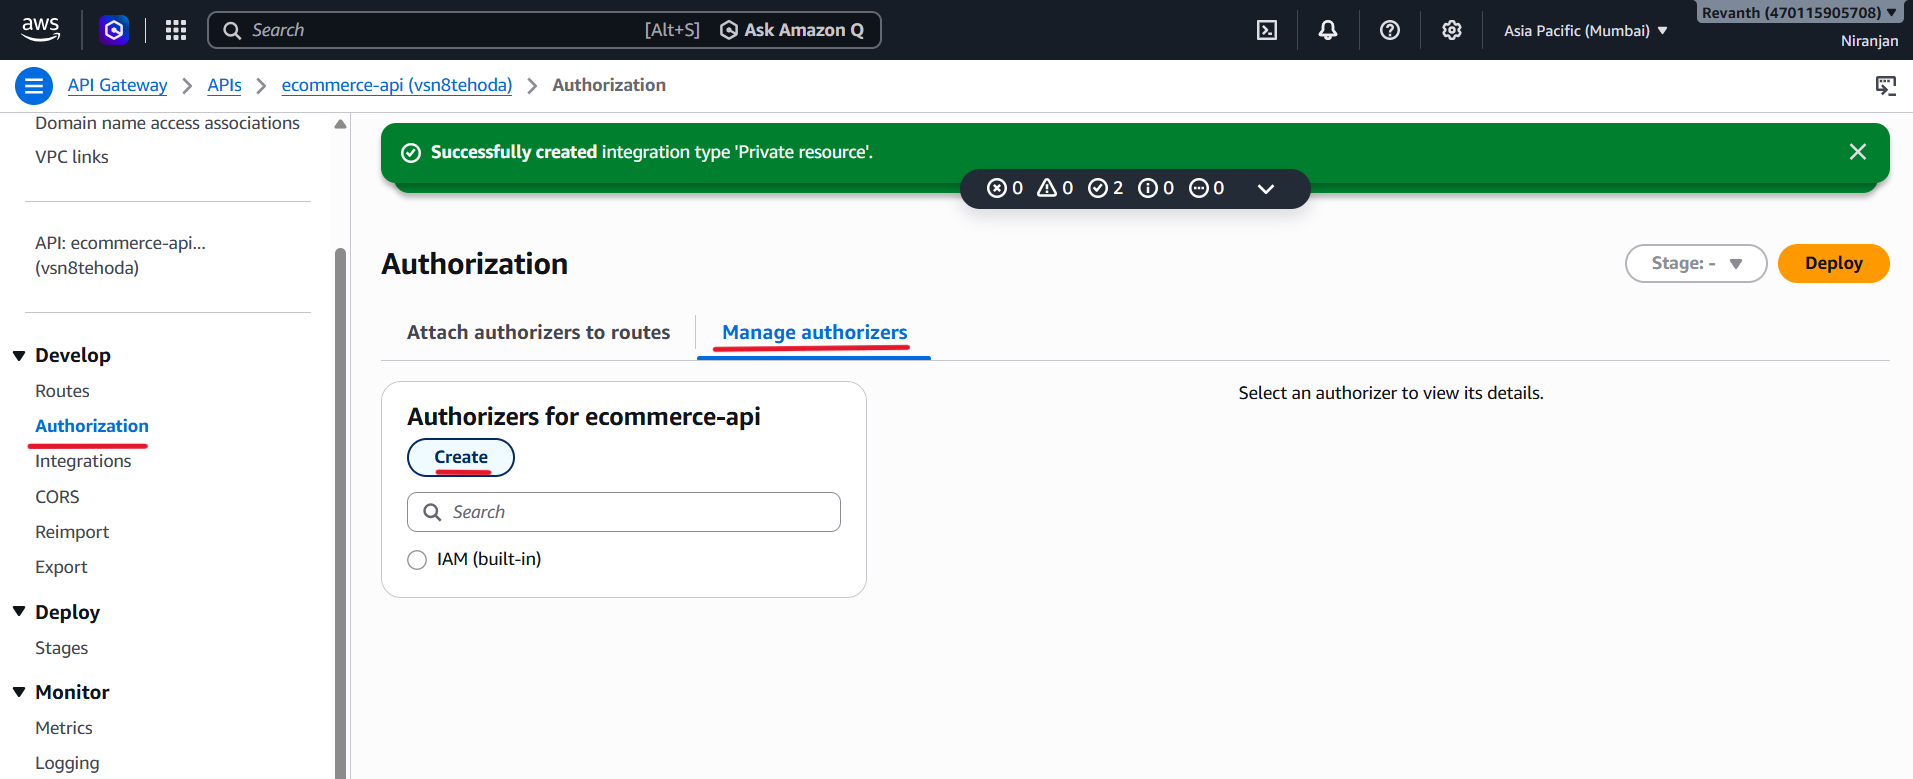
- Click Create authorizer.
Configure the following settings:
- Authorizer name:
cognito-jwt-authorizer - Authorizer type: JWT.
- Identity source:
$request.header.Authorization
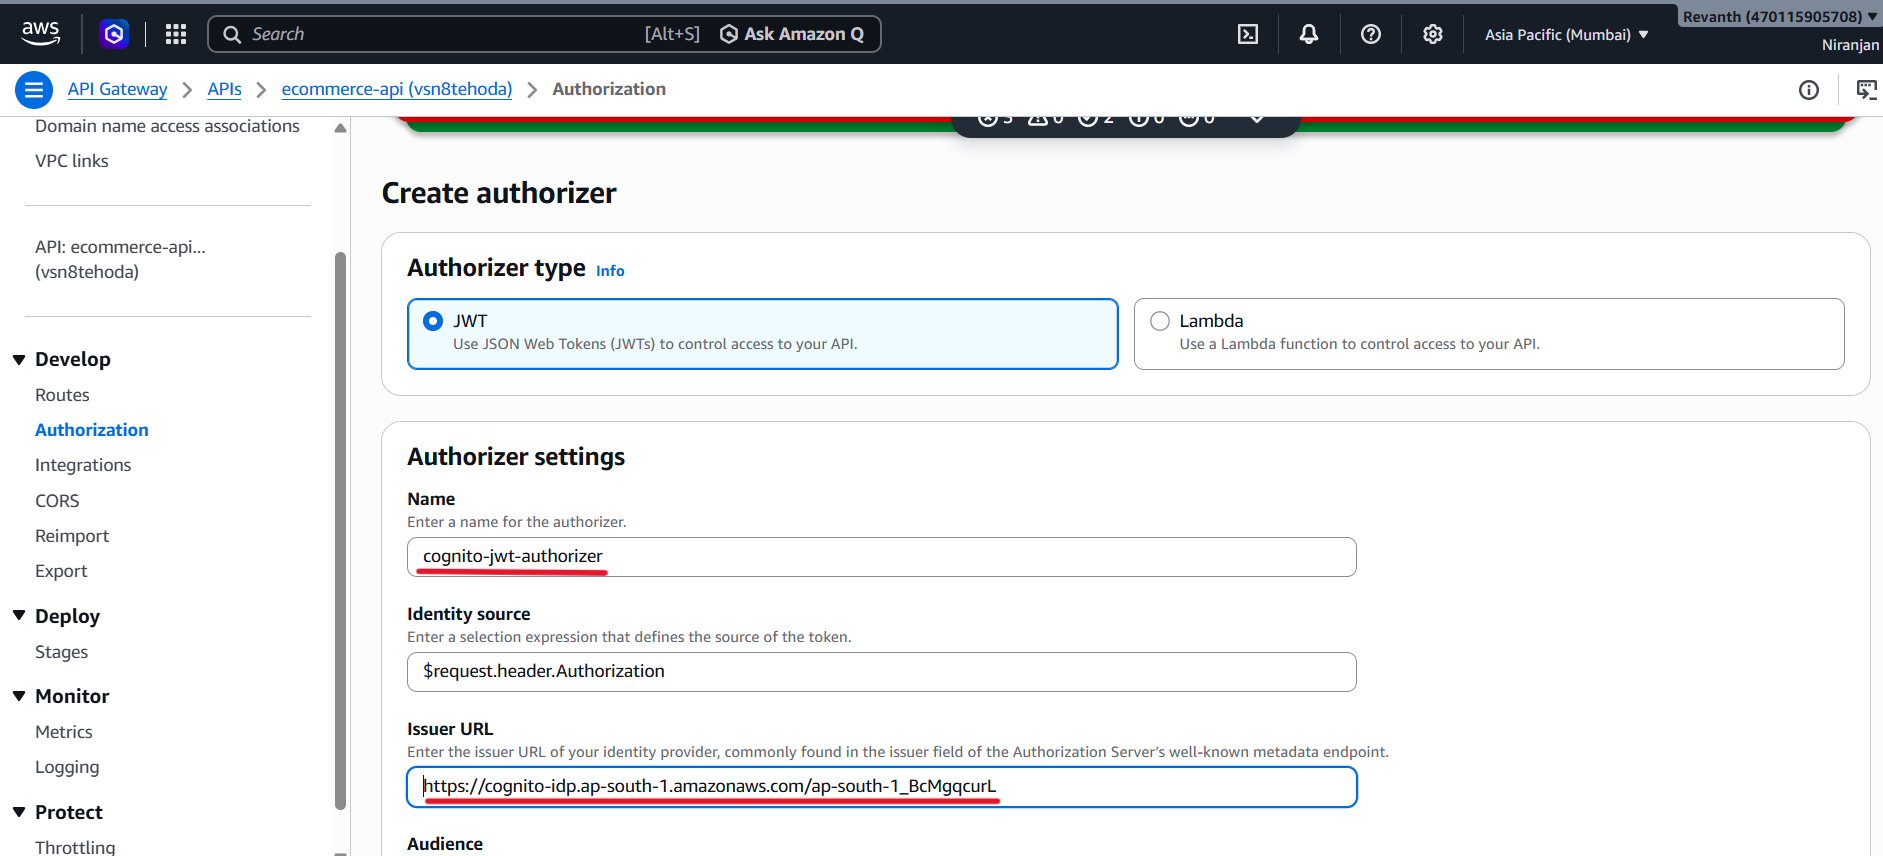
Issuer URL:
Enter your Cognito User Pool issuer URL using the following format:
https://cognito-idp.<your-region>.amazonaws.com/<user-pool-id>
- Replace
<your-region>and<user-pool-id>with your actual values. - For this project, the AWS Region is
ap-south-1. - You can find the User Pool ID in the Amazon Cognito console.
Audience:
Enter your Cognito App Client ID created in Module 2.

- Click Create authorizer.
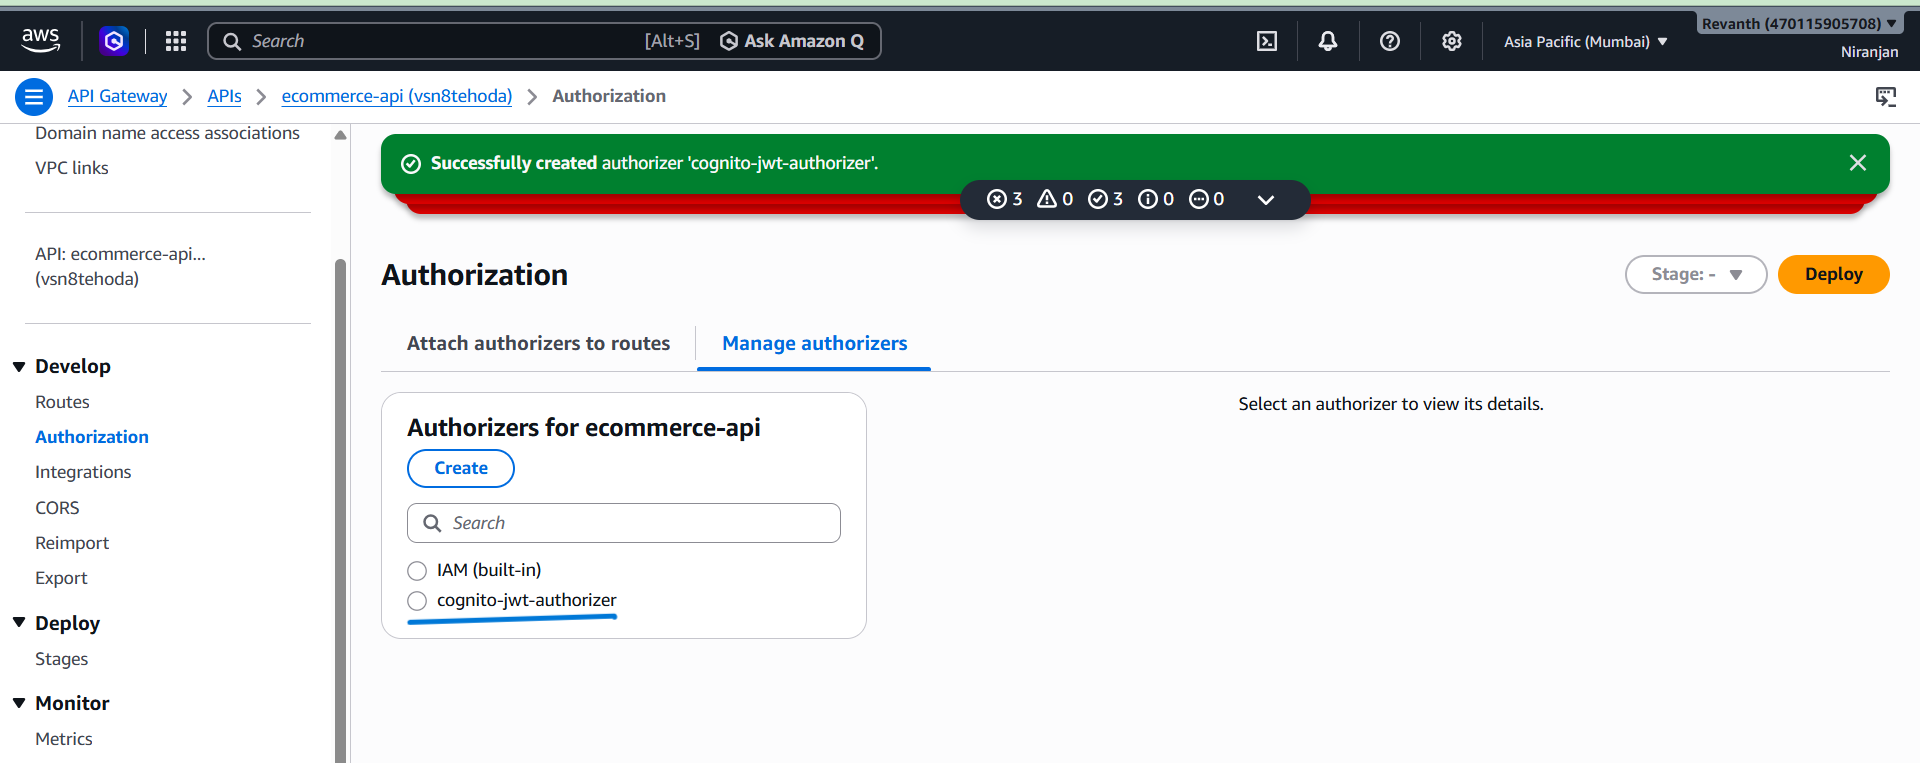
Note: Make sure the Issuer URL contains the correct Cognito User Pool ID and the Audience contains the correct App Client ID.
6.5 Create API Routes
- Now we have successfully created the VPC Link, HTTP API, ALB Integration, and Cognito JWT Authorizer.
- The next step is to create three API routes.
- All three routes will use the same ALB integration, but their authentication settings will be different.
- Before creating the routes, let's understand why we need them.
- Why do we need API routes?
- API routes define how incoming API requests should be handled by API Gateway. They specify:
- Which HTTP method and resource path should be matched.
- Which backend integration should receive the request.
- Whether authentication is required to access the endpoint.
Route 1: Public Products Route
This route allows users to access the product list without authentication.
- Open your API → Routes → Create route.
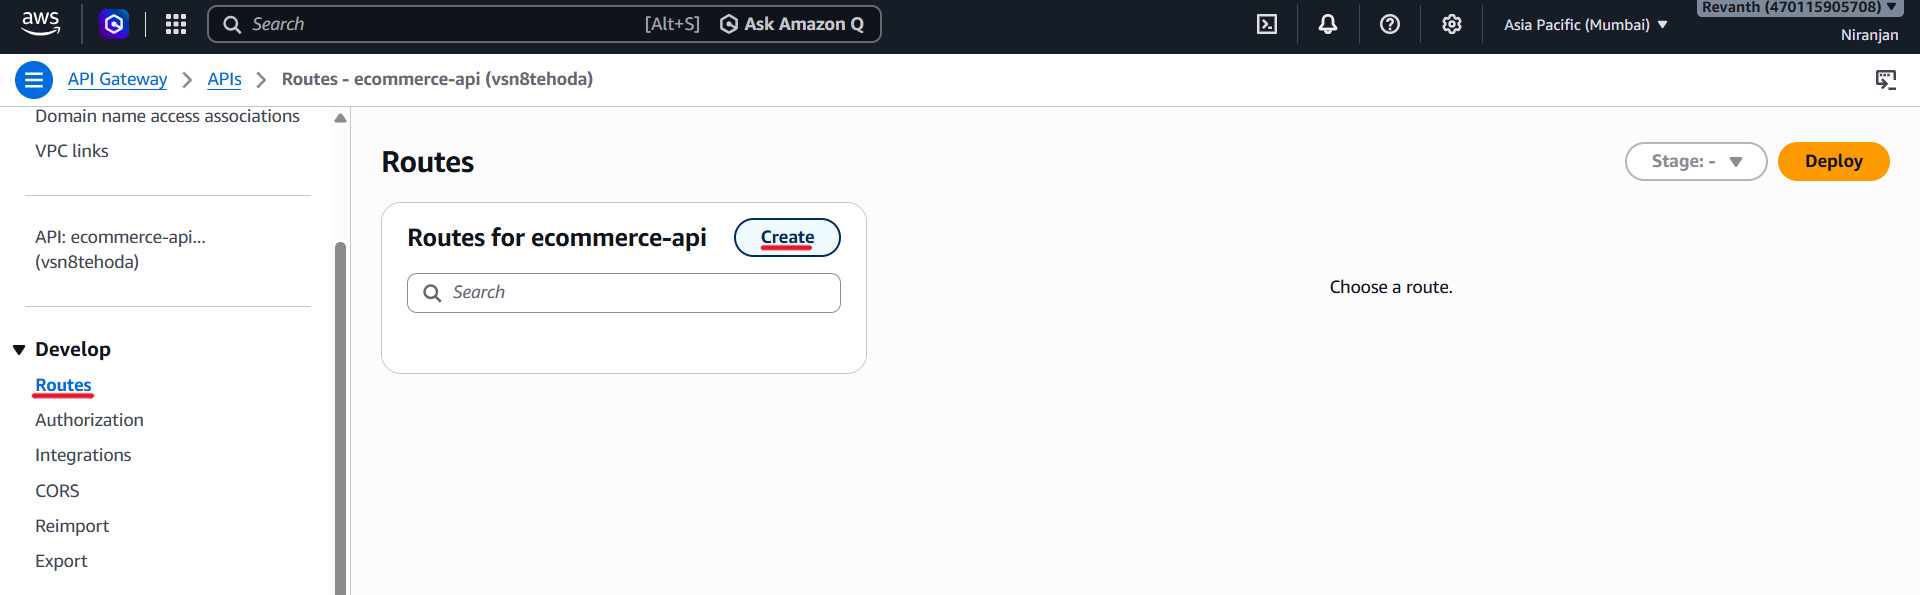
- Method: GET
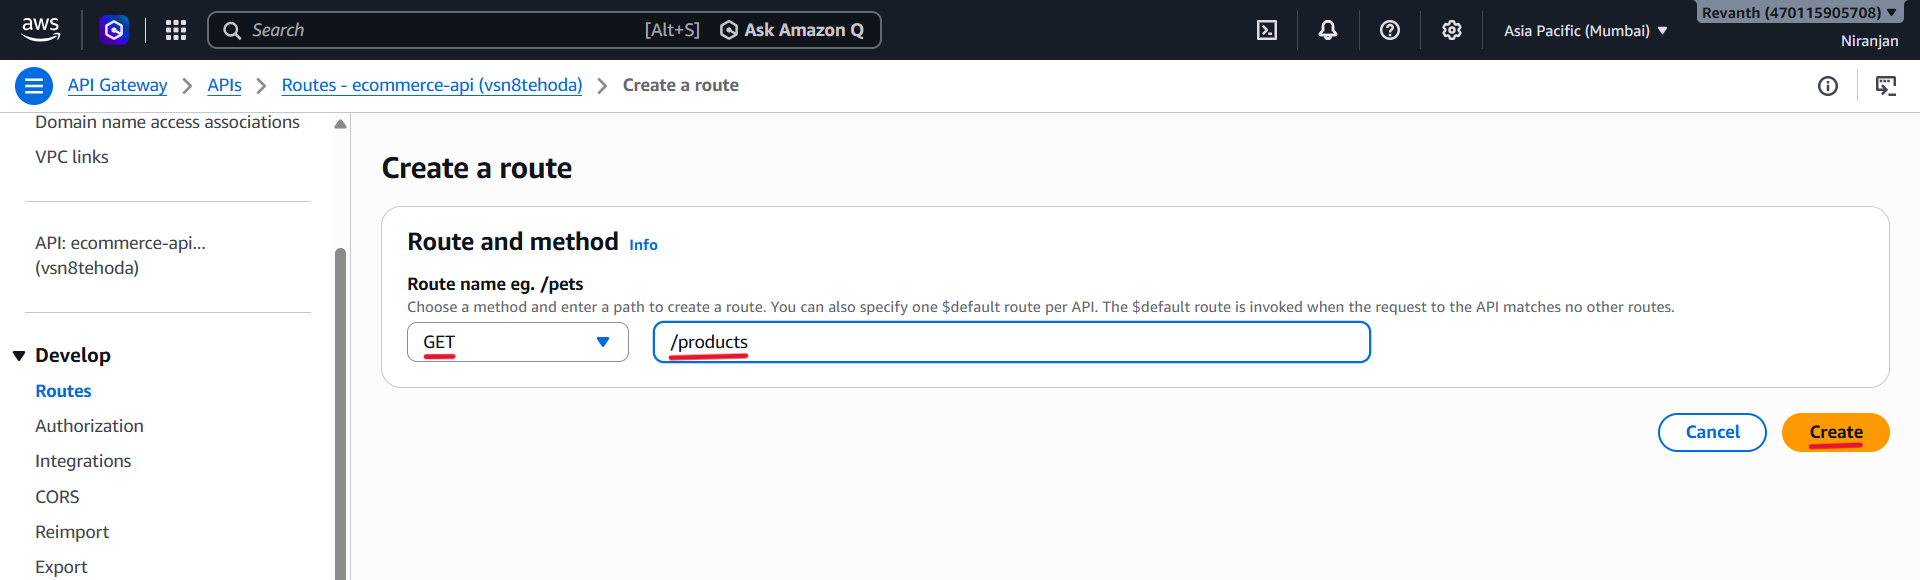
- Resource path:
/products - Create the route.
- After creating the route, select GET /products.
- Under Integration, click Attach integration.
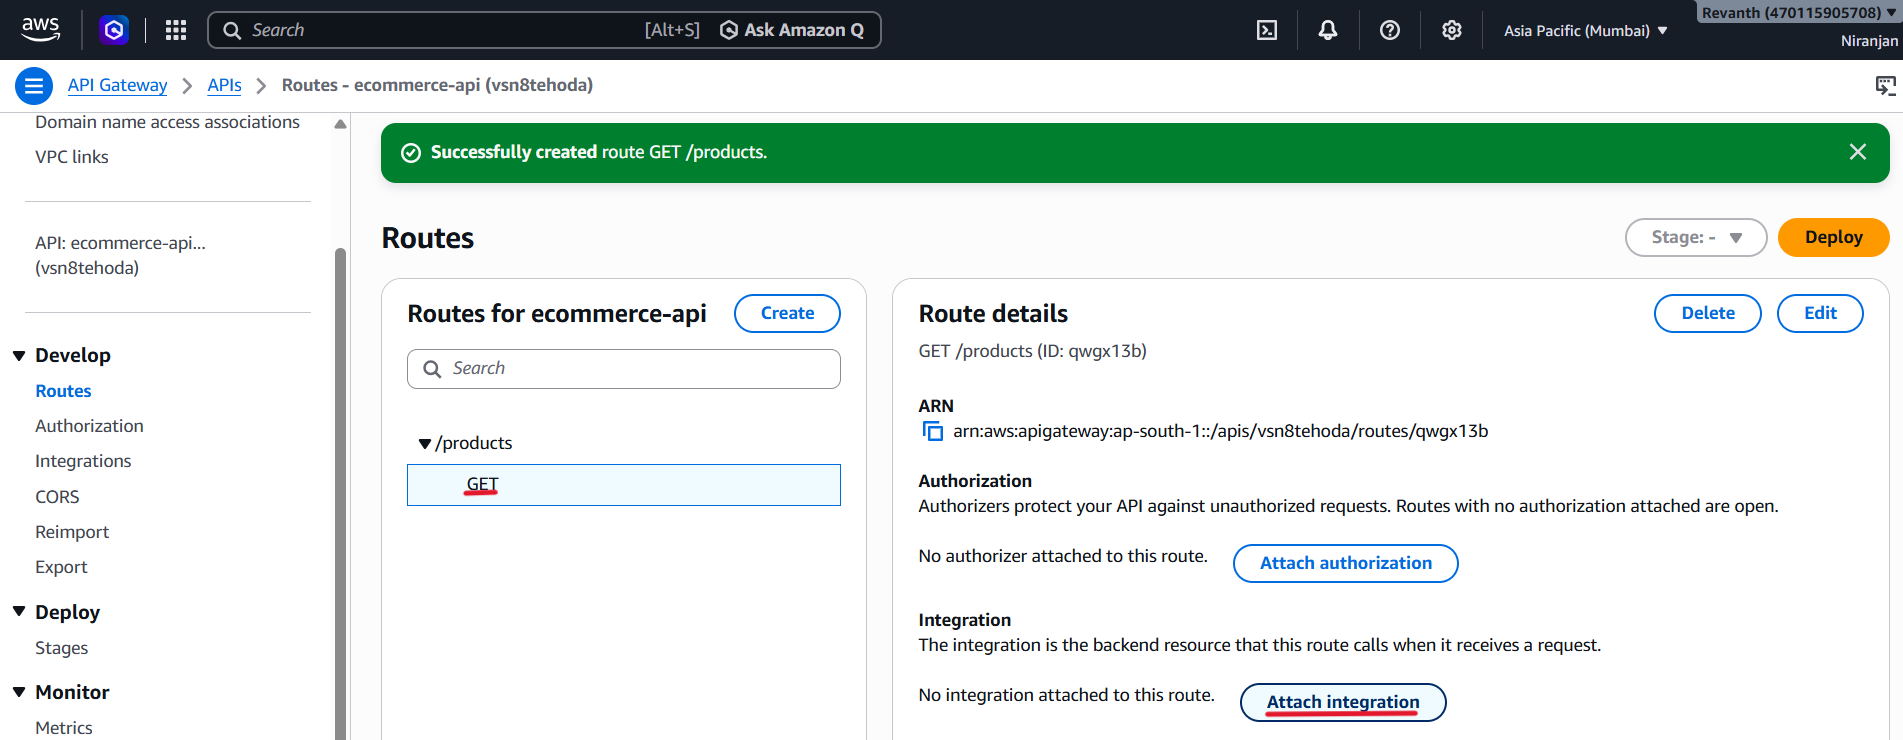
- Select the existing integration from the dropdown:
HTTP:80 - ecommerce-internal-alb
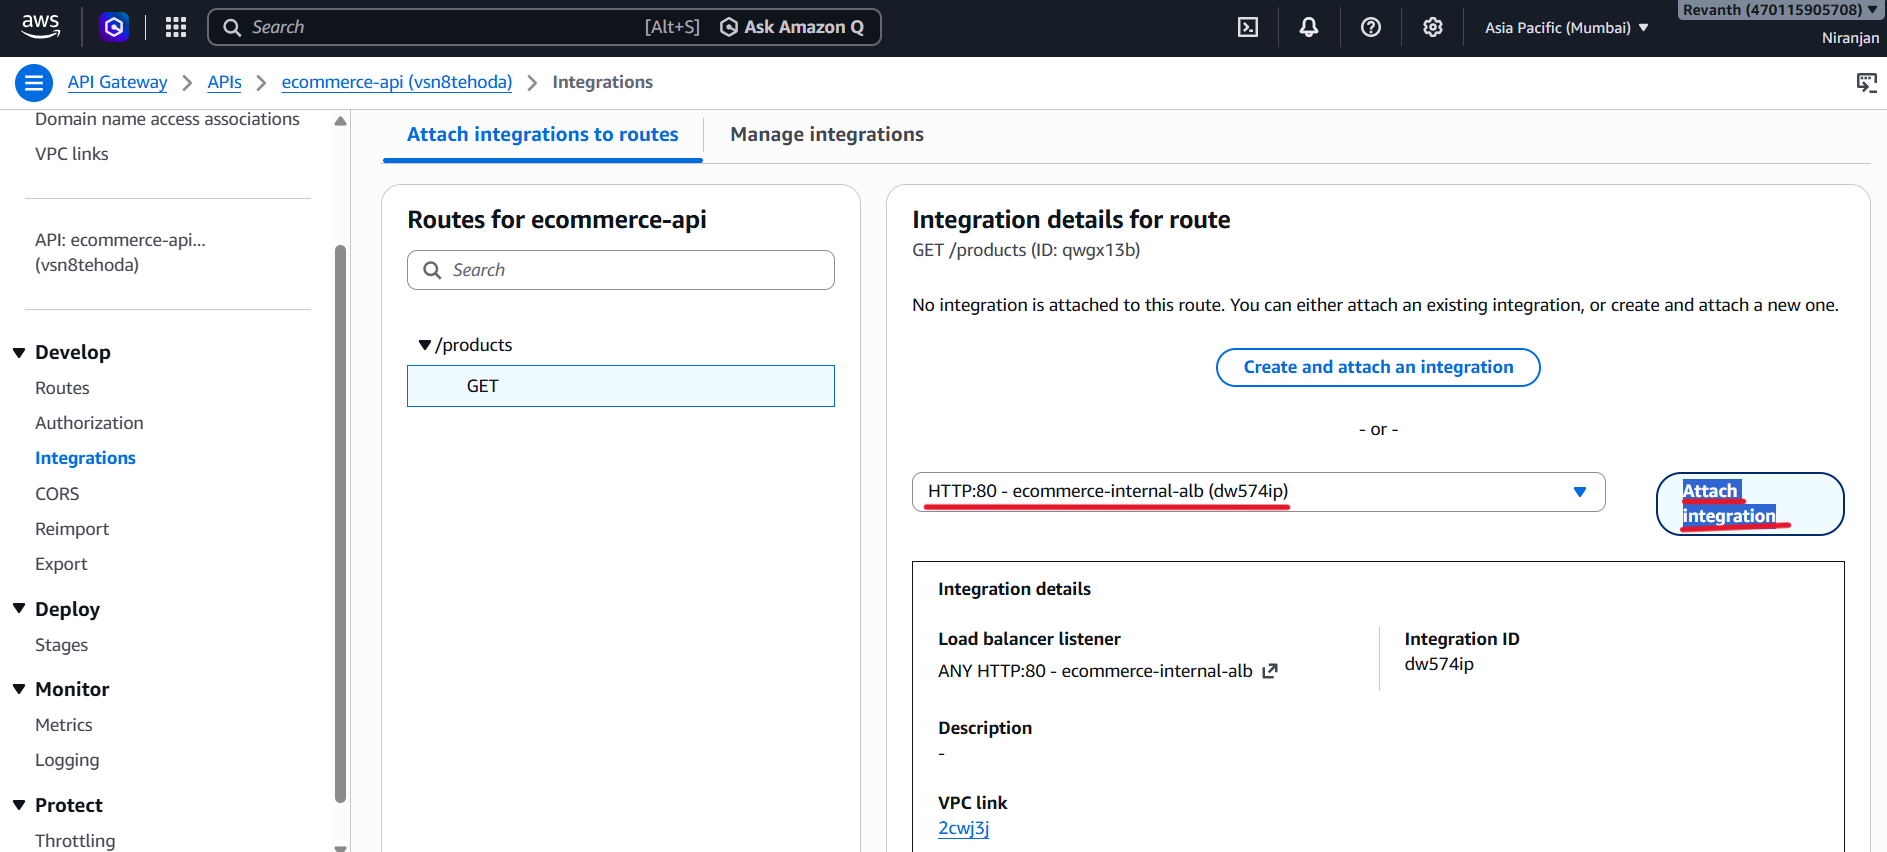
- Verify that the selected integration points to the correct internal ALB.
- Click Attach integration.
- After clicking Attach integration, AWS automatically takes you to the Integrations tab.
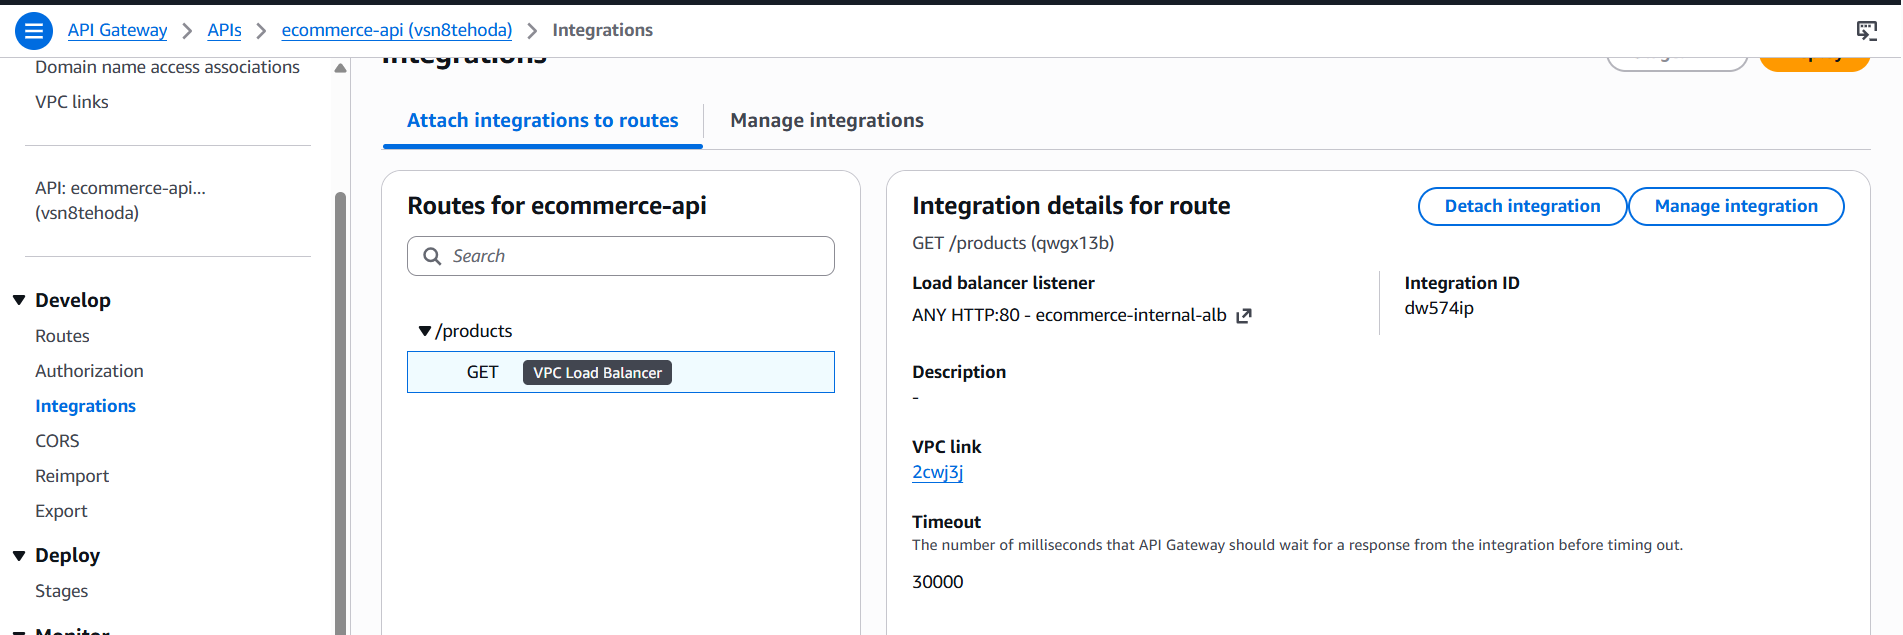
Route 2: Authenticated Proxy Route
This route handles requests for the remaining backend services, such as Cart, User, and Order.
We will use the ANY method with the {proxy+} path to capture the remaining API requests.
- Navigate to Routes → Create route.
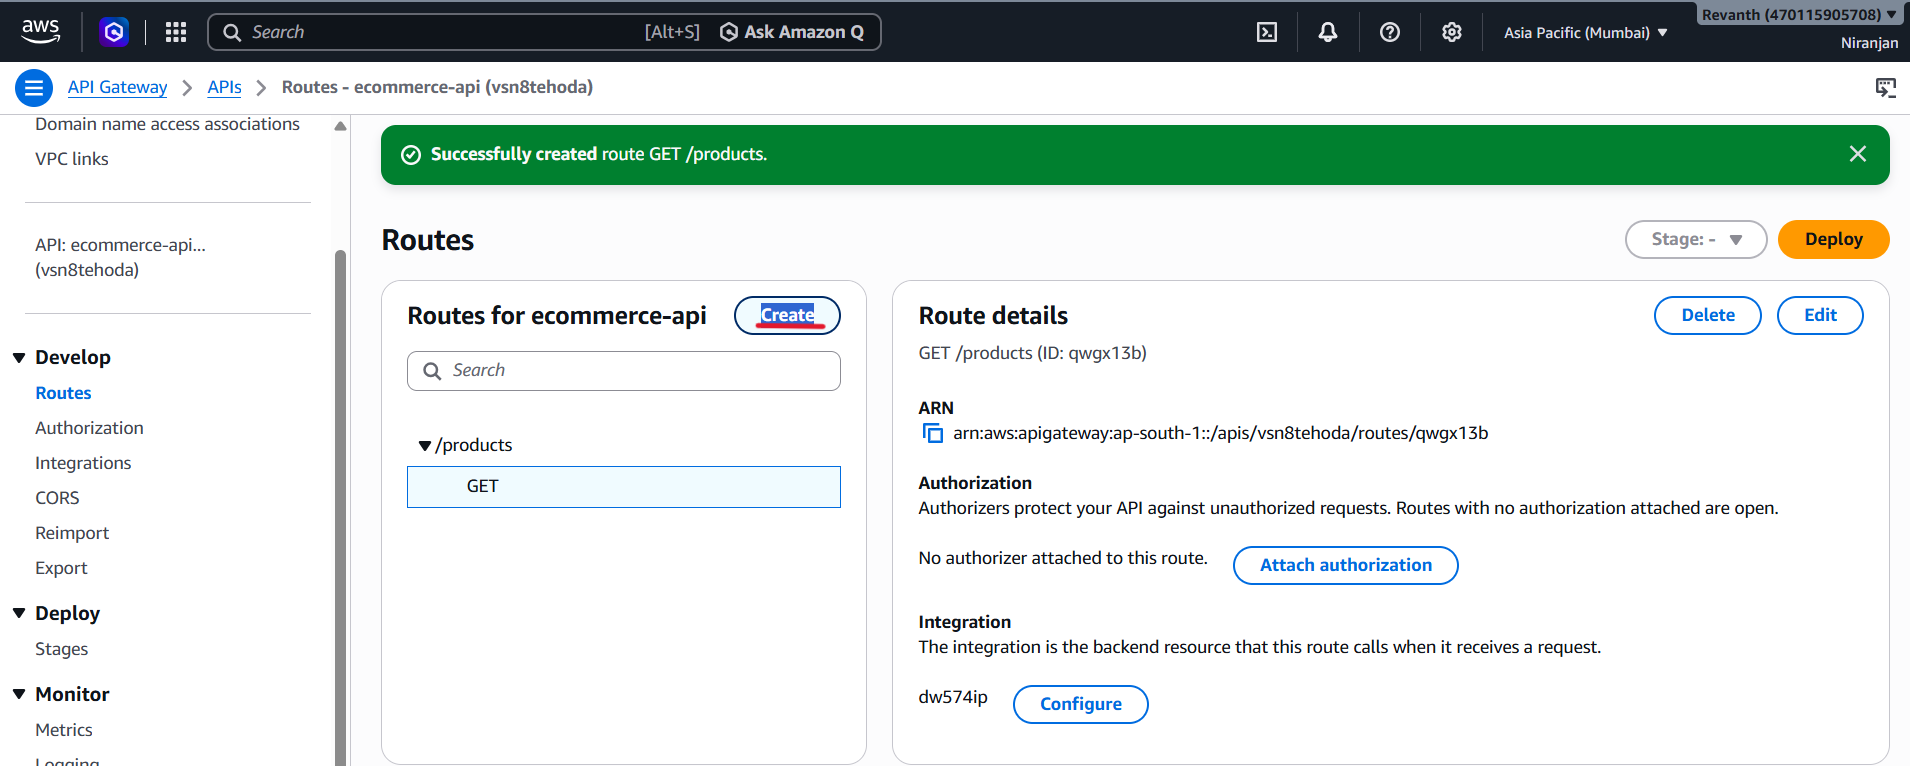
- Method: ANY
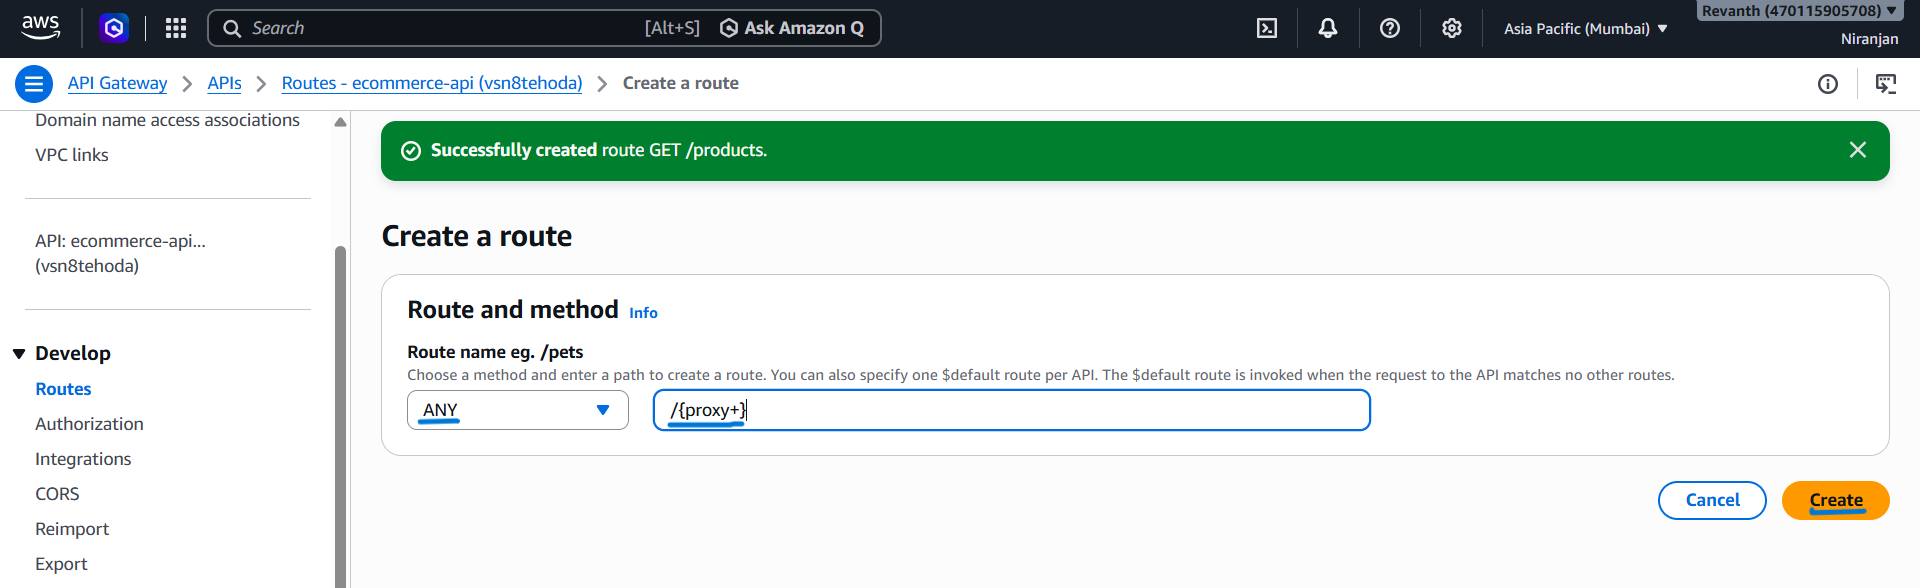
- Resource path:
/{proxy+} - Create the route.
- Attach Cognito JWT Authorizer
- Select the newly created ANY /{proxy+} route.
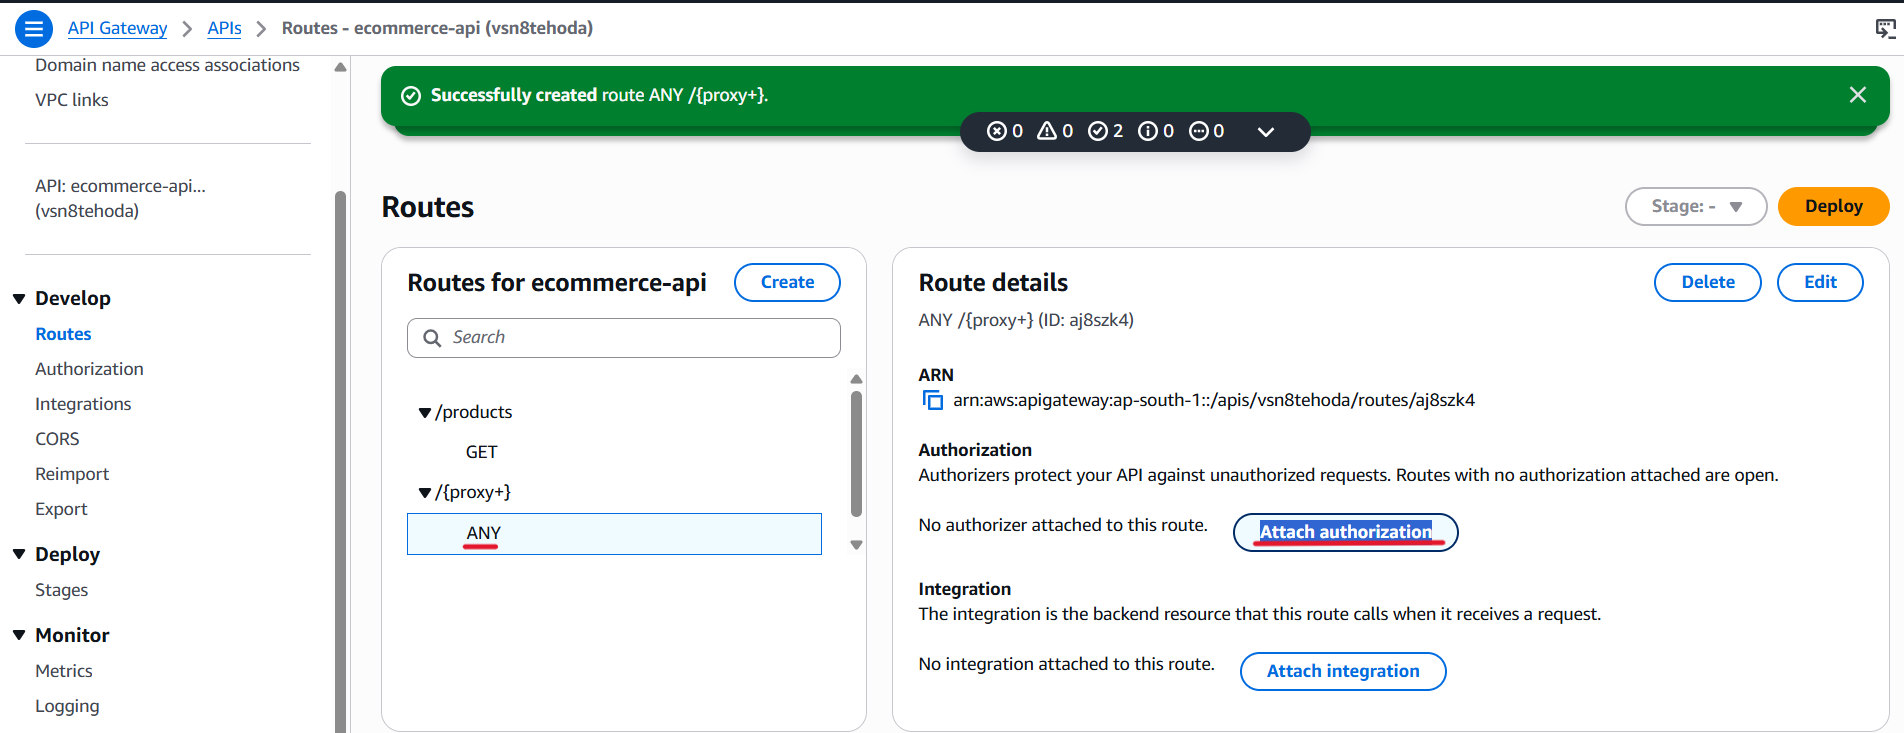
- Under Authorization, click Attach authorization.
- Select the existing cognito-jwt-authorizer from the dropdown.
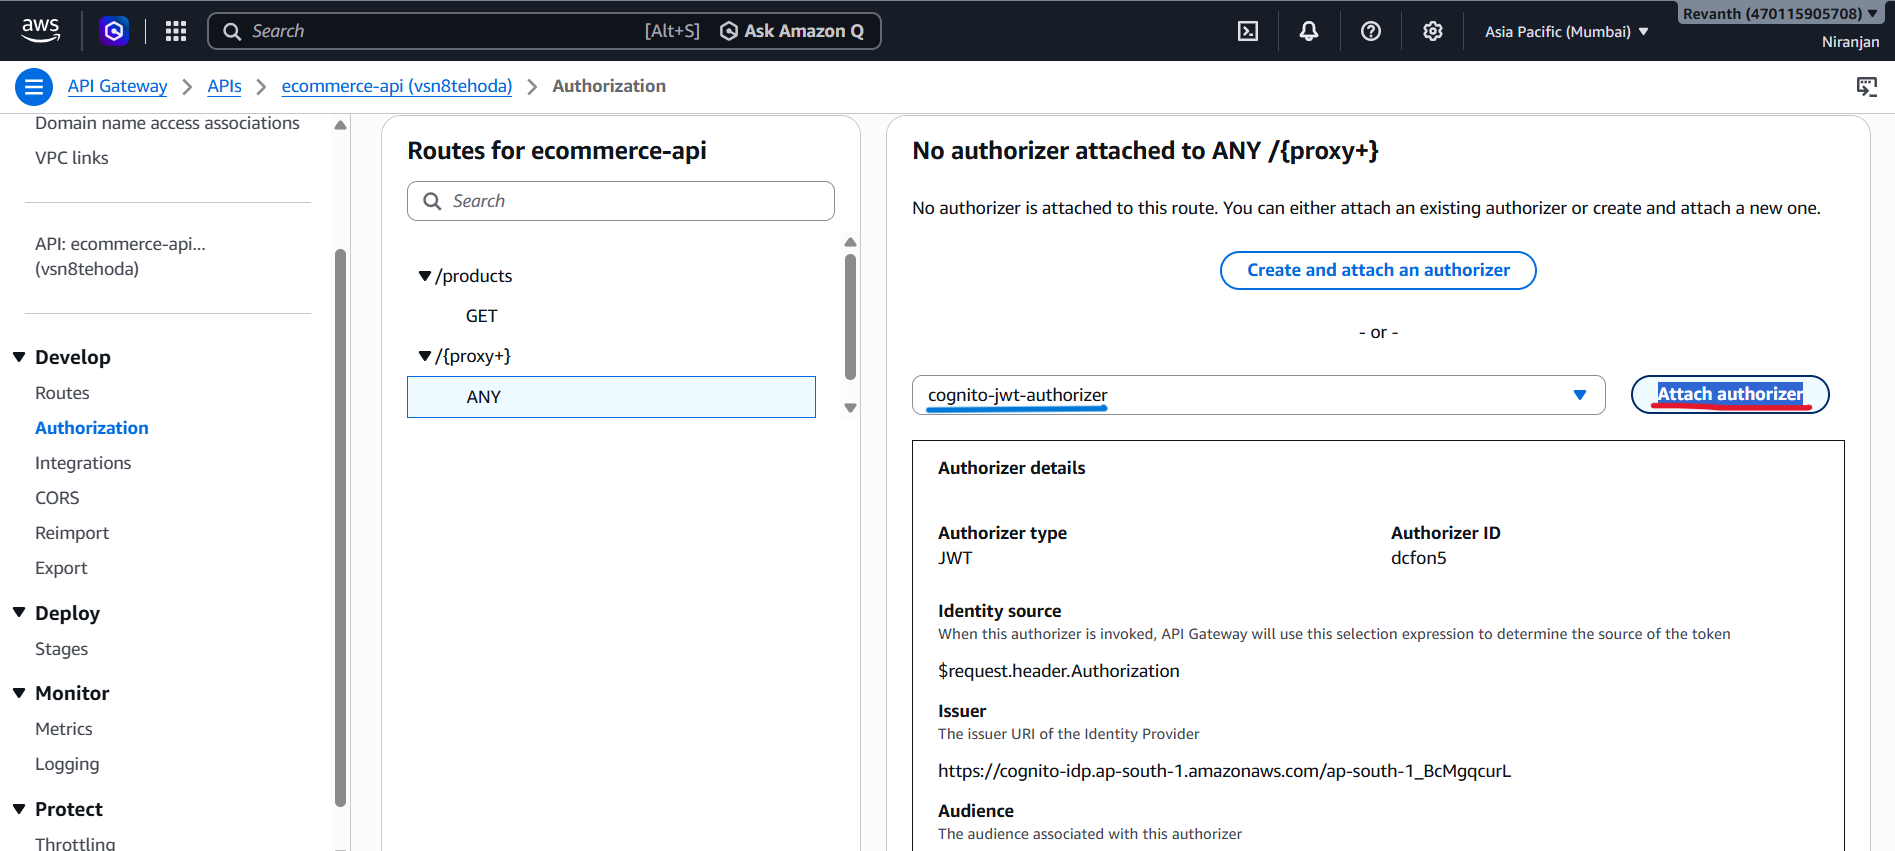
- Click Attach authorizer.
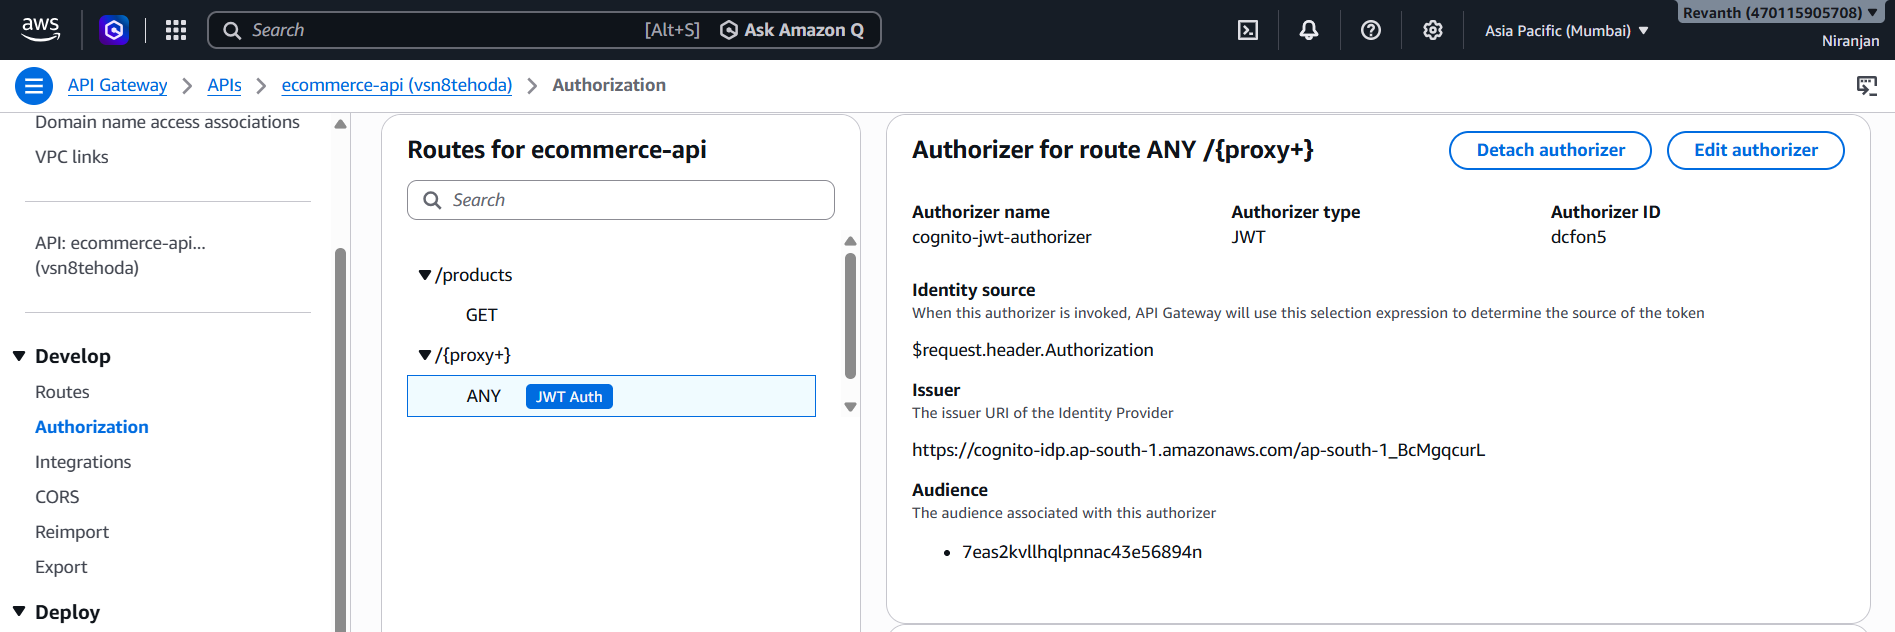
Attach the ALB Integration to the Route
- After creating the ANY /{proxy+} route, select the ANY method under /{proxy+}.
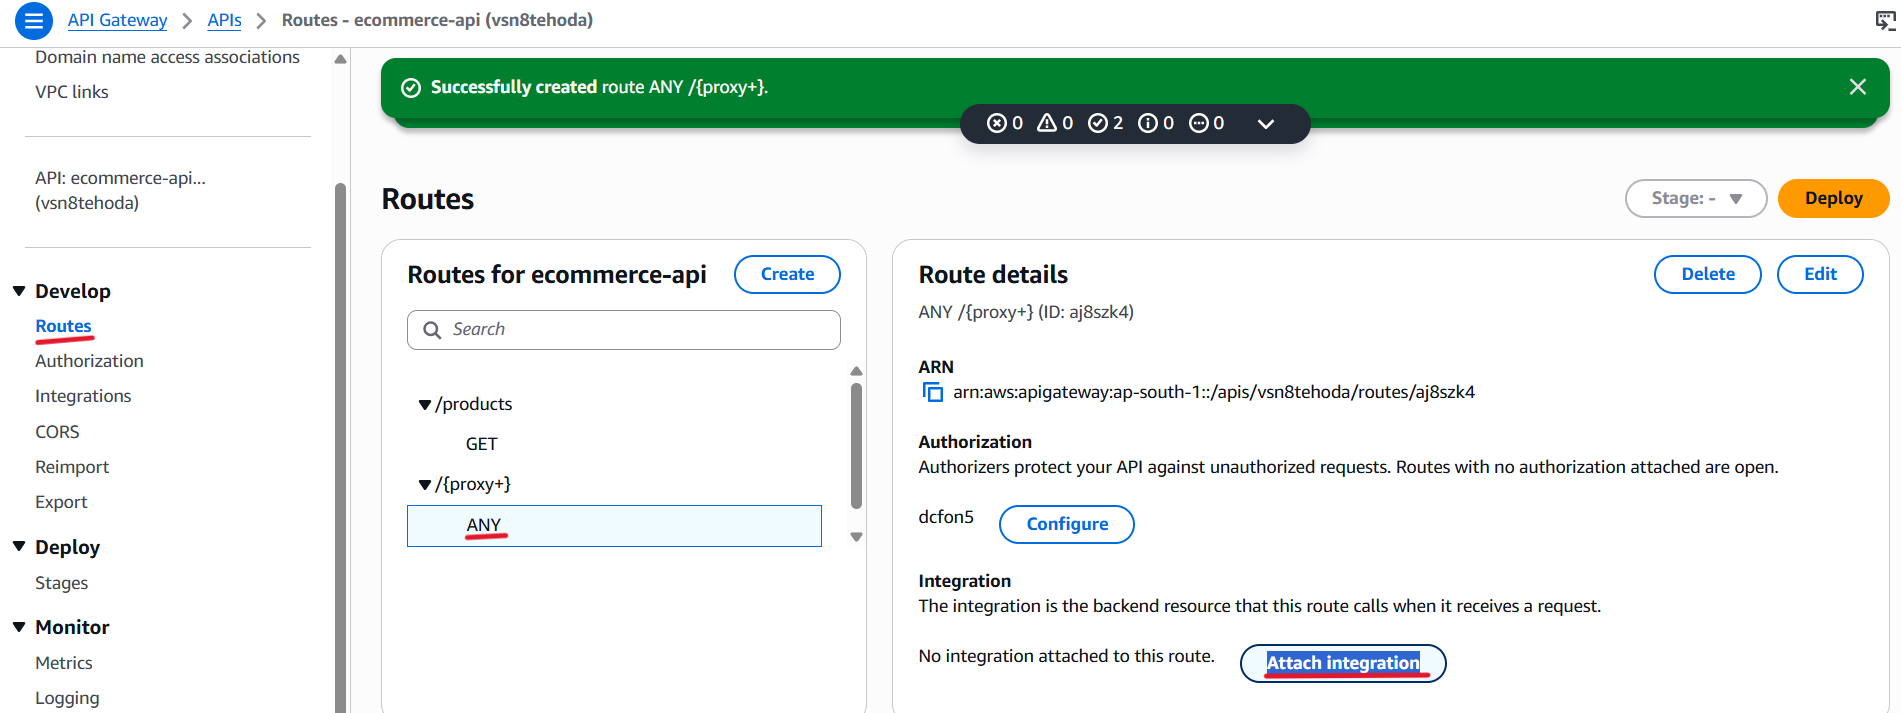
- Under Integration, click Attach integration.
- You will be redirected to the Integrations tab.
- Under Attach integrations to routes, select the existing integration from the dropdown: HTTP:80 - ecommerce-internal-alb
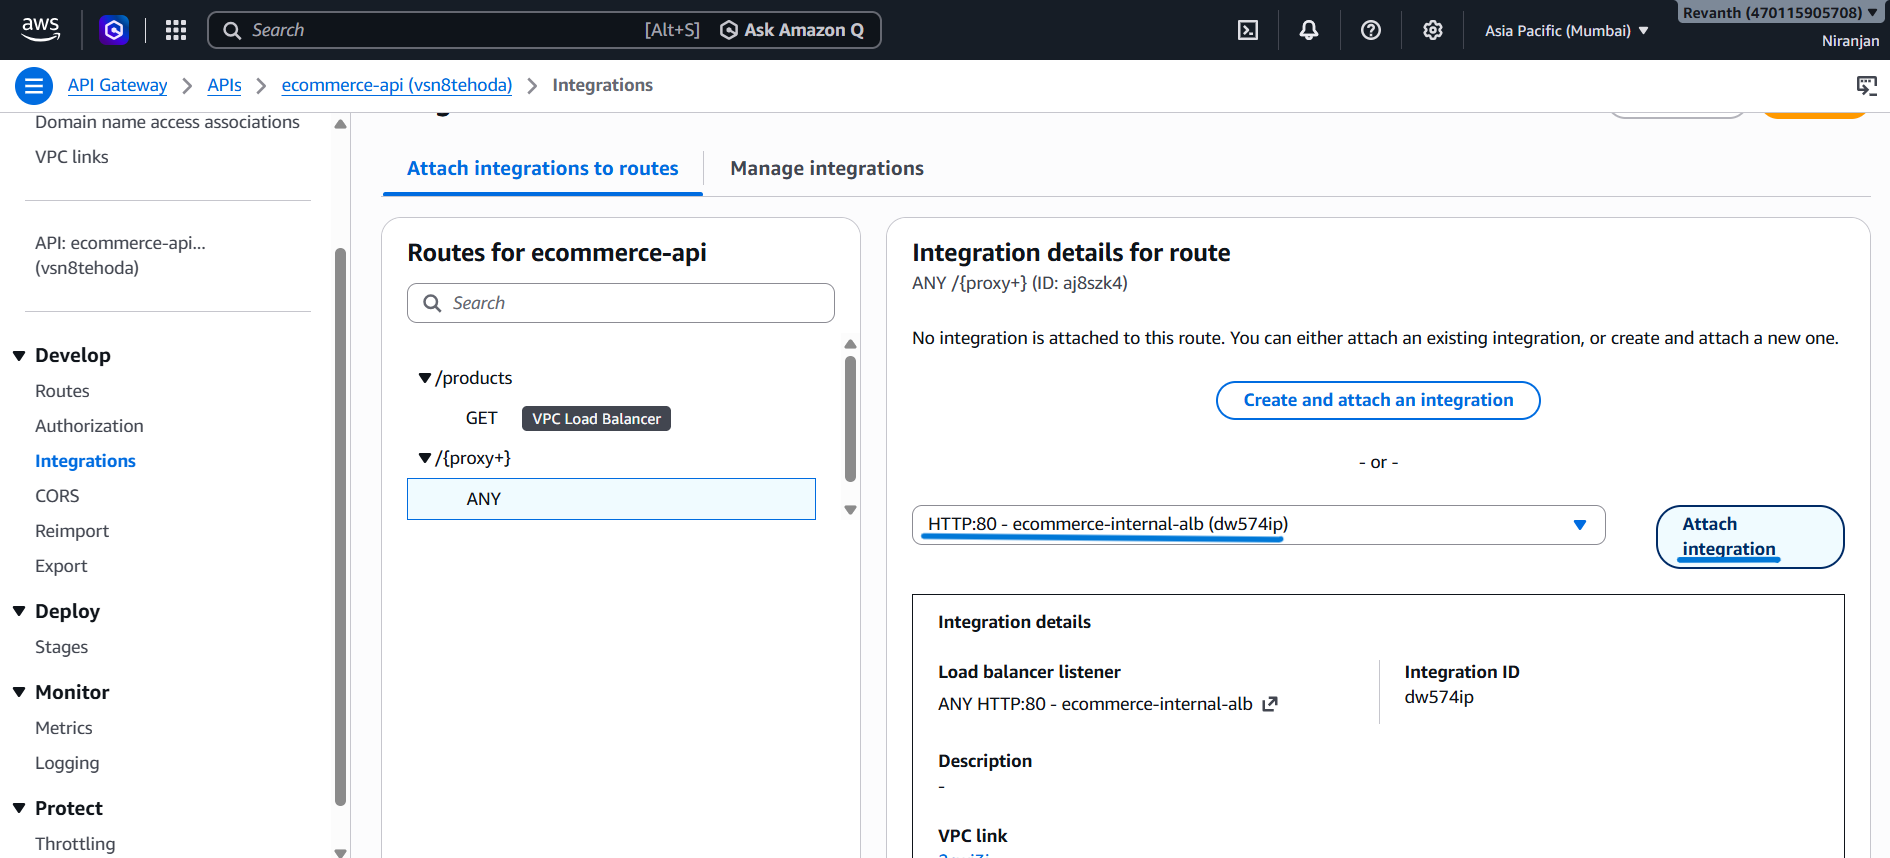
- Click Attach integration.
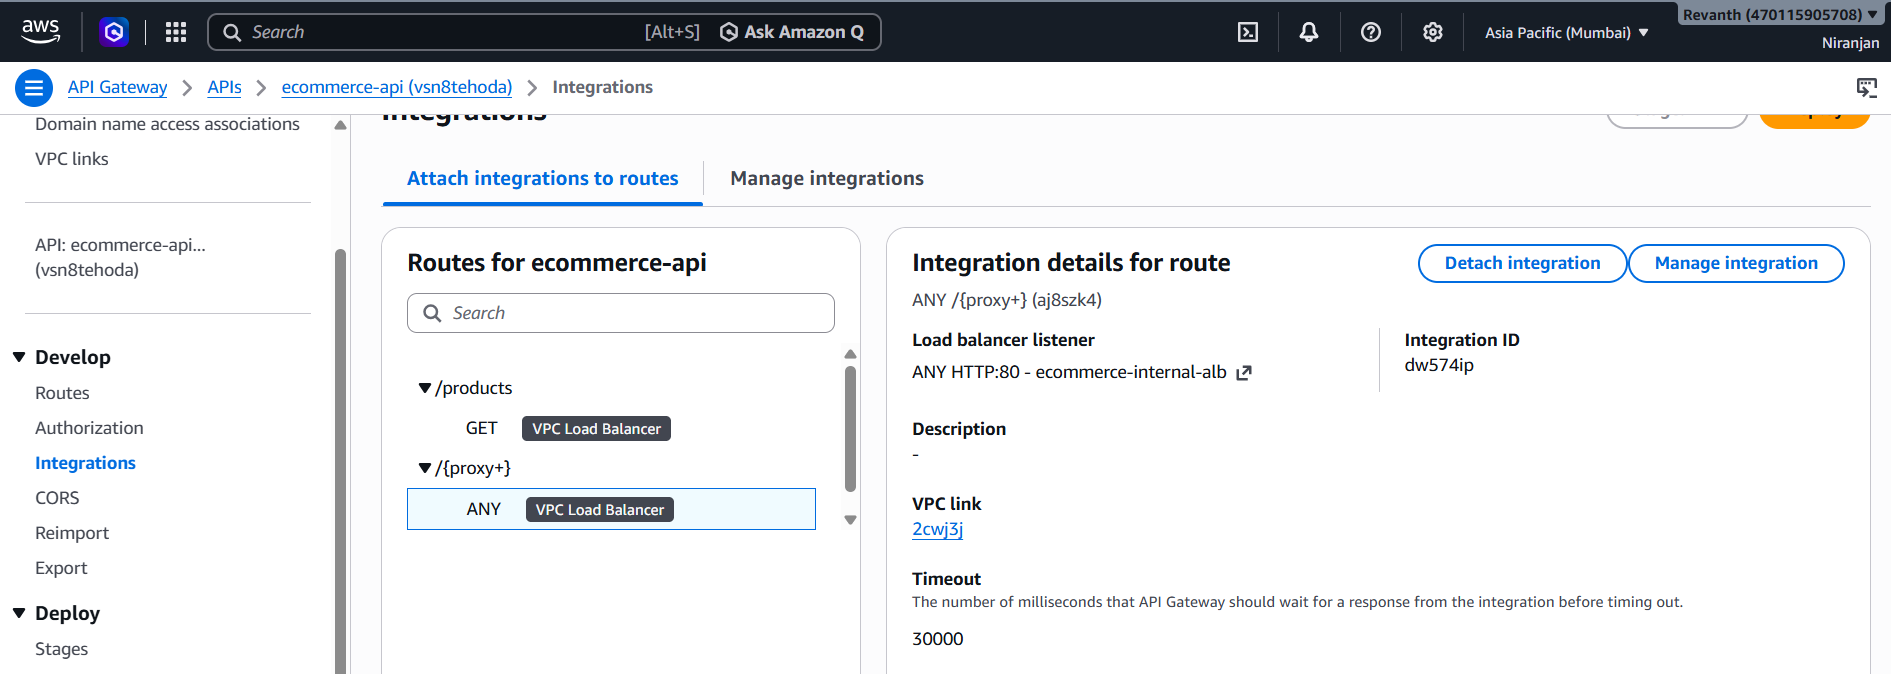
Route 3: CORS Preflight Route
- The third route is required to handle browser CORS preflight requests.
- Before sending certain cross-origin API requests, browsers send an HTTP OPTIONS request to check whether the requested operation is allowed.
- We will create a dedicated OPTIONS route without authentication.
- Navigate to Routes → Create route.
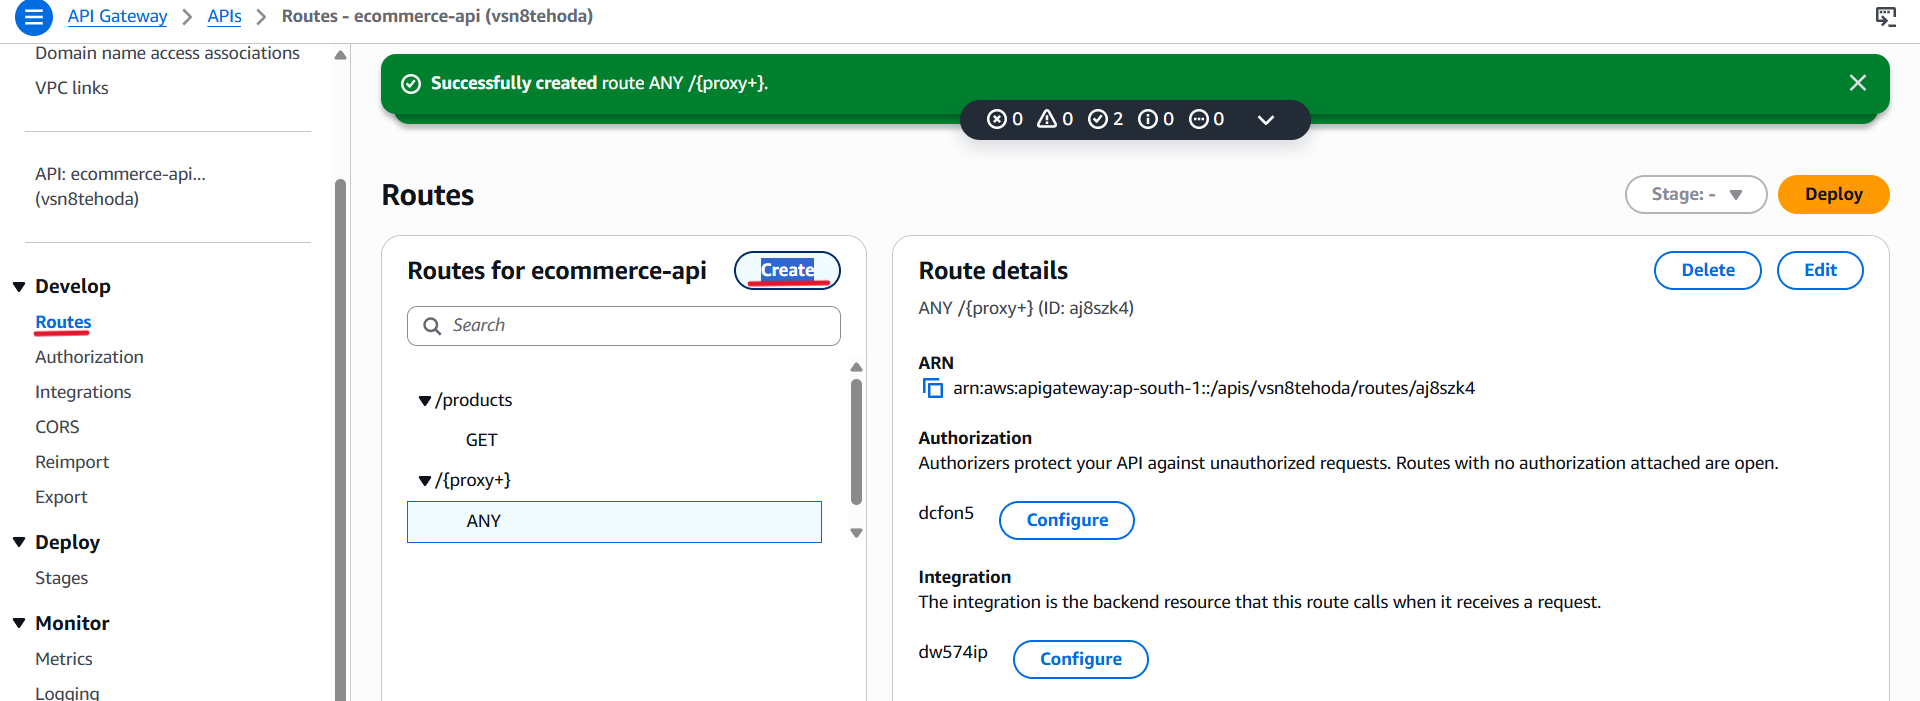
- Method: OPTIONS
- Resource path:
/{proxy+}
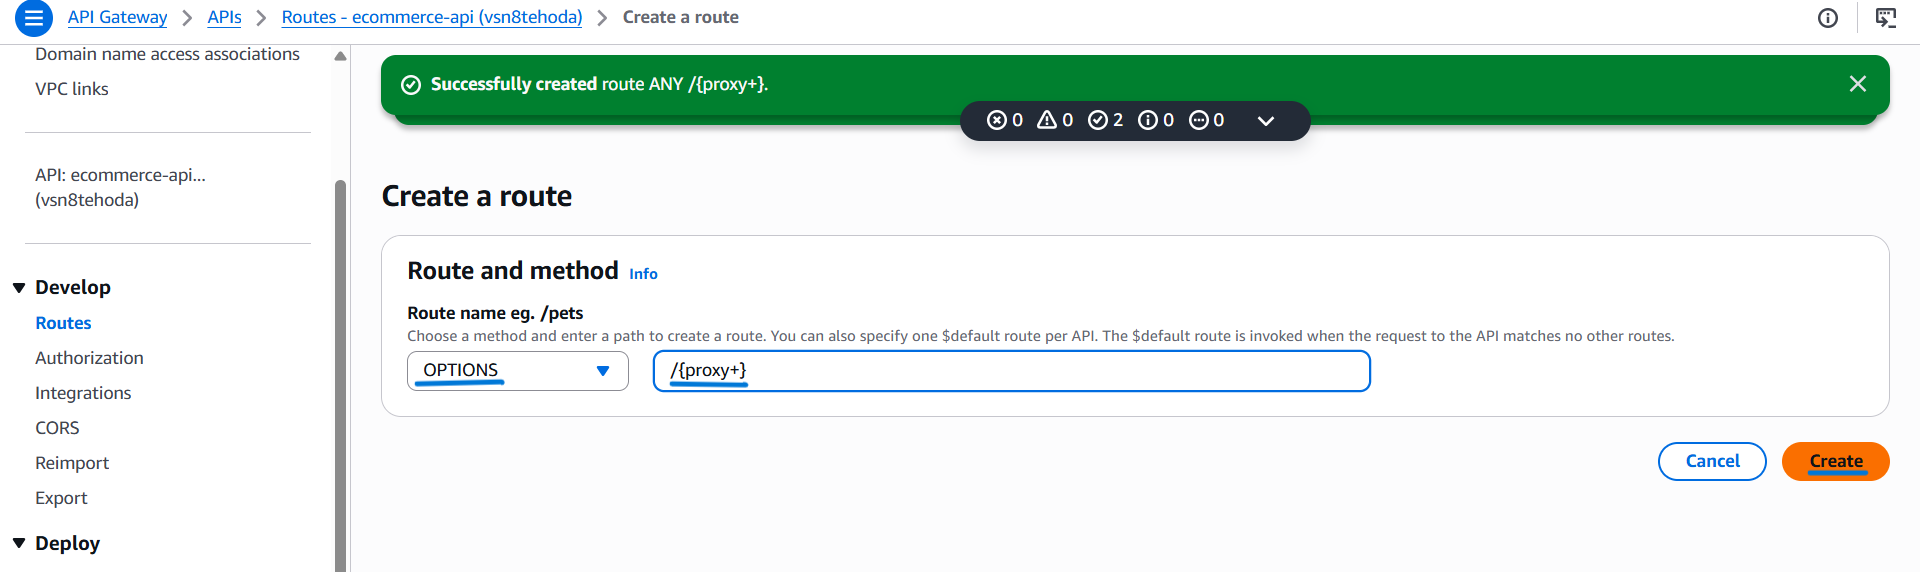
- Create the route.
- Attach the ALB Integration
- Select the newly created OPTIONS method under /{proxy+}.
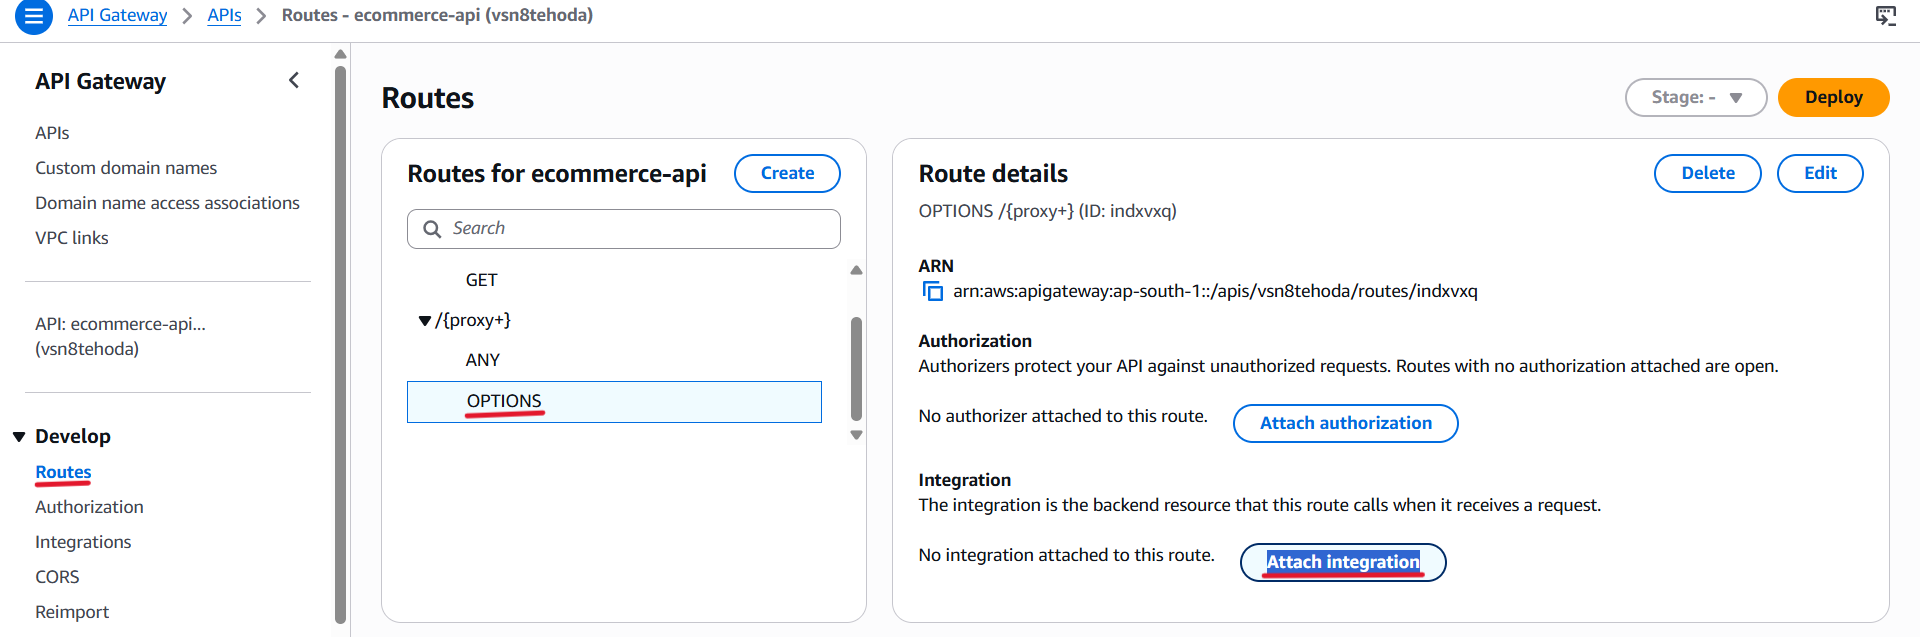
- Under Integration, click Attach integration.
- You will be redirected to the Integrations tab.
- Select the existing integration from the dropdown: HTTP:80 - ecommerce-internal-alb
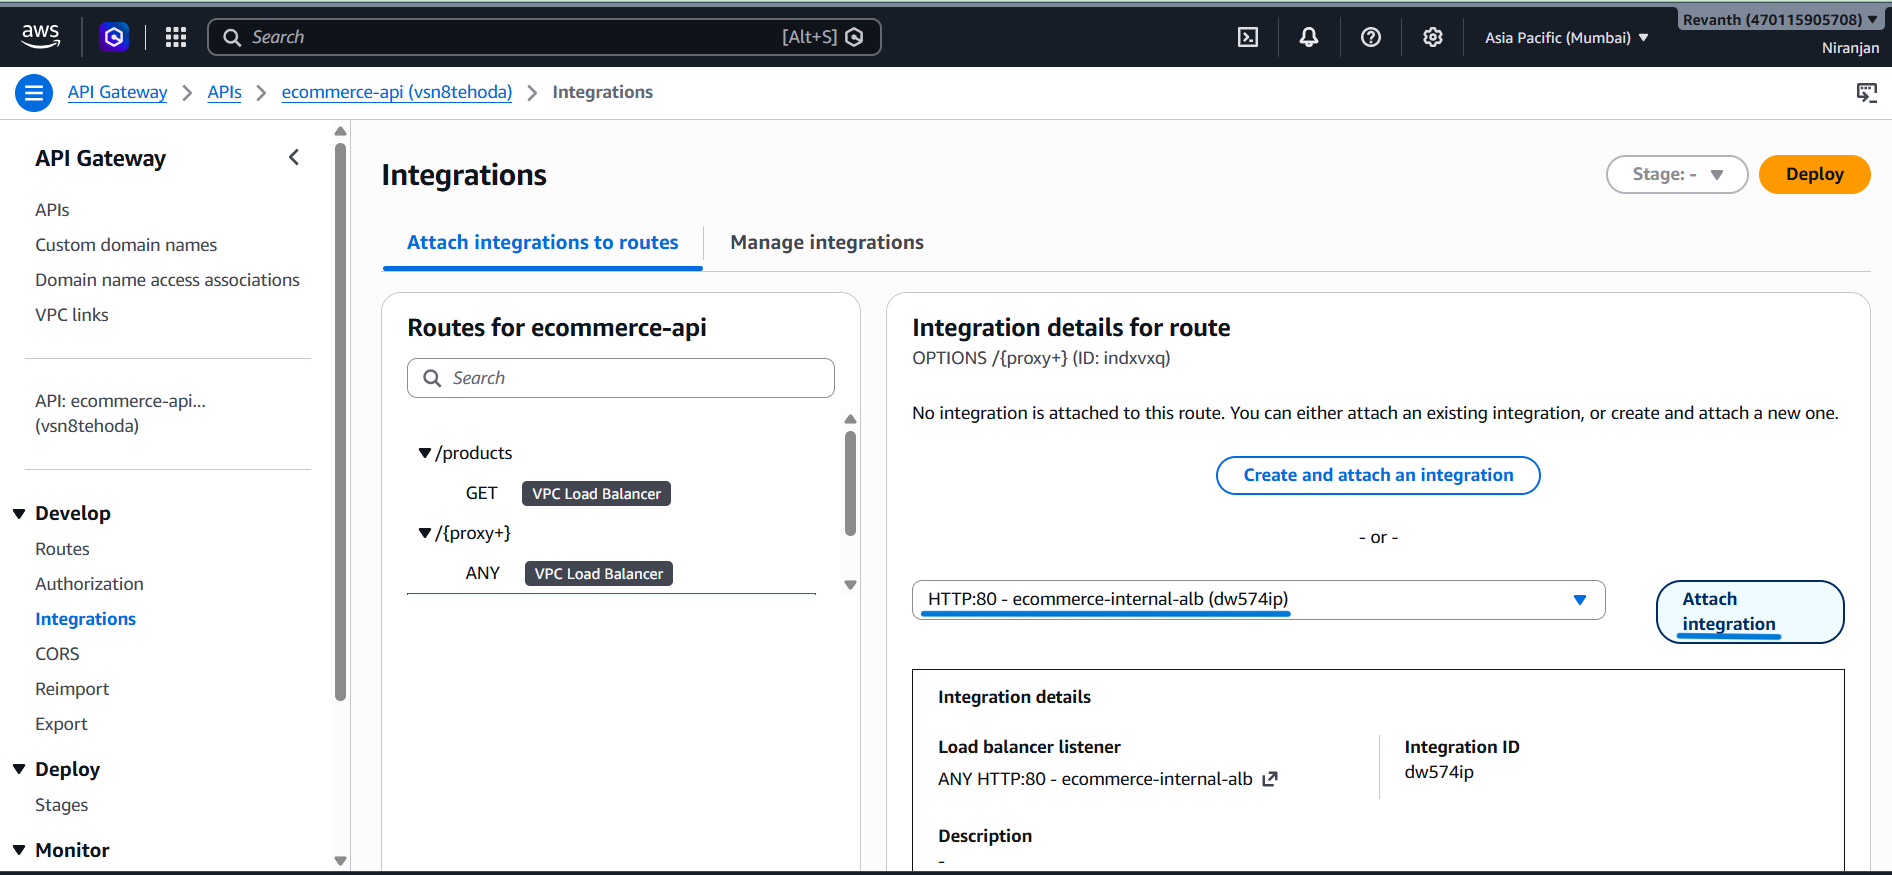
- Click Attach integration.
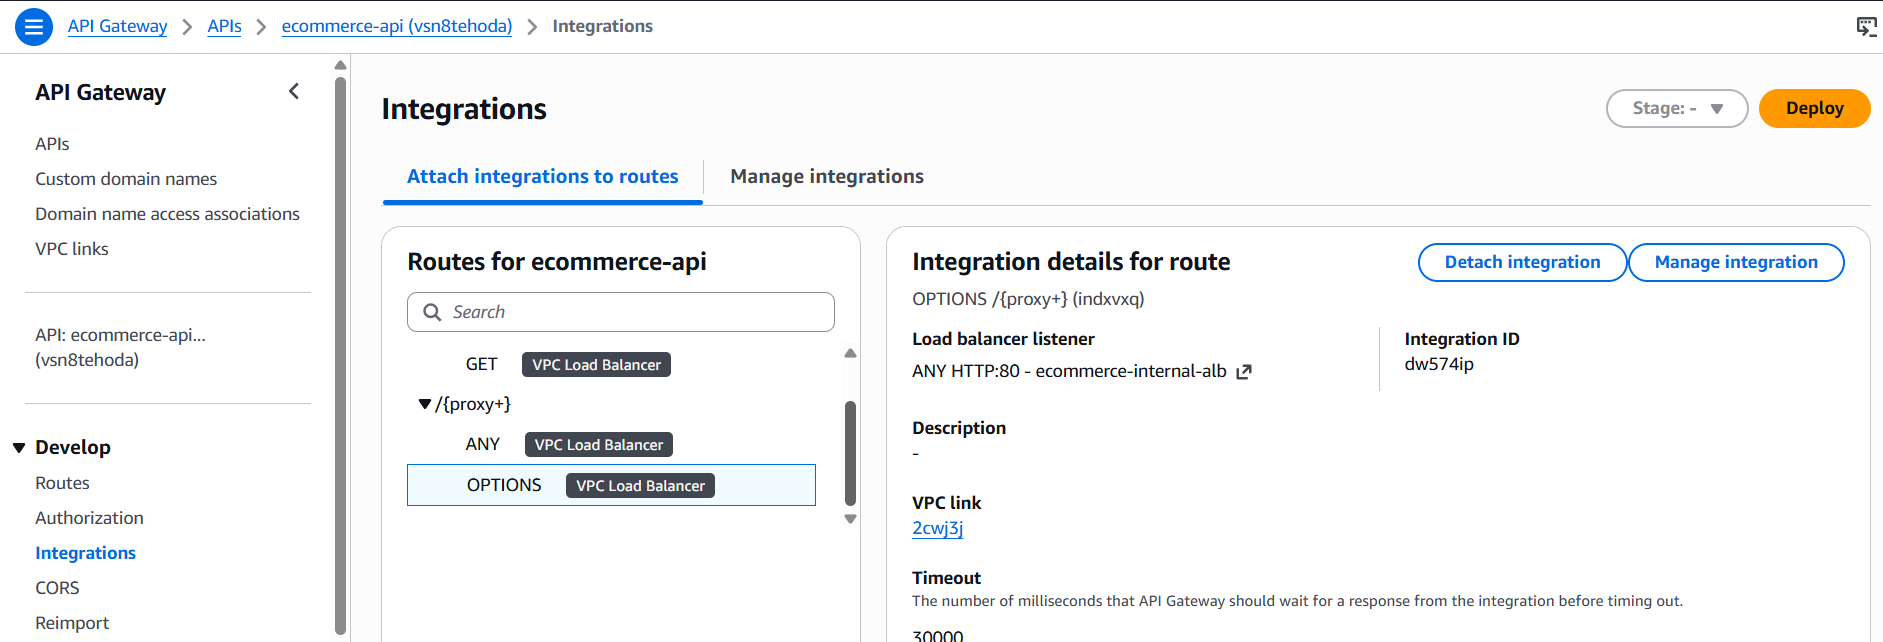
Verify All Three Routes
After creating the routes, verify the following configuration:
- GET /products: ALB integration attached; no authorization.
- ANY /{proxy+}: ALB integration attached; Cognito JWT Authorizer enabled.
- OPTIONS /{proxy+}: ALB integration attached; no authorization.
6.6 Configure CORS
Now we need to configure CORS (Cross-Origin Resource Sharing) to allow our frontend application to communicate with API Gateway.
Since our frontend and API Gateway use different domain names, we need to configure the appropriate CORS settings.
- Open your API Gateway.
- Navigate to CORS → Configure.
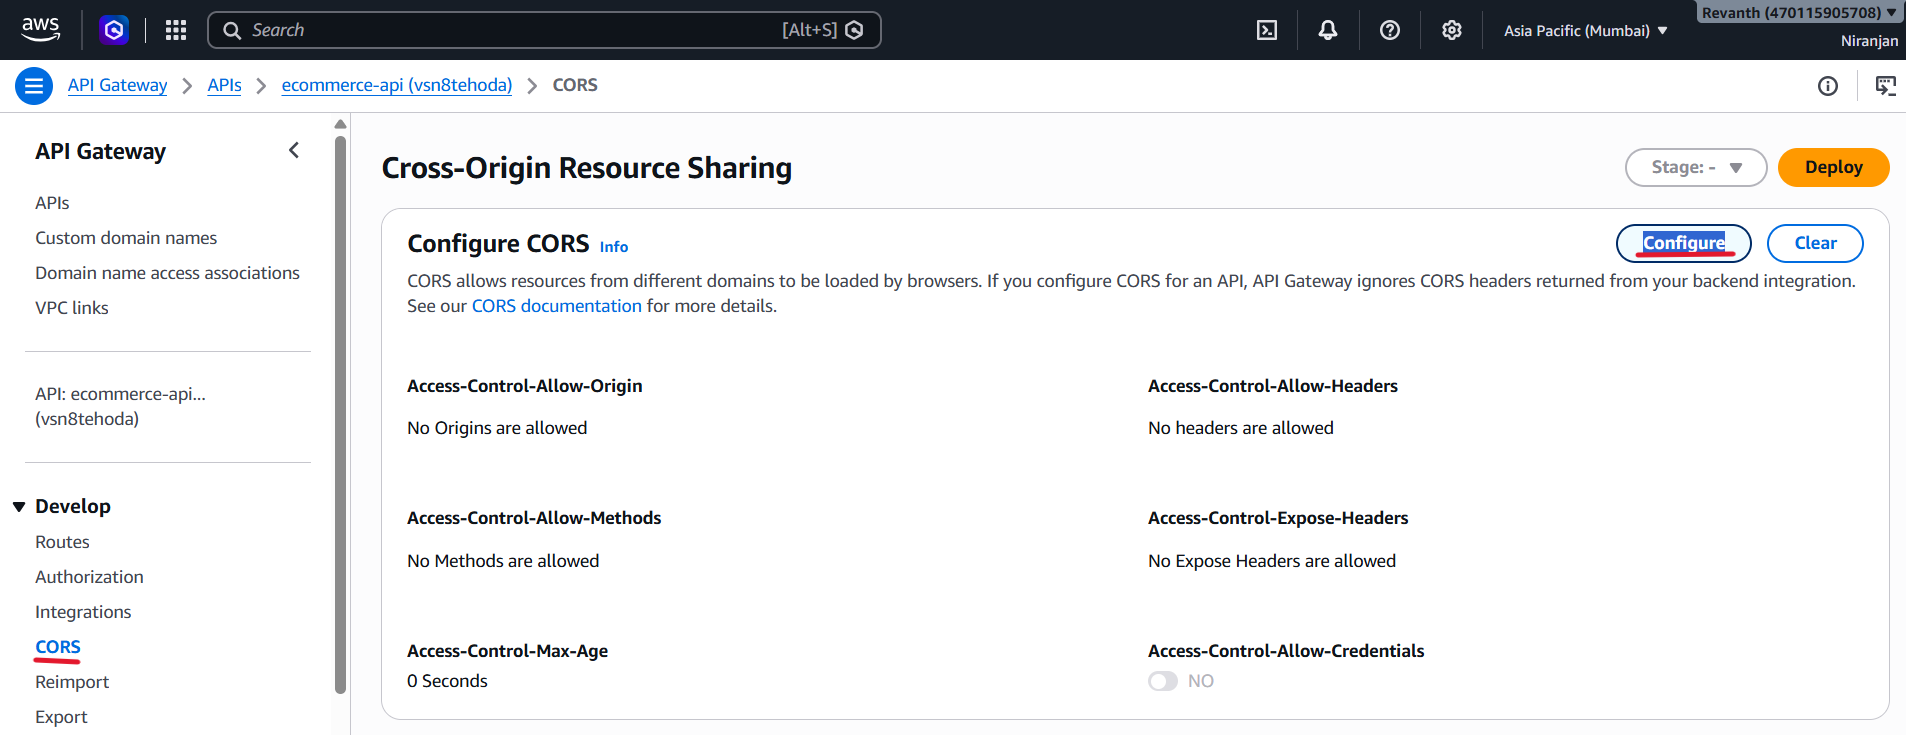
Configure the following settings:
Access-Control-Allow-Origin:
*
This allows requests from all origins during development.
Access-Control-Allow-Headers:
*
This allows all request headers, including custom headers such as Authorization.
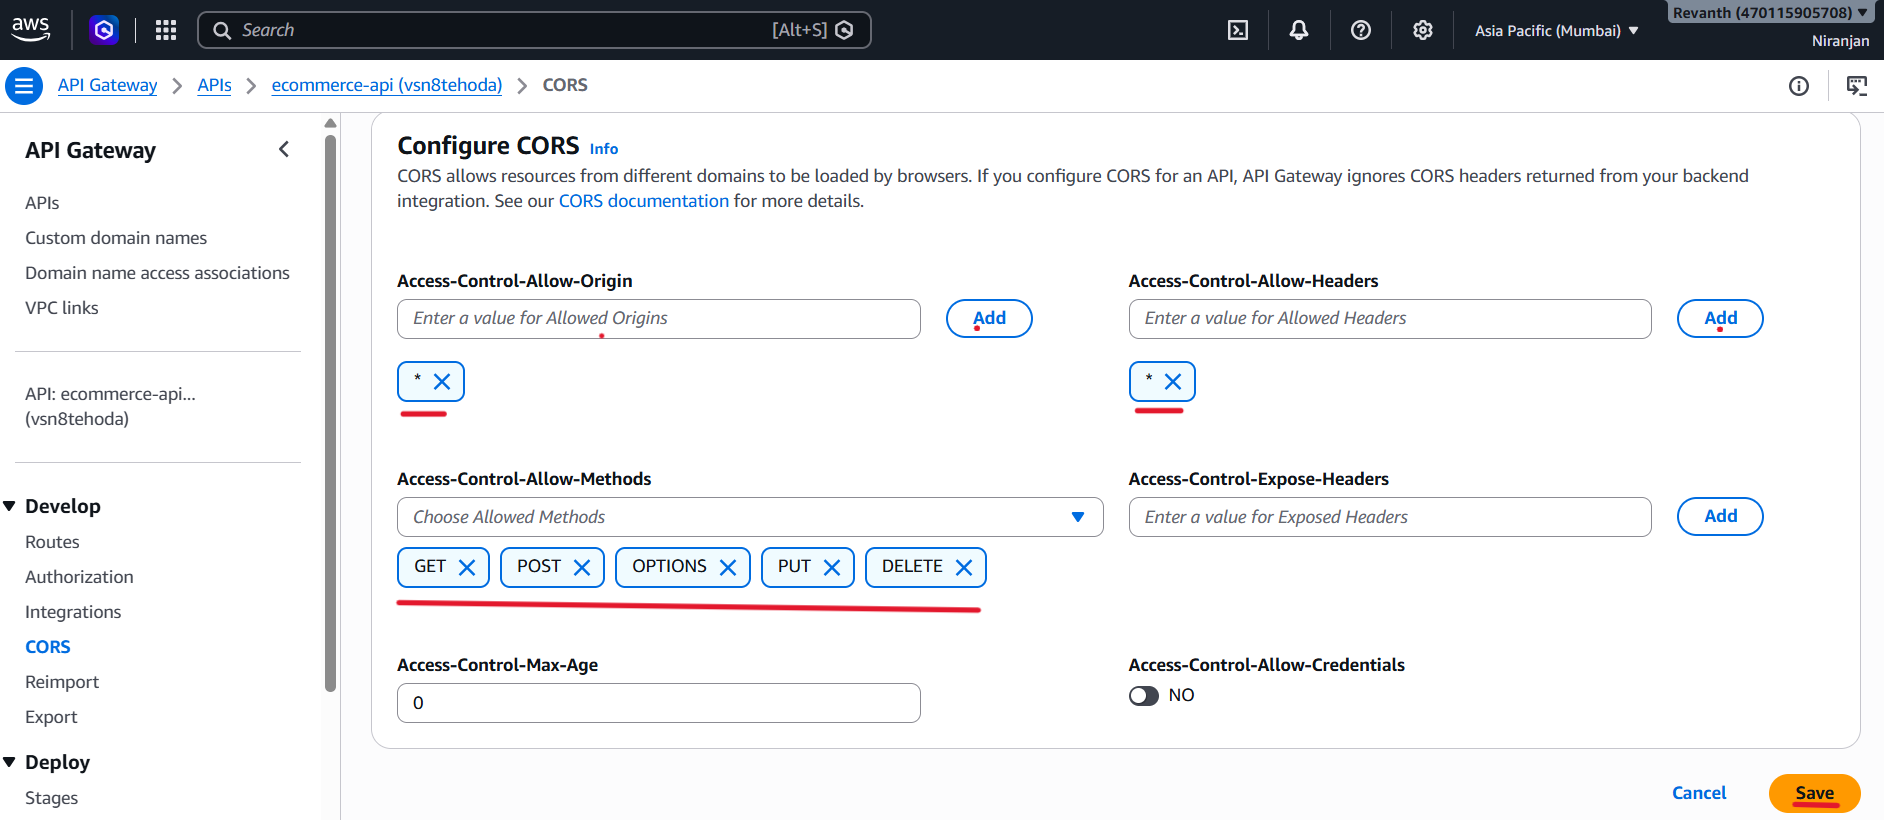
Access-Control-Allow-Methods:
Select the following methods:
- GET
- POST
- PUT
- DELETE
- OPTIONS
- Keep the remaining settings as default.
- Click Save.
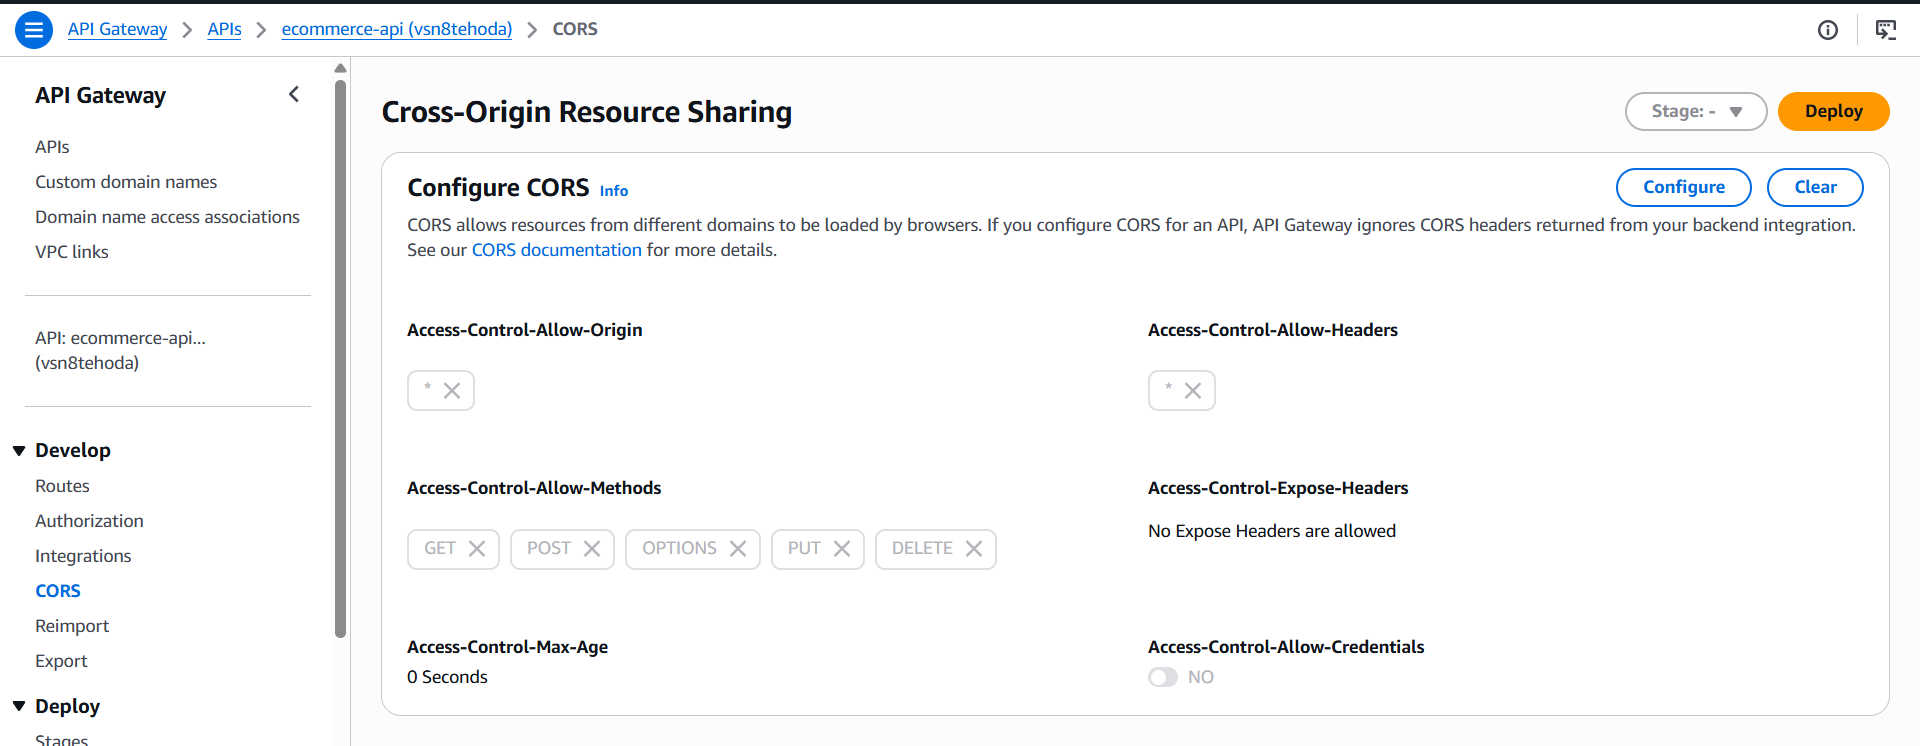
Note: Using * is convenient for development and testing. For a production environment, specify your actual frontend domain and restrict the allowed headers and methods as required.
6.7 Test API Gateway
Now that we have configured the API Gateway, VPC Link, ALB integration, Cognito JWT Authorizer, routes, and CORS, we can test the API endpoints.
Get the API Gateway Invoke URL
- Open your API Gateway.
- Navigate to Stages → $default.
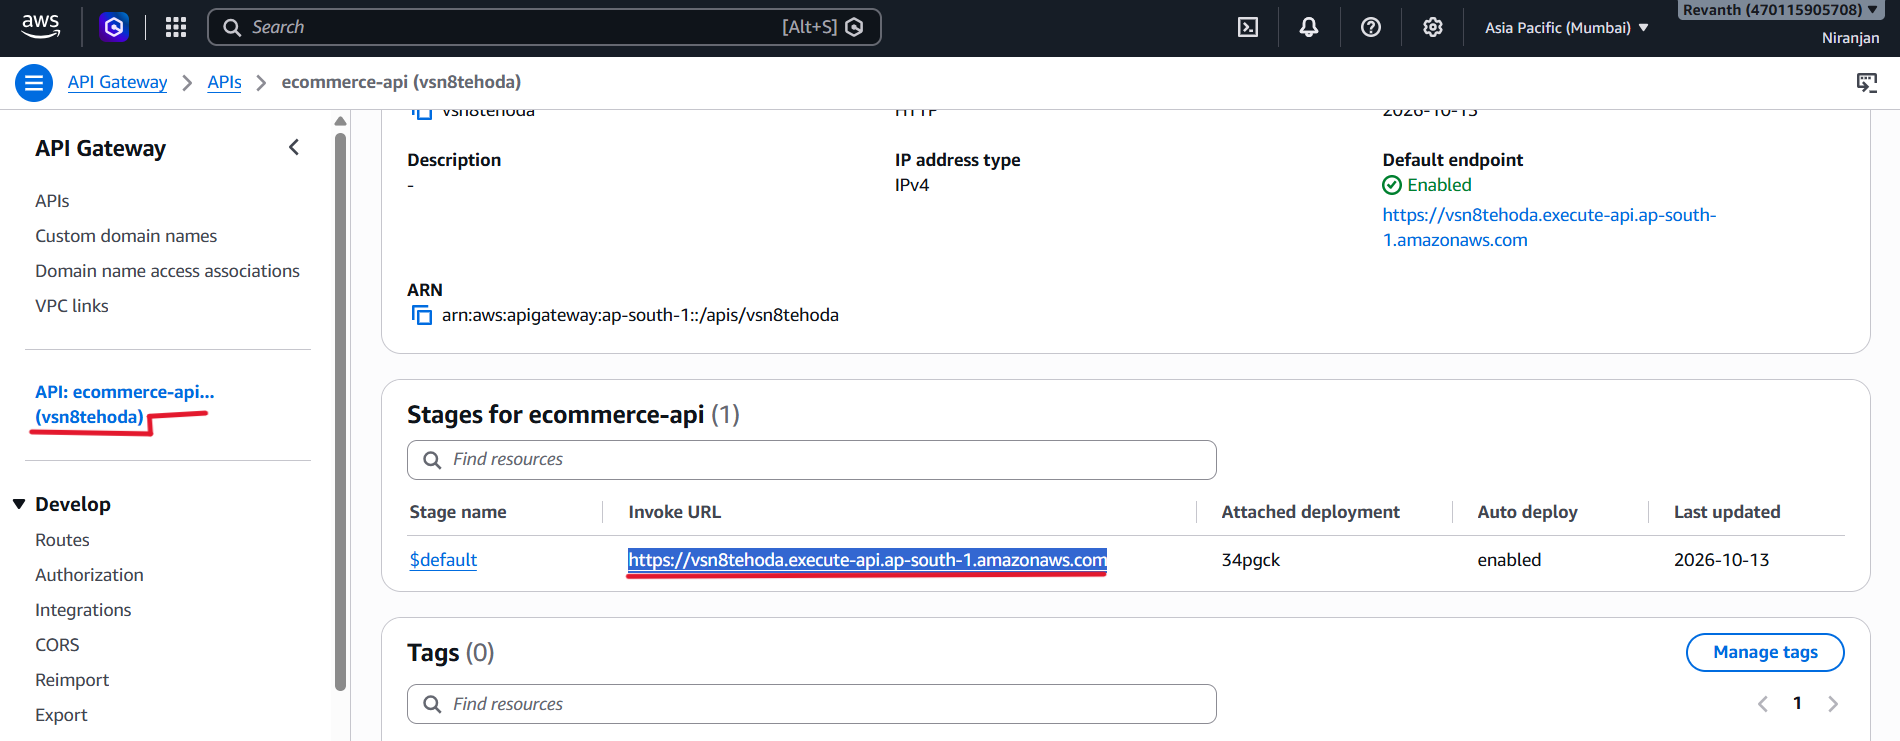
- Copy the Invoke URL.
It will look similar to the following:
https://xxxxxxxxxx.execute-api.ap-south-1.amazonaws.com
Test the Public Products Endpoint
The products endpoint does not require authentication.
Run the following command from your local workstation:
curl https://xxxxxxxxxx.execute-api.ap-south-1.amazonaws.com/products
Expected result: The API should return the list of products from the Product Service.
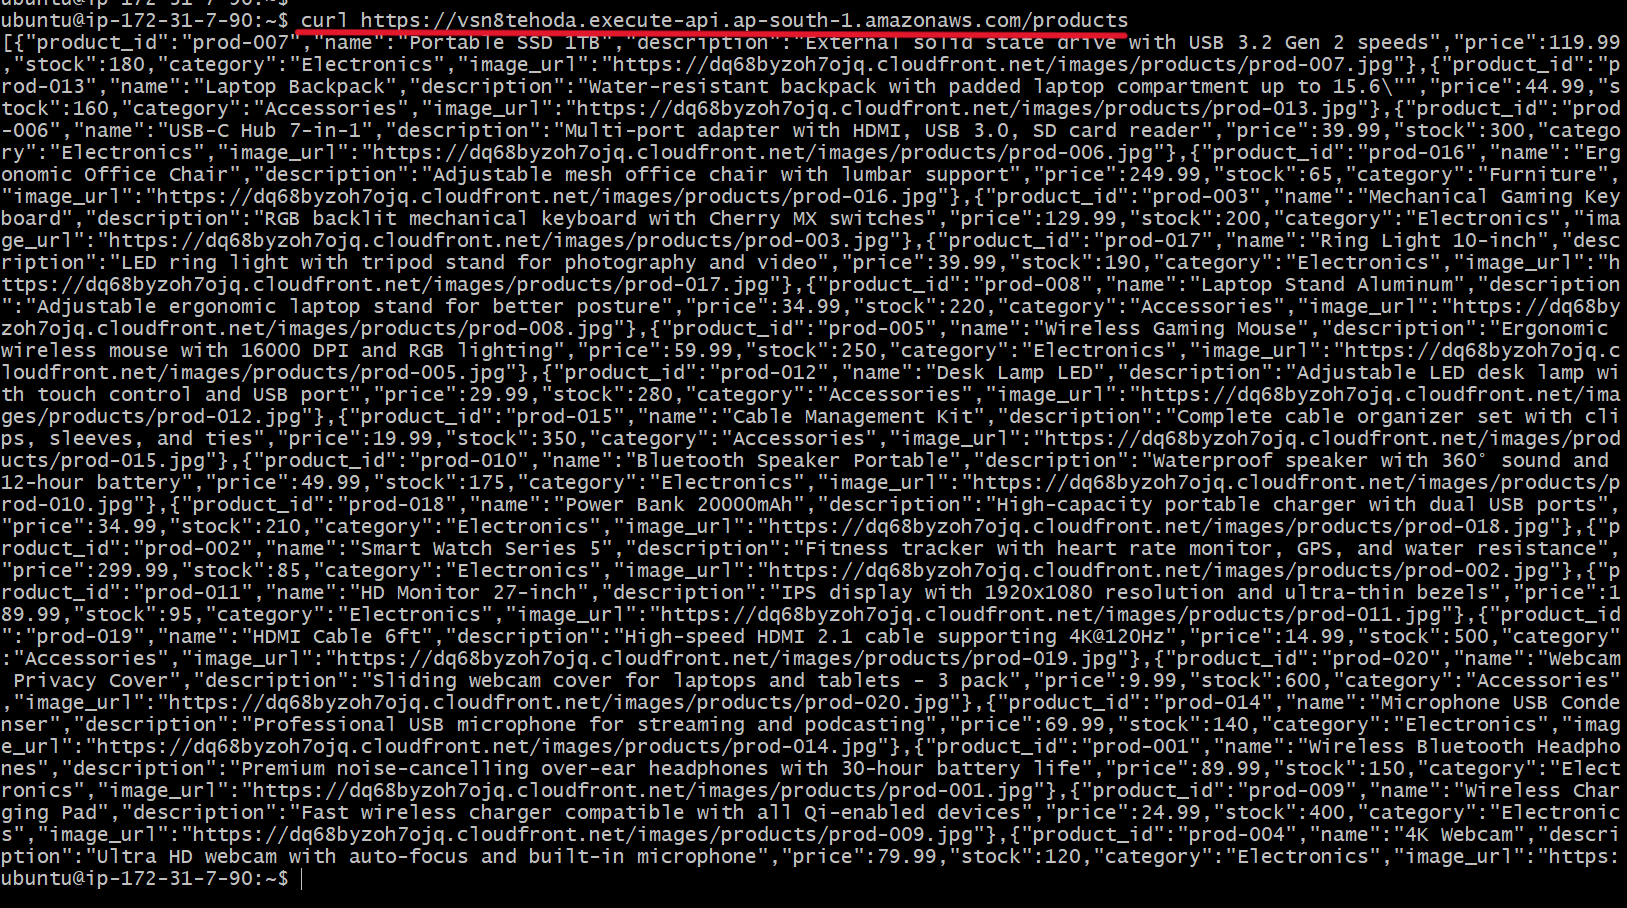
Test Authenticated Endpoints
Now test the other backend endpoints without providing an authentication token.
Cart Service:
curl https://xxxxxxxxxx.execute-api.ap-south-1.amazonaws.com/cart

User Service:
curl https://xxxxxxxxxx.execute-api.ap-south-1.amazonaws.com/users
Order Service:
curl https://xxxxxxxxxx.execute-api.ap-south-1.amazonaws.com/orders
Expected result:
{"message": "Unauthorized"}
This is expected because these endpoints are protected by the Cognito JWT Authorizer.
Note: The authenticated endpoints will require a valid Cognito JWT token in the Authorization header. We will handle the frontend integration and token-based API requests in the next module.
Troubleshooting
1. CORS Errors
If you encounter Access-Control-Allow-Origin errors:
- Verify that CORS is configured in API Gateway.
- Check that
Access-Control-Allow-Headersincludes*. - Verify that the required allowed methods are configured.
- Check that the OPTIONS route is created.
2. 401 Unauthorized
If you receive a 401 Unauthorized response:
- Verify the Cognito User Pool ID in the JWT Authorizer configuration.
- Check that the Issuer URL is correct.
- Verify that the App Client ID is configured correctly under Audience.
- Ensure that a valid JWT token is included when accessing protected endpoints.
Note: A 401 response when testing protected routes without a token is expected behavior.
3. 502 Bad Gateway
If you encounter a 502 Bad Gateway error:
- Check the VPC Link status.
- Verify the internal ALB integration configuration.
- Ensure the ALB target groups are healthy.
- Verify that the ALB listener rules are configured correctly.
4. 504 Gateway Timeout
If you encounter a 504 Gateway Timeout error:
- Check the ECS service health.
- Verify that the ALB target groups contain healthy targets.
- Check the ALB listener rules.
- Verify the VPC Link and security group configurations.
- Ensure the VPC Link security group and ALB security group allow the required traffic.
Module Summary
In this module, we successfully configured Amazon API Gateway and connected it to our internal Application Load Balancer using VPC Link.
We completed the following configurations:
- VPC Link: Created a private connection between API Gateway and our VPC.
- HTTP API: Created the
ecommerce-api-http. - Private Integration: Connected API Gateway to
ecommerce-internal-alb. - Cognito JWT Authorizer: Configured authentication for protected endpoints.
- API Routes: Created public, authenticated, and CORS preflight routes.
- CORS: Configured cross-origin access for frontend communication.
- API Testing: Successfully tested the public products endpoint and verified authentication on protected endpoints.
Our API Gateway is now publicly accessible, while communication between API Gateway and the internal ALB takes place privately through VPC Link.
In the next module, we will integrate the frontend application with the backend services using the API Gateway endpoint.
Module 7: Frontend-Backend Integration
Overview
- In this module, we will integrate the React frontend with the backend services through Amazon API Gateway.
- We have already deployed the frontend to Amazon S3 and configured CloudFront. We have also created API Gateway and connected it to the internal Application Load Balancer.
- Now, we need to update the frontend configuration with the API Gateway URL so that the application can communicate with the backend services.
- After updating the configuration, we will rebuild the React application, upload the new build to S3, and invalidate the CloudFront cache to make the latest changes available.
In this module
- Update the frontend configuration with the API Gateway URL.
- Rebuild the React application.
- Upload the updated build to the S3 frontend bucket.
- Invalidate the CloudFront cache.
- Test the fully integrated application.
7.1 Update Frontend with API Gateway URL
- The frontend needs to know the API Gateway endpoint to communicate with the backend services.
- Since our frontend is hosted on Amazon S3, we will configure the API Gateway URL directly in the React application's configuration file.
Note: If the frontend were running inside a container, we could retrieve configuration values dynamically from SSM Parameter Store. However, because our frontend is hosted on S3, we will update the API URL directly in the configuration file.
Step 1: Navigate to the frontend directory
- Open your terminal and navigate to the React application directory.
cd frontend/react-app
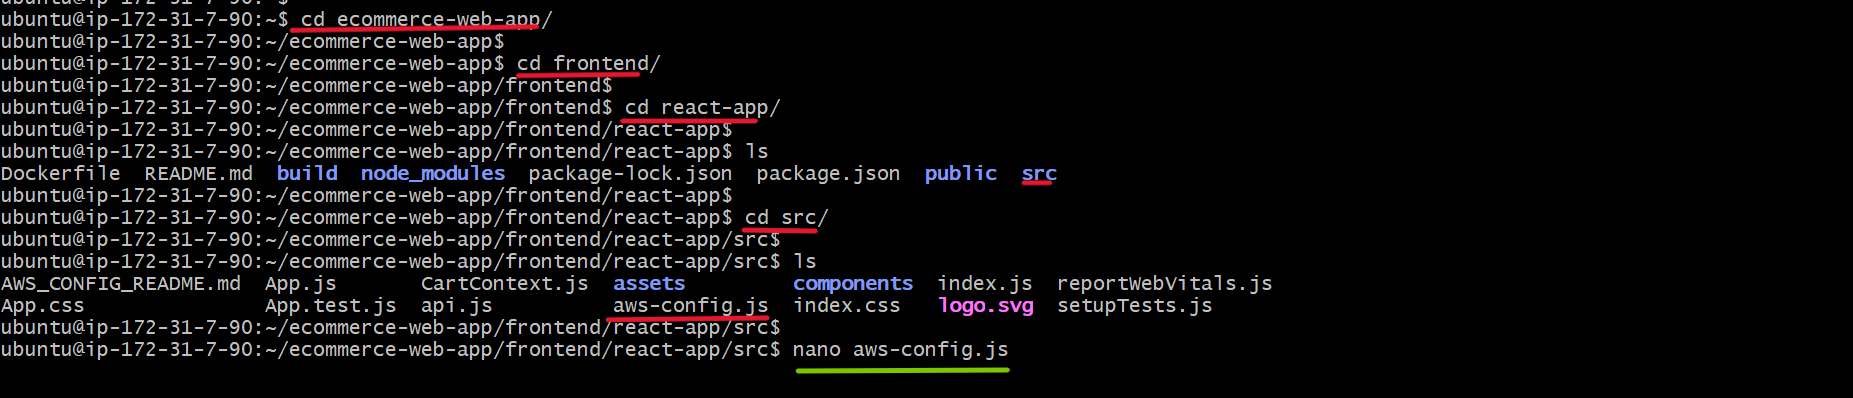
Step 2: Open the AWS configuration file
- Open
src/aws-config.jsand locate thebaseUrlfield under the API configuration.
Step 3: Update the API Gateway URL
- Copy the Invoke URL from:
API Gateway Console → APIs → ecommerce-api → Stages → $default
- Update only the
baseUrlfield with your API Gateway URL.
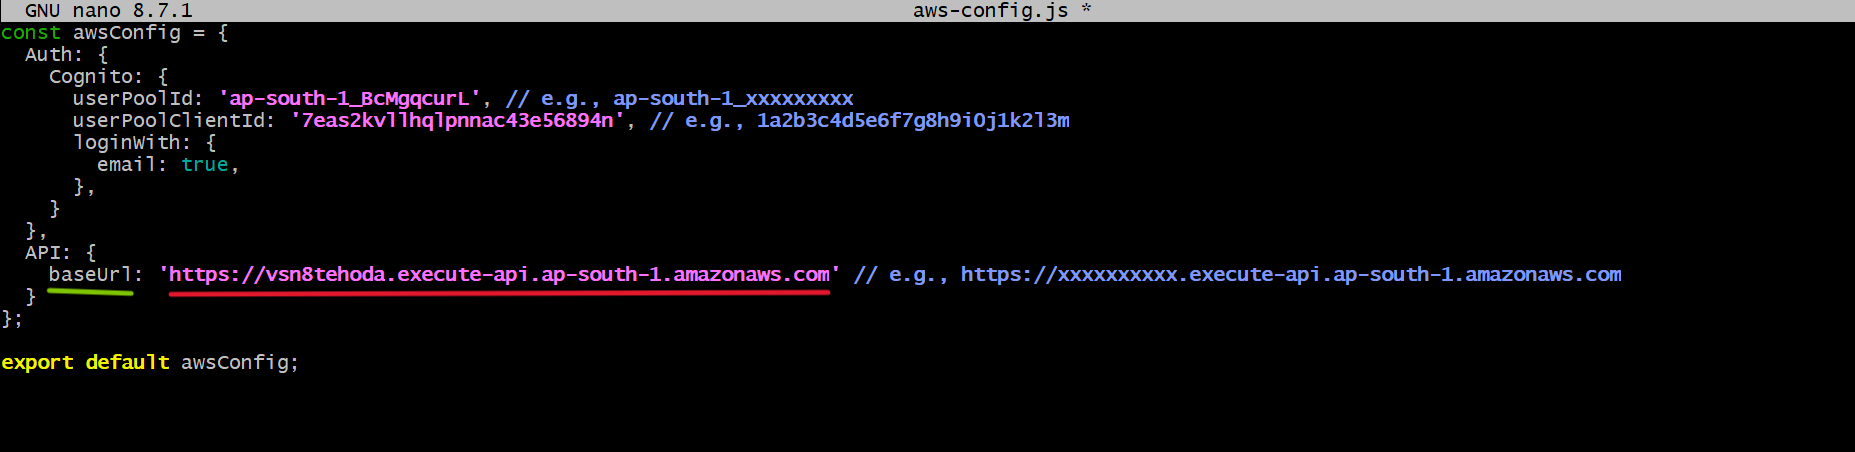
const awsConfig = {
  Auth: {
    Cognito: {
      userPoolId: '<COGNITO_USER_POOL_ID>',
      userPoolClientId: '<COGNITO_CLIENT_ID>',
      loginWith: {
        email: true,
      },
    }
  },
  API: {
    baseUrl: '<API_GATEWAY_URL>'
  }
};

export default awsConfig;
Important:
- Keep the existing Cognito User Pool ID and App Client ID configured in Module 3.
- Replace
<API_GATEWAY_URL>with your actual API Gateway Invoke URL. - Do not add a trailing slash (
/) at the end of the API Gateway URL.
7.2 Rebuild and Redeploy Frontend to S3
- After updating the API Gateway URL, we need to create a new production build of the React application and upload it to the existing S3 frontend bucket.
Step 1: Create a new production build
- Run the following command from the React application directory:
npm run build
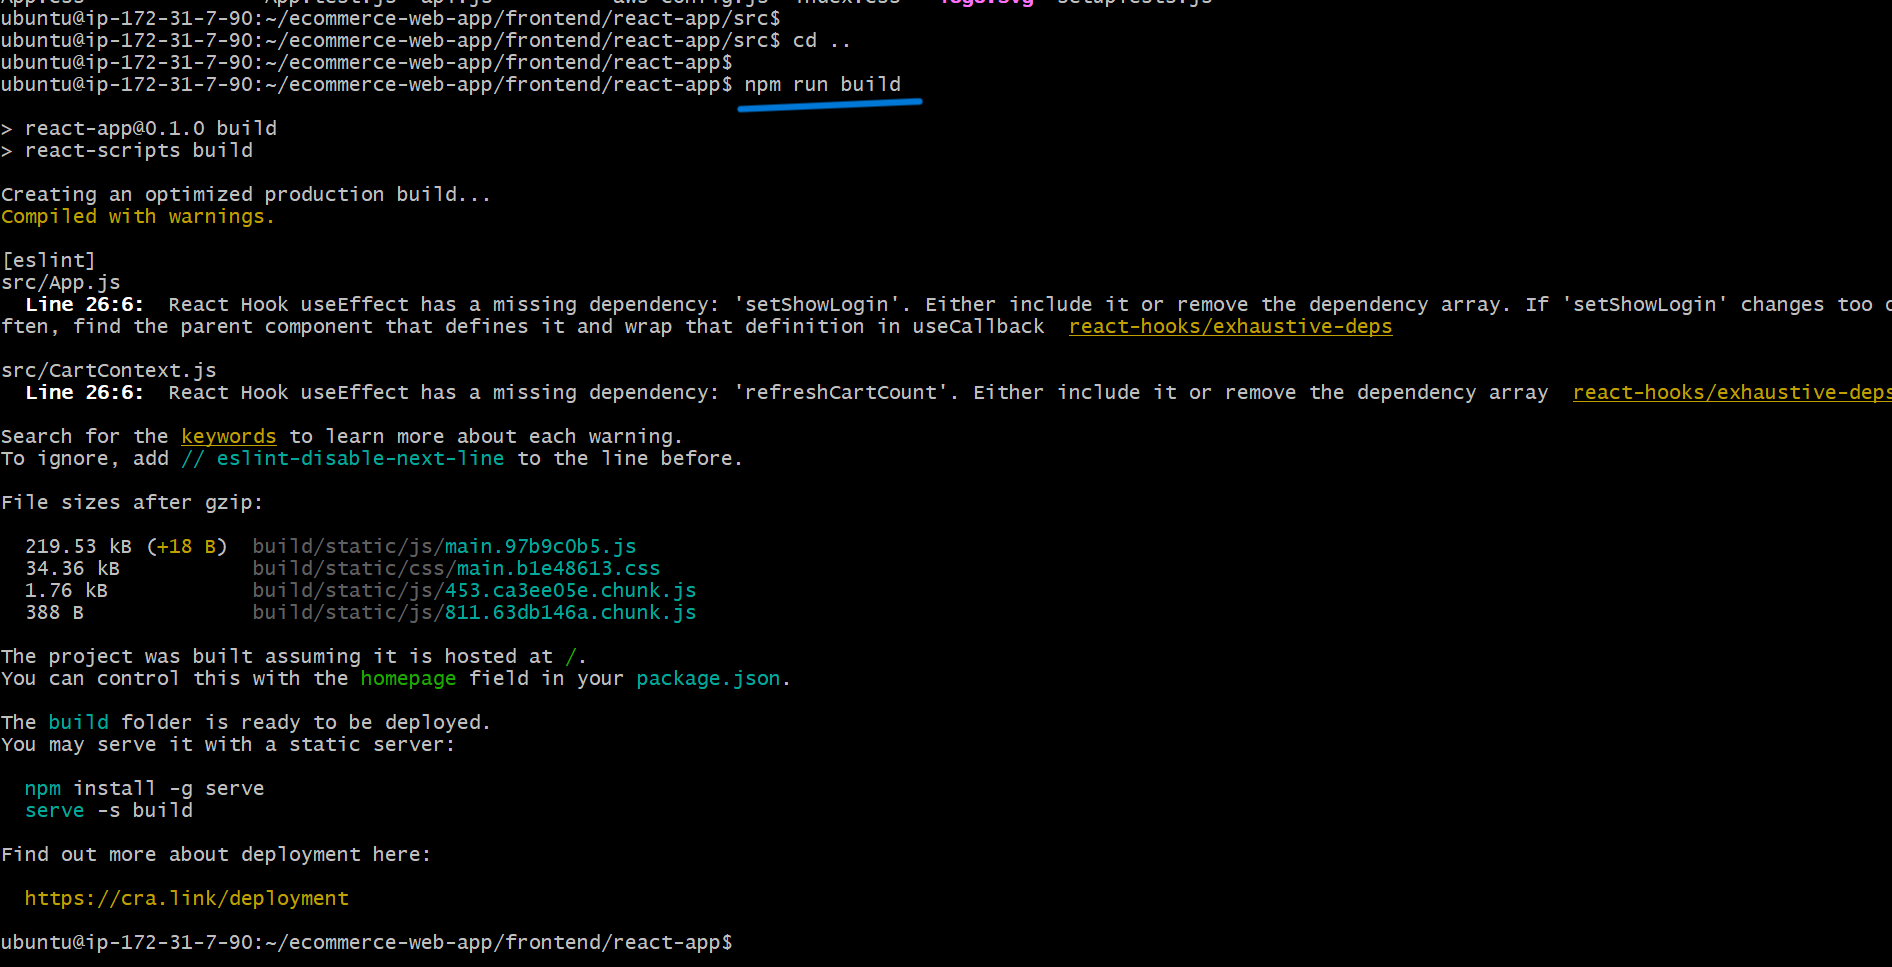
- This command generates the updated production-ready frontend files inside the
build/directory.
Step 2: Upload the updated build to S3
- Run the following AWS CLI command to synchronize the new build files with your existing S3 frontend bucket.
aws s3 sync build/ s3://<your-frontend-bucket-name> --delete --exclude "images/*"
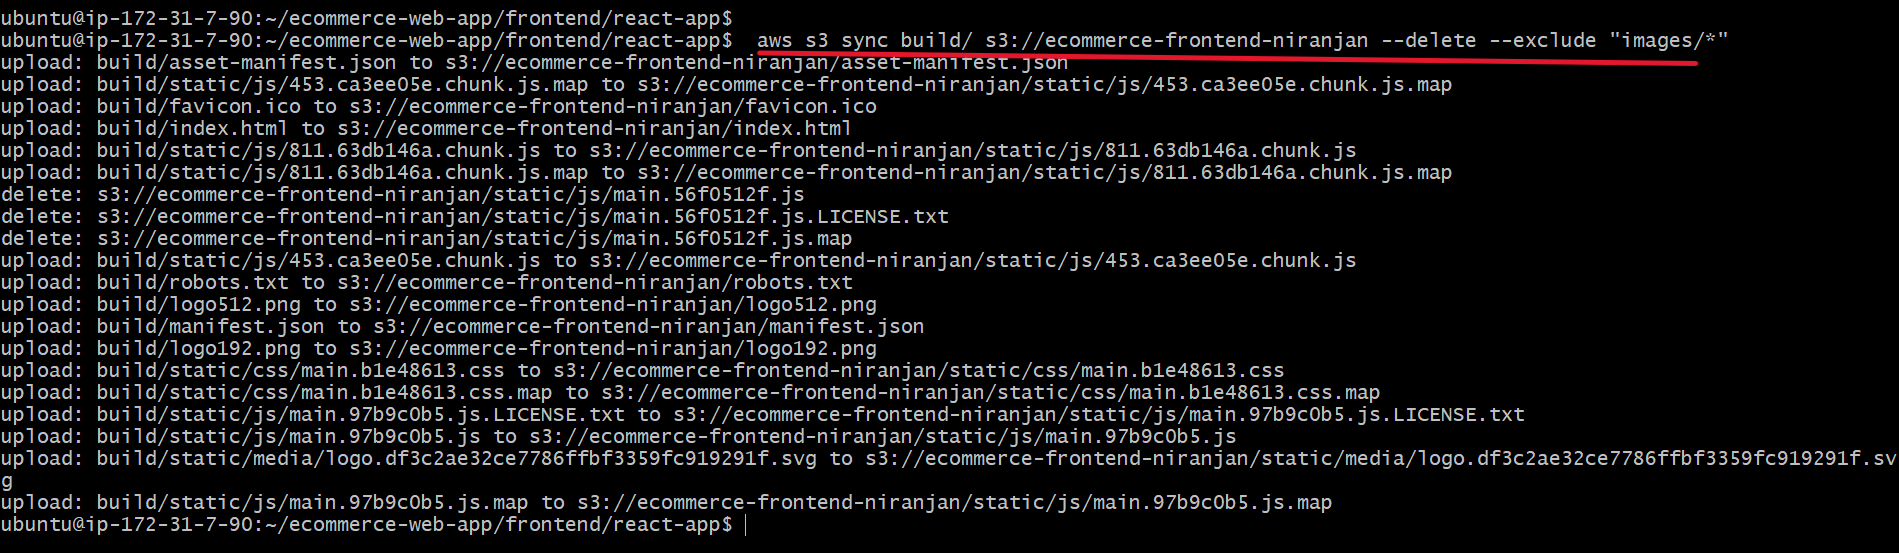
- Replace
<your-frontend-bucket-name>with your actual frontend S3 bucket name.
Important: We are using the same S3 bucket to host the frontend files and static product images. Therefore, the --exclude "images/*" option prevents the existing images from being overwritten or deleted during synchronization.
7.3 Invalidate CloudFront Cache
- After uploading the updated frontend files to S3, we need to invalidate the CloudFront cache.
Why is CloudFront invalidation required?
- CloudFront caches frontend files at its edge locations to improve application performance. Even after uploading the updated files to S3, users might continue receiving the previously cached files.
- To make the latest frontend changes available, we need to create a cache invalidation.
Step 1: Open CloudFront
Navigate to:
AWS Console → CloudFront → Distributions
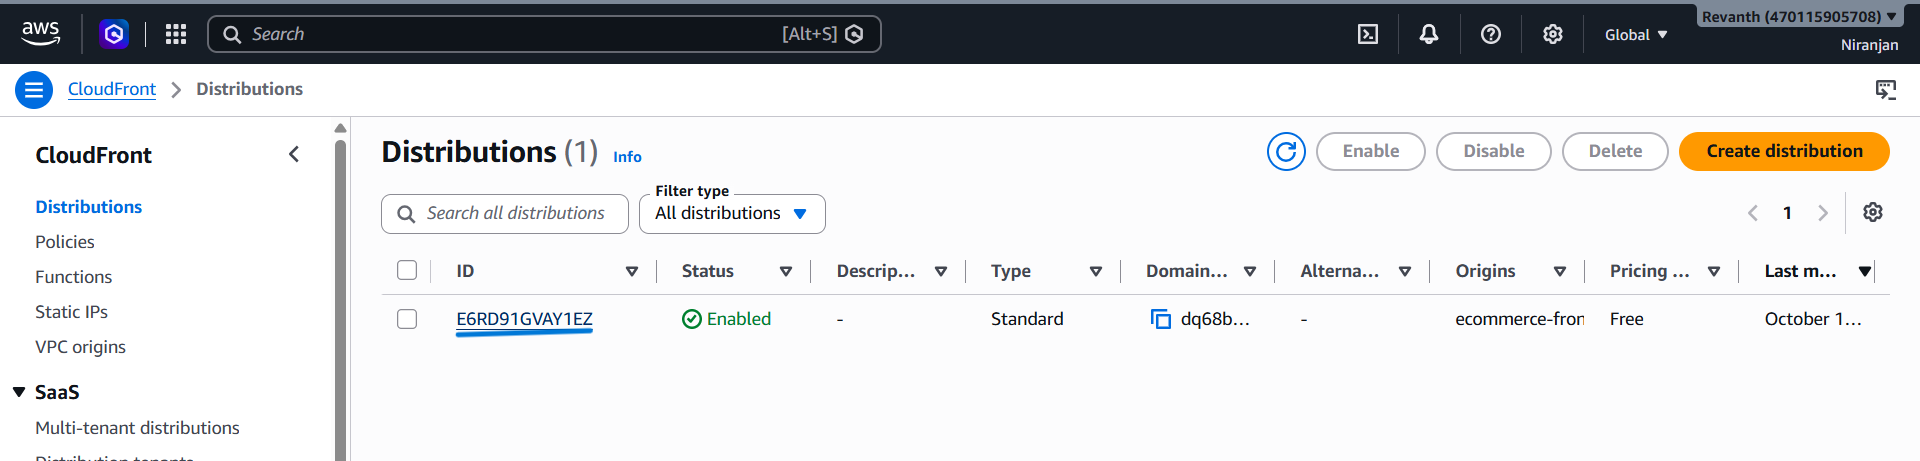
Select your existing frontend CloudFront distribution.
Step 2: Open Invalidations
- Select the Invalidations tab.
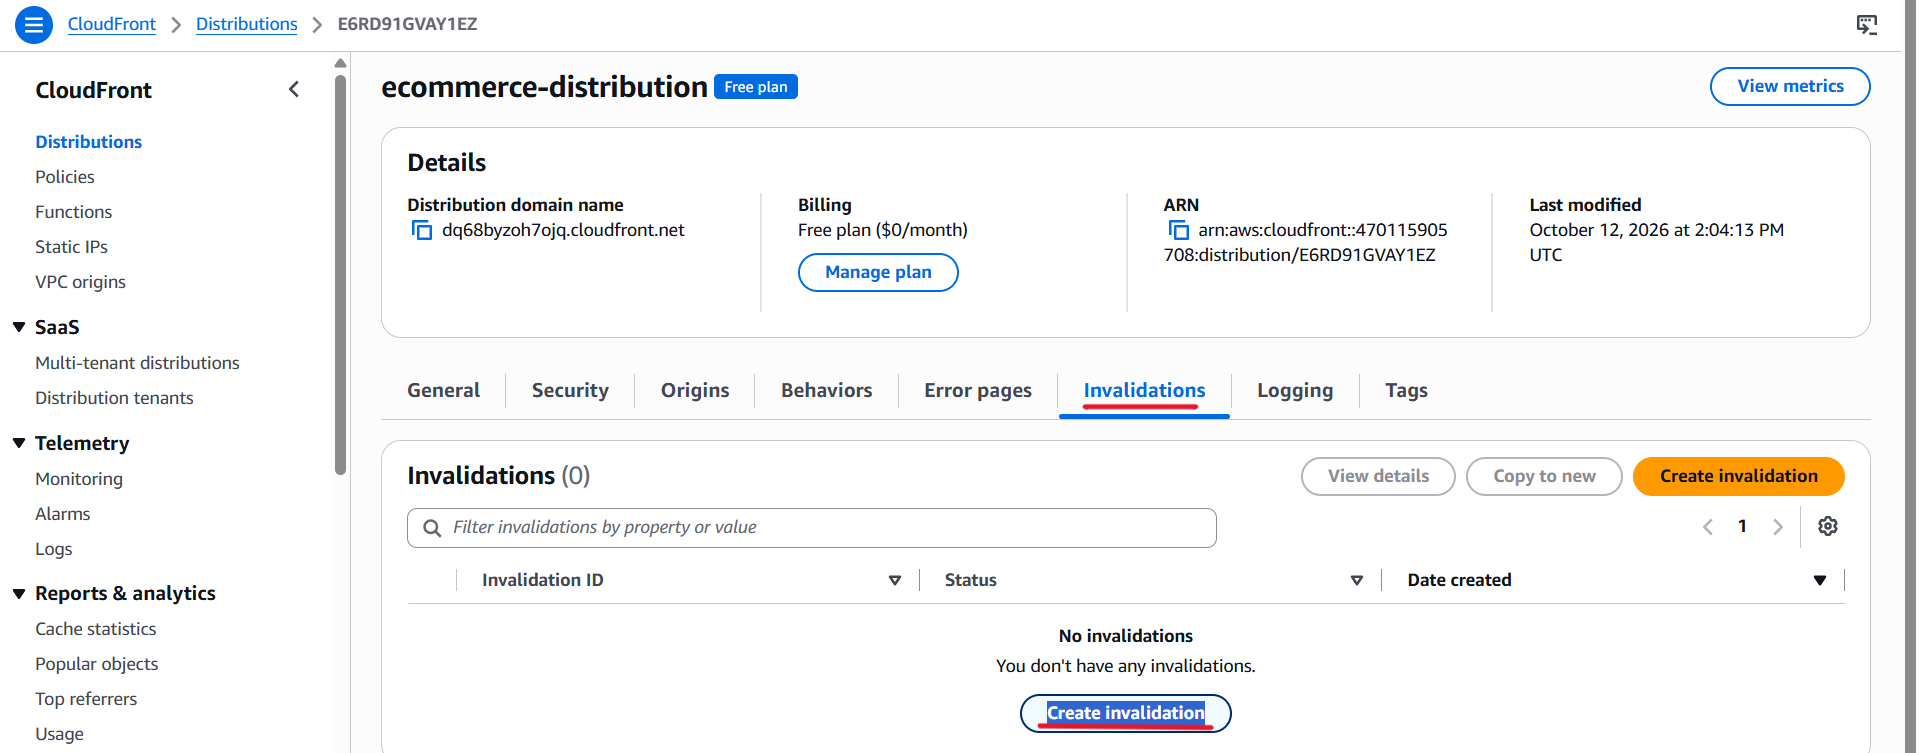
- Click Create invalidation.
Step 3: Enter the object path
Under Object paths, enter:
/*
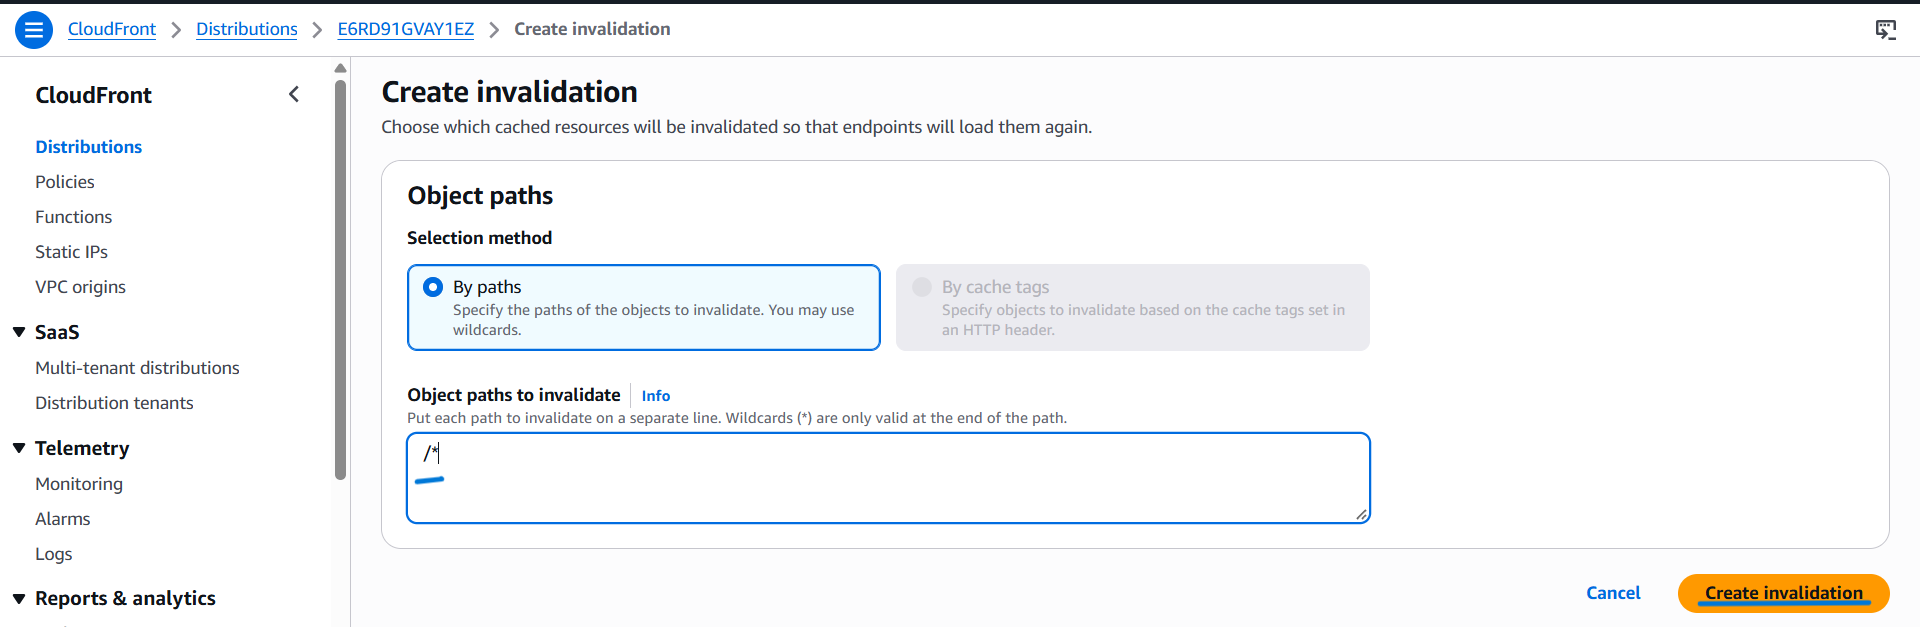
- This invalidates all cached objects associated with the distribution.
Step 4: Create the invalidation
- Click Create invalidation to start the process.
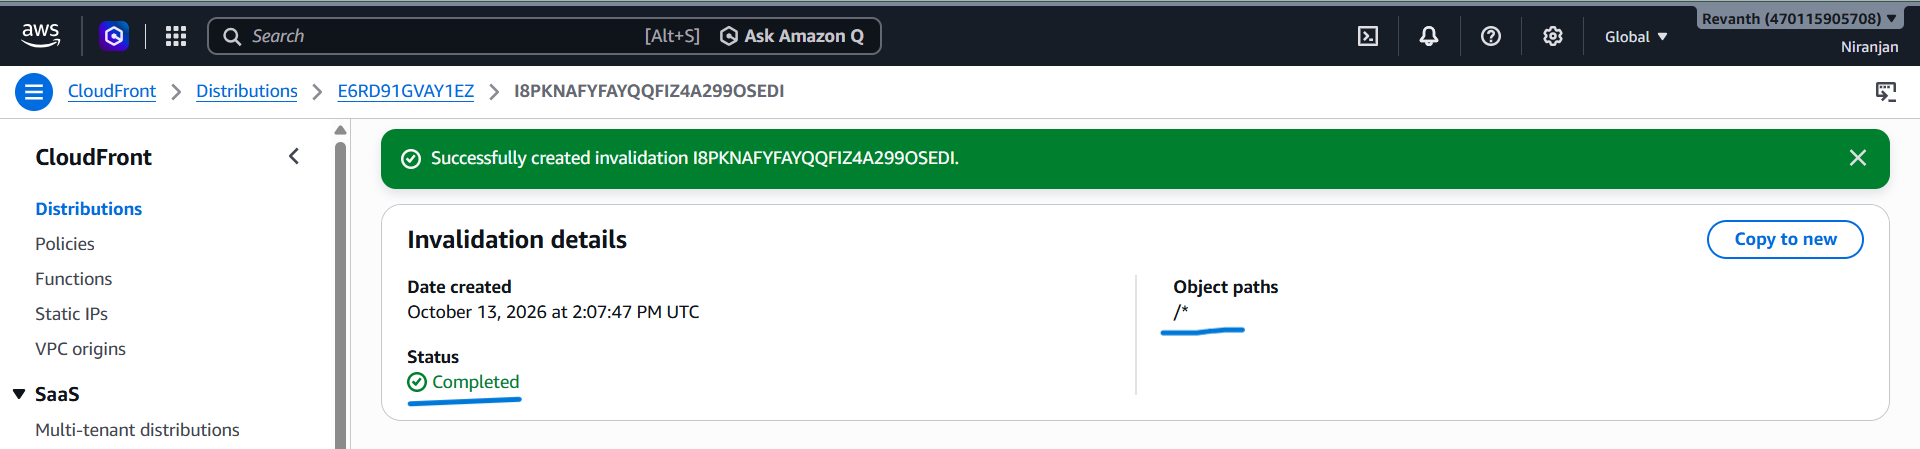
- Wait until the invalidation status changes to Completed.
7.4 Test the Fully Integrated Application
Now that the frontend has been updated and the CloudFront cache has been invalidated, we can test the complete application.
Step 1: Open the application
Navigate to your CloudFront distribution and copy its domain name.
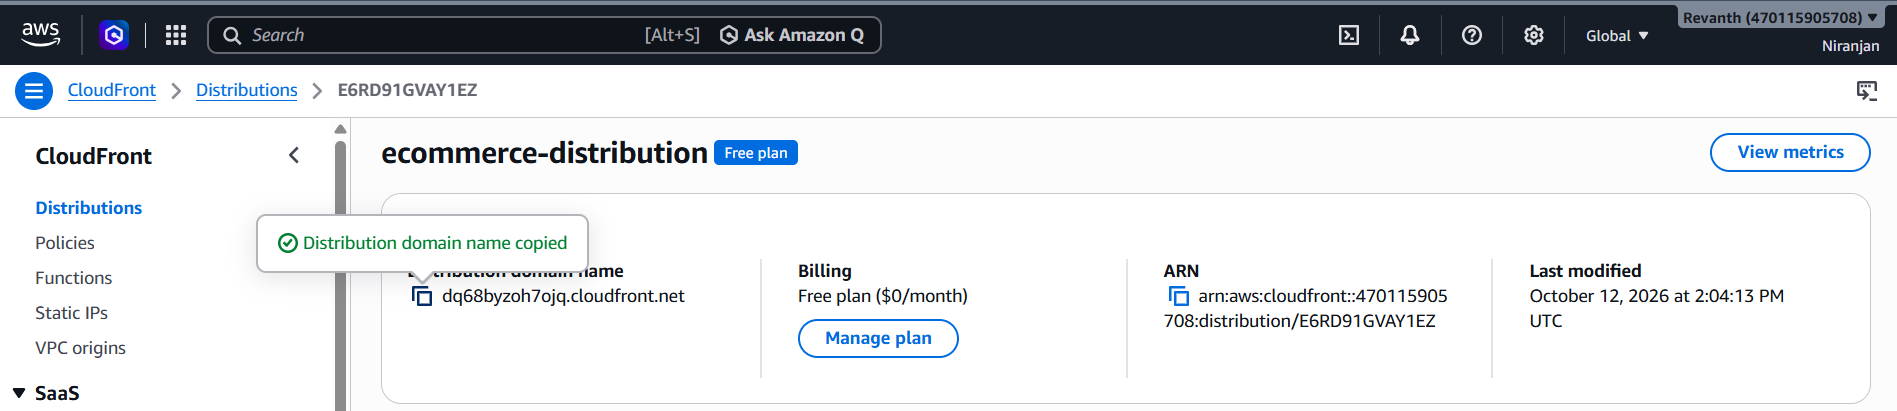
Open the application in your browser:
https://<your-cloudfront-domain>
Step 2: Verify product listing
- Check whether the product listing loads successfully.
- Verify that product details are retrieved from the backend.
- Confirm that product images are displayed correctly.
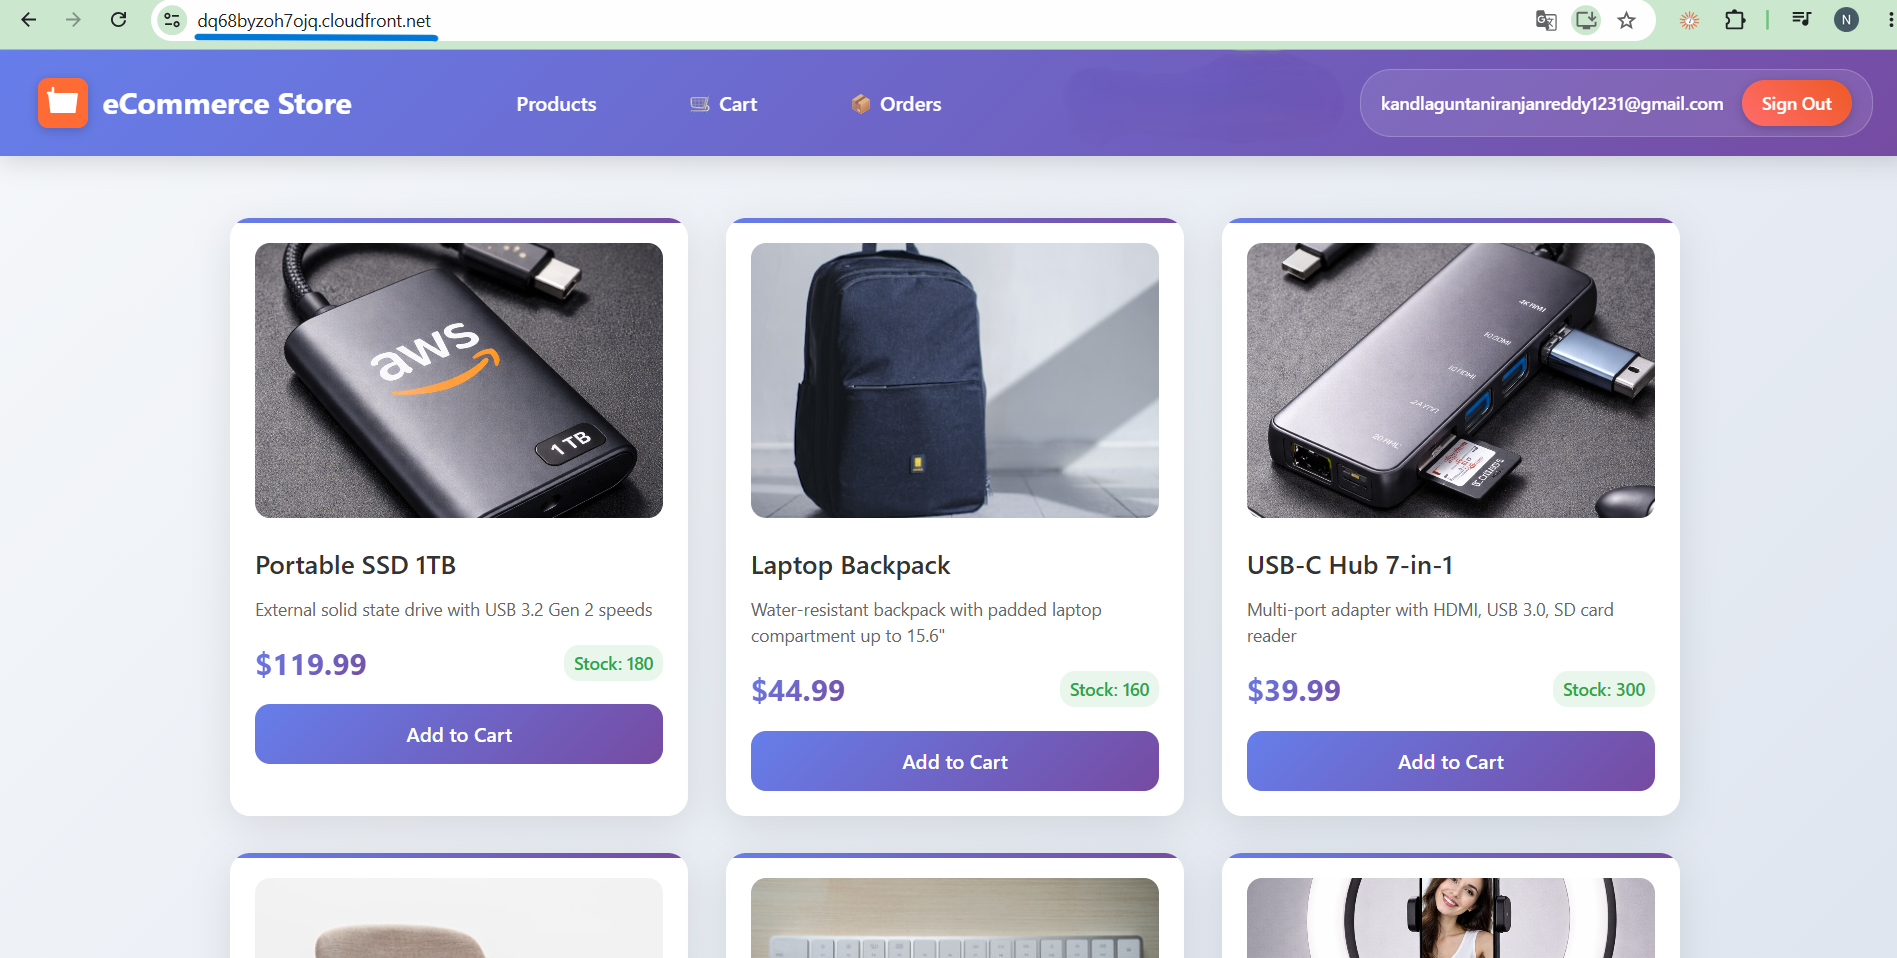
The product information is retrieved from the DynamoDB products table through the Product Service API.
Step 3: Login to the application
- Click the login option.
- Enter the email address and password of your existing Cognito user.
- Sign in to the application.
Authentication is handled by Amazon Cognito.
Step 4: Test cart functionality
- Select a product.
- Click Add to Cart.
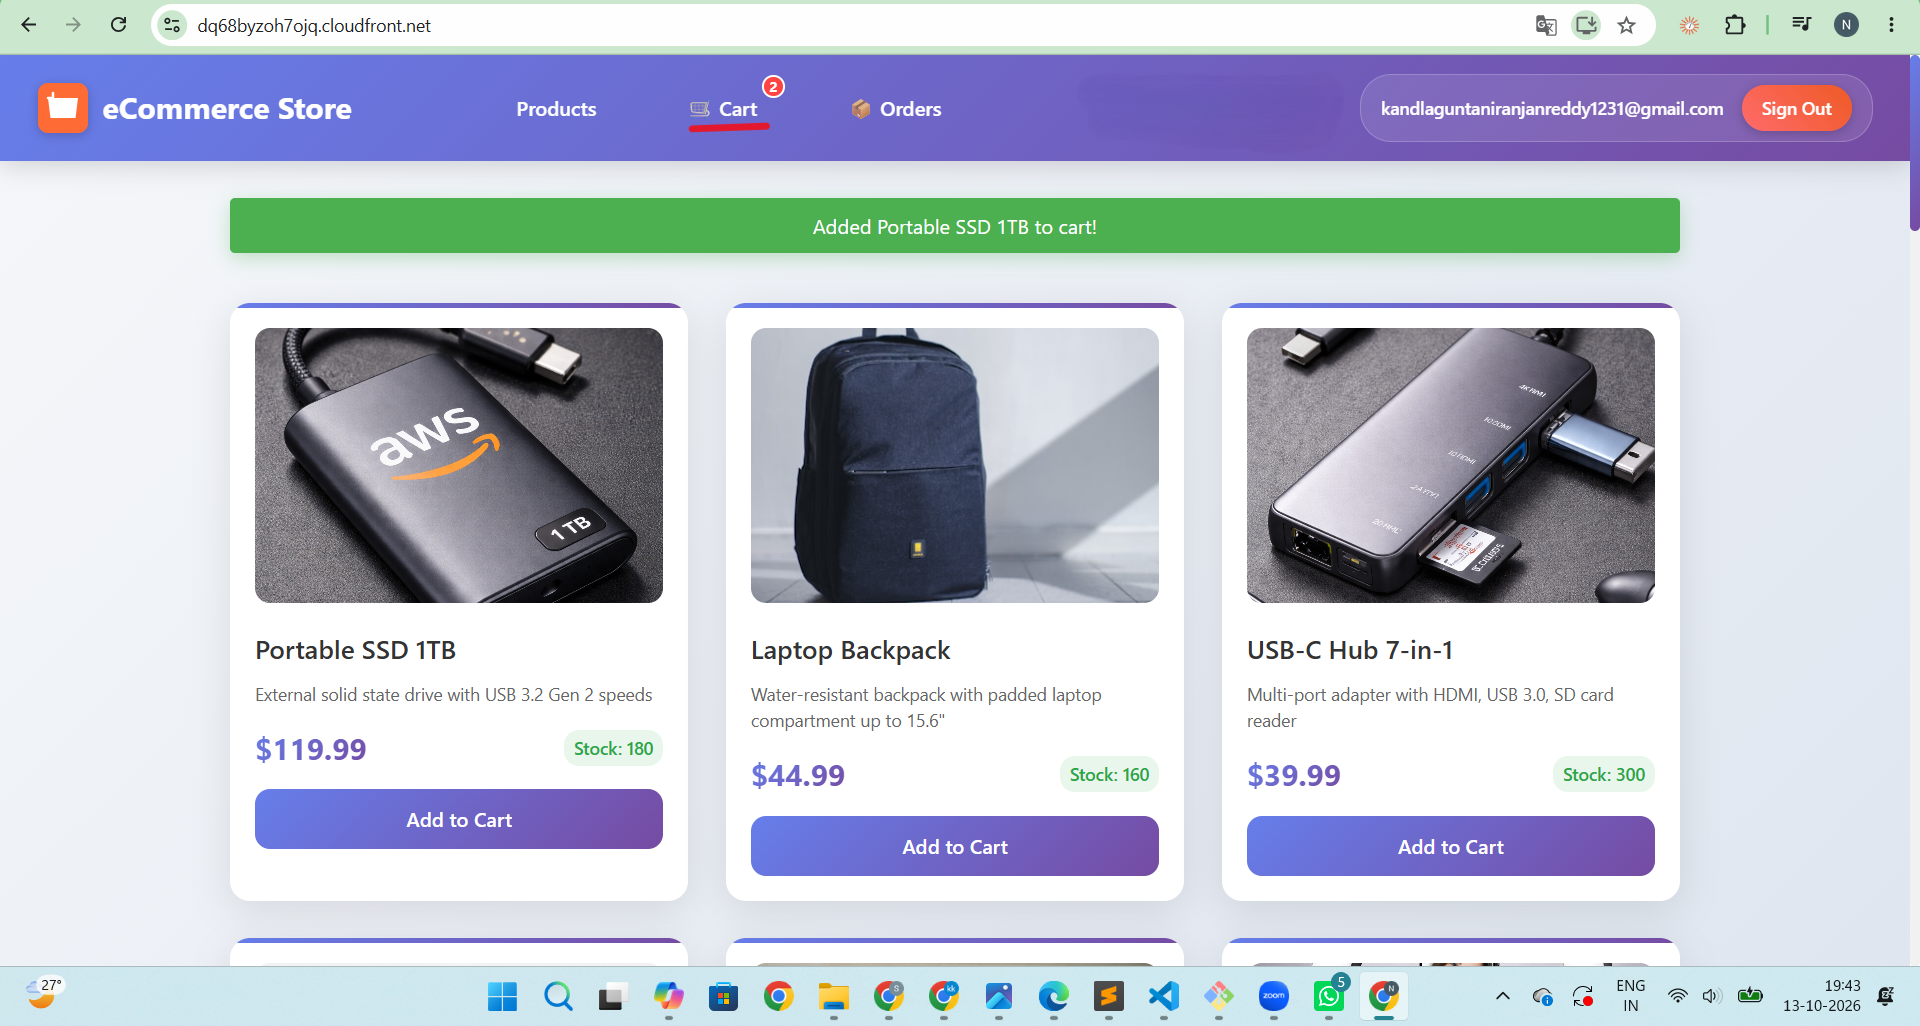
- Navigate to the Network tab.
- Check the request methods, response status codes, and any errors.
- This helps us identify whether the frontend is communicating with the backend services correctly.
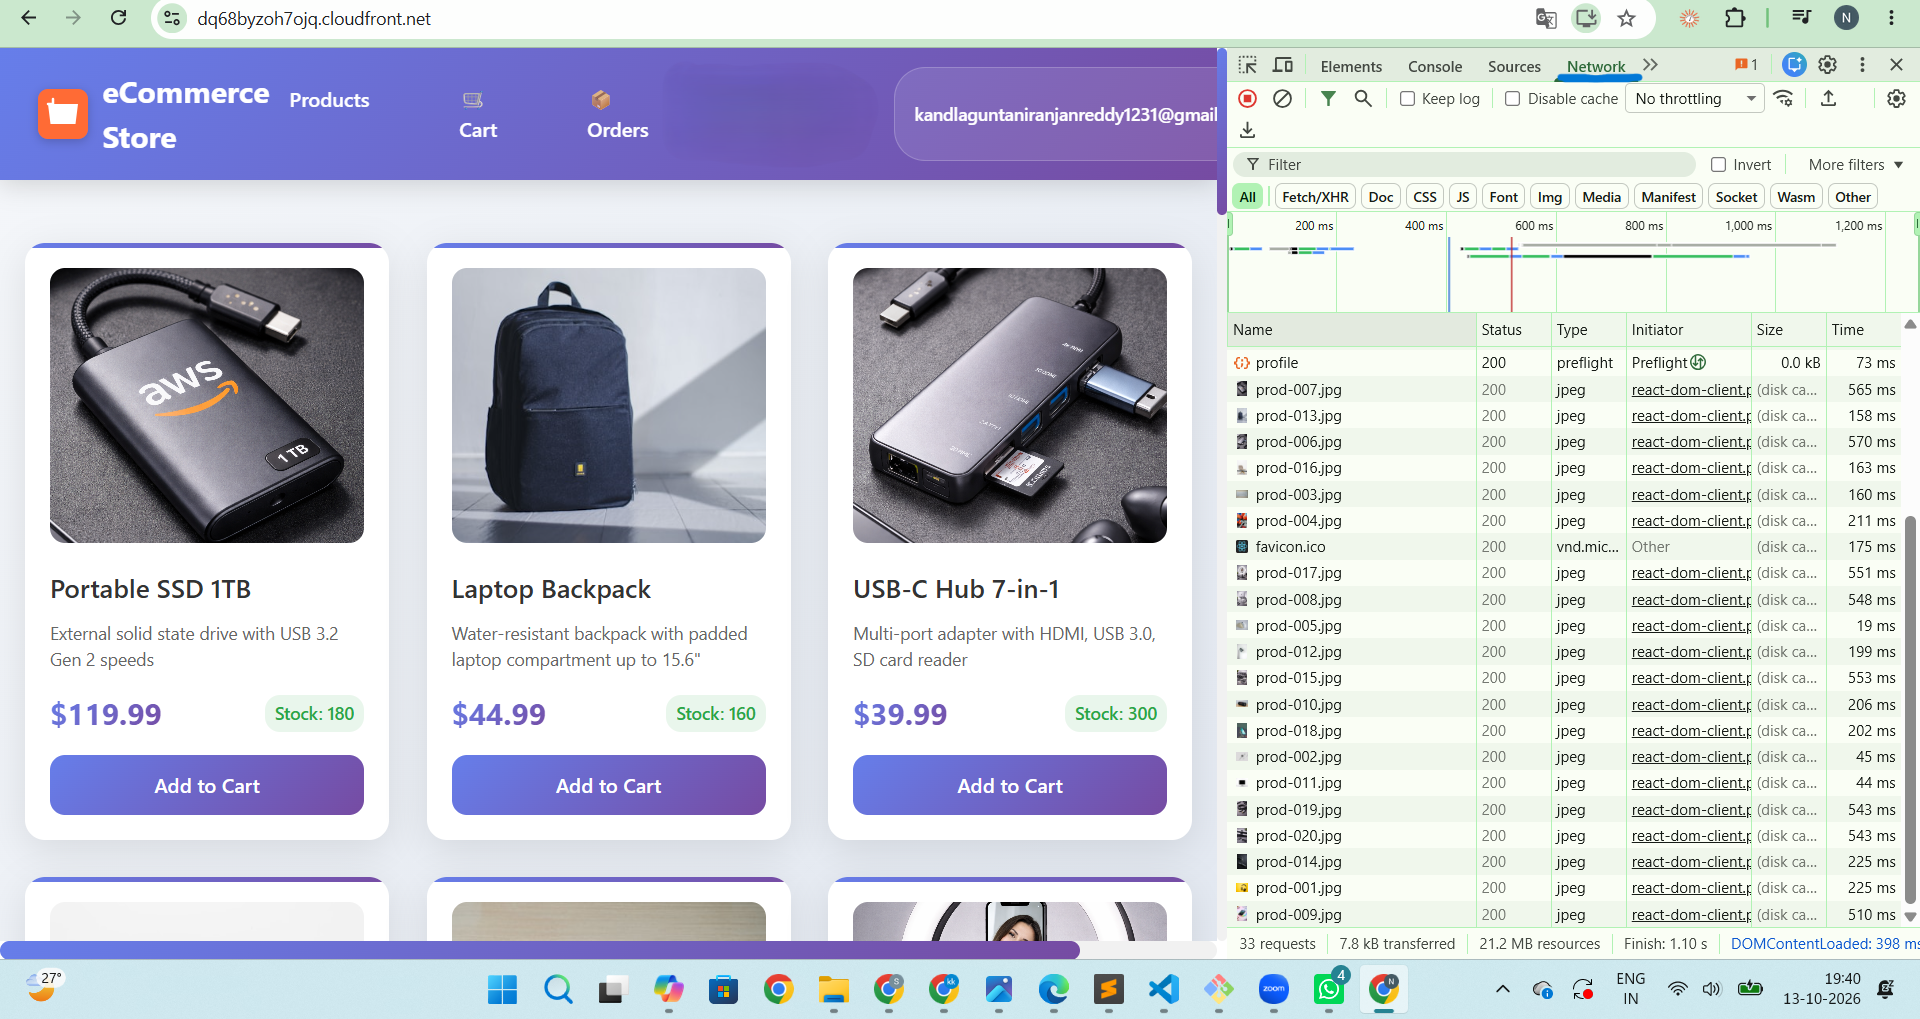
- Add a few more products.
- Open the cart and verify that the selected items are displayed.
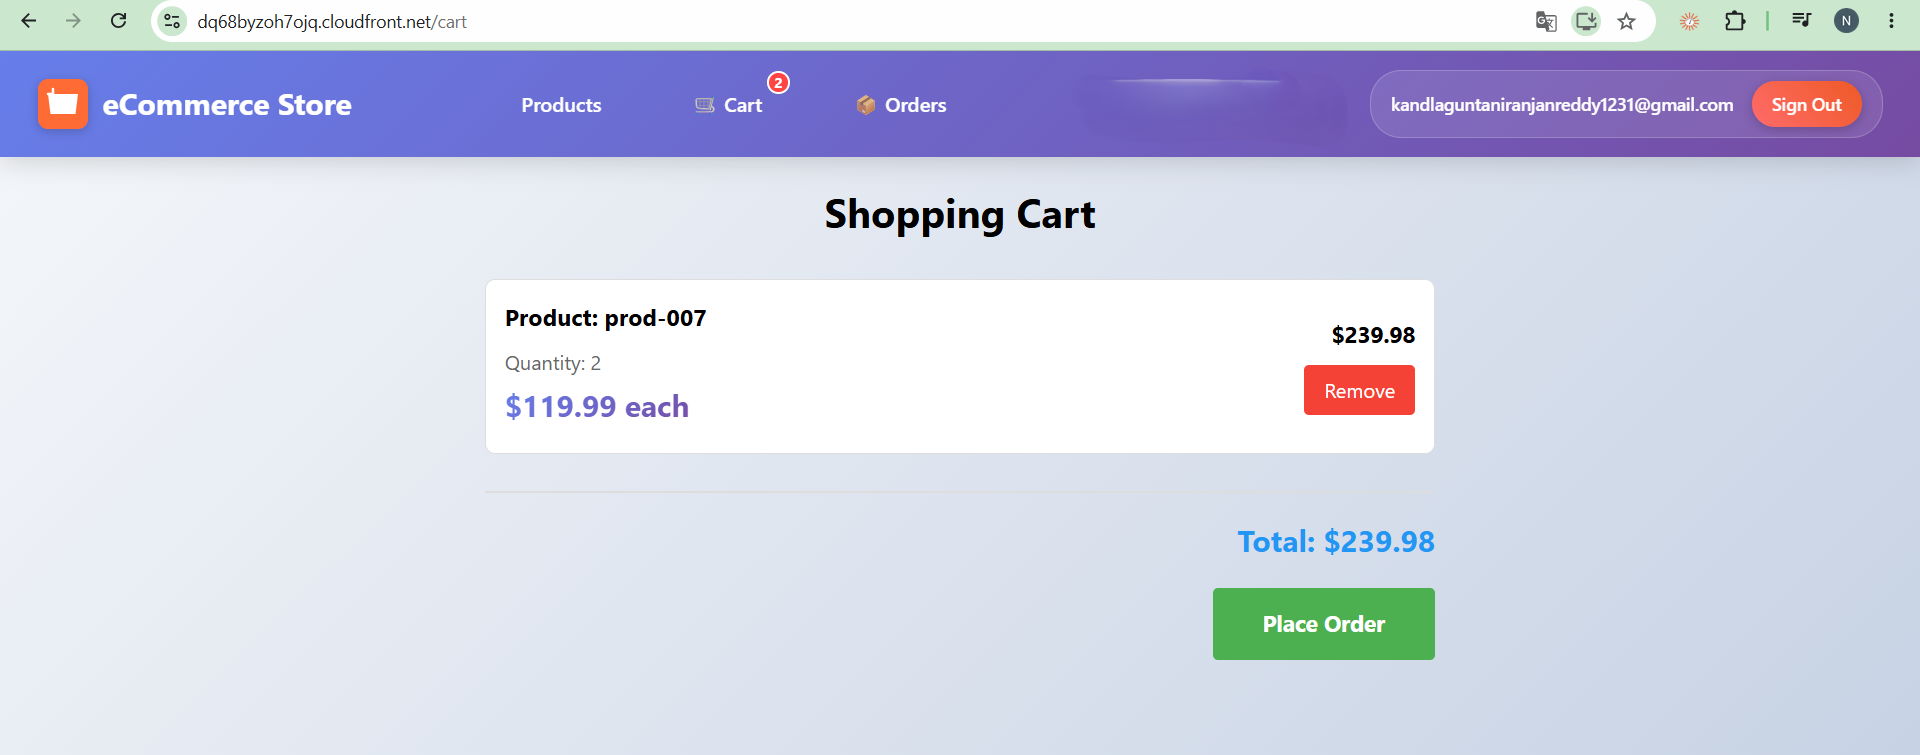
The Cart Service handles these requests and stores cart information in DynamoDB.
Step 5: Place a test order
- Proceed to place an order.
- Verify that the order is placed successfully.

- Open the orders section and verify that the order details are displayed.
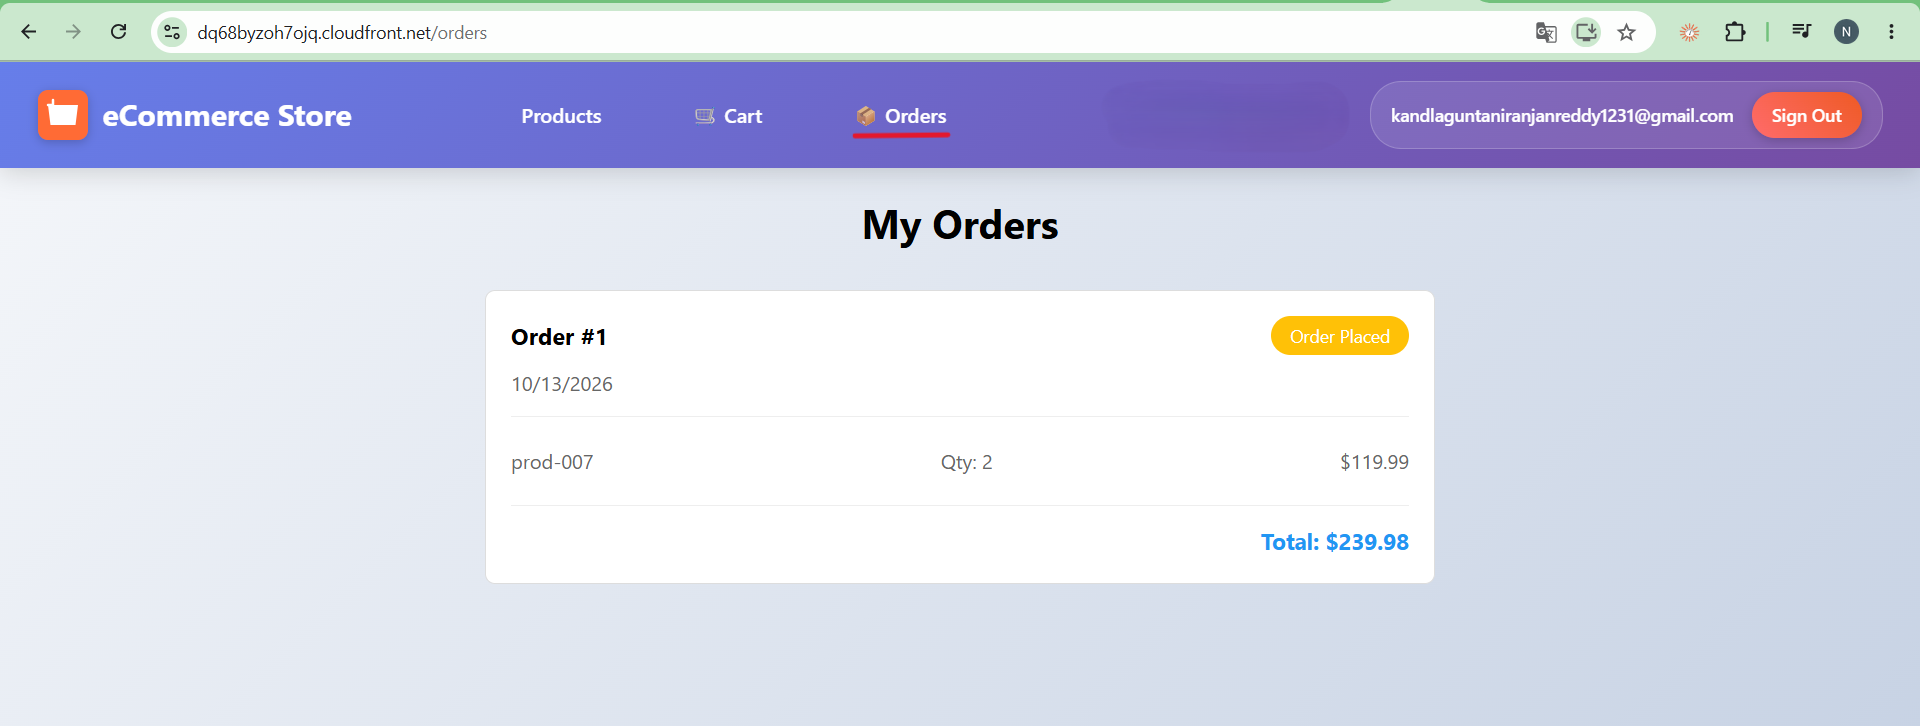
The Order Service processes the order, while the User Service manages user profile information in Amazon RDS PostgreSQL.
Verify Backend Logs Using CloudWatch
We can also verify backend requests through Amazon CloudWatch Logs.
- Open the CloudWatch Console.
- Navigate to Logs → Log groups.
- Open the
/ecslog group.
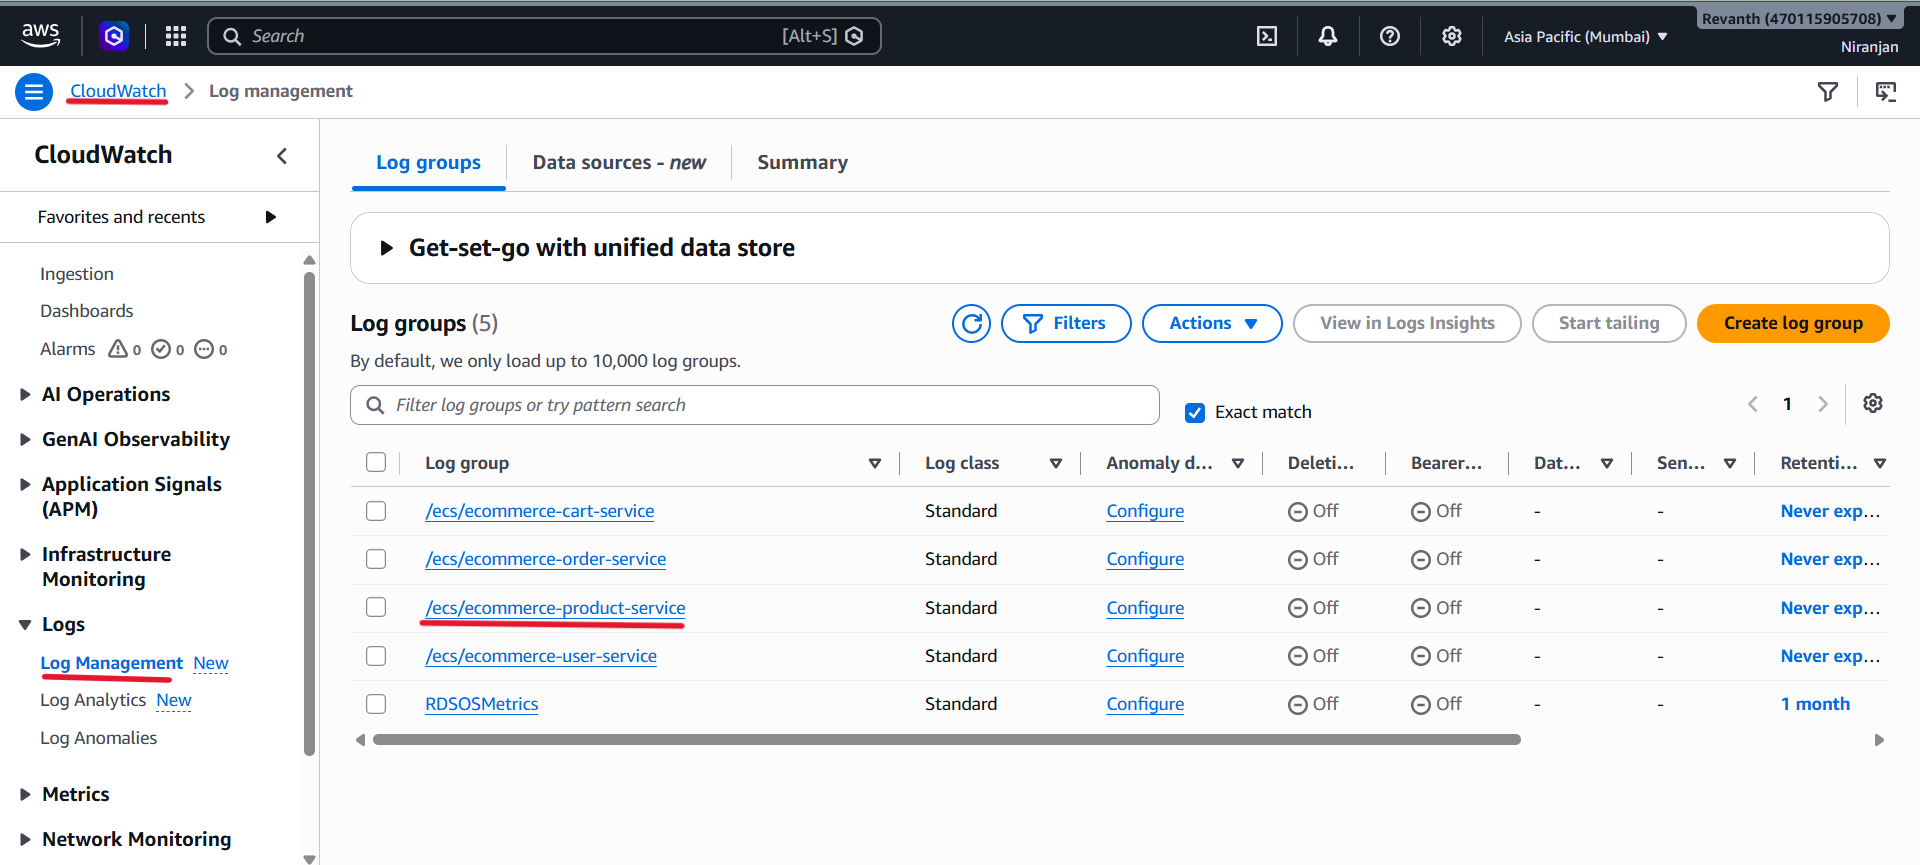
- Select the relevant service log stream, such as the Product Service.
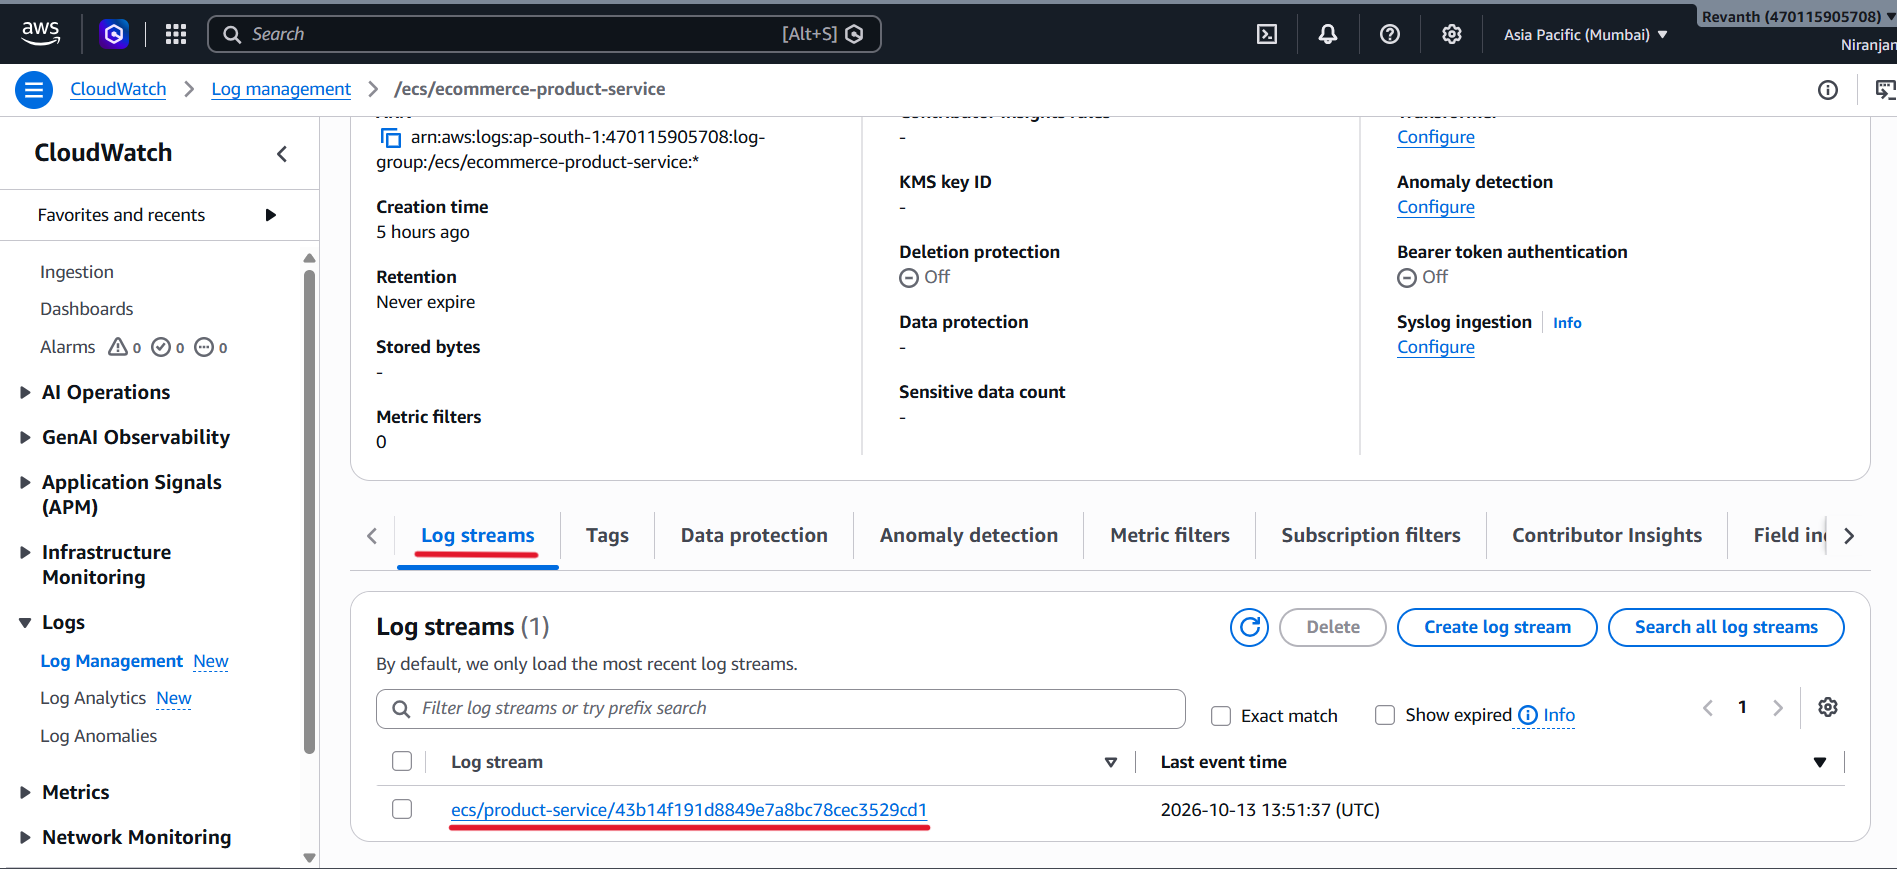
- Review the API requests and application logs.
You should be able to observe API requests, CORS OPTIONS requests, and load balancer health checks.
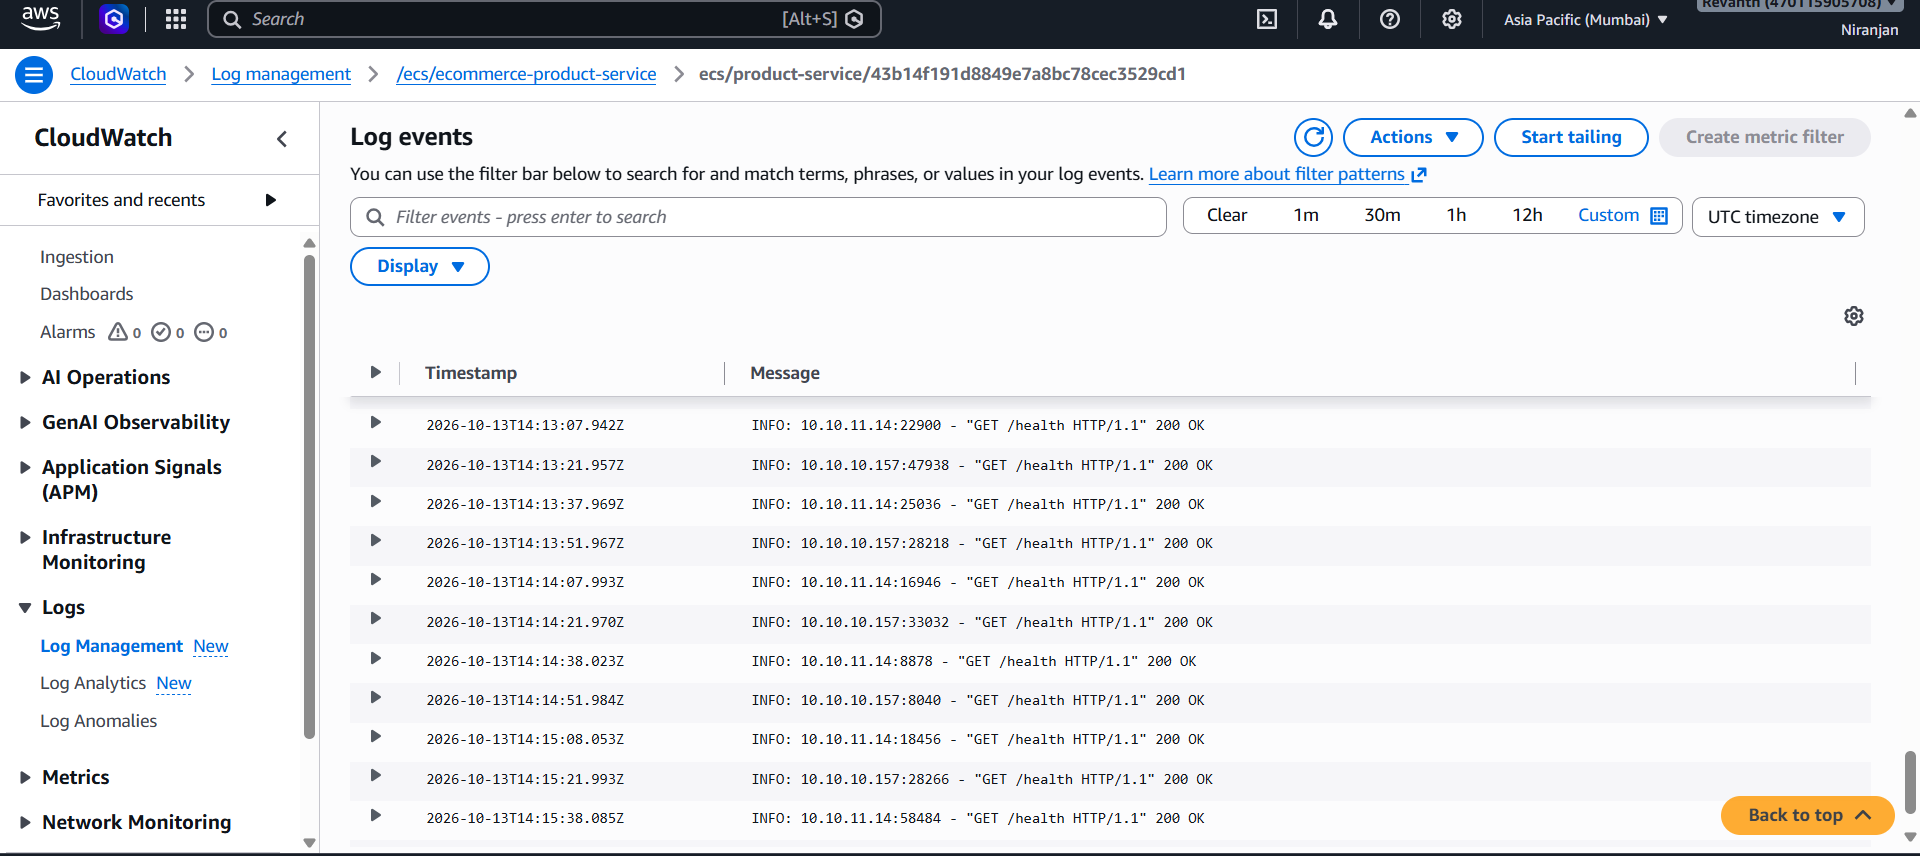
If any backend errors occur, they can also be investigated through these logs.
Verify Database Records
The application uses different AWS database services to store application data.
- DynamoDB: Stores product information and shopping cart details.
- RDS PostgreSQL: Stores user profiles and order information.
You can connect to your RDS database using the PostgreSQL username and password configured earlier and verify the corresponding user and order records.
Troubleshooting
Products are not loading:
- Verify that the CloudFront invalidation has completed.
- Check that the API Gateway URL in
aws-config.jsis correct. - Ensure that the API Gateway URL does not contain a trailing slash.
- Verify the API Gateway CORS configuration from Module 6.
- Check whether the ECS services are running and healthy.
- Open the browser's Developer Tools → Network and Console to identify errors.
- Review the relevant CloudWatch service logs.
Authentication errors:
- Verify the Cognito User Pool ID in
aws-config.js. - Verify the Cognito App Client ID.
- Check the Cognito JWT Authorizer configuration in API Gateway.
502 / 504 errors:
- Check ECS service health in the ECS Console.
- Verify the internal ALB and target group health.
- Review the relevant CloudWatch logs.
- Check the API Gateway integration and VPC Link configuration.
Next Steps
At this stage, the frontend and backend services are integrated, and we can test the main application functionality, including product browsing, authentication, cart operations, and order placement.
However, order notifications and other notification-related integrations are not configured yet.
In the next module, we will configure the notification services to extend the application's functionality.
Module 8: Notifications and Integration (SNS and SQS)
Overview
In this module, we will configure Amazon SNS (Simple Notification Service) and Amazon SQS (Simple Queue Service) to implement an event-driven notification workflow for our eCommerce application.
Whenever a customer places an order, the Order Service will publish an event to an SNS topic. SNS will distribute that event to multiple subscribers:
- Email subscription: Sends an order notification to a configured email address.
- SQS subscription: Stores the order event in a queue for downstream processing, such as integration with a shipping service provider.
This approach allows different systems to receive and process the same event independently.
Important: Email Notification Approach
- Ideally, we would use Amazon SES (Simple Email Service) with an AWS Lambda function subscribed to SNS. Lambda would process the order event and send an email to the customer's email address using SES.
- However, Amazon SES is initially placed in Sandbox mode in many AWS accounts. This restricts email sending to verified email addresses and requires a request to AWS to move the account into production mode.
- To keep this project simple, we will use a direct SNS Email Subscription instead.
- With this approach, order notifications will be sent to one configured email address. This is mainly for demonstration and testing purposes, not a complete customer-specific email notification system.
In this module
- Create an SNS topic for order events.
- Create an SQS queue for order shipping.
- Configure SNS email and SQS subscriptions.
- Verify the SQS queue access policy.
- Store the SNS Topic ARN in SSM Parameter Store.
- Restart the Order Service to load the new parameter.
- Test the notification workflow.
Architecture
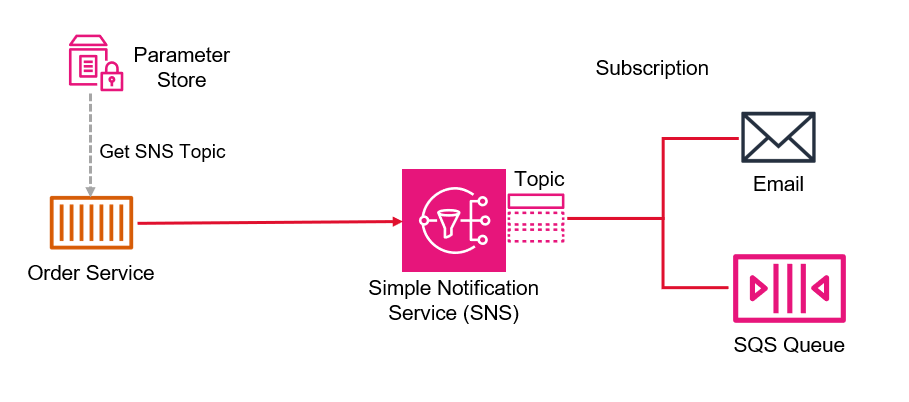
How the Notification Workflow Works
- A customer places an order through the frontend.
- The Order Service publishes an order event to the SNS topic.
- SNS distributes the same event to its subscribers.
- The Email subscription sends an order notification to the configured email address.
- The SQS subscription stores the order event in the shipping queue.
- A downstream process, such as a Lambda function or shipping service, can read and process messages from the SQS queue.
Note: In this project, we will test the email notification and SQS message delivery. We will not implement an actual shipping service or an SQS message-processing application.
8.1 Create SNS Topic
- First, we need to create an SNS topic that will receive order events from the Order Service.
- SNS follows a publish-subscribe model. The Order Service publishes a message to a topic, and SNS distributes that message to all the subscribers configured for that topic.
SNS Topic Configuration
- AWS Console → Simple Notification Service (SNS) → Topics → Create topic.
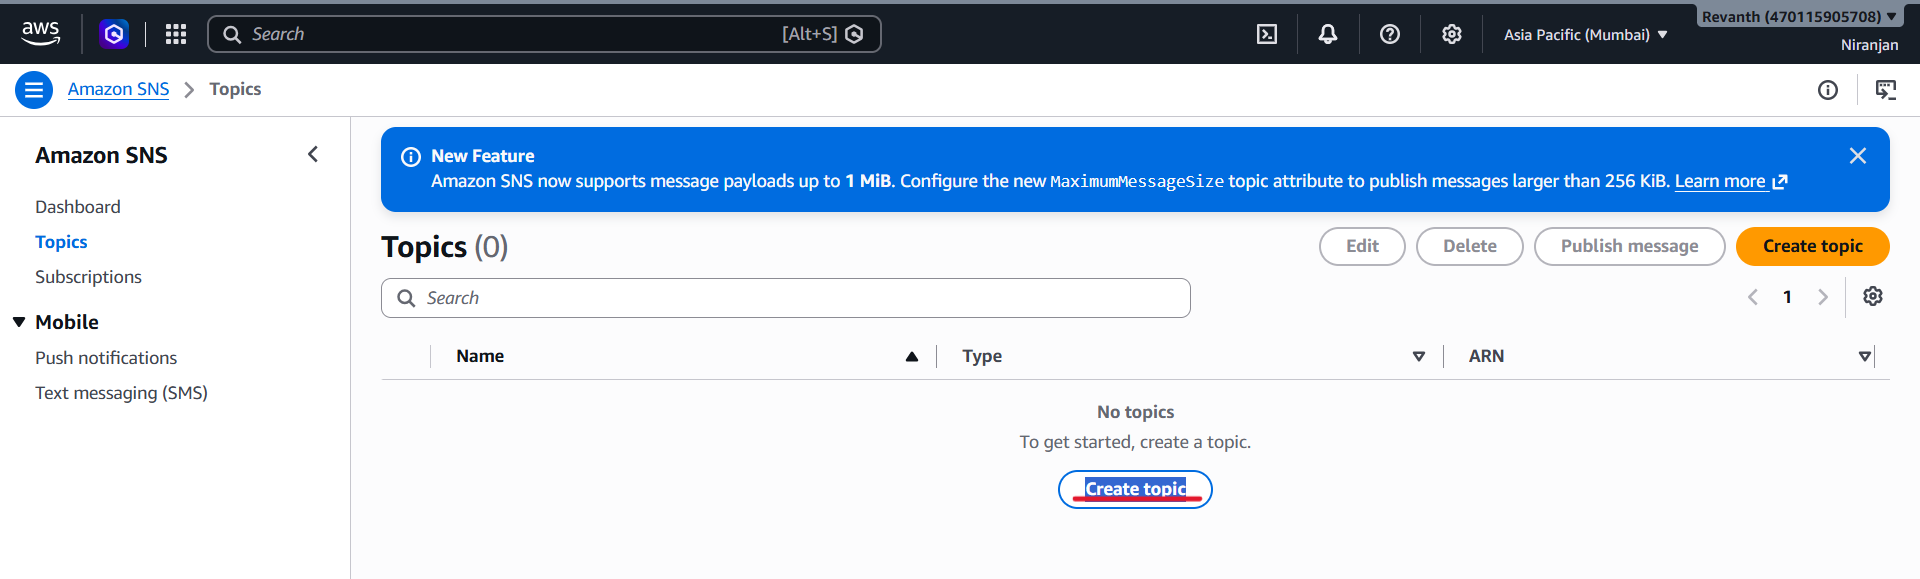
- Type: Select Standard.
- Name:
ecommerce-order-events - Display name:
ecommerce-order-events
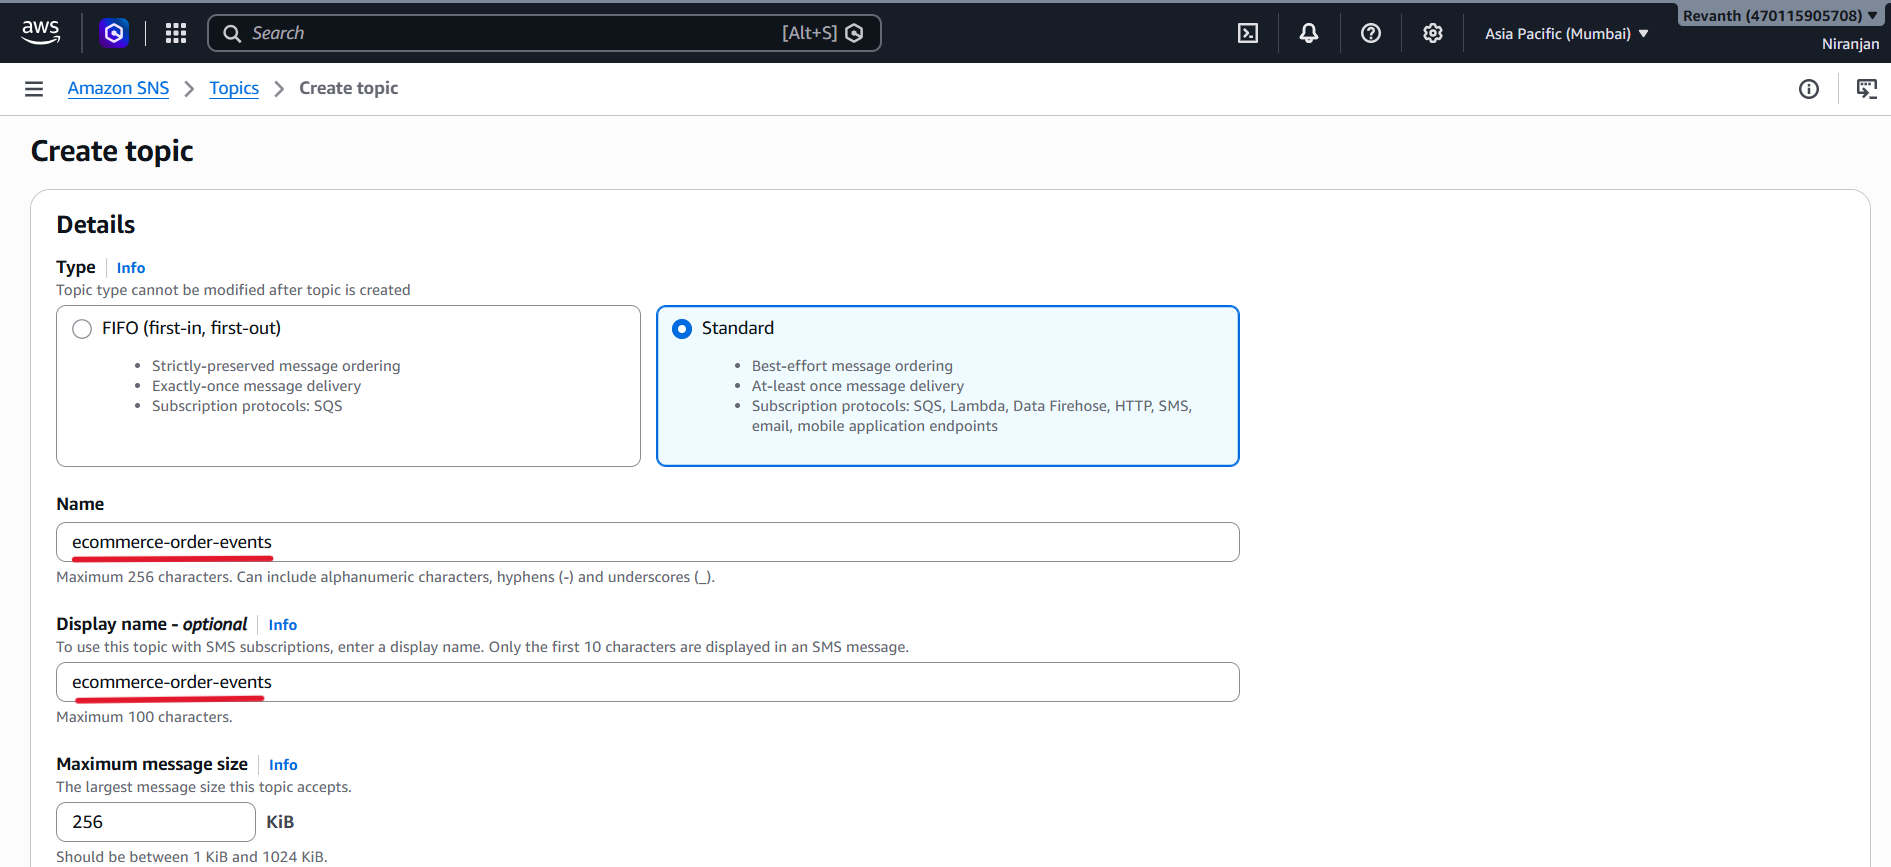
- Keep the remaining settings as default.
- Click Create topic.
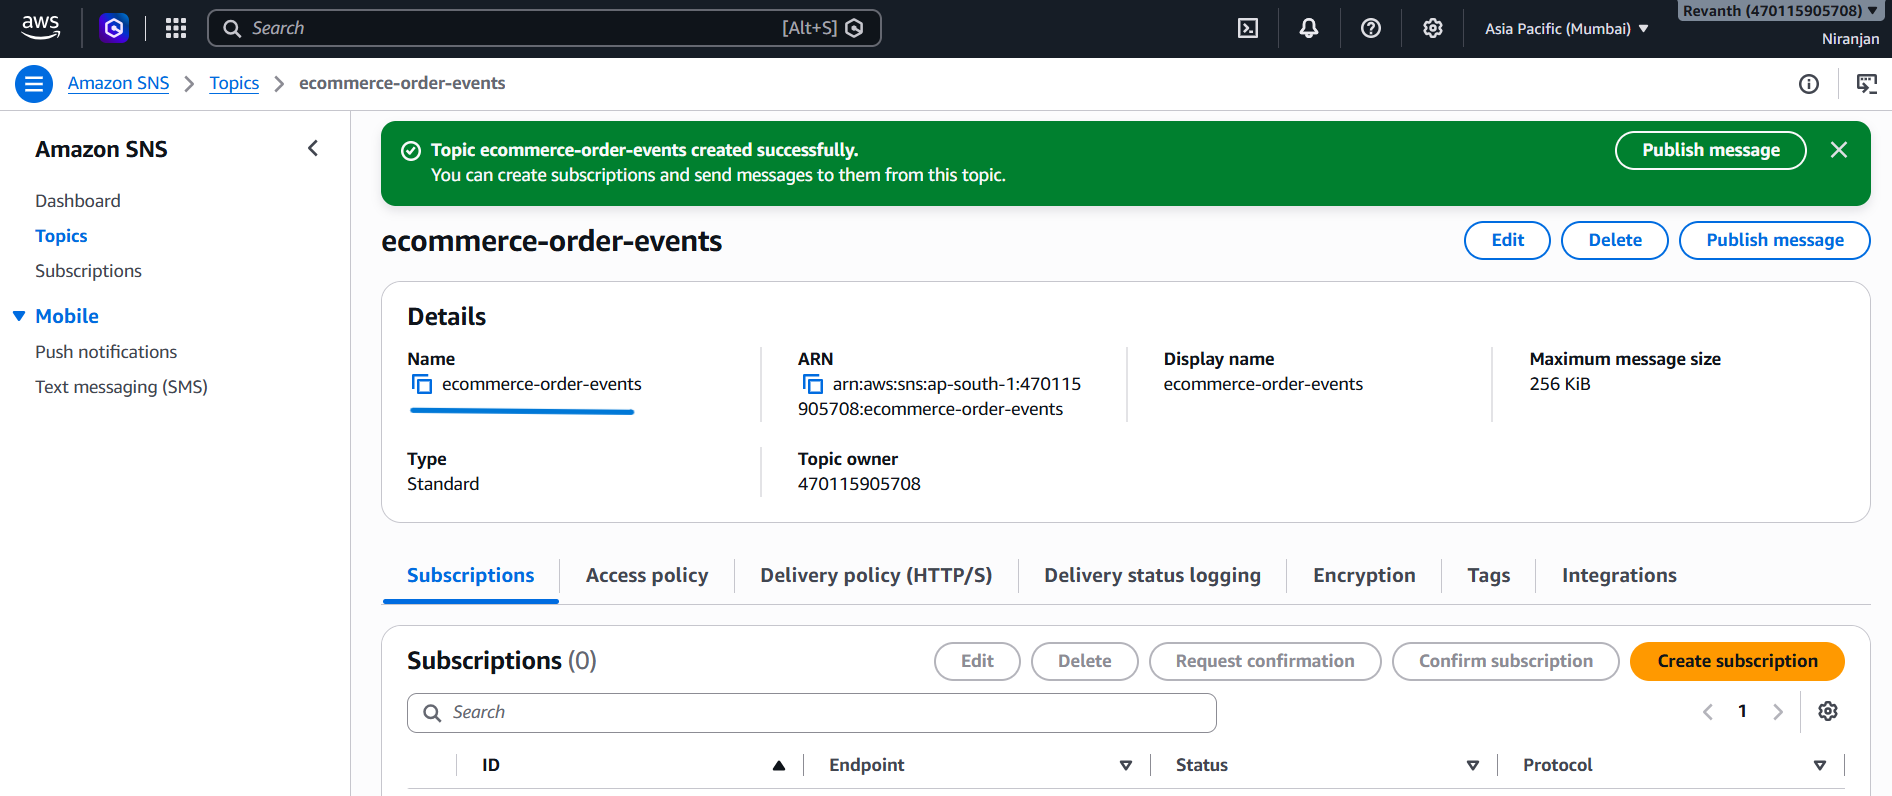
Copy the Topic ARN
After creating the topic:
- Open the newly created
ecommerce-order-eventstopic. - Locate the ARN (Amazon Resource Name).
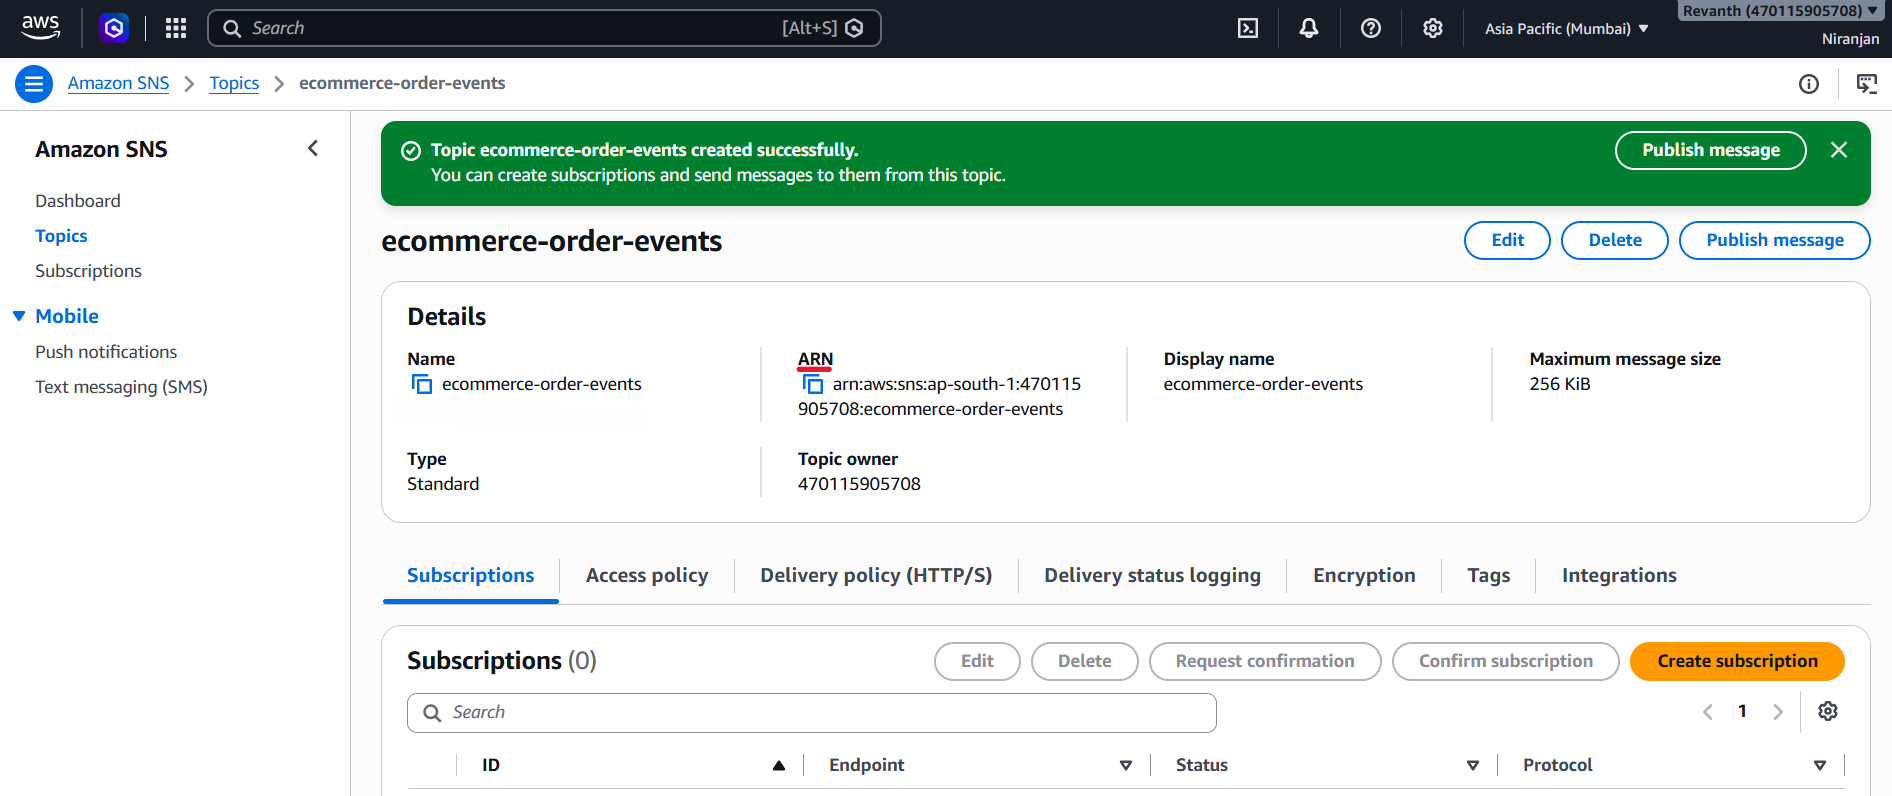
- Copy the Topic ARN and save it temporarily. We will use it in SSM Parameter Store later.
Example:
arn:aws:sns:<your-region>:<account-id>:ecommerce-order-events
Note: We are using a Standard topic because FIFO ordering is not required for this project.
8.2 Create SQS Queue for Order Shipping
- Next, we need to create an SQS queue and subscribe it to the SNS topic.
- The purpose of this queue is to store order events so that a downstream system, such as a shipping service provider, can retrieve and process them later.
SQS Queue Configuration
- AWS Console → Simple Queue Service (SQS) → Queues → Create queue.
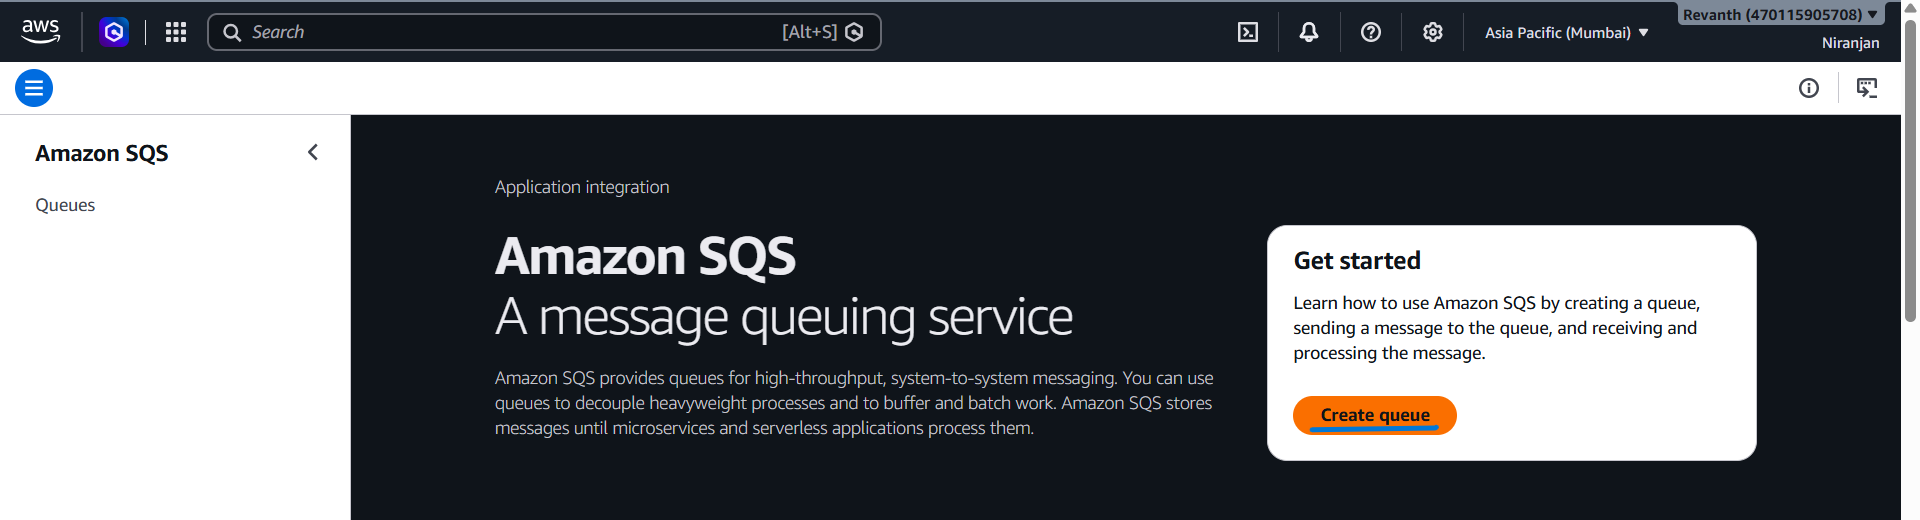
- Type: Select Standard.
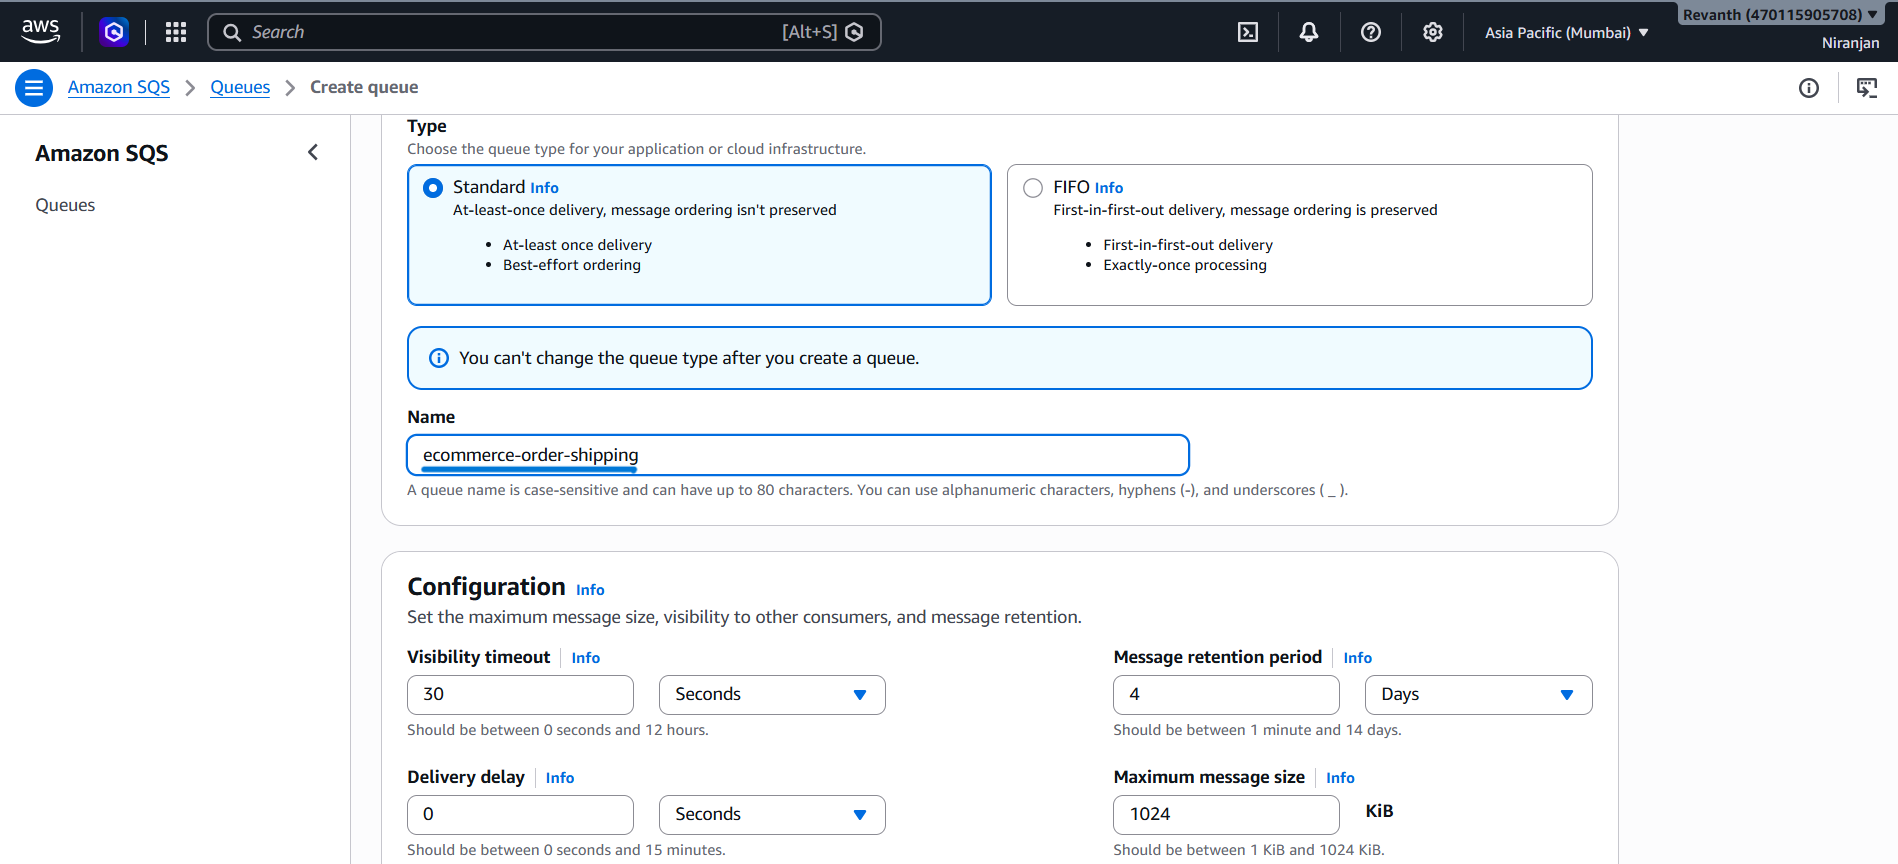
- Name:
ecommerce-order-shipping - Keep the remaining settings as default.
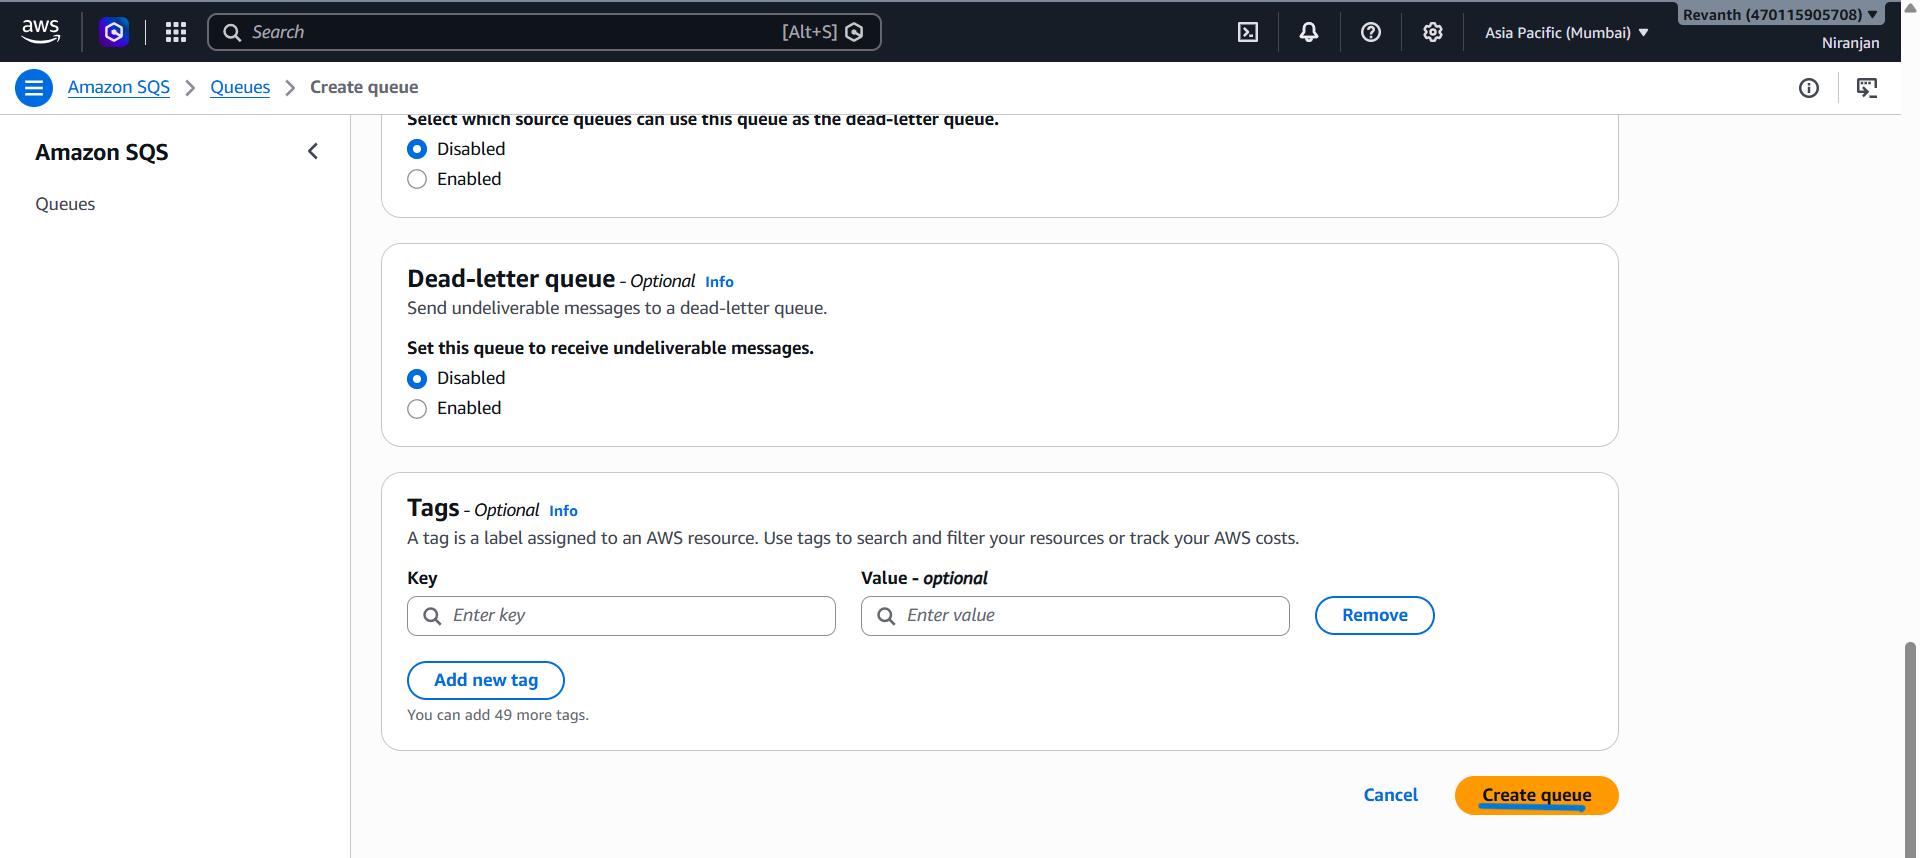
- Click Create queue.
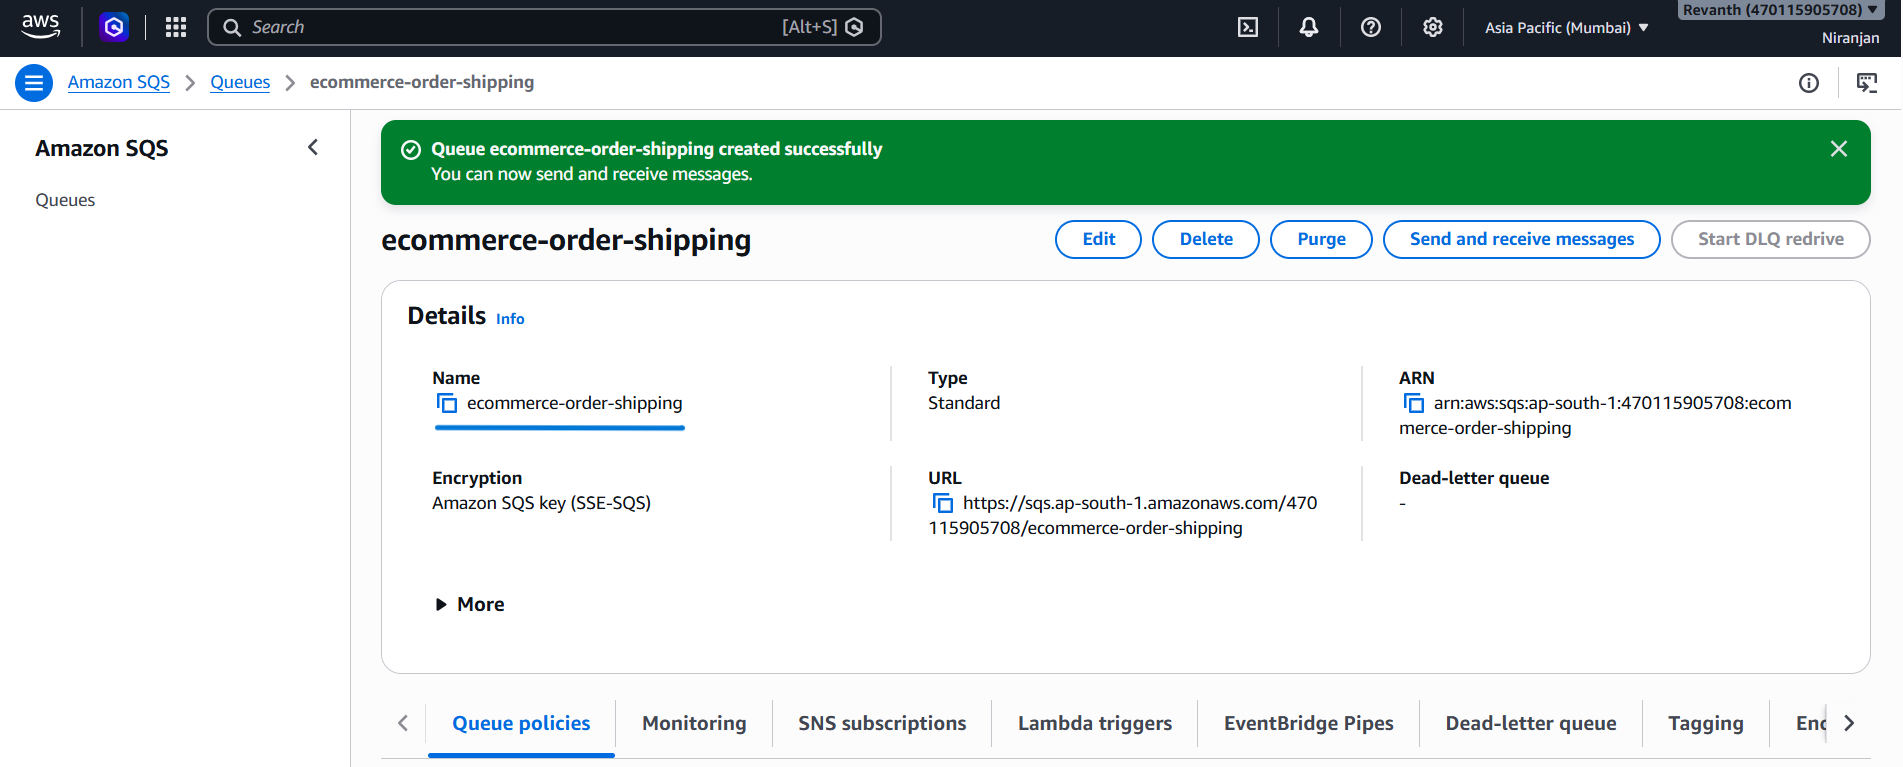
Verify the Queue Access Policy
After creating the queue:
- Open
ecommerce-order-shipping. - Navigate to the Access policy section.
- Initially, the queue policy allows access to the AWS account owner.
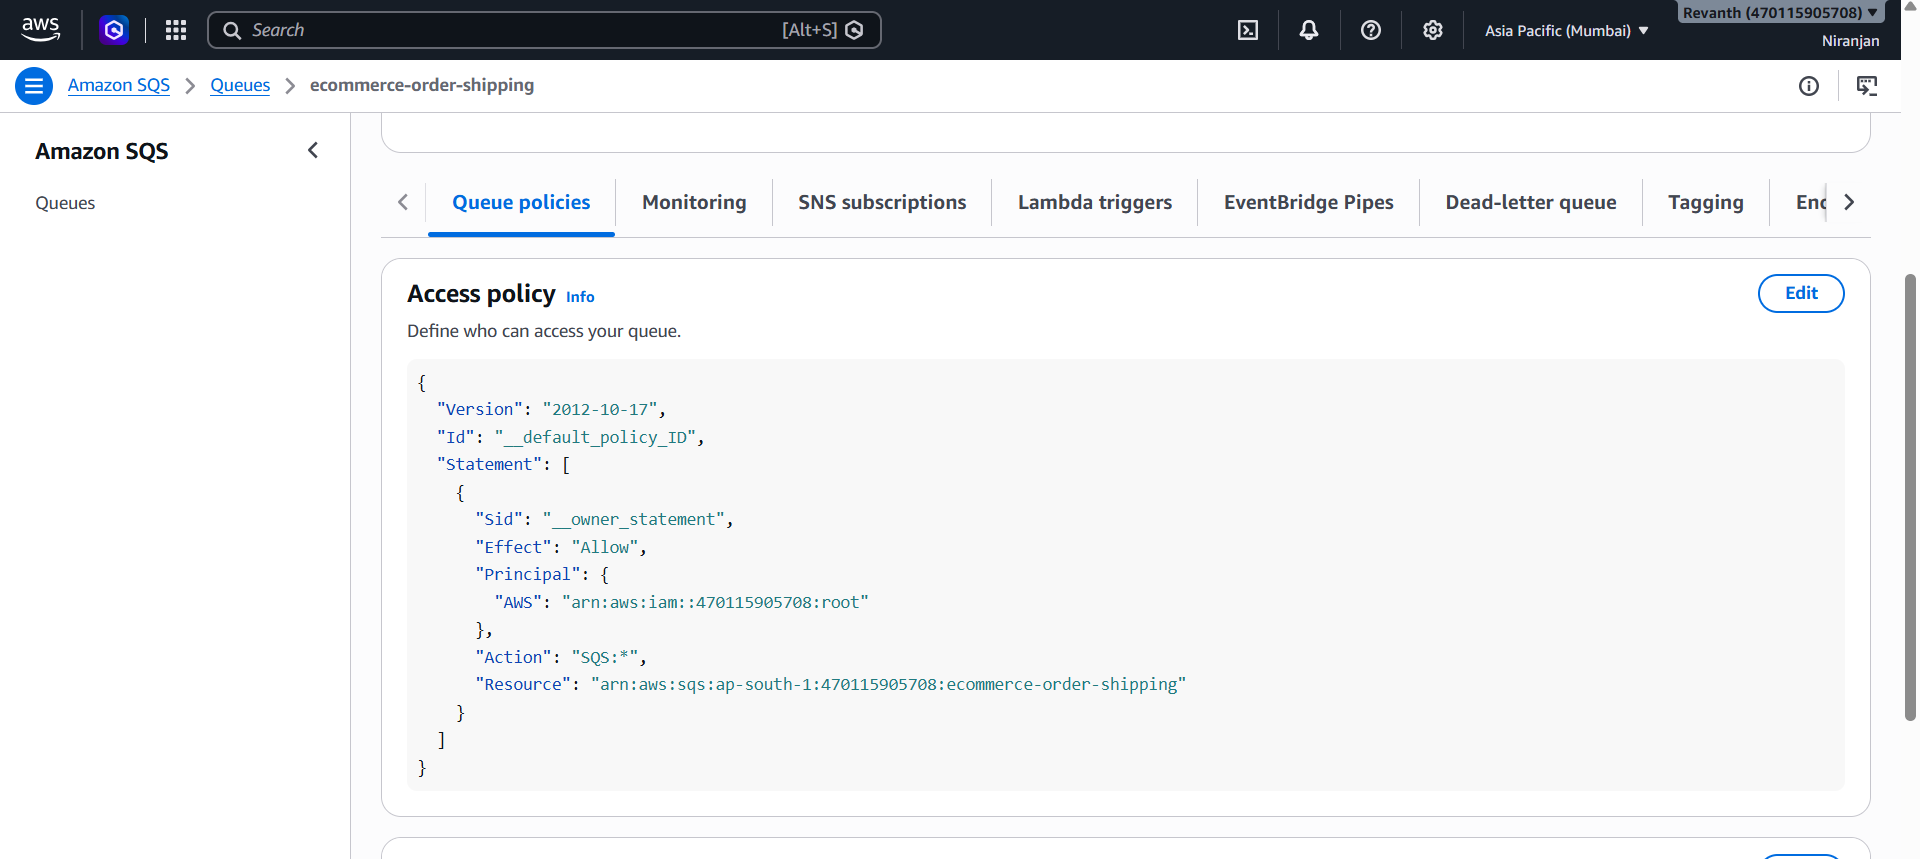
- We will verify whether SNS receives permission to send messages to this queue after creating the SNS subscription.
8.3 Configure SNS Subscriptions
Now that we have created the SNS topic and SQS queue, we need to configure two subscriptions.
- Email subscription: Sends order notifications to our configured email address.
- SQS subscription: Delivers order events to the shipping queue.
8.3.1 Create Email Subscription
First, let's subscribe an email address to the SNS topic.
- SNS Console → Topics → Select
ecommerce-order-events. - Navigate to Subscriptions.
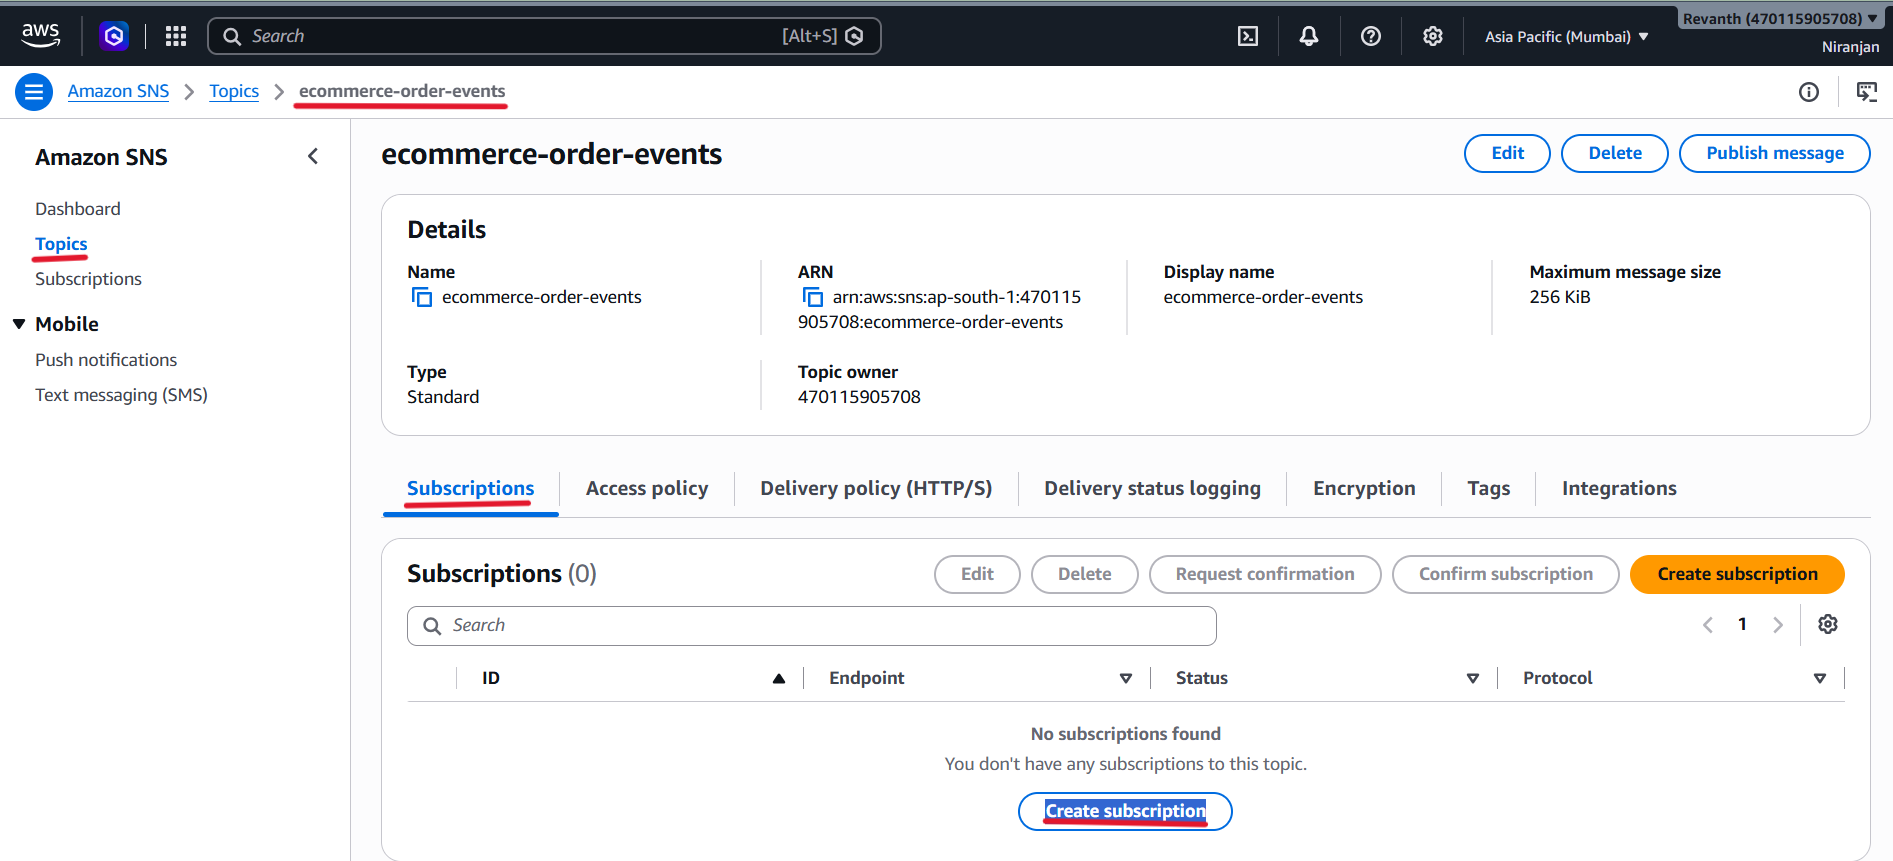
- Click Create subscription.
- Topic ARN: Select
ecommerce-order-events.
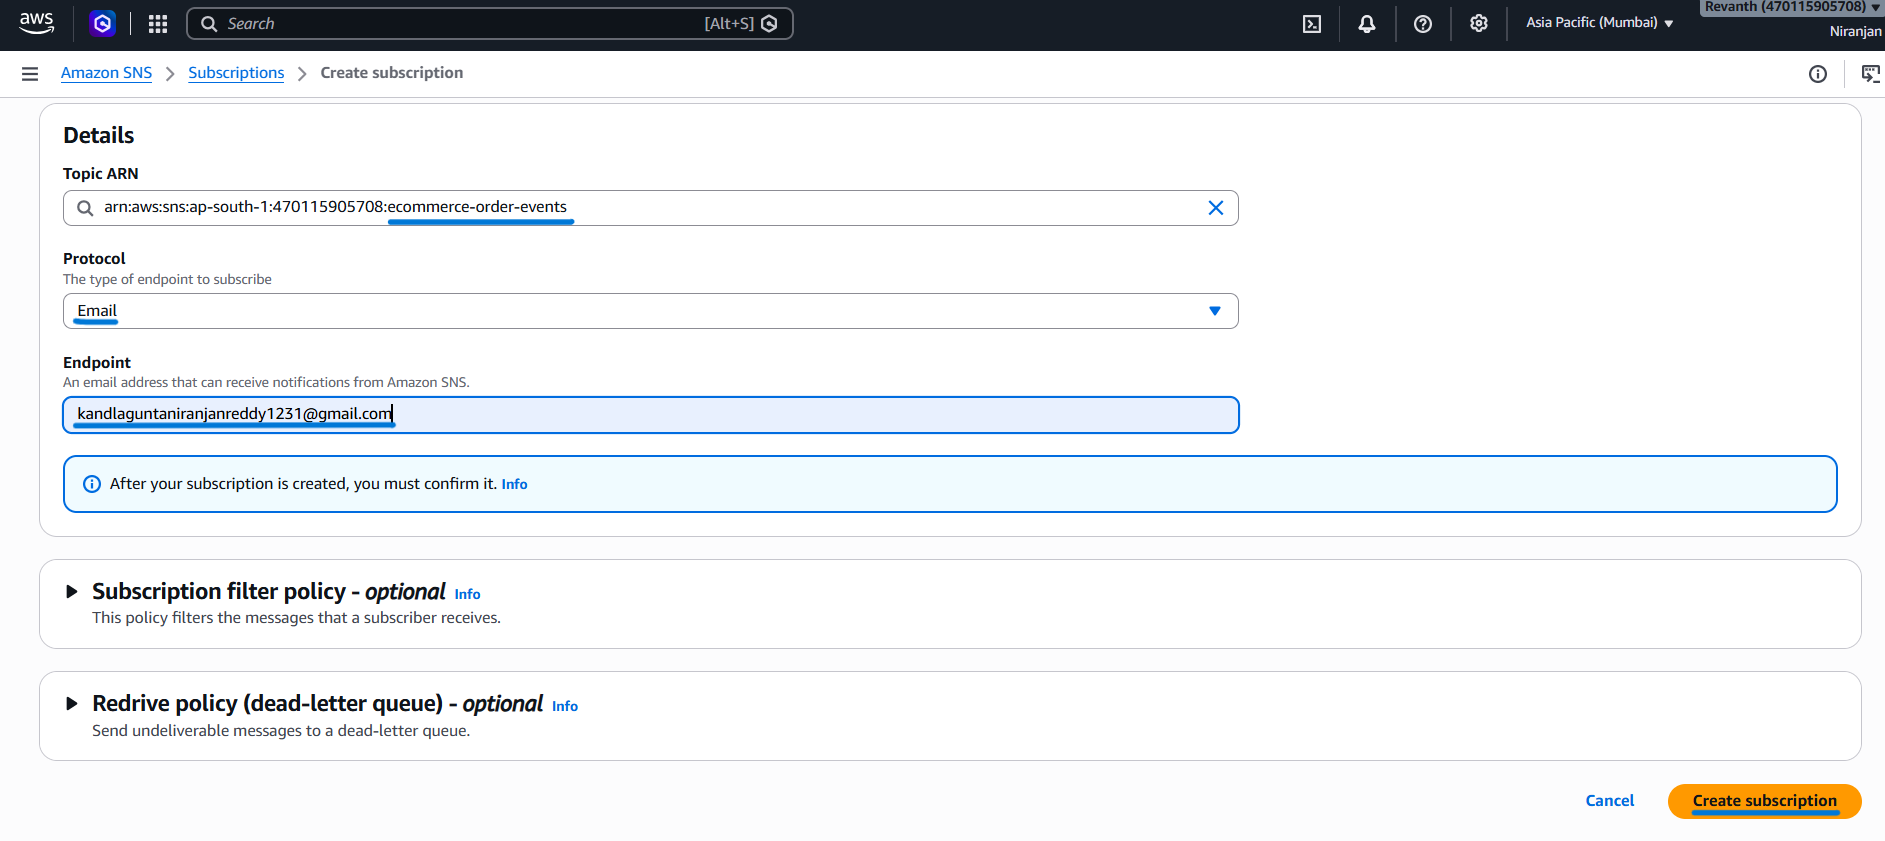
- Protocol: Select Email.
- Endpoint: Enter your email address.
- Click Create subscription.
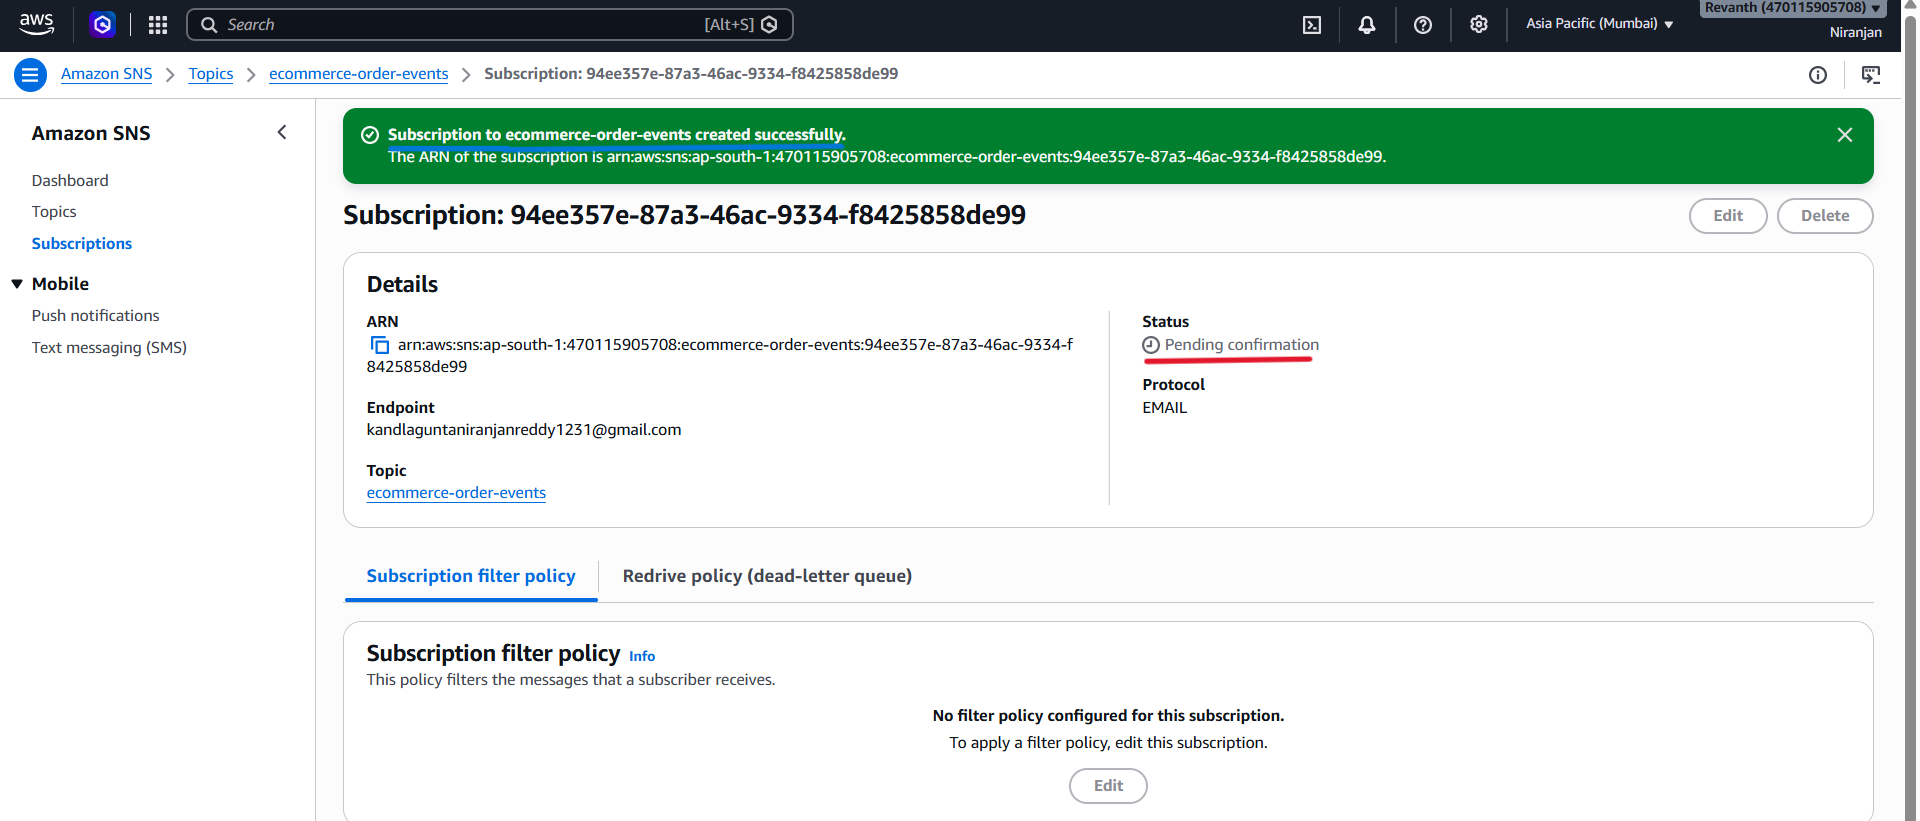
Confirm Email Subscription
After creating the subscription, AWS SNS sends a confirmation email to the configured email address.
- Open your email inbox.
- Find the subscription confirmation email from AWS.
- Open the email.
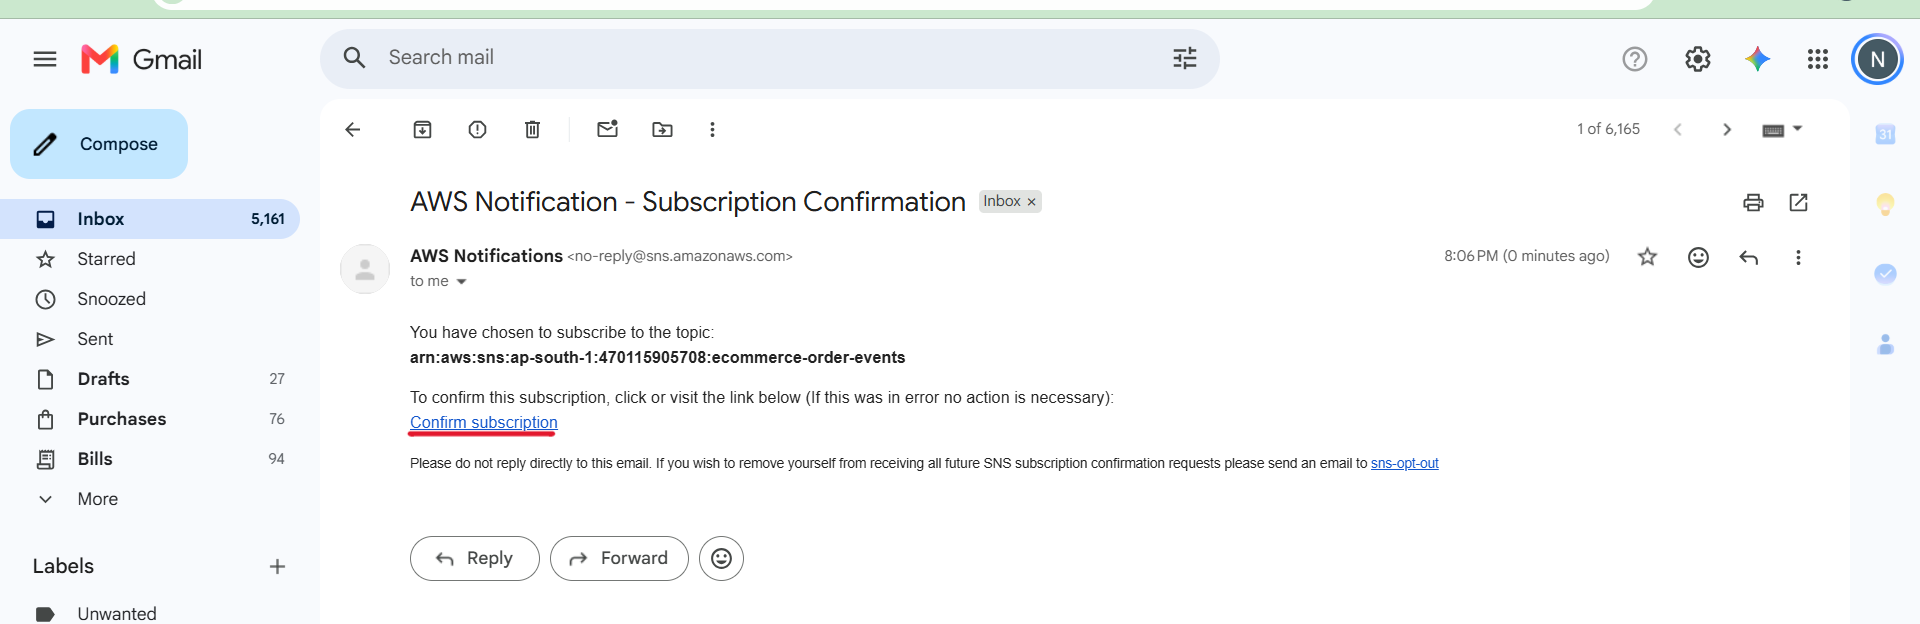
- Click Confirm subscription.

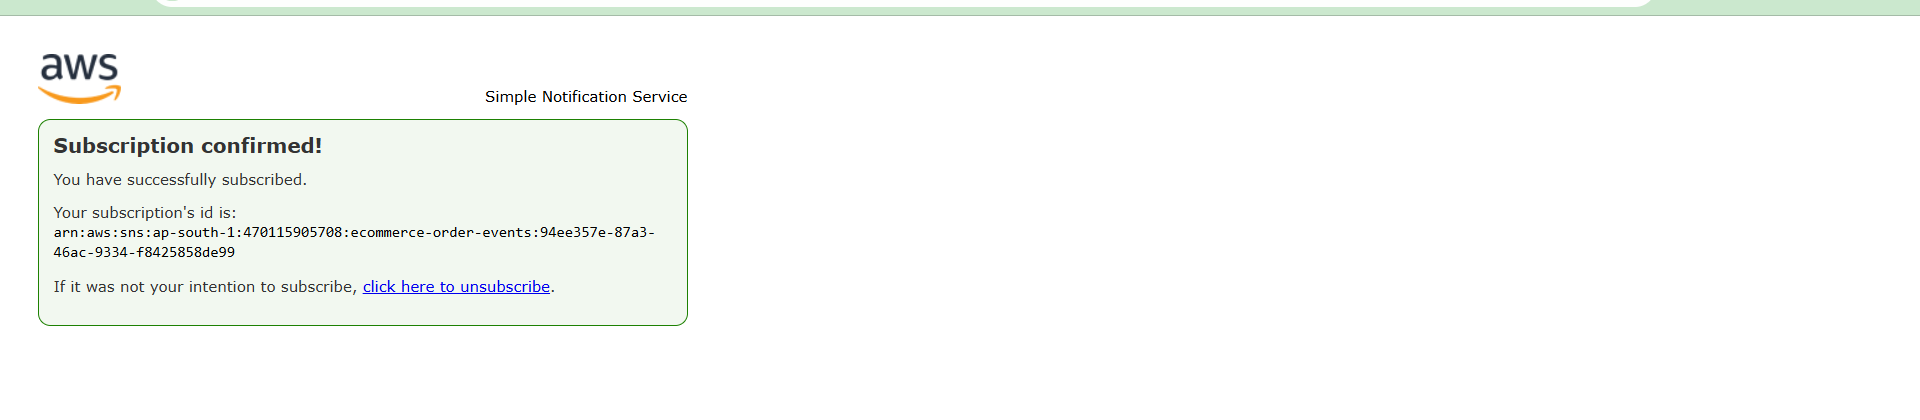
- Return to the SNS console.
- Verify that the subscription status shows Confirmed.
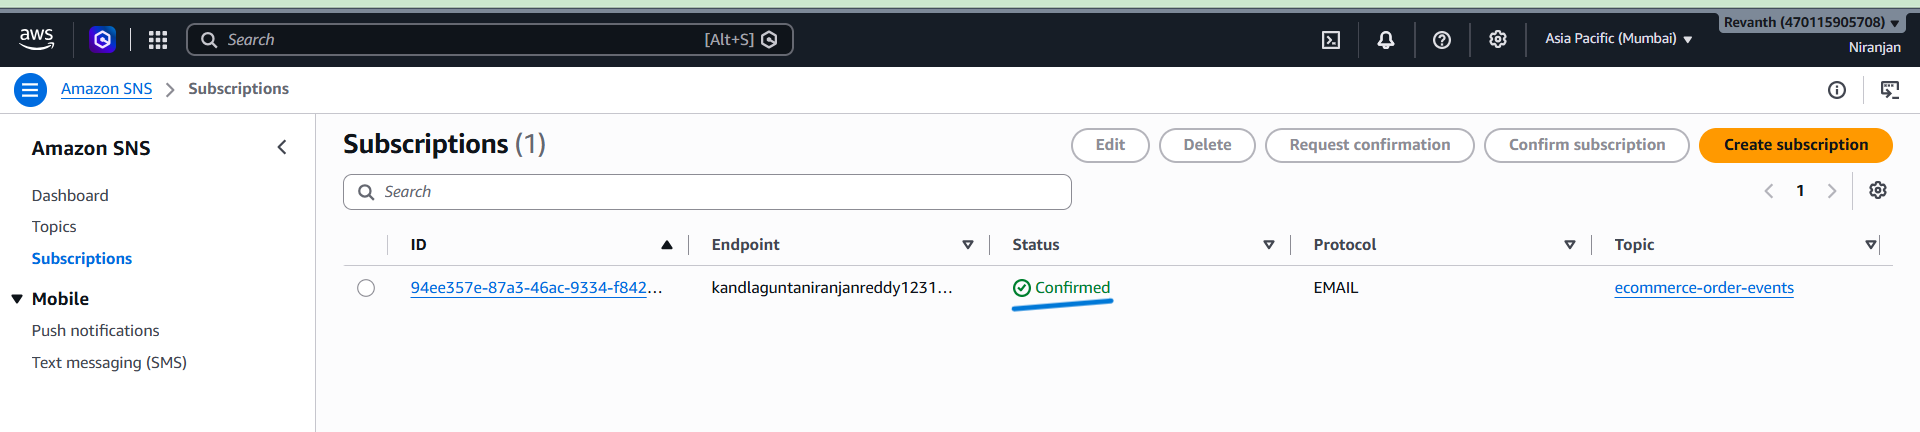
Important: The email subscription will not become active until you confirm it using the link sent by AWS.
8.3.2 Create SQS Subscription for Shipping
- Next, we need to subscribe the SQS queue to the same SNS topic.
- We create an email subscription to receive order notifications whenever a customer places an order. Once the subscription is confirmed, Amazon SNS automatically sends order event notifications to the registered email address.
- Navigate to SNS → Topics → ecommerce-order-events → Subscriptions.

- Click Create subscription.
- Topic ARN: Select
ecommerce-order-events. - Protocol: Select Amazon SQS.
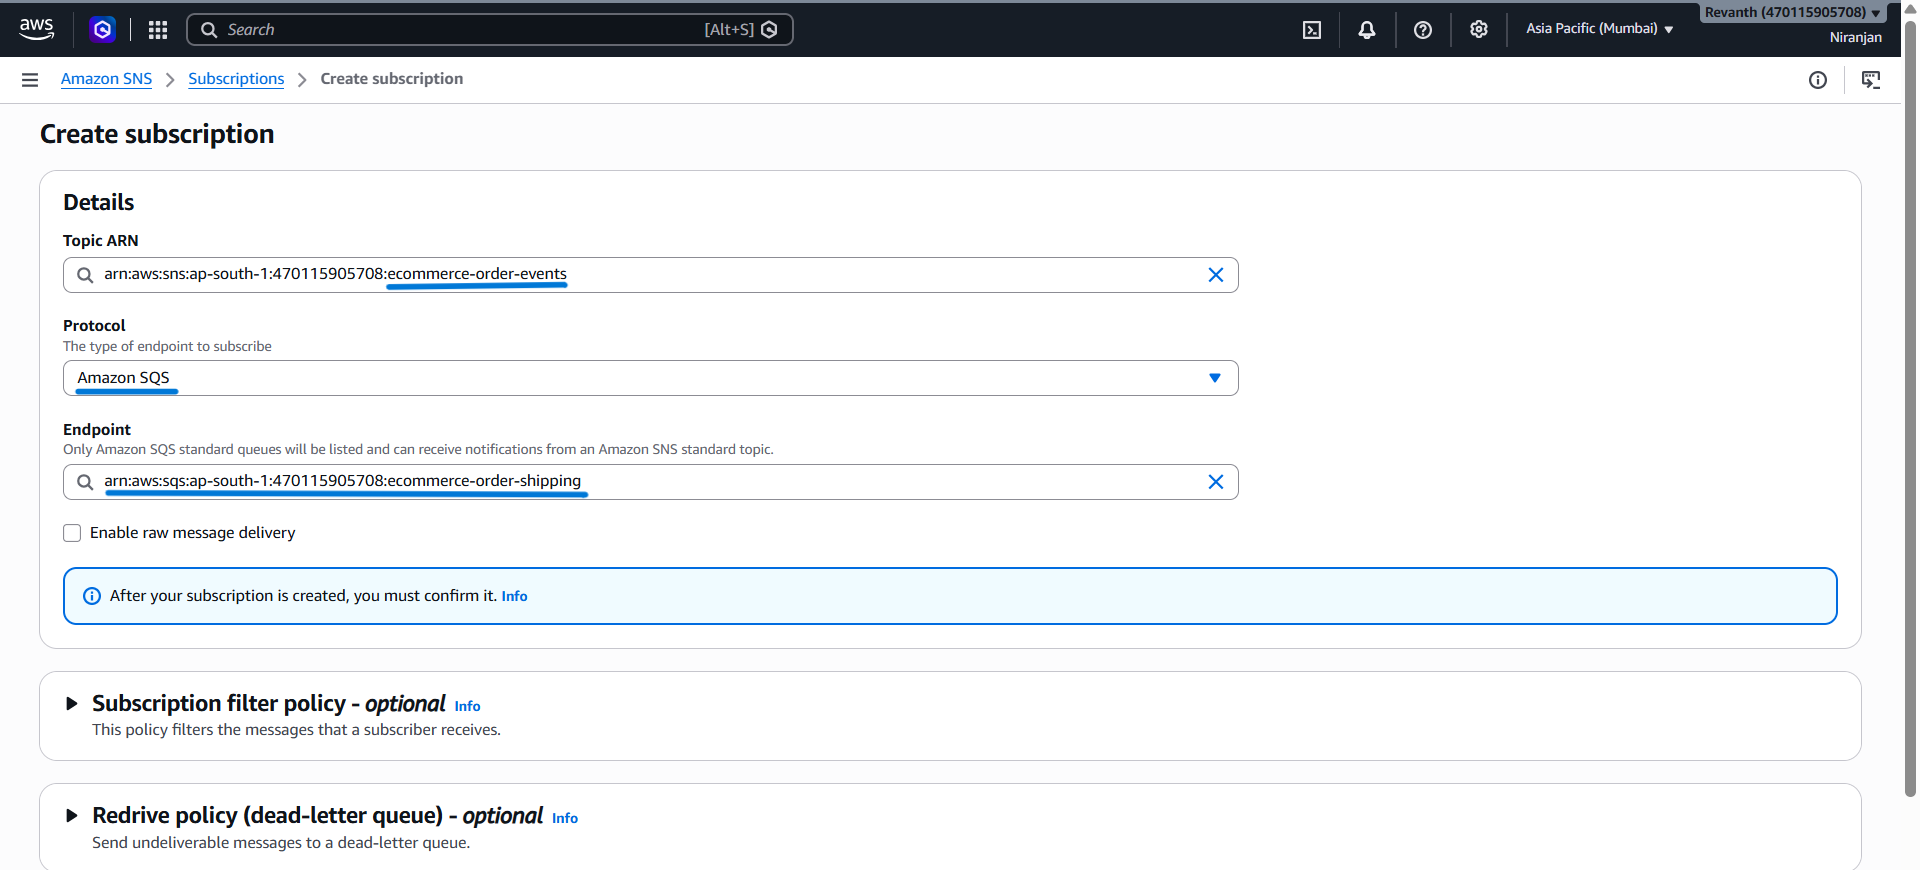
- Endpoint: Select the ARN of the
ecommerce-order-shippingqueue. - Keep the remaining settings as default.
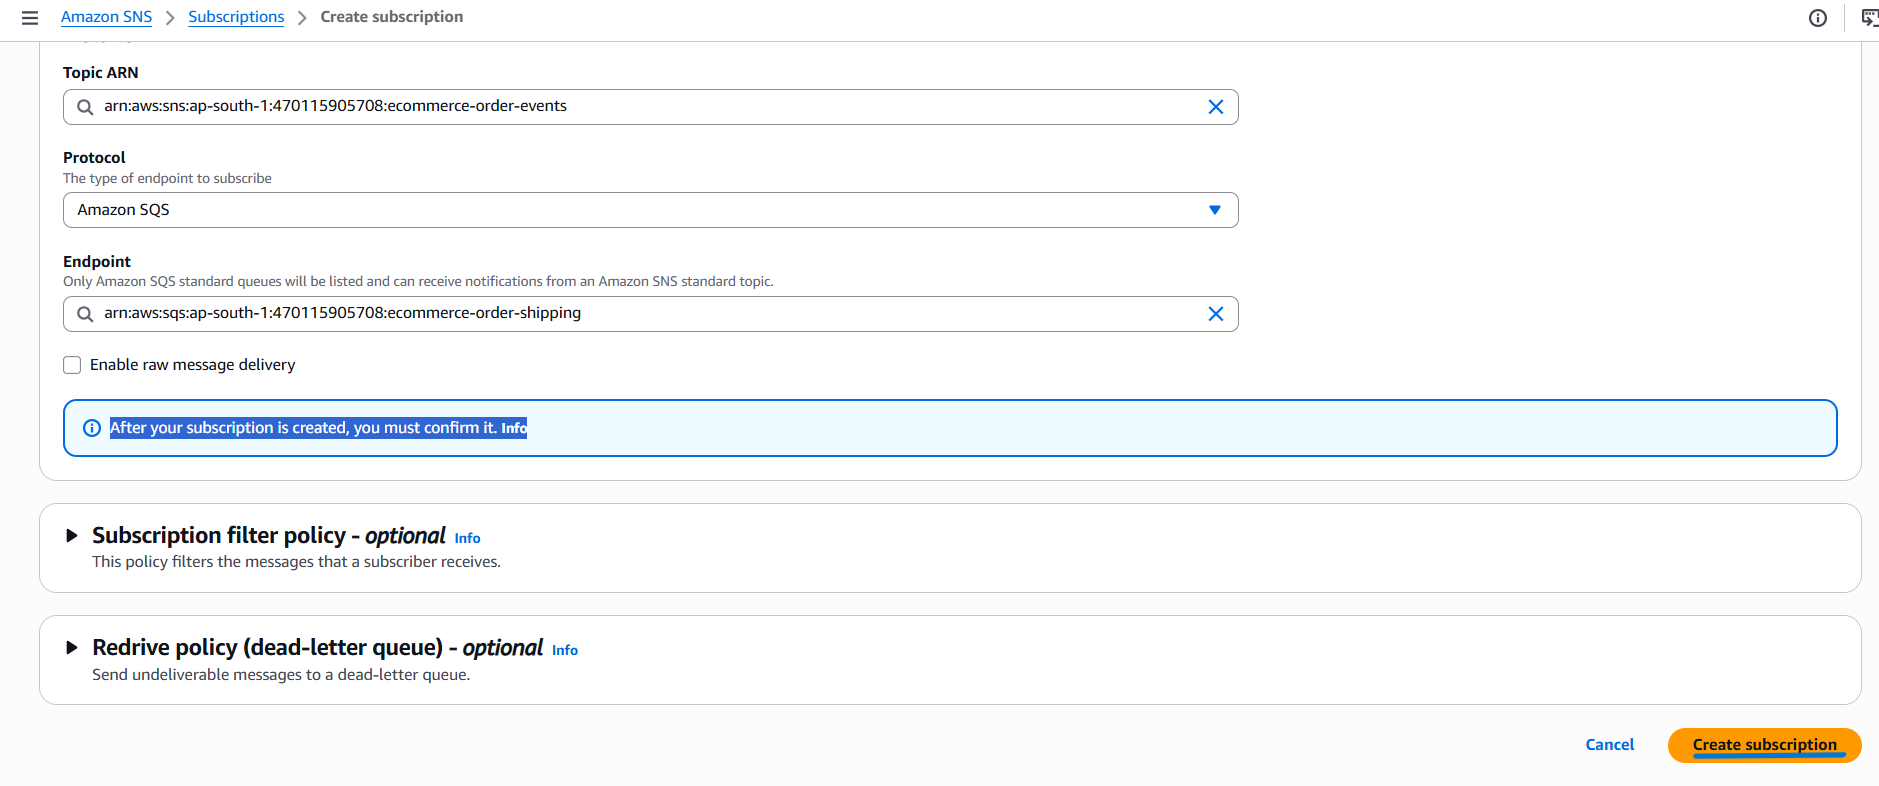
- Click Create subscription.
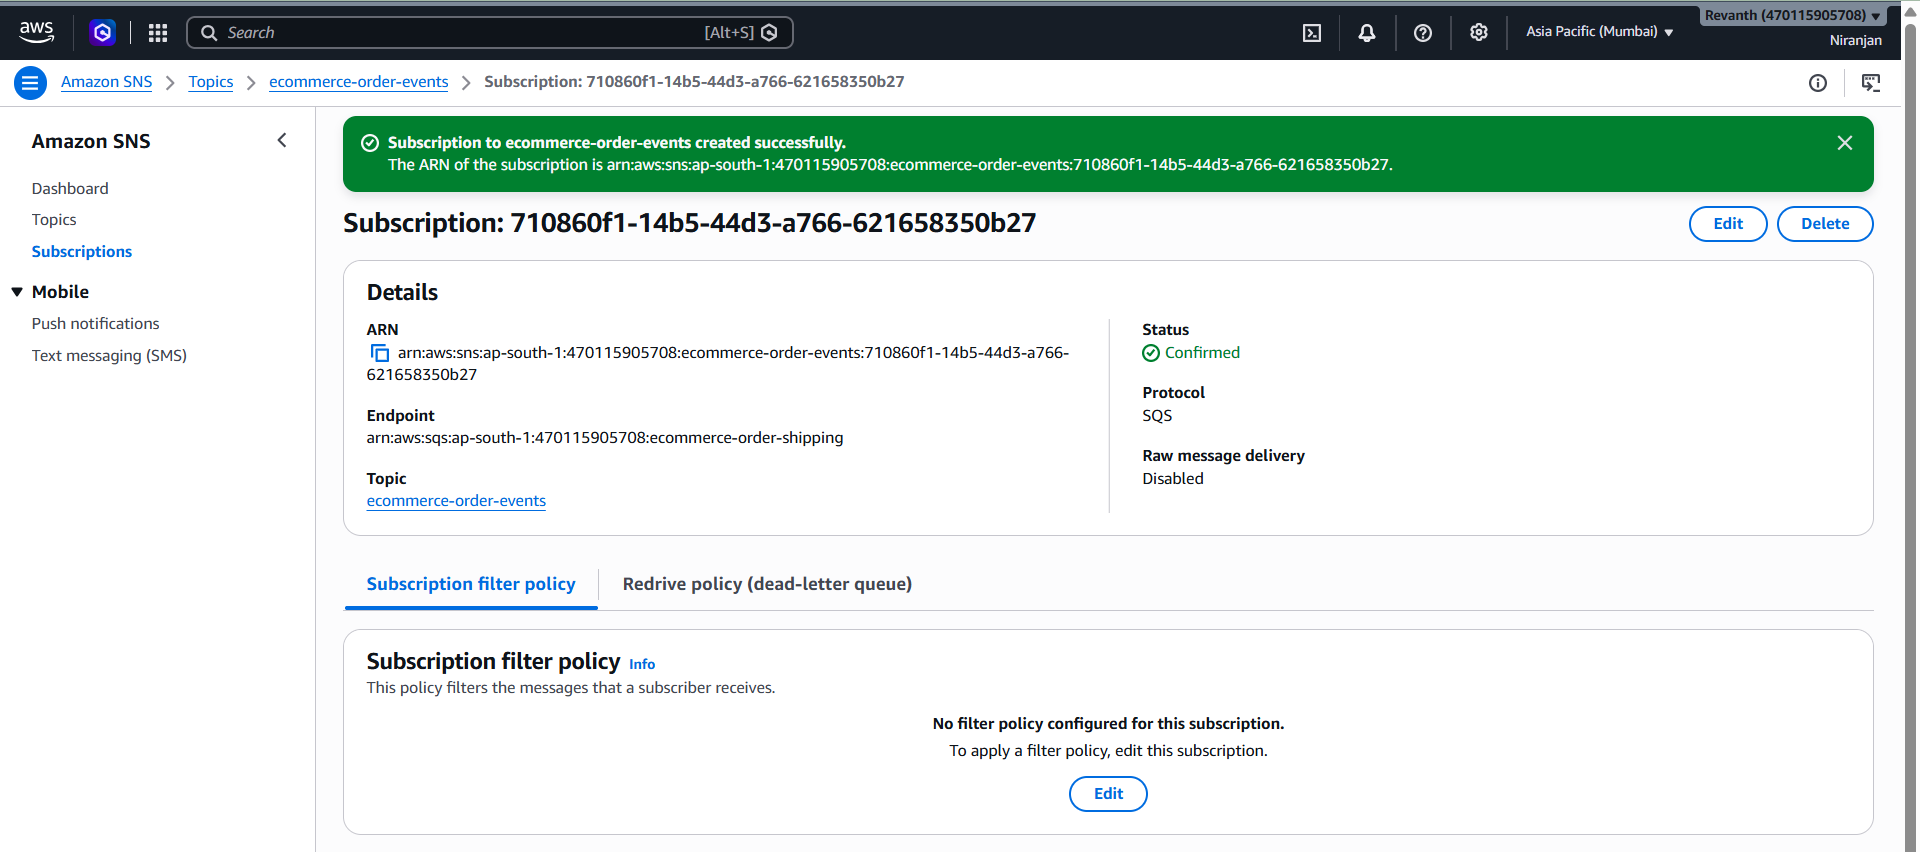
Verify SQS Queue Policy
Once the SQS subscription is created, AWS automatically updates the queue access policy to allow the SNS topic to send messages to the queue.
To verify this:
- Open SQS Console → Queues.
- Select
ecommerce-order-shipping. - Navigate to the Access policy section.
- Refresh the page.
- Verify that the policy contains a statement allowing the SNS service to perform the
sqs:SendMessageaction.
The policy should restrict this permission to messages originating from our SNS topic.
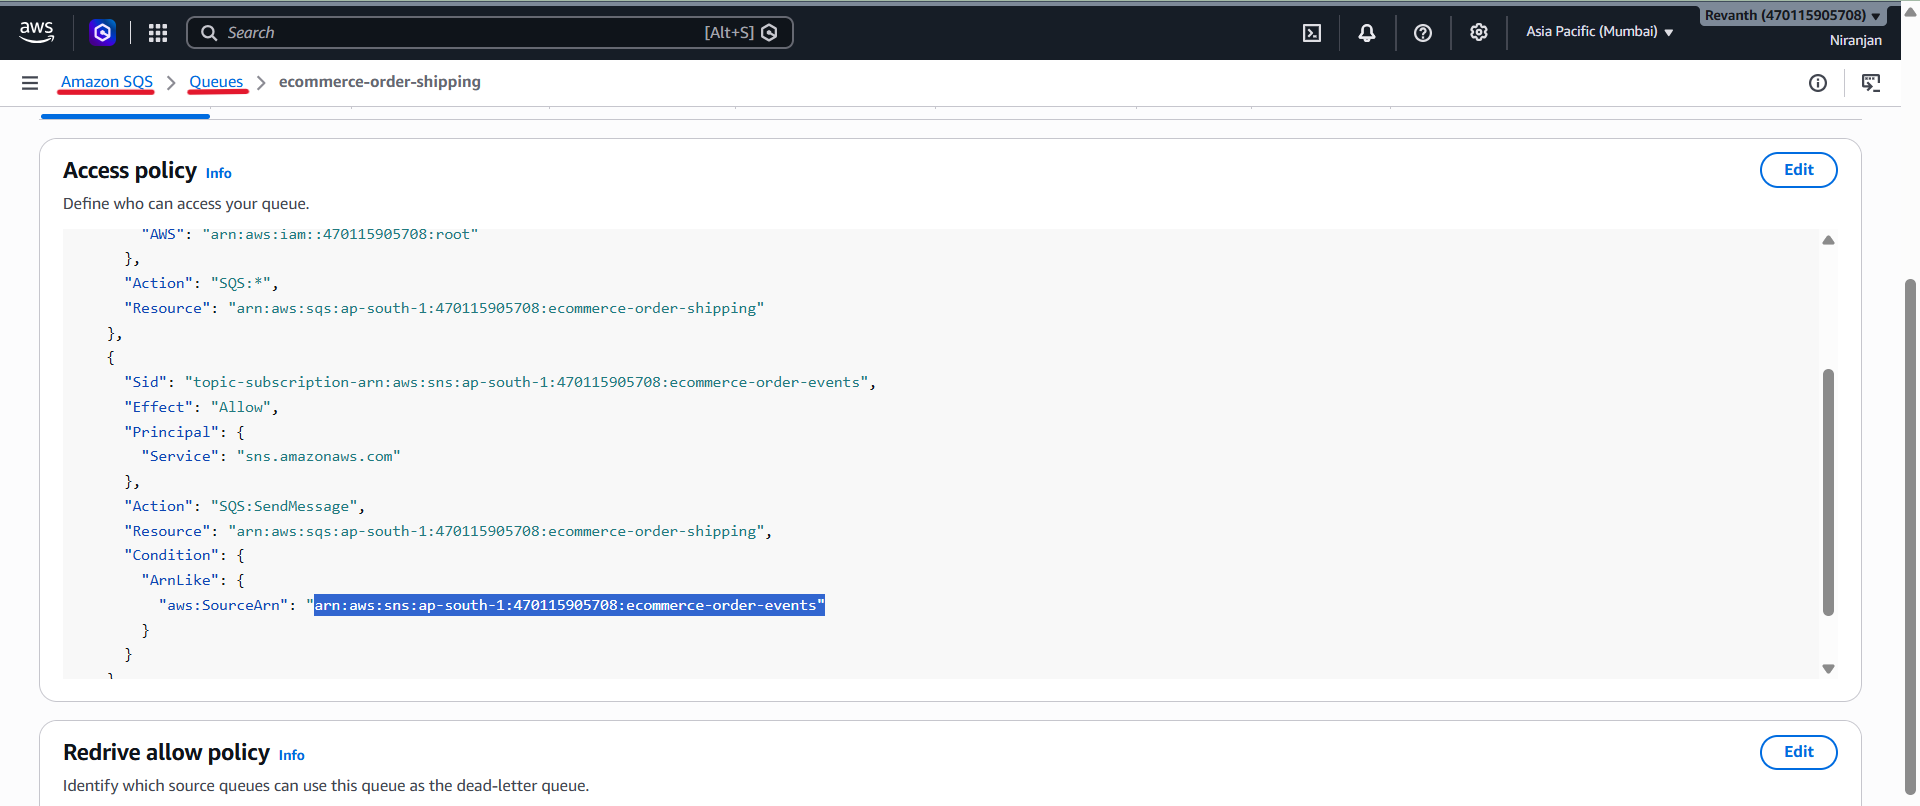
Note: In our implementation, AWS automatically updates the SQS queue policy when the SNS subscription is created. No manual policy update is required if this permission is already present.
Subscription Summary
We now have two subscriptions configured for the ecommerce-order-events topic:
- Email: Sends order notifications to the configured email address.
- Amazon SQS: Stores order events in the
ecommerce-order-shippingqueue.
Whenever the Order Service publishes an event to SNS, both subscribers receive the message.
8.4 Update SSM Parameter Store
- Now we need to provide the SNS Topic ARN to the Order Service.
- The Order Service needs the SNS Topic ARN to know where to publish order notifications. We store this ARN in AWS Systems Manager Parameter Store so the service can retrieve it from its configuration.
- We will create a new parameter containing the ARN of our SNS topic.
Create SNS Topic ARN Parameter
- AWS Console → Systems Manager → Parameter Store → Create parameter.
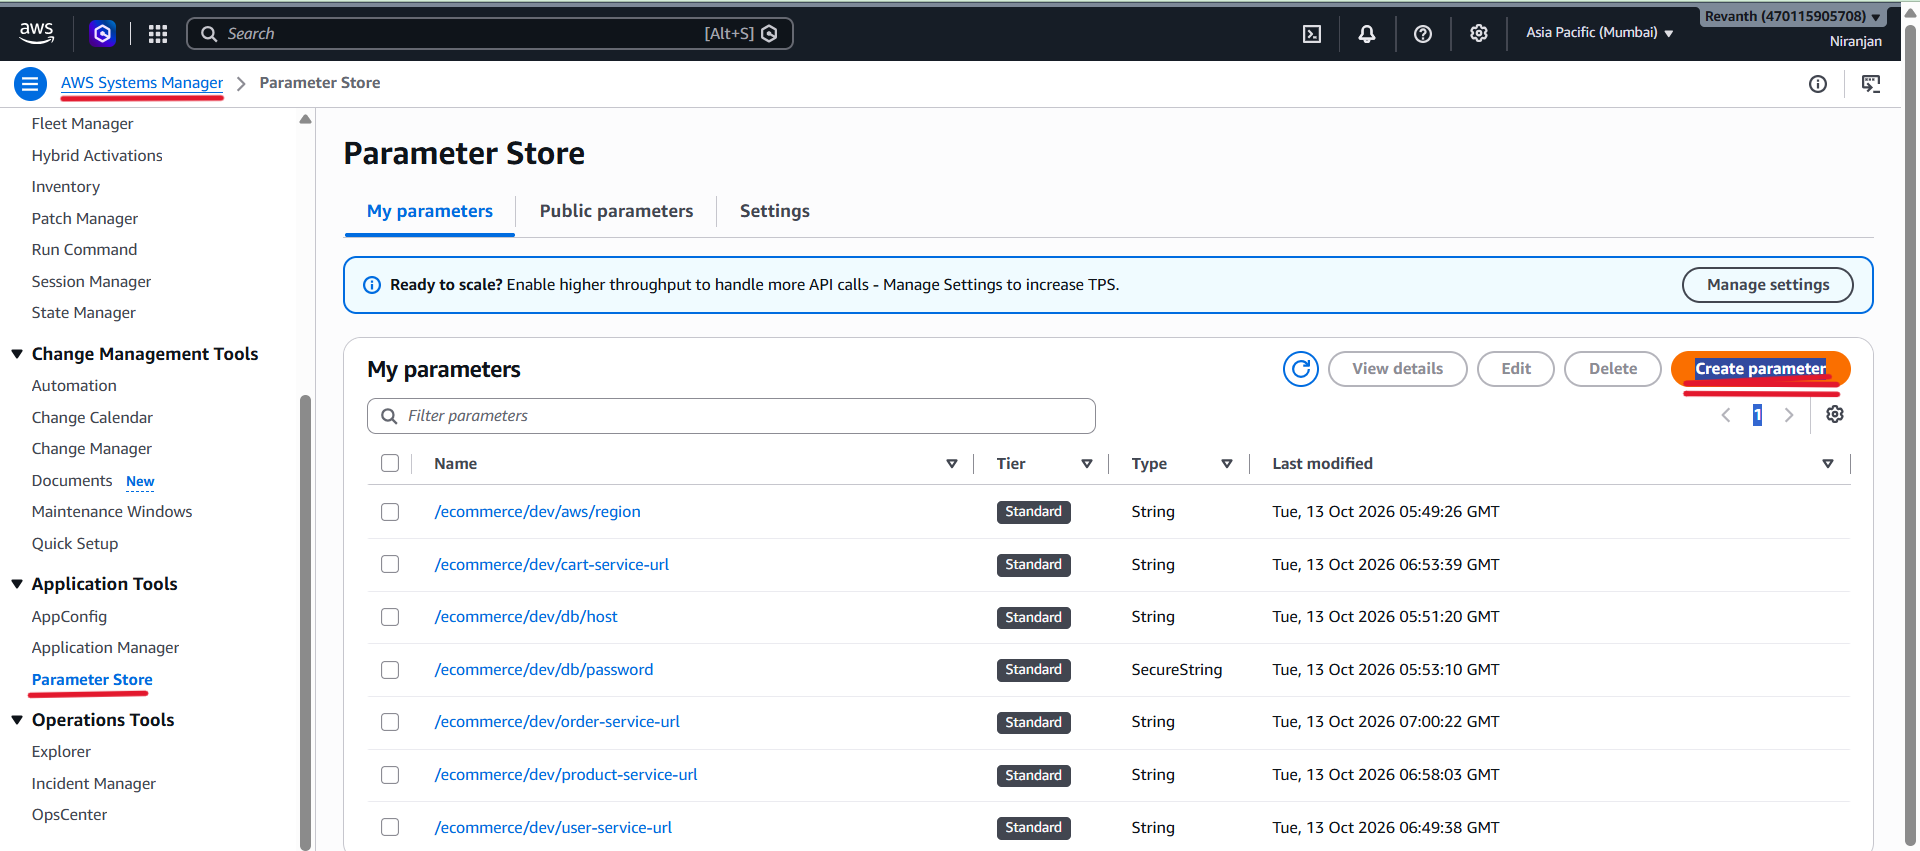
- Name:
/ecommerce/dev/sns/topic-arn
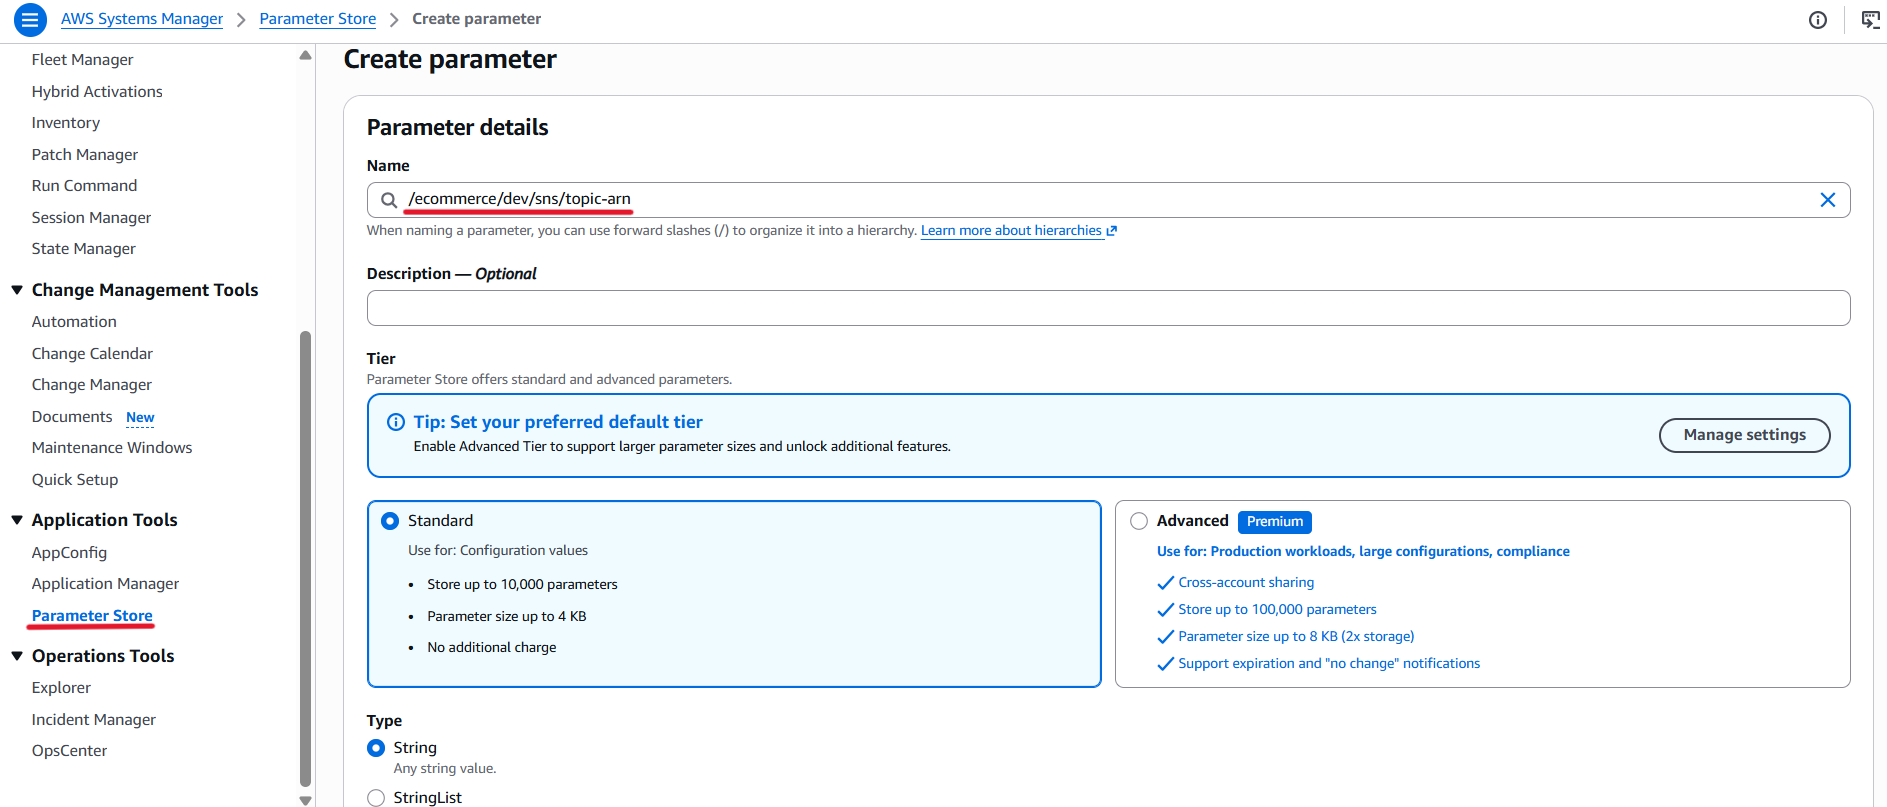
- Tier: Standard.
- Type: String.
- Data type: Text.
- Value: Paste the SNS Topic ARN copied in Section 8.1.
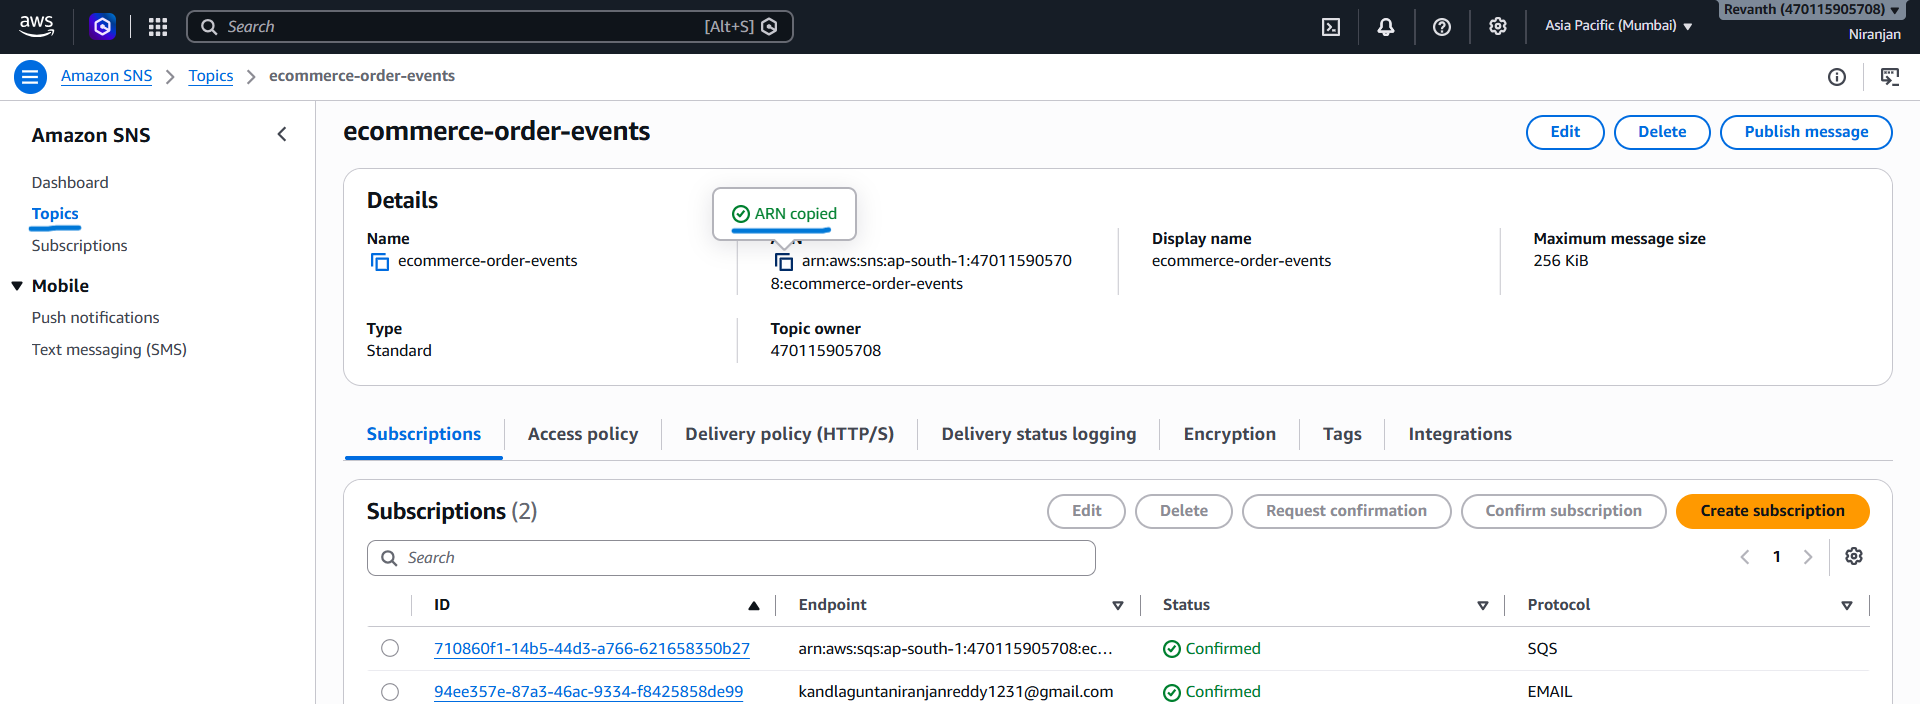
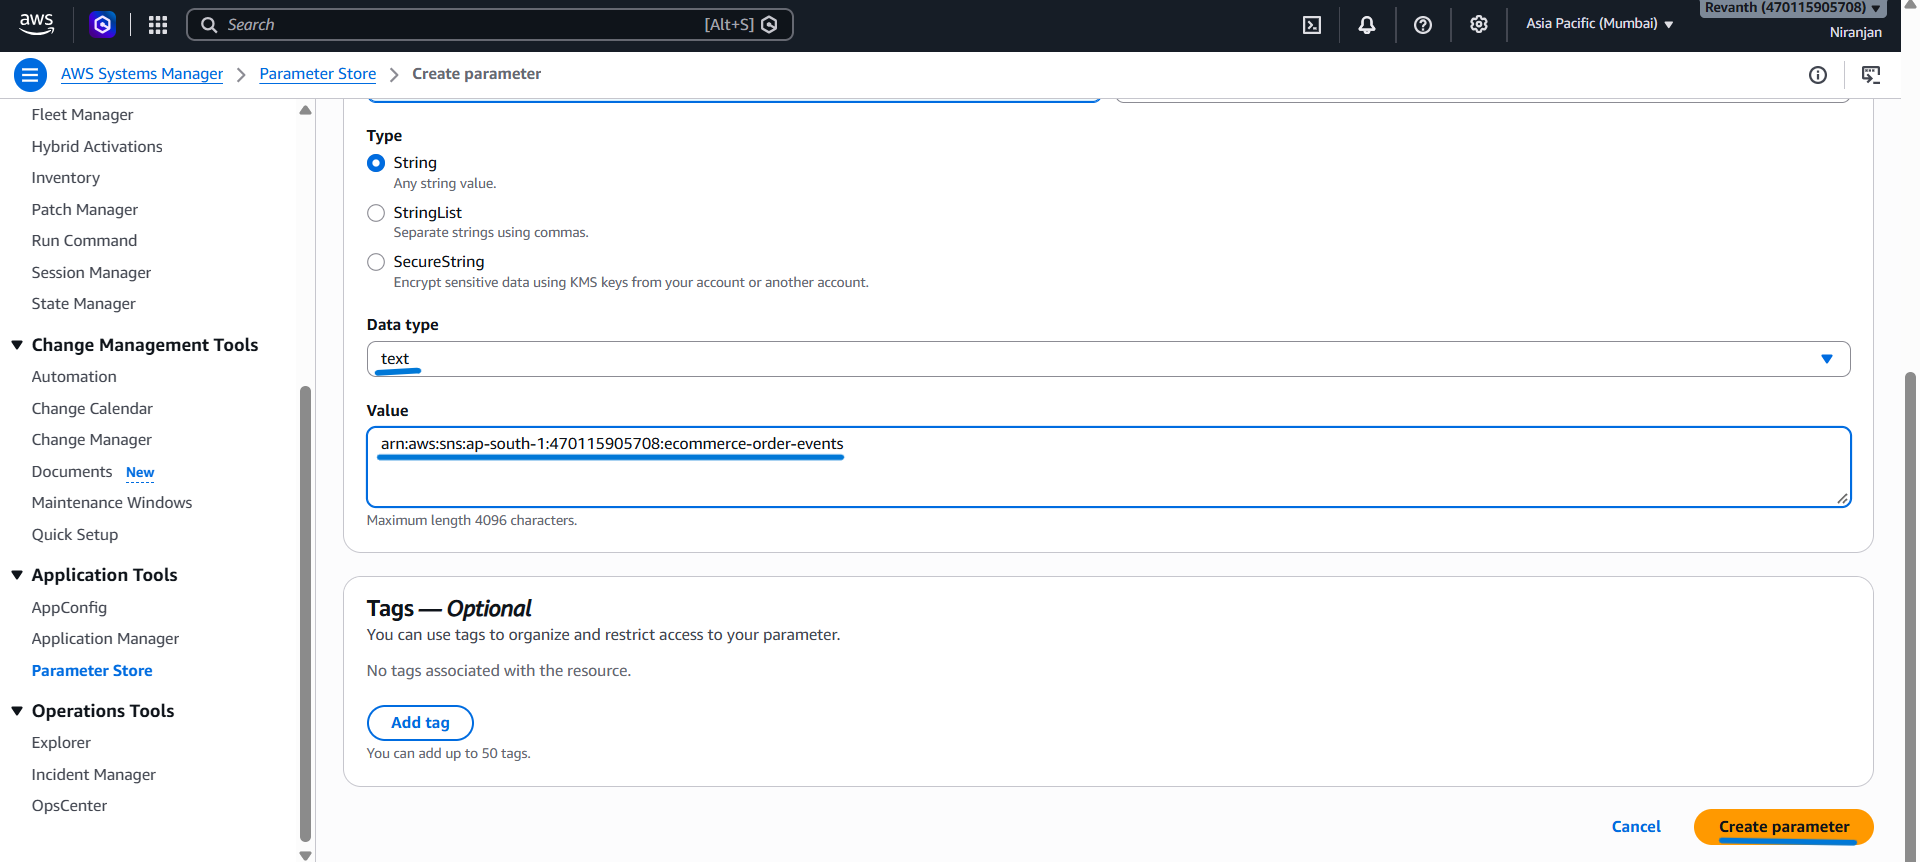
Example:
arn:aws:sns:<your-region>:<account-id>:ecommerce-order-events
- Click Create parameter.
Note: Make sure that the parameter name matches the name expected by the Order Service configuration.
8.5 Restart the Order Service to Load the SNS Topic ARN
After creating the SNS Topic ARN parameter, we need to restart the Order Service.
Why is restarting the Order Service required?
The Order Service loads its configuration parameters from SSM Parameter Store when the application starts.
Since we created the SNS Topic ARN parameter after the service was already running, the existing task may not have loaded this new parameter.
To ensure that the Order Service retrieves the latest parameter, we need to trigger a new ECS deployment.
Force a New Deployment
- ECS Console → Clusters → ecommerce-cluster.
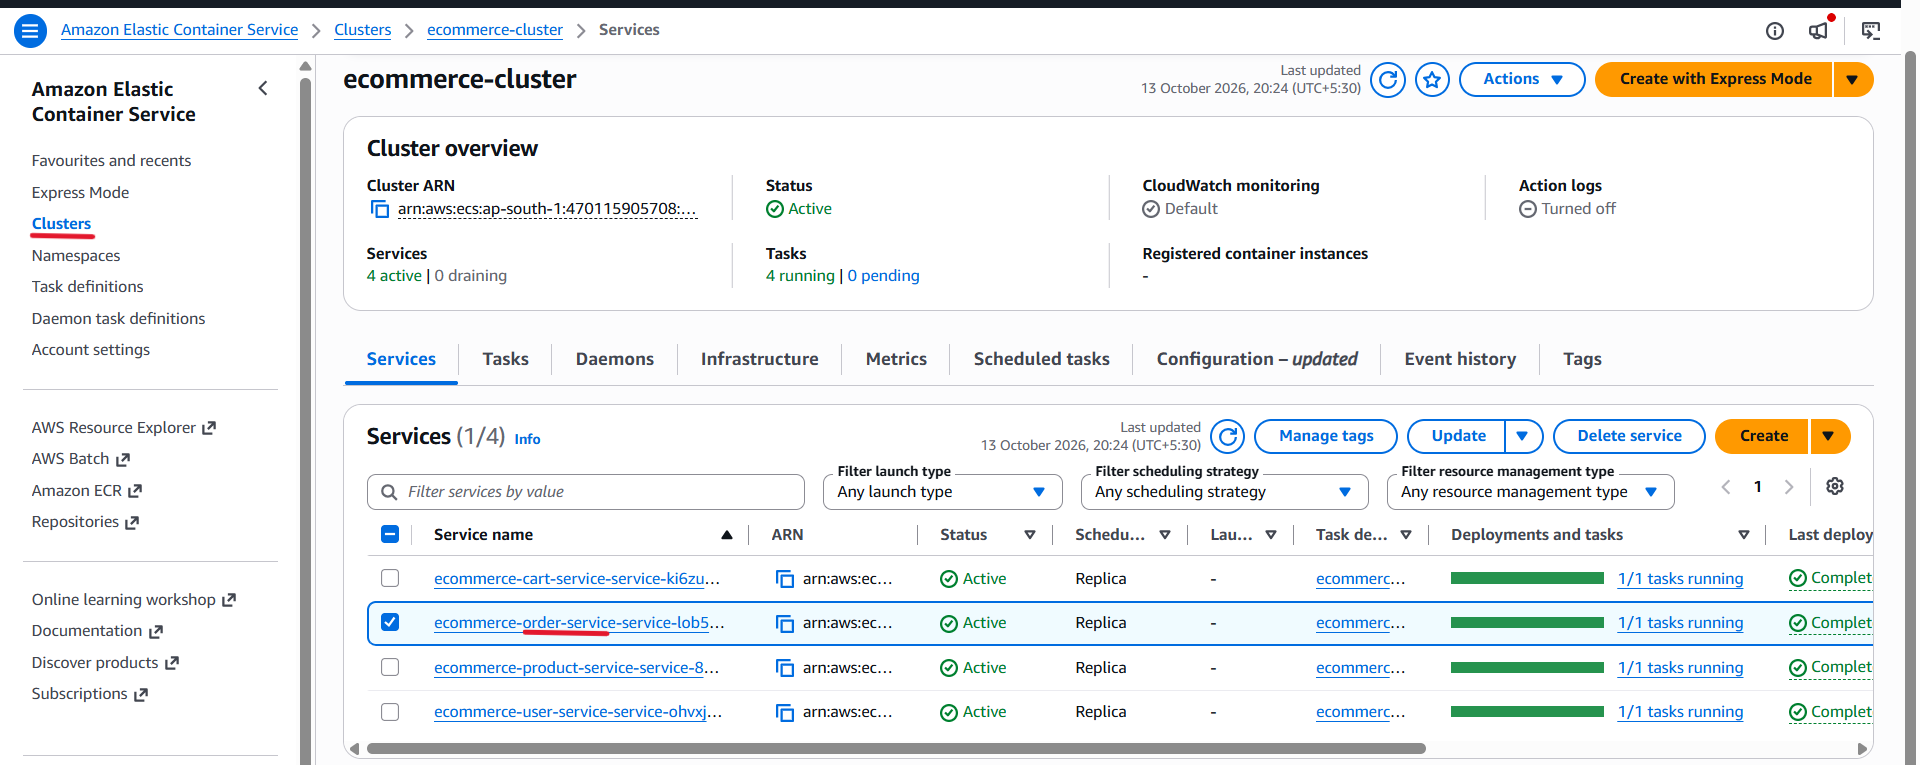
- Navigate to Services.
- Select the Order Service.
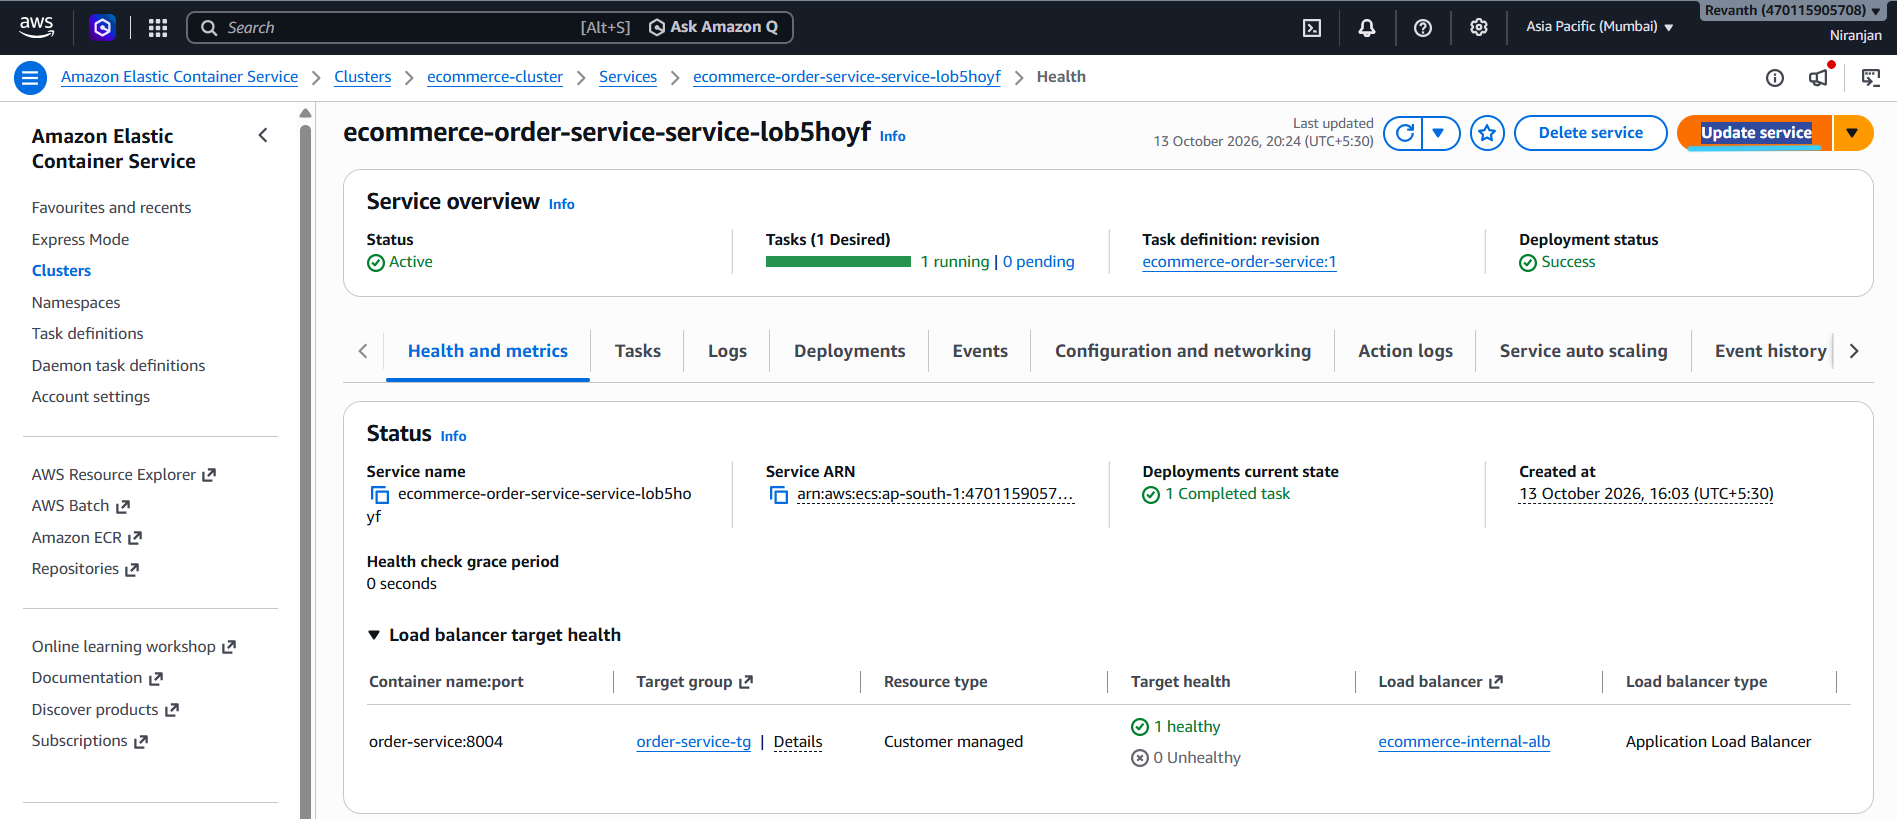
- Click Update.
- Locate the deployment options.
- Enable Force new deployment.
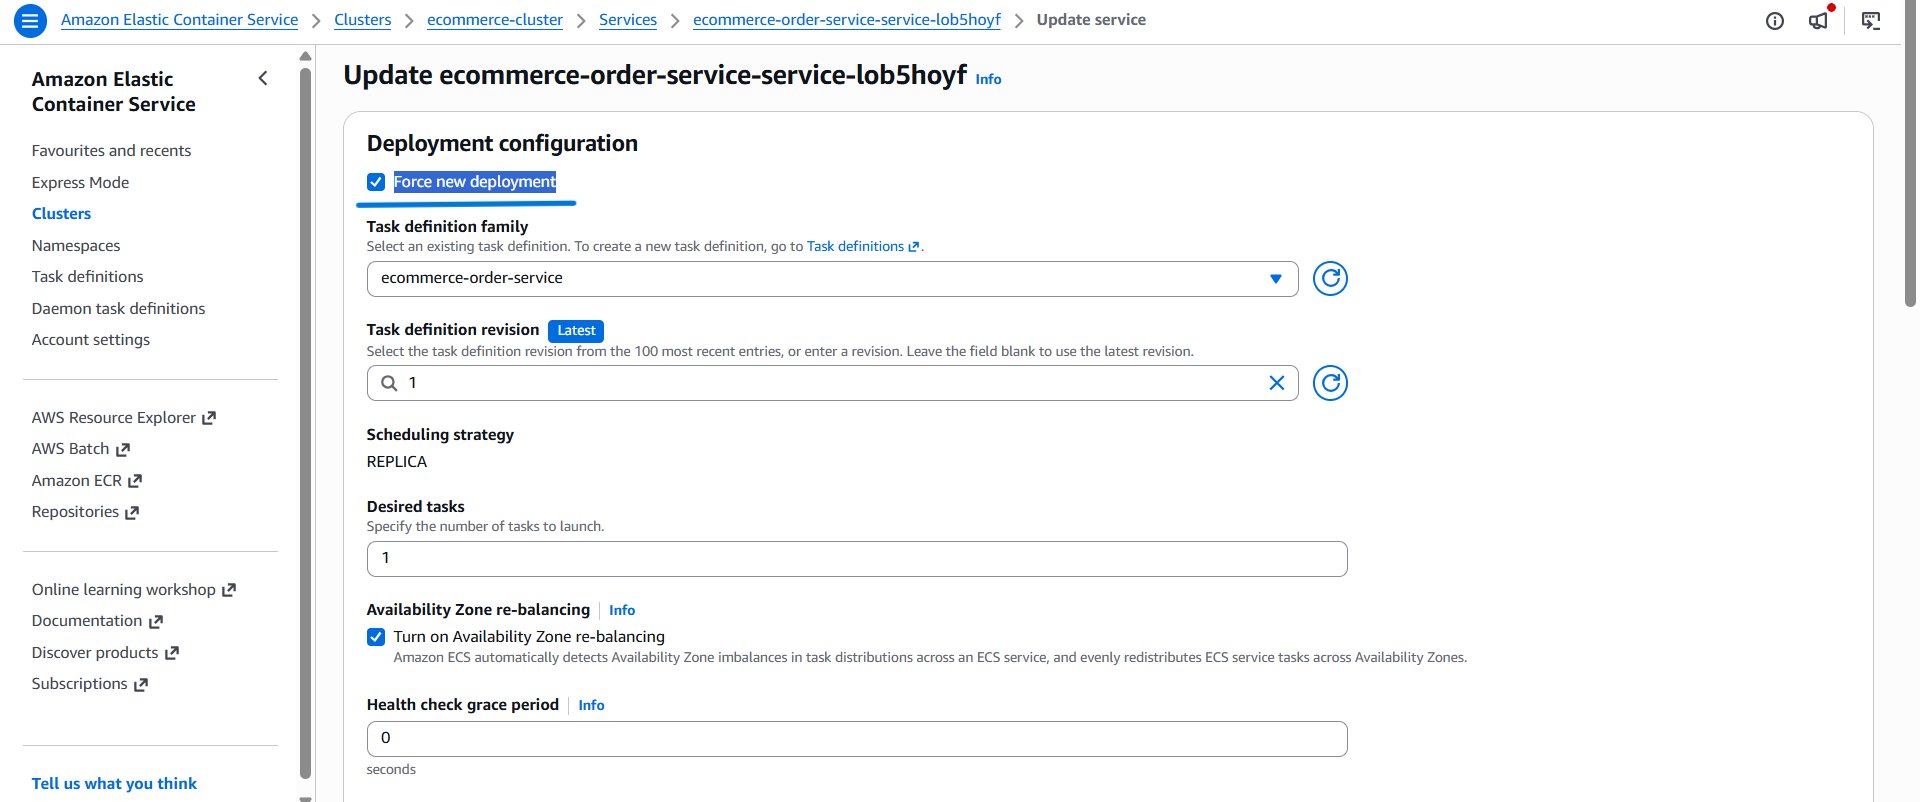
- Keep the remaining settings unchanged.
- Click Update.
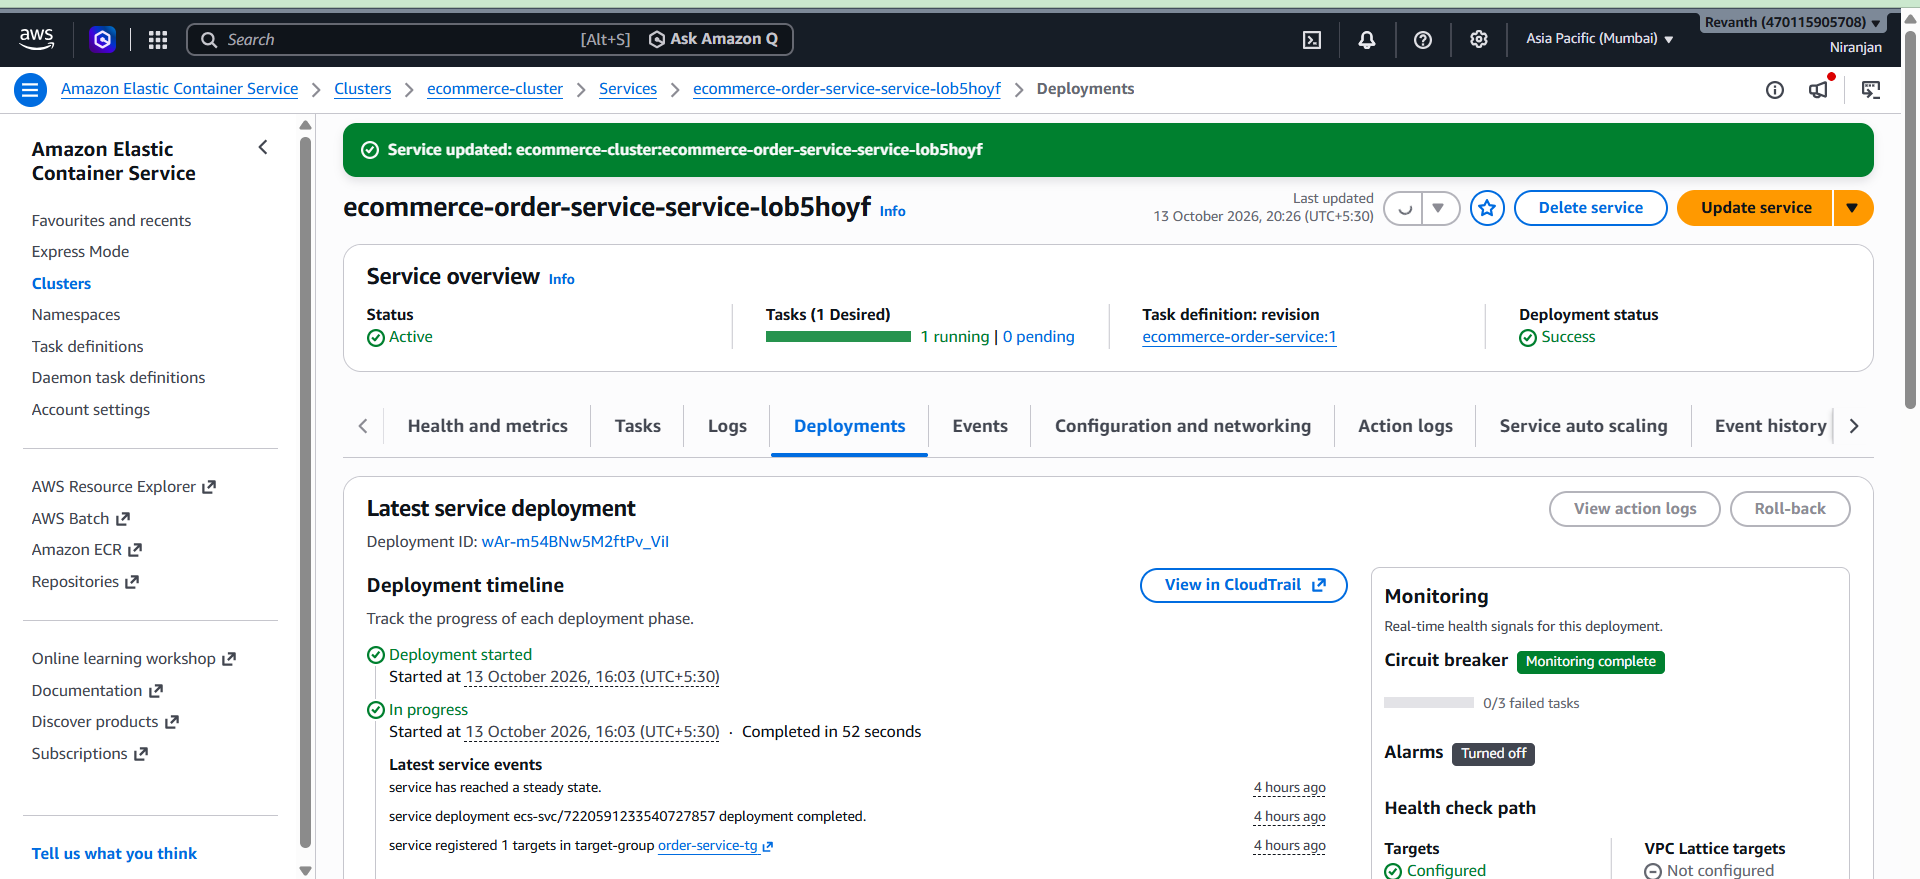
Verify Order Service Status
- Open the Order Service in the ECS console.
- Navigate to the Tasks section.
- Wait until the new task reaches the Running state.
- Verify that the service has one running task and the previous task has been replaced.
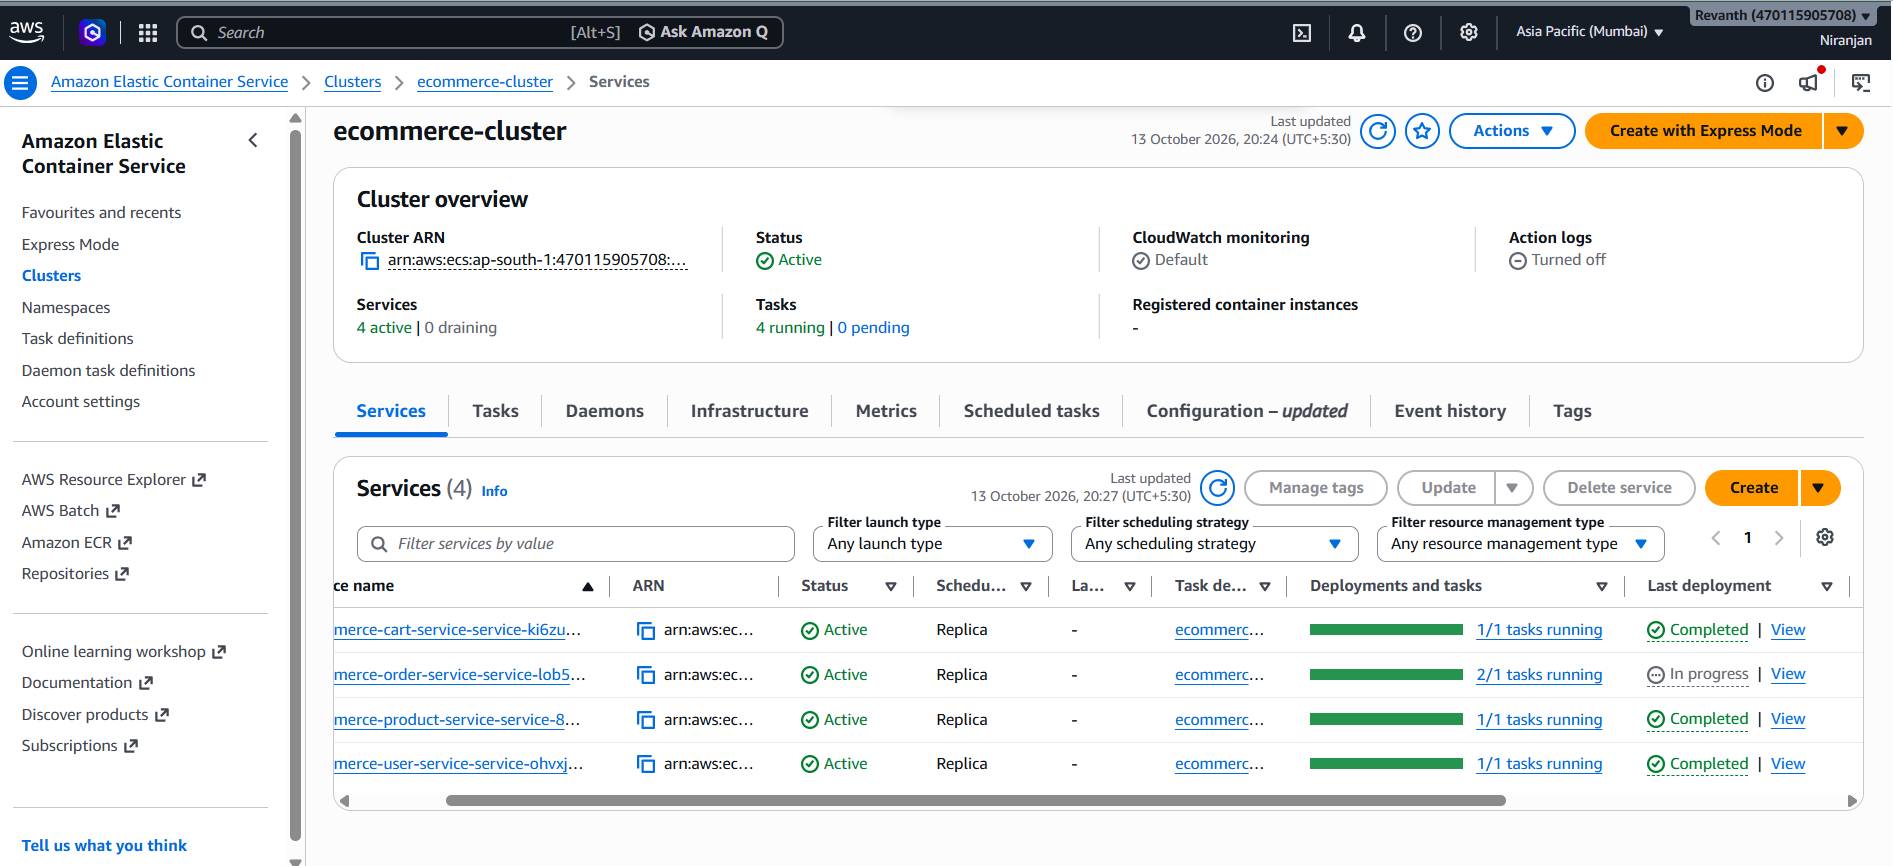
Note: The new deployment allows the Order Service to load the SNS Topic ARN from SSM Parameter Store during startup. Make sure the task role has permission to read the required SSM parameter and publish to the SNS topic.
8.6 Test the Notification Workflow
Now that all the components are configured and the Order Service has been updated, let's test the complete notification workflow.
Step 1: Place an Order
- Open the eCommerce application using the CloudFront URL.
- Log in to your account.
- Add products to the cart.
- Click Place Order.
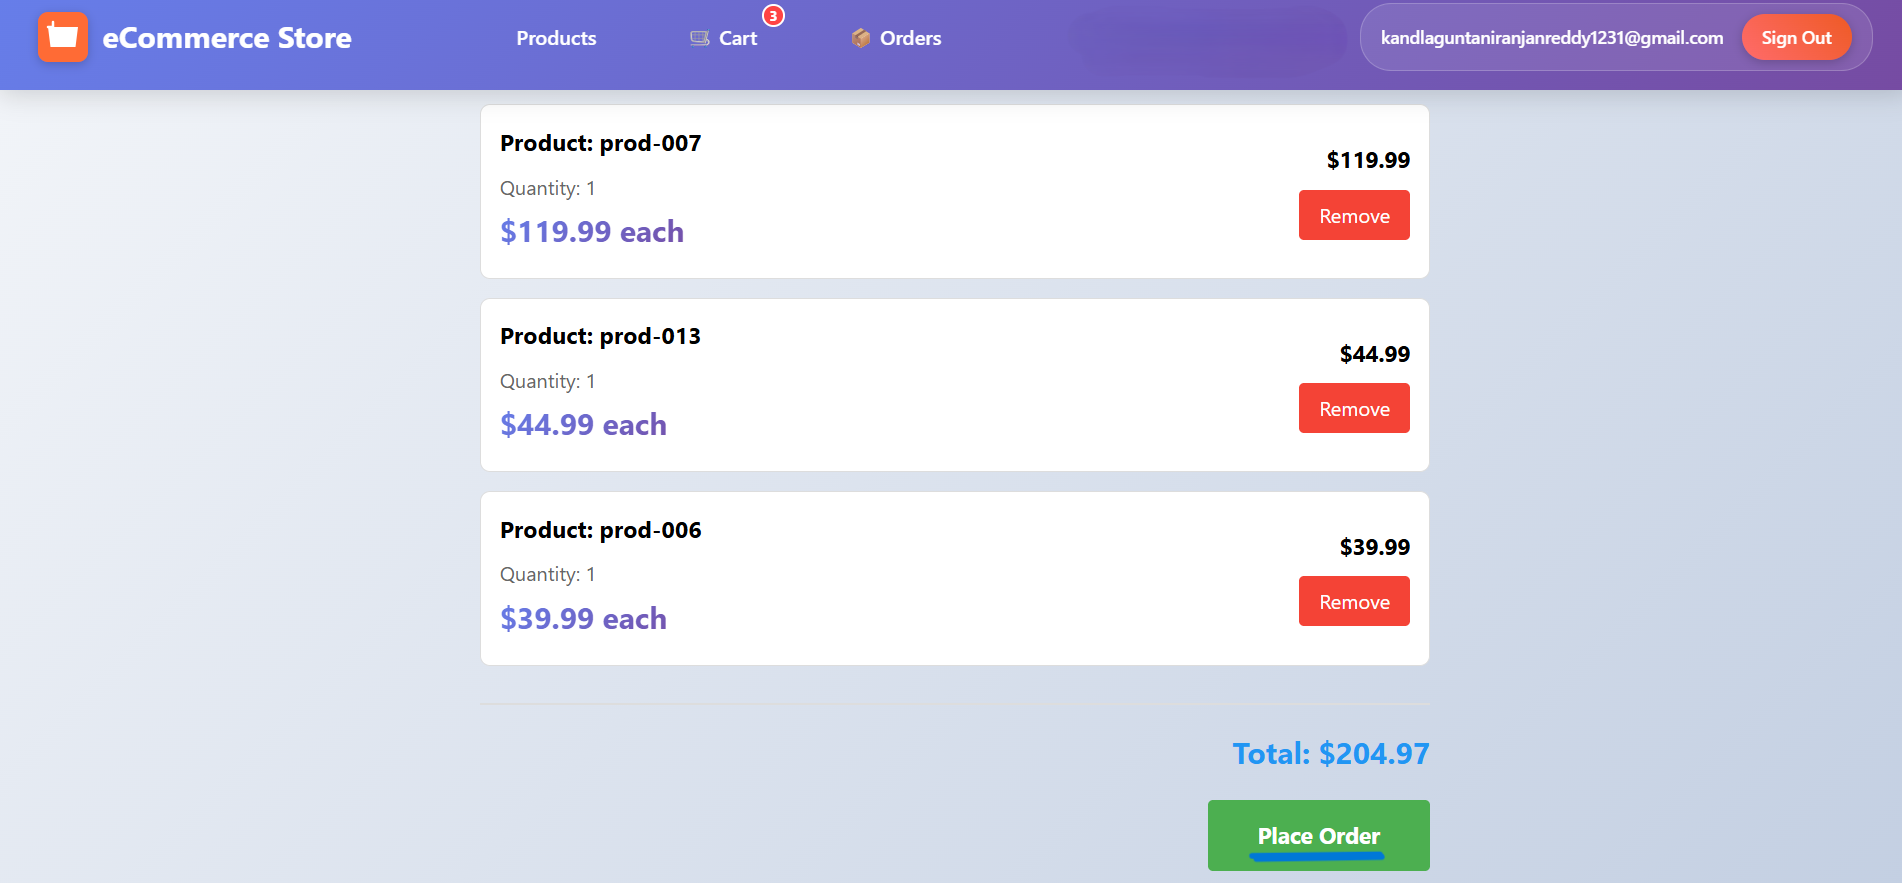
- Verify that the order is placed successfully.

Step 2: Verify Email Notification
- Open the email inbox configured in the SNS subscription.
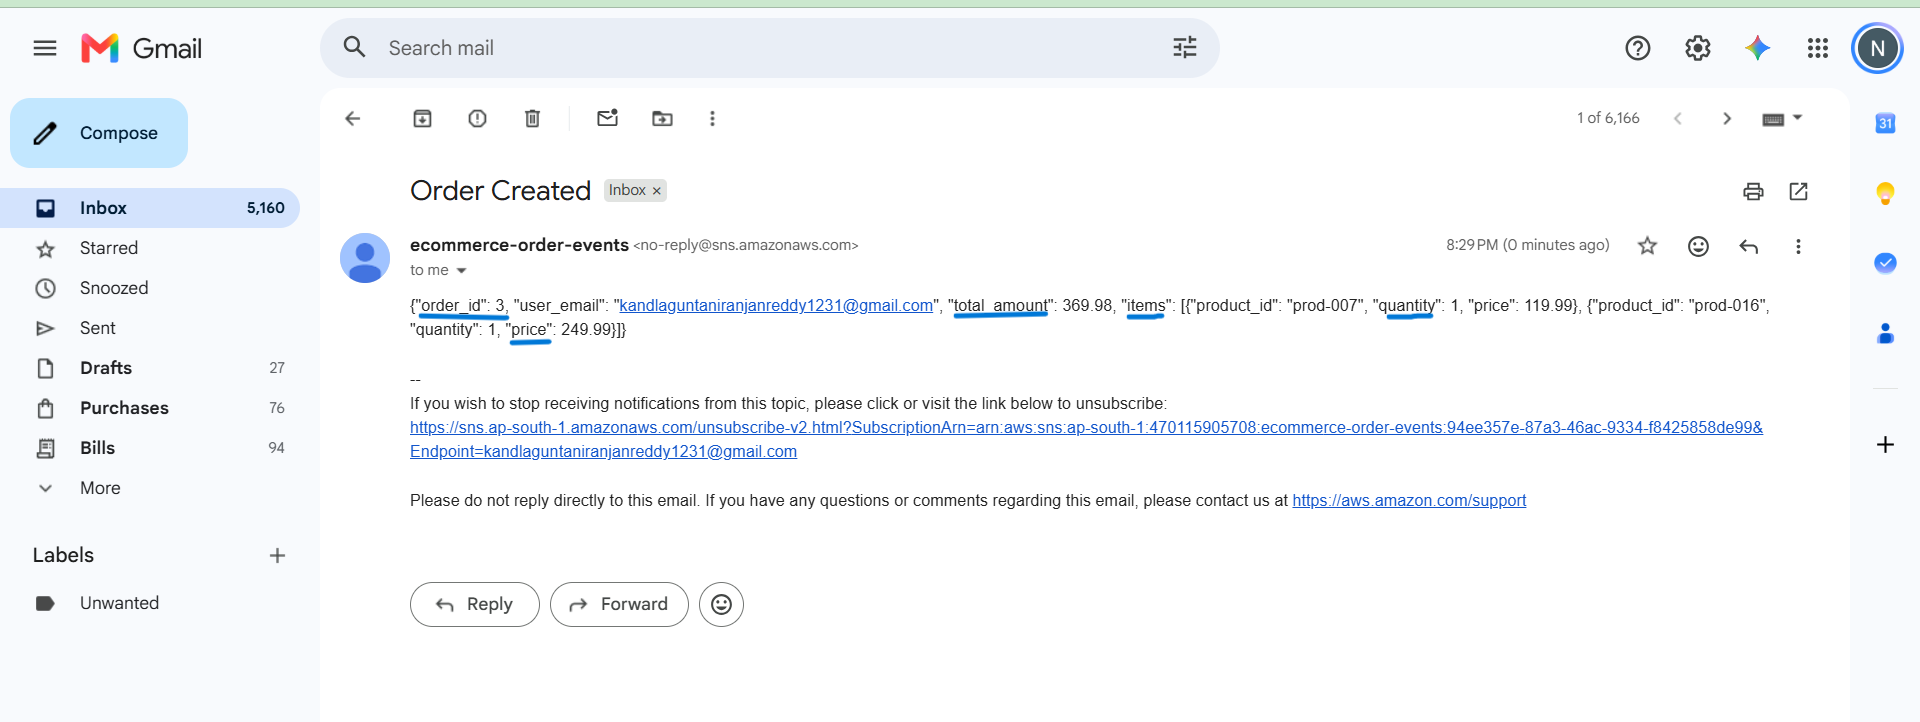
- Refresh the inbox and check for the order notification.
- If the email is not visible, check the Spam folder. The email should contain the order details, such as Order ID, customer email address, total amount, and ordered products.
Step 3: Verify SQS Message
- Open SQS Console → Queues → ecommerce-order-shipping.
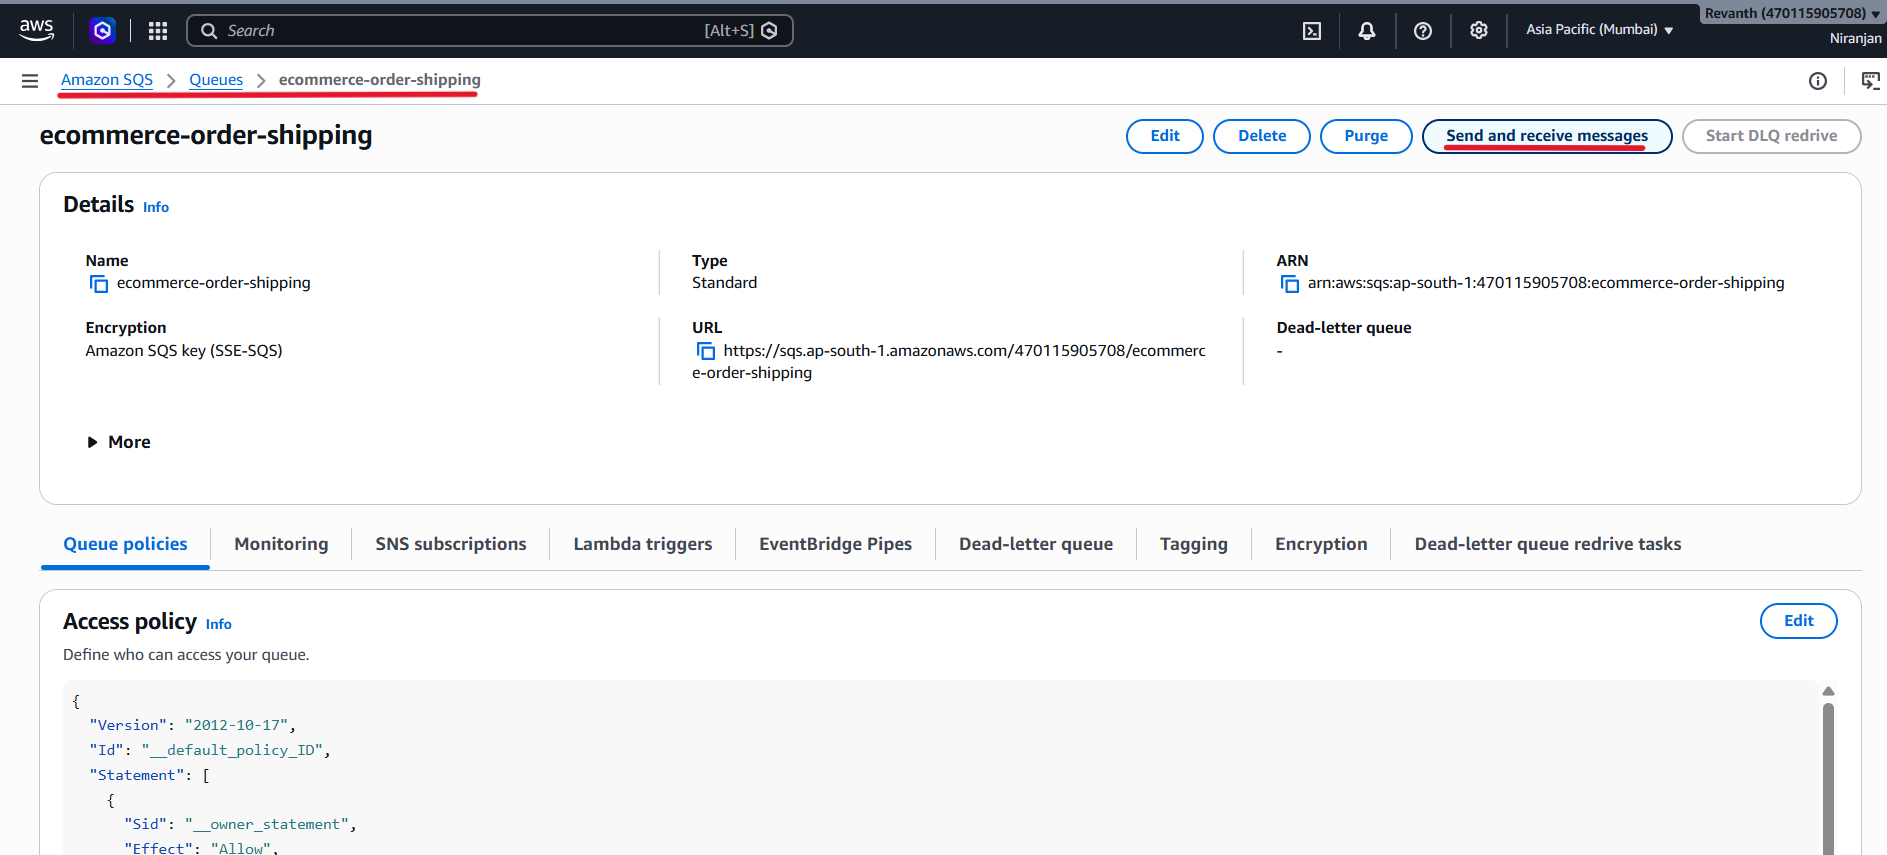
- Select Send and receive messages.
- Click Poll for messages.
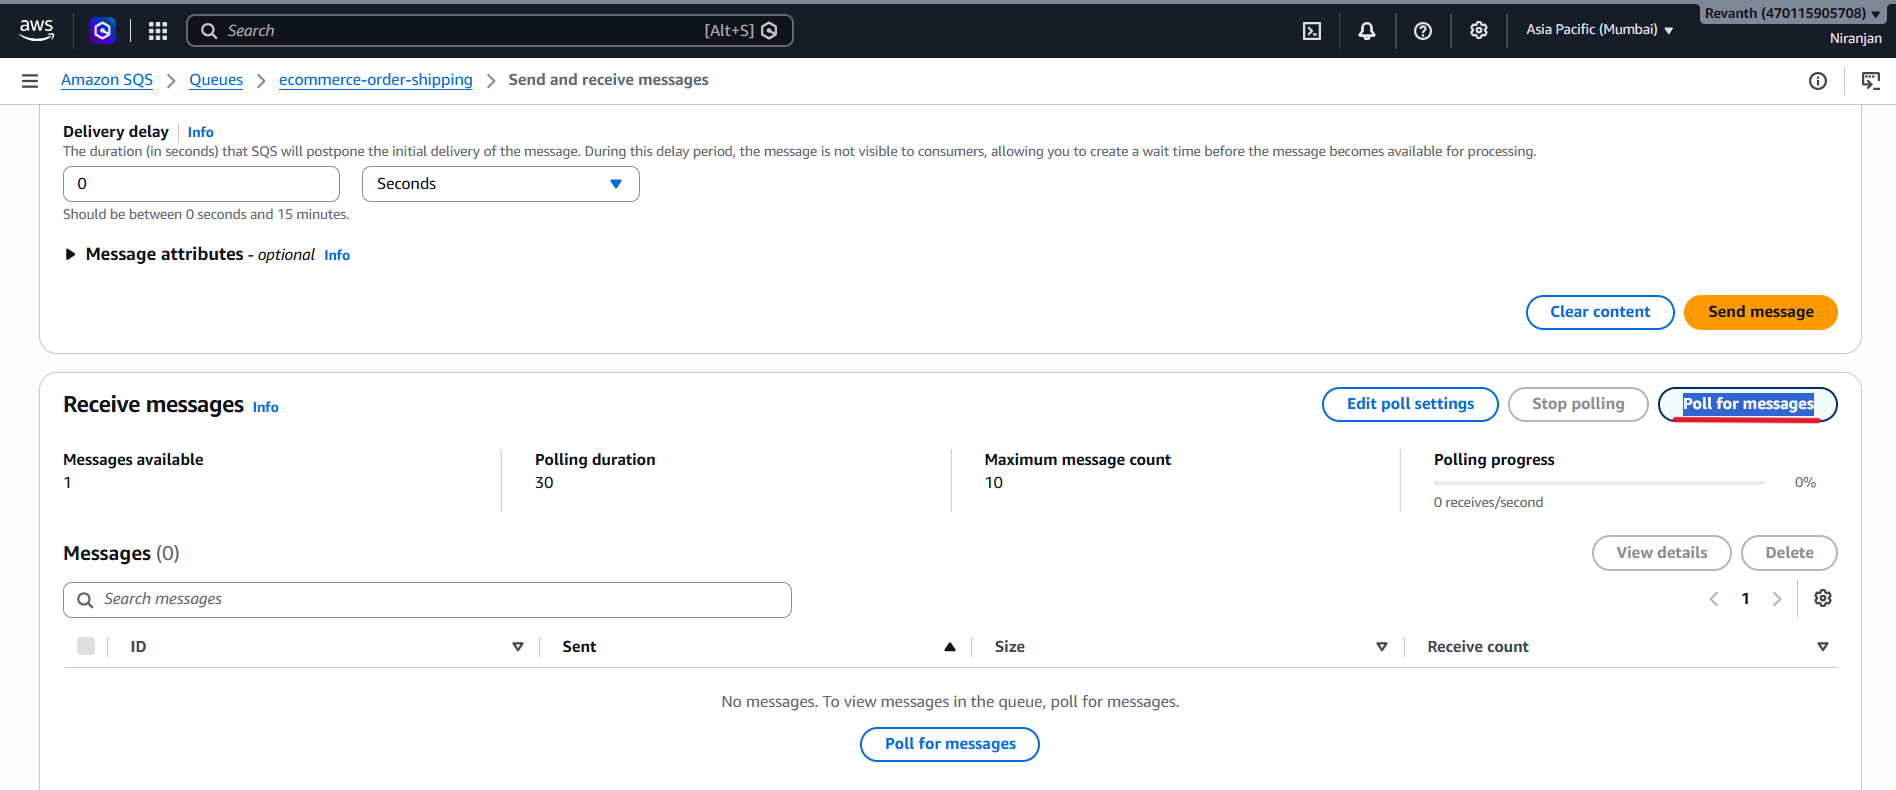
- Open the received message and verify the order details.
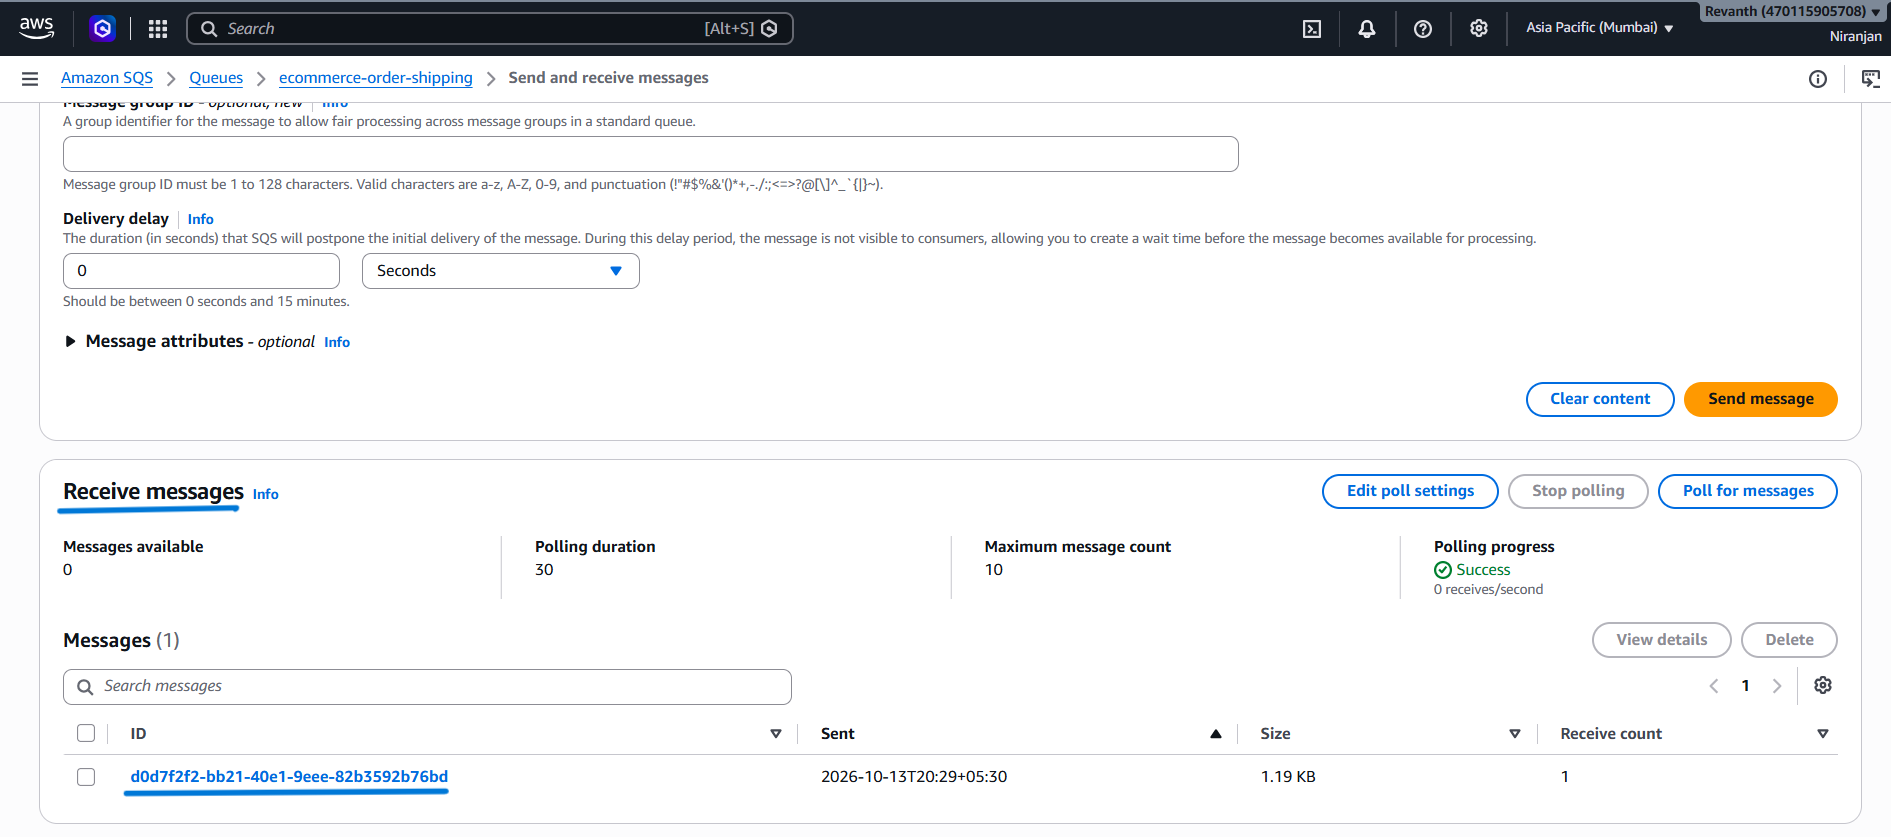
- Select the message ID to view its details.
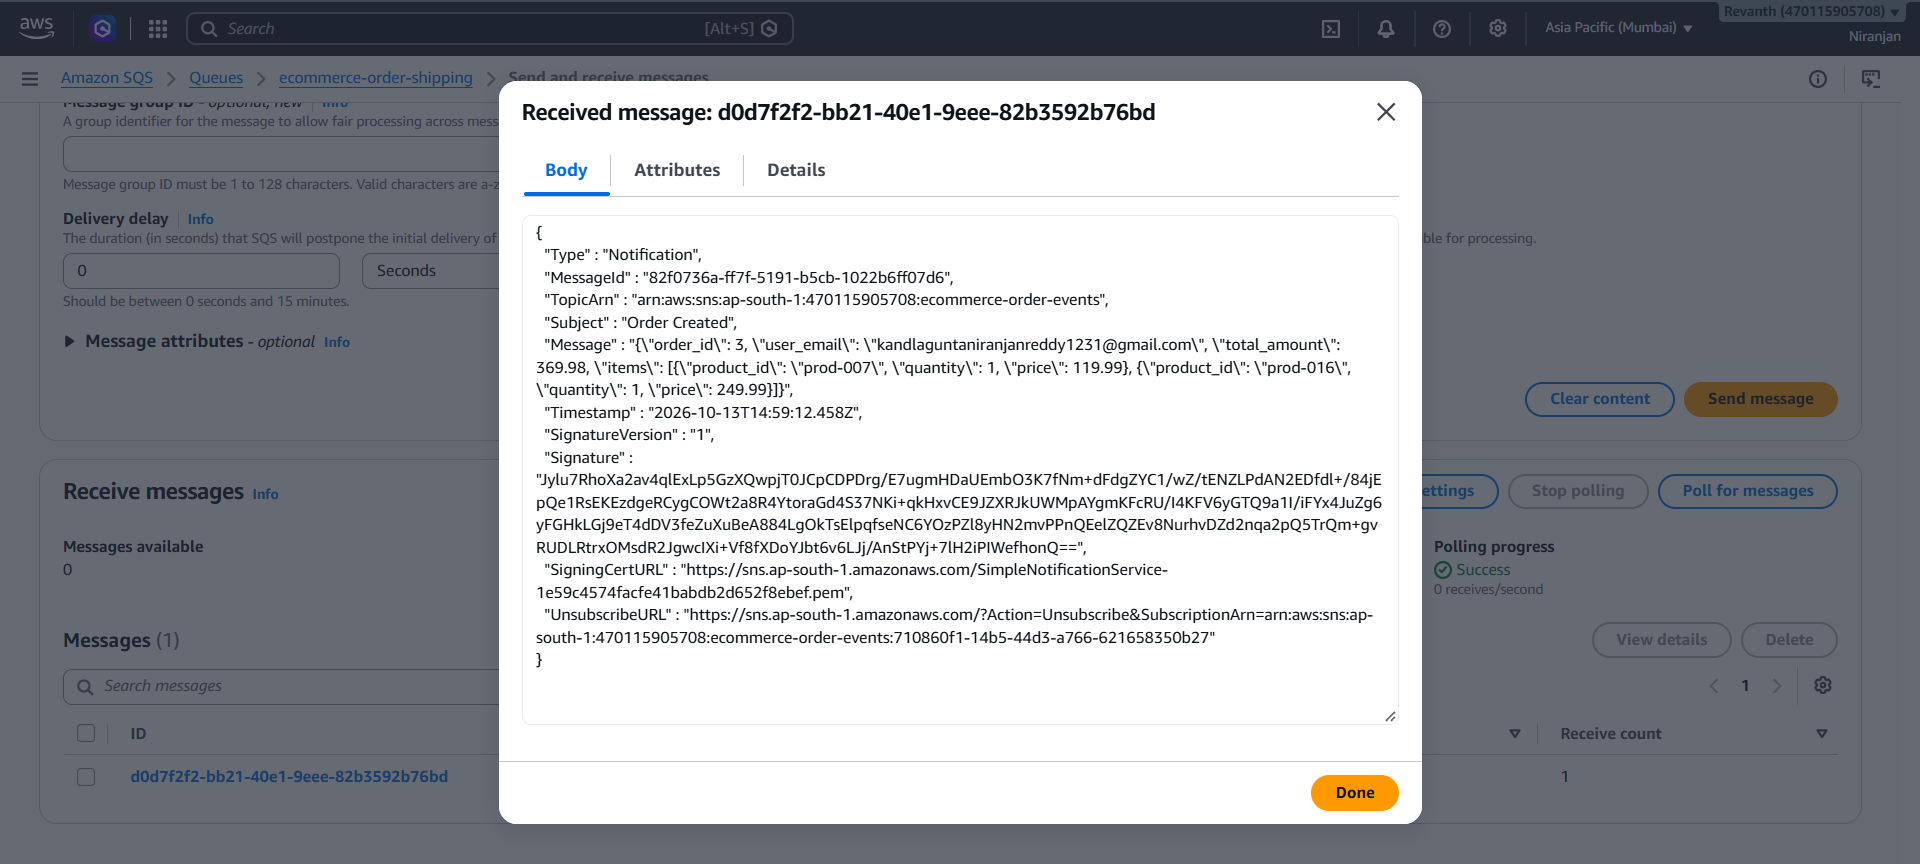
Note: Since no message-processing application is configured for this queue, messages will remain in SQS until a consumer processes and deletes them or they expire according to the queue's retention settings.
This confirms that the SNS topic successfully distributes order events to both the configured email and SQS subscribers.
Troubleshooting
1. Email Notification Not Received
If you do not receive an email notification:
- Check the Spam folder.
- Verify that the SNS email subscription status is Confirmed.
- Check whether the correct email address is configured.
- Review the Order Service logs in CloudWatch.
- Verify that the Order Service has successfully published the SNS event.
2. SQS Queue Not Receiving Messages
If no messages appear in the SQS queue:
- Verify that the SQS subscription is created successfully.
- Check the SNS subscription status.
- Verify that the SQS queue policy allows the SNS topic to perform
sqs:SendMessage. - Check the Order Service logs in CloudWatch.
3. SNS Event Publishing Error
If the Order Service reports an error while publishing an SNS event:
- Open CloudWatch Console → Logs → Log groups.
- Open the Order Service log group under
/ecs. - Review the latest log stream.
- Look for errors related to SNS event publishing or parameter retrieval.
- Verify that
/ecommerce/dev/sns/topic-arnexists in Parameter Store. - Verify that the Order Service task role has the required SSM and SNS permissions.
- If the parameter was created after the service started, perform a Force new deployment of the Order Service.
Important: In this project, the Order Service loads the SNS Topic ARN during startup. Restarting the service after creating the parameter is an important step.
Module Summary
In this module, we successfully configured an event-driven notification workflow using Amazon SNS and SQS.
We completed the following steps:
- SNS Topic: Created
ecommerce-order-eventsto publish order events. - SQS Queue: Created
ecommerce-order-shippingto store order messages. - Email Subscription: Configured an email subscriber and confirmed the subscription.
- SQS Subscription: Subscribed the shipping queue to the SNS topic.
- Queue Policy: Verified that SNS has permission to send messages to SQS.
- SSM Parameter Store: Stored the SNS Topic ARN for the Order Service.
- ECS Deployment: Restarted the Order Service to load the newly created parameter.
- End-to-End Testing: Placed orders and verified email notifications and SQS messages.
- Our notification workflow is now working. Whenever a customer places an order, the Order Service publishes an event to SNS, and SNS distributes that event to the configured subscribers.
- This also gives us a foundation for future integrations with shipping partners and other third-party services.
Next Steps
So far, we have accessed our application using the CloudFront distribution URL.
In the next module, we will configure a custom domain name and SSL certificate so that users can access the eCommerce application using our own domain name over HTTPS.
Module 9: Custom Domain & SSL Configuration on AWS
Overview
- In this module, we will configure a custom domain name for our eCommerce application and enable secure HTTPS access using an SSL/TLS certificate.
- Until now, we have been accessing the application using the CloudFront-provided domain name. Now, we will configure our own domain name so users can access the application through a familiar URL.
For example:
- CloudFront URL:
https://dxxxxxxxxxxxxx.cloudfront.net - Custom domain:
https://yourdomain.com
We will use Amazon Route 53, AWS Certificate Manager (ACM), and Amazon CloudFront to complete this configuration.
Architecture
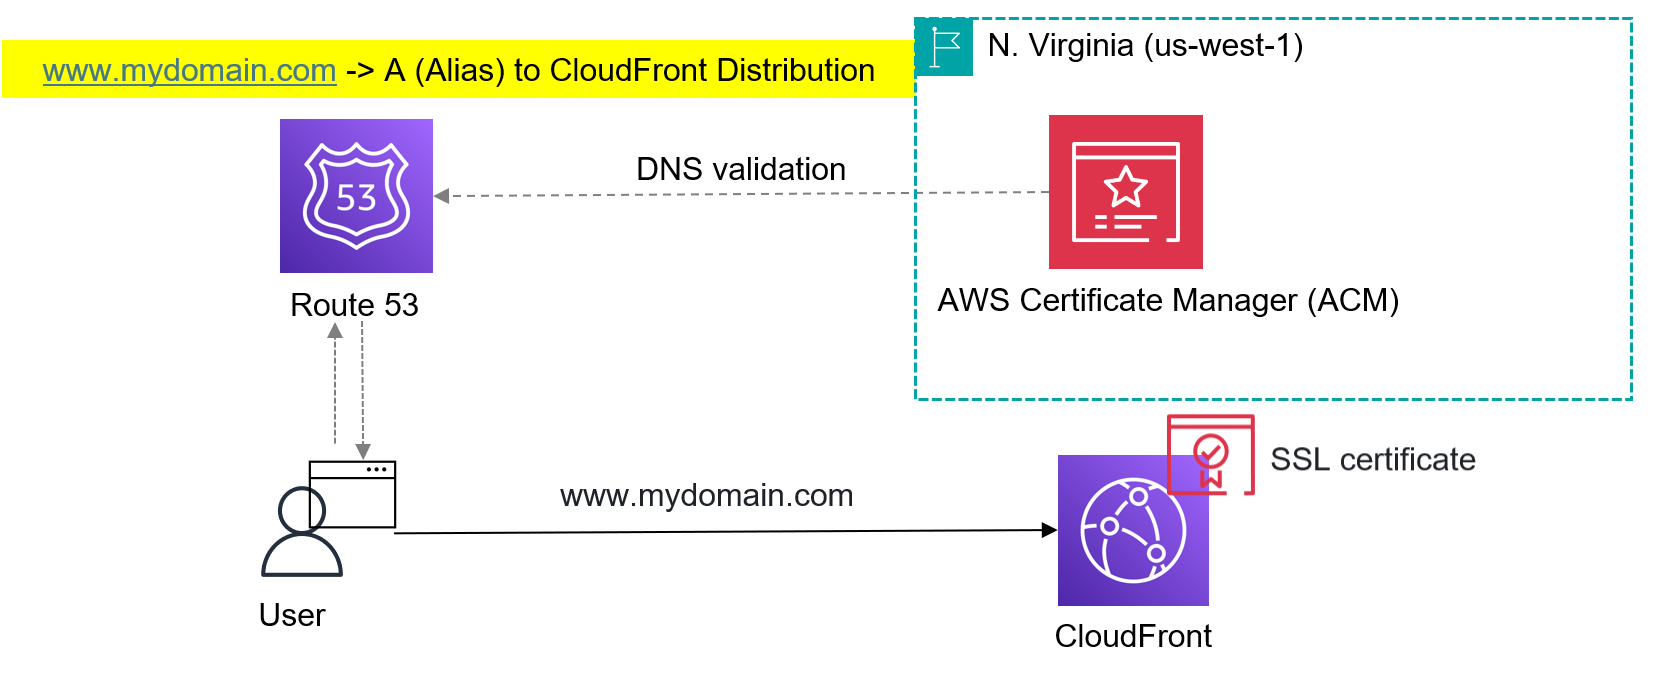
Prerequisites
Before starting this module, make sure you have:
- A registered public domain name (purchased through Hostinger, GoDaddy, Route 53, or another domain registrar).
- An existing CloudFront distribution hosting the frontend application.
Note: If you do not have a public domain name, you can skip this module and continue using the CloudFront domain name.
In This Module
We will complete the following tasks:
- Create a Route 53 Public Hosted Zone.
- Update the domain nameservers at the domain registrar.
- Request a public SSL certificate using AWS Certificate Manager.
- Validate domain ownership using DNS validation.
- Add alternate domain names to the CloudFront distribution.
- Configure the SSL certificate in CloudFront.
- Create Route 53 records pointing to CloudFront.
- Test application access using the custom domain.
9.1 Create a Route 53 Public Hosted Zone
- First, we need to create a Public Hosted Zone in Amazon Route 53 for our registered domain name.
- A Public Hosted Zone contains the DNS records required to route internet traffic for our domain and its subdomains.
Step 1: Open Route 53
- Open the AWS Management Console.
- Search for Route 53.
- Select Hosted zones.
- Click Create hosted zone.
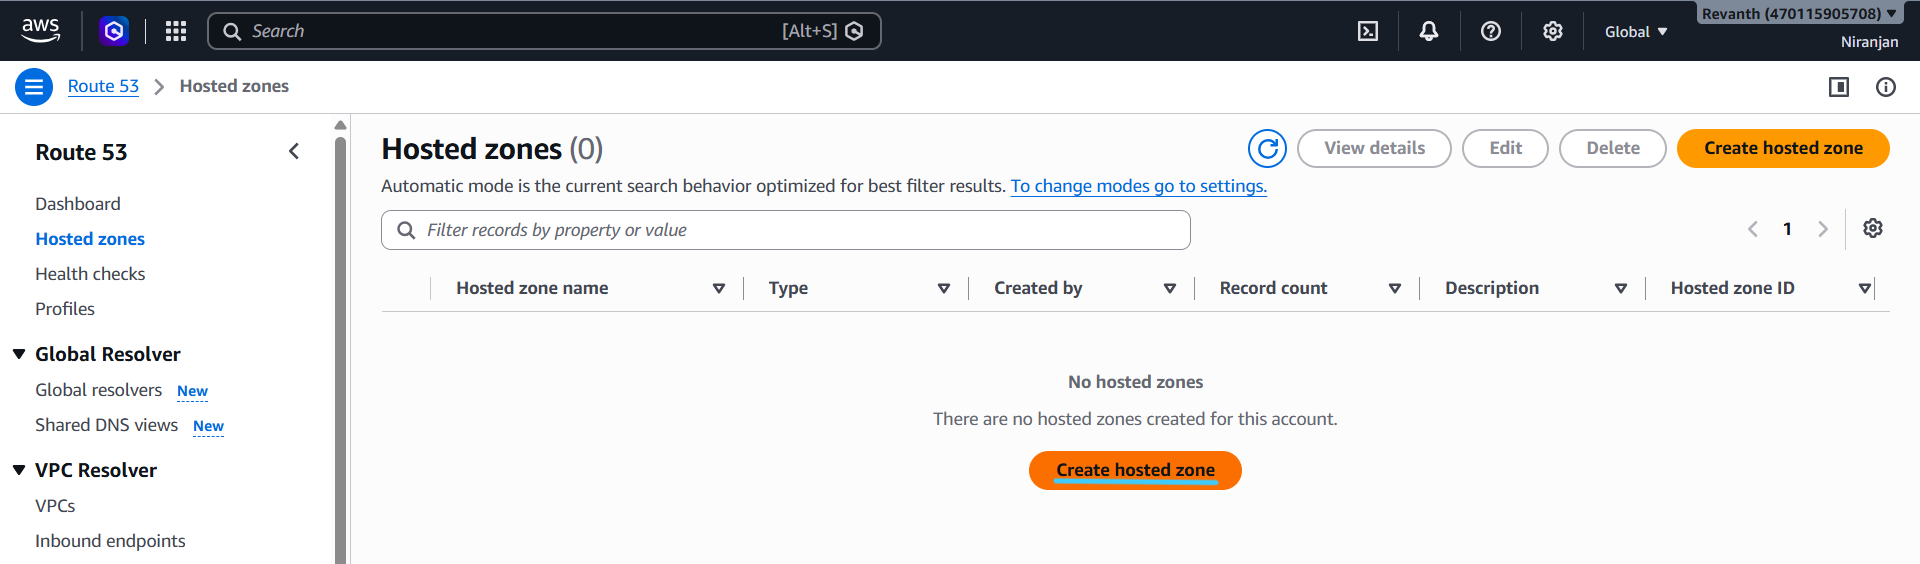
Step 2: Configure the Hosted Zone
Enter the following details:
- Domain name: Enter your registered domain name (e.g.,
niranjanreddy.shop).
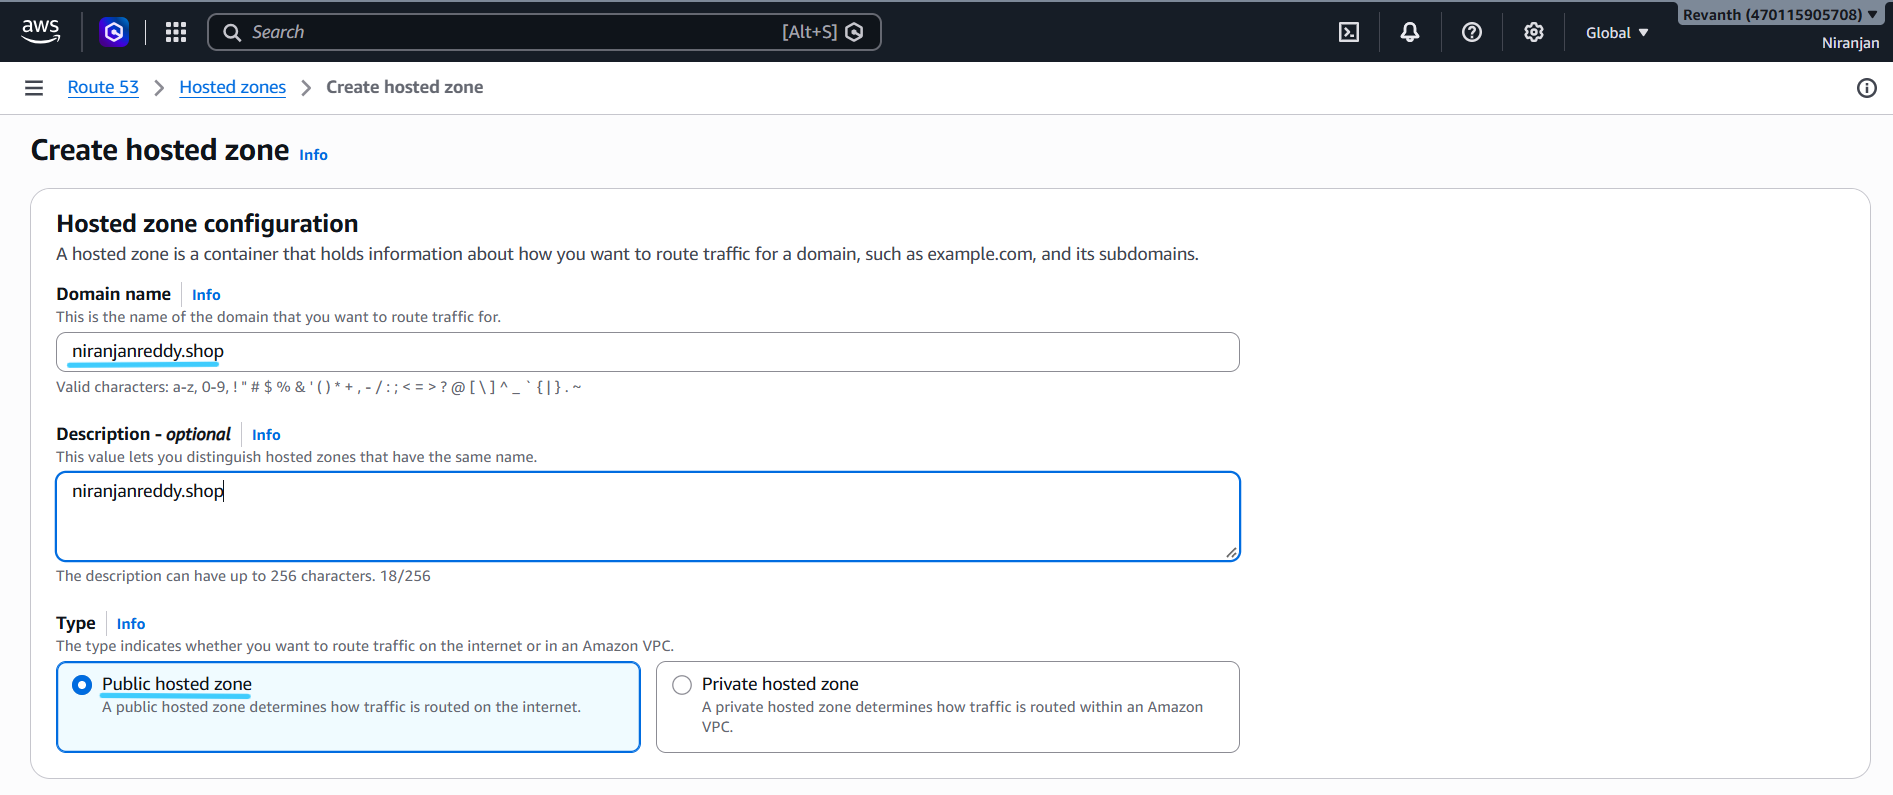
- Description: Enter your domain name (optional).
- Type: Select Public hosted zone.
- Click Create hosted zone.
Step 3: Note the Route 53 Name Servers
After creating the hosted zone, Route 53 automatically creates two DNS records:
- NS (Name Server): Contains the four AWS name servers assigned to your hosted zone.
- SOA (Start of Authority): Contains the DNS administrative information for the hosted zone.
Open the NS record and note all four name servers. We will use these values in the next step.
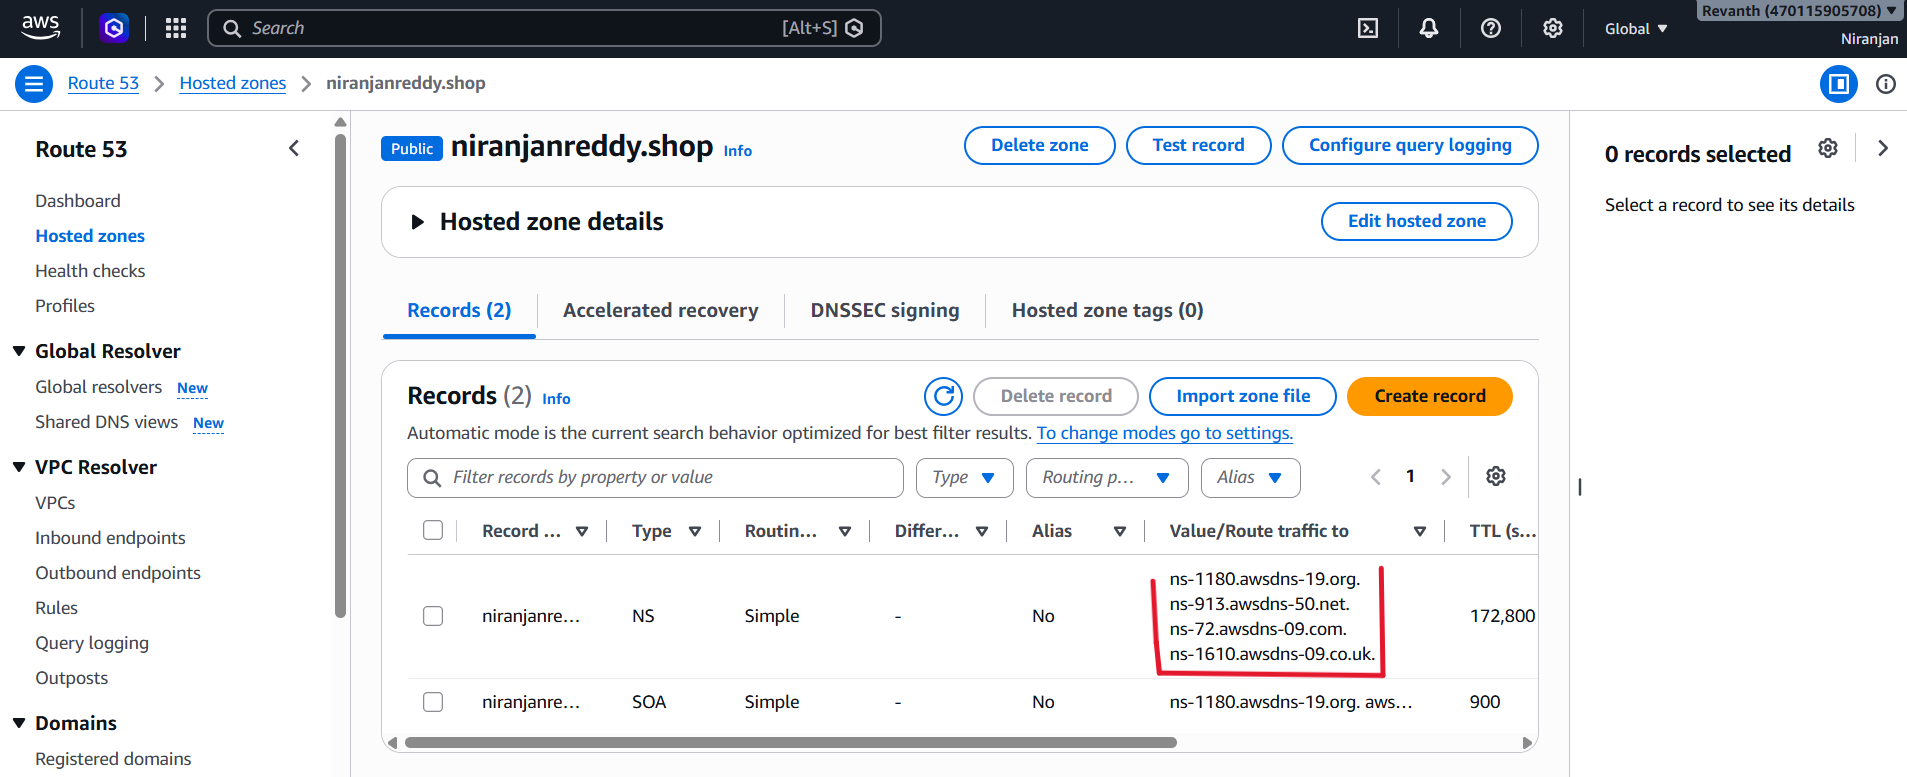
Step 4: Update Name Servers in Hostinger
Since our domain is registered with Hostinger, we need to update its name server configuration to point to Route 53.
- Log in to your Hostinger account.
- Navigate to Domains → Domain portfolio.
- Select your domain.
- Open DNS / Nameservers.
- Under Select Nameservers, choose Change nameservers.
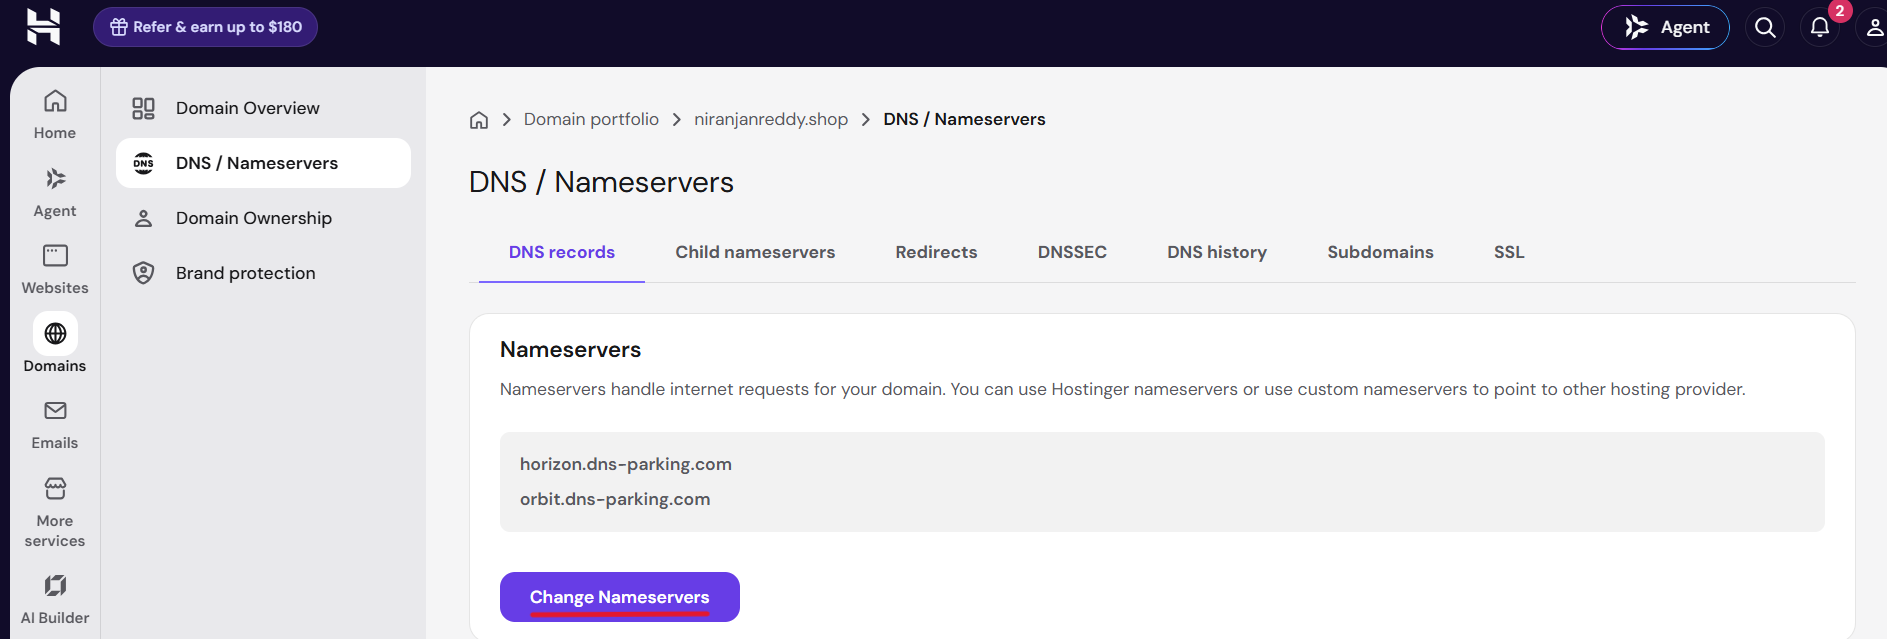
- Replace the existing nameservers with the four name servers copied from Route 53.
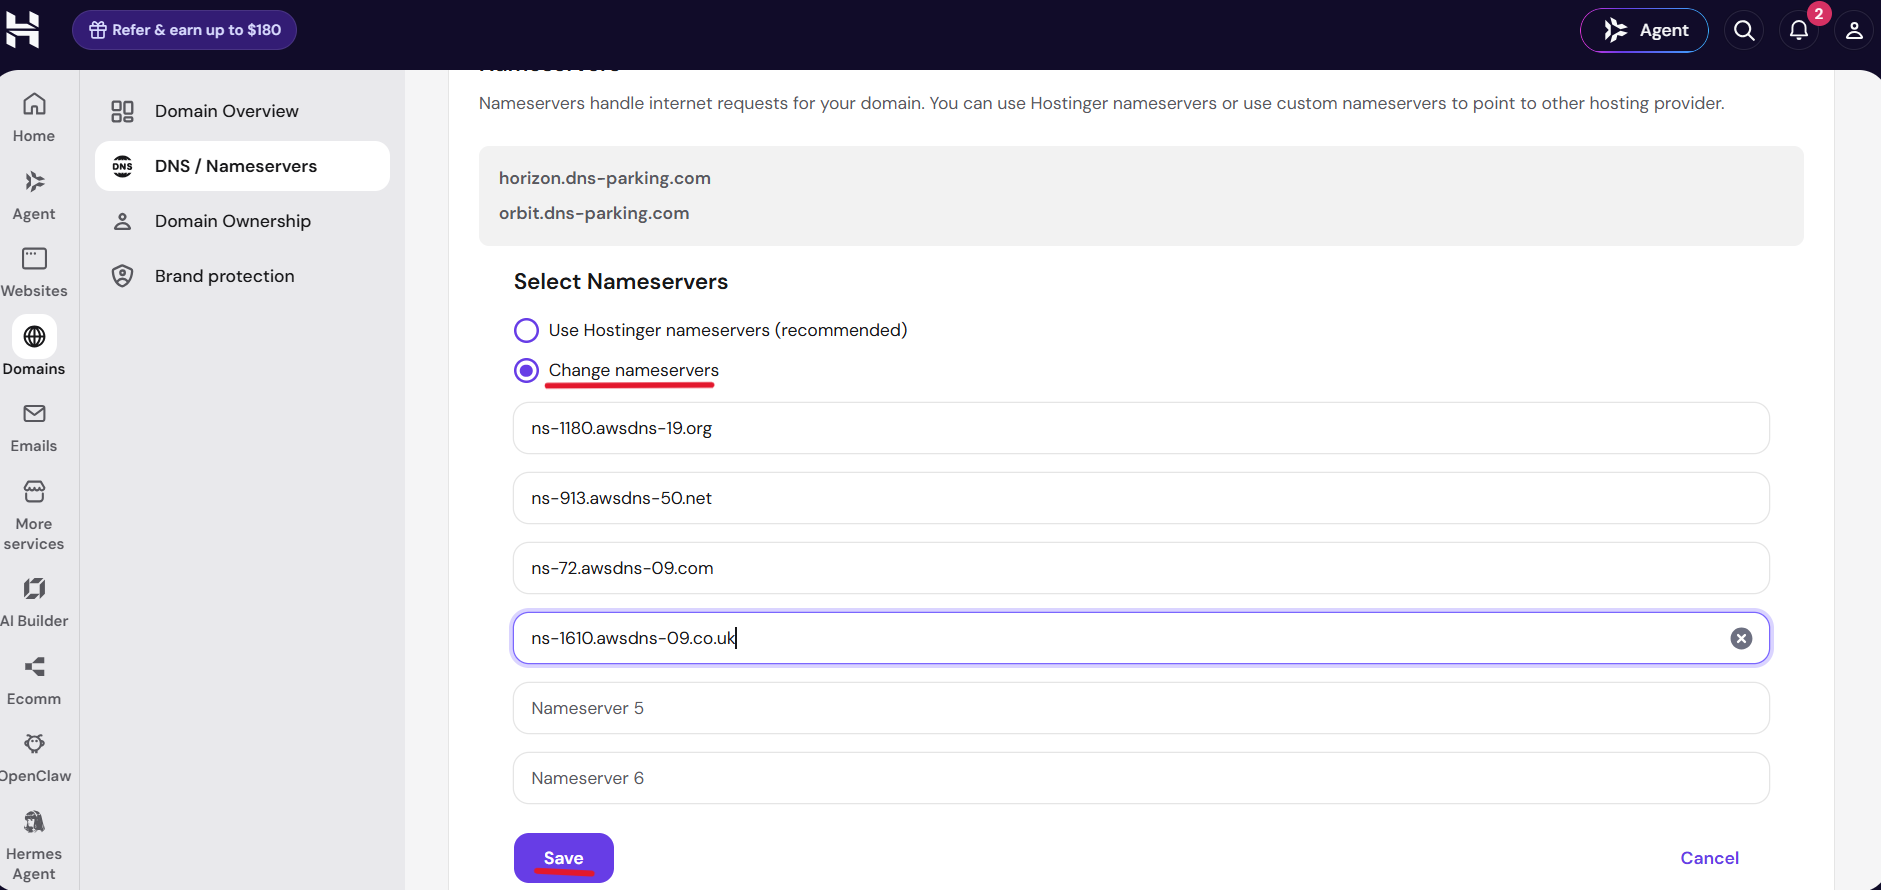
- Click Save.
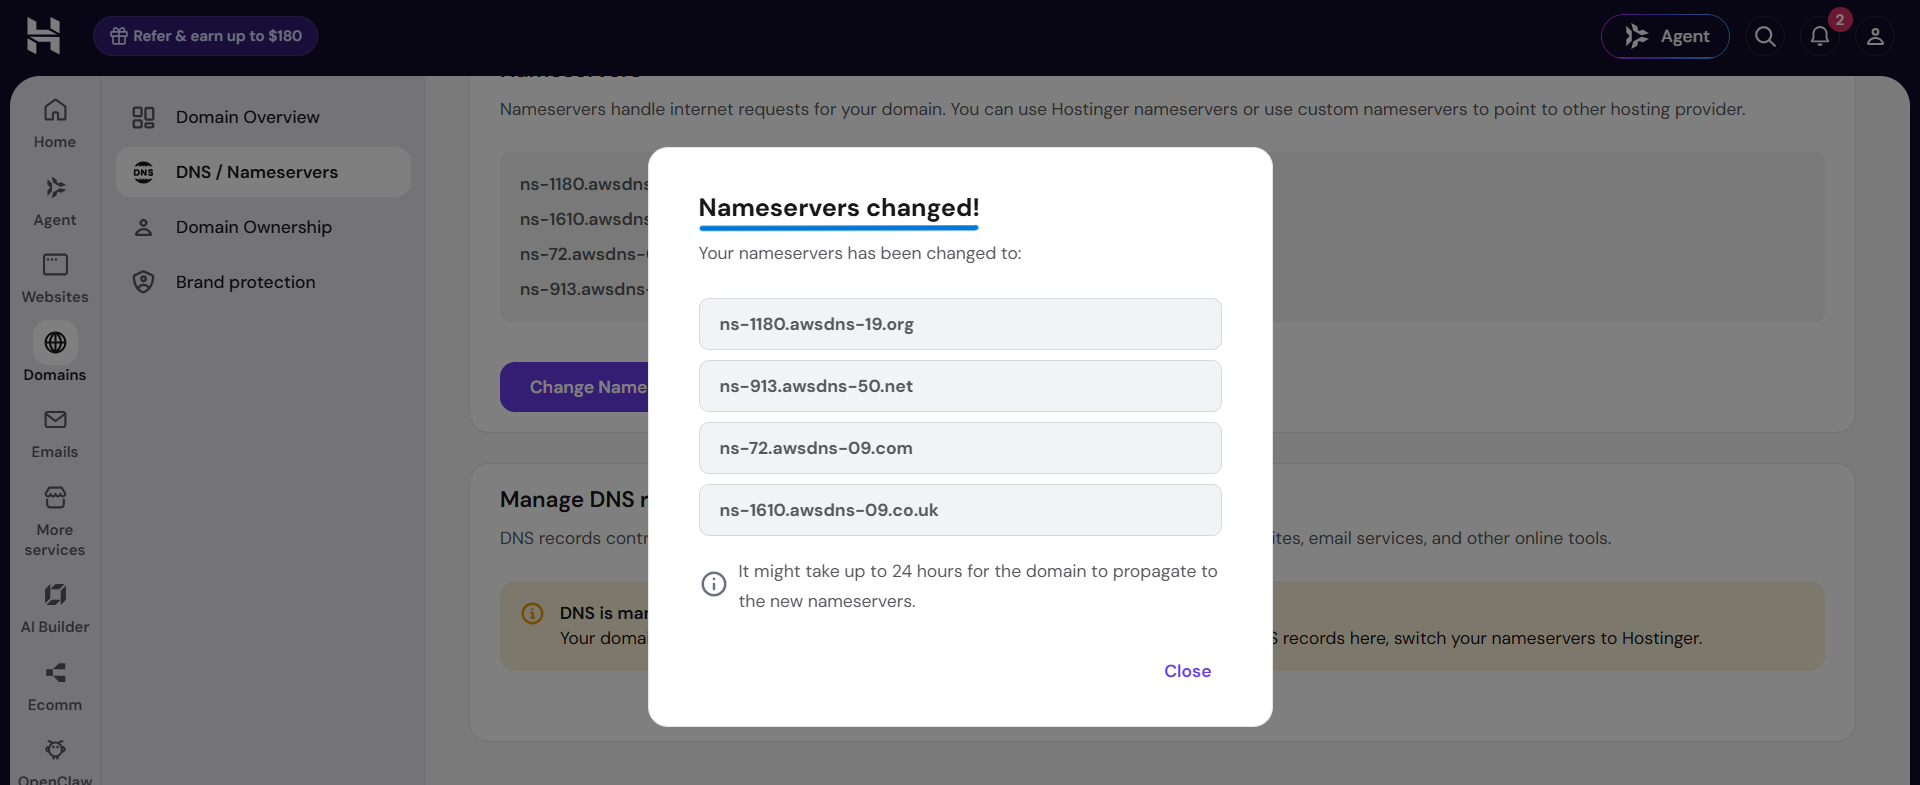
Important: Make sure you copy all four name servers correctly from the Route 53 NS record.
- Once the nameserver changes take effect, Route 53 becomes the DNS provider for your domain. DNS propagation may take some time.
- Now our Route 53 Public Hosted Zone is ready, and we can proceed with requesting an SSL certificate.
9.2 Request an SSL Certificate Using AWS Certificate Manager
- Now we need an SSL/TLS certificate for our custom domain.
- When users access the application using HTTPS, CloudFront uses this certificate to establish a secure connection with their browsers.
- We will request the certificate using AWS Certificate Manager (ACM).
Important: CloudFront requires the ACM certificate to be created in the US East (N. Virginia) – us-east-1 region, even if your application and other AWS resources are hosted in another region.
Step 1: Open AWS Certificate Manager
- Open the AWS Management Console.
- Search for Certificate Manager (ACM).
- Switch the AWS region to US East (N. Virginia) –
us-east-1.
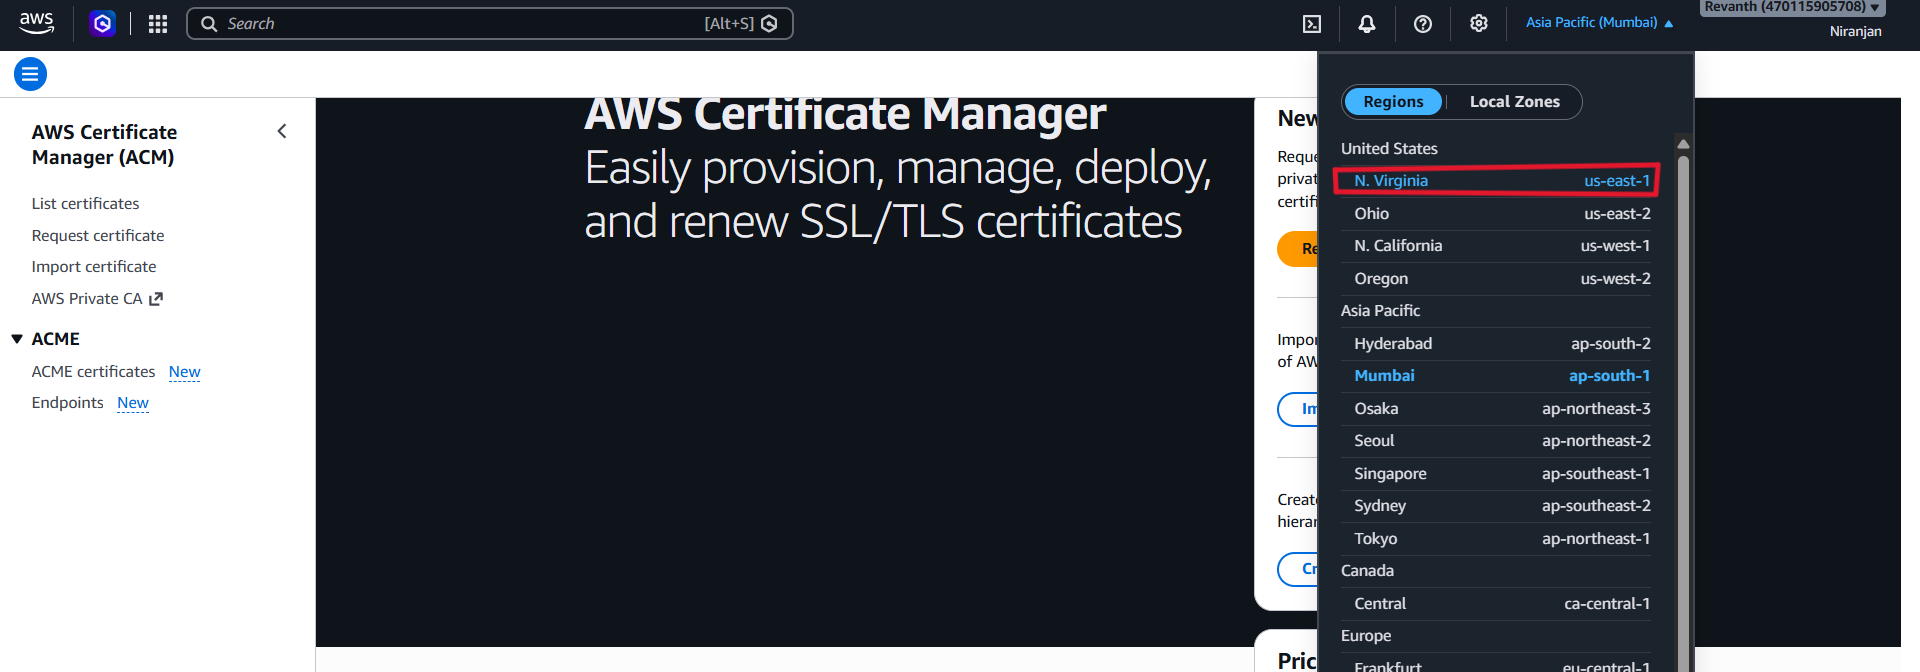
- Open Certificate Manager.
Step 2: Request a Public Certificate
- Click Request.
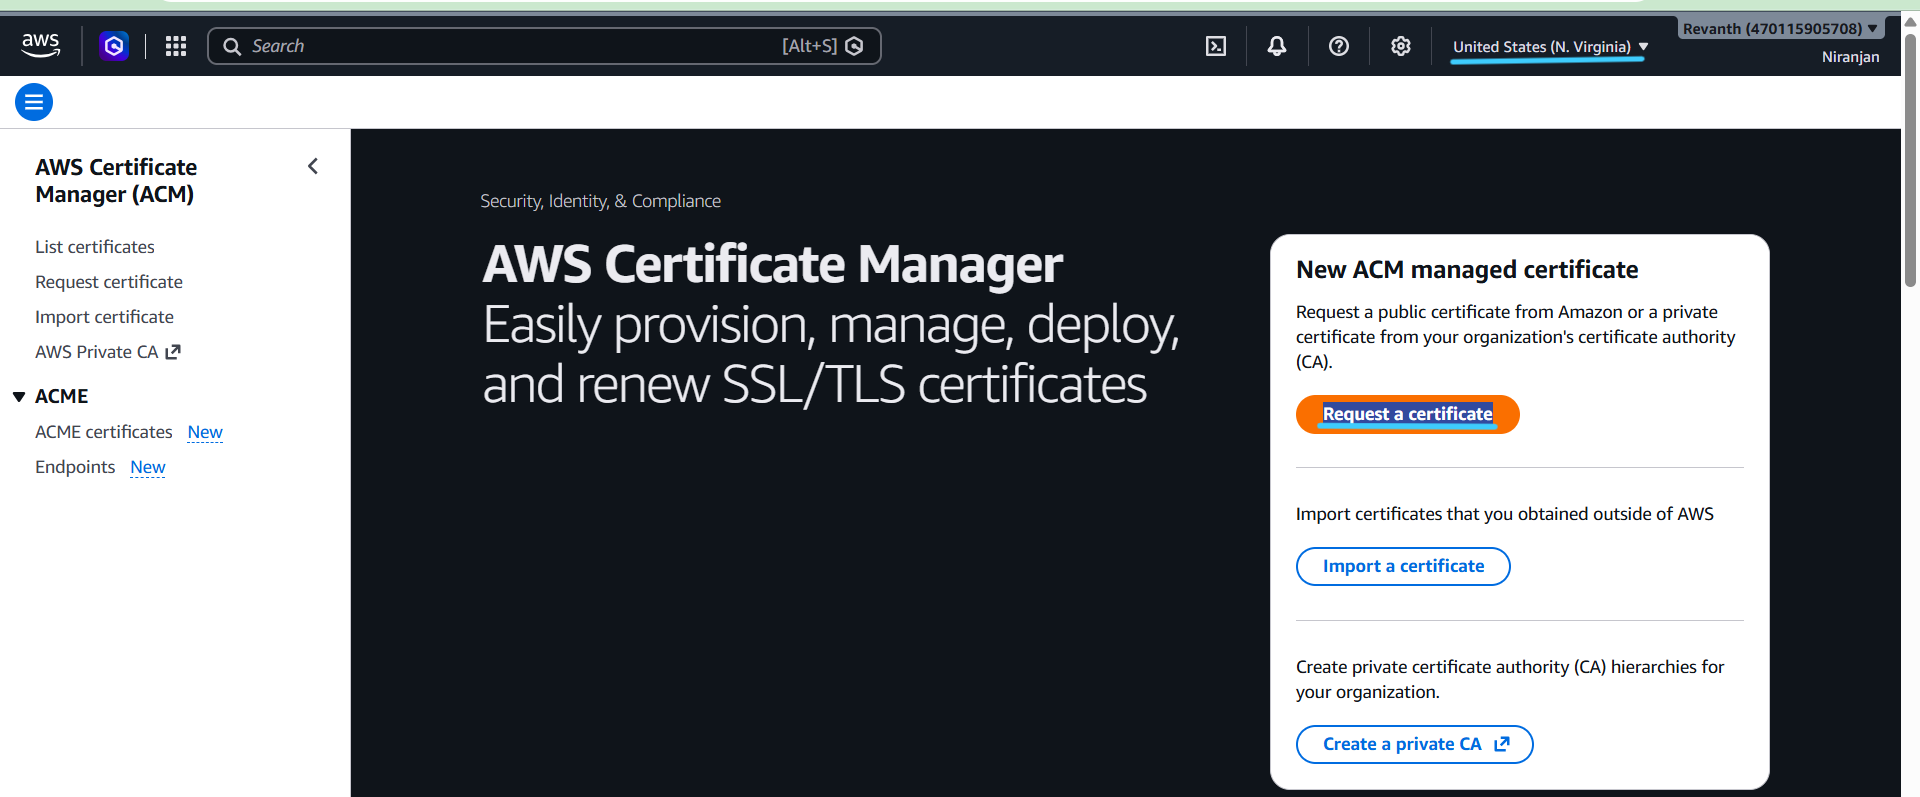
- Select Request a public certificate.
- Click Next.
Step 3: Add Domain Names
Enter your domain names.
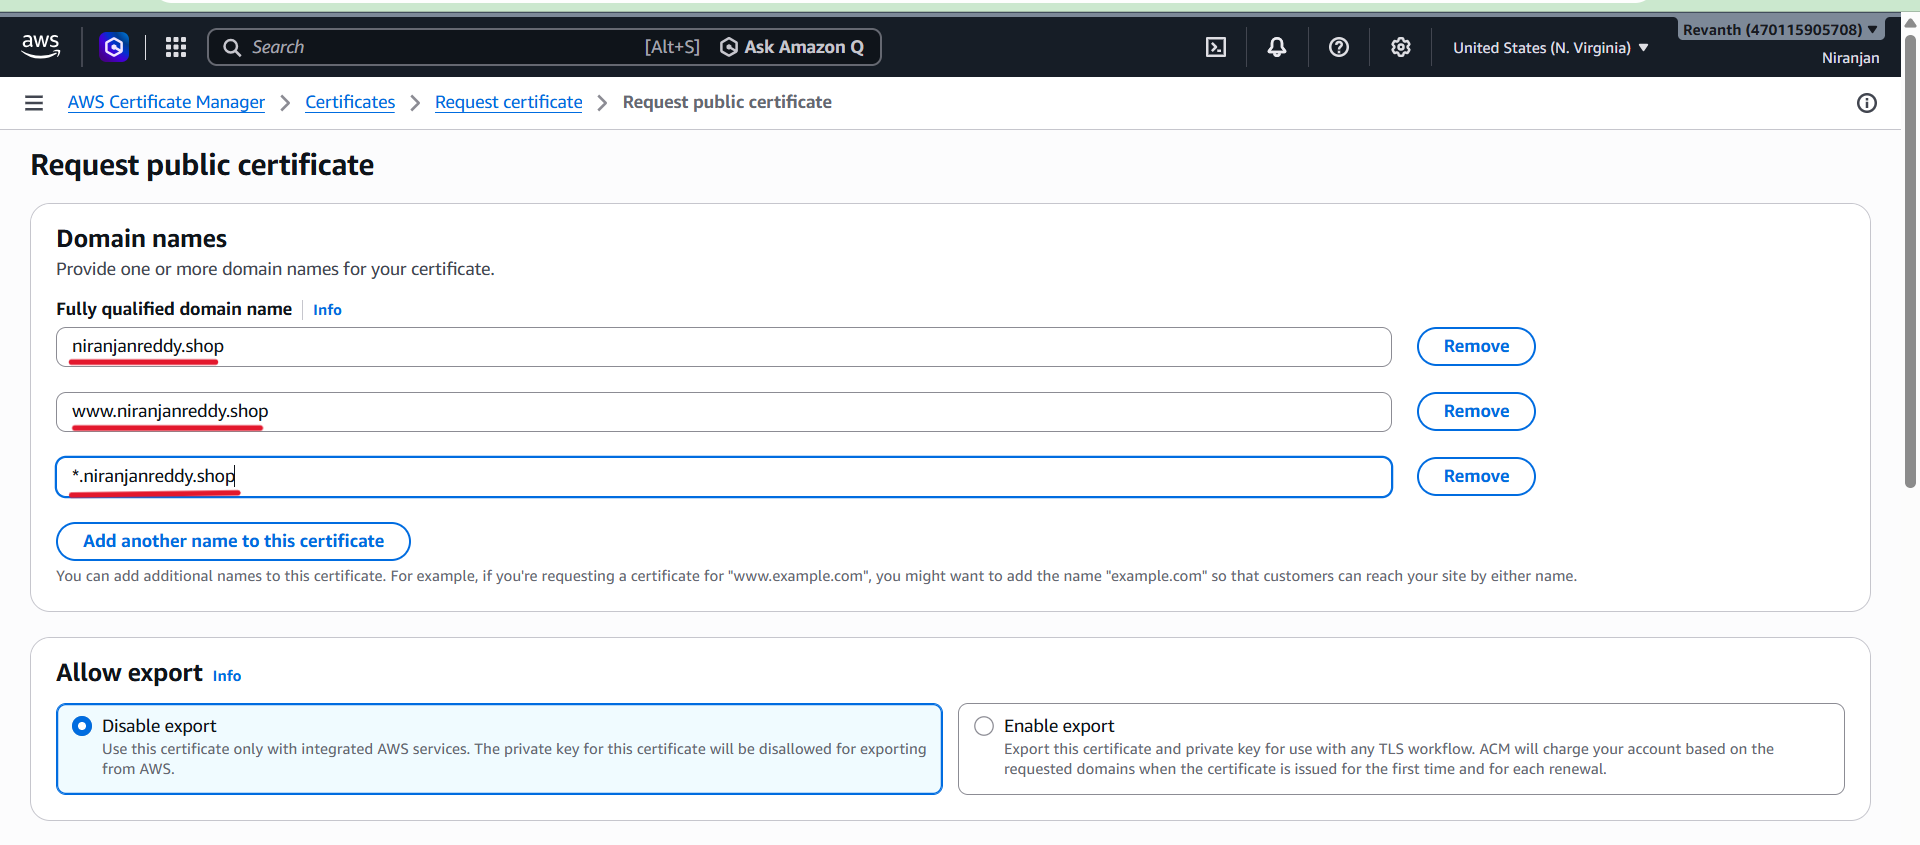
For example:
yourdomain.comwww.yourdomain.com
*.yourdomain.com(optional, to cover subdomains such asapi.yourdomain.comorapp.yourdomain.com).
Using a wildcard certificate is useful if you plan to use additional subdomains in the future.
Step 4: Select DNS Validation
- Select DNS validation as the validation method.
- Keep the remaining settings as default.
- Click Request.
ACM will create the certificate request and display its validation status as Pending validation.
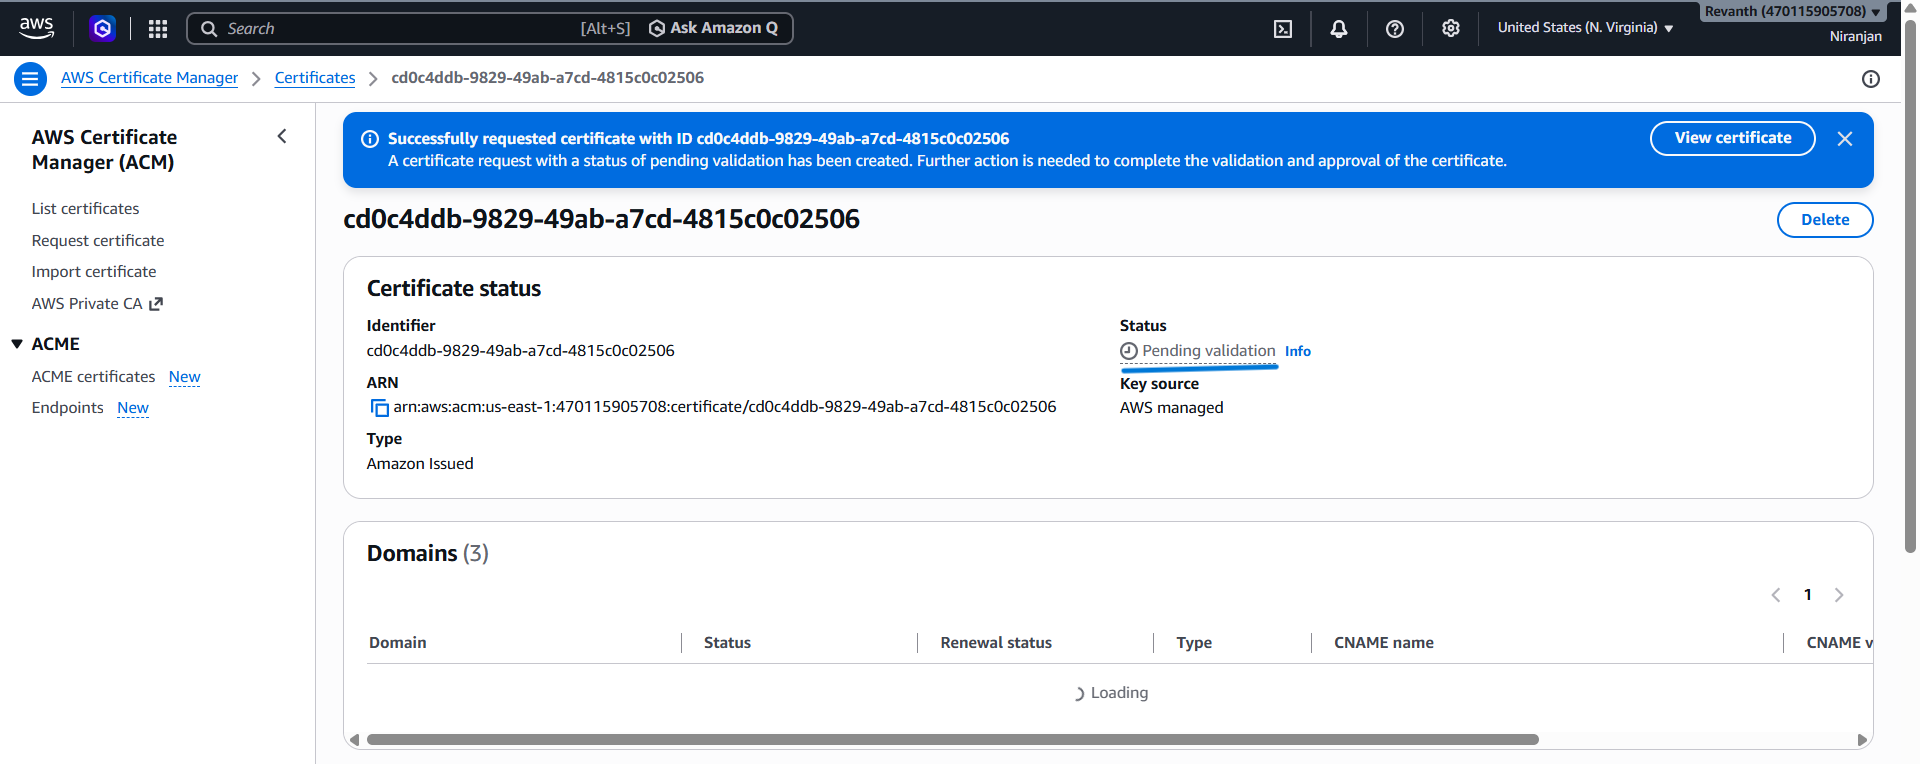
Step 5: Validate Domain Ownership
Since we selected DNS validation, ACM needs to verify that we own the domain.
- Open the requested certificate.
- Locate the domain validation section.
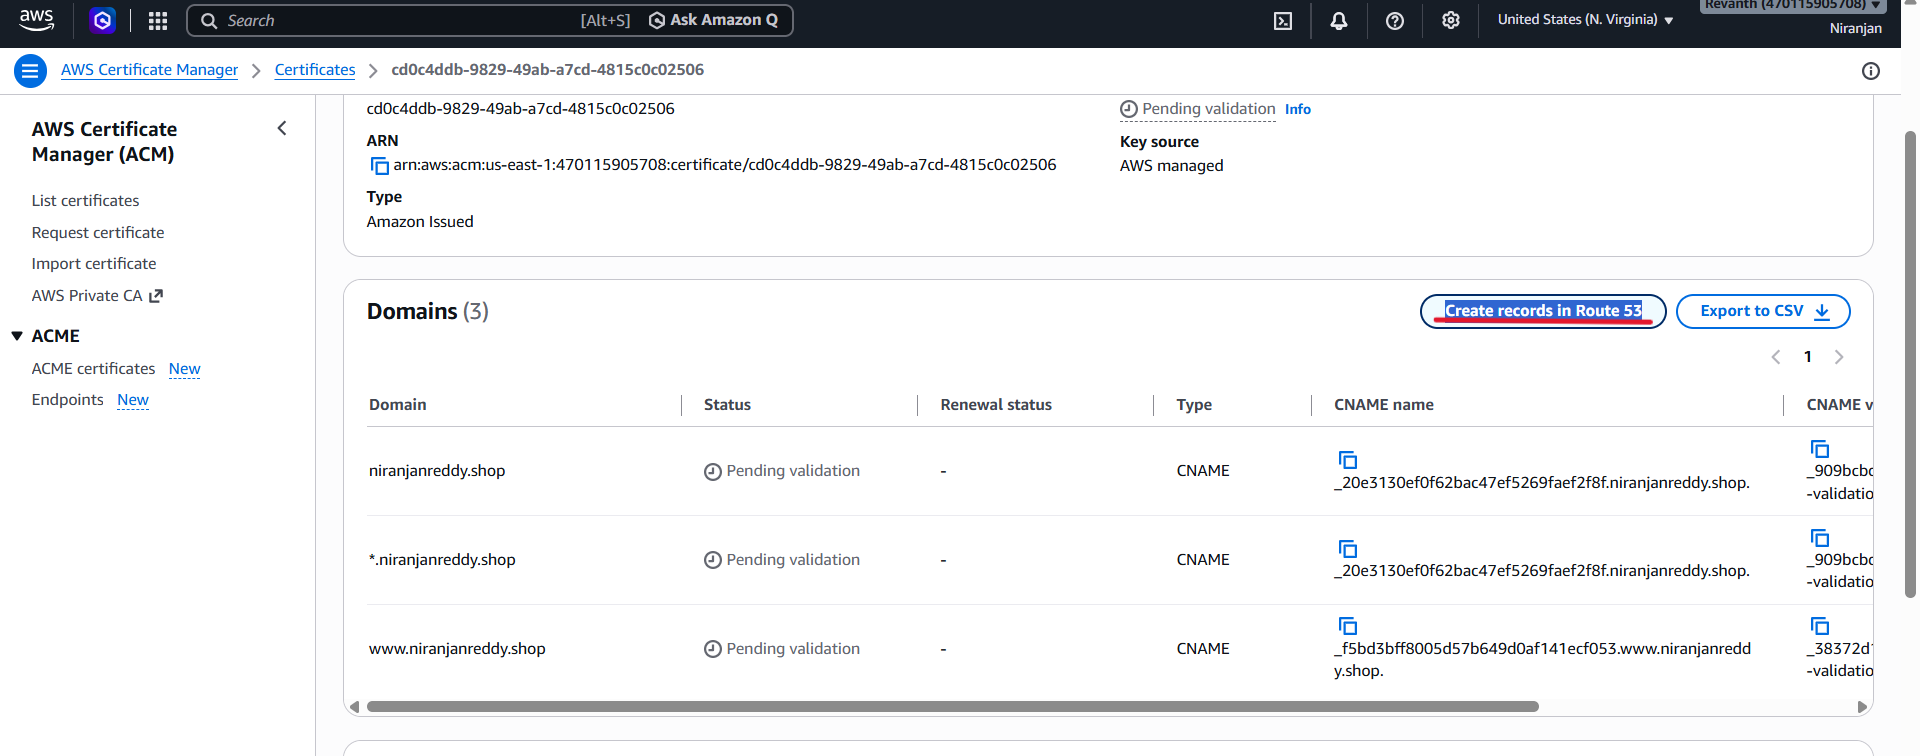
- Click Create records in Route 53.
- Confirm the creation of the DNS validation records.
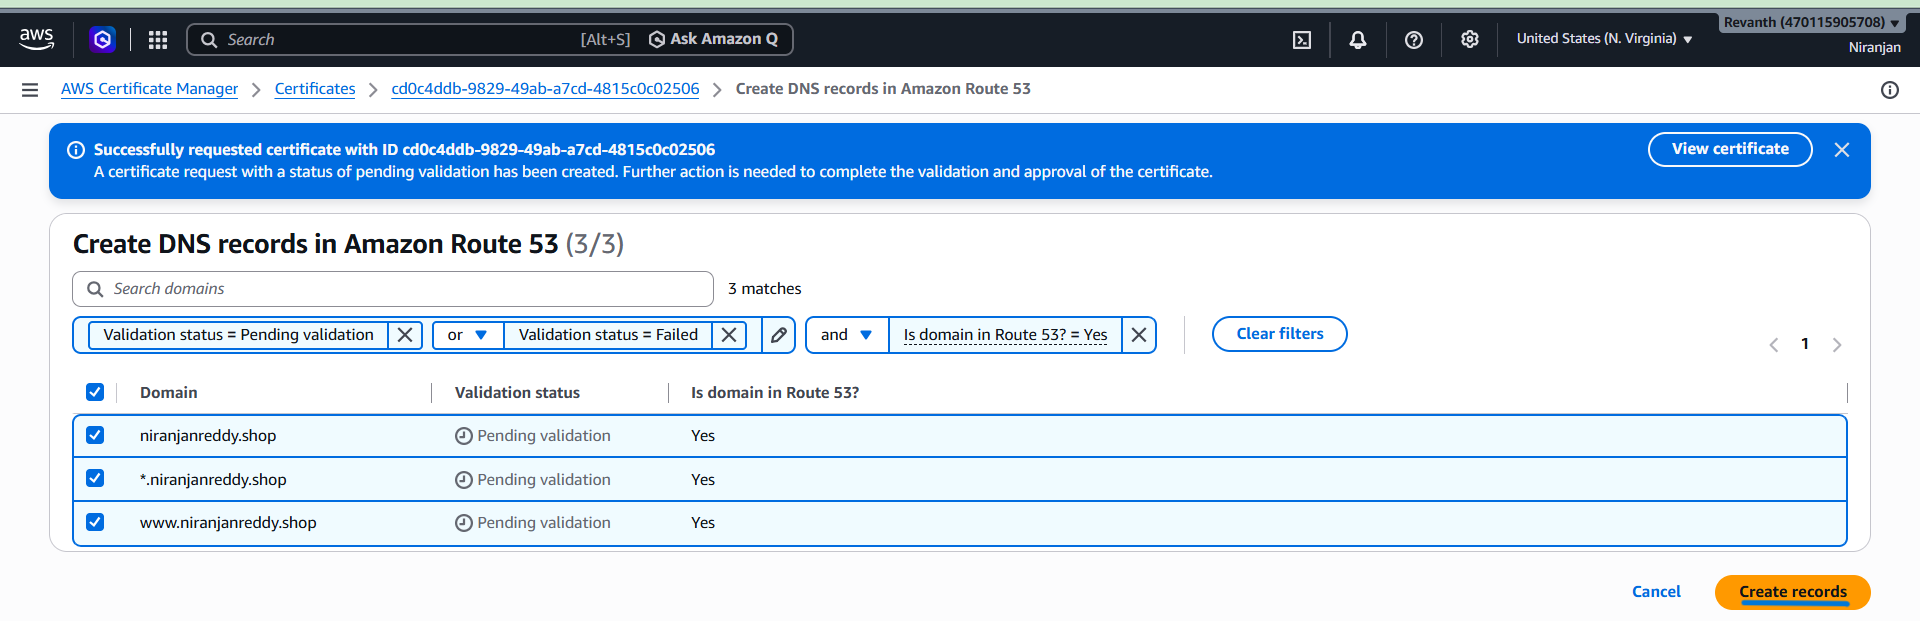
- After creating the records, open Route 53 → Hosted zones → Your domain. You can see the newly created CNAME validation records in the hosted zone. These records are used by ACM to verify domain ownership.
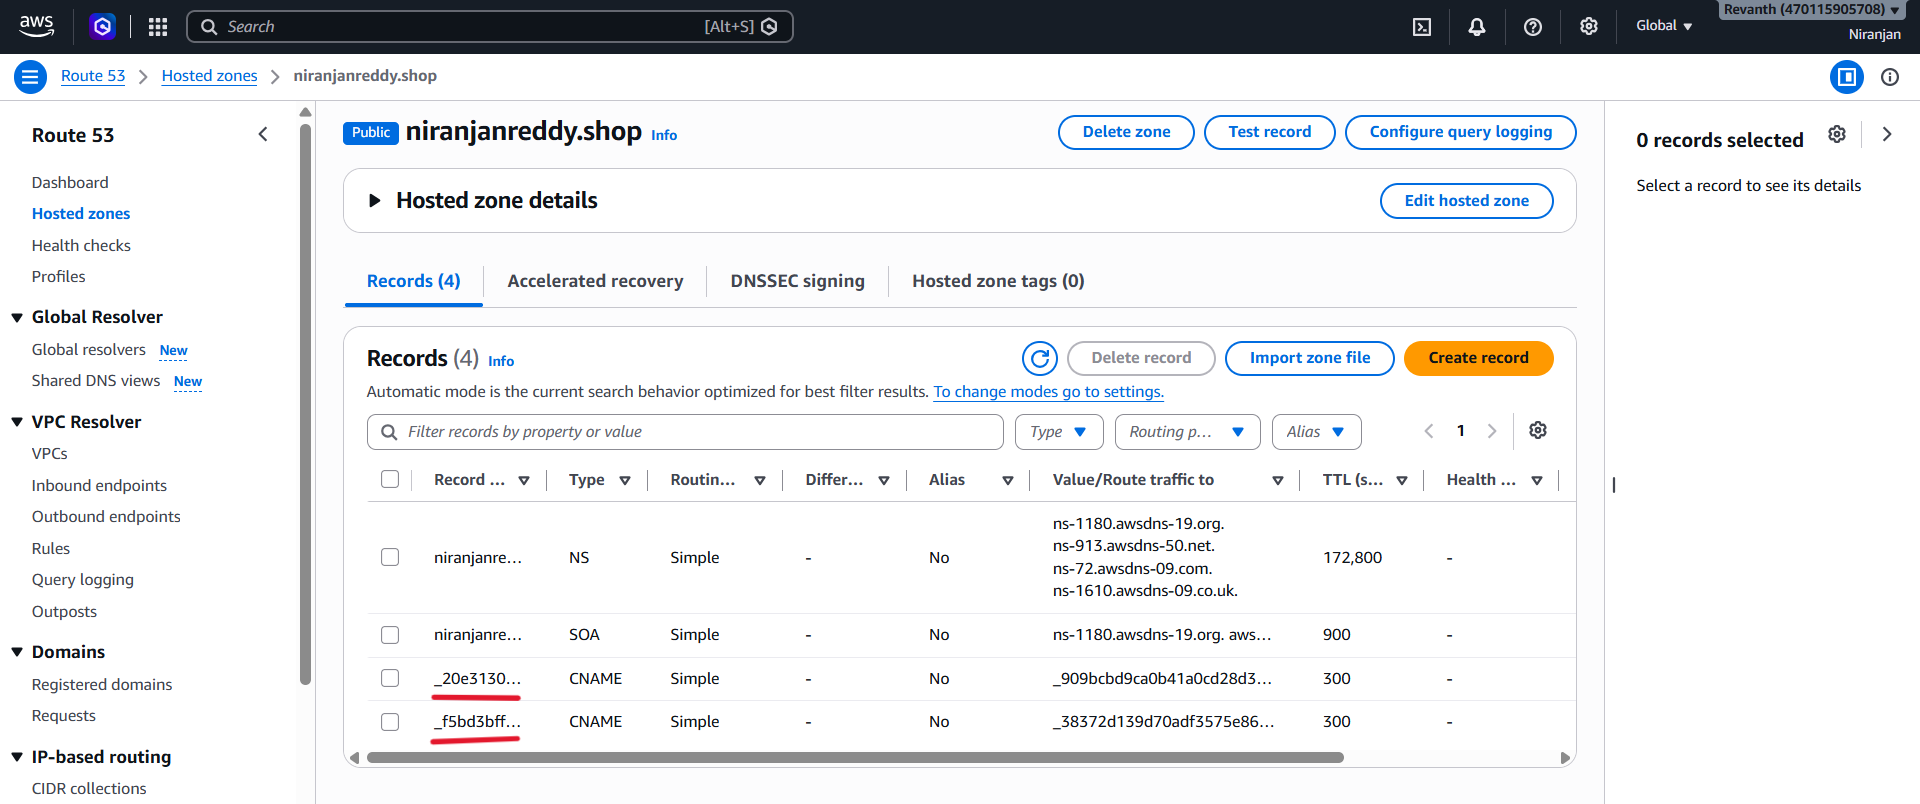
- Wait for the validation process to complete. It may take a few minutes.
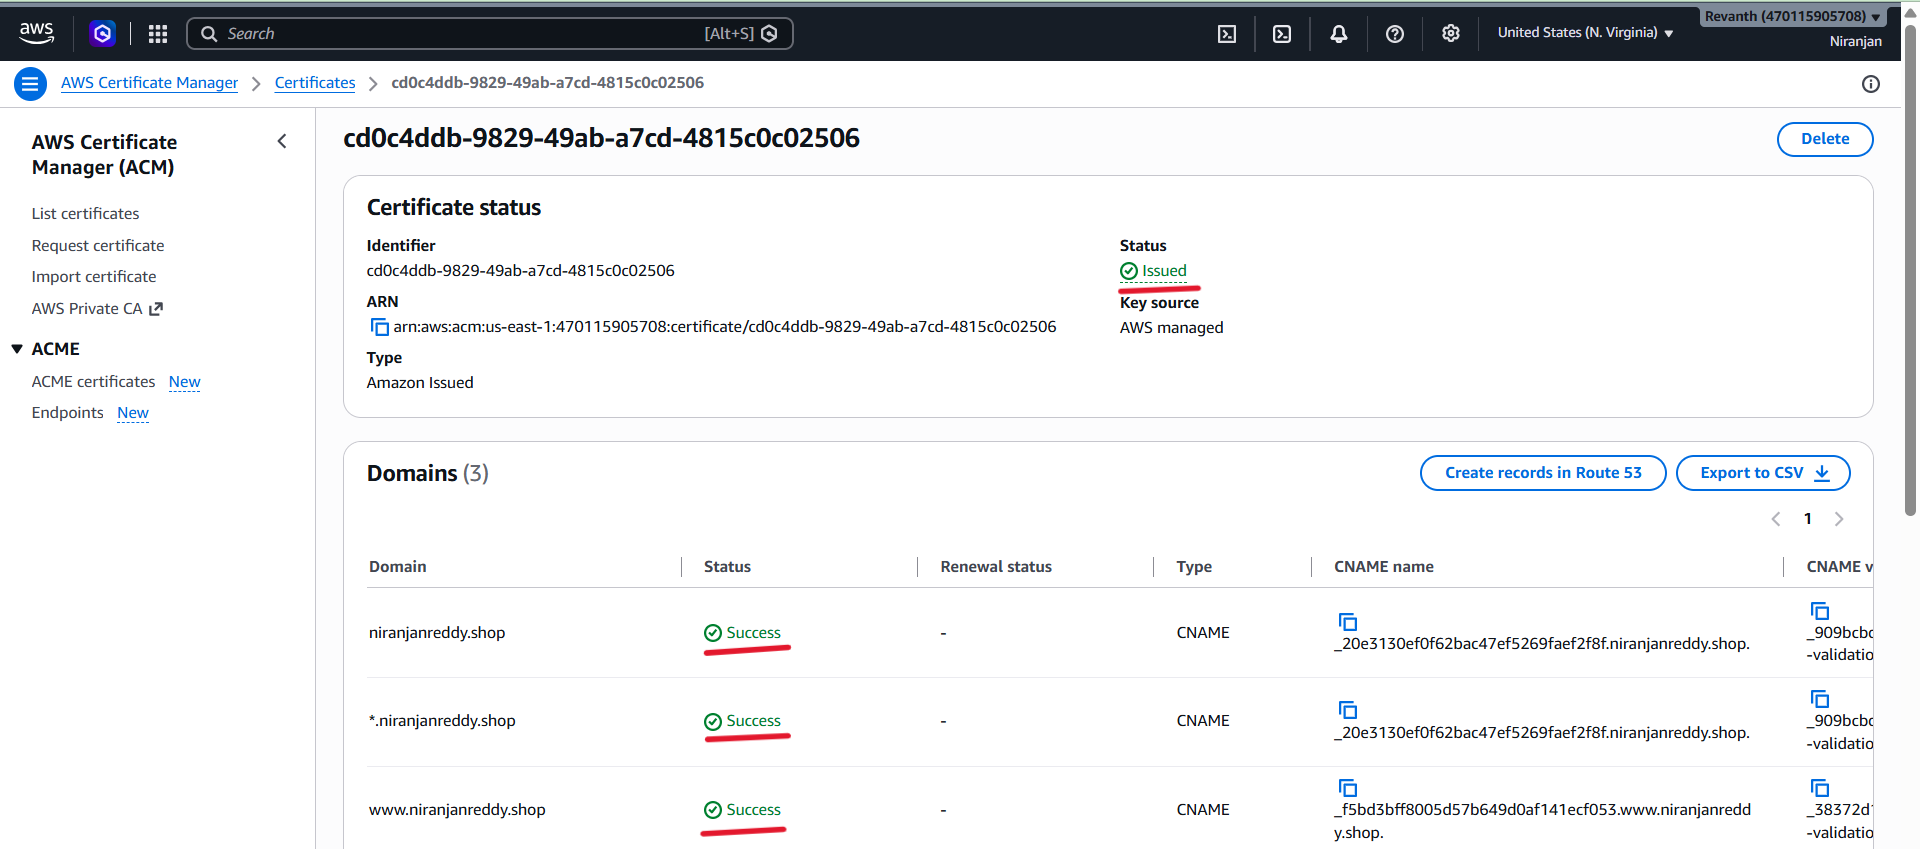
- Once validation is successful, the certificate status changes to Issued.
9.3 Add Alternate Domain Names to CloudFront Distribution
- Now that our SSL certificate has been issued, we need to tell CloudFront which custom domain names we want to use for our application.
- Currently, CloudFront is accessed using its default domain name. By adding our custom domain names, we allow CloudFront to serve the application when users access URLs such as
https://yourdomain.comorhttps://www.yourdomain.com. - In simple terms, we are connecting our custom domain names to the CloudFront distribution and attaching the SSL certificate so CloudFront can serve our application securely over HTTPS.
Step 1: Open CloudFront Distribution
- Open the CloudFront Console.
- Select Distributions.

- Open the distribution currently hosting your frontend application.
- Navigate to the General tab.
- Click Edit.
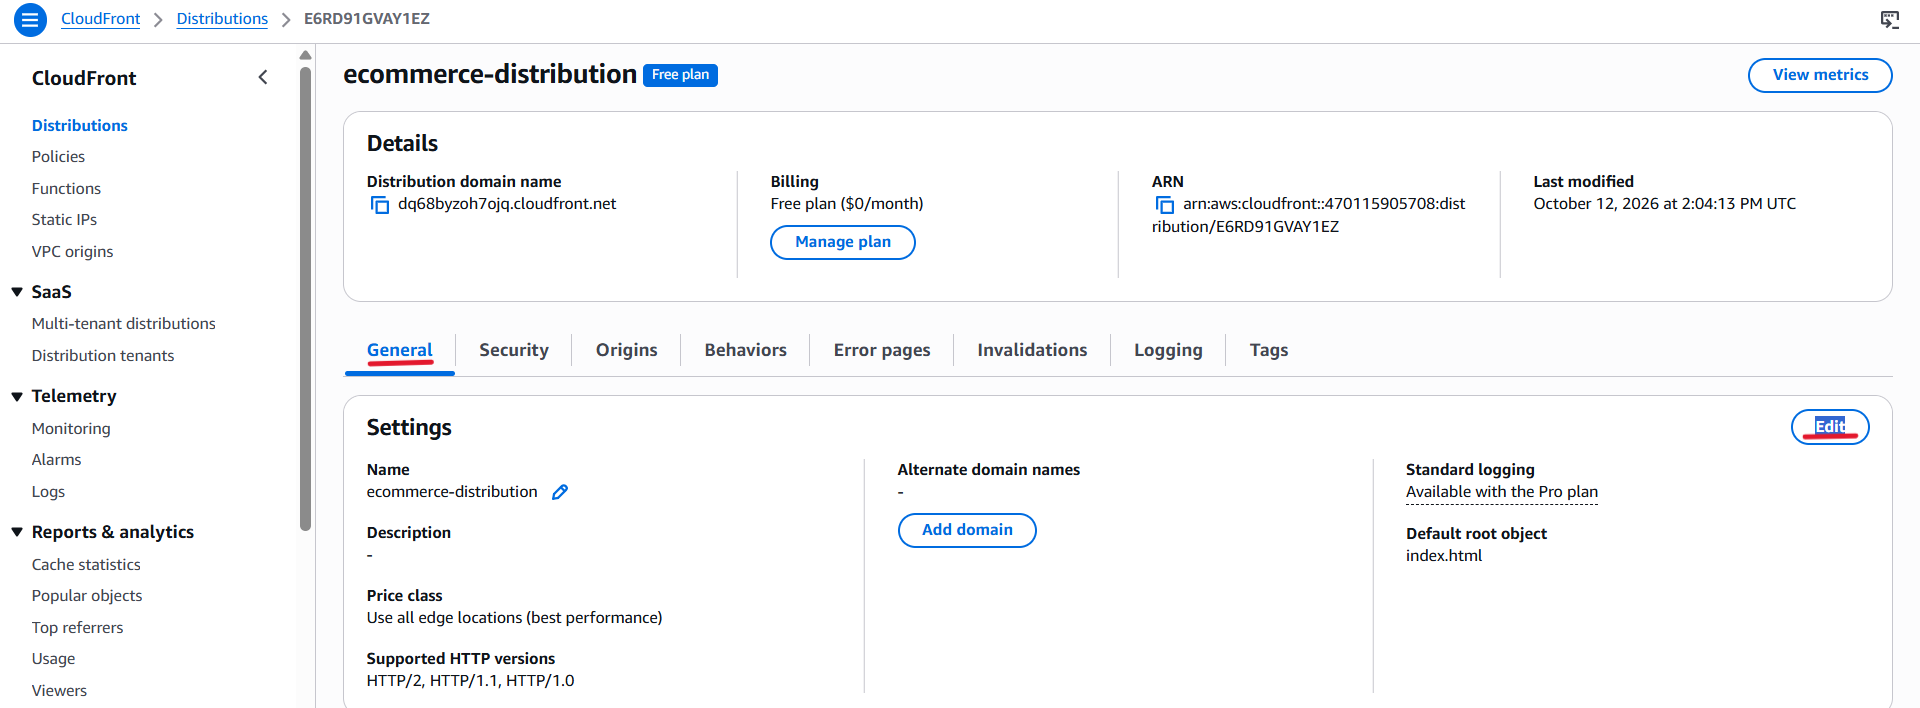
Step 2: Configure Alternate Domain Names
Under Alternate domain names (CNAMEs), add item:
yourdomain.comwww.yourdomain.com
These entries tell CloudFront that users can access this distribution using the configured custom domain names.
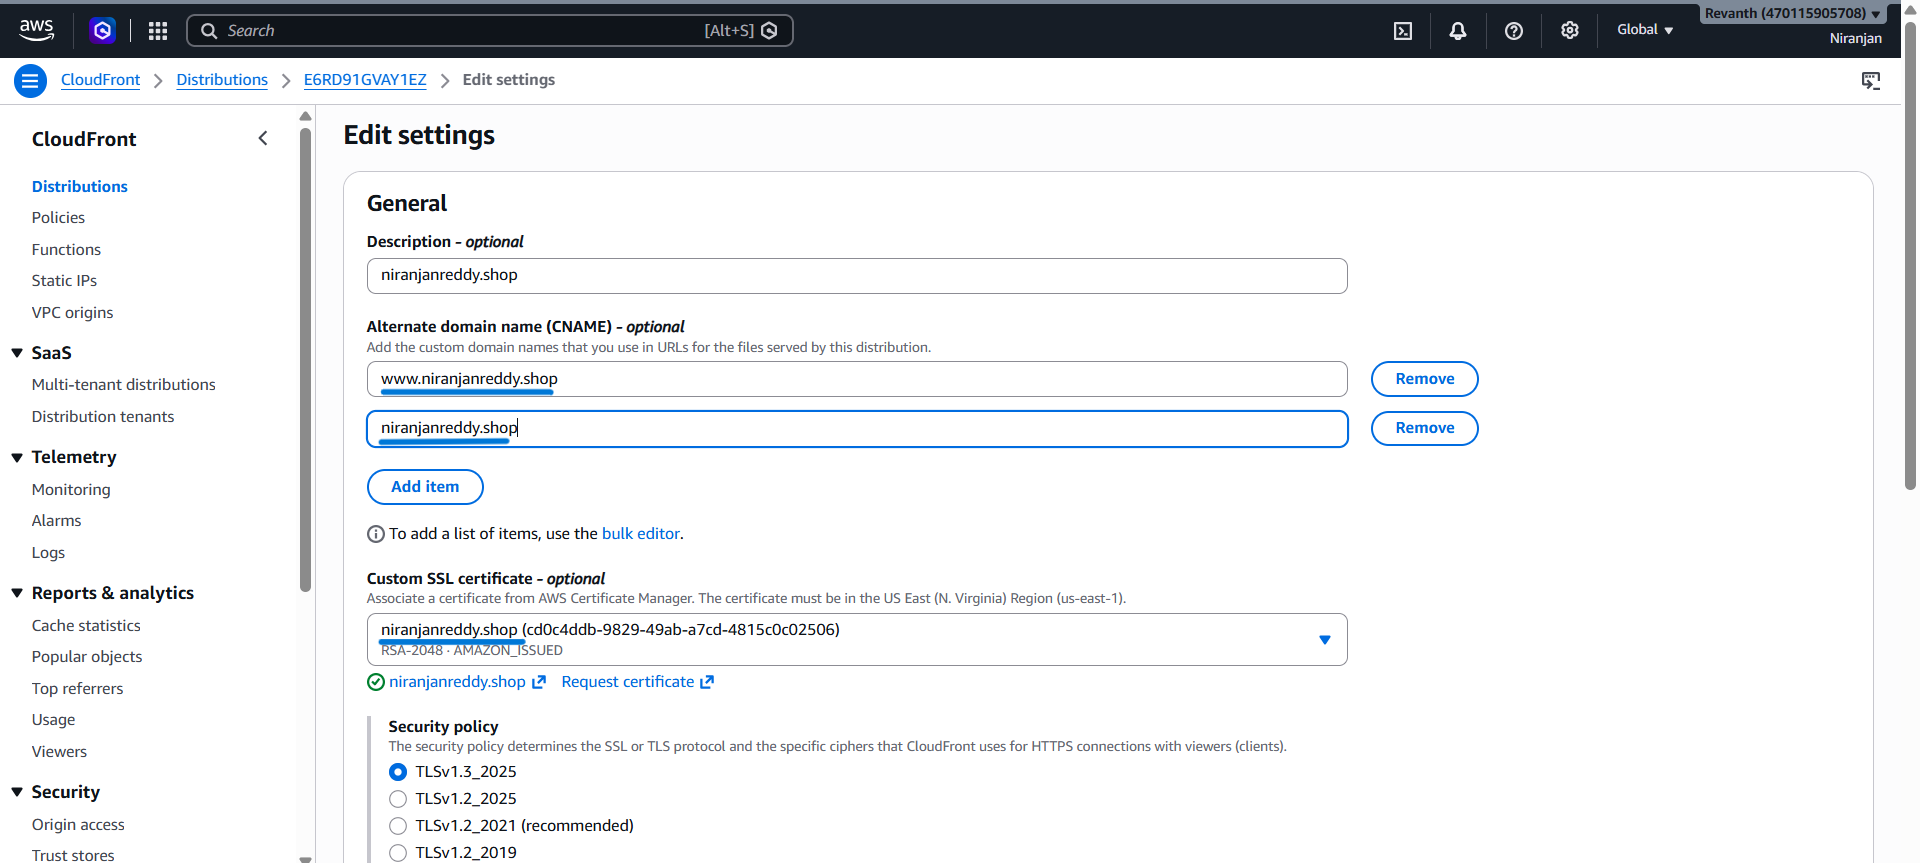
Step 3: Select the Custom SSL Certificate
- Locate the Custom SSL certificate setting.
- Select the ACM certificate that we created in the
us-east-1region.

- Keep the remaining settings unchanged.
- Click Save changes.
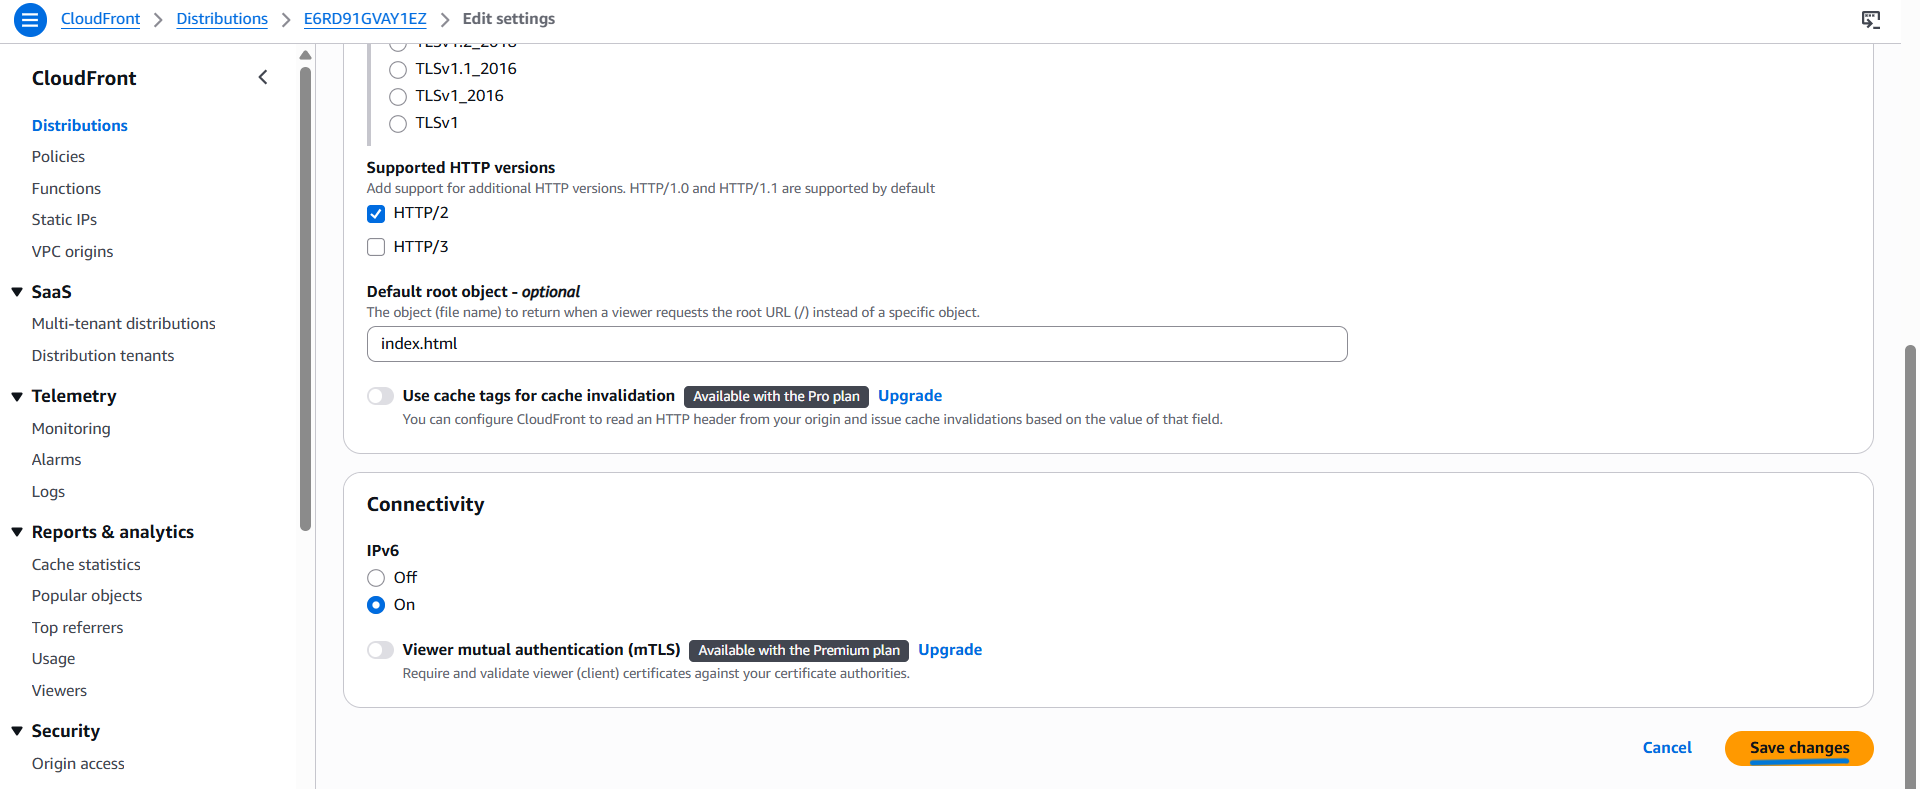
- CloudFront will start deploying the updated configuration.
- Wait until the distribution deployment is complete before proceeding to the next step.
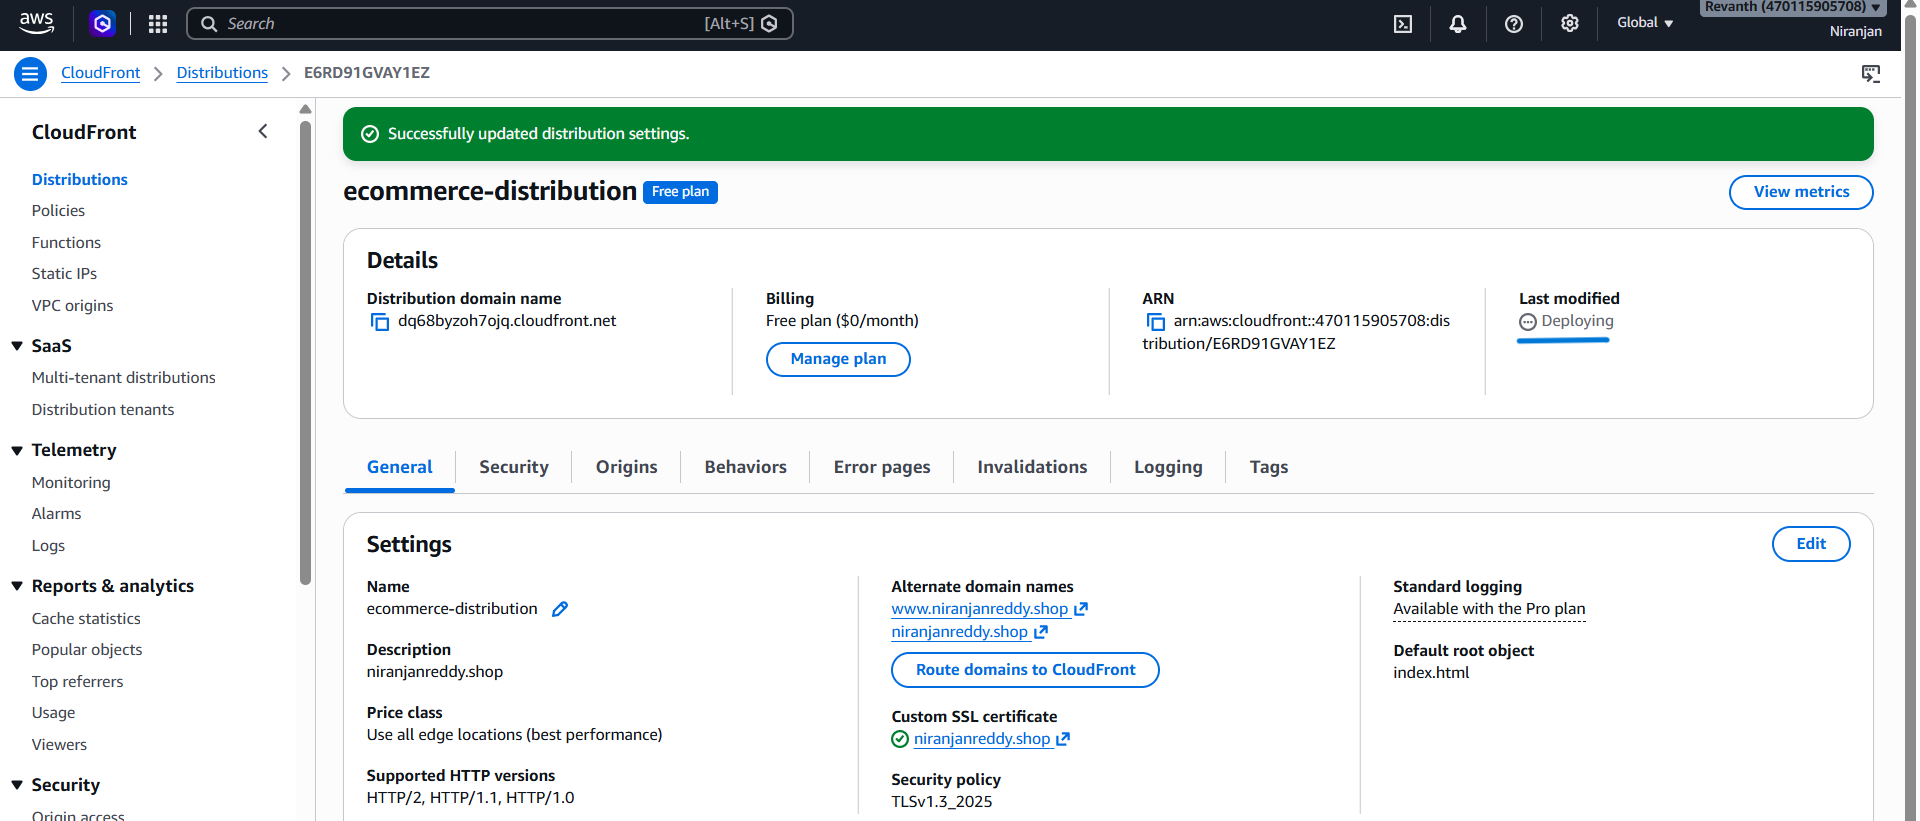
9.4 Create Route 53 Records
Now we need to connect our custom domain name to the CloudFront distribution.
For this, we will create two DNS records in the Route 53 Public Hosted Zone:
- Root domain:
yourdomain.com - Subdomain:
www.yourdomain.com
Both records will point to the same CloudFront distribution using Alias records.
Step 1: Create an A Record for the Root Domain
- Open Route 53 → Hosted zones.
- Select your domain's Public Hosted Zone.
- Click Create record.
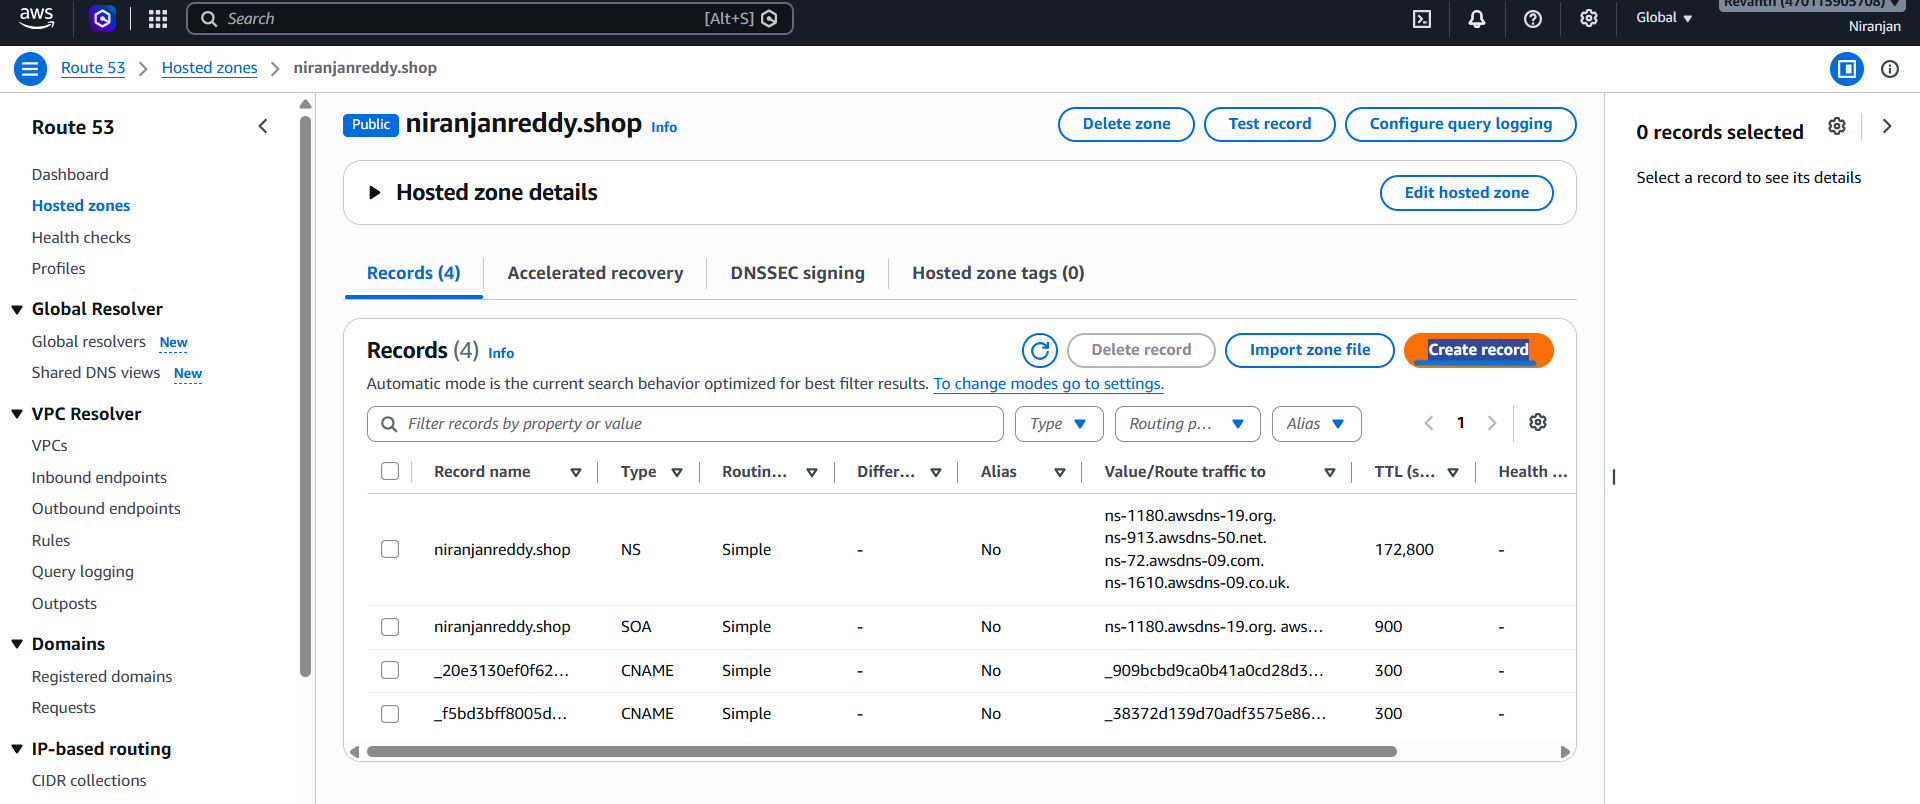
- Configure the following settings:
- Record name: Leave empty.
- Record type: A
- Alias: Enable.
- Route traffic to: Alias to CloudFront distribution.
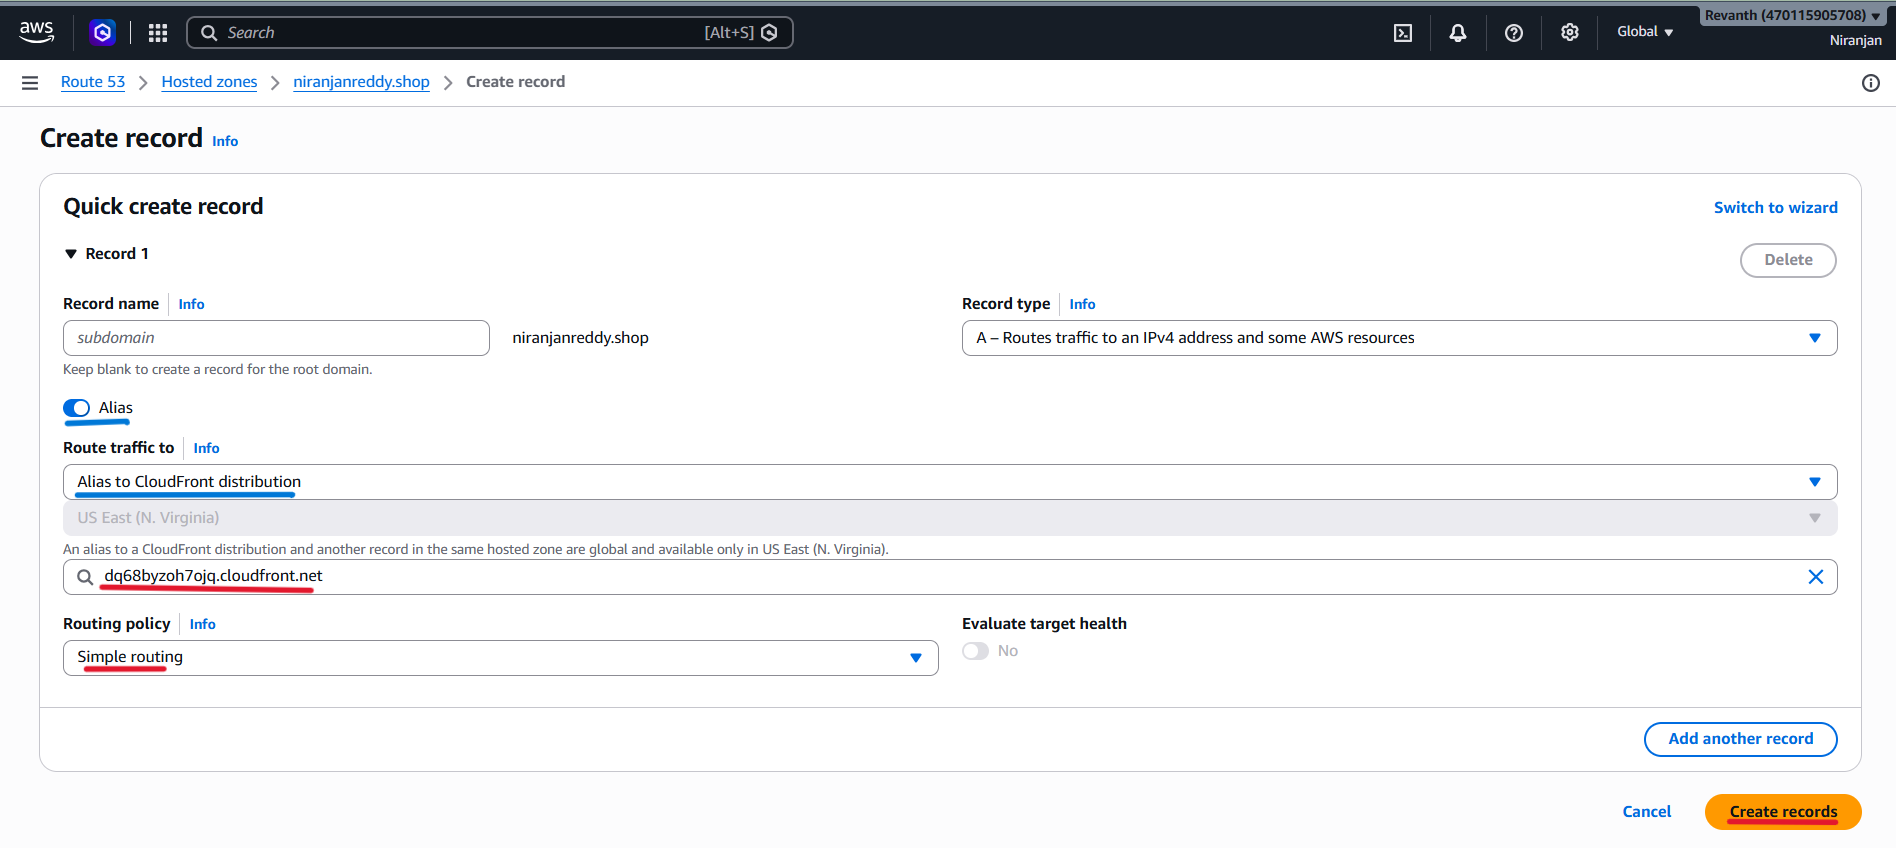
- Choose distribution: Select your CloudFront distribution.
- Routing policy: Simple routing.Click Create records.
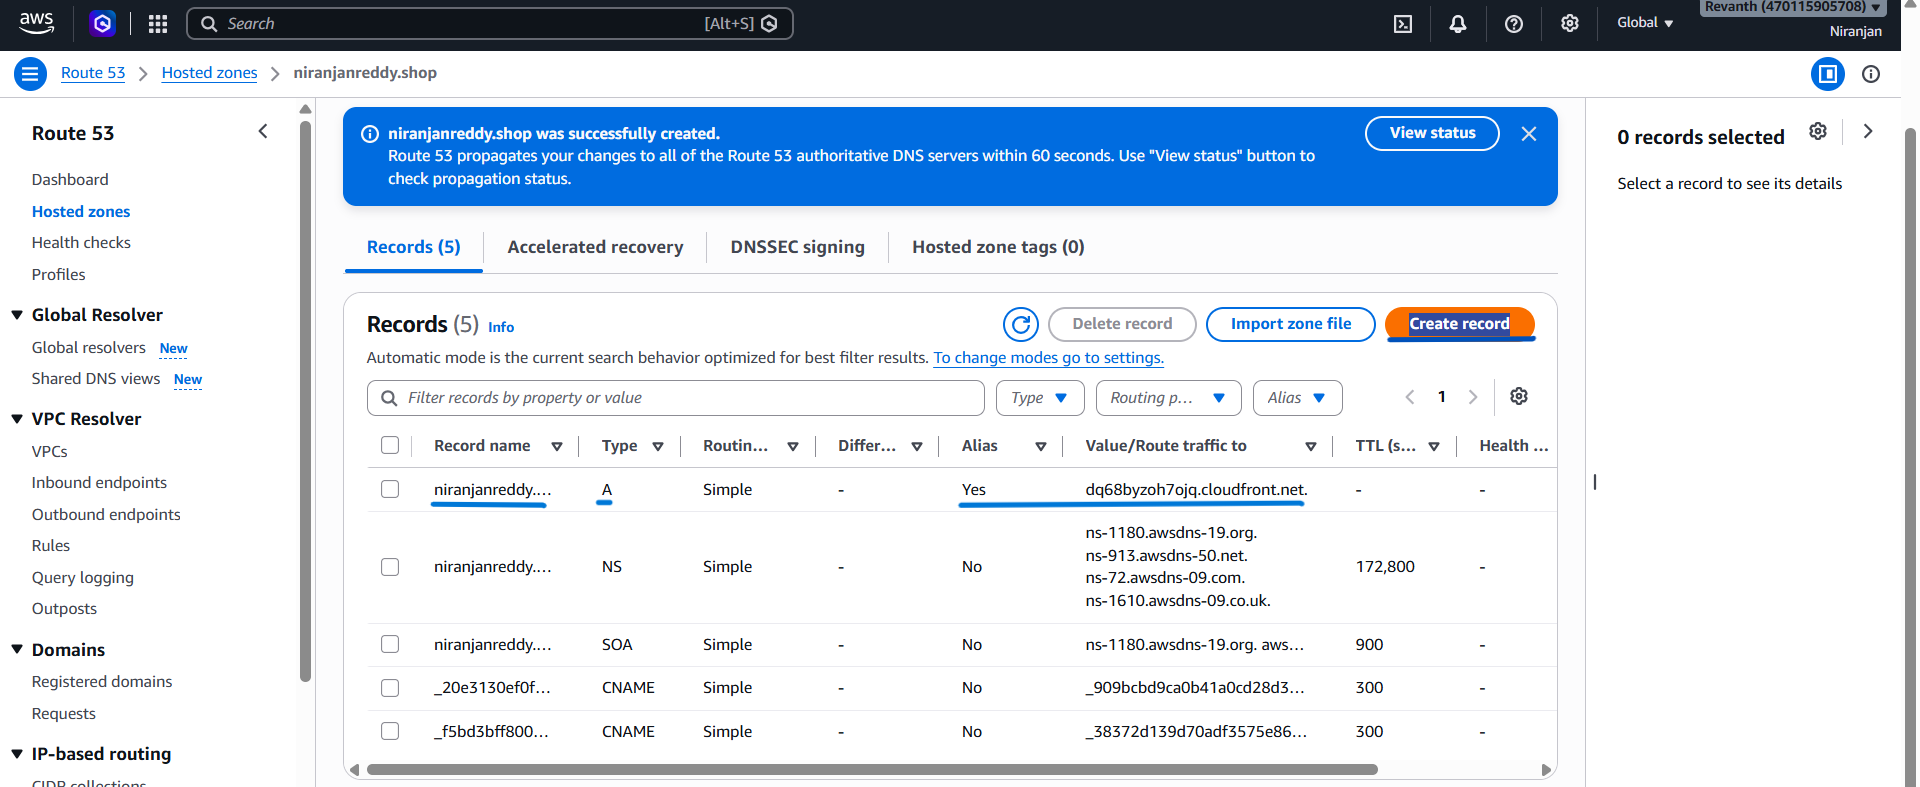
Step 2: Create an A Record for the www Subdomain
Create another record with the following settings:
- Record name:
www - Record type: A
- Alias: Enable.
- Route traffic to: Alias to CloudFront distribution.
- Choose distribution: Select the same CloudFront distribution.
- Routing policy: Simple routing.
Click Create records.
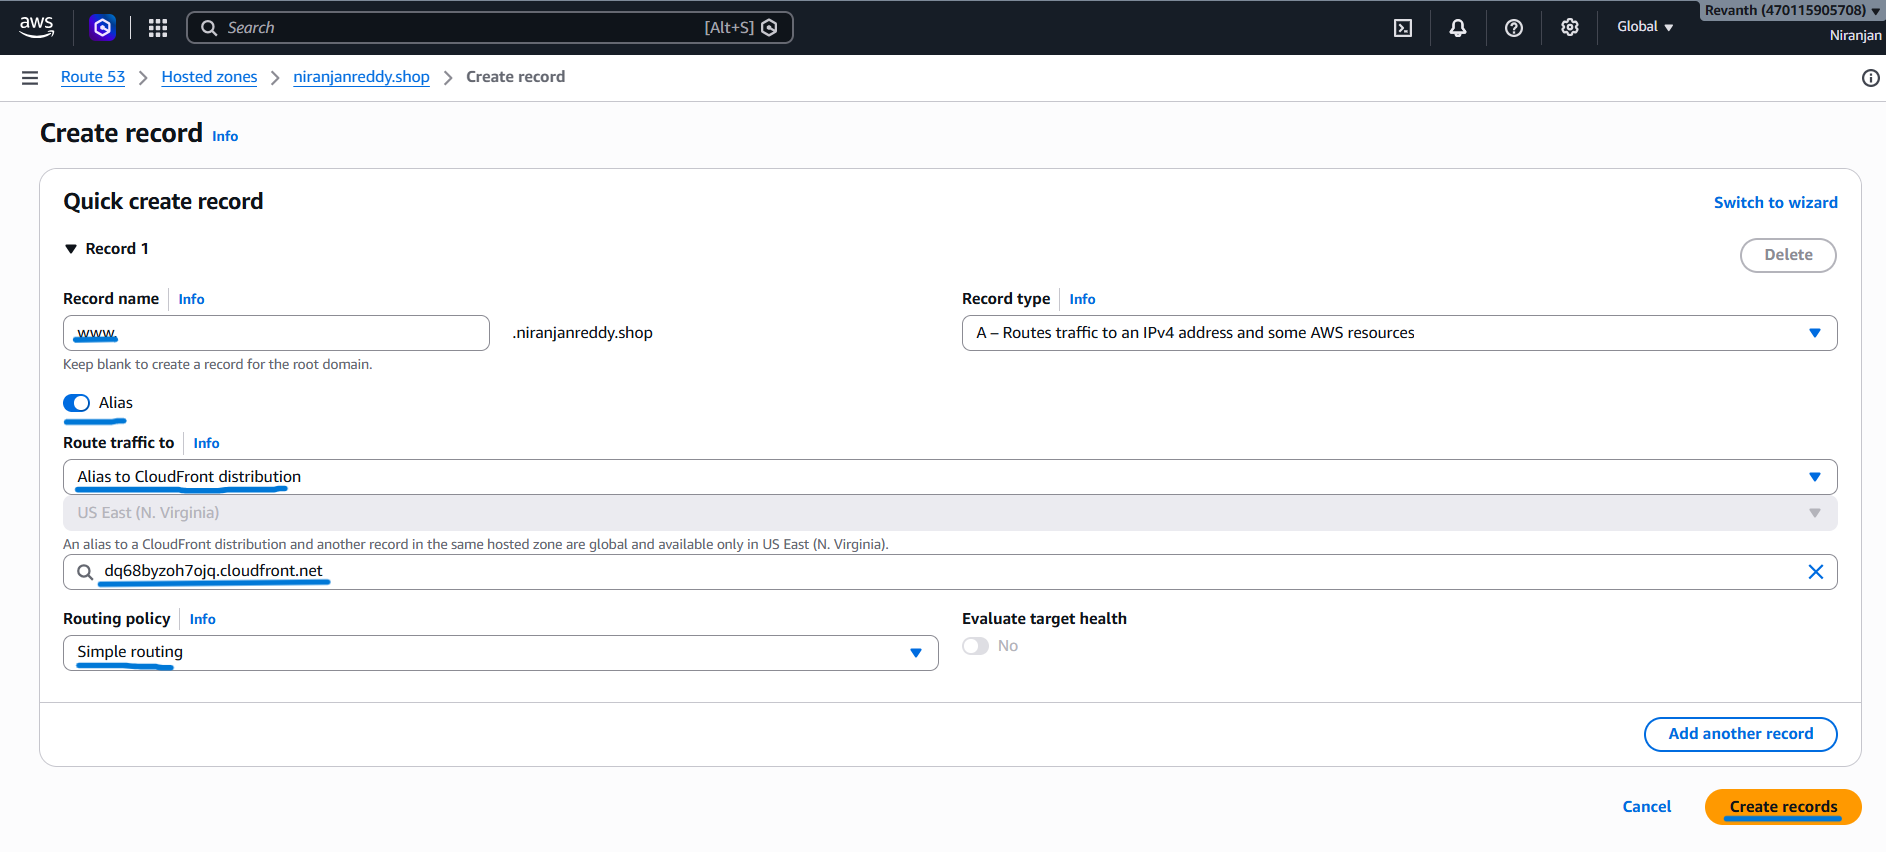
After creating both records, Route 53 will route requests for the root domain and www subdomain to the CloudFront distribution.
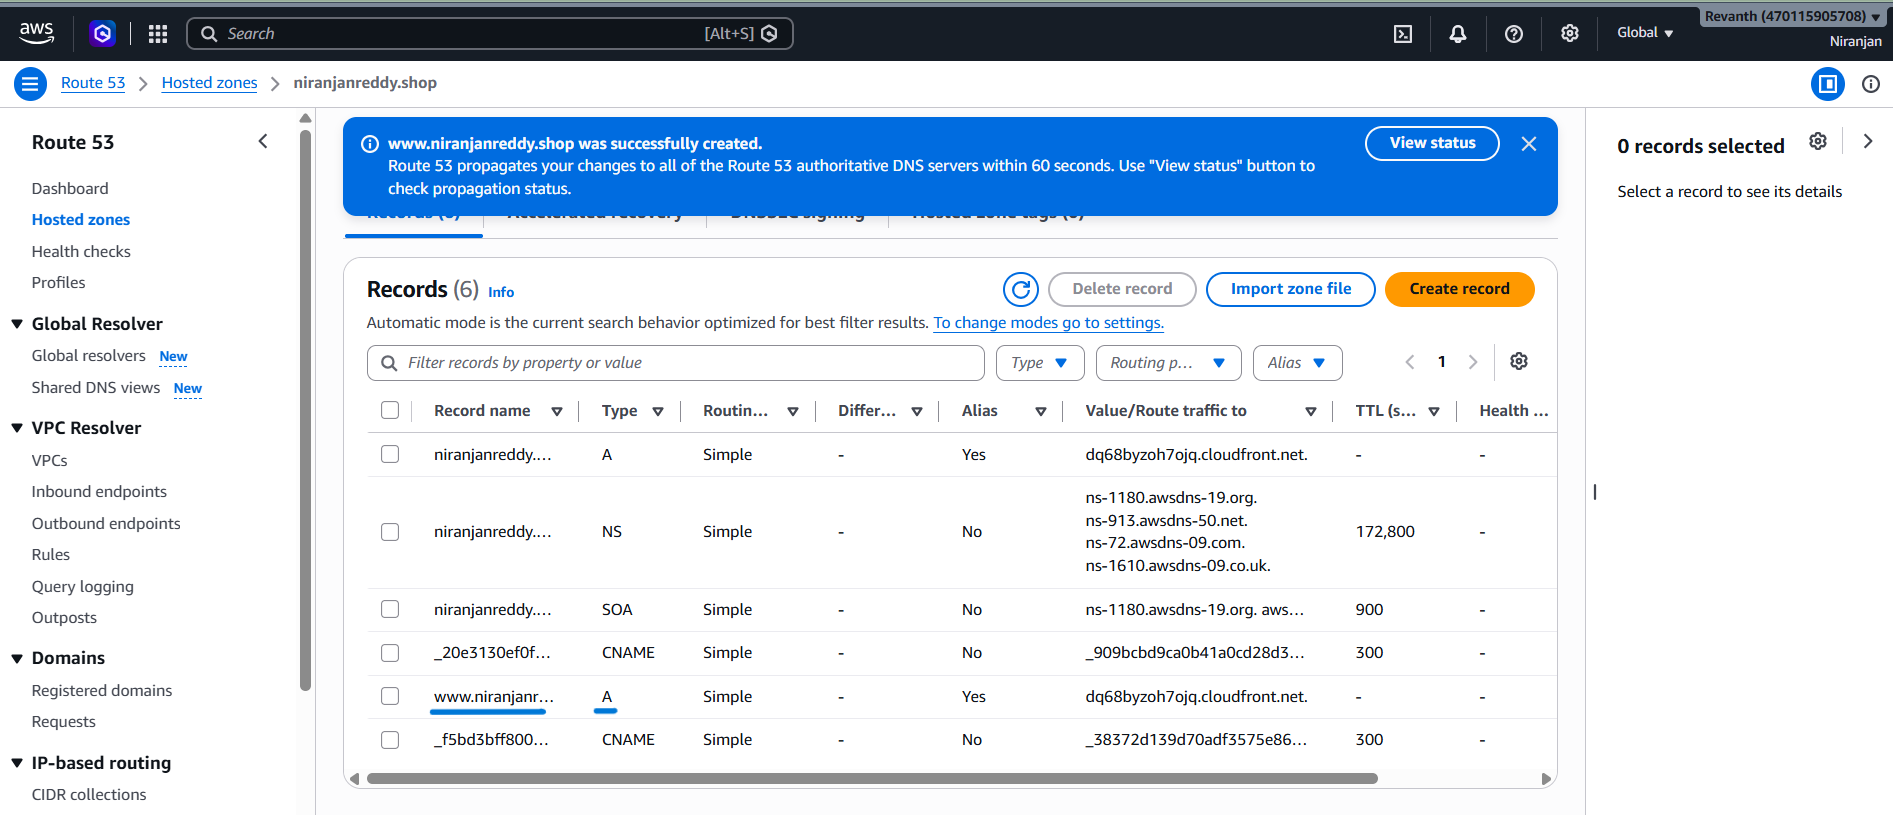
9.6 Test the Application Using the Custom Domain
Now all the configurations are complete. Let's verify that our eCommerce application is accessible through the custom domain.
Step 1: Open the Application
Open your browser and enter your custom domain:
https://yourdomain.com
Verify that the eCommerce application loads successfully.
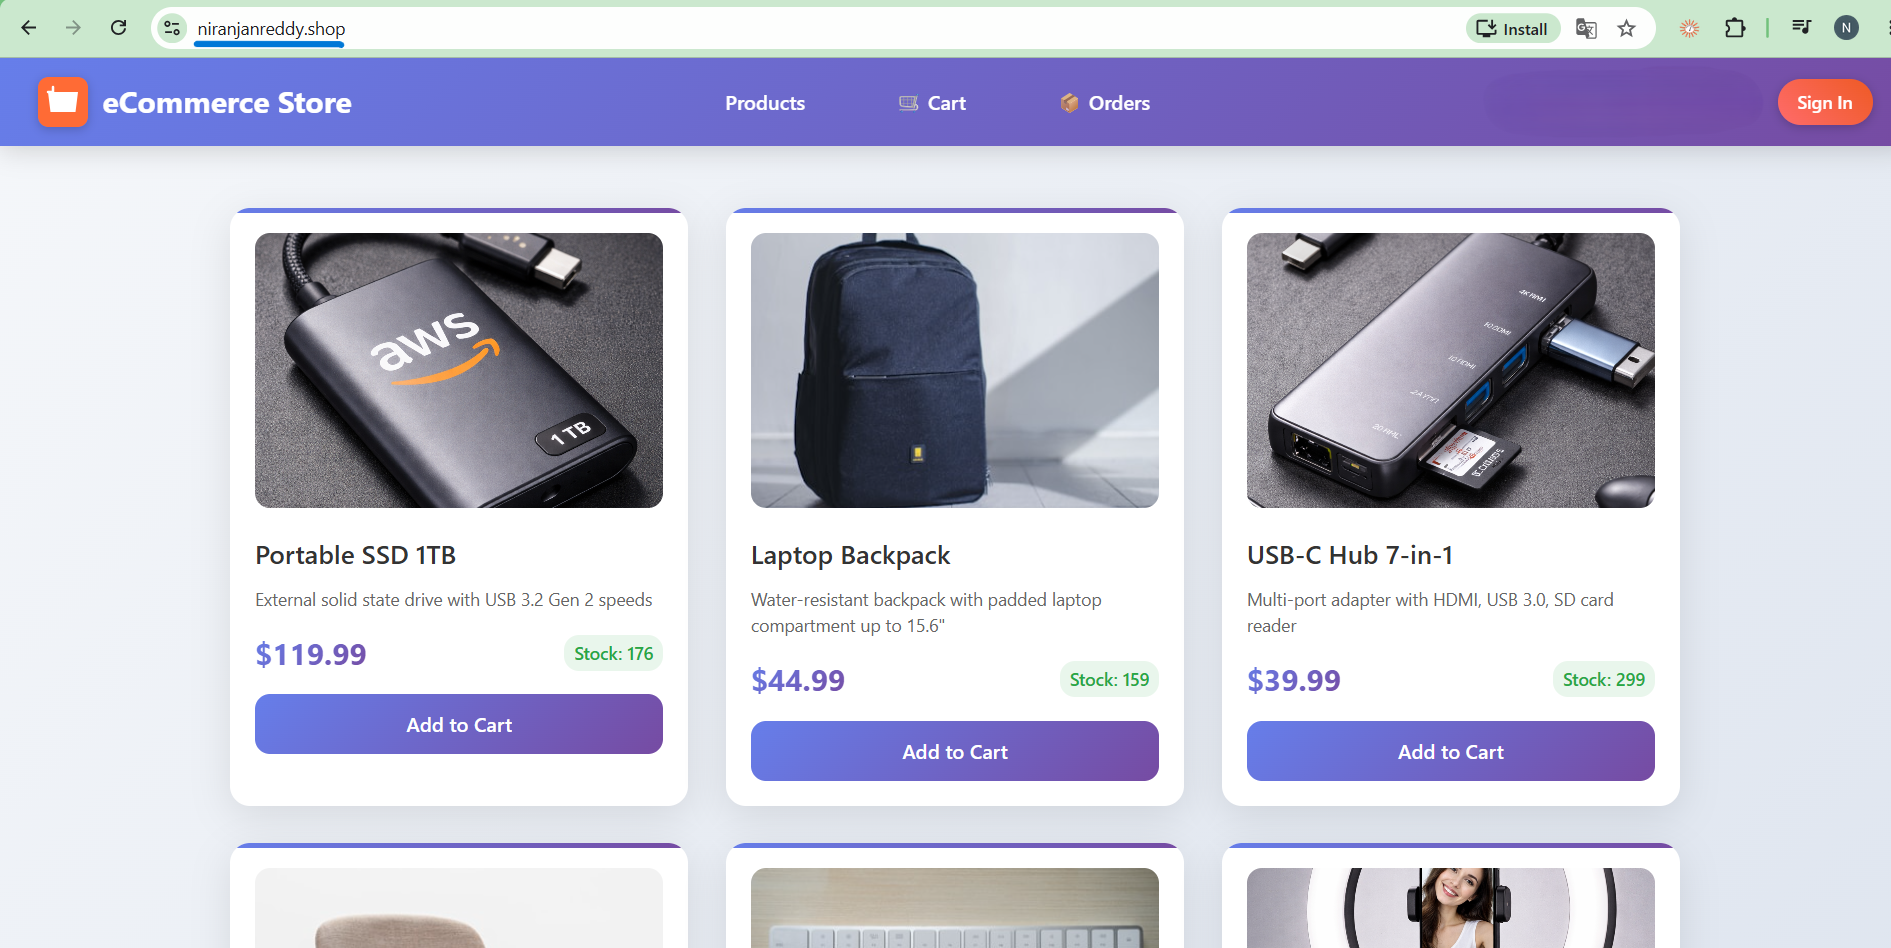
Step 2: Verify the SSL Certificate
- Click the browser's site information or connection icon near the address bar.
- Verify that the connection is secure.
- Open the certificate details and confirm that the certificate is valid and issued by Amazon.
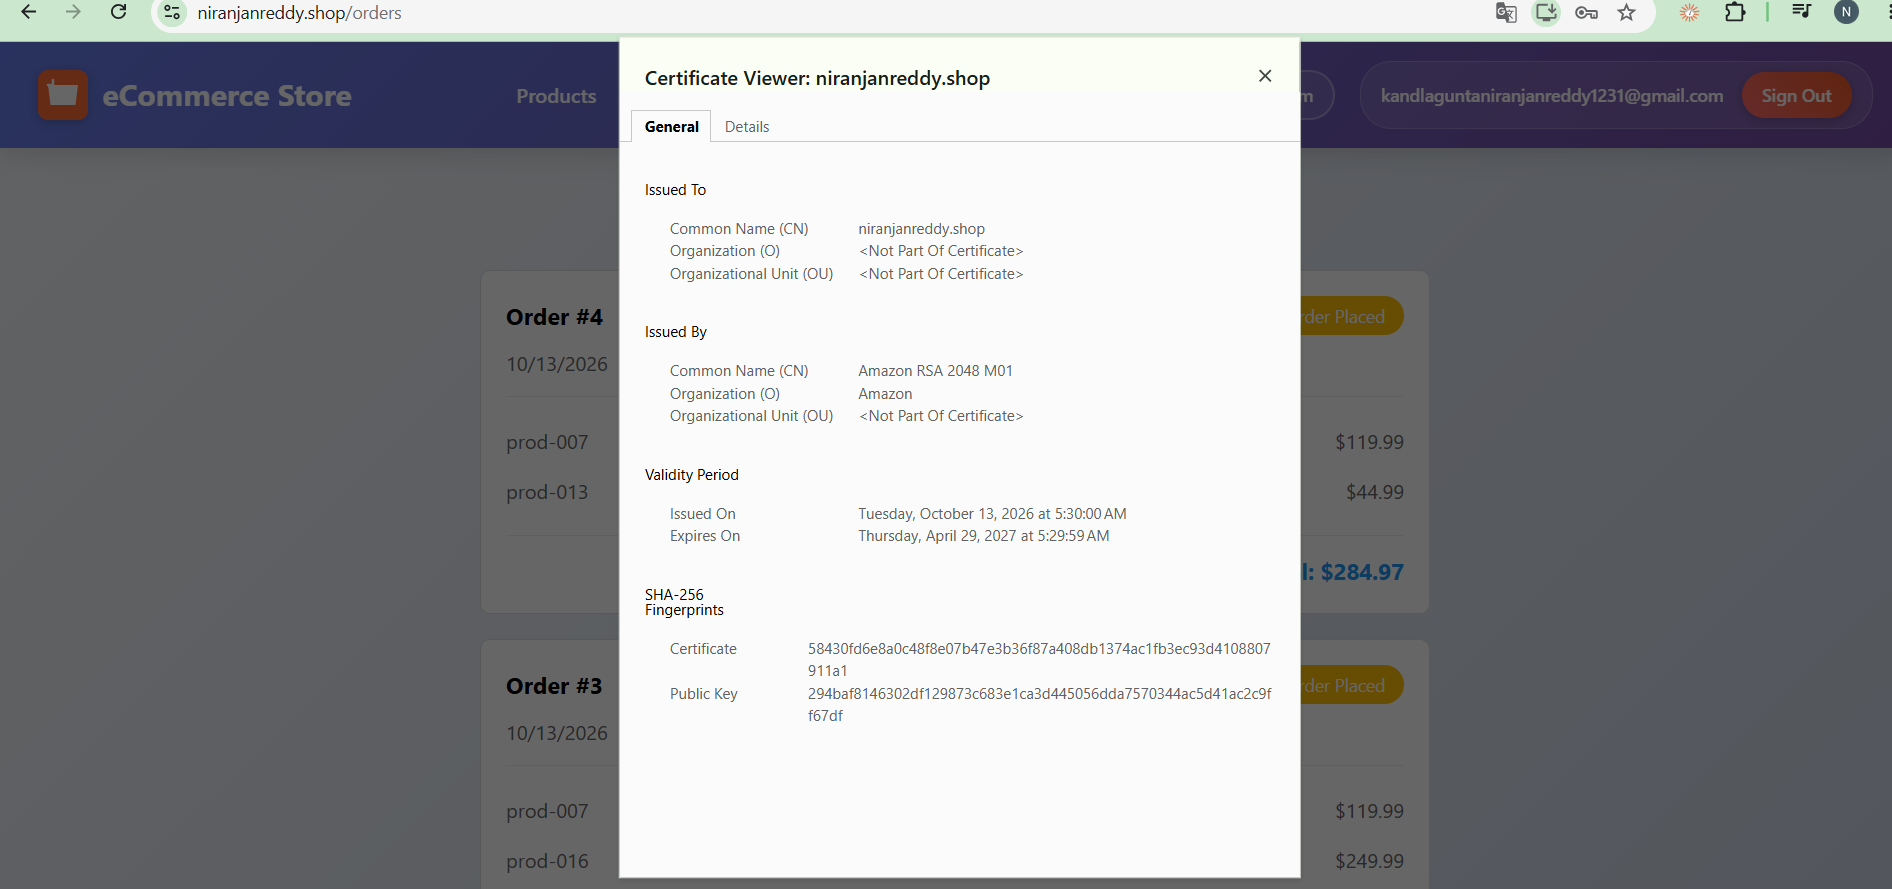
Step 3: Test Application Functionality
Verify that the existing application features are working:
- Browse products and verify that product images load.
- Sign in using your Cognito account.
- Add products to the cart.
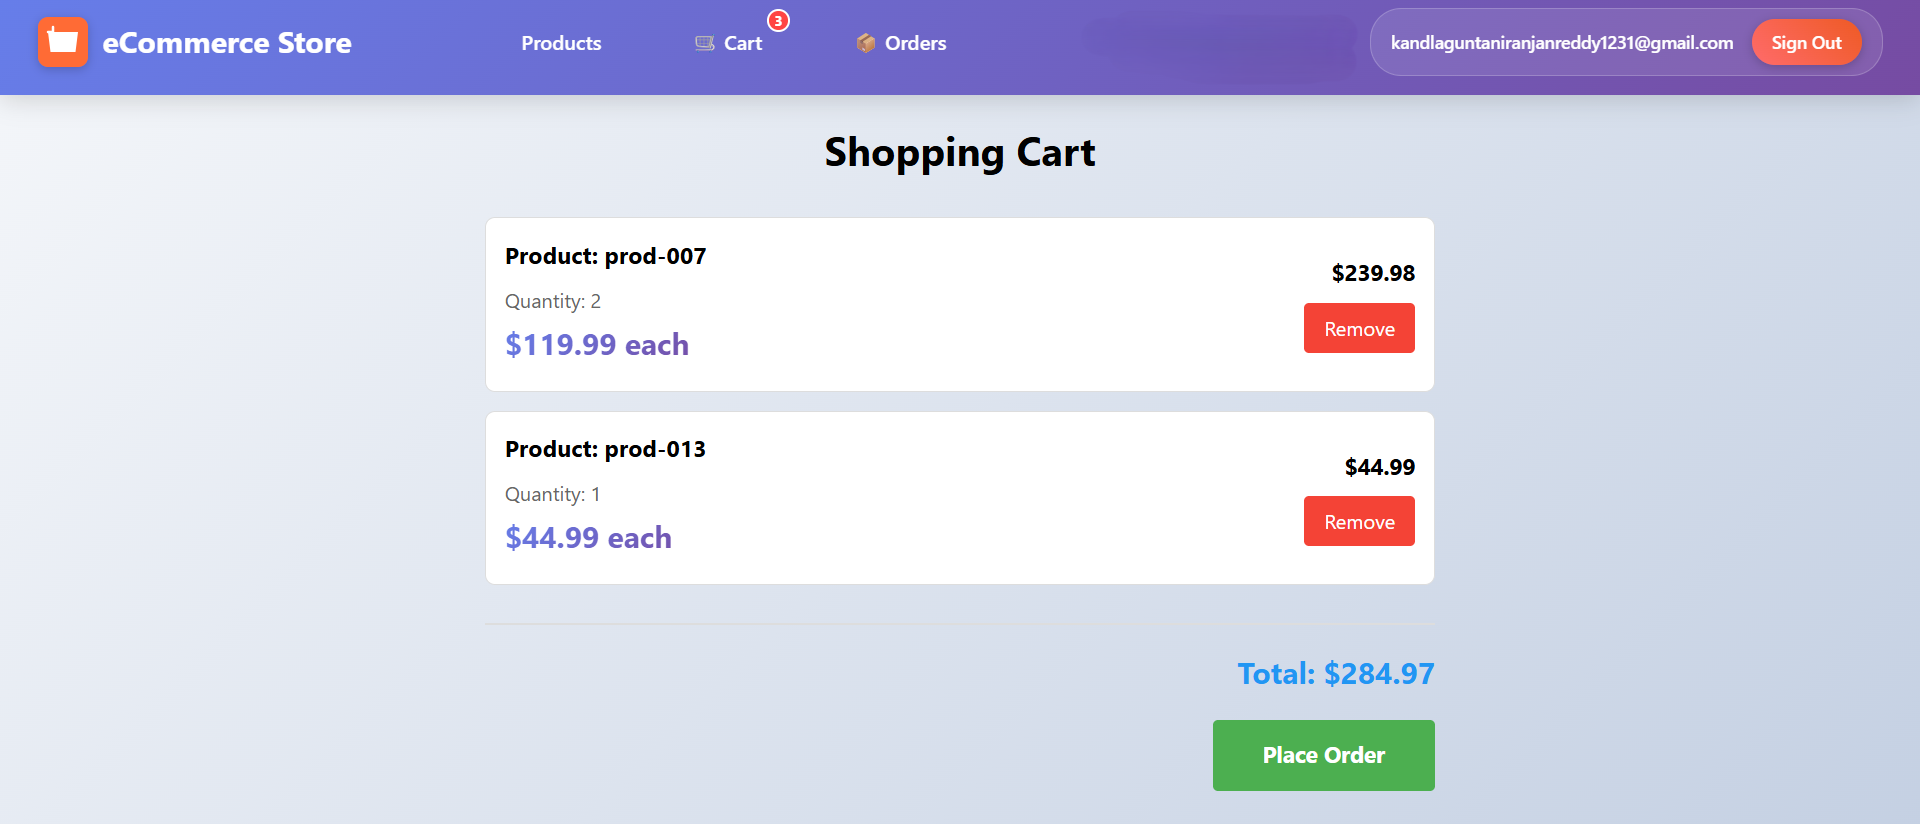
- Place a test order.

- Verify that the order is placed successfully.
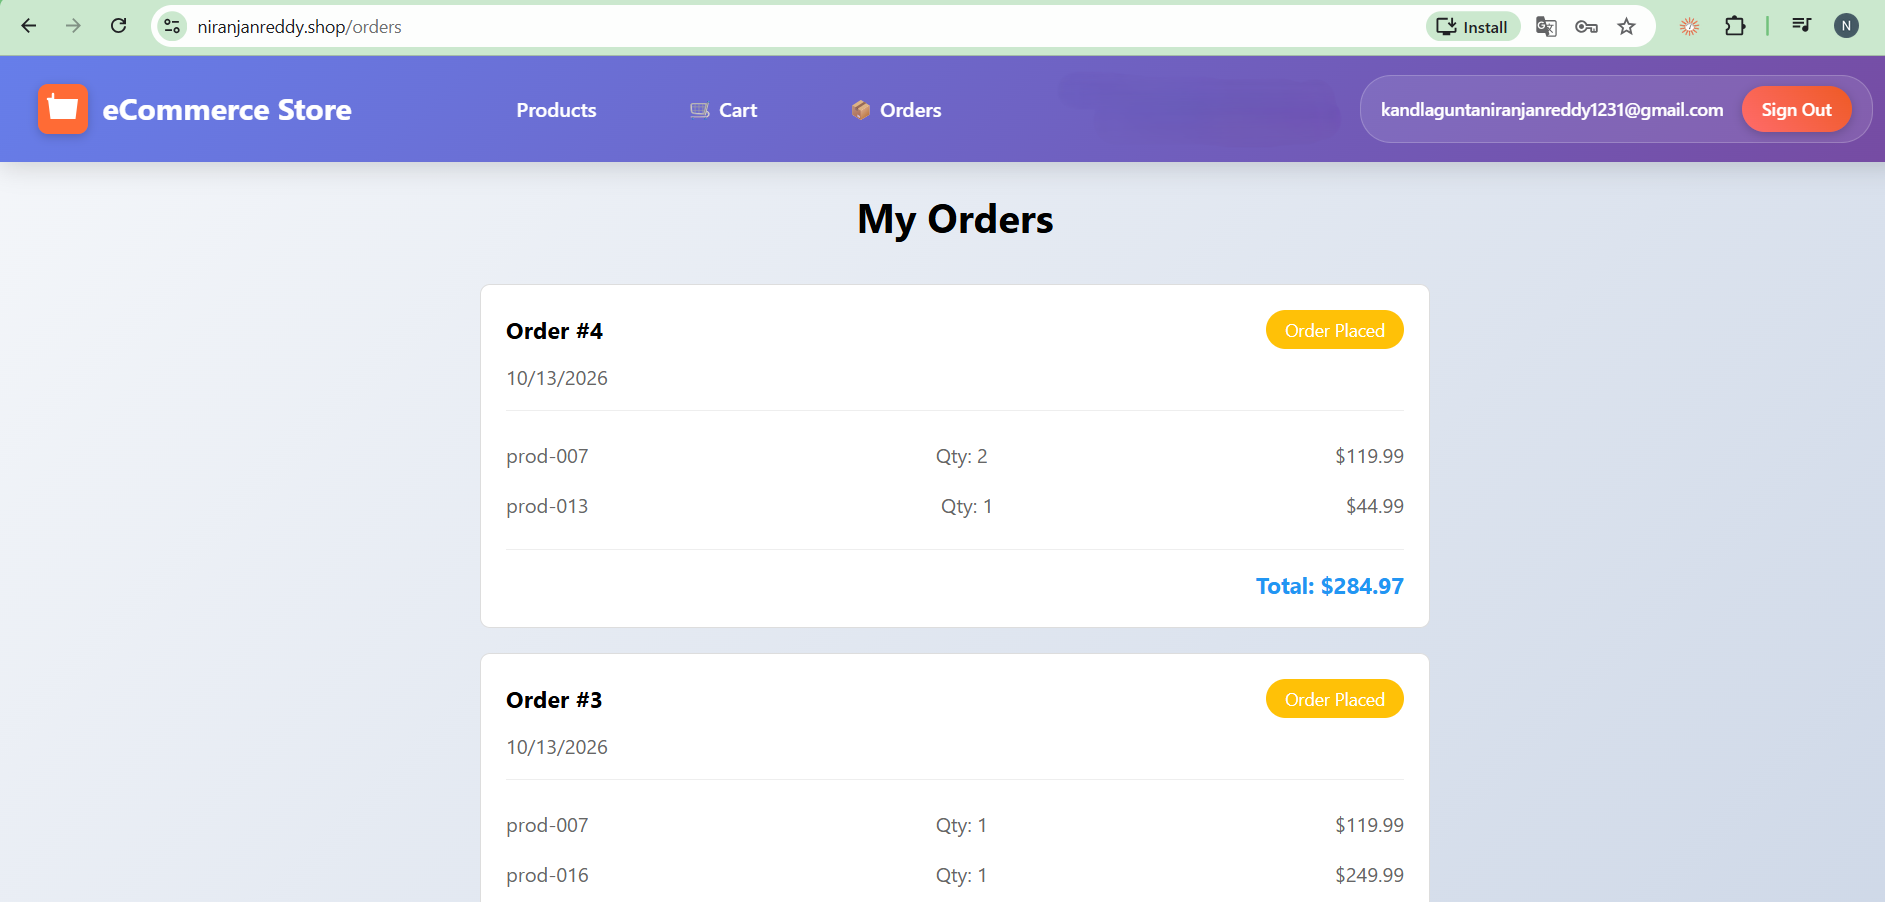
- Check your email for the order notification.
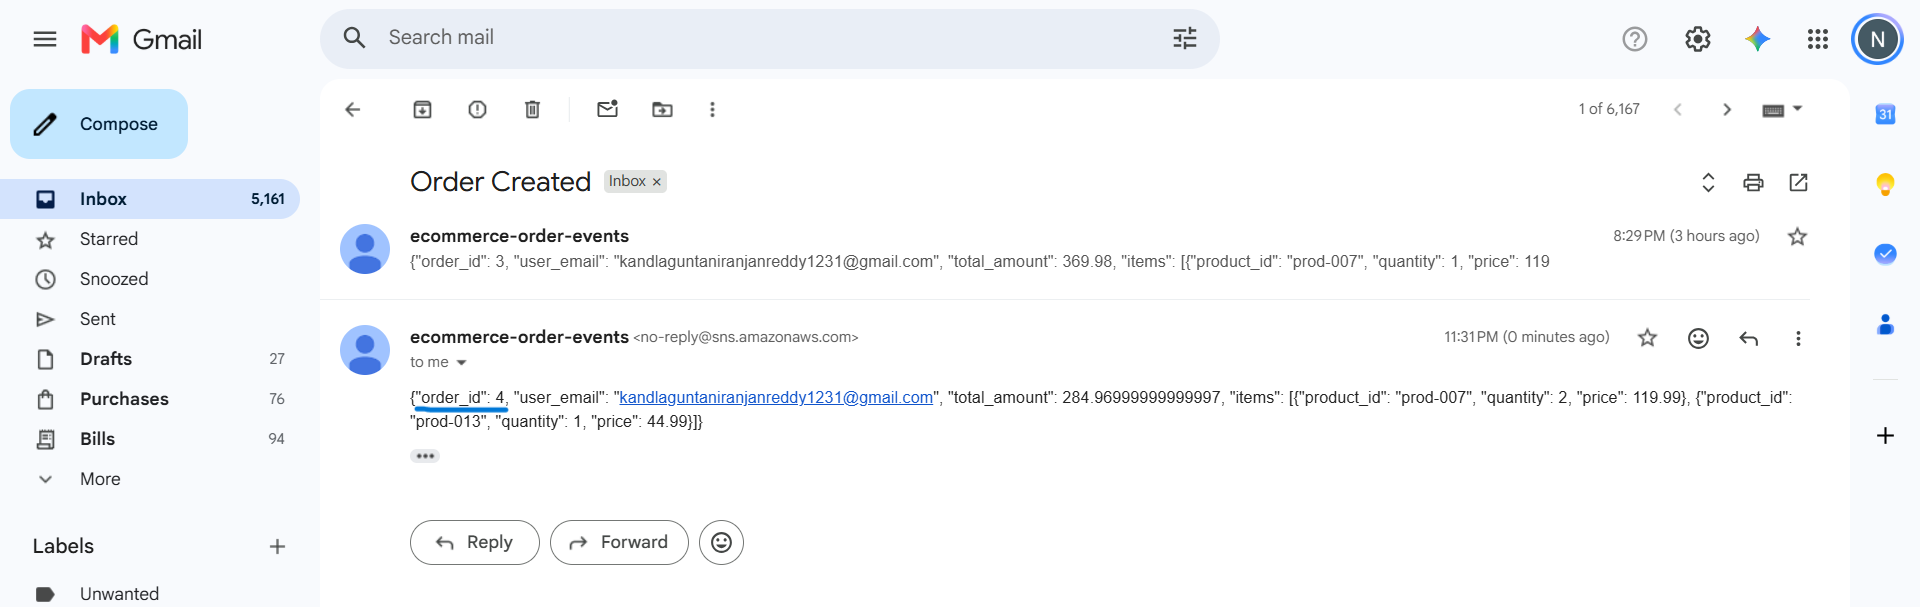
This confirms that the application is working end to end using the custom domain name.
Conclusion
Congratulations! We have successfully configured a custom domain name and enabled HTTPS for our eCommerce application using AWS.
We have used:
- Amazon Route 53 for DNS management.
- AWS Certificate Manager (ACM) to request and validate the SSL certificate.
- Amazon CloudFront to configure the custom domain and HTTPS access.
Our eCommerce application is now accessible through our own domain name instead of the default CloudFront URL.
Next Steps
In the next module, we will discuss the final project enhancements and cleanup activities, including how to remove the AWS resources created during this course to avoid unnecessary ongoing costs.
Continue to Module 10: Cleanup.
Module 10: AWS Resource Cleanup
1. Overview
In this final module, we will clean up all AWS resources created during our full-stack e-commerce application deployment.
The purpose of this cleanup is to avoid unnecessary AWS charges and remove resources that are no longer required.
We will follow the correct deletion order to avoid dependency issues between AWS services.
Important: Before starting the cleanup, save any application data, configuration details, or resources you may need later. Deleting these resources may permanently remove application data.
2. Cleanup Order
Follow the steps below in sequence to remove all project-related AWS resources.
Step 1: Custom Domain and SSL Configuration (Module 9)
First, remove the custom domain configuration.
Amazon Route 53
- Delete the application-specific A (Alias) records pointing to CloudFront.
- Delete the CNAME records created for the application, if any.
- Delete other application-specific DNS records.
- Delete the Public Hosted Zone after removing the custom records.
AWS Certificate Manager (ACM)
- Open ACM in the
us-east-1region. - Remove the custom domain and SSL certificate association from the CloudFront distribution.
- Wait until the CloudFront configuration update is deployed.
- Delete the SSL/TLS certificate.
Note: If your domain registrar uses Route 53 nameservers, update the registrar's nameserver settings before deleting the hosted zone. This prevents your domain from losing its DNS configuration. Do not delete the domain registration itself unless you intend to.
Step 2: Notification Services (Module 8)
Remove the notification resources created for order processing.
Amazon SNS
- Delete the email subscription.
- Delete the SQS subscription.
- Delete the
ecommerce-order-eventsSNS topic.
Amazon SQS
- Delete the
ecommerce-order-shippingqueue.
Systems Manager Parameter Store
- Delete the SNS Topic ARN parameter:
/ecommerce/dev/sns/topic-arn
Note: This project uses direct SNS email subscriptions. Lambda and SES are not required for this cleanup unless you created them separately.
Step 3: API Gateway and VPC Link (Module 6)
Remove the API Gateway resources and private integration.
Amazon API Gateway
- Delete the HTTP API (
ecommerce-api-http). - Its associated routes, integrations, JWT authorizer, and stages are removed with the API.
VPC Link
- Delete the VPC Link created for the internal ALB integration.
- Wait until the VPC Link deletion is complete.
The VPC Link security group will be removed later during networking cleanup.
Step 4: Backend Infrastructure (Module 5)
Remove the backend services, load balancer, container repositories, and related resources.
Amazon ECS
- Delete the Product Service.
- Delete the Cart Service.
- Delete the User Service.
- Delete the Order Service.
- Delete the ECS cluster after all services have been deleted.
- Deregister the four ECS task definitions after their services are removed.
Application Load Balancer (ALB)
- Delete the listener rules.
- Delete the HTTP listener.
- Delete all four target groups.
- Delete the internal Application Load Balancer.
Amazon ECR
- Delete the Docker images stored in the repositories.
- Delete the following repositories:
ecommerce/product-serviceecommerce/cart-serviceecommerce/user-serviceecommerce/order-service
AWS IAM
- Delete the
ecommerce-ecs-task-role. - Delete the ECS task execution role if it was created specifically for this project and is no longer in use.
Amazon CloudWatch
- Delete the ECS log groups created for the backend services, if they are no longer required.
Temporary EC2 Instance
- Terminate the temporary EC2 instance if you created one for testing internal ALB connectivity.
Step 5: Database and Configuration Resources (Module 4)
Remove the databases and application configuration parameters.
Amazon RDS
- Delete the PostgreSQL database instance.
- Delete the custom DB subnet group created for this project after the database is deleted.
Amazon DynamoDB
- Delete the
ecommerce-productstable. - Delete the
ecommerce-carttable.
AWS Systems Manager Parameter Store
Delete the following application parameters:
/ecommerce/dev/aws/region/ecommerce/dev/db/host/ecommerce/dev/db/password- Internal ALB service URL parameter created in Module 5.
Also delete any other application-specific parameters created during the project.
Step 6: Frontend Hosting Resources (Module 3)
Remove the frontend hosting and content delivery resources.
Amazon CloudFront
- Disable the CloudFront distribution.
- Wait until its status changes to Disabled.
- Delete the CloudFront distribution.
- Delete the Origin Access Control (OAC) after it is no longer associated with the distribution.
Amazon S3
- Empty the frontend S3 bucket.
- Delete the React frontend build files.
- Delete the product images stored under
images/products/. - Delete all remaining objects and object versions, if bucket versioning is enabled.
- Delete the S3 bucket.
Step 7: User Authentication (Module 2)
Remove the authentication resources.
Amazon Cognito
- Delete the Cognito User Pool created for the application.
The associated App Client and user accounts will also be removed when the User Pool is deleted.
Step 8: Networking Infrastructure (Module 1)
Finally, remove the networking resources after all dependent services have been deleted.
1. NAT Gateway and Elastic IP
- Delete the NAT Gateway.
- Wait until the NAT Gateway deletion is complete.
- Release the Elastic IP address associated with the NAT Gateway.
2. Internet Gateway
- Detach the Internet Gateway from
ecommerce-vpc. - Delete the Internet Gateway.
3. Security Groups
- Delete the project-specific security groups:
ecommerce-alb-sgecommerce-ecs-sg- VPC Link security group
- RDS security group, if created specifically for this project.
Make sure no remaining network interfaces or resources are using these security groups.
4. Custom Route Tables
- Remove the custom subnet associations.
- Delete the three custom route tables created for the project.
- Keep the main route table; it is removed along with the VPC.
5. Subnets
Delete all six subnets created for the project:
ecommerce-public-subnet-1ecommerce-public-subnet-2ecommerce-private-ecs-1ecommerce-private-ecs-2ecommerce-private-database-1ecommerce-private-database-2
6. Amazon VPC
- Open the Amazon VPC Console.
- Select
ecommerce-vpc. - Delete the VPC after all dependent resources have been removed.
Step 9: Final Verification
After completing the cleanup, review the AWS Management Console and verify that the project resources have been removed.
Check the following services:
- Amazon Route 53
- AWS Certificate Manager
- Amazon SNS and SQS
- Amazon API Gateway
- Amazon ECS and ECR
- Elastic Load Balancing
- AWS IAM
- Amazon RDS
- Amazon DynamoDB
- AWS Systems Manager Parameter Store
- Amazon CloudFront
- Amazon S3
- Amazon Cognito
- Amazon VPC
- Amazon CloudWatch
Also check AWS Billing and Cost Management for any remaining billable resources.
3. Conclusion
In this project, we successfully deployed a full-stack e-commerce application using multiple AWS services.
We configured networking, frontend hosting, user authentication, backend microservices, databases, API integration, notifications, and custom domain access.
Finally, we cleaned up the AWS infrastructure in the correct dependency order to avoid unnecessary ongoing charges.
This completes our AWS Full-Stack E-Commerce Application Deployment Project.
Project Conclusion
In this project, we successfully designed and deployed a full-stack e-commerce application using AWS services. We configured the AWS networking infrastructure, including VPC, public and private subnets, Internet Gateway, NAT Gateway, and route tables.
We deployed the React frontend using Amazon S3 and CloudFront, and implemented user authentication using Amazon Cognito. The backend microservices (Product, Cart, User, and Order) were containerized using Docker and deployed on Amazon ECS Fargate, with Amazon ECR for image management and an internal Application Load Balancer for service routing.
We also integrated Amazon API Gateway, RDS PostgreSQL, DynamoDB, Systems Manager Parameter Store, SNS, and SQS to support API communication, data storage, configuration management, and order notifications. Finally, we configured Route 53 and AWS Certificate Manager for custom domain access and HTTPS.
Overall, this project provided practical, end-to-end experience in building and deploying a scalable and secure microservices-based application on AWS, covering infrastructure setup, containerization, application deployment, service integration, and resource management.
Comments
Join the discussionNo comments yet. Be the first to comment.


